Windows XP's two most popular utilities are Notepad and the Clipboard. In fact, you use the Clipboard countless times every day without even knowing it: every time you cut, copy, or paste something, Windows stashes and retrieves the goods from its trusty Clipboard. And if you edit a lot of text files, you may use Notepad, which is faster and simpler than Word for editing small files. Both programs are more powerful than they appear; the following hints help you tap into their hidden abilities.
When using Notepad, you may want to put a time and date stamp in a file—for example, if you're adding comments to a document and want to show when the notes were made. To insert a time and date stamp at any point in a Notepad file, simply Press F5.
Notepad can also automatically insert a time and date stamp in a file every time you open it. This trick is especially useful if you're using a file to keep a journal or work record: Each time you open your file to compose a new entry, Notepad inserts a fresh time and date stamp. Simply create a blank text file with .LOG as the first line in the file, then press Save and close the file. Every time you open the file, Notepad inserts the current time and date. All you have to do is type away.
Notepad includes a little-known feature that lets you automatically insert headers and footers into your documents when you print them. (A header is text that appears at the top of every page in a document, like the title or your name; a footer is text that appears at the bottom of each page, like a page number.)
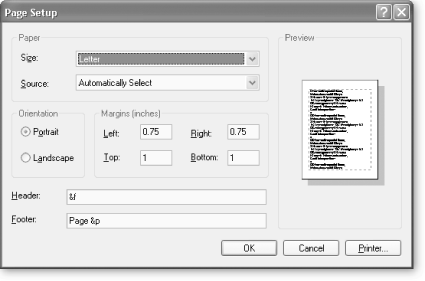
To create headers and footers in Notepad, choose File → Page Setup. The Page Setup dialog box, shown in Figure 4-3, appears. In the Page Setup dialog box, use the Header and Footer fields and type in the text you want to appear—or type in any of the key combinations listed in Table 4-1 for Notepad's built-in header or footer commands.
Figure 4-3. Like many fancy word processors, Notepad lets you insert headers and footers. You can't see the headers and footers onscreen, though; they show up only in the printed document. Here, the settings in the dialog will create a header containing the file name, and a footer containing the page number, preceded by the word "Page."
You can use more than one command for the header or footer. For example, to insert a header that displays the file name and page number and aligns the header to the right, type this command into the Header box:
&f &p &r
Make sure to leave a space between each item so the header or footer is easy to read. You can also combine text with header and footer commands. For example, the command Page &p in a header or footer prints Page 1 on the first page, Page 2 on the second page, and so on.
Notepad is great for plain text files, but if style's what you're after, you'll find the program a bit skimpy on formatting features. Furthermore, Notepad isn't so hot for creating HTML pages, because it doesn't include any HTML-specific help or commands. The more powerful WordPad, also built into Windows XP, offers some formatting features, such as tools for coloring text and inserting tabs, but not much else.
But there are plenty of Notepad alternatives that can handle text formatting, HTML coding, and programming. NoteTab Light and EditPlus are two of the best options available.
If you're budget conscious but want an excellent, all-around text editor, NoteTab Light is a good choice. For starters, it's free. It includes a souped-up Clipboard that lets you save boilerplate text for later use, and it also lets you open multiple documents at the same time. If you're a power hound, NoteTab Light lets you create macros—mini-programs that automatically perform a series of operations—or pull from its library of built-in macros. Creating HTML files is a snap thanks to a set of tools that lets you quickly insert HTML code.
NoteTab Light also comes in two premium versions (NoteTab Standard, which costs $9.95, and NoteTab Pro, which costs $19.95). These versions include features like a spell checker and an outline creation tool. All three programs are available from http://www.fookes.com.
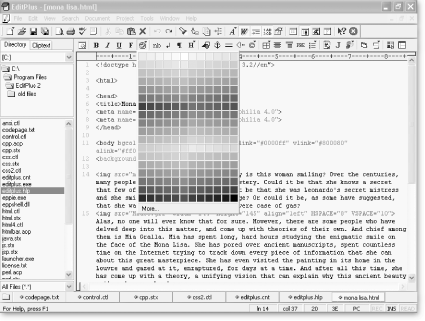
If you create HTML pages and you're looking for an excellent text editor with lots of HTML shortcuts, EditPlus (Figure 4-4) is a good bet. It includes an HTML toolbar that lets you quickly insert common HTML tags, choose Web-safe colors and characters, build tables, and view Web pages within the program.
For programmers, EditPlus offers syntax highlighting for PHP, ASP, Perl, C/C++, Java, JavaScript, VBScript, CSS, and HTML. (You can also create your own syntax files for other languages.)
EditPlus is available at http://www.editplus.com; it's free to try and costs $30 if you decide to keep it.
Figure 4-4. If you use a text editor to create or edit HTML files, EditPlus comes with a handful of HTML-friendly tools, including a color picker, shown here, which saves you from having to memorize or look up HTML color codes. Just choose the color from the palette and EditPlus automatically adds the right HTML code to your file.
The Windows Clipboard holds a single chunk of information at a time. If you copy a phrase, a paragraph, a graphic, or the entire contents of a Word file, Windows saves that information on the Clipboard and then pastes it from the Clipboard to a document when you select the Paste command. A lot of the time, you cut or copy something to the Clipboard and paste it right away. But if you forget what's on the Clipboard, how do you view it?
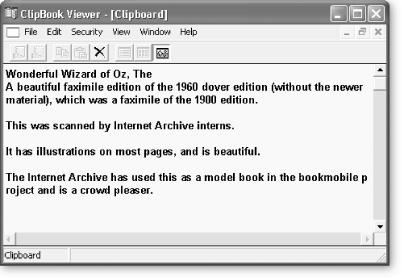
Enter an obscure little Windows XP utility called the ClipBook Viewer, which lets you see the current contents of your Clipboard or save individual clips as files you can use later. To run the ClipBook Viewer, type clipbrd at the command prompt or in the Run box. The Viewer opens and displays the contents of your Clipboard, as shown in Figure 4-5.
Note
When you run the ClipBook Viewer for the first time, your current clip may appear in a minimized window at the bottom left corner of the Viewer window. To see the clip, maximize it by clicking the middle button on the minimized bar.
You can use the ClipBook Viewer to save individual clips as files. Choose File → Save As, name the file, and save it to a folder. Windows XP saves the file with a .clp extension, but you can't open it just by double-clicking. When you want to open the clip, you have to run Clipbook Viewer, choose File → Open, and then browse to the correct file. After you've re-opened a file in Clipbook Viewer, you can then paste it anywhere you'd normally paste something.
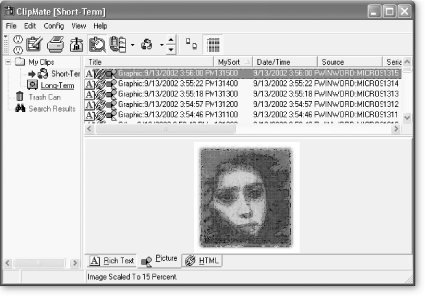
Windows XP's Clipboard is about as basic as it gets. It holds one clip at a time, and as soon as you save a new clip, the previous one vanishes. There's no way to save
Figure 4-6. ClipMate lets you save hundreds of clips—not just one—providing you ready access to text and graphics clips that you may want to reuse at some point. It's handy if you have items you use regularly—for example, different versions of your company logo.
boilerplate text or other frequently used files, and once a clip is gone, it's gone (unless you've saved the clip as a file, as described in the previous hint).
For a much better Clipboard, get ClipMate, shown in Figure 4-6. It lets you save libraries of clips in different folders, combine multiple clips into one large clip, see thumbnail previews of your clips, and control how individual applications capture clips, essentially turning the clipboard into the useful tool it always should have been.
ClipMate is shareware. You can try it for free, but it costs $20 if you decide to keep it. Download it from http://www.thornsoft.com.
Get Windows XP Power Hound now with the O’Reilly learning platform.
O’Reilly members experience books, live events, courses curated by job role, and more from O’Reilly and nearly 200 top publishers.


