YOUR DOCUMENT MAKES A FIRST IMPRESSION before anyone reads a word. The paper size, color, and borders give the reader an overall sense of the document’s theme and quality. Margins, the text layout, and perhaps a watermark send further visual clues. Making the right choices about your document setup helps you send the right message to your readers. Say you’re working on an invitation; using a smaller, elegant paper size and adding a subtle border lets your recipients know right away that they’re in for a sophisticated event.
In this chapter, you’ll learn how to set and change all the page layout features that people notice first, starting with paper size, orientation, and margins. You’ll also learn how to adjust margins and make changes to the headers and footers. Finally, you’ll learn how to work with multiple columns and how to control Word’s hyphenation inclinations.
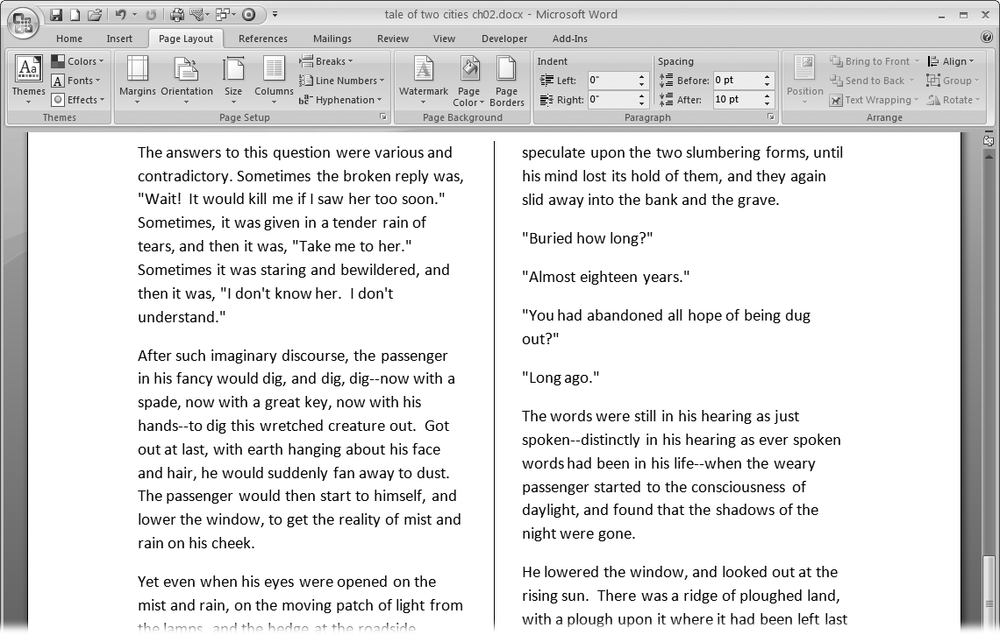
When you edit a document in Word, what you see on your computer screen looks almost exactly like the final printed page. To get that correct preview, Word needs to know some details about the paper you’re using, like the page size and orientation. You have two different ways to change the page settings: using the Page Layout tab (Figure 4-1) or the Page Setup dialog box (Figure 4-2). When you click the Page Layout tab, the ribbon’s buttons and icons change to show you options related to designing your page as a whole. Your options are organized in five groups: Themes, Page Setup, Page Background, Paragraph, and Arrange.
If you want to quickly change the page size to a standard paper size like letter, legal, or tabloid, the Page Layout → Page Setup → Size menu is the way to go (Figure 4-1). With one quick click, you change your document’s size. If there’s text in your document, Word reshapes it to fit the page. Say you change a ten-page document from letter size to the longer legal-size page. Word spreads out your text over the extra space, and you’ll have fewer pages overall.
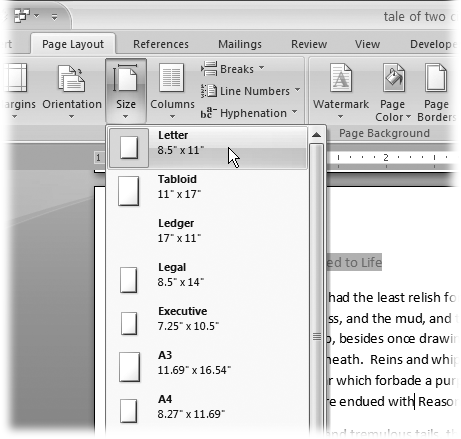
Figure 4-1. The Size menu, like many Word 2007 menus, uses icons as well as text to give you quick visual cues. Your choices include Letter (8.5” × 11”), Tabloid (11” × 17”), and more. If you’re using standard-size paper (including standard international sizes like A3 and A4), you can click one of these choices, and you’re done.
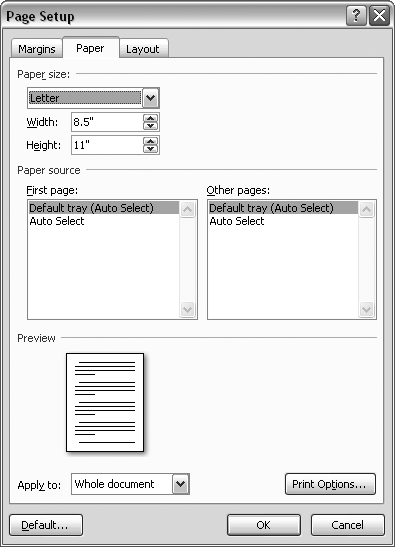
If you can’t find the paper size you need on the Size menu, then you need to customize your paper size, which you do in the Page Setup dialog box’s Paper tab. Here are the steps:
Choose Page Layout → Page Setup → Size. At the bottom of the Size menu, click More Paper Sizes.
The Page Setup dialog box appears, with the Paper tab showing (Figure 4-2). Why the Paper tab? Because you opened the box using the More Paper Sizes button.
In the Width and Height boxes, enter the size of your custom paper.
The quickest way to change the Width and Height settings is to select the numbers in the boxes and type your new page dimensions. Your new numbers replace the previous settings. You can also click the up and down arrows to the right of the text boxes, but it’s slow going as the sizes change in tenths of an inch. Notice that as you change the dimensions, the Preview image at the bottom of the Page Setup box changes to match.
Click OK at the bottom, to close the dialog box and make the changes.
The Page Setup box closes, and your custom-sized document shows in Word.
Figure 4-2. Using the Paper tab of the Page Setup box, you can choose from standard paper sizes or set your own custom paper size. Dialog boxes are great for making several changes at once. On this tab you can also choose a paper source (if you’re lucky enough to have a printer with more than one paper tray). You can read more about printing in Chapter 7.
Note
At the bottom of the Page Setup dialog box is an “Apply to” option with two choices: “Whole document” and “This point forward.” If you choose “Whole document,” Word applies these paper size and other page layout settings to your entire document. If you choose “This point forward,” Word creates a page break at the insertion point, and starts using the new settings only after the break.
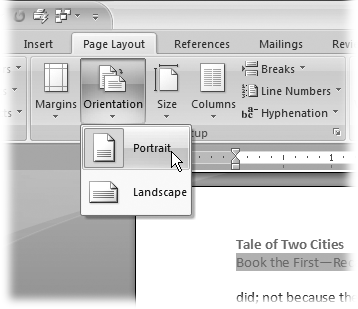
Most business documents, school papers, and letters use a portrait page orientation, meaning the page is taller than it is wide. But sometimes you want a short, wide page—landscape page orientation—to accommodate a table, chart, or photo, or just for artistic effect. Whatever the reason, using the Orientation menu (Page Layout → Page Setup → Orientation) is the easiest way to make the change (Figure 4-3). Just click one of the two options: Portrait or Landscape.
If you’ve already got the Page Setup box open, you’ll find the Orientation options on the Margins tab (Page Layout → Page Setup → Margins → Custom Margins).
Page margins are more than just empty space. The right page margins make your document more readable. Generous page margins make text look inviting and give reviewers room for notes and comments. With narrower margins, you can squeeze more words on the page; however, having too many words per line makes your document difficult to read. With really long lines it’s a challenge for readers to track from the end of one line back to the beginning of the next. Margins become even more important for complex documents, such as books or magazines with facing pages. With Word’s margins and page setup tools, you can tackle a whole range of projects.
Word’s Margins menu (Page Layout → Page Setup → Margins) gives you a way to quickly apply standard margins to your pages. The preset margins are a mixed bag of settings from a half inch to one and a quarter inches. For most documents, you can choose one of these preset margins and never look back (Figure 4-4).
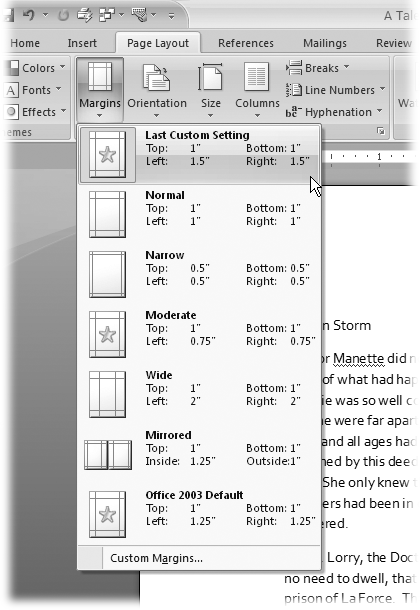
Figure 4-4. The Margins menu provides some standard settings such as the ever popular one inch all the way around. Word calls this favorite of businesses and schools the Normal margin. If you’ve customized your margins, your most recent settings appear at the top of the menu.
For each of the preset margin options you see dimensions and an icon that hints at the look of the page:
▸ Normal gives you one inch on all sides of the page.
▸ Narrow margins work well with multicolumn documents, giving you a little more room for each column.
▸ Moderate margins with three-quarter inches left and right let you squeeze a few more words in each line.
▸ The Wide preset gives you more room for marginal notes when you’re proofing a manuscript.
To select one of the preset margins, go to Page Layout → Page Setup → Margins, and then click one of the options. You can also use the shortcut key Alt+P, M, and then use your up and down arrow keys to highlight one of the margins. Press Enter to use the highlighted margin.
Note
Word measures margins from the edge of the page to the edge of the body text. Any headers and footers that you add (Section 4.4.1) appear in the margin areas.
What if none of the preset margins on the menu suits your needs? Say your company’s style guide insists on one-and-a-half-inch margins for all press releases. Here’s how to customize your margins:
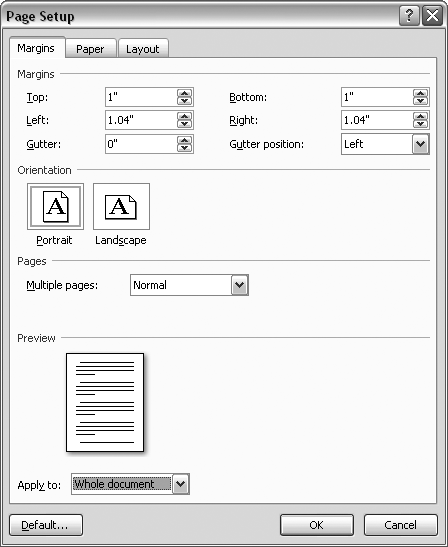
Go to Page Layout → Page Setup → Margins → Custom Margins to open the Page Setup box to the Margins tab (Figure 4-5).
The Page Setup box has three tabs at the top. The Margins tab is on the left.
At the top of the box, enter dimensions for top, bottom, left, and right margins.
The boxes in the Margins section already contain your document’s current settings. To change the Top margin to one and a half inches, select the current setting, and then type 1.5, or you can click the arrows on the right side of the box to change the margin number. Make the same change in the Bottom, Left, and Right margin text boxes.
Tip
While you’re here in the Page Setup box, double-check the page Orientation setting. Margins and page orientation have a combined effect. In other words, if you want a quarter-inch top margin, make sure the orientation is set correctly depending on whether you want the “top” of the page to be on the long side or the short side of the paper.
Click OK to apply the changes to your document.
The Page Setup box closes and your document takes shape with the new margins. If the changes are substantially different from the previous settings, you may find that you have a different number of pages in your document.
The vast majority of the documents spewing forth from our collective printers are printed on a single side of the page. If they’re bound at all, it’s likely to be with a staple or a paper clip in the upper-left corner. Documents like this don’t need fancy margins or page setups. But, if you’re putting together a booklet, corporate report, or newsletter, you need more sophisticated tools.
Open the Page Setup box to the Margins tab (Page Layout → Page Setup → Margins → Custom Margins or Alt+P, MA). In the Pages group, click the “Multiple pages” drop-down menu to see the options.
▸ Normal is the setting you use for most single-sided documents.
▸ Mirror margins are great for documents with facing pages, like bound reports or newsletters. This setting makes outside and inside margins identical. Outside margins are the left margin on the left page and the right margin on the right page. Inside margins are in between the two facing pages. Documents with facing pages may also have a gutter, which is a part of the page that is hidden when the document is bound.
▸ 2 pages per sheet prints two pages on a single side of the paper. If you’ve defined headers and footers, they’ll show up on both pages. Usually you cut these pages after printing to create separate pages.
▸ Book fold is similar to the option above and prints two pages on one side of the paper. The difference is that the book fold layout is designed so you can fold the paper down the middle to create a booklet with facing pages.
When you make a selection from the “Multiple pages” menu, some of the other options in the Margins box change too. For example, if you choose “Mirror margins,” the labels above for the Right and Left margins change to Inside and Outside.
A tasteful, properly applied border can add a certain flare to your document. However, an inappropriate border can make your document look cheesy (Figure 4-6). Enough said?
Figure 4-6. The Page Layout → Page Background → Page Borders menu lets you add a simple line border around a paragraph, picture, or page. You can also add an art border, but don’t get carried away. This cake border is a bad choice for Marie Antoinette and most other adults.
Okay, now that you’ve been warned, here’s how to add page borders:
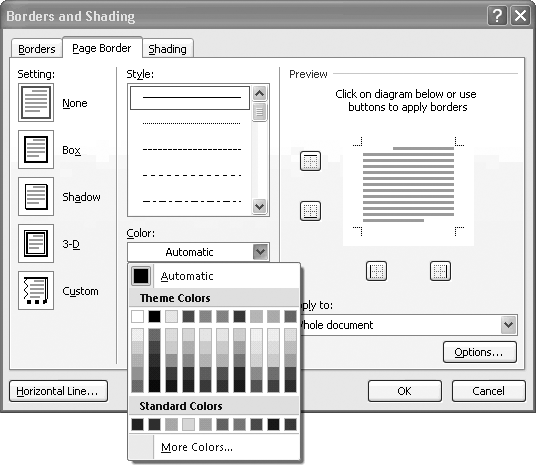
Choose Page Layout → Page Background → Page Borders to open the Borders and Shading box.
The Borders and Shading box has three tabs. Make sure you’re using the Page Border tab. (The first Borders tab puts borders around paragraphs, pictures, and other objects on the page.)
On the left, choose a setting to define the border.
Start with the five settings on the left, to define the border in broad strokes ranging from no border to drop shadows. You can select only one of these settings.
Choose a line style, color, and width, or choose an art border.
If you’re going with a line border, choose a line type from the Style drop-down menu. You can choose from more than two dozen lines, including solid, dotted, double, and wavy. Then use the drop-down menus to choose a Color and Width (Figure 4-7).
If you want an art border-trees, hearts, pieces of cake, and so on-select your design from the Art menu (just below the Width menu). Note that some of the art styles use different patterns for different sides of the page and for the corner design.
Figure 4-7. If you choose a line border, you can choose a color as well as a style.Selecting from the Theme Colors palette ensures that your color coordinates with the document’s current theme. The Standard Colors palette gives you access to several basic, bright colors. Preview the border, and then select the sides of the page that will have borders.
Note
Whether you choose lines or art for your border, you can adjust the width. You can increase line widths to a thick 6 points and art widths to 31 points.
The Preview on the right side of the Borders and Shading box shows what sides of your page will have borders. Click the borders to toggle them on or off. Using this technique, you can choose to show a border on a single side of the page or on any combination of sides.
In the lower-right corner of the box, use the “Apply to” control to set the pages that will have borders.
Maybe you want your first page to have a different border from the rest of the document. If the first page of your document uses letterhead, you may want a first page with no border at all, so select “This section - all except first page.” Or, to put a border around the cover page but no other pages, choose the “This section - first page only” setting. As with paper size and other page layout settings, Word lets you apply borders differently in different sections of your document. See the tip.
Click OK to accept the settings and to close the Borders and Shading box.
Headers and footers are where Word puts the bits of information that appear at the top or bottom of every page of most multipage documents (Figure 4-8). They remind you of the page number, chapter title, and so on, as you read along. For business memos and reports, headers are a great place to repeat the document’s subject and publication date. (If you’re the author of the report and want your boss to know, consider adding your name under the title.)
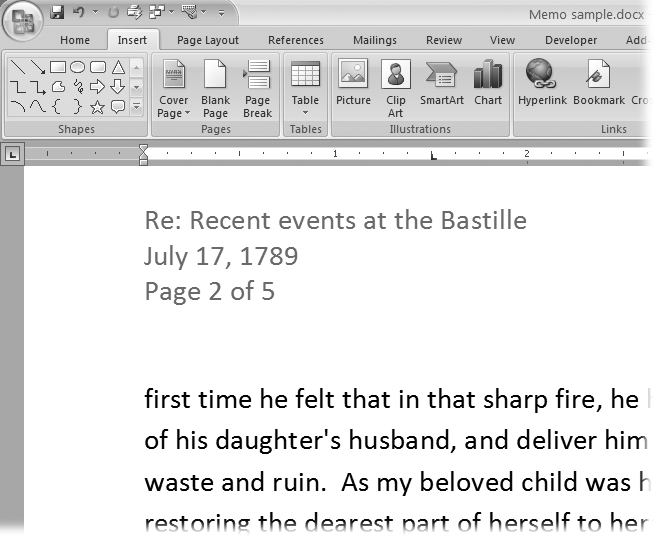
Figure 4-8. Document headers give the reader additional information that’s not found in the text. For example, the header for a business memo can include the subject, date, and page number. Word lets you enter this information manually or with the help of fields that automatically update the information.
Note
Word’s fields are bits of text automated with the help of some behind-the-scenes computer code. You can insert fields into your document to show information that’s likely to change, like today’s date or a page number. Because it’s a field, this text updates itself automatically, as discussed on Section 4.3.
Unlike some of the other features in this chapter, the header and footer tools are on the Insert tab (not the Page Layout tab). As you can see in Figure 4-9, three menus appear in the Header & Footer group—Header, Footer, and Page Number. Each of the menus provides predesigned page elements, known in Word-speak as Building Blocks. So, for example, if you select a header Building Block, it may add text and several graphic elements to the top of your page.
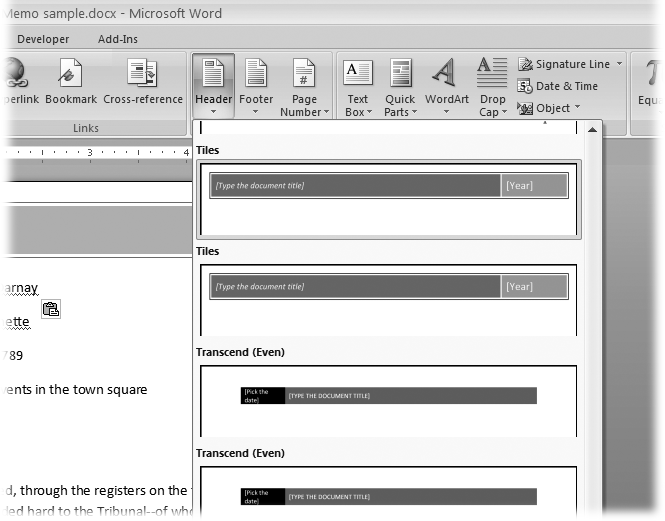
Figure 4-9. The Header, Footer, and Page Number menus help you insert predesigned page elements, known as Building Blocks, into your document. You can see what each one looks like right on the menu. At the bottom of the menu, you find options to create (or remove) custom headers, footers, and page numbers.
Go to Insert → Header & Footer → Header, and you see more than a dozen predesigned header options. You can keep these canned headers as they are, or use them as a starting point for your own imagination. The following steps show you how to use a Building Block to add a header to your document and then tweak it a bit by inserting an additional field.
Go to Insert → Header & Footer → Header to open the Header menu.
If you’ve used earlier versions of the program, you’ll notice that the drop-down menus in Word 2007 are larger and much more visual. The Header menu is a good example, as it gives you a clear representation of the available predesigned headers.
Use the scroll bar on the right to find the Tiles header.
You can drag the box in the scroll bar to move quickly through the menu, or use the arrow buttons to browse through the examples.
Click the Tiles header to insert it into your document.
When you select the Tiles header, you’re adding more than text to your document: A Building Block comes with all its own accessories. The Tiles header includes a box with a rule around it and two tiles of color. Inside the tiles are bracketed words.
When you insert a header, a couple of other things happen too. The Header menu closes and a new Design tab appears on your ribbon, with a Header & Footer Tools tab above. Along with that, a whole slew of new buttons and tools appear on the ribbon (left to right): Header & Footer, Insert, Navigation, Options, Position, and the Close Header and Footer button.
Click the bracketed words “Type the document title,” and then type a title of your choice.
The bracketed words are a prompt that you’re supposed to enter new text in that spot. A single click anywhere on the words selects the entire group. Type your title, say, A Tale of Two Cities. When you type, the other words and the brackets disappear. When you add a title to the header, Word uses this text to update the title shown in the Document Properties (Office button → Prepare → Properties). For details, see the box.
Click the bracketed word “Year,” and then use the calendar control to update the header’s Year field.
This standard Word tool lets you enter a date by selecting it. At the top, you see the month and year. Click the buttons on either side to move backward or forward through the months. Click a date on the calendar below to select a specific date. Word uses the year from the date you selected to update the Year text in the header. Or you can enter a year simply by typing it.
You can modify Building Blocks after you add them to your document by typing your own text, which you’ll do next.
Click the header to the right of your title. If the title is highlighted, use the right arrow key to deselect the title, and then type a hyphen (-) followed by a space.
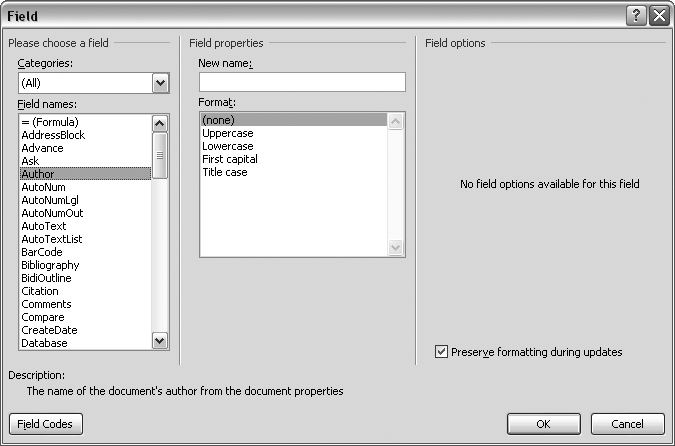
You can also add automatically updating text by inserting a field, which is how Word creates those ever-changing dates and page numbers. Word has fields for lots of other stuff too. You can’t create (or edit) a field by typing directly in your document, though. You must use the Field dialog box.
Choose Insert → Quick Parts → Field.
The Field dialog box opens showing an alphabetical list of field names on the left side, as shown in Figure 4-10. Fields store information about your document and keep track of other information that you can use in your documents.
Double-click the Author field name to insert it into the header.
The author’s name appears next to the title in the header. (If you’re working on your own computer, it’s probably your name.) This text is grayed out to show that it’s a field and that you can’t edit it directly.
Double-click anywhere on the document’s body text to close the Header & Footer Tools contextual tab.
You have two options for closing the header and going back to editing your document. You can double-click anywhere outside the header, or, on the right side of the ribbon, you can click the Close Header and Footer button. Either way, the header fades out and the text of your document sharpens up. Your insertion point appears back in the body text, and you’re ready to work.
Most of the header Building Blocks have complementary footers. For example, the Tiles header used in the step-by-step example provides title and date information, while the Tiles footer provides company and page information (Figure 4-11). The steps for inserting the Tiles footer are nearly identical to the header steps. Just start with the Footer menu: Choose Insert → Header & Footer → Footer or press Alt+N, 0.
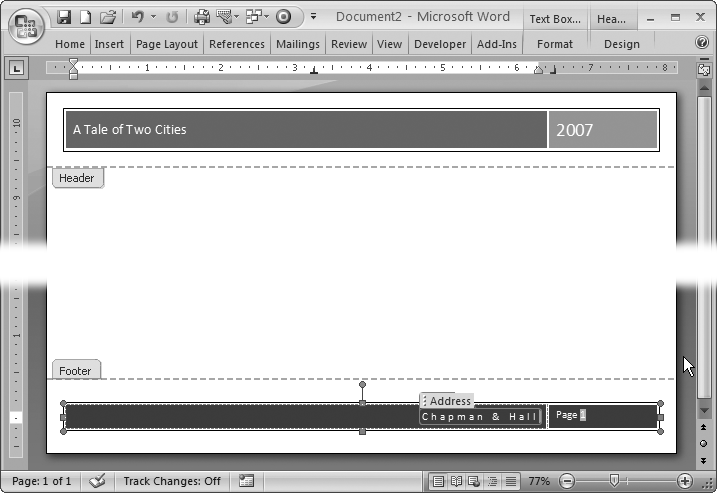
Figure 4-11. Most of the header and footer Building Blocks come in pairs. By using a header and footer with the same name, you can be sure of having a consistent design. You can modify Building Blocks—like this predesigned header and footer—after you insert them in your text. Just edit as you would any text. It’s best to leave the page numbers as they are, though. This page number is grayed out to indicate that it’s a field that automatically changes for each page.
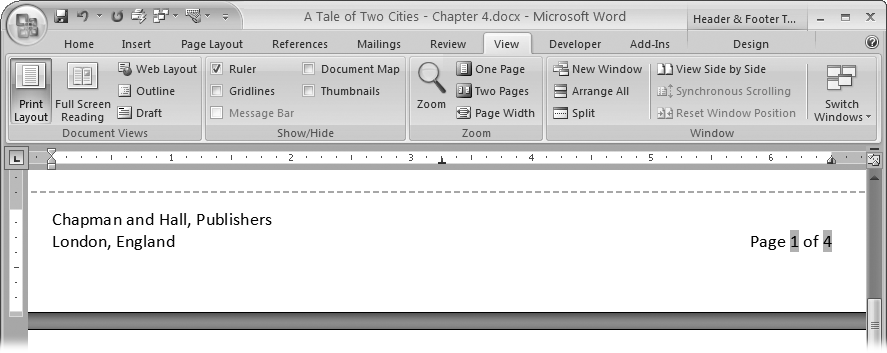
Microsoft provides a lot of competently designed headers and footers with Word, but you’re free to create your own. After all, Microsoft’s Building Blocks may not be to your taste, or maybe you have to follow company guidelines for your documents. It’s not difficult to create your own headers in Word. Here’s how to create a custom footer with a company name on the left and page numbers on the right:
Go to Insert → Header & Footer → Footer → Edit Footer.
The insertion point moves from the body of your document to the footer space at the bottom.
Type your company name, press Enter, and then type your city and country.
Pressing Enter puts the city and country on a new line below the company name. Text that you type directly into the footer appears on every page unless you make changes to the header and footer options.
Press Tab twice to move the insertion point to the right side of the footer.
The first time you press Tab, the insertion point moves to the center of the page. If you enter text at that point, Word centers the text in the footer. The second time you press Tab, the insertion point moves to the right margin. Text that you enter there is aligned on the right margin.
Type Page , and then press the Space bar.
As you type, the insertion point remains on the right margin and your text flows to the left.
Choose Header & Footer Tools | Design → Insert → Quick Parts → Field (or press Alt+JH, Q, F) to open the Field dialog box.
The Quick Parts menu shows several different options: Document Property, Field, and Building Blocks Organizer.
In the list of Field Names, double-click Page to insert the Page field in the footer.
Remember, if you simply type a number into the footer, you’ll end up with the same number on every page. Instead, you place the Page field in your footer to tell Word to insert the correct number on each page. The page number appears in the footer next to the word “Page.” The number is grayed out, indicating that it’s a field and you can’t edit the number.
Type of and then a space. Press Alt+JH, Q, F to open the Field box again, and then double-click the NumPages field to insert it in your footer after the space.
The NumPages field keeps track of the number of pages in your document. When you’re done, your footer looks like the one in Figure 4-12.
It’s easy to remove any headers, footers, or page numbers that you’ve added to your document. You’ll find a command at the bottom of each of the respective menus to do just that. If you want to remove a header, follow these steps:
Go to Insert → Header & Footer → Header to open the Header menu.
You see the same menu that you used to insert the header Building Block into your document. At the bottom of the menu, below all the Header examples, you see the Remove Header command.
Click Remove Header.
The Header menu closes, and the entire header disappears from your document—text, graphics, and all.
The steps for removing a footer or a page number Building Block are nearly identical. Just start with the Footer menu (Insert → Header & Footer → Footer) or the Page Number menu (Insert → Header & Footer → Page Number).
Word makes it easy to work with multiple newspaper-style columns. Instead of your having to use tabs or spaces to separate the column one line at a time, Word lets you set up the column guidelines and then type away. When you type text in a multicolumn layout, your words appear in the left column first. After you reach the end or bottom of the column, the insertion point jumps to the top of the next column and you begin to fill it, from top to bottom.
To use multiple columns, go to Page Layout → Page Setup → Columns, and then click one of the following options:
▸ One. Whether you know it or not, every page in Word has a column layout. The standard layout is one big column stretching from margin to margin.
▸ Two. With two columns, your document begins to look like a pamphlet or a school textbook.
▸ Three. Three columns are about as much as a standard 8.5 × 11-inch page can handle, unless you switch to Landscape orientation. In fact, you may want to reduce the body text size to about 9 or 10 points and turn on hyphenation. Otherwise, you can’t fit very many words on a line.
▸ Left. This layout has two columns, with the narrower column on the left. The narrow column is a great place to introduce the text with a long heading and subheading or a quote pulled from the larger body text.
▸ Right. The mirror image of the Left layout, this option uses two columns with a narrow column at right.
▸ More Columns. Use the More Columns option to open the Columns dialog box (Figure 4-13) where you can create a customized column layout.
Tip
If you want to use keyboard shortcuts to select column options, press Alt+P, J and then use the up and down arrow keys to highlight one of the options. With your choice highlighted, hit Enter.
When you get to the bottom of a column, Word automatically flows your text to the top of the next one, but you can also force Word to end the column and jump to the next one. There are two ways to create a column break. The quickest way while you’re typing is to use the keyboard shortcut Ctrl+Shift+Enter (or Alt+P, BC). Or, if you forget the shortcut, you can use the ribbon: Page Layout → Page Setup → Breaks → Column.
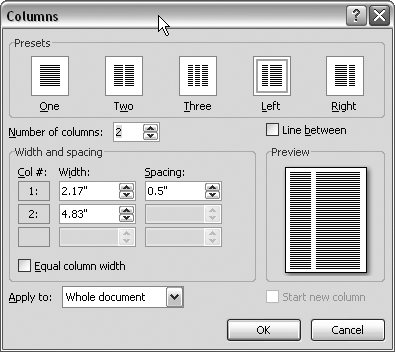
Go to Page Layout → Page Setup → Columns → More Columns to open the Columns box (Figure 4-13) where you can create custom page layouts with multiple columns. By entering a number in the “Number of columns” text box, you can create more than three columns per page.
If you turn on the “Equal column width” checkbox, Word automatically sets all the columns to the same width, so you don’t have to do the math (Figure 4-14). Turn off this checkbox, and you can get creative by entering a different width and spacing for each column. Use the scroll bar on the right if you can’t see all of the columns. Turn on the “Line between” box to place a line (also known as a rule) between your columns for a crisp professional look.
Near the bottom of the Columns box is a drop-down menu labeled “Apply to.” If you want to use your column settings for your entire document, leave this set to “Whole document.” If you want to create a new section with the column settings, select “This point forward” from the menu.
Without hyphenation, if a word is too long to fit on the line, Word moves it down to the beginning of the next line. If a word is particularly long, it can leave some pretty big gaps at the end of the line. Justified text is aligned on both the left and right margins, like most of the text in this book. If you have justified text and no hyphenation, you often get large, distracting gaps between words, where Word is trying to spread out the text along the line. When used properly, hyphenation helps make text more attractive on the page and easier to read. In most cases, you can relax and let Word handle the hyphenating.
You just have to choose one of three basic hyphenation styles from the Page Layout → Page Setup → Hyphenation menu (Alt+P, H), as shown in Figure 4-15:
▸ None. No hyphenation at all. For informal letters, first drafts, and many reports, you may choose not to use hyphenation. It’s a good-looking choice for documents that have fairly long lines (60 to 80 characters) and left-aligned text.
▸ Automatic. Word makes hyphenation decisions based on some simple rules that you provide. Consider using automatic hyphenation for documents that have line lengths of about 50 characters or less, including documents that use newspaper-style columns.
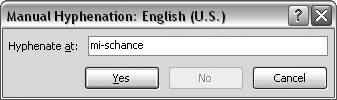
▸ Manual. In this scheme, Word asks you about each word it wants to hyphenate, giving you the final decision. Use manual hyphenation when you need to be particularly scrupulous about your grammar and when you need to be certain that you don’t hyphenate a company name, a person’s name, or some other equally important word.
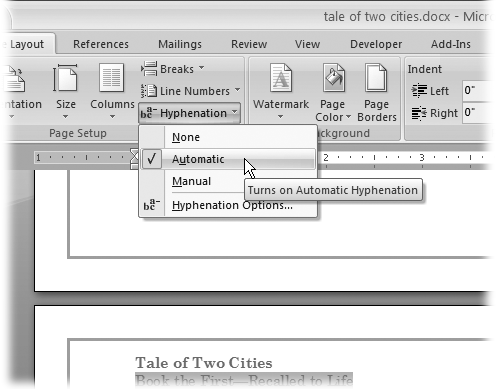
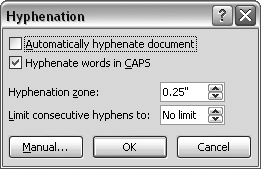
It’s easy to turn on automatic hyphenation. Just choose Page Layout → Page Setup → Hyphenation (or press Alt+P, H). Still, you may want to assert some control over how and when Word uses hyphenation. To do that, open the Hyphenation box (Figure 4-16) by choosing Page Layout → Page Setup → Hyphenation → Hyphenation Options (Alt+P, HH). This box has two important options that let you control hyphenation:
▸ Hyphenation zone. This zone is the maximum space that Word allows between the end of a word and the right margin. If the space is larger than this, Word hyphenates a word to close the gap. For most documents, .25” (a quarter of an inch) is a reasonable choice. A larger distance may give you fewer hyphens but a more ragged look to your right margin.
▸ Limit consecutive hyphens to. A “ladder” of three or more hyphens makes text difficult to read. Enter 2 in this box, and Word won’t hyphenate more than two lines in a row.
It’s easier to remove hyphenation from your document if you’ve used automatic rather than manual hyphenation. In the case of automatic hyphenation, you simply turn it off: Choose Page Layout → Page Setup → Hyphenation → None, or use the keyboard shortcut Alt+P, HN. All the automatic hyphens in your document disappear and the words rearrange themselves accordingly.
But when you use manual hyphenation, Word inserts optional hyphens in your document that don’t go away even if you turn hyphenation off. If you set Hyphenation to None (Alt+P, HN), then Word continues to split words at the end of lines using the optional hyphens. The only way to find and delete the optional hyphens is with Word’s Find and Replace dialog box.
Here are the steps to remove optional hyphens from your document:
Choose Home → Replace (or press Ctrl+H) to open the Find and Replace dialog box to the Replace tab.
If you don’t see a Special button at the bottom, click the More button on the left to expand the box. (If the box is expanded, the More button is labeled “Less” and clicking it shrinks the box.)
Click in the “Find what” box to put the insertion point in the box.
Normally, you’d just type in the text that you’re searching for, but the optional hyphen is a special character that you won’t find on your keyboard. Searching for optional hyphens requires a couple of extra steps.
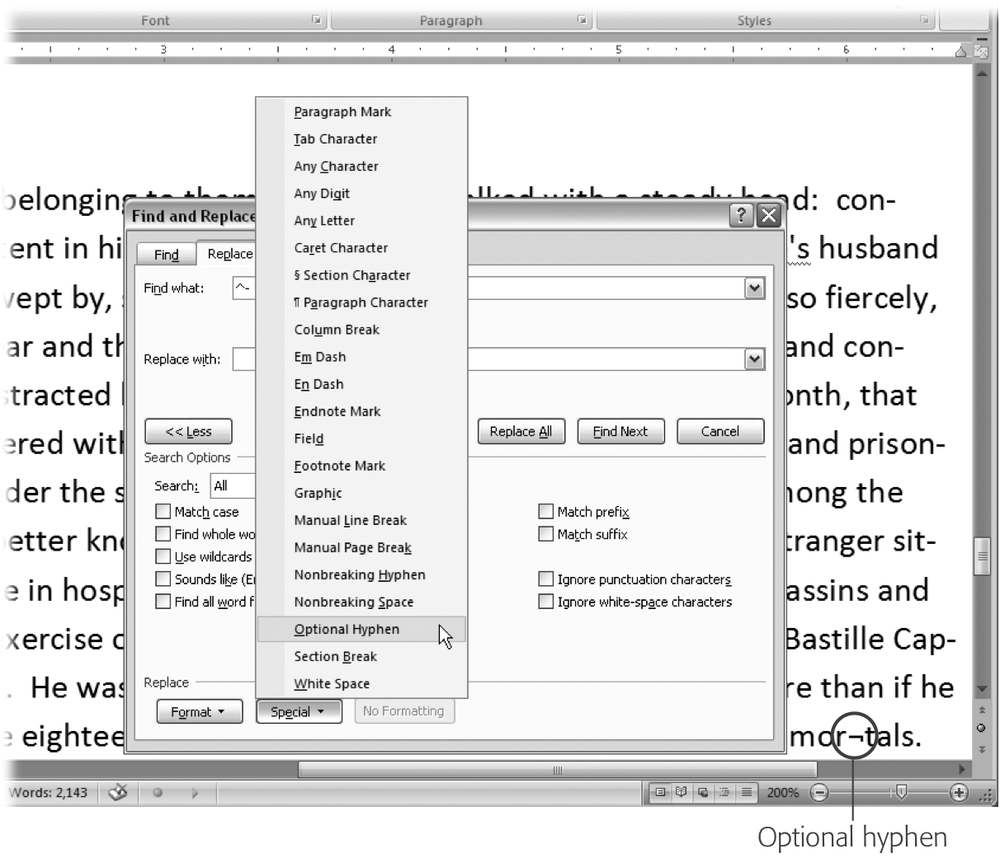
Click the Special button to reveal the list of special characters.
The Find and Replace tool can search for a number of special characters. Some of them, like the optional hyphen and the paragraph mark, are nonprinting characters. Others, like the em dash need more than a single keystroke to produce.
From the menu of special characters, choose Optional Hyphen.
The Special menu closes when you make a choice from the list. In the “Find what” box, you see ^-, the code Word uses to indicate an optional hyphen. Leave the “Replace with” box empty, because you want to replace the optional hyphens with nothing, which effectively removes them.
Click Replace All to remove all optional hyphens from your text.
Word quickly removes the optional hyphens and displays a message telling you how many changes were made. Click Close to dismiss the alert box, and then, in the Find and Replace box (Figure 4-18), click Close. Mission accomplished.
Figure 4-18. Click the Special button on the Replace tab (Ctrl+H) to enter nonprinting characters like optional hyphens in the “Find what” or “Replace with” field. You can change your display settings to always show optional hyphens. When they aren’t at the end of a line, optional hyphens look like the character between the “r” and “t” in the word “mortals” (circled).
The longer and more complex your document is, the more likely it is to contain different sections. Word’s sections don’t have anything to do with how you’ve divided your document with headings and subheadings. They’re electronic divisions you create by adding section breaks to your document. Section breaks are a close cousin to page breaks, except that a section can contain any number of pages. More important, each section in a Word document can have its own page formatting.
Many people work with Word for years without ever really understanding Word’s sections. But breaking your document into different sections gives you a lot more flexibility within the same document. For example:
▸ To change the page orientation. If you want to have some pages in portrait orientation and others in landscape orientation (charts or graphs, for example), you need to insert a section break where the format changes (Figure 4-19).
▸ To use different sizes of paper in a single document. If you want to insert some tabloid-size pages in the middle of a document that’s the standard 8.5 × 11 inches, you need to use page breaks where the format changes.
▸ To change the number of columns on the page. Perhaps you want to change from a single column format to a double column format; you need to insert a section break where the format changes. You can even put the break right smack in the middle of a page.
▸ To change page margins in a single document. When you want to change page margins, not just adjust a paragraph’s indentation, you need to create a section break where the margins change.

As you can see from the previous list, sections are all about page formatting, so it’s not surprising that the section break commands are found under the Page Layout tab (Page Layout → Page Setup → Breaks or Alt+P, B). When you click the Breaks button in the Page Setup group, the menu is divided into two parts: Page Breaks and Section Breaks.
Note
When you use the Breaks menu (Figure 4-19), remember that the breaks shown at the top aren’t section breaks. They’re just text formatting breaks like page breaks and column breaks. The commands on the bottom are section breaks, as advertised.
Section breaks have two major distinctions. There are Next Page breaks, which create a new page for the new section, and there are Continuous breaks, which place a divider mark in the text with no visible interruption. Everything below that mark is in a new section. You use a Next Page break when you’re changing the paper size or orientation. Or you can use a Next Page break if you want each chapter to start on a new page. You use the Continuous break to change the number of columns or the margins in your document in the middle of a page.
The other two options—Even Page and Odd Page—are just variations on Next Page. They create section breaks and start the new section on the next even or odd page. For example, you use this option to make sure that all your chapters begin on a right-hand page (like the ones in this book).
Here’s how to insert a section break and change the paper orientation for the new section from Portrait to Landscape.
Click within your text to place the insertion point where you want the section break.
You’re going to insert a Next Page break, so click after the end of a sentence or paragraph. Also, make sure you’re in Print Layout view, so you can see the results of the break.
Choose Page Layout → Page Setup → Breaks, and then select Next Page from the drop-down menu.
If you’re at the end of your document, Word creates a new empty page, and your insertion point is on the new page, ready to go. If you’re in the middle of a document, Word creates a page break and moves your insertion point and all the remaining text to the new section.
With the insertion point in the new section, click the Orientation button (Page Layout → Page Setup → Orientation), and then choose Landscape.
When you make Page Setup changes in your new section, they affect only the new section. So when you change the page orientation to landscape, you see pages before the break in portrait orientation and pages after the break in landscape orientation.
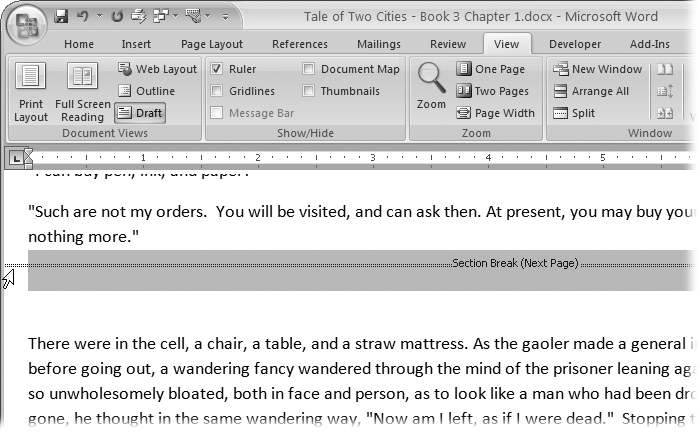
In Print Layout view, you see how your document looks with section breaks inserted. In Draft view, section breaks appear in your document as dotted lines. The line doesn’t print, but it’s visible on your computer screen (Figure 4-20).
Get Word 2007 for Starters: The Missing Manual now with the O’Reilly learning platform.
O’Reilly members experience books, live events, courses curated by job role, and more from O’Reilly and nearly 200 top publishers.

