Encore is a great tool for banging out a quick project by transferring a bunch of video files to DVD. In this way, you can create a quick prototype of a DVD design, then come back and refine it later. Usually, DVD authors will design a great deal of the interface before actually creating it with the computer. In this chapter, however, we’ll dive into learning Encore and take advantage of the ability to experiment.
So, without any further delay, let’s do the following:
Create an opening menu page for our DVD
Add buttons, with thumbnail images, to our opening menu
Create links between the buttons and video clips
Just to make it a little more interesting, we’ll also customize the design with some text and graphics images. This level of customization is already more than you can do in most entry-level DVD authoring tools, but is still wonderfully straightforward in Encore.
The first step in using Encore DVD is to start a new project. Although you can have only one project open at a time in Encore, you can have many windows open to provide different views of the project.
Create a new project. Select the New Project menu item from the File menu at the upper left (File → New Project), or just press Ctrl-N).
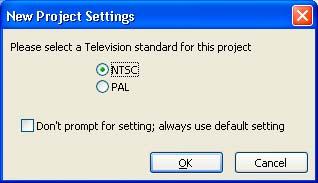
Choose the TV standard. Encore first displays the New Project Settings dialog, shown in Figure 1-5, to prompt for the television standard to be used for this project: NTSC or PAL. Choose the TV format compatible with your DVD player, and click OK. In the New Project Settings dialog, you can disable this prompt so that it uses the default setting and doesn’t continue to nag you each time you start a new project. To set the default or enable this prompt again, use the Preferences dialog, accessed by selecting Edit → Preferences → General.
After closing the initial dialog, Encore opens an empty Project window. Not surprisingly, this window also contains four tabs: the Project, Menus, Timelines, and Disc tabs. (Note these are called tabs, not palettes.) The previously empty Properties palette on the upper right now contains a number of new options under the heading “Disc” (Figure 1-6).

Like the two palette windows, you can drag the tabs in the Project window out into separate windows, or drag them back to nest them in another Project window. However, you cannot drag a Project tab into a palette window, or vice versa.
Here is a brief description of each tab in the Project window.
The Project tab is the main window of your project, used to import and view all the assets used in your project. An asset is simply a resource, such as a still image background, an MPEG or AVI movie, or an audio file that you plan to use with the DVD. The Project tab also lists elements, which are similar to assets, but are resources that Encore generates for you.
The Menus tab provides more general information on the behavior of the graphical DVD menus that you’ll create. We’ll talk about this tab in much more detail in Chapters 5 and 6.
The Timelines tab provides more advanced information on the video clips contained on the DVD. We’ll discuss timelines in Chapter 4.
Finally, the Disc tab is used to set options when you are finished authoring, and provides an interface to check and burn your disc. We’ll get to it at the end of this chapter, as well as Chapter 8.
For the moment, let’s just stick with the Project tab.
The Project tab is the organizational center of Encore. The first thing that you’ll always do with the Project tab is import the asset files you want to use, and then build and link timelines and menus from them. For this chapter, we’ll just import a few short video clip files. Encore can actually import a variety of media file formats, discussed in more detail in Chapter 3. For the moment, however, let’s just use AVI files in DV format, which should be compatible with the TV format you selected when you started the new project. If you don’t have any clips handy, you can use the Tutorial files on the Encore product disc.
Import an asset file. To import a file, select File → Import As Asset (or press Ctrl-I) to open the Import dialog to select an AVI file. You can also use the context menu by right-clicking in the interior of the Project tab, or you can even double-click in an empty area of the interior of the Project tab.
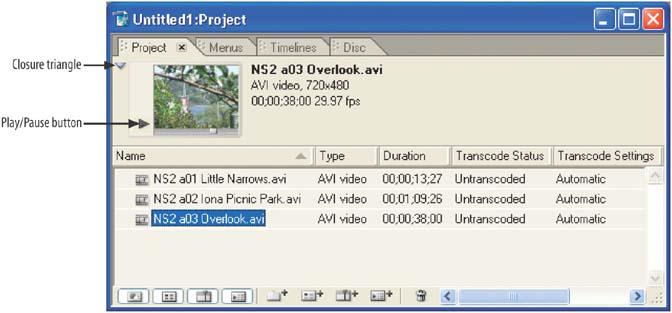
Import more files. Go ahead and import some more AVI files to work with (short clips are fine for this first project). Note that you can select more than one file to import at the same time by pressing Shift or Ctrl while clicking the filename. After you’re finished, Encore lists the imported clip files in the Project tab, along with their type (AVI), duration, transcode status, and transcode settings. You can click the column headings to sort the list, or drag them to resize the displayed columns. This becomes very useful when reviewing larger projects. See Figure 1-7.
Preview your assets. You can preview your asset files one at a time in the Project tab. Click an asset name in the list, and Encore displays it in the Asset Preview thumbnail at the upper-left corner of the Project tab. Encore lists the asset’s filename and format to the right of the thumbnail, including the video or still image resolution and the video or audio clip duration. If you want, click the Play/Pause button next to the thumbnail in the upper left to play through it, or drag the slider below the thumbnail to skip to a specific location in the clip. These are shown in Figure 1-8.
Use the closure triangle if needed. If you are cramped for space in the Encore window, you can click the closure triangle beyond the top left corner of the asset preview (also shown in Figure 1-8). This will hide the Asset Preview thumbnail area, freeing space for three or four more rows of the asset list.

Get Adobe Encore DVD: In the Studio now with the O’Reilly learning platform.
O’Reilly members experience books, live events, courses curated by job role, and more from O’Reilly and nearly 200 top publishers.

