At some point, you’re going to want to play some video on your DVD; after all, that’s the whole point of what we’re doing here. Or maybe you want to play a slide show with some still images. Or maybe you want to play some audio. In all of these cases, you need to use a timeline to organize the playable assets. In the opening chapter, we took the fast track by dragging and dropping video clips to create video thumbnail buttons. You may remember that, as we did so, Encore created three corresponding timelines—one for each clip. However, Encore can support up to 99 timelines in a project, and each timeline can consist of much more than just an audio and video layer.
In fact, each timeline can contain:
A video track, used to display the actual video on the screen.
Up to eight audio tracks, which can be used for alternate languages, soundtracks, and commentary. Incidentally, the eight audio track limit is not a limitation of Encore DVD. Eight audio tracks is actually the maximum allowed by the DVD-Video specification.
Up to 32 subtitle tracks, to display text and graphics overlays on the video. The audio and subtitle tracks also can be tagged with language codes, which help the viewer select the language he wants to use. 32 subtitle tracks is also the maximum allowed by the DVD-Video specification.
Chapter points to mark specific frames in the clip. Chapter points make it easier for the viewer to skip through the clip by pressing the Next/Previous Chapter buttons on his DVD remote. Chapter points can also be used as targets for navigational links, which we’ll talk about in more detail shortly.
Encore can use a range of different types of assets in timelines: video, audio, still images, and several different formats for specifying subtitle data. These are assembled using a multi-track timeline interface, which should be somewhat familiar if you’ve ever used a video-editing tool such as Adobe Premiere Pro or Avid. In the timeline, we can create a number of interesting elements for our DVDs, including longer clips with chapter markers, still image slide shows, alternate audio tracks (i.e., what you might use to create a director’s commentary), and subtitle overlays.
In addition, Encore 1.5 also supports playlists. These are lists that consist of one or more timelines that will be played sequentially on the DVD. Each timeline can start at any chapter point, but once started, the timeline will play to the end. You can use this, for example, to play through a number of gag reel clips on a DVD without creating several timelines and manually linking each of them together.
Each timeline in your project corresponds to a discrete, playable element on the DVD. You can create links from menu buttons to timelines to play them, and you can create links between timelines, so the playback continues from the end of the first timeline to the start of the second. Finally, you can define chapter points within timelines. In addition to simple navigation, chapter points can also serve as targets for links so that the DVD can jump to a specific point within a timeline and begin playback from that point.
Every timeline has one video track, although it can be empty (and play blank video). The audio and subtitle tracks, on the other hand, are optional. The video track in a timeline can contain only one video clip, or one or more still images, as in a slide show. Each audio track can contain only one audio clip. Each subtitle track can contain multiple subtitle clips that are synchronized to the playback time.
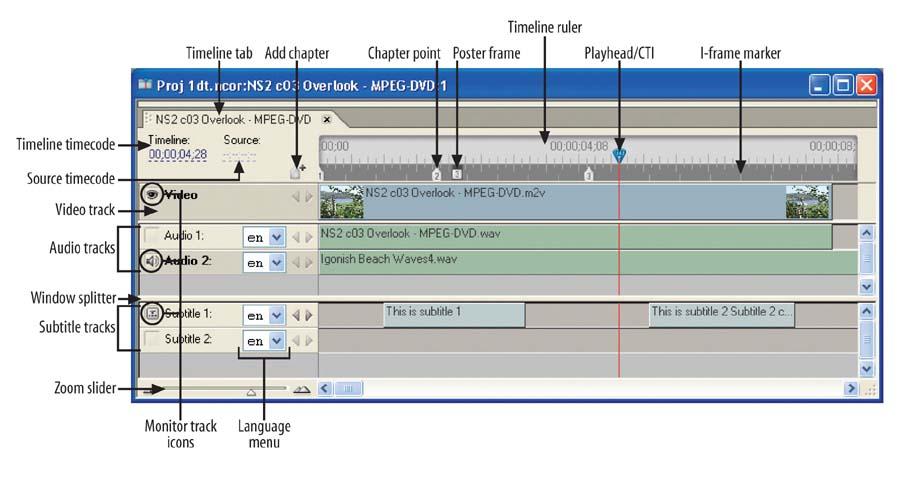
As you might expect, the Timeline window contains tracks for video, audio, and subtitles, along with tools that can be used for viewing and playing the contents of the timeline or editing chapter points. See Figure 4-1.
The Timeline window contains the following items.
- Timeline tabs
The Timeline window contains tabs at the top for each open timeline. The name on each tab matches the timeline shown in the Project window. The active timeline has a close box, which you can use to close the timeline.
- Timeline ruler
The timeline ruler marks elapsed time in the hours/minutes/seconds/frames format within the timeline. You can zoom in to display smaller increments of time at each tick mark.
- Playhead/current-time indicator (CTI)
The playhead (sometimes called the current time indicator, or CTI) marks the current playback or edit point in the timeline, as also displayed in the Monitor window.
- Chapter point
A chapter point marks a numbered chapter point within the video track. Chapter points can be used as link targets from menus, buttons, and even other timelines.
- Poster frame
A poster frame marks a single frame of video used to represent an associated chapter point. Poster frames are used as the source for a thumbnail image for buttons that link to it. If a poster frame is not specified, the first frame of the chapter point is used by default.
- I-Frame
An I-Frame marks the location of an I-frame in an MPEG-2 video clip, which can be used as a chapter point. I-frame tick marks are visible only when zoomed in sufficiently.
- Timeline timecode
The timeline timecode represents the current playhead position within the timeline, using the hours/minutes/seconds/frames format (semicolons for drop-frame NTSC, or colons for nondrop-frame PAL). You can click and drag left or right from the timecode area to move backward or forward, respectively. In addition, you can click and release over the timecode and type in your own timecode. You do not need to enter semicolons when typing in a timecode: the rightmost two numbers are assumed to be the frames, the next two numbers are assumed to be the seconds, and so on. Any numbers not entered are treated as zero.
- Source timecode
The source timecode represents the current playhead position within the source itself (not the timeline), using the hours/minutes/seconds/frames format (semicolons for drop-frame NTSC, colons for nondrop-frame PAL). Like the timeline timecode, you can click and drag either left or right from the timecode area to move backward or forward, respectively. In addition, you can click and release over the timecode and enter your own timecode. Note that this is the timecode position of the source, not the clip. In other words, the timecode specified is how far the current frame is from the start of the original asset file, not how far it is from the first frame that you’re using in the timeline.
- Add chapter point
You can click this small button to add a new chapter point at the current playhead position in the timeline. All subsequent chapter points (those occurring later in the timeline) are renumbered accordingly.
- Video track
There is only one video track in a timeline, and it contains the content displayed: a single video clip, one or more still images, or an empty (black) screen.
- Audio tracks
You can have up to eight numbered tracks for audio, as per the DVD standard, with each containing a single audio clip.
- Subtitle tracks
You can have up to 32 tracks for subtitles, as per the DVD standard, that are displayed over the video content. Each track contains a list of text or images that are displayed at different timecodes.
- Window splitter
You can use the window splitter to adjust the number of audio and subtitle tracks that are visible while working on the timeline.
- Monitor track icons
The monitor track icons dictate which audio and subtitle tracks will be displayed in the Monitor window. Note that this isn’t necessarily the same track that you may have selected and are editing.
- Language menu
Each audio or subtitle track contains a small menu that you can use to select a language code. This code will tag the associated audio or subtitle track that belongs to that language.
- Zoom slider
Use the zoom slider and Zoom Out/Zoom In icons to expand or contract the timeline display to the desired resolution.
You can use the Monitor window to view and control playback of the contents of the Timeline window. You can also use it to enter and edit subtitle text. The Monitor window should raise itself whenever you create a timeline. However, if you have closed it and need it to reopen, select the Window → Monitor menu item (or press Shift-Ctrl-Space). Note that if the video is paused, the current frame of video displayed in the Monitor window (and its associated timecode) correspond to the current playhead position in the active tab of the Timeline window.
The Monitor window contains the following items, shown in Figure 4-2.
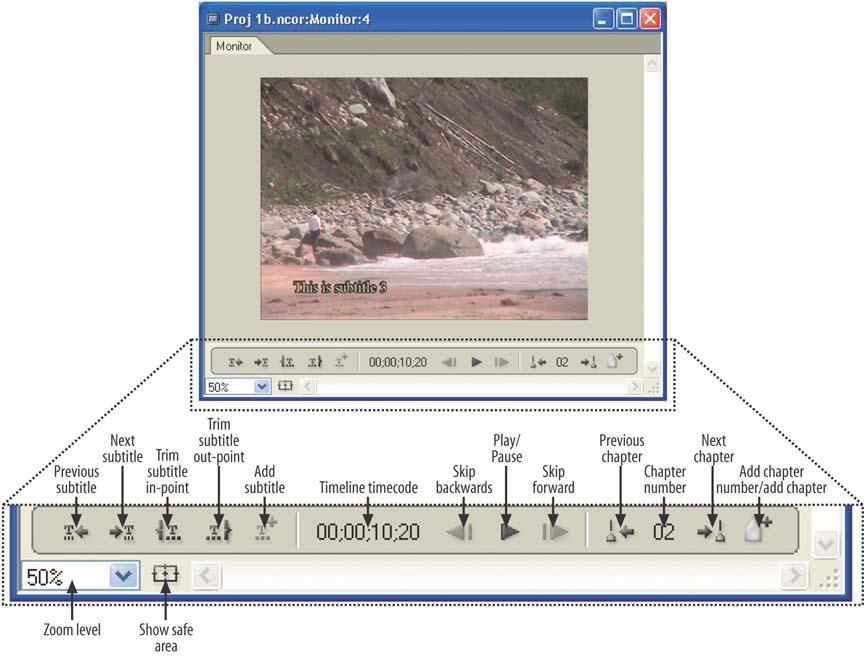
- Zoom level
This control allows you to select a zoom percentage from the dropdown menu, or type a value and press Enter.
- Show safe area
Activating this button will display a title safe overlay, which is useful for entering and editing subtitles. The lines serve as a guide for the visible region of the frame when displayed on televisions. You should never enter text outside the guidelines, as it may be cropped by some televisions.
- Previous/next subtitle
These controls move the playhead to the beginning of either the previous or next subtitle.
- Trim subtitle in-point/out-point
These controls can be used to trim the in- or out-point of the selected subtitle element to the current playhead position.
- Add subtitle
Pressing this button creates a new subtitle using the current character settings (likely the same as the previous subtitle).
- Timeline timecode
The timeline timecode displays the current playhead position within the timeline, using the hours/minutes/seconds/frames format, which uses semicolons to represent the NTSC drop-frame timecode and colons for the PAL nondrop-frame timecode. It duplicates the information found in the active timeline.
- Skip backward/Skip forward
These controls will skip backward or forward in a video clip. If you are viewing an MPEG-2 video clip, it will skip to the previous or next I-frame, which can be used as a chapter point.
- Play/pause
This control either starts or pauses the Monitor playback. You can also use the spacebar as a keyboard shortcut to do the same thing.
- Previous chapter
This mirrors the button on a DVD remote. It jumps back to the previous chapter point.
- Chapter number
This displays the current chapter number (the closest chapter point before the current playhead position).
- Next chapter
This also mirrors the button on a DVD remote. It jumps forward to the next chapter point, if there is one. If there isn’t a chapter point defined after the current playhead position, it will not do anything.
- Add chapter number/add chapter
You can click this button to add a chapter point at the current playhead position—the functionality is identical to the Add Chapter button in the Timeline window.
Zooming is often necessary in the event that a video and/or audio clip in the timeline covers a large period of time, such as a two-hour movie. To zoom in on the contents of a timeline, click the Zoom Out/Zoom In icons, or drag the slider. Alternatively, you can use the Zoom tool in the floating toolbox. Select the tool, place it over the timeline, and click to zoom in or Alt-click to zoom out.
To zoom in the Monitor window, choose a Zoom Level percentage from the drop-down menu at the bottom left, or simply type in a percentage value. Note that this controls the zoom of the video, and does not expand or shrink the Monitor window to a proportionate size. You must manually resize the window to the desired proportions.
You also can use the View menu or corresponding keyboard shortcuts to zoom the windows in and out, and to fit the contents to the current window size, as shown in Table 4-1. For example, use Ctrl-0 in the Timeline window to zoom its contents to fit in the current window size, and use Ctrl-1 in the Monitor window to zoom its contents to actual size (100%).
To locate a specific frame in the timeline while displaying its contents in the Monitor window, drag the playhead in the Timeline window. You can use this to precisely position the video at a specific point, possibly for a chapter point or a poster frame. Moving back and forth with the playhead is often called scrubbing.
If you want to watch the timeline video, use the play controls under the Monitor window. To play from the current playhead position, you can select Timeline → Play Timeline, or just press the spacebar. You can also use the spacebar to pause the video as it is playing.
If you want to precisely position the playhead at a specific timecode without scrubbing, click the timecode value at the top left of the Timeline window and enter a new value, or click and drag sideways in the timecode display area to step the time forward (right) or backward (left) slowly. If you enter a new value, you don’t have to use semicolons—Encore will interpret the rightmost two digits as the frames, the next two as seconds, and so on. Any values not entered are considered to be zero. So, for example, if you enter “123412”, Encore will set the playhead position at “00;12;34;12”. Table 4-2 shows the Encore keyboard shortcuts to control playback.
Table 4-2. Encore keyboard shortcuts for controlling playback in the Timeline and Monitor windows
|
Keyboard shortcut |
Description |
|---|---|
|
Spacebar |
Zoom out |
|
Left arrow |
Step back one frame |
|
Right arrow |
Step forward one framew |
|
Up arrow (or Home) |
Move playhead to the beginning of the timeline |
|
Down arrow (or End) |
Move playhead to the end of the timeline |
Get Adobe Encore DVD: In the Studio now with the O’Reilly learning platform.
O’Reilly members experience books, live events, courses curated by job role, and more from O’Reilly and nearly 200 top publishers.

