Chapter 1. Ajax Basics
Remember when users called the Internet the “world wide wait?” Way back in the Neolithic era of the Web? With some applications, that aspect of the Web hasn’t really changed that much: fill out form, click button, web page goes away, wait, page refreshes, correct mistake, click, wait, wait... You’ve been stuck in this limbo before.
A number of recent web sites, however, such as many of the cool mapping applications that have evolved of late, require much greater responsiveness in the way they interact with users. The old, conventional way of handling user interaction is to have the entire page “go away” with every click, with the new page reappearing in the browser view only when the server’s response is finally complete. However, some new applications require small pieces of the web page to change instantaneously, without the entire page reloading.
For example, if you have ever used Google Maps, the way you can drag outlying regions into your view conveys the impression that you have all of the maps stored locally on your computer, for your effortless manipulation. Imagine how unpopular this application would be if every time you tried to “drag” the map the page disappeared for a few (long) moments while the browser waited for another server response. The application would be so sluggish that no one would use it. So what’s the magic that makes this work?
It’s Not a Floor Wax
A blend of well-known technologies and a nifty JavaScript tool form the basis of a snappier and more powerful application model for the Web. If you’re afraid of acronym overload, don’t worry—this one’s easy. It’s called Ajax, which stands for Asynchronous JavaScript and XML.
Ajax is neither a floor wax nor a desert topping (nor, indeed, a lemon-scented cleaning product!). It’s a blend of a number of standard technologies already familiar to developers and designers:
JavaScript, a programming language that adds dynamic scripting to web pages. JavaScript code can be embedded in a web page to allow the page to implement cool new behaviors with a technique called client-side scripting. This technique is almost as old as the Web itself.
XMLHttpRequest, a JavaScript object with an application programming interface (API) that can connect with a server using the HyperText Transfer Protocol (HTTP). A lot of the Ajax magic is propelled by this piece of code, which all the major browsers (such as Mozilla Firefox, Internet Explorer 6, Safari 1.3 and 2.0, and Opera 7.6) support. The asynchronous part of Ajax derives from this object’s characteristics.[1]Extensible Markup Language (XML), a language designed to define other languages. The
XMLHttpRequestobject can handle the server response in standard XML format as well as plain text.HTML and Cascading Style Sheets (CSS), which control what the user sees on a web page. Web developers can use JavaScript to make dynamic changes to the visual interface by programming HTML elements and CSS styles.
The Document Object Model (DOM), a model that represents an XML file or web page as a set of related objects that can be dynamically manipulated, even after the user has downloaded the page. The web page view is structured as a tree hierarchy made up of a root node, the parent, and its various branches, or children. Each HTML element is represented by a node or branch, which is accessible via JavaScript. We show a lot (a lot!) of DOM programming in these hacks.
Extensible Stylesheet Language and Transformation (XSLT), a templating technology for transforming the display of XML information for a receiving client.
Ajax is far from new, as these are relatively old technologies.
Microsoft issued the first implementation of a JavaScript object that
makes HTTP requests, often referred to as the XMLHTTP object, with Version 5.0 of the
Internet Explorer browser (as of this writing, IE is on Version 6, with
v7 in a beta release).
The plethora of new web applications that use Ajax, however, suggests that this group of technologies has morphed into a new web model. “Web 2.0” is next-generation-speak encompassing Ajax, a form of Rich Internet Application (so called because much of the application’s functionality can reside in the client browser). Examples of these applications are Google Maps, Gmail, a collaboration suite called Zimbra, an interesting personal search-engine tool called Rollyo (http://www.rollyo.com), and one of the first interactive web maps, this one of Switzerland (see http://map.search.ch/index.en.html). The number of Ajax applications is growing very rapidly. You can find a short list on Wikipedia, at http://en.wikipedia.org/wiki/List_of_websites_using_Ajax.
Handle with Care
Of course, Ajax is not for everyone (particularly those dessert topping fans!). Because Ajax technology can dynamically alter a web page that has already been downloaded, it may interfere with certain functions near and dear to many users, such as creating bookmarks for browser views. For example, in the absence of fancy scripting solutions, the dynamic changes you make with DOM in an existing web page cannot be linked to with a URL that you can send to your friends or save for later. (Both “Fix the Browser Back Button in Ajax Applications” [Hack #68] and “Handle Bookmarks and Back Buttons with RSH” [Hack #69] should help shed light on these issues and provide some hackable solutions.)
A number of the cool Ajax tips described in this book alter the
behavior of many familiar web widgets, such as select lists, textareas, text fields, and radio buttons that
submit their own data and talk to servers behind the scenes. However,
bear in mind that Ajax-powered widgets should be first and foremost
usable, and always avoid confusing and irritating
web users.
XMLHttpRequest
At the center of many of the hacks in this book is the XMLHttpRequest object, which allows JavaScript
to fetch bits of server data while the user is happily playing with the
rest of your application. This object has its own API, which we will
summarize in this introduction.
“Detect Browser Compatibility with the Request Object” [Hack #1] covers setting up the request object in JavaScript. Once the object is initialized, it has several methods and properties that you can use in your own hacks.
Tip
A common practice among programming types is to call the
functions that are associated with particular JavaScript
objects “methods.” The XMLHttpRequest object’s methods include
open(), send(), and abort().
The following list shows the properties supported by the request objects defined by most of the major browsers, such as Internet Explorer 5.0 and later, Safari 1.3 and 2.0, Netscape 7, and Opera’s latest releases (such as Opera 8.5). Mozilla Firefox’s request object has additional properties and methods not shared by the request objects of other major browsers,[2] but it also supports all of the following:
onreadystatechangeCallback function; the function assigned to this property is called whenever
readyStatechanges.readyStateNumber;
0means uninitialized,open()has not yet been called;1means loading,send()has not been called;2means loaded,send()has been called, and headers/status are available;3means interactive,responseTextholds partial data;4means completed.responseTextstring; the plain text of the response.responseXMLDOM
Documentobject; an XML return value.statusResponse status code, such as
200(Okay) or404(Not Found).statusTextstring; the text associated with the HTTP response status.
The methods supported include:
abort()void; cancels the HTTP request.getAllResponseHeaders()string; returns all of the response headers in a preformatted string (see “Dig into the HTTP Response” [Hack #9]).getResponseHeader(string header)string; returns the value of the specified header.open(string url,string asynch)void; prepares the HTTP request and specifies whether it is asynchronous or not.send(string)void; sends the HTTP request.setRequestHeader(string header,string value)void; sets a request header, but you must callopen()first!
Detect Browser Compatibility with the Request Object
Use JavaScript to set up Microsoft’s and the Mozilla-based browsers’ different request objects.
Browser compatibility is an important consideration. You have to make sure the “engine” behind Ajax’s server handshake is properly constructed, but you can never predict which browsers your users will favor.
The programming tool that allows Ajax applications to make HTTP
requests to a server is an object that you can use from within
JavaScript code. In the world of Firefox and Netscape (as well as Safari
and Opera), this object is named XMLHttpRequest. However, continuing with the
tradition established by IE 5.0, recent vintages of Internet Explorer
implement the software as an ActiveX
object named Microsoft.XMLHTTP or
Msxml2.XMLHTTP.
Tip
Microsoft.XMLHTTP and
Msxml2.XMLHTTP refer to different
versions of software components that are a part of Microsoft XML Core
Services (MSXML). Here’s what our contributing IE expert says on this
matter:
“If you use Microsoft.XMLHTTP, the ActiveXObject wrapper will try to initialize
the last known good version of the object that has this program (or
“prog”) ID. This object, in theory, could be MSXML 1.0, but almost no
one these days has that version because it has been updated via
Windows Update, IE 6, or another means. MSXML 1.0 was very
short-lived. If you use MSXML2.XMLHTTP, that signifies to the
wrapper to use at least MSXML 2.0 libraries. Most developers do not
need to use a specific version of MSXML, such as MSXML2.XMLHTTP.4.0 or MSXML2.XMLHTTP.5.0.”
Although Microsoft and the engineers on the Mozilla project have
chosen to implement this object differently, we will refer to the
ActiveX and XMLHttpRequest objects simply as “request objects” throughout this book, because they have
very similar functionality.
As a first step in using Ajax, you must check if the user’s
browser supports either one of the Mozilla-based or ActiveX-related request objects, and then
properly initialize the object.
Using a Function for Checking Compatibility
Wrap the compatibility check inside a JavaScript
function, then call this function before you make any HTTP requests
using the object. For example, in Mozilla-based browsers such as
Netscape 7.1 and Firefox 1.5 (as well as in Safari 2.0 and Opera 8.5),
the request object is available as a property of the top-level
window object. The reference to
this object in JavaScript code is window.XMLHttpRequest. The compatibility check
for these browser types looks like this:
if(window.XMLHttpRequest){
    request = new XMLHttpRequest();
    request.onreadystatechange=handleResponse;
    request.open("GET",theURL,true);
    request.send(null);
}
The JavaScript variable request is a top-level variable that will
refer to the request object.
Tip
As an alternative model, the open-source library
Prototype uses object-oriented JavaScript
to wrap the request object into its own object, as in the object
Ajax.Request (see Chapter 6).
If the browser supports XMLHttpRequest, then:
if(window.XMLHttpRequest)returnstruebecause theXMLHttpRequestis notnullorundefined.The object will be instantiated with the
newkeyword.Its
onreadystatechangeevent listener (see the section “XMLHttpRequest” earlier in this chapter) will be defined as a function namedhandleResponse().The code calls the request object’s
open()andsend()methods.
What about Internet Explorer users?
Tip
Microsoft Internet Explorer–related blogs mentioned, at the time this book went to publication, that IE 7 would support a native XMLHttpRequest object.
In this case, the window.XMLHttpRequest object will not exist
in the browser object model. Therefore, another branch of the if test is necessary in your code:
else if (window.ActiveXObject){
    request=new ActiveXObject("Microsoft.XMLHTTP");
    if (! request){
        request=new ActiveXObject("Msxml2.XMLHTTP");
    }
    if(request){
        request.onreadystatechange=handleResponse;
        request.open(reqType,url,true);
        request.send(null);
    }
}
This code fragment tests for the existence of the
top-level window object ActiveXObject, thus signaling the use of
Internet Explorer. The code then initializes the request using two of
a number of possible ActiveX program IDs (here, Microsoft.XMLHTTP and Msxml2.XMLHTTP).
You can get even more fine-grained when testing for different
versions of the IE request object, such as Msxml2.XMLHTTP.4.0. In the vast majority of
cases, however, you will not be designing your application based on
various versions of the MSXML libraries, so the prior code will
suffice.
The code then makes one final check for whether the request
object has been properly constructed (if(request){...}).
Given three chances, if the request variable is still null or undefined, your browser is really out of
luck when it comes to using the request object for Ajax!
Here’s an example of an entire compatibility check:
/* Wrapper function for constructing a request object.
 Parameters:
  reqType: The HTTP request type, such as GET or POST.
  url: The URL of the server program.
  asynch: Whether to send the request asynchronously or not. */

function httpRequest(reqType,url,asynch){
    //Mozilla-based browsers
    if(window.XMLHttpRequest){
        request = new XMLHttpRequest();
    } else if (window.ActiveXObject){
        request=new ActiveXObject("Msxml2.XMLHTTP");
        if (! request){
            request=new ActiveXObject("Microsoft.XMLHTTP");
        }
    }
    //the request could still be null if neither ActiveXObject
    //initialization succeeded
    if(request){
        initReq(reqType,url,asynch);
    } else {
        alert("Your browser does not permit the use of all "+
              "of this application's features!");
    }
}
/* Initialize a request object that is already constructed */
function initReq(reqType,url,bool){
    /* Specify the function that will handle the HTTP response */
    request.onreadystatechange=handleResponse;
    request.open(reqType,url,bool);
    request.send(null);
}
“Use the Request Object to
POST Data to the Server” [Hack #2] shows how to implement a
POST request with XMLHttpRequest.
Use the Request Object to POST Data to the Server
Step beyond the traditional mechanism of posting your user’s form values.
This hack uses the POST HTTP request method to send data, communicating with the server without disrupting the user’s interaction with the application. It then displays the server’s response to the user. The difference between this hack’s approach to posting data and the typical form-submission method is that with Ajax, the page is not altered or refreshed when the application connects with the server to POST it the data. Thus, the user can continue to interact with the application without waiting for the interface to be rebuilt in the browser.
Imagine that you have a web portal in which several regions of the page or view provide the user with a variety of services. If one of these regions involves posting data, the entire application might have a more responsive feel if the POST request happens in the background. This way, the entire page (or segments of it) does not have to be refreshed in the browser.
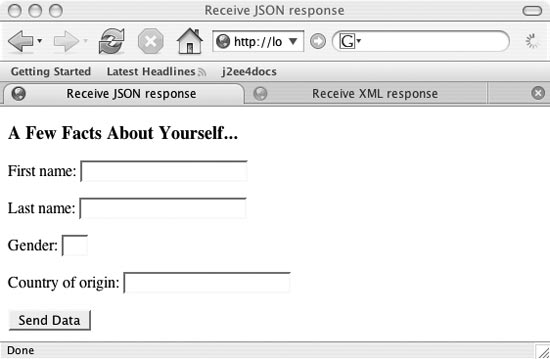
The example web page used in this hack is a simple one. It requests users to enter their first and last names, gender, and country of origin, and then click a button to POST the data. Figure 1-1 shows what the web page looks like in a browser window.
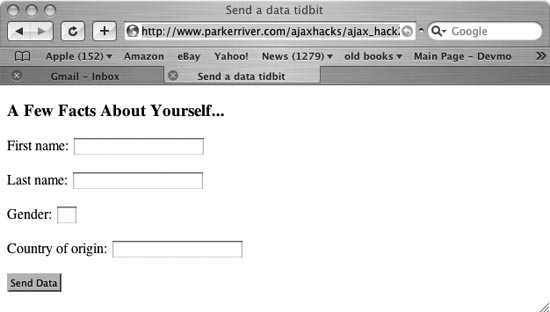
Here’s the code for the HTML page:
<!DOCTYPE HTML PUBLIC "-//W3C//DTD HTML 4.01//EN"
        "http://www.w3.org/TR/1999/REC-html401-19991224/strict.dtd">
<html>
<head>
    <script type="text/javascript" src="/parkerriver/js/hack2.js"></script>
    <meta http-equiv="content-type" content="text/html; charset=utf-8" />
    <title>Send a data tidbit</title>
</head>
<body>
<h3>A Few Facts About Yourself...</h3>
<form action="javascript:void%200" onsubmit="sendData();return false">
    <p>First name: <input type="text" name="firstname" size="20"> </p>
    <p>Last name: <input type="text" name="lastname" size="20"> </p>
    <p>Gender: <input type="text" name="gender" size="2"> </p>
    <p>Country of origin: <input type="text" name="country" size="20"> </p>
    <p><button type="submit">Send Data</button></p>
</form>
</body>
</html>
Tip
You may be wondering about the weird-looking form action="javascript:void%200" part. Because
we are calling JavaScript functions when the form is submitted, we do
not want to give the action
attribute anything but a JavaScript URL that has no return value, such
as "javascript:void 0". We have to
encode the space between void and
0, which is where the %20 comes in. If JavaScript is disabled in
the user’s browser, clicking the submit button on the form has no
effect because the action attribute
does not point to a valid URL. In addition, certain HTML validators
will display warnings if you use action="". Another way of writing this code
is to include the function calls as part of the window.onload event handler in the
JavaScript .js file, which is the
approach used by most hacks in this book.
The first code element of interest is the script tag, which imports the JavaScript code
(in a file named hack2.js). The
form tag’s onsubmit attribute specifies a function called
sendData(), which in turn formats
the data for a POST request (by calling another function, setQueryString()) and sends the data to the
server. For brevity’s sake, we’ve saved the description of checking for
blank fields for a later hack (“Validate a Text Field or textarea for
Blank Fields” [Hack #22]), but web applications should take this
step before they hit the server.
The hack2.js file defines the necessary JavaScript.
Here is the setQueryString() function:
function setQueryString(){
    queryString="";
    var frm = document.forms[0];
    var numberElements =  frm.elements.length;
    for(var i = 0; i < numberElements; i++) {
        if(i < numberElements-1) {
            queryString += frm.elements[i].name+"="+
                           encodeURIComponent(frm.elements[i].value)+"&";
        } else {
            queryString += frm.elements[i].name+"="+
                           encodeURIComponent(frm.elements[i].value);
        }

    }
}
This function formats a POST-style string out of all the form’s input elements. All the name/value pairs are
separated by an & character,
except for the pair representing the last input element in the form. The entire string
might look like:
firstname=Bruce&lastname=Perry&gender=M&country=USA
Now you have a string you can
use in a POST HTTP request. Let’s look at the JavaScript code that sends
the request. Everything starts with the
sendData() function. The code calls this
function in the HTML form tag’s
onsubmit attribute:
var request;
var queryString;   //will hold the POSTed data
function sendData(){
    setQueryString();
    var url="http://www.parkerriver.com/s/sender";
    httpRequest("POST",url,true);
}

/* Initialize a request object that is already constructed.
 Parameters:
   reqType: The HTTP request type, such as GET or POST.
   url: The URL of the server program.
   isAsynch: Whether to send the request asynchronously or not. */
function initReq(reqType,url,isAsynch){
    /* Specify the function that will handle the HTTP response */
    request.onreadystatechange=handleResponse;
    request.open(reqType,url,isAsynch);
    /* Set the Content-Type header for a POST request */
    request.setRequestHeader("Content-Type",
            "application/x-www-form-urlencoded; charset=UTF-8");
    request.send(queryString);
}

/* Wrapper function for constructing a request object.
 Parameters:
  reqType: The HTTP request type, such as GET or POST.
  url: The URL of the server program.
  asynch: Whether to send the request asynchronously or not. */

function httpRequest(reqType,url,asynch){
    //Mozilla-based browsers
    if(window.XMLHttpRequest){
        request = new XMLHttpRequest();
    } else if (window.ActiveXObject){
        request=new ActiveXObject("Msxml2.XMLHTTP");
        if (! request){
            request=new ActiveXObject("Microsoft.XMLHTTP");
        }
    }
    //the request could still be null if neither ActiveXObject
    //initialization succeeded
    if(request){
        initReq(reqType,url,asynch);
    } else {
        alert("Your browser does not permit the use of all "+
              "of this application's features!");
    }
}
The purpose of the httpRequest() function is to check which
request object the user’s browser is associated with (see “Detect Browser Compatibility with the
Request Object” [Hack #1]). Next, the code calls initReq(), whose parameters are described in
the comment just above the function definition.
The code request.onreadystatechange=handleResponse;
specifies the event-handler function that deals with the response. We’ll
look at this function a little later. The code then calls the request
object’s open() method, which
prepares the object to send the request.
Setting Headers
The code can set any request headers after calling
open(). In our case, we have to
create a Content-Type header for a
POST request.
Tip
Firefox required the additional Content-Type header; Safari 1.3 did not.
(We were using Firefox 1.02 at the time of writing this hack.) It is
a good idea to add the proper header because in most cases the
server is expecting it from a POST request.
Here’s the code for adding the header and sending the POST request:
request.setRequestHeader("Content-Type",
        "application/x-www-form-urlencoded; charset=UTF-8");
request.send(queryString);
If you enter the raw queryString value as a parameter, the method
call looks like this:
send("firstname=Bruce&lastname=Perry&gender=M&country=USA");Ogling the Result
Once your application POSTs data, you want to display
the result to your users. This is the responsibility of the handleResponse() function. Remember the code
in the initReq() function:
request.onreadystatechange=handleResponse;
When the request object’s readyState property has a value of 4, signifying that the object’s operations
are complete, the code checks the HTTP response status for the value
200. This value indicates that the
HTTP request has succeeded. The responseText is then displayed in an
alert window. This is somewhat
anticlimactic, but I thought I’d keep this hack’s response handling
simple, because so many other hacks do something more complex with
it!
Here is the relevant code:
//event handler for XMLHttpRequest
function handleResponse(){
    if(request.readyState == 4){
        if(request.status == 200){
            alert(request.responseText);
        } else {
            alert("A problem occurred with communicating between "+
                  "the XMLHttpRequest object and the server program.");
        }
    }//end outer if
}
Figure
1-2 shows what the alert
window looks like after the response is received.
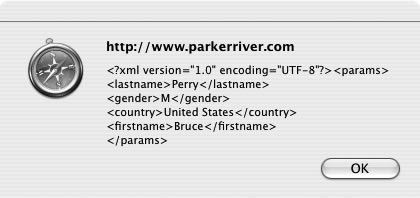
The server component returns an XML version of the POSTed data.
Each parameter name becomes an element name, with the parameter value
as the element content. This POSTed data is nested within params tags. The component is a Java
servlet. The servlet is not the main focus of this hack, but here’s
some code anyway, for the benefit of readers who are curious about
what is happening on the server end:
protected void doPost(HttpServletRequest httpServletRequest,
                      HttpServletResponse httpServletResponse) throws
                      ServletException, IOException {
    Map reqMap = httpServletRequest.getParameterMap();
    String val=null;
    String tag = null;
    StringBuffer body = new StringBuffer("<params>\\n");
    boolean wellFormed = true;
    Map.Entry me = null;
    for(Iterator iter= reqMap.entrySet().iterator();iter.hasNext();) {
        me=(Map.Entry) iter.next();
        val= ((String[])me.getValue())[0];
        tag = (String) me.getKey();
        if (! XMLUtils.isWellFormedXMLName(tag)){
            wellFormed=false; break;
        }
        body.append("<").append(tag).append(">").
        append(XMLUtils.escapeBodyValue(val)).        append("</").append(tag).append(">\\n");
    }
    if(wellFormed) {
        body.append("</params>");
        sendXML(httpServletResponse,body.toString());
    } else {
        sendXML(httpServletResponse,"<notWellFormedParams />");
    }
}
The code uses XMLUtils, a Java class from the Jakarta
Commons Betwixt open source package, to check whether the parameter
names are well formed, as well as whether the parameter values contain
invalid XML content and thus have to be escaped. If for some reason
the component is POSTed data that contains nonwell-formed parameter
names (such as na< >me instead of name), the servlet returns an empty XML
element reporting this condition.
Use Your Own Library for XMLHttpRequest
Break out the code that initializes the request object and sends requests to its own JavaScript file.
To cleanly separate the concerns of big Ajax applications, create
a separate file that manages the XMLHttpRequest object, then import that file
into every web page that needs it. At the very least, this ensures that
any necessary changes regarding how the code sets up the request object
have to be made only in this file, as opposed to every JavaScript file
that uses Ajax-style requests.
This hack stores all the request object–related code in a file
called http_request.js. Any web page that uses
XMLHttpRequest can then import this
file in the following way:
<script type="text/javascript" src="js/http_request.js"></script>
Here’s the code for the file, including all the comments:
var request = null; /* Wrapper function for constructing a request object. Parameters: reqType: The HTTP request type, such as GET or POST. url: The URL of the server program. asynch: Whether to send the request asynchronously or not. respHandle: The name of the function that will handle the response. Any fifth parameters, represented as arguments[4], are the data a POST request is designed to send.*/function httpRequest(reqType,url,asynch,respHandle){ //Mozilla-based browsers if(window.XMLHttpRequest){ request = new XMLHttpRequest(); } else if (window.ActiveXObject){ request=new ActiveXObject("Msxml2.XMLHTTP"); if (! request){ request=new ActiveXObject("Microsoft.XMLHTTP"); } } //very unlikely, but we test for a null request //if neither ActiveXObject was initialized if(request) { //if the reqType parameter is POST, then the //5th argument to the function is the POSTed data if(reqType.toLowerCase() != "post") { initReq(reqType,url,asynch,respHandle); } else { //the POSTed data var args = arguments[4]; if(args != null && args.length > 0){ initReq(reqType,url,asynch,respHandle,args); } } } else { alert("Your browser does not permit the use of all "+ "of this application's features!"); } } /* Initialize a request object that is already constructed */ function initReq(reqType,url,bool,respHandle){ try{ /* Specify the function that will handle the HTTP response */ request.onreadystatechange=respHandle; request.open(reqType,url,bool); //if the reqType parameter is POST, then the //5th argument to the function is the POSTed data if(reqType.toLowerCase() == "post") { request.setRequestHeader("Content-Type", "application/x-www-form-urlencoded; charset=UTF-8"); request.send(arguments[4]); } else { request.send(null); }}catch (errv) { alert( "The application cannot contact "+ "the server at the moment. "+ "Please try again in a few seconds.\\n"+ "Error detail: "+errv.message); } }
The applications that use this code call the httpRequest() function with four or five (with
POST requests) parameters. You see lots of examples of calling this
function in the other hacks. Here’s another:
var _url = "http://www.parkerriver.com/s/sender";
var _data="first=Bruce&last=Perry&middle=W";
httpRequest("POST",_url,true,handleResponse,_data);
The code comments describe the meaning of each of these parameters. The last parameter represents the data that accompanies a POST request.
Tip
A POST HTTP request includes the POSTed data beneath the request-header information. A GET request, on the other hand, appends parameter names/values onto the URL.
If the code is not using POST, the client code uses only the first four parameters. The fourth parameter can be either the name of a function that is declared in the client code (i.e., a response-handling function that appears outside of the http_request.js file) or a function literal. The latter option involves defining a function inside a function call, which is often awkward and difficult to read. However, it is sensible in situations in which the HTTP response handling is short and simple, as in:
var _url = "http://www.parkerriver.com/s/sender";
//a debugging setup
httpRequest("POST",_url,true,function(){alert(request.responseText);});
httpRequest() initiates the
same browser detection and setup of XMLHttpRequest for Internet Explorer and
non-Microsoft browsers as described in “Detect Browser Compatibility with the
Request Object” [Hack #1]. initReq() handles the second step of setting
up the request object: specifying the onreadystatechange event handler and calling
the open() and send() methods to make an HTTP request. The
code traps any errors or exceptions thrown by these request method calls
using a try/catch statement. For
example, if the code calls open()
with a URL specifying a different host than that used to download the
enclosing web page, the try/catch
statement catches the error and pops up an alert window.
Finally, as long as the web page imports http_request.js, the request variable is available to code external
to the imported file; request is, in
effect, a global variable.
Warning
request is thus reserved as a
variable name because local variables that use the var keyword will supercede (with
unintentional consequences) the globally used request, as in the following example:
function handleResponse(){ //supercedes the imported request variable var request = null; try{ if(request.readyState == 4){ if(request.status == 200){...
Receive Data as XML
Ajax and server programs provide a DOM Document object that’s ready to go.
Many technologies currently exchange data in Extensible Markup Language format, mostly because XML is a standardized and extensible format widely supported by the software world. Thus, different parties can use existing, well-known technologies to generate, send, and receive XML, without having to adapt to the software tools used by the parties with whom they are exchanging the XML data.
An example is a Global Positioning System (GPS) device that can share the data it has recorded about, say, a hike or a bike ride with a location-aware web application. You just stick the USB cable attached to the GPS device into a USB computer port, launch software that sends the device data to the Web, and that’s it. The data format is usually an XML language that has been defined already for GPS software. The web application and the GPS device “speak the same language.”
Although this book is not the place for an extensive introduction
to XML, you have probably seen these text files in one form or another.
XML is used as a “meta” language that describes and categorizes specific
types of information. XML data starts with an optional XML declaration
(e.g., <?xml version="1.0" encoding="UTF-8"?>), followed
by a root element and zero or more child elements. An example is:
<?xml version="1.0" encoding="UTF-8"?>
<gps>
<gpsMaker>Garmin</gpsMaker>
<gpsDevice>
Forerunner 301
</gpsDevice>
</gps>
Here, gps is the root element,
and gpsMaker and gpsDevice are child elements.
Ajax and the request object can receive data as XML, which is very
useful for handling web-services responses that use XML. Once the HTTP
request is complete, the request object has a property named responseXML. This object is a DOM Document object
that your Ajax application can use. Here’s an example:
function handleResponse(){
    if(request.readyState == 4){
        if(request.status == 200){
            var doc = request.responseXML;
...
}
In the previous code sample, the doc variable is a DOM Document object, offering a similar API to a
browser’s display page. This hack receives XML from a server, then
initiates a little DOM programming with the Document object to pull some information out
of the XML.
Tip
If you just want to see the raw XML text, use the request.responseText property instead.
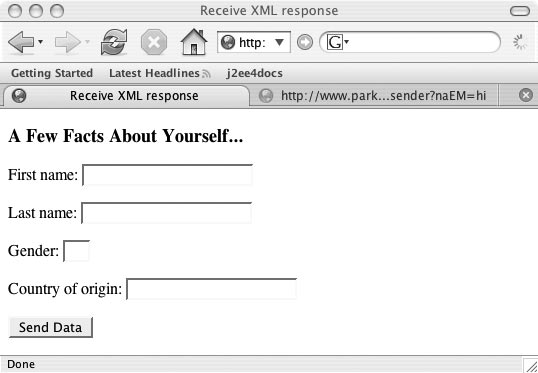
The HTML file for this hack is basically the same as the one used
in “Use the Request Object to POST
Data to the Server” [Hack #2], but a
div element is added at the end, where the code
displays information about the returned XML. Here’s the code for the
HTML page:
<!DOCTYPE HTML PUBLIC "-//W3C//DTD HTML 4.01//EN"
        "http://www.w3.org/TR/1999/REC-html401-19991224/strict.dtd">
<html>
<head>
    <script type="text/javascript" src="js/hack3.js"></script>
    <meta http-equiv="content-type" content="text/html; charset=utf-8" />
    <title>Receive XML response</title>
</head>
<body>
<h3>A Few Facts About Yourself...</h3>
<form action="javascript:void%200" onsubmit="sendData();return false">
    <p>First name: <input type="text" name="firstname" size="20"> </p>
    <p>Last name: <input type="text" name="lastname" size="20"> </p>
    <p>Gender: <input type="text" name="gender" size="2"> </p>
    <p>Country of origin: <input type="text" name="country" size="20"> </p>
    <p><button type="submit">Send Data</button></p>
    <div id="docDisplay"></div>
</form>
</body>
</html>
Figure 1-3 shows what the page looks like before the user enters any information.
The JavaScript code in the hack3.js file POSTs its data to a server application, which sends back a response in XML format. The field validation step [Hack #22] has been skipped for the sake of brevity, but web applications using forms should always implement this task.
Like other examples in this chapter, the server program echoes the
parameter names and values back to the client, as in <params><firstname>Bruce</firstname></params>.
“Use the Request Object to POST
Data to the Server” [Hack #2] shows some of the code for the
server component that puts together the return value. This technique
suits our purpose for showing a simple example of programming XML in an
Ajax application:
var request;
var queryString;   //will hold the POSTed data

function sendData(){
    setQueryString();
    var url="http://www.parkerriver.com/s/sender";
    httpRequest("POST",url,true);
}
//event handler for XMLHttpRequest
function handleResponse(){
    if(request.readyState == 4){
        if(request.status == 200){
            var doc = request.responseXML;
            var info = getDocInfo(doc);
            stylizeDiv(info,document.getElementById(""docDisplay""));
        } else {
            alert(""A problem occurred with communicating between ""+
                  ""the XMLHttpRequest object and the server program."");
        }
    }//end outer if
}

/* Initialize a request object that is already constructed */
function initReq(reqType,url,bool){
    /* Specify the function that will handle the HTTP response */
    request.onreadystatechange=handleResponse;
    request.open(reqType,url,bool);
    request.setRequestHeader(""Content-Type"",
            ""application/x-www-form-urlencoded; charset=UTF-8"");
    /* Only works in Mozilla-based browsers */
    //request.overrideMimeType(""text/xml"");
    request.send(queryString);
}

/* Wrapper function for constructing a request object.
 Parameters:
  reqType: The HTTP request type, such as GET or POST.
  url: The URL of the server program.
  asynch: Whether to send the request asynchronously or not. */
function httpRequest(reqType,url,asynch){
    //Snipped...See Hack #1
}
function setQueryString(){
    queryString="";
    var frm = document.forms[0];
    var numberElements =  frm.elements.length;
    for(var i = 0; i < numberElements; i++) {
        if(i < numberElements-1) {
            queryString += frm.elements[i].name+"="+
                           encodeURIComponent(frm.elements[i].value)+"&";
        } else {
            queryString += frm.elements[i].name+"="+
                           encodeURIComponent(frm.elements[i].value);
        }
    }
}
/* Provide the div element's content dynamically. We can add
style information to this function if we want to jazz up the div */
function stylizeDiv(bdyTxt,div){
    //reset DIV content
    div.innerHTML="";
    div.style.backgroundColor="yellow";
    div.innerHTML=bdyTxt;
}

/* Get information about an XML document via a DOM Document object */
function getDocInfo(doc){
    var root = doc.documentElement;
    var info = "<h3>Document root element name: </h3>"+ root.nodeName;
    var nds;
    if(root.hasChildNodes()) {
        nds=root.childNodes;
        info+= "<h4>Root node's child node names/values:</h4>";
        for (var i = 0; i < nds.length; i++){
            info+=  nds[i].nodeName;
            if(nds[i].hasChildNodes()){
                info+=  " : \\""+nds[i].firstChild.nodeValue+"\\"<br />";
            } else {
                info+=  " : Empty<br />";
            }
        }
    }
    return info;
}
Tip
Mozilla Firefox can use the request.overrideMimeType() function to force
the interpretation of the response stream as a certain mime type, as
in request.overrideMimeType("text/xml").
Internet Explorer’s request object does not have this function. This
function call does not work with Safari 1.3, either.
After the code POSTs its data and receives a response, it calls a
method named getDocInfo(), which builds a string that displays some information about
the XML document and its child or subelements:
var doc = request.responseXML;
var info = getDocInfo(doc);
The getDocInfo() function
gets a reference to the root XML element (var root =
doc.documentElement;); it then builds a string specifying the name of the root element
and information about any of its child nodes or elements, such as the
child node name and value. The code then feeds this information to the
stylizeDiv() method. The stylizeDiv() method uses the div element at the end of the HTML page to
dynamically display the gathered information:
function stylizeDiv(bdyTxt,div){
    //reset div content
    div.innerHTML="";
    div.style.backgroundColor="yellow";
    div.innerHTML=bdyTxt;
}
Figure 1-4 shows what the web page looks like after the application receives the XML response.
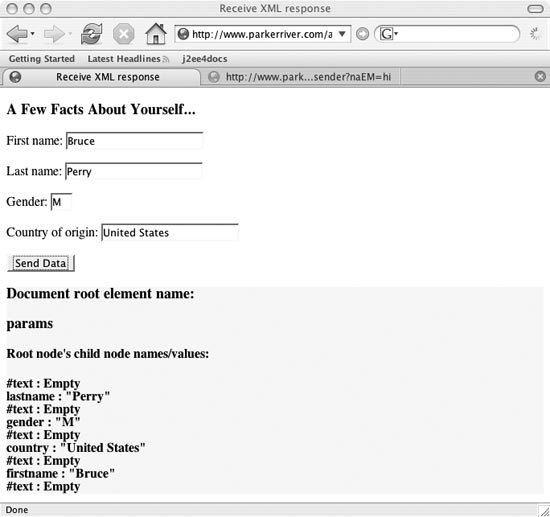
Tip
The text nodes that the application shows are newline characters in the returned XML.
The core DOM API offered by the browser’s JavaScript implementation provides developers with a powerful tool for programming complex XML return values.
Get Plain Old Strings
Manage weather readings, stock quotes, web page scrapings, or similar non-XML data as plain old strings.
The request object has the perfect property for web
applications that do not have to handle server return values as XML:
request.responseText. This hack asks
the user to choose a stock symbol, and the server returns the stock
price for display. The code handles the return value as a string.
Tip
A variation to this program in the next hack requires the stock prices to be handled as numbers. These are old prices that a server component stores for certain stock symbols, not live quotes that you would obtain from a commercial web service or by HTML scraping. For an example of that mechanism, see “Use XMLHttpRequest to Scrape a Energy Price from a Web Page” [Hack #39].
First, here is the HTML for the web page. It imports JavaScript code from a file named hack9.js:
<!DOCTYPE HTML PUBLIC "-//W3C//DTD HTML 4.01//EN"
"http://www.w3.org/TR/1999/REC-html401-19991224/strict.dtd">
<html>
<head>
<script type="text/javascript" src="js/hack9.js"></script>
<meta http-equiv="content-type" content="text/html; charset=utf-8" />
<title>Choose a stock</title>
</head>
<body>
<h3>Stock prices</h3>
<form action="javascript:void%200" onsubmit=
"getStockPrice(this.stSymbol.value);return false">
<p>Enter stock symbol: <input type="text" name=
"stSymbol" size="4"><span id="stPrice"></span></p>
<p><button type="submit">Get Stock Price</button></p>
</form>
</body>
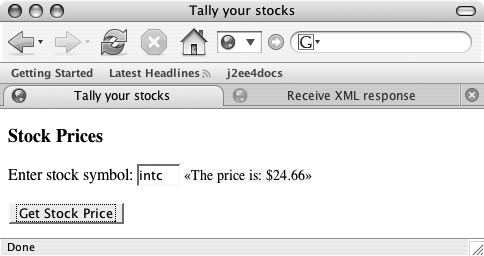
</html>Figure 1-5
shows the web page as displayed in Firefox. The user enters a symbol
such as “GRMN” (case insensitive) and clicks the Get Stock Price button;
the JavaScript then fetches the associated stock price and displays it
within a span element to the right of
the text field.
The function that sets the request process in motion is getStockPrice(). This function takes the value
of the text field named stSymbol and
returns the associated stock price (it uses the request object to talk
to a server component, which fetches the actual stock price). Here is
the JavaScript code:
var request;
var symbol;   //will hold the stock symbol

function getStockPrice(sym){
    symbol=sym;
    if(sym){
        var url="http://localhost:8080/parkerriver/s/stocks?symbol="+sym;
        httpRequest("GET",url,true);
    }
}

//event handler for XMLHttpRequest
function handleResponse(){
    if(request.readyState == 4){
        if(request.status == 200){
            /* Grab the result as a string */
            var stockPrice = request.responseText;
            var info = "«The  price is: $"+stockPrice+"»";
            document.getElementById("stPrice").style.fontSize="0.9em";
            document.getElementById("stPrice").style.
            backgroundColor="yellow";
            document.getElementById("stPrice").innerHTML=info;

        } else {
            alert("A problem occurred with communicating between "+
                  "the XMLHttpRequest object and the server program.");
        }
    }//end outer if
}

/* See Hack #1 for the httpRequest() code;
it is snipped here for the sake of brevity. */
The function getStockPrice()
wraps a call to the function httpRequest(), which is responsible for
setting up the request object. If you have already read through some of
this chapter’s other hacks, you will recognize the handleResponse() function as enclosing much
of the interesting action.
Tip
“Detect Browser
Compatibility with the Request Object” [Hack #1] and “Use Your Own Library for
XMLHttpRequest” [Hack #3] explain the httpRequest() function in more
detail.
If the request is complete (i.e., if request.readyState has a value of 4) and the HTTP response status is 200 (meaning that the request has succeeded),
the code grabs the server response as the request.responseText property value. The code
then uses DOM scripting to display the stock price with some CSS
style-related attributes:
document.getElementById("stPrice").style.fontSize="0.9em";
document.getElementById("stPrice").style.backgroundColor="yellow";
document.getElementById("stPrice").innerHTML =info;
The style attributes make the
font size a little bit smaller than the user’s preferred browser font
size and specify yellow as the background color of the text display. The
innerHtml property of the span element is set to the stock price within
double angle brackets.
Receive Data as a Number
Do numerical calculations that depend on the request object’s return value as a number.
This hack receives a stock quote as a number, then dynamically displays the total value of a stock holding based on the number of shares a user enters. If the server does not send a valid number, the application displays an error message to the user.
The great advantage of Ajax technology is in receiving discrete
values rather than entire web pages from a server. Sometimes, that
discrete information has to be used as a number, rather than as a
string (as discussed in the last
hack) or some other object. JavaScript is usually pretty smart about
converting values to number types without your intervention, but still,
you don’t want your application to multiply an innocent investor’s share
quantity by undefined or some other
weird data the server returns!
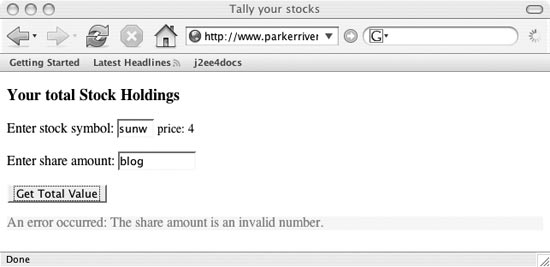
This hack checks that the user has entered a proper number for a “number of shares” value. The code also checks the server return value to make sure it is numerically valid. It then dynamically displays the stock price and total value of the shares in the user’s browser.
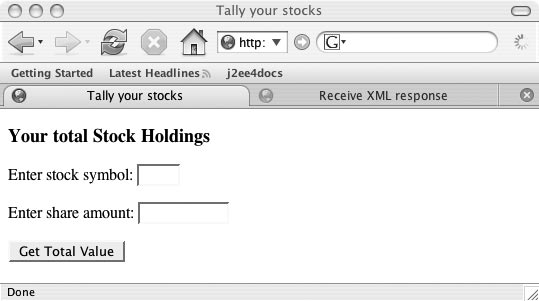
Figure 1-6 shows what the browser form looks like.
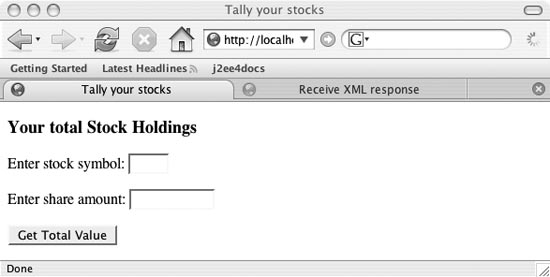
The following code shows the HTML for the web page:
<!DOCTYPE HTML PUBLIC "-//W3C//DTD HTML 4.01//EN"
        "http://www.w3.org/TR/1999/REC-html401-19991224/strict.dtd">
<html>
<head>
    <script type="text/javascript" src="/parkerriver/js/hack4.js">
    </script>
    <meta http-equiv="content-type" content="text/html; charset=utf-8" />
    <title>Tally your stocks</title>
</head>
<body>
<h3>Your total Stock Holdings</h3>
<form action="javascript:void%200" onsubmit=
        "getStockPrice(this.stSymbol.value,this.numShares.value);return false">
<p>Enter stock symbol: <input type="text" name="stSymbol" size="4">
            <span id="stPrice"></span></p>
<p>Enter share amount: <input type="text" name="numShares" size="10"></p>
<p><button type="submit">Get Total Value</button></p>
<div id="msgDisplay"></div>
</form>
</body>
</html>
When the user clicks the Get Total Value button, this action
triggers the form element’s onsubmit event. The event handler for this
event is the getStockPrice() function. This function takes
the stock symbol and the number of shares as its two parameters. The
return false part of the event-handling code
cancels the browser’s typical submission of the
form values to the URL specified by the form tag’s action attribute.
Number Crunching
Now let’s look at the JavaScript code, which the HTML file imports as part of the hack4.js file:
var request;
var symbol;   //will hold the stock symbol
var numberOfShares;

function getStockPrice(sym,shs){
    if(sym && shs){
        symbol=sym;
        numberOfShares=shs;
        var url="http://localhost:8080/parkerriver/s/stocks?symbol="+sym;
        httpRequest("GET",url,true);
    }
}
//event handler for XMLHttpRequest
function handleResponse(){
    if(request.readyState == 4){
        alert(request.status);
        if(request.status == 200){
            /* Check if the return value is actually a number.
            If so, multiply by the number of shares and display the result */
            var stockPrice = request.responseText;
            try{
                if(isNaN(stockPrice)) { throw new Error(
                        "The returned price is an invalid number.");}
                if(isNaN(numberOfShares)) { throw new Error(
                        "The share amount is an invalid number.");}
                var info = "Total stock value: "+  calcTotal(stockPrice);
                displayMsg(document.
                getElementById("msgDisplay"),info,"black");
                document.getElementById("stPrice").style.fontSize="0.9em";
                document.getElementById("stPrice").innerHTML ="price:
                "+stockPrice;
            } catch (err) {
                displayMsg(document.getElementById("msgDisplay"),
                        "An error occurred: "+
                        err.message,"red");
            }
        } else {
            alert(
                    "A problem occurred with communicating between the "+
                    "XMLHttpRequest object and the server program.");
        }
    }//end outer if
}

/* See Hack #1 or #2 for the httpRequest() code sample and the associated function
initReq(). They are snipped here for the sake of brevity. */

function calcTotal(price){
    return stripExtraNumbers(numberOfShares * price);
}
/* Strip any characters beyond a scale of four characters
past the decimal point, as in 12.3454678 */
function stripExtraNumbers(num){
    //check if the number's already okay
    //assume a whole number is valid
    var n2 = num.toString();
    if(n2.indexOf(".") == -1)  { return num; }
    //if it has numbers after the decimal point,
    //limit the number of digits after the decimal point to 4
    //we use parseFloat if strings are passed into the method
    if(typeof num == "string"){
        num = parseFloat(num).toFixed(4);
    } else {
        num = num.toFixed(4);
    }
    //strip any extra zeros
    return parseFloat(num.toString().replace(/0*$/,""));
}

function displayMsg(div,bdyText,txtColor){
    //reset DIV content
    div.innerHTML="";
    div.style.backgroundColor="yellow";
    div.style.color=txtColor;
    div.innerHTML=bdyText;
}
All the number crunching starts in the call to handleResponse(). First, the code receives
the response as a string, in
var stockPrice =
        request.responseText
. The code then tests the validity of
the stockPrice variable using a
method that is part of JavaScript’s core API: isNaN(). This is the best way to test
whether a string value in
JavaScript can represent a valid number. For example, isNaN("goodbye") returns true because “goodbye” cannot be converted
to a number. The code also tests the number of shares value with this
function.
If either method returns true, indicating an invalid number value,
the code throws an exception. This is another way of declaring, “We
can’t use these values; get them out of here!” The web page then
displays an error message to the user.
Tip
Exception handling with Ajax is covered in “Handle Request Object Errors” [Hack #8].
However, we’re not yet finished with our number crunching. The
calcTotal() function then multiplies the
share total by the stock price in order to display the total value to
the user.
To make sure that the numerical display of the value is friendly
enough to the eye (in terms of the U.S. stock exchange), the stripExtraNumbers() function keeps no more
than four characters to the right of the decimal point.
Tip
Even though $10.9876 may look a little weird (stock prices are sometimes displayed with four or more characters to the right of the decimal point), I decided to allow this display for the total share value.
DOM-inating
The code uses Document Object Model programming to
dynamically display new text and values on the page, all without
having to make new server calls and refresh the entire page. The
following bit of code, within the handleResponse() function, calls the
displayMsg() function to show the user the
total share value. The code also dynamically embeds the stock price
just to the right of the text field where the user entered the stock
symbol. All the code does here is get a reference to the div element with id
stPrice, make its font-size style property a little smaller
than the web user’s font setting, and then set the div’s innerHTML property:
displayMsg(document.getElementById("msgDisplay"),info,"black");
document.getElementById("stPrice").style.fontSize="0.9em";
document.getElementById("stPrice").innerHTML ="price: "+stockPrice;
The displayMsg() function
is also simple. It has a parameter that represents the font color,
which allows the code to set the font color “red” for error
messages:
function displayMsg(div,bdyText,txtColor){
    //reset DIV content
    div.innerHTML="";
    div.style.backgroundColor="yellow";
    div.style.color=txtColor;
    div.innerHTML=bdyText;
}
Figure 1-7 shows what the page looks like when the user requests a stock value.
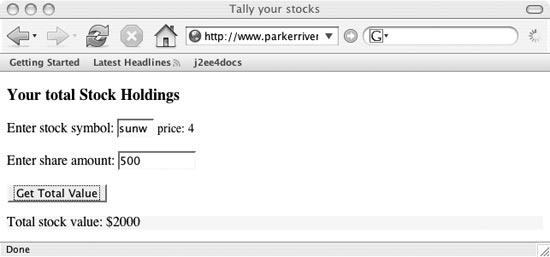
Figure 1-8 shows an example error message, in case the user enters values that cannot be used as numbers or the server returns invalid values.
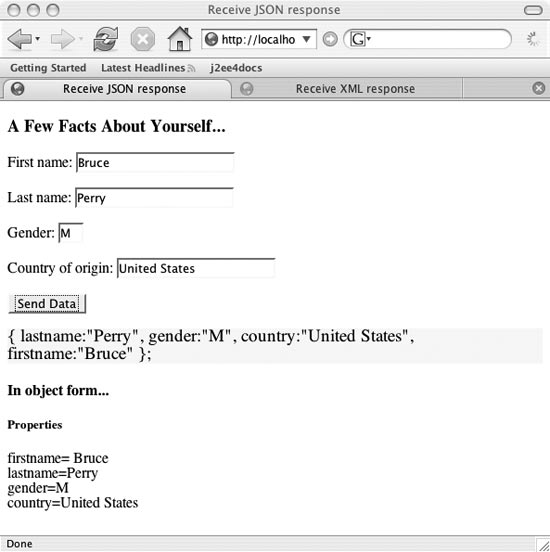
Receive Data in JSON Format
Ajax can receive data in efficient and powerful JavaScript Object Notation.
How would you like to use Ajax and receive data from the server as plain old JavaScript objects? Well, you can, using a format called JavaScript Object Notation (JSON). This hack takes information entered by a web user and initiates a server round trip, which returns the data in JSON syntax for the web page’s use.
JSON is simple and straightforward, which is probably why a lot of developers like it. JSON-formatted data is appropriate for simple objects that are bundles of properties and values. An example is a server program that pulls product information from a database or cache and returns it to a retail web page in JSON format. Data in JSON format is represented by:
The values of each property in the object can be:
Simple strings, such as
"hello"Arrays, such as
[1,2,3,4]Numbers
The values
true,false, ornullOther objects, as in a composition, or an object containing one or more objects
Tip
See http://www.json.org for further details.
This is exactly the format of an Object literal in JavaScript. As an example,
here is what the information requested of the user in “Use the Request Object to POST Data to
the Server” [Hack #2] looks like in JSON format:
{
firstname:"Bruce",
lastname:"Perry",
gender:"M",
country:"USA"
}
Magic JSON
In this section, we’ll use a similar HTML page to the one used
in “Use the Request Object to
POST Data to the Server” [Hack #2], and we’ll ask the user for
the same information; however, this hack uses JavaScript code and Ajax
to handle a JSON return value from the server. Two div elements at the bottom of the HTML page
show the JSON return value from the server and then display the
object’s properties and values in a more friendly fashion.
Here’s the code for the HTML page:
<!DOCTYPE HTML PUBLIC "-//W3C//DTD HTML 4.01//EN"
        "http://www.w3.org/TR/1999/REC-html401-19991224/strict.dtd">
<html>
<head>
    <script type="text/javascript" src="js/hack5.js"></script>
    <meta http-equiv="content-type" content="text/html; charset=utf-8" />
    <title>Receive JSON response</title>
</head>
<body>
<h3>A Few Facts About Yourself...</h3>
<form action="javascript:void%200" onsubmit="sendData();return false">
    <p>First name: <input type="text" name="firstname" size="20"> </p>
    <p>Last name: <input type="text" name="lastname" size="20"> </p>
    <p>Gender: <input type="text" name="gender" size="2"> </p>
    <p>Country of origin: <input type="text" name="country" size="20"> </p>
    <p><button type="submit">Send Data</button></p>
    <div id="json"></div>
    <div id="props"></div>
</form>
</body>
</html>
Figure 1-9 shows what the web page looks like.
The JavaScript code is imported by the script tag and specified by the file
hack5.js. The JavaScript sends the user’s
entered values to the server; because this was discussed in “Use the Request Object to POST Data
to the Server” [Hack #2] and other hacks, the code is
reproduced here but doesn’t go into great detail.
Warning
Beware of cross-site scripting (XSS) attacks when evaluating any
return values as JavaScript code in this manner. This is a potential
threat for any use of eval() or
the Function-related code
discussed in this hack.
As a countermeasure, the client-side JavaScript can filter and
inspect the return value (e.g., by looking at the XMLHttpRequest responseText property) for the presence of
the expected object property names before the code uses responseText in the eval() function (see http://www.perl.com/pub/a/2002/02/20/css.html).
Here’s the code for this hack. Below, we’ll go over the key parts that handle the return value as a JavaScript object.
var request;
var queryString;   //will hold the POSTed data

function sendData(){
    setQueryString();
    url="http://localhost:8080/parkerriver/s/json";
    httpRequest("POST",url,true);
}

//event handler for XMLHttpRequest
function handleJson(){
    if(request.readyState == 4){
        if(request.status == 200){
            var resp =  request.responseText;
            var func = new Function("return "+resp);
            var objt = func();
            var div = document.getElementById("json");
            stylizeDiv(resp,div);
            div = document.getElementById("props");
            div.innerHTML="<h4>In object form...</h4>"+
                          "<h5>Properties</h5>firstname= "+
                          objt.firstname +"<br />lastname="+
                          objt.lastname+ "<br />gender="+
                          objt.gender+ "<br />country="+
                          objt.country;
        } else {
            alert("A problem occurred with communicating between "+
                 "the XMLHttpRequest object and the server program.");
        }
    }//end outer if
}

/* Initialize a request object that is already constructed */
function initReq(reqType,url,bool){
    /* Specify the function that will handle the HTTP response */
    request.onreadystatechange=handleJson;
    request.open(reqType,url,bool);
    request.setRequestHeader("Content-Type",
            "application/x-www-form-urlencoded; charset=UTF-8");
    request.send(queryString);
}

/* Wrapper function for constructing a request object.
 Parameters:
  reqType: The HTTP request type, such as GET or POST.
  url: The URL of the server program.
  asynch: Whether to send the request asynchronously or not. */

function httpRequest(reqType,url,asynch){
    //Snipped... See Hack #1 or #2
}

function setQueryString(){
    queryString="";
    var frm = document.forms[0];
    var numberElements =  frm.elements.length;
    for(var i = 0; i < numberElements; i++){
        if(i < numberElements-1){
            queryString += frm.elements[i].name+"="+
                           encodeURIComponent(frm.elements[i].value)+"&";
        } else {
            queryString += frm.elements[i].name+"="+
                           encodeURIComponent(frm.elements[i].value);
        }
    }
}

function stylizeDiv(bdyTxt,div){
    //reset DIV content
    div.innerHTML=" ";
    div.style.fontSize="1.2em";
    div.style.backgroundColor="yellow";
    div.appendChild(document.createTextNode(bdyTxt));
}
As in this chapter’s previous hacks, the initReq() function initializes the request
object and sends an HTTP request to the server.
The event-handling function for when the response is ready is
called handleJson(). The response is a
JSON-formatted text string, as opposed to XML or some other text type.
As is, JavaScript interprets this returned text as a string object. Therefore, the code initiates
an opening step before the server’s return value is interpreted as a
JavaScript object literal. (By the
way, in this hack, the server takes the request parameters and
reformats the parameter names and property values into JSON syntax,
prior to sending the reformatted data as its response.)
Tip
Special error-handling code is not included here, because these elements require further explanation and are covered by “Handle Request Object Errors” [Hack #8].
Within the handleJson()
code (highlighted in the previous code sample), the variable resp refers to the HTTP response text, which
JavaScript interprets as a string.
The interesting stuff occurs in the
Function constructor:
var func = new Function("return "+resp);This code creates a new Function object on the fly and stores the
Function in a variable named
func. JavaScript coders might note
that most functions are predefined and declared in code, or created as
function literals. However, in this case we need to define a function
body dynamically using a string,
and the Function constructor
provides the perfect tool.
Tip
Thanks to this site for guidance on this code usage: http://www.jibbering.com/2002/4/httprequest.html.
Another method for converting JSON strings that’s making its way around the Web goes like this:
var resp = request.responseText;var obj = eval( "(" + resp + ")" );You do not have to use the parentheses characters when using
eval() and an array, as in:
var resp = request.responseText;//resp contains something like "[1,2,3,4]"var arrObject = eval(resp);
The next line creates a function that returns an object literal, representing the server return
value. You then call the function and use the returned object to dynamically display server values
on the web page with DOM programming (all without complex object serialization or a page
refresh!):
var objt = func();
var div = document.getElementById("json");
stylizeDiv(resp,div);
div = document.getElementById("props");
div.innerHTML="<h4>In object form...</h4><h5>Properties</h5>firstname= "+
        objt.firstname +"<br />lastname="+
        objt.lastname+ "<br />gender="+
        objt.gender+ "<br />country="+
        objt.country;
A variable named objt stores the object literal. The values are pulled from
the object with syntax such as
objt.firstname. Figure 1-10 shows
what the web page looks like after it has received a response.
On the Server Side
A Java servlet handles requests for this hack. For those
interested in the server activity, here is the doPost() method for this code:
protected void doPost(HttpServletRequest httpServletRequest,
                      HttpServletResponse httpServletResponse) throws
                      ServletException, IOException {
    Map valMap = httpServletRequest.getParameterMap();
    StringBuffer body = new StringBuffer("{\\n");

    if(valMap != null) {
        String val=null;
        String key = null;
        Map.Entry me = null;
        Set entries =  valMap.entrySet();

        int size = entries.size();
        int counter=0;
        for(Iterator iter= entries.iterator();iter.hasNext();) {
            counter++;
            me=(Map.Entry) iter.next();
            val= ((String[])me.getValue())[0];
            key = (String) me.getKey();
            if(counter < size) {
                body.append(key).append(":\\"").append(val).append("\\",\\n");
            } else {
                //remove comma for last entry
                body.append(key).append(":\\"").append(val).append("\\"\\n");
            }
        }

    }
    body.append("}");
    AjaxUtil.sendText(httpServletResponse,body.toString());
}
The AjaxUtil class sends the
HTTP response with a Content-Type
of text/plain; charset=UTF-8. Some
web sites have discussed using a Content-Type of application/x-json for JSON, but as of this
writing, developers and standards bodies have not yet settled on a
standard relating to this matter.
The AjaxUtil class also sets
the HTTP response header Cache-Control to no-cache, which tells the browser or user
agent not to cache the responses:
response.setHeader("Cache-Control", "no-cache");
Handle Request Object Errors
Design your Ajax application to detect any server errors and provide a friendly user message.
Much of the oomph behind Ajax technology is that it allows JavaScript to connect with a server program without the user intervening. However, JavaScript developers often have no control over the server component itself (which could be a web service or other software designed outside their organizations). Even if your application involves your organization’s server component, you cannot always be sure that the server is behaving normally or even that your users are online at the moment they trigger your request object. You have to make sure that your application recovers in the event that the backend program is unavailable.
This hack traps errors and displays a meaningful error message, in the event that the Ajax application loses server contact.
Problems, Problems...
This hack addresses the following exceptional events, and recommends ways for the application to recover from them:
The web application or server component you are connecting with is temporarily unavailable.
The server your application is connecting with is down, or its URL has changed unbeknownst to you.
The server component you connect with has one or more bugs, and it crashes during your connection (yeech!).
When you call the
open()method with the request object, your code uses a different host address than the address from which the user downloaded the web page. The request object throws an exception in this case when you try to call itsopen()method.
You can use this hack’s exception-handling code in any application. This hack uses the stock calculation code from “Receive Data as a Number” [Hack #6]. We’ll take a look at the code that initializes the request object and the exception-handling mechanism in a moment, but first, here’s the HTML file that imports the JavaScript code from hack6.js:
<!DOCTYPE HTML PUBLIC "-//W3C//DTD HTML 4.01//EN"
        "http://www.w3.org/TR/1999/REC-html401-19991224/strict.dtd">
<html>
<head>
    <script type="text/javascript" src="js/hack6.js"></script>
    <meta http-equiv="content-type" content="text/html; charset=utf-8" />
    <title>Tally your stocks</title>
</head>
<body>
<h3>Your total Stock Holdings</h3>
<form action="javascript:void%200" onsubmit=
        "getStockPrice(this.stSymbol.value,this.numShares.value);return false">
    <p>Enter stock symbol: <input type="text" name="stSymbol" size="4">
            <span id="stPrice"></span></p>
    <p>Enter share amount: <input type="text" name="numShares" size="10"></p>
    <p><button type="submit">Get Total Value</button></p>
    <div id="msgDisplay"></div>
</form>
</body>
</html>
When users load this file into their browsers, they see the screen shown in Figure 1-11.
The code we are interested in can trap exceptions involving
unavailable applications, backend servers that are down, backend
server bugs, and erroneous URLs. The
handleResponse() function is the event
handler for managing the server response, as in request.onreadystatechange=handleResponse.
The following code uses a nested try/catch/finally statement to deal with
invalid numbers handled by the application, as discussed in “Receive Data as a Number” [Hack
#6].
function handleResponse(){
    var statusMsg="";
    try{
        if(request.readyState == 4){
            if(request.status == 200){
                /* Check if the return value is actually a number.
                If so, multiply by the number
                of shares and display the result */
                var stockPrice = request.responseText;

                try{
                    if(isNaN(stockPrice)) { throw new Error(
                            "The returned price is an invalid number.");}
                    if(isNaN(numberOfShares)) { throw new Error(
                            "The share amount is an invalid number.");}
                    var info = "Total stock value: $"+
                    calcTotal(stockPrice);
                    displayMsg(document.
                    getElementById("msgDisplay"),info,"black");
                    document.getElementById("stPrice").style.fontSize="0.
                    9em";
                    document.getElementById("stPrice").innerHTML ="price: "+
                            stockPrice;
                } catch (err) {
                    displayMsg(document.getElementById("msgDisplay"),
                            "An error occurred: "+
                            err.message,"red");
                }
            } else {
                //request.status is 503 if the application isn't available;
                //500 if the application has a bug
                alert(
                        "A problem occurred with communicating between the "
                        "XMLHttpRequest object and the server program. "+
                        "Please try again very soon");
            }
        }//end outer if
    } catch (err) {
        alert("It does not appear that the server "+
              "is available for this application. Please "+
              "try again very soon. \\nError: "+err.message);

    }
}
Now, let’s take a look at how this code handles the different types of exceptions previously enumerated.
Floored Server
A try block traps any exceptions thrown within
its curly braces ( {}). If the code throws an exception, this
mechanism executes the code within the associated catch block. The inner try block, which is designed to manage
exceptions thrown in the event of invalid numeric values, is explained
in “Receive Data as a Number”
[Hack #6].
So, what happens if the server host is completely down, even
though the URL your application uses is otherwise correct? In this
case, the code’s attempt to access the request.status property throws an exception
because the request object never receives the expected response header
from the server and the status
property is not associated with any data.
As a result, the code displays the alert window defined in the outer catch block. Figure 1-12 depicts
what the alert window looks like
after this type of error.

The code displays a user message, as well as the more techie error message associated with the exception. You can leave out that part of the message if you desire; it is mainly useful for debugging purposes.
Tip
The err variable in the
code is a reference to the JavaScript Error object. The message property of this object (as in
err.message) is the actual error
message, a string generated by
the JavaScript engine.
If you do not include this try/catch/finally mechanism, the user sees
just an alert window containing the
indecipherable error message generated by JavaScript. After dismissing
this window (or leaving the computer in frustration), the user has no
way of knowing what state the application is in.
Backend Application Out to Lunch
Sometimes the application server or host is running
okay, but the server component you want to connect with is out of
service. In this case, the value of the
request.status property is 503 (“Service
Unavailable”). Because the status
property holds a value other than 200, this hack’s code executes the
expression contained within the else statement block:
} else {
    //request.status is 503 if the application isn't available;
    // 500 if the application has a bug
    alert(
            "A problem occurred with communicating between the "
            "XMLHttpRequest object and the server program. "+
            "Please try again very soon");
}
In other words, the user sees an alert window explaining the application’s
status. This alert also appears if
the server component has a bug and crashes. This event typically (such
as with the Tomcat servlet container) results in a 500 response status
code (“Internal Server Error”), so response.status evaluates to 500 instead of 200 (“Okay”). In addition, any 404 response
codes involving a static or dynamic component that the server cannot
find at the URL you provided are captured with this try statement.
Tip
The try/catch/finally
statement is available only with JavaScript engines of JS Version
1.4 or later. The optional finally statement block follows the
catch block. The code enclosed by
finally{...} executes regardless
of whether or not an exception is thrown.
Whoops, Wrong URL
What if the URL that your Ajax application uses in the
request.open() method is wrong or
has changed? In this case, the
request.open() call throws the
exception, so this is where you have to position your try/catch/finally statement. The code at the
top of the next example constructs a request object [Hack #1]. The following
function definition, initReq(),
catches the exception just described:
function httpRequest(reqType,url,asynch){
    //Mozilla-based browsers
    if(window.XMLHttpRequest){
        request = new XMLHttpRequest();
    } else if (window.ActiveXObject){
        request=new ActiveXObject("Msxml2.XMLHTTP");
        if (! request){
            request=new ActiveXObject("Microsoft.XMLHTTP");
        }
    }
    //the request could still be null if neither ActiveXObject
    //initialization succeeded
    if(request){
        initReq(reqType,url,asynch);
    } else {
        alert("Your browser does not permit the use of all "+
              "of this application's features!");
    }
}
/* Initialize a request object that is already constructed */
function initReq(reqType,url,bool){
    try{
        /* Specify the function that will handle the HTTP response */
        request.onreadystatechange=handleResponse;
        request.open(reqType,url,bool);
        request.send(null);
    } catch (err) {

        alert(
                "The application cannot contact the server at the moment."+
                " Please try again in a few seconds.");
    }
}
Another variation of this error is when the URL you use with the
request.open() method includes a
different host than the host from which the user downloaded the web
page. For example, say the user downloads the web page from
http://www.myorg.com/app, but the URL you use for
open() is
http://www.yourorg.com. This type of error is
also caught by the code’s try/catch/finally statement.
Tip
You can also optionally abort or cancel the request in the
catch block with request.abort(). For more information,
see “Set a Time Limit for the
HTTP Request” [Hack #70] and its discussion of setting a
timeout for the request and aborting it in the event that the
request is not completed within a certain period.
Dig into the HTTP Response
Display the values of various HTTP response headers in addition to or in lieu of a typical server return value.
An HTTP response header is descriptive information,
laid out by the HTTP 1.1 protocol, that web servers send requestors
along with the actual web page or data. If you have already coded with
the XMLHttpRequest object (discussed
at the beginning of this chapter), you know that the request.status property equates to an HTTP
response status code sent from the server. This is an important value to
check before your page does anything cool with the HTTP response.
Tip
Status values can include 200
(the request went through okay), 404 (the requested file or URL path was not
found), or 500 (internal server
error).
However, you might want to see some of the other response headers
associated with the request, such as the type of web server software
associated with the response (the Server response header) or the content type of
the response (the Content-Type
header). This hack requests the user to enter a URL in a text field.
When the user tabs out of or clicks outside of the text field, the
browser displays various HTTP response headers. As usual with Ajax, this
happens without a page refresh.
Tip
This request object method returns only a subset of the
available response headers, including Content-Type, Date, Server, and Content-Length.
Here is the HTML page code:
<!DOCTYPE HTML PUBLIC "-//W3C//DTD HTML 4.01//EN"
        "http://www.w3.org/TR/1999/REC-html401-19991224/strict.dtd">
<html>
<head>
    <script type="text/javascript" src="js/hack7.js"></script>
    <meta http-equiv="content-type" content="text/html; charset=utf-8" />
    <title>view response headers</title>
    <link rel="stylesheet" type="text/css" href="/parkerriver/css/hacks.css" />
</head>
<body onload="document.forms[0].url.value=urlFragment">
<h3>Find out the HTTP response headers when you "GET" a Web page</h3>

<form action="javascript:void%200">
    <p>Enter a URL:
        <input type="text" name="url" size="20" onblur="getAllHeaders(this.value)">
        <span class="message">::press tab when finished editing the
             field::</span></p>
    <div id="msgDisplay"></div>
</form>
</body>
</html>
Figure 1-13 shows the page in the Safari browser.

The application prefills the text field with a partial URL (e.g., http:// localhost:8080/) for the user to complete, because the request object cannot send a request to a different host from the host that uploaded the web page to the user. In other words, the partially completed URL provides a hint to the user that the application can only send a request to that specified host.
When the user completes the URL and then presses the Tab key or
clicks outside the text field, the text field’s onblur event handler is triggered. The event
handler is defined as a function named
getAllHeaders(), which passes the URL the user
has entered to the request object. The request object then sends a
request to the URL and returns the available response headers to the web
page.
The following code is from the
hack7.js file that the page imports. After
showing this code, I explain the parts that deal with displaying the
server’s response headers. “Detect
Browser Compatibility with the Request Object” [Hack #1] explains
how to initialize and open an HTTP connection with the request object,
otherwise known as XMLHttpRequest.
“Handle Request Object Errors”
[Hack #8] explains trapping any errors with JavaScript’s try/catch/finally statement.
var request;
var urlFragment="http://localhost:8080/";

function getAllHeaders(url){
    httpRequest("GET",url,true);
}

//function for XMLHttpRequest onreadystatechange event handler
function handleResponse(){
    try{
        if(request.readyState == 4){
            if(request.status == 200){
                /* All headers received as a single string */
                var headers = request.getAllResponseHeaders();
                var div = document.getElementById("msgDisplay");
                div.className="header";
                div.innerHTML="<pre>"+headers+"</pre>";
            } else {
                //request.status is 503 if the application isn't available;
                //500 if the application has a bug
                alert(request.status);
                alert("A problem occurred with communicating between "+
                      "the XMLHttpRequest object and the server program.");
            }
        }//end outer if
    } catch (err)   {
        alert("It does not appear that the server is "+
              "available for this application. Please"+
              " try again very soon. \\nError: "+err.message);

    }
}

/* Initialize a request object that is already constructed */
function initReq(reqType,url,bool){
    try{
        /* Specify the function that will handle the HTTP response */
        request.onreadystatechange=handleResponse;
        request.open(reqType,url,bool);
        request.send(null);
    } catch (errv) {
        alert(
                "The application cannot contact the server at the moment. "+
                "Please try again in a few seconds." );
    }
}

/* Wrapper function for constructing a request object.
 Parameters:
  reqType: The HTTP request type, such as GET or POST.
  url: The URL of the server program.
  asynch: Whether to send the request asynchronously or not. */
function httpRequest(reqType,url,asynch){
    //Mozilla-based browsers
    if(window.XMLHttpRequest){
        request = new XMLHttpRequest();
    } else if (window.ActiveXObject){
        request=new ActiveXObject("Msxml2.XMLHTTP");
        if (! request){
            request=new ActiveXObject("Microsoft.XMLHTTP");
        }
    }
    //the request could still be null if neither ActiveXObject
    //initialization succeeded
    if(request){
        initReq(reqType,url,asynch);
    } else {
        alert("Your browser does not permit the use of all "+
              "of this application's features!");
    }
}
The interesting stuff takes place in the
handleResponse() function. This function calls
the request object’s getAllResponseHeaders() method, which returns
(rather awkwardly) all the available response headers, preformatted into
a string. A developer would probably
prefer this value to be returned in JSON format as an associative
array, rather than a monolithic
string in which extra code is
required to pull out individual header information.
Tip
To get one header, you can also use request.getResponseHeader(). An example
would be request.getResponseHeader("Content-Type");.
The code then gets hold of the div element, where it will display the header
values:
if(request.status == 200){
    /* All headers received as a single string */
    var headers = request.getAllResponseHeaders();
    var div = document.getElementById("msgDisplay");
    div.className="header";
    div.innerHTML="<pre>"+headers+"</pre>";
}...
To provide a CSS style for the message display, the code sets the
className property of the div to a class that is already defined in a
stylesheet. Here’s the stylesheet, which is linked to the web
page:
div.header{ border: thin solid black; padding: 10%;
 font-size: 0.9em; background-color: yellow}
span.message { font-size: 0.8em; }
In this manner, the code dynamically connects a div to a certain CSS class, which is defined
by a separate stylesheet. This strategy helps separate DOM programming
from presentation decisions. Finally, the div’s innerHTML property is set to the returned
header values. You use the pre tag to
conserve the existing formatting.
Tip
You can, alternatively, manipulate the returned string and format the headers in a different way, using a custom function.
Figure 1-14 shows what the browser displays after the user submits a URL.
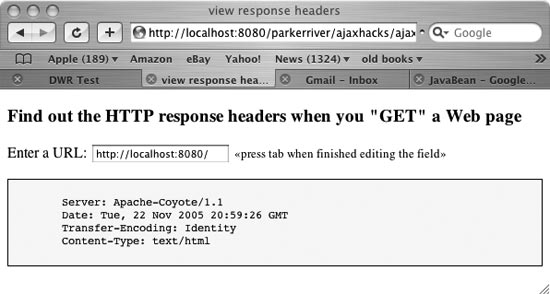
Generate a Styled Message with a CSS File
Let the users choose predesigned styles for the messages they see.
This hack sends a request to a server, which returns a
text message. The user’s choices determine the actual message content
and appearance. The HTML for the page includes a select tag listing the styles the users can
choose for the display of the results and a text field containing a
partial URL they can complete and submit to a server.
The information returned relates to the response headers returned by the server [Hack #9]. However, what we are interested in here is this hack’s dynamic message generation and style assignment. Here’s the HTML code for the page:
<!DOCTYPE HTML PUBLIC "-//W3C//DTD HTML 4.01//EN"
"http://www.w3.org/TR/1999/REC-html401-19991224/strict.dtd">
<html>
<head>
<script type="text/javascript" src="js/hack8.js"></script>
<script type="text/javascript">
function setSpan(){
document.getElementById("instr").onmouseover=function(){
this.style.backgroundColor='yellow';};
document.getElementById("instr").onmouseout=function(){
this.style.backgroundColor='white';};
}
</script>
<meta http-equiv="content-type" content="text/html; charset=utf-8" />
<title>view response headers</title>
<link rel="stylesheet" type="text/css" href="/parkerriver/css/hacks.css" />
</head>
<body onload="document.forms[0].url.value=urlFragment;setSpan()">
<h3>Find out the HTTP response headers when you "GET" a Web page</h3>
<h4>Choose the style for your message</h4>
<form action="javascript:void%200">
<p>
<select name="_style">
<option label="Loud" value="loud" selected>Loud</option>
<option label="Fancy" value="fancy">Fancy</option>
<option label="Cosmopolitan" value="cosmo">Cosmopolitan</option>
<option label="Plain" value="plain">Plain</option>
</select>
</p>
<p>Enter a URL: <input type="text" name="url" size="20" onblur=
"getAllHeaders(this.value,this.form._style.value)"> <span id=
"instr" class="message">«press tab or click outside the field
when finished editing»</span></p>
<div id="msgDisplay"></div>
</form>
</body>
</html>Tip
The purpose of the setSpan() function defined within the web
page’s script tags is to give some
instructions (“press tab or click outside the field when finished
editing”) a yellow background when the user passes the mouse pointer
over them.
Before I describe some of the code elements, you may be interested in how the web page appears in a browser. Figure 1-15 shows this window.
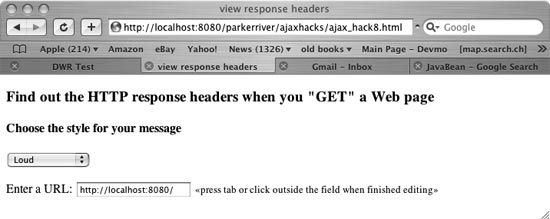
The CSS styles used by this web page derive from a stylesheet file
named hacks.css. When the user chooses a style (say,
“Cosmopolitan”) from the select list,
enters a value in the text field, and then tabs out of or clicks outside
of the field, that user’s chosen style is dynamically assigned to the
container that will hold the message (a div element with id
msgDisplay).
Here is the hacks.css stylesheet:
div.header{ border: thin solid black; padding: 10%;
 font-size: 0.9em; background-color: yellow; max-width: 80%}

span.message { font-size: 0.8em; }
div { max-width: 80% }

.plain { border: thin solid black; padding: 10%;
 font: Arial, serif font-size: 0.9em; background-color: yellow; }
.fancy { border: thin solid black; padding: 5%;
 font-family: Herculanum, Verdana, serif;
 font-size: 1.2em;  text-shadow: 0.2em 0.2em grey; font-style: oblique;
 color: rgb(21,49,110); background-color: rgb(234,197,49)}
.loud { border: thin solid black; padding: 5%; font-family: Impact, serif;
 font-size: 1.4em; text-shadow: 0 0 2.0em black; color: black;
background-color: rgb(181,77,79)}
.cosmo { border: thin solid black; padding: 1%;
 font-family: Papyrus, serif;
 font-size: 0.9em; text-shadow: 0 0 0.5em black; color: aqua;
 background-color: teal}
The stylesheet defines several classes (plain, fancy, loud, and cosmo). A class in a CSS
stylesheet begins with a period (as in .fancy) and defines various style properties,
such as the font family and background color. Using this technique, your
CSS experts can define the actual styles in one place, for use in
multiple web pages. Clearly, an experienced designer would have some,
ah, differences with the style-attribute choices here, but please bear
with me!
The Ajax-related JavaScript code can assign the predefined styles to page elements based on user choices. Therefore, the presentation tier of your web application is separated from the application logic or domain tier.
The onblur event handler for the text field submits
the URL value and the style name to a function named getAllHeaders():
onblur="getAllHeaders(this.value,this.form._style.value)"
The reference this.form._style.value is JavaScript that
represents the value of the option chosen from the select list (the style name). The reference
this.value is the text entered by the
user in the text field.
Here is the JavaScript code that the page imports from hacks8.js, with the code that dynamically assigns the style to the displayed message highlighted:
var request;
var urlFragment="http://localhost:8080/";
var st;

function getAllHeaders(url,styl){
    if(url){
        st=styl;
        httpRequest("GET",url,true);
    }
}

//event handler for XMLHttpRequest
function handleResponse(){
    try{
        if(request.readyState == 4){
            if(request.status == 200){
                /* All headers received as a single string */
                var headers = request.getAllResponseHeaders();
                var div = document.getElementById("msgDisplay");
                div.className= st == "" ? "header" : st;
                div.innerHTML="<pre>"+headers+"</pre>";
            } else {
                //request.status is 503 if the application isn't available;
                //500 if the application has a bug
                alert(request.status);
                alert("A problem occurred with communicating between "+
                      "the XMLHttpRequest object and the server program.");
            }
        }//end outer if
    } catch (err)   {
        alert("It does not appear that the server is available for "+
              "this application. Please"+
              " try again very soon. \\nError: "+err.message);

    }
}

/* See Hacks #1, #2, and others for definitions of the httpRequest()
 and initReq() functions; snipped here for the sake of brevity. */
Easy as Pie
The getAllHeaders() function sets a top-level
st variable to the name of a CSS
style class (plain, fancy, loud, or cosmo). The code then sets the className property of the div that holds the message in a shockingly
simple way, which changes the style assigned to the message:
if(request.status == 200){
    /* All headers received as a single string */
    var headers = request.getAllResponseHeaders();
    var div = document.getElementById("msgDisplay");
    div.className= st == "" ? "header" : st;
    div.innerHTML="<pre>"+headers+"</pre>";
}
If for some reason the choice of class name derived from the web
client is the empty string (it
cannot be here because the select
tag only contains complete string
values), the div element is
assigned a default style class name of header.
Tip
This JavaScript could potentially be imported into another client web page, so you have to include some checks for invalid input values.
The hacks.css stylesheet
also defines the header
class.
The following figures are examples of the same message assigned different styles by the user. Figure 1-16 shows the result if the user selects the “Cosmopolitan” style.

Figure 1-17 depicts an alternate style.
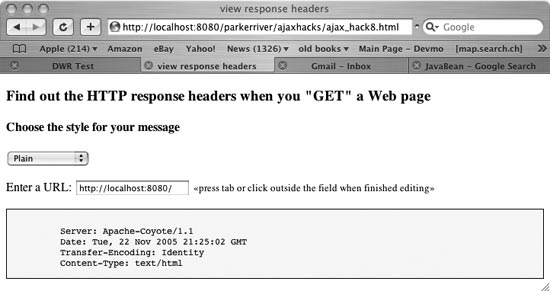
Generate a Styled User Message on the Fly
Dynamically define and assign CSS styles to web page content.
JavaScript and DOM programming allow you to define CSS style attributes and apply them to page elements from scratch. An example of where you may want to implement these methods is a Wiki page that permits users to develop their own page designs and styles.
Tip
In most cases, separating the style definitions from the JavaScript code is the way to go. Separating application concerns or tiers in this manner allows each element to evolve independently and makes web development less complex and more efficient.
This hack, like the one before it, dynamically displays server information based on the user’s choice of style categories. Unlike the previous hack, this one formulates the styles in code, then applies the chosen style to an HTML element. Here is the code, with the style information highlighted:
var request;
var urlFragment="http://localhost:8080/";
var st;

function getAllHeaders(url,styl){
    if(url){
        st=styl;
        httpRequest("GET",url,true);
    }
}

/*  Set one or more CSS style attributes on a DOM element
CSS2Properties Object.
 Parameters:
  stType stands for a style name, as in 'plain,''fancy,''loud,' or 'cosmo'.
  stylObj is the HTML element's style property, as in div.style. */

function setStyle(stType,stylObj){
    switch(stType){
        case 'plain' :
            stylObj.maxWidth="80%";
            stylObj.border="thin solid black";
            stylObj.padding="5%";
            stylObj.textShadow="none";
            stylObj.fontFamily="Arial, serif";
            stylObj.fontSize="0.9em";
            stylObj.backgroundColor="yellow"; break;
        case 'loud' :
            stylObj.maxWidth="80%";
            stylObj.border="thin solid black";
            stylObj.padding="5%";
            stylObj.fontFamily="Impact, serif";
            stylObj.fontSize="1.4em";
            stylObj.textShadow="0 0 2.0em black";
            stylObj.backgroundColor="rgb(181,77,79)"; break;
        case 'fancy' :
            stylObj.maxWidth="80%";
            stylObj.border="thin solid black";
            stylObj.padding="5%";
            stylObj.fontFamily="Herculanum, Verdana, serif";
            stylObj.fontSize="1.2em";
            stylObj.fontStyle="oblique";
            stylObj.textShadow="0.2em 0.2em grey";
            stylObj.color="rgb(21,49,110)";
            stylObj.backgroundColor="rgb(234,197,49)"; break;
        case 'cosmo' :
            stylObj.maxWidth="80%";
            stylObj.border="thin solid black";
            stylObj.padding="1%";
            stylObj.fontFamily="Papyrus, serif";
            stylObj.fontSize="0.9em";
            stylObj.textShadow="0 0 0.5em black";
            stylObj.color="aqua";
            stylObj.backgroundColor="teal"; break;
        default :
            alert('default');

    }
}

//event handler for XMLHttpRequest
function handleResponse(){
    try{
        if(request.readyState == 4){
            if(request.status == 200){
                /* All headers received as a single string */
                var headers = request.getAllResponseHeaders();
                var div = document.getElementById("msgDisplay");
                if(st){
                    setStyle(st,div.style);
                } else {
                    setStyle("plain",div.style);
                }
                div.innerHTML="<pre>"+headers+"</pre>";
            } else {
                //request.status is 503 if the application isn't available;
                //500 if the application has a bug
                alert(request.status);
                alert("A problem occurred with communicating between "+
                      "the XMLHttpRequest object and the server program.");
            }
        }//end outer if
    } catch (err) {
        alert("It does not appear that the server is available for "
              "this application. Please"+
              " try again very soon. \\nError: "+err.message);

    }
}

/* Initialize a request object that is already constructed */
function initReq(reqType,url,bool){
    try{
        /* Specify the function that will handle the HTTP response */
        request.onreadystatechange=handleResponse;
        request.open(reqType,url,bool);
        request.send(null);
    } catch (errv) {

        alert(
                "The application cannot contact the server at the moment. "+
                "Please try again in a few seconds." );
    }
}

/* Wrapper function for constructing a request object.
 Parameters:
  reqType: The HTTP request type such as GET or POST.
  url: The URL of the server program.
  asynch: Whether to send the request asynchronously or not. */
function httpRequest(reqType,url,asynch){
    //Mozilla-based browsers
    if(window.XMLHttpRequest){
        request = new XMLHttpRequest();
    } else if (window.ActiveXObject){
        request=new ActiveXObject("Msxml2.XMLHTTP");
        if (! request){
            request=new ActiveXObject("Microsoft.XMLHTTP");
        }
    }
    //the request could still be null if neither ActiveXObject
    //initialization succeeded
    if(request){
        initReq(reqType,url,asynch);
    }  else {
        alert("Your browser does not permit the use of all "+
              "of this application's features!");
    }
}
Nudging Aside the Stylesheet
Each HTML element on a web page has a
style property, if its host browser supports
CSS stylesheets. For example, a div
element has a property called div.style that allows a JavaScript writer to
set inline style attributes for that div (as in div.style.fontFamily="Arial"). This is how
the setStyle() function works in the prior code.
The two function parameters are a style name such as “Fancy” (chosen
from a predefined list) and the style property of a specific div element. The function then sets the
appearance of the HTML div element
on the web page.
The information that appears on the page (a bunch of response
headers) is derived from the server using the request object. As in
the previous hack, the user completes a URL, then clicks outside the
text field or presses the Tab key, thus firing an onblur event handler that sets the request
object and CSS styling in motion. The HTML for the page is not much
different from that in “Generate a Styled Message with a CSS
File” [Hack #10], but it omits the link to a stylesheet. All
the styling for this hack is defined by the imported JavaScript file,
hack10.js. Here’s the code:
<!DOCTYPE HTML PUBLIC "-//W3C//DTD HTML 4.01//EN"
"http://www.w3.org/TR/1999/REC-html401-19991224/strict.dtd">
<html>
<head>
<script type="text/javascript" src="/parkerriver/js/hack10.js"></script>
<script type="text/javascript">
function setSpan(){
document.getElementById("instr").onmouseover=function(){
this.style.backgroundColor='yellow';};
document.getElementById("instr").onmouseout=function(){
this.style.backgroundColor='white';};
}
</script>
<meta http-equiv="content-type" content="text/html; charset=utf-8" />
<title>view response headers</title>
</head>
<body onLoad="document.forms[0].url.value=urlFragment;setSpan()">
<h3>Find out the HTTP response headers when you "GET" a Web page</h3>
<h4>Choose the style for your message</h4>
<form action="javascript:void%200">
<p>
<select name="_style">
<option label="Loud" value="loud" selected>Loud</option>
<option label="Fancy" value="fancy">Fancy</option>
<option label="Cosmopolitan" value="cosmo">Cosmopolitan</option>
<option label="Plain" value="plain">Plain</option>
</select>
</p>
<p>Enter a URL: <input type="text" name="url" size="20" onblur=
"getAllHeaders(this.value,this.form._style.value)">
<span id="instr" class="message">«press tab or
click outside the field when finished editing»
</span></p>
<div id="msgDisplay"></div>
</form>
</body>
</html>The getAllHeaders() function, an event handler
for onblur, passes in to the
application the name of the style the user has chosen from a select list (such as “cosmo”), as well as
the URL of the server component. The only purpose of the server
component is to provide a value for display. We’re mainly interested
in dynamically generating styles for any type of server information
your applications could acquire via Ajax and the request
object.
Tip
The purpose of the setSpan() function defined within the web
page’s script tags is to give
some instructions (“press tab or click outside the field when
finished editing”) a yellow background when the user passes the
mouse pointer over them.
Figure 1-18 shows what the page looks like in a web browser prior to the sending of the HTTP request.
Figure 1-19 depicts what the page looks like when the user optionally selects a style name, completes the URL in the text field, and presses Tab.
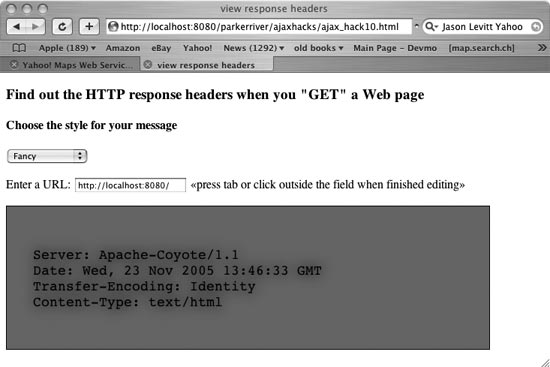
None of these web page changes involves waiting for the server to deliver a new page. The request object fetches the data from the server in the background, and the client-side JavaScript styles the displayed information. Voilà , Ajax!
[1] The XMLHttpRequest object can make an
asynchronous request to a server, meaning that once the request
has been initiated, the rest of the JavaScript code does not
have to wait for a response to execute. XMLHttpRequest can also make
synchronous requests.
[2] The Mozilla Firefox XMLHttpRequest object has onload, onprogress, and onerror properties that are event listener
types. Firefox has also defined addEventListener(), dispatchEvent(), overrideMimeType(), and removeEventListener() methods. See
http://www.xulplanet.com/references/objref/XMLHttpRequest.html
for more details on these Firefox request object members.
Get Ajax Hacks now with the O’Reilly learning platform.
O’Reilly members experience books, live events, courses curated by job role, and more from O’Reilly and nearly 200 top publishers.

