This section takes you on a guided tour of the Mac OS X Finder and System Preferences applications. We assume that you have the Mac OS X Developer Tools installed. All of the steps work under Mac OS X Version 10.1.
To get the most out of these exercises, we recommend that you follow them precisely. For example, start by logging in and do not close any windows or dialogs unless instructed to do so. If you do not follow a step precisely or if you skip a step, subsequent steps may not make sense.
The steps in configuring your desktop are as follows. As with all step-by-step exercises in this book, we recommend that you follow these steps precisely.
Start up your computer and log in.
The Finder will be running, and the Finder menu will appear in the menu bar at the top of the screen. A Finder window will appear in the center of the screen, and the Dock will be at the bottom of the screen (unless you’ve closed it or previously changed its position, in which case you should choose Finder → New Finder Window).
Note the black triangle below the Mac OS Finder icon. This triangle indicates that the Finder is running. If your Dock is on the side of your screen, the triangle will be on the side of the icon, rather than below it.
Move your Finder window around the desktop by dragging its title bar. Any window can be moved in this way.
Note that you cannot drag a window above the menu bar, but you can drag it partially off-screen to the left or right or at the bottom. Note also that the window goes “under” the Dock but is only partially obscured.
Resize your Finder window by dragging the resize control in the lower-right corner.
Click the green zoom button at the top left of the window. Note that the window changes size (perhaps to fill the working area). Click the zoom button again to restore the previous size.
Windows have an initial size and position that are set by the application and are called the standard state . If a user resizes or moves a window, the window is in the user state . The zoom button simply toggles between the standard and user states. Each of the three views in the Finder has its own standard state.
Make sure you are viewing files in your Finder window in column-view mode by clicking the column-view button in the Finder’s toolbar.
Remove all of the icons from your Dock (except for the Mac OS and Trash icons, which cannot be removed) by dragging them from the Dock and dropping them onto the desktop (background). Each icon will disappear in a cloud of dust.
If any applications are running, you must quit them before you can drag them out of your Dock. Running applications are those that have a small triangle below the icon in the Dock. To quit a running application, press and hold down the mouse on its icon in the Dock, and choose Quit from the menu that pops up.
Select (i.e., single-click) the hard disk icon labeled Macintosh HD in the Finder window. This represents the top (root) of the filesystem hierarchy for the Mac OS X filesystem.
Now select the
/Applicationsfolder (directory) in the Finder by clicking its icon. The/Applicationsfolder should have an A-like picture (made up of a pencil, pen, and ruler) on it.Add the Mail application to your Dock by selecting it in the Finder, dragging its icon from your icon path, and dropping it just below the Mac OS icon in your Dock.
Use the same procedure to add the TextEdit application to your Dock.
Open the
Utilitiesfolder by selecting the folder icon at the bottom of the column that holds the list of applications. This folder contains applications that are useful for power users but that are not normally needed by beginners. (If you aren’t already a power user, you need to become one!)Add the Terminal and Console applications to your Dock, as you did with Mail and TextEdit. Only one application can be dropped into the Dock at a time.
Open the
/Developer/Examples/AppKitfolder in your Finder by selecting Developer (from the second Finder column), then Examples, and finally AppKit.Drag the
AppKitfolder icon to the “end” of the Dock, near the Trash icon. Folders and file icons can be placed only in the part of the Dock between the Trash icon and the faint line.Now remove the
AppKitfolder icon from the Dock by dragging it out to the desktop and releasing it. The Finder toolbar is a better location for folders.The
AppKitfolder contains good examples of Cocoa applications that show off different aspects of the Foundation and Application Kits, the two fundamental frameworks of the Cocoa development environment. (When you are finished with this book, you should go through the examples in this folder, build each with Project Builder, run them, and then look at the code to see how they work.)
Open your Home folder again by clicking the little house icon in the Finder window’s toolbar.
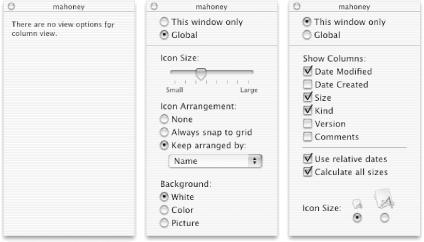
Choose View → Show View Options to bring up the View Options utility window. If necessary, drag this utility window so that it doesn’t share screen space with the Finder window. If you are still in column-view mode, no options will currently be shown in the View Options window.
Experiment with the three different ways of displaying files (icon view, list view, and column view) by clicking the three different view-control buttons) in your Finder’s toolbar. (These views were covered earlier, in Section 1.9.) Note that the View Options window changes to show the options for the selected Finder view, as shown in Figure 1-24.
Choose the Finder’s View → as List menu command. Note that you are provided with more information about the files in the list view than in the other views.
Click the Name column header, and note that the files are ordered alphabetically by name. Click the Name column header again, and note that the order is reversed.
Click the Date Modified, Size, and Kind column headers, an1978 d note that while in list view you have many ordering options for the files in a folder. You can also add more columns with similar functionality, as indicated in Figure 1-24.
Choose the Finder’s View → as Columns menu command, an alternative way of selecting the column view (the view-control buttons are quicker).
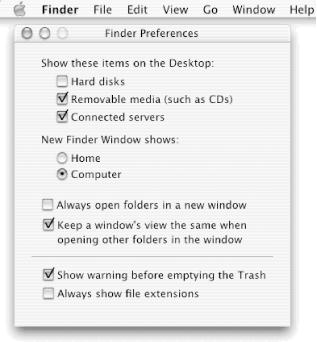
Open another Finder window by choosing the File → New Finder Window menu command. The new window will probably open with the root Computer folder displayed in the view pane, but it might open with your Home folder displayed. This is a user preference that can be selected in the Finder Preferences window.
Click in one Finder window and then in the other (this is known as click-to-focus [4]).
Note how each window is displayed “on top of” the other after it is clicked (using the desktop analogy, where windows are pieces of paper). Note also that the title of the window in front is displayed in black instead of gray and that the window-control buttons are colored red, yellow, and green instead of gray.
Minimize (iconify) one of the Finder windows by clicking the yellow minimize button in the window’s title bar.
The window will animate into a minimized Finder icon in the Dock with either the Genie effect or the Scale effect. The animation effect is a user preference and can be changed in the System Preferences application. The mini-window icon in the Dock should resemble the full-sized window.
Open your Home folder by selecting (with a single-click) the little house icon in the still-open Finder window’s toolbar.
Many Mac
OS X applications allow the user to set preferences
that change the way the application behaves. Your
preferences are stored in your
~/Library/Preferences folder. If different
people use the same computer with different login accounts, each
person will have her own set of system- and application-specific
preferences. In the following steps, we will look at the
Finder’s preferences.
Choose the Finder → Preferences menu command. The Finder Preferences dialog should appear, as shown in Figure 1-25 (your preferences may differ).
Click the “Hard disks” checkbox, and the icon(s) representing your computer’s hard disk(s) will appear on the desktop (the icon(s) might be hidden behind a window). Uncheck the checkbox (i.e., click it again), and the hard disk icon(s) will disappear.
Click the “Always show file extensions” checkbox and look in a Finder window. File extensions will appear after the names of the files that have them.
Click the red close button to close the Finder Preferences dialog.
Now click the button in the upper-right corner of the Finder window. Note that the toolbar disappears.
Click the button in the upper-right corner of the Finder window again. The button is a toggle, so the toolbar will return.
Use this button to hide the toolbar quickly when you need more space in the view pane. Note that you can also hide the status bar that lies between the toolbar and the view pane by choosing View → Hide Status Bar.
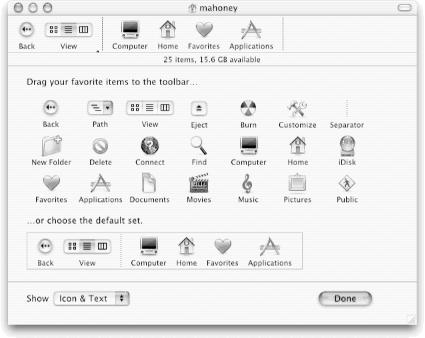
Choose the Finder’s View → Customize Toolbar menu command to change the Finder view pane into a cornucopia of useful icons and tools that can be dragged to your toolbar for quick access, as shown in Figure 1-26. Note that the window in Figure 1-26 has the default set of icons in its toolbar.
The Finder preferences affect only the Finder. Many Mac OS X preferences affect your entire operating-system environment. These preferences can be modified using the System Preferences application. This application replaces the Control Panels system used in previous versions of Mac OS (and it’s similar to the Microsoft Windows Control Panel).
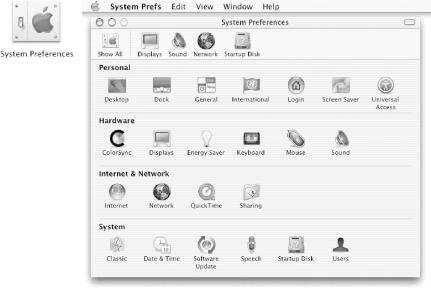
Choose System Preferences from the Apple menu to launch the System Preferences application, as shown in Figure 1-27.
If your System Preferences window doesn’t look like the one in Figure 1-27, click the Show All icon-button in the toolbar (the row of icons just below the title bar).
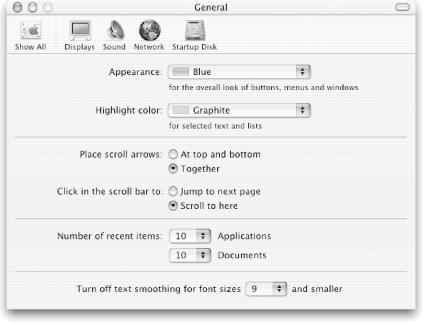
Click the General icon-button in the Personal row in the System Preferences window. Note that the new preferences pane (view) that shows up (see Figure 1-28) is slightly smaller than the previous one, and the window shrinks accordingly.
Press the Highlight color pop-up menu button, drag to Graphite, then release the mouse button. (Change it back if you prefer.)
Click the radio button labeled “At top and bottom” in the “Place scroll arrows” section of the General System Preferences pane.
Now click the Finder icon in your Dock to make the Finder active. Note that the highlight color is Graphite (or whatever you chose for a highlight color) and the “up” scroll arrow is at the top of the scroller instead of the bottom.
Choose Finder → Hide Finder (or type Command-H) to hide the Finder. The System Preferences application should become active, because it was the active application before the Finder was made active.
Click the radio button labeled “Together” in the “Place scroll arrows” section of the General System Preferences pane.
We recommend keeping both scroll arrows together because this makes it easier to switch from scrolling up to scrolling down. In fact, you can switch the scrolling direction while pressing the mouse button by simply sliding from one scroll arrow to the other.
Now single-click the Apple icon in the menu bar, then position the mouse over the Recent Items.
Note that there is a list of recently launched applications and another list of recently opened documents in the menu. This is a very useful menu that defaults to lists of length 5. We’ll change the lengths to 10 in the next step.
Back in the System Preferences application, press the “Number of recent items: Applications” pop-up menu button, drag to 10, then release the mouse button. Do the same for the number of recent documents.
Click the Show All icon-button in the System Preferences toolbar.
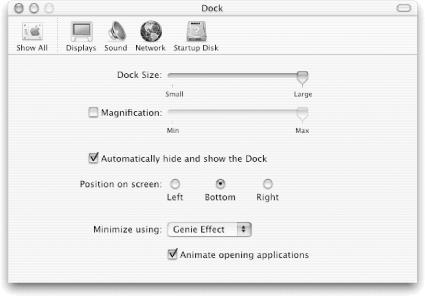
Click the Dock icon-button in the Personal row in the System Preferences window to get the pane shown in Figure 1-29.
Click the “Right” radio button to position your Dock at the right of your screen. Note that you can also have your Dock hide automatically and change the animation effects applied to applications as they open. When turned on, the Magnification feature will cause icons in your Dock to enlarge when the mouse is positioned over them, a wonderful feature if you have lots of icons in your Dock or if your vision is poor. Some of these preferences are available via the Apple menu.
Click the Show All icon-button again and then click the Screen Saver icon-button in the System Preferences toolbar. Note that you can choose from a variety of screen savers, specify the number of inactivity minutes before your chosen screen saver takes effect, and also choose corners where you want to position the mouse to force the screen saver to take effect.
Click the Show All icon-button once again, then click the Sound icon-button in the System Preferences toolbar (see Figure 1-18 for a screen shot of the Sound pane). Note that you can choose from a variety of sounds for system alerts and specify the volume.
Click the Show All icon-button one last time, then click the Software Update icon-button in the System Preferences toolbar. We recommend that you visit this pane regularly and click the Update Now button to download updates from Apple’s web site. Or, you can click the “Update Software Automatically” radio button and select “Check for updates Daily” (or Weekly), so you won’t have to remember to update your software.
Choose System Prefs → Quit System Prefs to quit the System Preferences application.
[4] The Unix-based X Windows windowing system supports point-to-focus (or mouse-to-focus ) in addition to click-to-focus. With point-to-focus, windows become active when you move the cursor on top of them; no click is required. Point-to-focus can result in commands being accidentally sent to the wrong window if your mouse is bumped. This is one of the reasons that the Macintosh and Windows operating systems don’t use point-to-focus. On the other hand, some people prefer point-to-focus because it requires less clicking.
Get Building Cocoa Applications: A Step by Step Guide now with the O’Reilly learning platform.
O’Reilly members experience books, live events, courses curated by job role, and more from O’Reilly and nearly 200 top publishers.
