Chapter 4. Service Worker Lifecycle and Cache Management
Now that you have had a chance to play around with service workers a bit, you may have noticed a few peculiarities about the way they behave.
Sometimes when loading a page, your service worker code seems to be in control of the page, and sometimes you need to refresh the page first (even though the service worker is active). You may have even encountered situations where you changed the service worker code, and yet no matter how many times you refreshed the page, the change did not take.
In Chapter 2, I encouraged you to turn on “Update on reload,” which allowed you to see any change made to your service worker immediately after each page refresh. And yet, just like a cheat-code in an old-school video game, this convenient workaround makes things easy for you but does not represent how things behave in the real world.
Service worker peculiarities can be confusing at first, but once you understand the simple flow of a service worker from one state to the next, it all makes sense.
Note
This chapter explores and uses many of the developer tools available in the browser. For simplicity, this chapter will assume you are using Chrome to visit your app. The code will work in all browsers that support service workers, but the location and availability of the developer tools may differ between browsers and browser versions.
See “Developer Tools” for more details.
Let’s take a look at how a user experiences our app.
Before you begin, make sure that your code is in the state we left it in at the end of Chapter 3 by running the following commands in your command line:
git reset --hard
git checkout ch04-start
If your project’s local server isn’t already running, start it again by running npm start.
Replace the code in serviceworker.js with the following code:
self.addEventListener("install",function(){console.log("install");});self.addEventListener("activate",function(){console.log("activate");});self.addEventListener("fetch",function(event){if(event.request.url.includes("bootstrap.min.css")){console.log("Fetch request for:",event.request.url);event.respondWith(newResponse(".hotel-slogan {background: green!important;} nav {display:none}",{headers:{"Content-Type":"text/css"}}));}});
This code should be quite familiar to you by now. It listens to install and activate events (we will explore activate later in this chapter) and logs a message to the console when either of those is triggered. It also listens to fetch requests for bootstrap.min.css and replaces them with a simple stylesheet that changes the background color of the page’s header to green.
It is natural to expect that visiting our app now will show it with a green background. Before you test that assumption, make sure you experience the app like a user visiting it for the first time:
-
Open the app in your browser (http://localhost:8443/).
-
Turn off “Update on reload” if it is on (see “Service Worker Lifecycle”).
-
Delete all existing service workers registered to this page. In Chrome, this can be achieved by using the “Clear storage” tool in the Application panel of the developer tools. See the section on “Developer Tools” for more details.
By deleting the service workers, you make sure that on your next visit, you will see the page as a new user who does not have the service worker installed yet.
Refresh the page. It should look like Figure 4-1.
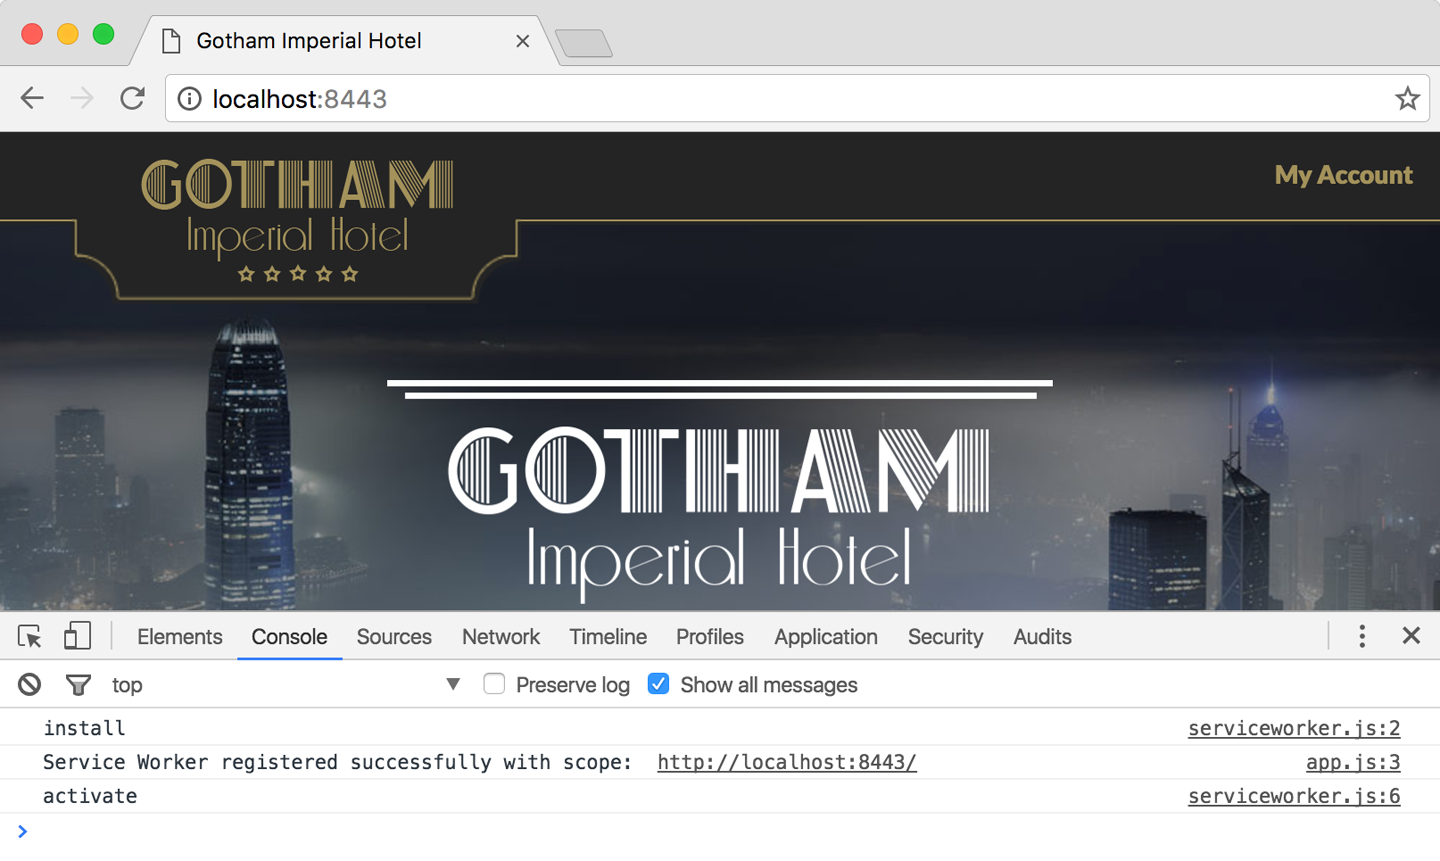
Figure 4-1. The service worker is active but still not controlling the page
Refresh the page again. It should now look like Figure 4-2.
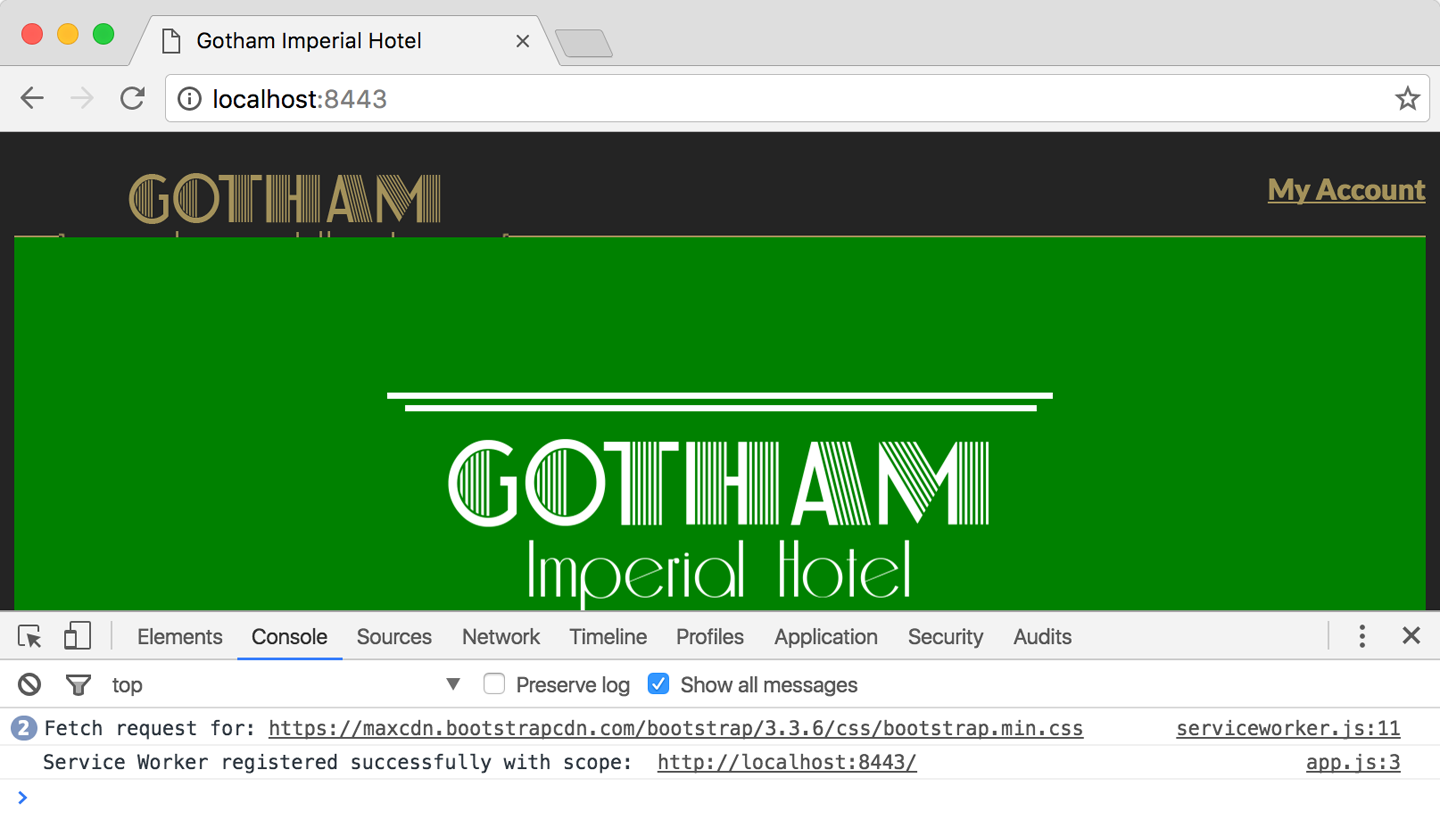
Figure 4-2. The service worker is active, and controlling the page
What happened here? As you can clearly see in Figure 4-1, the service worker installed and activated successfully after our first refresh, but no fetch events were caught, causing the stylesheet to remain untouched. Why did it take a second refresh for the service worker to start listening to fetch events?
To understand this, we need to understand the service worker’s lifecycle.
The Service Worker Lifecycle
When a page registers a new service worker, the service worker goes through a number of states (Figure 4-3):

Figure 4-3. The service worker lifecycle
- Installing
-
When a new service worker is registered using navigator.serviceWorker.register, the JavaScript is downloaded, parsed, and enters the installing state. If the installation succeeds, the service worker will proceed to the
installedstate. If however, an error occurs during installation, the script will instead be banished to the abyss of theredundantstate for all eternity (or until you attempt to register it again by refreshing the page).The life of the installation event can be extended by listening to the
installevent, callingwaitUntil()on it, and passing it a promise. The service worker will not consider the installation finished until that promise resolves or fails. If the promise fails, the entire installation fails, causing the service worker to move to theredundantstate.
Note
In Chapter 3 we created a dependency between our assets caching successfully and the successful installation of our service worker. By telling the install event to waitUntil the promise returned by our caching function resolved before moving to the installed state, we made sure that if any of the files aren’t cached, the installation will fail and the service worker will go immediately to the redundant state.
Installed/waiting-
Once a service worker has successfully installed, it enters the
installedstate. It will then immediately move on to theactivatingstate unless another active service worker is currently controlling this app, in which case it will remainwaiting.We explore the
waitingstate in “Updating a Service Worker”. Activating-
Before a service worker becomes active and takes control of your app, the
activateevent is triggered. Similar to the installing state, theactivatingstate can also be extended by callingevent.waitUntil()and passing it a promise.In “Why We Need to Manage the Cache”, we see how we can take advantage of this event to manage our app’s cache.
Activated-
Once a service worker is activated, it is ready to take control of the page and listen to functional events (such as
fetch).A service worker can only take control of pages before they start loading. This means that pages that began loading before the service worker became
activecannot be controlled by it. The reason for this is explored in Why Can’t a Service Worker Take Control of a Page After It Has Started Loading?. Redundant-
Service workers that failed during registration, or installation, or were replaced by newer versions, are placed in the
redundantstate. Service workers in this state no longer have any effect on your app.
Note
Remember that a service worker and its state are independent of any single browser window or tab. This means that once a service worker is in the activated state, it will remain in that state even if the user opens a second tab that attempts to register the same service worker again. If the browser detects that you are trying to register a service worker that is already active, it won’t try to install it again.
You can rely on the install and activate events to only run once in a service worker’s lifecycle.
Now that we are more familiar with the various states a service worker goes through, let’s try and understand why the service worker in our first example code didn’t change our app’s stylesheet until the second refresh.
When a user visits our site for the first time (simulated by us refreshing the page after deleting the service worker), the app registers the service worker. The service worker file downloads and starts installing. The install event gets dispatched, triggering our function that logs the occasion to the console. The service worker then advances to the installed state and immediately moves on to the activating state. Once again, another one of our functions is triggered, this time by the activate event, logging the state change to the console. Finally, the service worker advances to the activated state. It is now active and ready to control pages in its scope.
Unfortunately, while the service worker was installing, our page had already begun loading and rendering. This means that even though our service worker is in the active state, it cannot take control of this page. It is only after we refresh the page that our active service worker takes control of it. The service worker is now both active and in control of the page, and can listen to and manipulate fetch events.
Why Can’t a Service Worker Take Control of a Page After It Has Started Loading?
Let’s consider the alternative. Imagine a service worker charged with detecting when a video file loads too slowly and offering links to other mirror servers where the same video is hosted instead. This service worker would intercept all requests for video files and return either the video requested or a JSON file containing links to mirror sites. The same service worker also intercepts requests for app.js and serves app-sw.js instead—a version that knows how to display a video response or render a list of links from a JSON response. Now consider what would happen if the service worker was allowed to take control of the page that registered it after it began loading. What would happen if the page downloaded an unmodified app.js file before the service worker assumed control, and then started receiving JSON files from the service worker when it requested videos? The app.js would not know how to handle these responses, and the entire page might break.
By making sure each page is controlled only by a single service worker from the time it begins loading to the time it closes, service workers help us avoid these unexpected problems.
The Service Worker Lifetime and the Importance of waitUntil
Once a service worker has successfully installed and is activated, what happens to it? Since service workers are not tied directly to any tabs or windows and can respond to events at any time, does that mean they are kept running at all times?
The answer is no. The browser does not keep all service workers currently registered in it running at all times. If it did, performance would quickly suffer as more and more sites registered more and more service workers, all of which had to be kept running at all times.
Instead, the lifetime of a service worker is directly tied to the execution of the events it handles. When an event in a service worker’s scope is triggered, that service worker springs to life, handles that event, and is then terminated.
In other words, when a user visits your site, the browser starts the controlling service worker, and as soon as it finishes handling events from the page, it is terminated. If another event comes in later, the service worker would start up again and terminate as soon as it is done.
What would happen if event handling code in our service worker were to call something asynchronously? For example, let’s look at the following event handler that handles push events. We will explore push events in detail in Chapter 10, but for now, all you need to know is that they are triggered when your server sends a push message to your users (which may be when your app isn’t even running):
self.addEventListener("push",function(){fetch("/updates").then(function(response){returnself.registration.showNotification(response.text());});});
When a push event is triggered, the event listener in the preceding example code will attempt to fetch updates from the server, then once it receives a response, it will show a notification to the user with those updates.
But there is a problem with the code. While the fetch request goes off asynchronously to find updates, the event listener code finishes executing. Once the event is over, the service worker may be terminated by the browser before the response comes back. This will leave no one in charge of processing the response and showing a notification.
How can we tell our service worker to wait until something happens before letting the browser terminate it? The answer is self-evident. Since, as we have already established, the lifetime of a service worker is directly tied to the execution of the events it handles, all we need to do is extend the execution of the event by telling it to waitUntil something happens:
self.addEventListener("push",function(){event.waitUntil(fetch("/updates").then(function(){returnself.registration.showNotification("New updates");}));});
The code in this example tells the push event to wait until a promise we pass to it resolves or rejects before that event is considered to be complete. This means the service worker’s lifetime is also extended. The end result is that the service worker will stay around until the fetch and showNotification calls both complete.
Updating a Service Worker
Let’s see what happens when we try to update an existing service worker.
Modify the serviceworker.js file so that instead of changing the background color of the header to green, it changes to red.
Your fetch event listener should now look like this:
self.addEventListener("fetch",function(event){if(event.request.url.includes("bootstrap.min.css")){console.log("Fetch request for:",event.request.url);event.respondWith(newResponse(".hotel-slogan {background: red!important;} nav {display:none}",{headers:{"Content-Type":"text/css"}}));}});
Refresh the page once, twice, three times.
You might be surprised that your change to the service worker does not affect the page, and the background remains green.
What is happening? The background is green, so the page is obviously being controlled by the service worker, yet the service worker file clearly states it should be red.
We can begin to understand what is happening in this example code by looking at the Application → Service Workers section of Chrome’s developer tools (Figure 4-4).
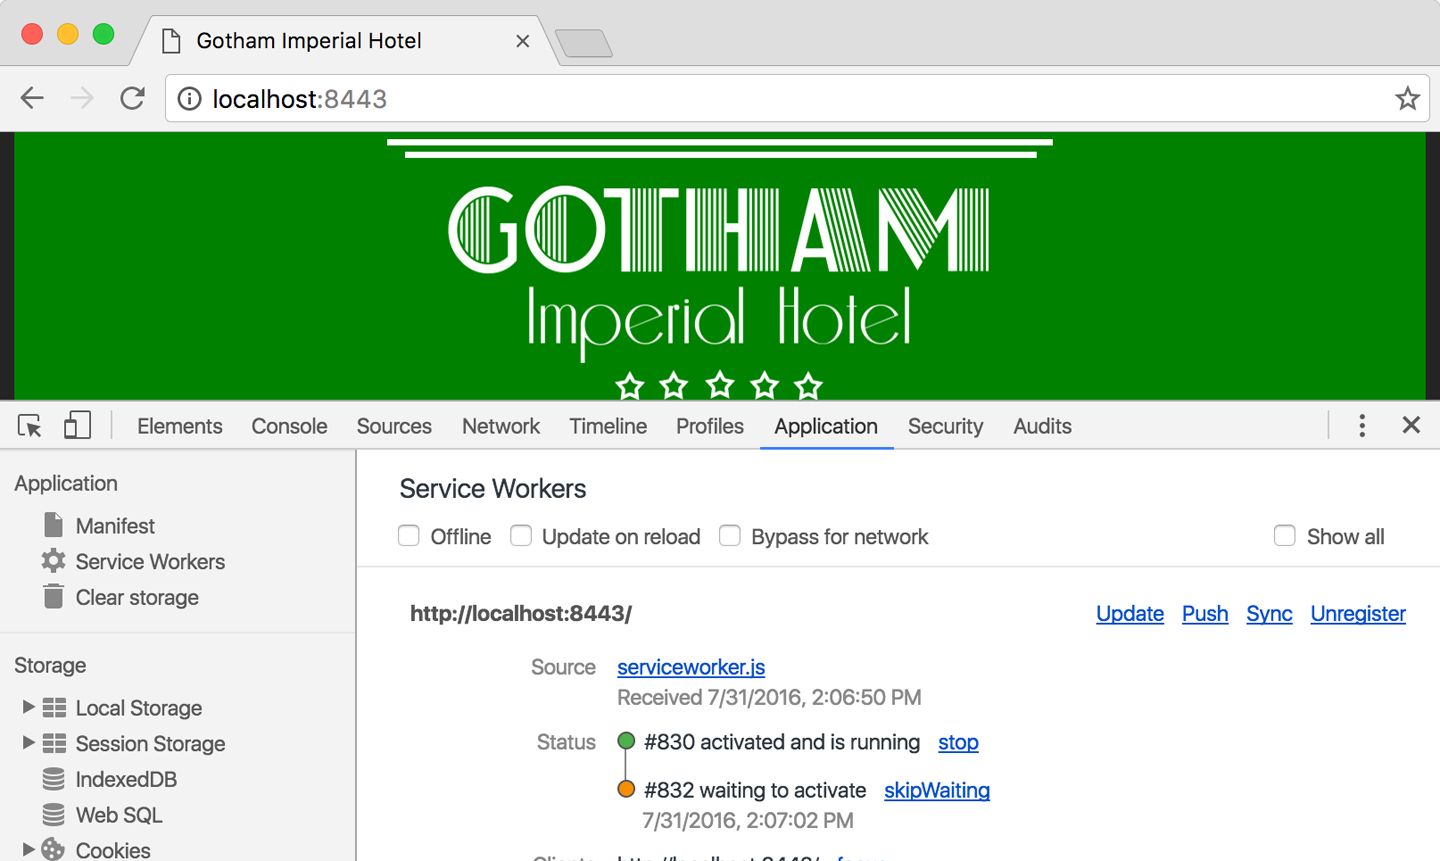
Figure 4-4. A new service worker waiting for the active service worker to release control
As you can see in the figure, there are two service workers registered on the page, but only one of them controls the page. Your older service worker (green background) is active, while the newer service worker (red background) remains in the waiting state.
Every time a page loads with an active service worker, it checks for an update to the service worker script. If that file changed since the current service worker was registered, the new file is registered and installed. Once installation completes, it does not replace the existing service worker but instead remains in the waiting state. It stays in this state until every single tab and window in this service worker’s scope is closed or is navigated to a page not in its scope. Only when there are no more pages controlled by the active service worker open will the old active service worker move to the redundant state and the new service worker be activated.
This explains why our app’s background did not change. Try closing the tab and reopening it, or just navigate to a different site and then hit the back button. This should allow the old service worker to become redundant, your new one to activate, and the background to finally change to red.
Note
Why must new service workers that finish installing have to wait for all pages under their scope to close before taking control and becoming the active service worker?
Imagine having two tabs open, showing two pages controlled by the same service worker. Now, what would happen if the first tab was refreshed, downloaded a new service worker, and made that the active service worker? The second page, which loaded using one service worker, is suddenly controlled by a different one. This could cause many unexpected problems, such as the one we explored in Why Can’t a Service Worker Take Control of a Page After It Has Started Loading?.
But why are new pages that loaded after the service worker finished installing not controlled by the new service worker, while the older pages remain controlled by the older service worker? Why can’t the browser keep track of multiple service workers? Why must all pages always be controlled by a single service worker?
Let’s explore one potential catastrophe caused by this situation. Imagine a scenario in which you release a new version of a service worker, and this service worker’s install event deletes userdata.json from the cache, adds users.json instead, and changes the fetch event to return the new file when user data is requested. If multiple service workers controlled different pages, the ones controlled by the old service worker might look for the old userdata.json file in the cache after it was removed, causing your app to break.
By making sure all open tabs are controlled by the same service worker from the moment they start loading until the moment they close, we can avoid these kinds of problems. It makes knowing which service worker is in charge at any time predictable.
Why We Need to Manage the Cache
Now that we understand the service worker’s lifecycle, let’s get back to our app and see what happens when we need to update the app.
Let’s say we decided to change the content of our offline home page. If we update the content of sw-index.html, how would our service worker know that it needs to download a new version of the file and store it in CacheStorage?
Before we begin, revert the code of serviceworker.js back to the state it was in at the end of Chapter 3 by running the following commands in your command line:
git reset --hard
git checkout ch04-start
Your serviceworker.js should look like this:
varCACHE_NAME="gih-cache";varCACHED_URLS=["/index-offline.html","https://maxcdn.bootstrapcdn.com/bootstrap/3.3.6/css/bootstrap.min.css","/css/gih-offline.css","/img/jumbo-background-sm.jpg","/img/logo-header.png"];self.addEventListener("install",function(event){event.waitUntil(caches.open(CACHE_NAME).then(function(cache){returncache.addAll(CACHED_URLS);}));});self.addEventListener("fetch",function(event){event.respondWith(fetch(event.request).catch(function(){returncaches.match(event.request).then(function(response){if(response){returnresponse;}elseif(event.request.headers.get("accept").includes("text/html")){returncaches.match("/index-offline.html");}});}));});
Remember that our service worker downloads and caches the files it needs during its installation phase. If we want it to download and cache some of these files again, we need to trigger another install event. As we saw in “The Service Worker Lifecycle”, any change to the service worker file will cause a new service worker to be installed the next time we visit any page of our app.
Note
Now that you are familiar with the service worker lifecycle, feel free to turn “Update on reload” back on to ease development.
Change the name of the cache on line 1 of serviceworker.js to gih-cache-v2. Line 1 should now look like the following:
varCACHE_NAME="gih-cache-v2";
By adding a version number to our cache name and incrementing it every time one of our files change, we achieve two goals:
-
Any change to the service worker file, even one as minuscule as changing a single digit in the cache version number, lets the browser know it is time to install a new service worker to replace the active one. This triggers a new install event, causing the new files to be downloaded and stored in the cache.
-
It creates a separate cache for each version of our service worker (Figure 4-5). This is important because even though we already updated the cache, until the user has closed all open pages, the old service worker is still the active one. That service worker may expect certain files to be in the cache, including files that may have been changed by the newer service worker. By letting each service worker have its own cache, we can make sure there are no unexpected surprises.
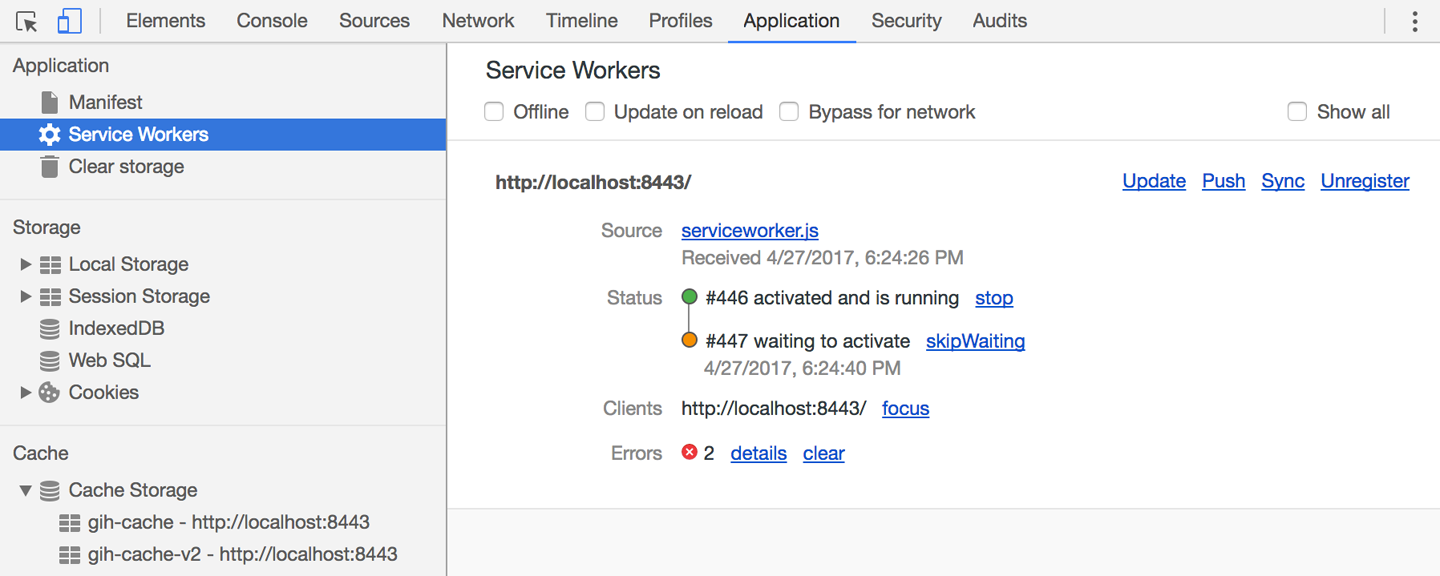
Figure 4-5. Two service workers, each with its own cache
Note
Our choice to use numbered versions as our cache names (e.g., "gih-cache-v2" and "gih-cache-v3") is simply made for developer comfort and readability. The browser does not understand that "gih-cache-v2" is older than "gih-cache-v3", just that it is different. We could have just as easily named them "cache-sierra" and "nevada-store".
While technically "gih-cache-v2" is the name of our cache version, we often use the cache name to refer to our service worker version. For example, we might refer to a service worker that uses a cache named "gih-cache-v2" as service worker version 2. Once you have decided to maintain a single cache version for each service worker version, calling them both by the same name makes things easier.
Cache Management and Clearing Old Caches
By versioning our caches and service workers, we were able to achieve a powerful system in which each version of our service worker can rely on having just the files it needs in its own dedicated cache. We can update our service worker or the files we would like to have in cache at any time and be sure that we won’t affect our users in unexpected ways. Don’t forget, you may have just updated your service worker to version 327, but your user may have version 122 of the service worker installed. Do you really want to make sure every change to your cached files works with every version of the service worker you have ever released?
This just leaves one issue. By creating a new cache on the user’s device every time we update our service worker, we risk cluttering their cache. Not only that, but we might end up storing 327 copies of our logo and fancy high-res cover photo. It won’t be long before the browser steps in and lets us know we have reached the storage limit allotted to us.
Our service worker needs to learn to be a good citizen in the browser, not just in creating caches, but also in responsibly disposing of old cached assets it no longer needs.
Before we can tackle this problem, we need to familiarize ourselves with two new methods of the caches object:
caches.delete(cacheName)-
Receives a cache name as its first argument, and deletes that cache.
caches.keys()-
A handy method for getting the names of all the caches accessible to you.
Returns a promise that resolves to an array of cache names.
By combining these two methods, we can create code that will delete all or some of the caches. For example, if we wanted to delete all the caches, we could use the following code:
caches.keys().then(function(cacheNames){cacheNames.forEach(function(cacheName){caches.delete(cacheName);});});
Next, let’s see how we can use this to manage our caches.
Caution
What is true for this app isn’t necessarily true for yours.
While I have decided to store all of Gotham Imperial Hotel’s assets in one cache (per version), you may decide on a different structure for your app. For example, you might decide to keep one cache for files that change very infrequently (like vendor libraries, logos, etc.) and one for files that change with every release. If you do, be sure to modify the pattern described here accordingly.
Our app needs at most two caches at any time: one cache for the currently active service worker, and one for a newer service worker that is now being installed but isn’t activated yet (if it exists). Any caches belonging to redundant service workers are—redundant.
Let’s break this down and put it in terms of the service worker lifecycle:
-
We create a new cache every time a new service worker installs.
-
When a new service worker becomes the active one, it is safe to delete all other caches created by past service workers.
Our code already fulfills step 1. We just need to add step 2 so our service worker can do some housecleaning. Luckily, we are already familiar with the perfect opportunity to do this—the activate event.
Let’s take our existing service worker and add a new event listener to listen for the activate event.
In serviceworker.js, rename the CACHE_NAME variable to "gih-cache-v4", and add the following code to the bottom of the file:
self.addEventListener("activate",function(event){event.waitUntil(caches.keys().then(function(cacheNames){returnPromise.all(cacheNames.map(function(cacheName){if(CACHE_NAME!==cacheName&&cacheName.startsWith("gih-cache")){returncaches.delete(cacheName);}}));}));});
Our code now listens to one more event—activate. This event is called when an installed/waiting service worker is ready to become the active service worker and replace the old active one. At this stage, the files it requires have already been cached successfully. But before we can declare our new service worker active, we want to delete all the old caches that were used by our older service workers.
Let’s go over the activate event code line by line.
We begin by extending the activate event using waitUntil. We are essentially telling the service worker to wait until we have cleaned out all the old caches before completing its activation. We do this by passing waitUntil a promise.
The code for creating this promise begins by calling caches.keys(). This returns a promise that resolves to an array containing the names of all the caches we created in our app. We want to take this array and create a promise that resolves only after we have iterated over each and every one of the caches in that array. For this, we can use Promise.all() to wrap all those promises with a single promise.
Note
Promise.all() takes an array of promises and returns a single promise that only resolves once all the promises in that array have been resolved. If any of those promises are rejected, the promise created by Promise.all() will also be rejected. If they all resolve successfully, so will the promise created by Promise.all().
Next, we create this array of promises that will be passed to Promise.all(). We can create it by taking the cacheNames array and using Array.map() to create a promise from each cache name—a promise to delete that cache and then resolve that promise.
For a more detailed exploration of how to use Array.map() to create an array of promises, see “Creating An Array of Promises for Promise.all()”.
Once we have an array of promises to delete caches, it is passed into Promise.all(), which in turn returns a single promise to event.waitUntil().
The only line we did not cover is the if statement surrounding our caches.delete() call. This statement makes sure we only delete caches that match both of these conditions:
-
Their name is different than the active cache’s name.
-
Their name begins with
gih-cache.
The first condition makes sure we don’t delete the new cache we just created. The second checks for an arbitrary prefix we chose for all of our service worker’s cache names. This makes sure we do not delete caches created elsewhere by our app, unrelated to the service worker.
Because of the chain of promises and the less common methods it uses, this code snippet might seem like one of the more complicated ones in the entire book, despite achieving something quite simple. An easier way to grasp what it does is to summarize the entire activate listener in pseudocode:
Listen for the activate event.
  Wait until the following is done and only declare the service worker activated
  if all of the following complete successfully:
    For each of the cache names:
      Check if a cache's name is not the same as the current cache name,
      and its name starts with 'gih-cache':
        Delete that cache.
Reusing Cached Responses
Our versioned cache approach gives us a very flexible way to control our cache and keep it up to date. But if we examine it closely, we might notice an inherent inefficiency in it.
Every time we create a new cache, we use cache.add() or cache.addAll() to cache all of the files our app needs. But what happens if the user already has a cache on his machine called cache-v1 and we are now creating cache-v2? Some of the files we will be fetching and placing into cache-v2 already exist in cache-v1. If these are files that we know never change, we are wasting valuable bandwidth and time downloading them again from the network.
What if when we created a new cache, we first went over our list of immutable files (files that never change, such as bootstrap.3.7.7.min.css or style-v355.css), looked for them in existing caches, and copied them directly to the new cache. Once this is done, we could go ahead and use cache.add() or cache.addAll() to fetch the remaining files (immutable files not found in older caches, and mutable files):
varimmutableRequests=["/fancy_header_background.mp4","/vendor/bootstrap/3.3.7/bootstrap.min.css","/css/style-v355.css"];varmutableRequests=["app-settings.json","index.html"];self.addEventListener("install",function(event){event.waitUntil(caches.open("cache-v2").then(function(cache){varnewImmutableRequests=[];returnPromise.all(immutableRequests.map(function(url){returncaches.match(url).then(function(response){if(response){returncache.put(url,response);}else{newImmutableRequests.push(url);returnPromise.resolve();}});})).then(function(){returncache.addAll(newImmutableRequests.concat(mutableRequests));});}));});
The code separates the resources it needs to cache into two arrays:
-
immutableRequestscontains URLs that we know never change. These can safely be copied from cache to cache. -
mutableRequestscontains URLs that we want to retrieve from the network every time we create a new cache.
Our install event first goes over all immutableRequests and looks for them in all existing caches. Any requests that are found are copied to the new cache using cache.put.1 Those that aren’t are placed into the newImmutableRequests array.
Once all the requests have been checked, the code uses cache.addAll() to cache all the URLs in mutableRequests and newImmutableRequests.
Note
This pattern can be useful in most service workers you will work on. To save you a lot of typing, I have created a drop-in replacement for cache.addAll() called cache.adderall() that makes using the preceding pattern much easier:
importScripts("cache.adderall.js");self.addEventListener("install",function(event){event.waitUntil(caches.open("cache-v2").then(function(cache){returnadderall.addAll(cache,IMMUTABLE_URLS,MUTABLE_URLS)}))});
You can find out more about cache.adderall() online (https://pwabook.com/cacheadderall).
Configuring the Server to Serve the Right Caching Headers
Because the service worker file is checked on each load, you should configure your server to serve it with a short expiration header (i.e., 1 to 10 minutes). If you give it a very long expiration time, the browser will not check it for changes and will not find out about new service worker versions or new files to cache.
Imagine what would happen if your service worker always served checkout.js from cache, and you accidentally released a version of that file that had a bug in it. If you were unable to update your service worker to cache a new version, you might be unable to release a fix for hours.
Luckily, the browser protects you here and defaults to an expiration time of 24 hours if you try to set a longer one.
Developer Tools
As you get to know service workers, CacheStorage, and the other new APIs in this book, I encourage you to take the time to learn the developer tools offered by the various browsers.
Most modern browsers like Chrome, Opera, and Firefox have tools that can improve your workflow, and make developing and debugging your code easier.
Below are some of the developer tools I personally depend on the most.
The Console
Setting breakpoints, watching variables, stepping into and over things, and the rest of the debugging tools provided by modern browsers are amazing. But maybe I’m just too old and grumpy to learn new tricks because for me the good old-fashioned console is still the tool I reach for first when debugging.
When working with service workers, keep in mind that when you open the console in any tab, commands will run in the context of that window and not the service worker. If you would like to explore the service worker’s context and run commands in it, you will have to change the console’s context.
In Chrome and Opera, this can be done by opening the console and changing the context from top (which is the window) to your service worker file. The context selection is shown in red in Figure 4-6.

Figure 4-6. Changing the console’s context in Chrome
In Firefox, the same can be done by opening about:debugging#workers and clicking the Debug button next to service worker. If you do not see a Debug button next to your service worker, you may have to Start it first.
Have You Tried Turning It Off and On Again?
As we work, we change our code and data structures all the time. When we look at our apps in the browser, we usually want to make sure we are looking at the latest code, the most recent data, and are working with a clean cache.
This used to be simple. A simple hard refresh done by holding the Shift key while refreshing used to ensure that the browser’s cache was ignored. But with more and more assets being stored in more and more places (CacheStorage, IndexedDB, Cookies, Local Storage, Session Storage, etc.), this is no longer enough.
Luckily, the developer tools in Chrome and Opera provide a quick way to get a fresh start. In the developer tools of either browser, open the Application tab, select the Clear storage section, go over the checkboxes, and click “Clear site data.”
Inspect CacheStorage and IndexedDB
During development, you will often find yourself needing to examine the assets that are stored in CacheStorage and IndexedDB (which we will explore in Chapter 6).
You can access these stores programmatically using the console, open connections to them, and read their data—this can be quite a hassle.
Firefox, Chrome, and Opera let you examine these stores directly using a graphical user interface. In Firefox you can access it through the Storage tab of the developer tools (Figure 4-7). In Chrome and Opera, you will find it under the Application tab.
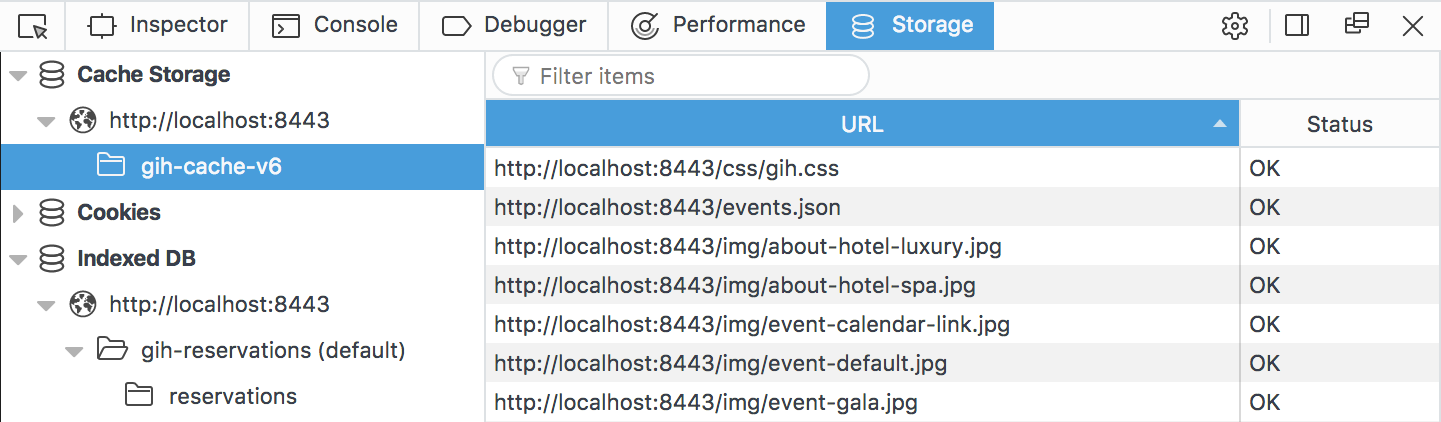
Figure 4-7. Inspecting storage in Firefox
Network Throttling and Simulating Offline Conditions
As we develop our apps on our local machines, always seeing our work in the best possible light, it is easy to forget that this is not how our users will experience our app.
One of the most invaluable tools, as we work on improving our apps, is the ability to simulate different connection speeds, as well as being able to simulate an offline state.
In Firefox, you can throttle your connection speed by turning on Responsive Design Mode from the developer tools toolbar, and changing the throttling settings shown on the top of the window. In Chrome and Opera, the same can be achieved from the developer tools’ Network tab by clicking the throttling controls and choosing a different connection (as shown in Figure 2-4).
Caution
Remember that simulating mobile devices can only take you so far. In the end, there is no replacement for real testing on real devices. I highly recommend Alex Russel’s “Progressive Performance” talk for a reality check.
Lighthouse
Lighthouse is an open source tool, originally developed by Google, that you can use to automatically audit your app against a set of PWA best practices.
Lighthouse is available both as a browser extension (shown in Figure 4-8), and as a command-line tool that you can integrate into your continuous integration pipeline.
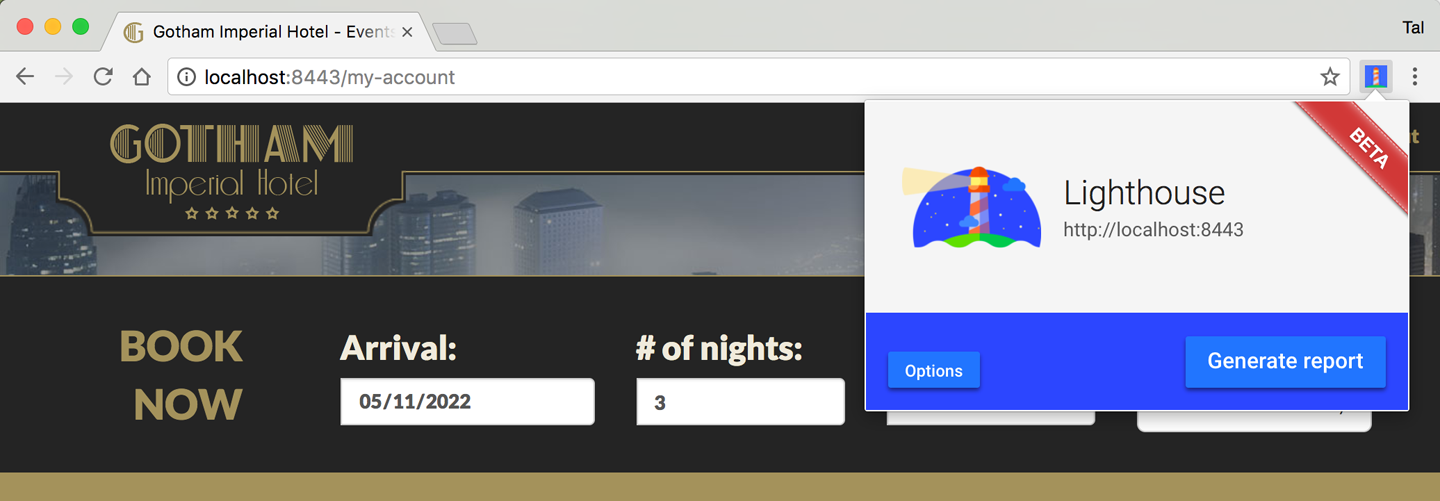
Figure 4-8. Lighthouse Chrome extension testing the Gotham Imperial Hotel app
Summary
Hopefully, by this point, you understand the service worker lifecycle a bit better.
If you are still not sure why you sometimes need to refresh the page before a service worker starts working, or why after you updated your service worker no amount of refreshing seems to make the new code work, consider going over this chapter one more time.
The service worker lifecycle can be one of its more confusing aspects. Forget to take it into consideration, and you may find yourself spending 20 minutes trying to debug a particularly nasty bug, only to finally realize your page is still being controlled by an older service worker. Trust me, I have been there—more recently than I would care to admit.
But understanding the service worker lifecycle also opens up new opportunities to do amazing stuff. By understanding how the install event works, we were able to create install dependencies for our service worker. By understanding when our service worker moves from the installed to the activated state, we were able to create a sophisticated system that manages multiple cache versions in just a few lines of code. In the next chapters, we will find many more opportunities to wield this knowledge to do some truly amazing things.
1 cache.put takes a key and a value (e.g., a URL, and a response object) and creates a new entry in the cache. Unlike cache.add which only takes a URL, cache.put does not require another network request because it already contains the response to cache.
Get Building Progressive Web Apps now with the O’Reilly learning platform.
O’Reilly members experience books, live events, courses curated by job role, and more from O’Reilly and nearly 200 top publishers.

