Chapter 4. Advanced C#
In this chapter, we cover advanced C# topics that build on concepts explored in previous chapters. You should read the first four sections sequentially; you can read the remaining sections in any order.
Delegates
A delegate dynamically wires up a method caller to its target method. There are two aspects to a delegate: type and instance. A delegate type defines a protocol to which the caller and target will conform, comprising a list of parameter types and a return type. A delegate instance refers to one (or more) target methods conforming to that protocol.
A delegate instance literally acts as a delegate for the caller: the caller invokes the delegate, and then the delegate calls the target method. This indirection decouples the caller from the target method.
A delegate type declaration is preceded by the keyword delegate, but otherwise it resembles an
(abstract) method declaration. For example:
delegate int Transformer (int x);
To create a delegate instance, you can assign a method to a delegate variable:
class Test
{
  static void Main(  )
  {Transformer t = Square;          // create delegate instance
    int result = t(3);               // invoke delegate
    Console.WriteLine (result);
  }
  static int Square (int x) { return x * x; }
}
Invoking a delegate is just like invoking a method (since the delegate’s purpose is merely to provide a level of indirection):
t(3);
This statement:
Transformer t = Square;
is shorthand for:
Transformer t = new Transformer(Square);
Tip
A delegate is similar to a callback, a general term that captures constructs such as C function pointers.
Writing Plug-in Methods with Delegates
A delegate variable is assigned a method
dynamically. This is useful for writing plug-in
methods. In this example, we have a utility method named Transform that applies a transform to each
element in an integer array. The Transform method has a delegate parameter,
for specifying a plug-in transform.
public delegate int Transformer (int x);

public class Util
{
  public static void Transform (int[] values,Transformer t)
  {
    for (int i = 0; i < values.Length; i++)
      values[i] = t(values[i]);
  }
}

class Test
{
  static void Main(  )
  {
    int[] values = new int[] {1, 2, 3};
    Util.Transform(values, Square);      // dynamically hook in Square
    foreach (int i in values)
      Console.Write (i + "  ");           // 1   4   9
  }

  static int Square (int x) { return x * x; }
}
Multicast Delegates
All delegate instances have multicast capability. This means that a
delegate instance can reference not just a single target method, but
also a list of target methods. The += operator combines delegate instances. For
example:
SomeDelegate d = SomeMethod1;
d += SomeMethod2;
Invoking d will now call both
SomeMethod1 and SomeMethod2. Delegates are invoked in the
order they are added.
The -= method removes the
right delegate operand from the left delegate operand. For
example:
d -= SomeMethod1;
Invoking d will now cause
only SomeMethod2 to be
invoked.
Calling += on a delegate
variable with a null value works,
and it is equivalent to assigning the variable to a new value:
SomeDelegate d = null;
d += SomeMethod1;       // equivalent (when d is null) to d = SomeMethod1;
If a multicast delegate has a nonvoid return type, the caller
receives the return value from the last method to be invoked. The
preceding methods are still called, but their return values are
discarded. In most scenarios in which multicast delegates are used,
they have void return types, so
this subtlety does not arise.
Tip
All delegate types implicitly inherit System.MulticastDelegate, which inherits
from System.Delegate. C# compiles
+= and -= operations made on a delegate to the
static Combine and Remove methods
of the System.Delegate
class.
Multicast delegate example
Suppose you wrote a routine that took a long time to execute.
That routine could regularly report progress to its caller by
invoking a delegate. In this example, the HardWork routine has a ProgressReporter delegate parameter, which
it invokes to indicate progress:
public delegate void ProgressReporter (int percentComplete);

public class Util
{
  public static void HardWork (ProgressReporter p)
  {
    for (int i = 0; i < 10; i++)
    {
      p (i * 10);                          // Invoke delegate
      System.Threading.Thread.Sleep(100);  // Simulate hard work
    }
  }
}
To monitor progress, the Main method creates a multicast delegate
instance p, such that progress is
monitored by two independent methods:
class Test
{
  static void Main (  )
  {
    ProgressReporter p = WriteProgressToConsole;
    p += WriteProgressToFile;
    Util.HardWork (p);
  }

  static void WriteProgressToConsole (int percentComplete)
  {
    Console.WriteLine (percentComplete);
  }

  static void WriteProgressToFile (int percentComplete)
  {
    System.IO.File.WriteAllText ("progress.txt", percentComplete.
        ToString(  ));
  }
}
Instance Method Targets
When a delegate instance is assigned to an
instance method, the delegate instance must
maintain a reference not only to the method, but also to the
instance of that method. The System.Delegate class’s Target property represents this instance
(and will be null for a delegate referencing a static method). For
example:
public delegate void ProgressReporter (int percentComplete);

class Test
{
  static void Main() {new Test(  );}
  Test (  )
  {
    ProgressReporter p = InstanceProgress;
    p(99);                                  // 99
    Console.WriteLine (p.Target == this);   // True
    Console.WriteLine (p.Method);           // Void InstanceProgress(Int32)
  }

  void InstanceProgress (int percentComplete)
  {
    Console.WriteLine(percentComplete);
  }
}
Generic Delegate Types
A delegate type may contain generic type parameters. For example:
public delegate T Transformer<T> (T arg);
With this definition, we can write a generalized Transform utility method that works on any
type:
public class Util
{
  public static void Transform<T> (T[] values,Transformer<T> t)
  {
    for (int i = 0; i < values.Length; i++)
      values[i] = t(values[i]);
  }
}

class Test
{
  static void Main(  )
  {
    int[] values = new int[] {1, 2, 3};
    Util.Transform(values, Square);      // dynamically hook in Square
    foreach (int i in values)
      Console.Write (i + "  ");           // 1   4   9
  }

  static int Square (int x) { return x * x; }
}
Delegates Versus Interfaces
A problem that can be solved with a delegate can also be solved
with an interface. For instance, the following explains how to solve
our filter problem using an ITransformer interface:
public interface ITransformer
{
  int Transform (int x);
}

public class Util
{
 public static void TransformAll (int[] values, ITransformer t)
 {
   for (int i = 0; i < values.Length; i++)
     values[i] = t.Transform(values[i]);
 }
}

class Test : ITransformer
{
 static void Main(  )
 {
   int[] values = new int[] {1, 2, 3};
   Util.TransformAll(values, new Test(  ));
   foreach (int i in values)
     Console.WriteLine (i);
 }

 public int Transform (int x) { return x * x; }
}
A delegate design may be a better choice than an interface design if one or more of these conditions are true:
The interface defines only a single method
Multicast capability is needed
The listener needs to implement the interface multiple times
In the ITransformer example,
we don’t need to multicast. However, the interface defines only a
single method. Furthermore, our listener may need to implement
ITransformer multiple times, to
support different transforms, such as square or cube. With interfaces,
we’re forced into writing a separate type per transform, since
Test can only implement ITransformer once. This is quite
cumbersome:
class Test
{
 static void Main(  )
 {
   int[] values = new int[] {1, 2, 3};
   Util.TransformAll(values, new Cuber(  ));
   foreach (int i in values)
     Console.WriteLine (i);
 }

 class Squarer : ITransformer
 {
   public int Transform (int x) { return x * x; }
 }
 class Cuber : ITransformer
 {
   public int Transform (int x) {return x * x * x; }
 }
}
Delegate Compatibility
Type compatibility
Delegate types are all incompatible with each other, even if their signatures are the same:
delegate void D1(  );
delegate void D2(  );
...

D1 d1 = Method1;
D2 d2 = d1;                           // compile-time error
Delegate instances are considered equal if they have the same method targets:
delegate void D(  );
...

D d1 = Method1;
D d2 = Method1;
Console.WriteLine (d1 == d2);         // true
Parameter compatibility
When you call a method, you can supply arguments that have more specific types than the parameters of that method. This is ordinary polymorphic behavior. For exactly the same reason, a delegate can have more specific parameter types than its method target. This is called contravariance.
Consider the following example:
delegate void SpecificDelegate (SpecificClass s);

class SpecificClass {}

class Test
{
  static void Main(  )
  {
    SpecificDelegate specificDelegate = GeneralHandler;
    specificDelegate (new SpecificClass(  ));
  }

  static void GeneralHandler(object o)
  {
    Console.WriteLine(o.GetType(  )); // SpecificClass
  }
}
A delegate merely calls a method on someone else’s behalf. In
this case, the SpecificDelegate
is invoked with an argument of type SpecificClass. When the argument is then
relayed to the target method, the argument gets implicitly upcast to
an object.
Tip
The standard event pattern is designed to help you leverage
contravariance through its use of the common EventArgs base class. For example, you
can have a single method invoked by two different delegates, one
passing a MouseEventArgs and
the other passing a KeyEventArgs.
Return type compatibility
If you call a method, you may get back a type that is more specific than what you asked for. This is ordinary polymorphic behavior. For exactly the same reason, the return type of a delegate can be less specific than the return type of its target method. This is called covariance. Consider the following example:
delegate Asset DebtCollector(  );

class Asset {}

class House : Asset {}

class Test
{
  static void Main(  )
  {
     DebtCollector d = new DebtCollector (GetHomeSweetHome);
     Asset a = d(  );
     Console.WriteLine(a.GetType(  )); // House
  }
  static House GetHomeSweetHome() {return new House(  ); }
}
A delegate merely calls a method on someone else’s behalf. In
this case, the DebtCollector
expects to get back an Asset—but
any Asset will do. Delegate
return types are said to be covariant.
Events
When using delegates, two emergent roles commonly appear: broadcaster and subscriber.
The broadcaster is a type that contains a delegate field. The broadcaster decides when to broadcast, by invoking the delegate.
The subscribers are the
method target recipients. A subscriber decides when to start and stop
listening, by calling += and -= on the broadcaster’s delegate. A subscriber
does not know about, or interfere with, other subscribers.
Events are a language feature that formalizes this pattern. An
event is a wrapper for a delegate
that exposes just the subset of delegate features required for the
broadcaster/subscriber model. The main purpose of events is to
prevent subscribers from interfering with each
other.
To declare an event member, you put the event keyword in front of a delegate member.
For instance:
public class Broadcaster
{
  publicevent ProgressReporter Progress;
}
Code within the Broadcaster
type has full access to Progress and
can treat it as a delegate. Code outside of Broadcaster can only perform += and -=
operations on Progress.
Consider the following example. The Stock class invokes its PriceChanged event every time the Price of the Stock changes:
public delegate void PriceChangedHandler (decimal oldPrice,
                                          decimal newPrice);

public class Stock
{
  string symbol;
  decimal price;

  public Stock (string symbol) {this.symbol = symbol;}public event PriceChangedHandler PriceChanged;

  public decimal Price
  {
    get { return price; }
    set
    {
      if (price == value) return;      // exit if nothing has changed
      if (PriceChanged != null)        // if invocation list not empty
        PriceChanged (price, value);   // fire event
      price = value;
    }
  }
}
If we remove the event keyword
from our example so that PriceChanged
becomes an ordinary delegate field, our example would give the same
results. However, Stock would be less
robust, in that subscribers could do the following things to interfere
with each other:
Replace other subscribers by reassigning
PriceChanged(instead of using the+=operator).Clear all subscribers (by setting
PriceChangedtonull).Broadcast to other subscribers by invoking the delegate
Standard Event Pattern
The .NET Framework defines a standard pattern for writing
events. Its purpose is to provide consistency across both Framework
and user code. At the core of the standard event pattern is System.EventArgs: a predefined Framework
class with no members (other than the static Empty property). EventArgs is a base class for conveying
information for an event. In our Stock example, we would subclass EventArgs to convey the old and new prices
when a PriceChanged event is
fired:
public class PriceChangedEventArgs : System.EventArgs
{
  public readonly decimal LastPrice;
  public readonly decimal NewPrice;

  public PriceChangedEventArgs (decimal lastPrice, decimal newPrice)
  {
    LastPrice = lastPrice;
    NewPrice = newPrice;
  }
}
For reusability, the EventArgs subclass is named according to the
information it contains (rather than the event for which it will be
used). It typically exposes data as properties or as read-only
fields.
With an EventArgs subclass in
place, the next step is to choose or define a delegate for the event.
There are three rules:
It must have a
voidreturn type.It must accept two arguments: the first of type
object, and the second a subclass ofEventArgs. The first argument indicates the event broadcaster, and the second argument contains the extra information to convey.Its name must end in “EventHandler”
The Framework defines a generic delegate called System.EventHandler<> that satisfies
these rules:
public delegate void EventHandler<TEventArgs>
  (object source, TEventArgs e) where TEventArgs : EventArgs;
Tip
Before generics existed in the language (prior to C# 2.0), we would have had to instead write a custom delegate as follows:
public delegate void PriceChangedHandler (object sender,
   PriceChangedEventArgs e);
For historical reasons, most events within the Framework use delegates defined in this way.
The next step is to define an event of the chosen delegate type.
Here, we use the generic EventHandler delegate:
public class Stock
{
  ...public event EventHandler<PriceChangedEventArgs> PriceChanged;
}
Finally, the pattern requires that you write a protected virtual
method that fires the event. The name must match the name of the
event, prefixed with the word “On”, and then accept a single EventArgs argument:
public class Stock
{
  ...

  public event EventHandler<PriceChangedEventArgs> PriceChanged;protected virtual void OnPriceChanged (PriceChangedEventArgs e)
  {
    if (PriceChanged != null) PriceChanged (this, e);
  }
}
This provides a central point from which subclasses can invoke or override the event.
Here’s the complete example:
using System;

public class PriceChangedEventArgs : EventArgs
{
  public readonly decimal LastPrice;
  public readonly decimal NewPrice;

  public PriceChangedEventArgs (decimal lastPrice, decimal newPrice)
  {
    LastPrice = lastPrice; NewPrice = newPrice;
  }
}

public class Stock
{
  string symbol;
  decimal price;

  public Stock (string symbol) {this.symbol = symbol;}

  public event EventHandler<PriceChangedEventArgs> PriceChanged;protected virtual void OnPriceChanged (PriceChangedEventArgs e)
  {
    if (PriceChanged != null) PriceChanged (this, e);
  }

  public decimal Price
  {
    get { return price; }
    set
    {
      if (price == value) return;
      OnPriceChanged (new PriceChangedEventArgs (price, value));
      price = value;
    }
  }
}

class Test
{
  static void Main(  )
  {
    Stock stock = new Stock ("THPW");
    stock.Price = 27.10M;
    // register with the PriceChanged event
    stock.PriceChanged += stock_PriceChanged;
    stock.Price = 31.59M;
  }

  static void stock_PriceChanged (object sender, PriceChangedEventArgs e)
  {
    if ((e.NewPrice - e.LastPrice) / e.LastPrice > 0.1M)
      Console.WriteLine ("Alert, 10% stock price increase!");
  }
}
The predefined nongeneric EventHandler delegate can be used when an
event doesn’t carry extra information. In this example, we rewrite
Stock such that the PriceChanged event is fired after the price
changes, and no information about the event is necessary, other than
it happened. We also make use of the EventArgs.Empty property, in order to avoid
unnecessarily instantiating an instance of EventArgs.
public class Stock
{
  string symbol;
  decimal price;

  public Stock (string symbol) {this.symbol = symbol;}

  public eventEventHandler PriceChanged;

protected virtual void OnPriceChanged (EventArgs e)
  {
    if (PriceChanged != null) PriceChanged (this, e);
  }

  public decimal Price
  {
    get { return price; }
    set
    {
      if (price == value) return;
      price = value;
      OnPriceChanged (EventArgs.Empty);
    }
  }
}
Event Accessors
An event’s accessors are
the implementations of its += and
-= functions. By default, accessors
are implemented implicitly by the compiler. Consider this event
declaration:
public event EventHandler PriceChanged;
The compiler converts this to the following:
A private delegate field
A public pair of event accessor functions, whose implementations forward the
+=and-=operations to the private delegate field
You can take over this process by defining explicit event accessors. Here’s a manual
implementation of the PriceChanged
event from our previous example:
private EventHandler _PriceChanged;         // declare a private delegate

public event EventHandler PriceChanged
{add
  {
    _PriceChanged += value;
  }
  remove
  {
    _PriceChanged -= value;
  }
}
This example is functionally identical to C#’s default accessor
implementation. The add and
remove keywords after the event
declaration instruct C# not to generate a default field and accessor
logic.
With explicit event accessors, you can apply more complex strategies to the storage and access of the underlying delegate. There are three scenarios where this is useful:
When the event accessors are merely relays for another class that is broadcasting the event
When the class exposes a large number of events, where most of the time very few subscribers exist, such as a Windows control. In such cases, it is better to store the subscriber’s delegate instances in a dictionary, since a dictionary will contain less storage overhead than dozens of null delegate field references
When explicitly implementing an interface that declares an event
Here is an example that illustrates the last point:
public interface IFoo
{
  event EventHandler Ev;
}

class Foo : IFoo
{
  private EventHandler ev;

  event EventHandler IFoo.Ev
  {
    add    { ev += value; }
    remove { ev -= value; }
  }
}
Tip
The add and remove parts of an event are compiled to
add_XXX and
remove_XXX
methods.
The += and -= operations on an event are compiled to
calls to the add_XXX and
remove_XXX
methods.
Lambda Expressions (C# 3.0)
A lambda expression is an unnamed method written in place of a delegate instance. The compiler immediately converts the lambda expression to either:
A delegate instance
An expression tree, of type
Expression<T>, representing the code inside the lambda expression in a traversable object model. This allows the lambda expression to be interpreted later at runtime (see the section "Building Query Expressions" in Chapter 8).
In the following example, square is assigned the lambda expression
x = > x * x:
delegate int Transformer (int i);

class Test
{
  static void Main(  )
  {
    Transformer square =x => x * x;
    Console.WriteLine (square(3));    // 9
  }
}
We could rewrite the example by converting the lambda expression into a method, and then call the method through the delegate. In fact, the compiler internally performs that translation for you when you assign a delegate a lambda expression:
delegate int Transformer (int i);

class Test
{
  static void Main(  )
  {
    Transformer square = Square;
    Console.WriteLine (square(3));    // 9
  }
  static int Square (int x) {return x * x;}
}
A lambda expression has the following form:
(parameters) =>expression-or-statement-block
For convenience, you can omit the parentheses if and only if there is exactly one parameter of an inferable type.
In our example, there is a single parameter, x, and the expression is x * x:
x => x * x;
Each parameter of the lambda expression corresponds to a delegate
parameter, and the type of the expression (which may be void) corresponds to the return type of the
delegate.
In our example, x corresponds
to parameter i, and the expression
x * x corresponds to the return type
int, therefore being compatible with
the Transformer delegate:
delegate int Transformer (int i);
A lambda expression’s code can be a statement block instead of an expression. We can rewrite our example as follows:
x => {return x * x;};Explicitly Specifying Lambda Parameter Types
The compiler can usually infer the type of lambda parameters contextually. When this is not the case, you must specify the type of each parameter explicitly. Consider the following delegate type:
delegate int Transformer (int i);
The compiler uses type inference to infer that x is an int, by examining Transfomer’s parameter type:
Transformer d = x => x * x;
We could explicitly specify x’s type as follows:
Transformer d = (int x) => x * x;
Generic Lambda Expressions and the Func Delegates
With generic delegates, it becomes possible to write a small set
of delegate types that are so general they can work for methods of any
return type and any (reasonable) number of arguments. These delegates
are the Func and Action delegates, defined in the System namespace:
delegate TResult Func <T>                   (  );
delegate TResult Func <T1,TResult>          (T1 arg1);
delegate TResult Func <T1,T2,TResult>       (T1 arg1, T2 arg2);
delegate TResult Func <T1,T2,T3,TResult>    (T1 arg1, T2 arg2, T3 arg3);
delegate TResult Func <T1,T2,T3,T4,TResult> (T1 arg1, T2 arg2, T3 arg3,
                                                   T4 arg4);

delegate void Action                              (  );
delegate void Action  <T>                   (T1 arg1);
delegate void Action  <T1,T2>               (T1 arg1, T2 arg2);
delegate void Action  <T1,T2,T3>            (T1 arg1, T2 arg2, T3 arg3);
delegate void Action  <T1,T2,T3,T4>         (T1 arg1, T2 arg2, T3 arg3,
                                                   T4 arg4);
These delegates are extremely general. The Transformer delegate in our previous example
can be replaced with a Func
delegate that takes a single int
argument and returns an int
value:
class Test
{
  static void Main(  )
  {
    Func<int,int> square = x => x * x;
    Console.WriteLine (square(3));     // 9
  }
}
Outer Variables
A lambda expression can reference the local variables and parameters of the method in which it’s defined. For example:
delegate int NumericSequence (  );

class Test
{
  static void Main(  )
  {
    int seed = 0;
    NumericSequence natural = (  ) =>seed++;
    Console.WriteLine (natural(  ));           // 0
    Console.WriteLine (natural(  ));           // 1
  }
}
Local variables and parameters referenced by a lambda expression
are called outer variables. In
our example, seed is an outer
variable referenced by the lambda expression ( ) => seed++. Outer variables are
captured, meaning their lifetime
is extended to that of the lambda expression. Let’s refactor the
example to make the effect of capturing more striking:
delegate int NumericSequence (  );

class Test
{
  static NumericSequence Natural (  )
  {
    int seed = 0;         // executes once  (per call to Natural(  ))
    return (  ) => seed++;  // executes twice (per call to delegate instance
                          //                 returned by Natural(  ))
  }

  static void Main(  )
  {
    NumericSequence natural = Natural (  );
    Console.WriteLine (natural(  ));           // 0
    Console.WriteLine (natural(  ));           // 1
  }
}
The local variable seed would
ordinarily just pop off the stack when the Natural method exits. However, seed is captured by the lambda expression of
the delegate instance returned by Natural. This means the lifetime of seed is extended to the lifetime of that
delegate instance. Subsequent invocations of that same delegate
instance will reuse the same seed
variable.
Tip
Capturing is internally implemented by “lifting” the captured variables into fields of a private class. When the method is called, the class is instantiated and lifetime-bound to the delegate instance.
A local variable instantiated within a
lambda expression is unique per invocation of the delegate instance.
If we refactor our previous example to instantiate seed within the lambda
expression, we get a different (in this case, undesirable)
result:
delegate int NumericSequence (  );

class Test
{
  static NumericSequence Natural (  )
  {
    return (  ) => {int seed = 0; return seed++; };
  }

  static void Main(  )
  {
    NumericSequence natural = Natural (  );
    Console.WriteLine (natural(  ));                 // 0
    Console.WriteLine (natural(  ));                 // 0
  }
}
Anonymous Methods
Anonymous methods are a C# 2.0 feature that has been subsumed by C# 3.0 lambda expressions. An anonymous method is like a lambda expression, but it lacks the following features:
Implicitly typed parameters
Expression syntax (an anonymous method must always be a statement block)
The ability to compile to an expression tree, by assigning to
Expression<T>
To write an anonymous method, you include the delegate keyword followed by a parameter
declaration and then a method body. For example:
delegate int Transformer (int i);

class Test
{
  static void Main(  )
  {
    Transformer square =delegate (int x) {return x * x;};
    Console.WriteLine (square(3));    // 9
  }
}
The following line:
Transformer square =delegate (int x) {return x * x;};is semantically equivalent to the following lambda expression:
Transformer square =(int x) => {return x * x;};Or simply:
Transformer square =x => x * x;Anonymous methods capture outer variables in the same way lambda expressions do.
try Statements and Exceptions
A try statement specifies a
code block subject to error-handling or cleanup code. The try block must be
followed by a catch
block, a finally
block, or both. The catch block executes when an error occurs in
the try block. The finally block executes after execution leaves
the try block (or if present, the
catch block), to perform cleanup
code, whether or not an error occurred.
A catch block has access to an
Exception object that contains
information about the error. You use a catch block to either compensate for the error
or rethrow the exception. You
rethrow an exception if you merely want to log the problem, or if you
want to rethrow a new, higher-level exception type.
A finally block adds
determinism to your program, by always executing no matter what. It’s
useful for cleanup tasks such as closing network connections.
A try statement looks like
this:
try
{
  ... // exception may get thrown within execution of this block
}
catch (ExceptionA ex)
{
  ... // handle exception of type ExceptionA
}
catch (ExceptionB ex)
{
  ... // handle exception of type ExceptionB
}
finally
{
  ... // cleanup code
}
Consider the following program:
class Test
{
  static int Calc (int x) {return 10 / x;}

  static void Main(  )
  {
    int y = Calc (0);
    Console.WriteLine (y);
  }
}
Because x is zero, the runtime
throws a DivideByZeroException, and
our program terminates. We can prevent this by catching the exception as
follows:
class Test
{
  static int Calc (int x) {return 10 / x;}

  static void Main(  )
  {try
    {
      int y = Calc (0);
      Console.WriteLine (y);
    }
    catch (DivideByZeroException ex)
    {
      Console.WriteLine("x cannot be zero");
    }
    Console.WriteLine ("program completed");
  }
}

OUTPUT:
x cannot be zero
program completed
When an exception is thrown, the CLR performs a test:
Is execution currently within a try statement that can catch the
exception?
If so, execution is passed to the compatible
catchblock. If thecatchblock successfully finishes executing, execution moves to the next statement after thetrystatement (if present, executing thefinallyblock first).If not, execution jumps back to the caller of the function, and the test is repeated (after executing any
finallyblocks that wrap the statement).
If no function takes responsibility for the exception, an error dialog is displayed to the user, and the program terminates.
The catch Clause
A catch clause specifies what
type of exception to catch. This must either be System.Exception or a subclass of System.Exception.
Catching System.Exception
catches all possible errors. This is useful when:
Your program can potentially recover regardless of the specific exception type
You plan to rethrow the exception (perhaps after logging it)
Your error handler is the last resort, prior to termination of the program
More typically, though, you catch specific exception
types, in order to avoid having to deal with circumstances
for which your handler wasn’t designed (e.g., an OutOfMemoryException).
You can handle multiple exception types with multiple catch clauses:
class Test
{
  static void Main (string[] args)
  {
    try
    {
      byte b = byte.Parse (args[0]);
      Console.WriteLine (b);
    }
    catch (IndexOutOfRangeException ex)
    {
      Console.WriteLine ("Please provide at least one argument");
    }
    catch (FormatException ex)
    {
      Console.WriteLine ("That's not a number!");
    }
    catch (OverflowException ex)
    {
      Console.WriteLine ("You've given me more than a byte!");
    }
  }
}
Only one catch clause
executes for a given exception. If you want to include a safety net to
catch more general exceptions (such as System.Exception), you must put the more
specific handlers first.
An exception can be caught without specifying a variable, if you don’t need to access its properties:
catch (StackOverflowException)   // no variable
{
  ...
}
Furthermore, you can omit both the variable and the type (meaning that all exceptions will be caught):
catch { ... }Tip
In languages other than C#, it is possible (though not
recommended) to throw an object that does not derive from Exception. The CLR automatically wraps
that object in a RuntimeWrappedException class (which does
derive from Exception).
The finally Block
A finally block always
executes—whether or not an exception is thrown and whether or not the
try block runs to completion.
finally blocks are typically used
for cleanup code.
A finally block executes
either:
After a
catchblock finishesAfter control leaves the
tryblock because of ajumpstatement (e.g.,returnorgoto)After the
tryblock ends
A finally block helps add
determinism to a program. In the following example, the file that we
open always gets closed, regardless of
whether:
The
tryblock finishes normally.Execution returns early because the file is empty (
EndOfStream).An
IOExceptionis thrown while reading the file.
using System;
using System.IO;

class Test
{
  static void Main (  )
  {
    StreamReader reader = null;
    try
    {
      reader = File.OpenText ("file.txt");
      if (reader.EndOfStream)return;
      Console.WriteLine (reader.ReadToEnd (  ));
    }
    finally
    {
      if (reader != null) reader.Dispose (  );
    }
  }
}
In this example, we closed the file by calling Dispose on the StreamReader. Calling Dispose on an object, within a finally block, is a standard convention
throughout the .NET Framework and is supported explicitly in C#
through the using statement.
The using statement
Many classes encapsulate unmanaged resources, such as file
handles, graphics handles, or database connections. These classes
implement System.IDisposable,
which defines a single parameterless method named Dispose to clean up these resources. The
using statement provides an
elegant syntax for calling Dispose on an IDisposable object within a finally block.
The following:
using (StreamReader reader = File.OpenText ("file.txt"))
{
  ...
}
is precisely equivalent to:
StreamReader reader = File.OpenText ("file.txt");
try
{
  ...
}
finally
{
  if (reader != null)
   ((IDisposable)reader).Dispose(  );
}
We cover the disposal pattern in more detail in Chapter 12.
Throwing Exceptions
Exceptions can be thrown either by the runtime or in user code.
In this example, Display throws a
System.ArgumentNullException:
class Test
{
  static void Display (string name)
  {
    if (name == null)throw new ArgumentNullException ("name");

    Console.WriteLine (name);
  }

  static void Main(  )
  {
    try { Display (null); }
    catch (ArgumentNullException ex)
    {
      Console.WriteLine ("Caught the exception");
    }
  }
}
Rethrowing an exception
You can capture and rethrow an exception as follows:
try {  ...  }
catch (Exception ex)
{
  // Log error
  ...throw;          // Rethrow same exception
}
Rethrowing in this manner lets you log an error without swallowing it. It also lets you back out of handling an exception should circumstances turn out to be outside what you expected:
using System.Net;       // (See Chapter 14)
...

string s;
using (WebClient wc = new WebClient(  ))
  try { s = wc.DownloadString ("http://albahari.com/");  }
  catch (WebException ex)
  {
    if (ex.Status == WebExceptionStatus.NameResolutionFailure)
      Console.WriteLine ("Bad domain name");
    elsethrow;     // Can't handle other sorts of WebException, so rethrow
  }
The other common scenario is to rethrow a more specific exception type. For example:
try
{
  ... // parse a date of birth from XML element data
}
catch (FormatException ex)
{
  throw new XmlException ("Invalid date of birth", ex);
}
Rethrowing an exception does not affect the StackTrace property of the exception (see
the next section). When rethrowing a different exception, you can
set the InnerException property
with the original exception if doing so could aid debugging. Nearly
all types of exceptions provide a constructor for this
purpose.
Key Properties of System.Exception
The most important properties of System.Exception are the
following:
StackTraceA string representing all the methods that are called from the origin of the exception to the
catchblock.MessageA string with a description of the error
InnerExceptionThe inner exception (if any) that caused the outer exception. This, itself, may have another
InnerException.
Tip
All exceptions in C# are runtime exceptions—there is no equivalent to Java’s compile-time checked exceptions.
Common Exception Types
The following exception types are used widely throughout the CLR and .NET Framework. You can throw these yourself or use them as base classes for deriving custom exception types.
System.ArgumentExceptionThrown when a function is called with a bogus argument. This generally indicates a program bug
System.ArgumentNullExceptionSubclass of
ArgumentExceptionthat’s thrown when a function argument is (unexpectedly)null.System.ArgumentOutOfRangeExceptionSubclass of
ArgumentExceptionthat’s thrown when a (usually numeric) argument is too big or too small. For example, this is thrown when passing a negative number into a function that accepts only positive values.System.InvalidOperationExceptionThrown when the state of an object is unsuitable for a method to successfully execute, regardless of any particular argument values. Examples include reading an unopened file or getting the next element from an enumerator where the underlying list has been modified partway through the iteration
System.NotSupportedExceptionThrown to indicate that a particular functionality is not supported. A good example is calling the
Addmethod on a collection for whichIsReadOnlyreturnstrue.System.NotImplementedExceptionThrown to indicate that a function has not yet been implemented
System.ObjectDisposedExceptionThrown when the object upon which the function is called has been disposed
Common Patterns
The try method pattern
When writing a method, you have a choice, when something goes
wrong, to return some kind of failure code or throw an exception. In
general, you throw an exception when the error is outside the normal
workflow—or if you expect that the immediate caller won’t be able to
cope with it. Occasionally, though, it can be best to offer both
choices to the consumer. An example of this is the int type, which defines two versions of
its Parse method:
public int Parse     (string input);
public bool TryParse (string input, out int returnValue);
If parsing fails, Parse
throws an exception; TryParse
returns false.
You can implement this pattern by having the
XXX method call the TryXXX method
as follows:
publicreturn-type XXX(input-typeinput) {return-typereturnValue; if (! TryXXX(input, out returnValue)) throw newYYYException (...) return returnValue; }
The atomicity pattern
It can be desirable for an operation to be atomic, where it either successfully
completes or fails without affecting state. An object becomes
unusable when it enters an indeterminate state that is the result of
a half-finished operation. finally blocks facilitate writing atomic
operations.
In the following example, we use an Accumulator class that has an Add method that adds an array of integers
to its field Total. The Add method will cause an OverflowException if Total exceeds the maximum value for an
int. The Add method is atomic, either successfully
updating Total or failing, which
leaves Total with its former
value.
class Test
{
  static void Main(  )
  {
    Accumulator a = new Accumulator (  );
    try
    {
      a.Add (4, 5);             // a.Total is now 9
      a.Add (1, int.MaxValue);  // will cause OverflowException
    }
    catch (OverflowException)
    {
      Console.WriteLine (a.Total);  // a.Total is still 9
    }
  }
}
In the implementation of Accumulator, the Add method affects the Total field as it executes. However, if
anything goes wrong during the
method (e.g., a numeric overflow, a stack overflow, etc.), Total is restored to its initial value at
the start of the method.
public class Accumulator
{
  public int Total;

  public void Add(params int[] ints)
  {
    bool success = false;
    int totalSnapshot = Total;
    try
    {
      foreach (int i in ints)
      {
        checked
        {
          Total += i;
        }
      }
      success = true;
    }
    finally
    {
      if (! success)
        Total = totalSnapshot;
    }
  }
}
Alternatives to exceptions
As with int.TryParse, a
function can communicate failure by sending an error code back to
the calling function via a return type or parameter. Although this
can work with simple and predictable failures, it becomes clumsy
when extended to all errors, polluting method signatures and
creating unnecessary complexity and clutter. It also cannot
generalize to functions that are not methods, such as operators
(e.g., the division operator) or properties. An alternative is to
place the error in a common place where all functions in the call
stack can see it (e.g., a static method that stores the current
error per thread). This, though, requires each function to
participate in an error-propagation pattern that is cumbersome and,
ironically, itself error-prone.
Enumeration and Iterators
Enumeration
An enumerator is a read-only, forward-only cursor over a sequence of values. An enumerator is an object that either:
Implements
IEnumeratororIEnumerator<T>Has a method named
MoveNextfor iterating the sequence, and a property calledCurrentfor getting the current element in the sequence
The foreach statement
iterates over an enumerable
object. An enumerable object is the logical representation of a
sequence. It is not itself a cursor, but an object that produces
cursors over itself. An enumerable object either:
Implements
IEnumerableorIEnumerable<T>Has a method named
GetEnumeratorthat returns an enumerator
Tip
IEnumerator and IEnumerable are defined in System.Collections. IEnumerator<T> and IEnumerable<T> are defined in
System.Collections.Generic.
The enumeration pattern is as follows:
classEnumerator// typically implements IEnumerator or IEnumerator<T> { publicIteratorVariableTypeCurrent { get {...} } public bool MoveNext( ) {...} } classEnumerable// typically implements IEnumerable or IEnumerable<T> { publicEnumeratorGetEnumerator( ) {...} }
Here is the high-level way of iterating through the characters
in the word “beer” using a foreach
statement:
foreach (char c in "beer")
  Console.WriteLine (c);
Here is the low-level way of iterating through the characters in
“beer” without using a foreach
statement:
var enumerator = "beer".GetEnumerator( );while (enumerator.MoveNext( )) { var element = enumerator.Current; Console.WriteLine (element); }
The foreach statement also
acts as a using statement,
implicitly disposing the enumerator object.
Tip
Chapter 7 explains the enumeration interfaces in further detail.
Iterators
Whereas a foreach statement
is a consumer of an enumerator, an iterator is a
producer of an enumerator. In this example, we
use an iterator to return a sequence of Fibonacci numbers (where each
number is the sum of the previous two):
using System;
using System.Collections.Generic;

class Test
{
  static void Main(  )
  {
    foreach (int fib in Fibs(6))
      Console.Write (fib + "  ");
  }

  static IEnumerable<int> Fibs(int fibCount)
  {
    for (int i = 0, prevFib = 1, curFib = 1; i < fibCount; i++)
    {yield return prevFib;
      int newFib = prevFib+curFib;
      prevFib = curFib;
      curFib = newFib;
    }
  }
}

OUTPUT: 1  1  2  3  5  8
Whereas a return statement
expresses “Here’s the value you asked me to return from this method,”
a yield return statement expresses
“Here’s the next element you asked me to yield from this enumerator.”
On each yield statement, control is
returned to the caller, but the callee’s state is maintained so that
the method can continue executing as soon as the caller enumerates the
next element. The lifetime of this state is bound to the enumerator,
such that the state can be released when the caller has finished
enumerating.
Iterator Semantics
An iterator is a method, property, or indexer that contains one
or more yield statements. An
iterator must return one of the following four interfaces (otherwise,
the compiler will generate an error):
// Enumerable interfaces
System.Collections.IEnumerable
System.Collections.Generic.IEnumerable<T>

// Enumerator interfaces
System.Collections.IEnumerator
System.Collections.Generic.IEnumerator<T>
An iterator has different semantics, depending on whether it returns an enumerable interface or an enumerator interface. We describe this in Chapter 7.
Multiple yield statements are permitted. For example:
class Test
{
  static void Main(  )
  {
    foreach (string s in Foo(  ))
      Console.WriteLine(s);         // prints "One","Two","Three"
  }

  static IEnumerable<string> Foo(  )
  {yield return "One";
    yield return "Two";
    yield return "Three";
  }
}
The yield break statement
indicates that the iterator block should exit early, without returning
more elements. We can modify Foo as
follows to demonstrate:
static IEnumerable<string> Foo(bool breakEarly)
{
  yield return "One";
  yield return "Two";

  if (breakEarly)yield break;

  yield return "Three";
}
Tip
A return statement is
illegal in an iterator block. Instead, a yield break statement is used to terminate
the iteration.
Composing Sequences
Iterators are highly composable. We can extend our example, this time to output even Fibonacci numbers only:
using System;
using System.Collections.Generic;

class Test
{
  static void Main(  )
  {
    foreach (int fib in EvenNumbersOnly(Fibs(6)))
      Console.WriteLine(fib);
  }

  static IEnumerable<int> Fibs(int fibCount)
  {
    for (int i = 0, prevFib = 1, curFib = 1; i < fibCount; i++)
    {yield return prevFib;
      int newFib = prevFib+curFib;
      prevFib = curFib;
      curFib = newFib;
    }
  }

  static IEnumerable<int> EvenNumbersOnly(IEnumerable<int> sequence)
  {
    foreach(int x in sequence)
      if ((x % 2) == 0)
        yield return x;
  }
}
Each element is not calculated until the last moment—when
requested by a MoveNext( )
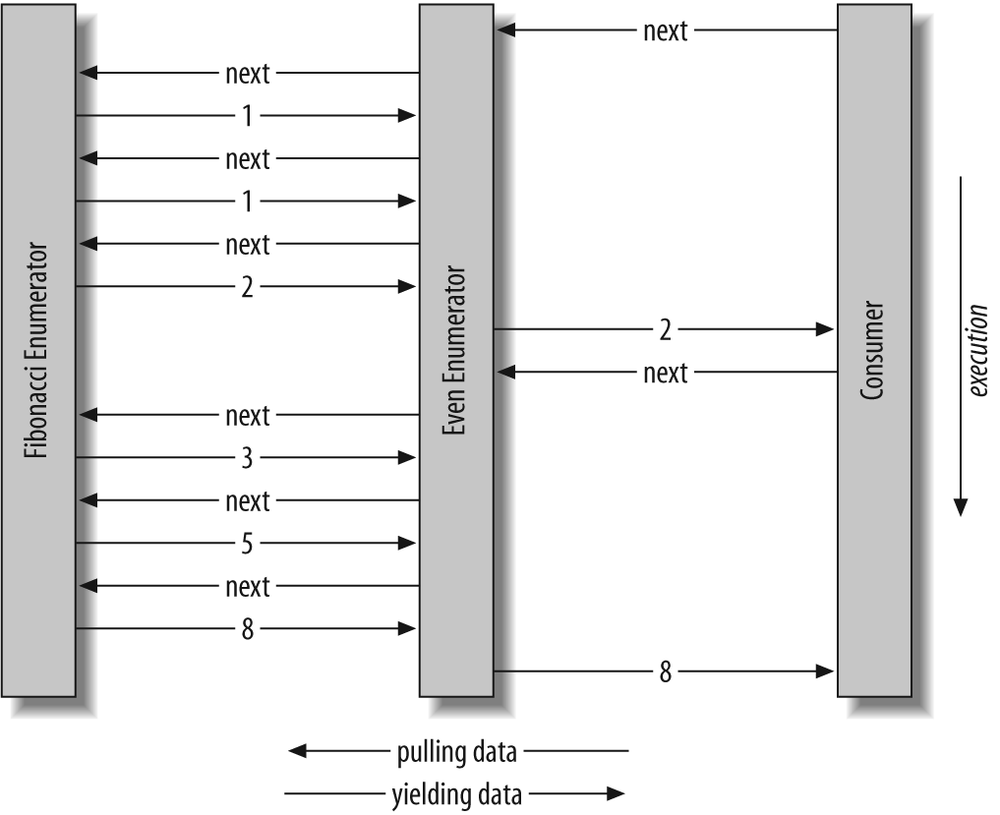
operation. Composing Sequences shows the data
requests and data output over time.
The composability of the iterator pattern is extremely useful in LINQ; we will discuss the subject again in Chapter 8.
Collection Initializers
You can instantiate and populate an enumerable object in a single step. For example:
using System.Collections.Generic;
...

List<int> list = new List<int>{1, 2, 3};
The compiler translates this to the following:
using System.Collections.Generic;
...

List<int> list = new List<int>(  );
list.Add (1);
list.Add (2);
list.Add (3);
This requires that the enumerable object implements the System.Collections.IEnumerable interface,
and that it has an Add method that
takes a single argument.
Nullable Types
Null Basics
Reference types can represent a nonexistent value with a null reference. Value types, however, cannot ordinarily represent null values. For example:
string s = null;       // OK, Reference Type
int i = null;          // Compile Error, Value Type cannot be null
To represent null in a value type, you must use a special
construct called a nullable type.
A nullable type is denoted with a value type followed by the ? symbol:
int? i = null;                     // OK, Nullable Type
Console.WriteLine (i == null);     // True
Nullable<T> struct
T? translates into System.Nullable<T>. Nullable<T> is a lightweight
immutable structure, having only two fields, to represent Value and HasValue. The essence of System.Nullable<T> is very
simple:
public struct Nullable<T> where T : struct
{
  public T Value {get;}
  public bool HasValue {get;}
  public T GetValueOrDefault(  );
  public T GetValueOrDefault(T defaultValue);
  ...
}
The code:
int? i = null;
Console.WriteLine (i == null);              // true
translates to:
Nullable<int> i = new Nullable<int>(  );
Console.WriteLine (! i.HasValue);           // true
Attempting to retrieve Value when HasValue is false throws an InvalidOperationException. GetValueOrDefault( ) returns Value if HasValue is true; otherwise, it returns
new T( ) or a specified custom
default value.
The default value of T? is
null.
Implicit and explicit nullable conversions
The conversion from T to
T? is implicit, and from T? to T
is explicit. For example:
int? x = 5;        // implicit
int y = (int)x;    // explicit
The explicit cast is directly equivalent to calling the
nullable object’s Value property.
Hence, an InvalidOperationException is thrown if
HasValue is false.
Lifted Operators
The Nullable<T> struct
does not define operators such as <, >, or even ==. Despite this, the following code
compiles and executes correctly:
int? x = 5;
int? y = 10;
bool b = x < y;      // true
This works because the compiler steals or “lifts” the less-than operator from the underlying value type. Semantically, it translates the preceding comparison expression into this:
bool b = (x.HasValue && y.HasValue) ? (x.Value < y.Value) : false;
In other words, if both x and
y have values, it compares via
int’s less-than operator;
otherwise, it returns false.
Operator lifting means you can implicitly use T’s operators on T?. You can define operators for T? in order to provide special-purpose null
behavior, but in the vast majority of cases, it’s best to rely on the
compiler automatically applying systematic nullable logic for you.
Here are some examples:
int? x = 5;
int? y = null;

// equality operator examples
Console.WriteLine(x == y);    // false
Console.WriteLine(x == null); // false
Console.WriteLine(x == 5);    // true
Console.WriteLine(y == null); // true
Console.WriteLine(y == 5);    // false
Console.WriteLine(y != 5);    // true

// relational operator examples
Console.WriteLine(x < 6);     // true
Console.WriteLine(y < 6);     // false
Console.WriteLine(y > 6);     // false

// all other operator examples
Console.WriteLine(x + 5);     // 10
Console.WriteLine(x + y);     // null (prints empty line)
The compiler performs null logic differently depending on the category of operator. The following sections explain these different rules.
Equality operators (== !=)
Lifted equality operators handles nulls just like references do. This means two null values are equal:
Console.WriteLine ( null == null); // True
Console.WriteLine ((bool?)null == (bool?)null); // True
Further:
If exactly one operand is null, the operands are unequal.
If both operands are non-null, their Values are compared.
Relational operators (< <= >= >)
The relational operators work on the principle that it is
meaningless to compare null operands. This means comparing a null
value to either a null or nonnull value returns false.
bool b = x < y;   // translation:
bool b = (x == null || y == null) ? false : (x.Value < y.Value);

// b is false
All other operators (+ − * / % & | ^ << >> + ++ − -- ! ∼)
These operators work on the principle to always return “I don’t know” (i.e., null) when fed any operands that are null. This means that if any operand is null, the result is also null. This pattern should be familiar to SQL users.
int? c = x + y;   // translation:
int? c = (x == null || y == null) ? null : (int?)(x.Value + y.Value);

// c is null
bool?
When supplied operands of type bool?, the & and | operators treat null as an unknown
value. So, null | true
is true, because:
If the unknown value is false, the result would be true
If the unknown value is true, the result would be true
Similarly, null & false
is false. This behavior would be familiar to SQL users. The following
example enumerates other combinations:
bool? n = null; bool? f = false; bool? t = true; Console.WriteLine (n | n); //(null)Console.WriteLine (n | f); //(null)Console.WriteLine (n | t); // True Console.WriteLine (n & n); //(null)Console.WriteLine (n & f); // False Console.WriteLine (n & t); //(null)
Null Coalescing Operator
The ?? operator is the null
coalescing operator, and it can be used with both nullable types and
reference types. It says “If the operand is nonnull, give it to me;
otherwise, give me a default value.” For example:
int? x = null;
int y = x ?? 5;        // y is 5
The ?? operator is equivalent
to calling GetValueOrDefault with
an explicit default value.
Scenarios for Nullable Types
One of the most common scenarios for nullable types is to represent unknown values. This frequently occurs in database programming, where a class is mapped to a table with nullable columns. If these columns are strings (e.g., an EmailAddress column on a Customer table), there is not a problem as string is a reference type in the CLR, which can be null. However, most other SQL column types map to CLR struct types, making nullable types very useful when mapping SQL to the CLR. For example:
// maps to a Customer table in a database
public class Customer
{
  ...
  public decimal? AccountBalance;
}
A nullable type can also be used to represent the backing field of an ambient property. An ambient property, if null, returns the value of its parent. For example:
public class Row
{
  ...
  Grid parent;
  Color? backColor;

  public Color BackColor
  {
    get { return backColor ?? parent.BackColor; }
    set { backColor = backColor == parent.BackColor ? null : value; }
  }
}
Alternatives to Nullable Types
Before nullable types were part of the C# language (i.e., before
C# 2.0), there were many strategies to deal with nullable value types,
examples of which still appear in the .NET Framework for historical
reasons. One of these strategies is to designate a particular nonnull
value as the “null value”; an example is in the string and array
classes. String.IndexOf returns the
magic value of −1 when the
character is not found:
int i = "Pink".IndexOf ('b');
Console.WriteLine(s);         // outputs −1
However, Array.IndexOf
returns −1 only if the index is
0-bounded. The more general formula is that IndexOf returns 1 less than the minimum
bound of the array. In the next example, IndexOf returns 0 when an element is not found:
// Create an array whose lower bound is 1 instead of 0:

Array a = Array.CreateInstance (typeof(string),
                                new int[] {2}, new int[] {1});
a.SetValue("a", 1);
a.SetValue("b", 2);
Console.WriteLine(Array.IndexOf(a, "c")); // outputs 0
Nominating a “magic value” is problematic for several reasons:
It means that each value type has a different representation of null. In contrast, nullable types provide one common pattern that works for all value types
There may be no reasonable designated value. In the previous example, −1 could not always be used. The same is true for our earlier examples representing an unknown account balance and an unknown temperature
Forgetting to test for the magic value results in an incorrect value that may go unnoticed until later in execution—when it pulls an unintended magic trick. Forgetting to test
HasValueon a null value, however, throws anInvalidOperationExceptionon the spot.The ability for a value to be null is not captured in the type. Types communicate the intention of a program, allow the compiler to check for correctness, and enable a consistent set of rules enforced by the compiler.
Operator Overloading
Overview
Operators can be overloaded to provide more natural syntax for custom types. Operator overloading is most appropriately used for implementing custom structs that represent fairly primitive data types. For example, a custom numeric type is an excellent candidate for operator overloading.
Table 4-1 lists the overloadable symbolic operators.
The following operators are also overloadable:
Implicit and explicit conversions (with the
implicitandexplicitkeywords)The literals
trueandfalse
The following operators are indirectly overloaded:
The compound assignment operators (e.g.,
+=,/=) are implicitly overridden by overriding the noncompound operators (e.g.,+,=).The conditional operators
&&and||are implicitly overridden by overriding the bitwise operators&and|.
Operator Functions
An operator is overloaded by declaring an operator function. An operator function has the following rules:
The name of the function is specified with the
operatorkeyword followed by an operator symbol.The operator function must be marked
static.The parameters of the operator function represent the operands
The return type of an operator function represents the result of an expression
At least one of the operands must be the type in which the operator function is declared
In the following example, we define a struct called Note representing a musical note, and then
overload the + operator:
public struct Note
{
  int value;
  public Note (int semitonesFromA) { value = semitonesFromA; }public static Note operator + (Note x, int semitones
  {
    return new Note (x.value + semitones);
  }
}
This overload allows us to add an int to a Note:
 Note B = new Note(2);
 Note CSharp = B + 2;
Overloading an assignment operator automatically supports the
corresponding compound assignment operator. In our example, since we
overrode +, we can use += too:
CSharp += 2;
Overloading Equality and Comparison Operators
Equality and comparison operators are sometimes overridden when writing structs, and in rare cases when writing classes. Special rules and obligations come with overloading the equality and comparison operators, which we explain in Chapter 6. A summary of these rules is as follows:
- Pairing
The C# compiler enforces operators that are logical pairs to both be defined. These operators are (
== !=), (< >), and (<= >=).EqualsandGetHashCodeIn most cases, if you overload (
==) and (!=), you need to override theEqualsandGetHashCodemethods defined onobjectin order to get meaningful behavior. The C# compiler will give a warning if you do not do this. (See the section "Equality comparison" in Chapter 6 for more details.)IComparableandIComparable<T>If you overload (
< >) and (<= >=), you should implementIComparableandIComparable<T>.
Custom Implicit and Explicit Conversions
Implicit and explicit conversions are overloadable operators. These conversions are typically overloaded to make converting between strongly related types (such as numeric types) concise and natural.
To convert between weakly related types, the following strategies are more suitable:
Write a constructor that has a parameter of the type to convert from
Write
ToXXXandFromXXXmethods to convert between types.
As explained in the discussion on types, the rationale behind implicit conversions is that they are guaranteed to succeed and do not lose information during the conversion. Conversely, an explicit conversion should be required either when runtime circumstances will determine whether the conversion will succeed or if information may be lost during the conversion.
In this example, we define conversions between our musical
Note type and a double (which
represents the frequency in hertz of that note):
...
// Convert to hertz
public static implicit operator double(Note x)
{
  return 440 * Math.Pow (2,(double) x.value / 12 );
}
// Convert from hertz (only accurate to nearest semitone)
public static explicit operator Note(double x)
{
  return new Note ((int) (0.5 + 12 * (Math.Log(x/440) / Math.Log(2)) ));
}
...

Note n =(Note)554.37;  // explicit conversion
double x = n;          // implicit conversion
Tip
Following our own guidelines, this example might be better
implemented with a ToFrequency
method (and a static FromFrequency method) instead of implicit
and explicit operators.
Overloading true and false
The true and false operators are used in the extremely
rare case of operators defining types with three-state logic to enable
these types to work seamlessly with conditional statements and
operators—namely, the if, do, while, for, and ?:. The System.Data.SqlTypes.SqlBooleanstruct
provides this functionality. For example:
class Test
{
  static void Main(  )
  {
    SqlBoolean a = SqlBoolean.Null;
    if (a)
      Console.WriteLine("True");
    else if (! a)
      Console.WriteLine("False");
    else
      Console.WriteLine("Null");
  }
}

OUTPUT:
Null
The following code is a reimplementation of the parts of
SqlBoolean necessary to demonstrate
the true and false operators:
public struct SqlBoolean
{
  public static bool operatortrue(SqlBoolean x)
  {
    return x.m_value == True.m_value;
  }

  public static bool operator false(SqlBoolean x)
  {
    return x.m_value == False.m_value;
  }

  public static SqlBoolean operator !(SqlBoolean x)
  {
    if (x.m_value == Null.m_value)  return Null;
    if (x.m_value == False.m_value) return True;
    return False;
  }

  public static readonly SqlBoolean Null =  new SqlBoolean(0);
  public static readonly SqlBoolean False = new SqlBoolean(1);
  public static readonly SqlBoolean True =  new SqlBoolean(2);

  private SqlBoolean (byte value) {m_value = value;}
  private byte m_value;
}
Extension Methods (C# 3.0)
Extension methods allow an existing type to be extended with new
methods without altering the definition of the original type. An
extension method is a static method of a static class, where the
this modifier is applied to the first
parameter. The type of the first parameter will be the type that is
extended. For example:
public static class StringHelper
{
  public static bool IsCapitalized (this string s)
  {
    if (string.IsNullOrEmpty(s)) return false;
    return char.IsUpper(s[0]);
  }
}
The IsCapitalized extension
method can be called as though it were an instance method on a string,
as follows:
Console.WriteLine("Perth".IsCapitalized( ));An extension method call, when compiled, is translated back into an ordinary static method call:
Console.WriteLine(StringHelper.IsCapitalized("Perth"));The translation works as follows:
arg0.Method(arg1, arg2, ...);              // extension method call
StaticClass.Method(arg0, arg1, arg2, ...); // static method call
Extension Method Chaining
Extension methods, like instance methods, provide a tidy way to chain functions. Consider the following two functions:
public static class StringHelper
{
  public static string Pluralize (this string s) {...}
  public static string Capitalize (this string s) {...}
}
x and y are equivalent and both evaluate to
"Sausages", but x uses extension methods, whereas y uses static methods:
string x = "sausage".Pluralize().Capitalize(  );
string y = StringHelper.Capitalize (StringHelper.Pluralize("sausage")));
Ambiguity and Resolution
Namespaces
An extension method cannot be accessed unless the namespace is
in scope. Consider the extension method IsCapitalized in the following
example:
using System;

namespace Utils
{
  public static class StringHelper
  {
    public static boolIsCapitalized (this string s)
    {
      if (string.IsNullOrEmpty(s)) return false;
      return char.IsUpper(s[0]);
    }
  }
}
To use IsCapitalized, the
following application must import Utils, in order to avoid a compile-time
error:
namespace MyApp
{using Utils;

  class Test
  {
    static void Main(  )
    {
      Console.WriteLine("Perth".IsCapitalized(  ));
    }
  }
}
Extension methods versus instance methods
Any compatible instance method will always take precedence
over an extension method. In the following example, Test’s Foo method will always take
precedence—even when called with an argument x of type int:
class Test
{
  public void Foo (object x) { }    // This method always wins
}

static class Extensions
{
  public static void Foo (this Test t, int x) { }
}
The only way to call the extension method in this case is via
normal static syntax; in other words, Extensions.Foo(...).
Extension methods versus extension methods
If two extension methods have the same signature, the extension method must be called as an ordinary static method to disambiguate the method to call. If one extension method has more specific arguments than another, the more specific extension method takes precedence over the less one. For example:
static class StringHelper
{
  public static bool IsCapitalized (thisstring s)
  {
    if (string.IsNullOrEmpty (s)) return false;
    return char.IsUpper (s[0]);
  }
}

static class ObjectHelper
{
  public static bool IsCapitalized (this object s)
  {
    return true;
  }
}
Usage:
// Calls StringHelper.IsCapitalized
Console.WriteLine("Perth".IsCapitalized(  ));

// Explictly calling ObjectHelper.IsCapitalized
Console.WriteLine(ObjectHelper.IsCapitalized("Perth"));
Extension Methods on Interfaces
Extension methods can apply to interfaces:
using System;
using System.Collections.Generic;

static class Test
{
  static void Main(  )
  {
    var strings = new string[] { "a", "b", null, "c"};
    foreach (string s in strings.StripNulls(  ))
      Console.WriteLine(s);
  }
  static IEnumerable<T> StripNulls<T> (this IEnumerable<T> seq)
  {
    foreach (T t in seq)
      if (t != null)
        yield return t;
  }
}
Anonymous Types (C# 3.0)
An anonymous type is a simple class created on the fly to store a
set of values. To create an anonymous type, use the new keyword followed by an object initializer,
specifying the properties and values the type will contain. For
example:
var dude = new { Name = "Bob", Age = 1 };The compiler translates this to the following:
internal class AnonymousGeneratedTypeName
{
  private string name;  // actual field name is irrelevant
  private int    age;   // actual field name is irrelevant

  public string  Name { get {return name;} set {name = value;}}
  public int     Age  { get {return age; } set {age = value; }}
}
...

AnonymousGeneratedTypeName dude = new AnonymousGeneratedTypeName (  );
dude.Name = "Bob";
dude.Age = 1;
You must use the var keyword to
reference an anonymous type, because the name of the type is
anonymous.
The property name of an anonymous type can be inferred from an expression that is itself an identifier. For example:
intAge= 1; var dude = new { Name = "Bob",Age};
is equivalent to:
var dude = new { Name = "Bob",Age = Age };Anonymous types are used primarily when writing LINQ queries (see Chapter 8).
Attributes
You’re already familiar with the notion of attributing code
elements of a program with modifiers, such as virtual or ref. These constructs are built into the
language. Attributes are an
extensible mechanism for adding custom information to code elements
(assemblies, types, members, return values, and parameters). This
extensibility is useful for services that integrate deeply into the type
system, without requiring special keywords or constructs in the C#
language.
A good scenario for attributes is serialization—the process of converting arbitrary objects to and from a particular format. In this scenario, an attribute on a field can specify the translation between C#’s representation of the field and the format’s representation of the field.
Attribute Classes
An attribute is defined by a class that inherits (directly or
indirectly) from the abstract class System.Attribute. To attach an attribute to
a code element, specify the attribute’s type name in square brackets,
before the code element. For example, the following attaches the
ObsoleteAttribute to the Foo class:
[ObsoleteAttribute]
public class Foo {...}
This attribute is recognized by the compiler and will cause compiler warnings if a type or member marked obsolete is referenced. By convention, all attribute types end in the word “Attribute”. C# recognizes this and allows you to omit the suffix when attaching an attribute:
[Obsolete]
public class Foo {...}
ObsoleteAttribute is a type
declared in the System namespace as
follows (simplified for brevity):
public sealed class ObsoleteAttribute : Attribute {...}The C# language and the .NET Framework include a number of predefined attributes. We describe how to write your own attributes in Chapter 17.
Named and Positional Parameters
Attributes may have parameters. In the following example, we
apply the XmlElement attribute to a
class. The XmlElement attribute
tells the System.Xml.Linq model how
an object is represented in XML. The XmlElement attribute accepts several
attribute parameters. The
following attribute maps the CustomerEntity class to an XML element named
Customer, belonging to the http://oreilly.com namespace:
[XmlElement ("Customer", Namespace="http://oreilly.com")]
public class CustomerEntity { ... }
Attribute parameters fall into one of two categories: positional and named. In the preceding example, the first argument is a positional parameter; the second is a named parameter. Positional parameters correspond to parameters of the attribute type’s public constructors. Named parameters correspond to public fields or public properties on the attribute type.
When specifying an attribute, you must include positional parameters that correspond to one of the attribute’s constructors. Named parameters are optional.
In Chapter 17, we describe the valid parameter types and rules for their evaluation.
Attribute Targets
Implicitly, the target of an attribute is the code element it immediately precedes, which is typically a type or type member. You can also attach attributes, however, to an assembly. This requires that you explicitly specify the attribute’s target.
Here is an example of using the CLSCompliant attribute to specify CLS
compliance for an entire assembly:
[assembly: CLSCompliant(true)]Specifying Multiple Attributes
Multiple attributes can be specified for a single code element. Each attribute can be listed either within the same pair of square brackets (separated by a comma) or in separate pairs of square brackets (or a combination of the two). The following three examples are semantically identical:
[Serializable, Obsolete, CLSCompliant(false)]
public class Bar {...}

[Serializable] [Obsolete] [CLSCompliant(false)]
public class Bar {...}

[Serializable, Obsolete]
[CLSCompliant(false)]
public class Bar {...}
Unsafe Code and Pointers
C# supports direct memory manipulation via pointers within blocks
of code marked unsafe and compiled with the /unsafe compiler option. Pointer types are
primarily useful for interoperability with C APIs, but may also be used
for accessing memory outside the managed heap or for
performance-critical hotspots.
Pointer Basics
For every value type or pointer type V, there is a corresponding pointer type V*. A pointer instance holds the address of a value. This is considered to be of type V, but pointer types can be (unsafely) cast to any other pointer type. Table 4-2 shows the main pointer operators.
Unsafe Code
By marking a type, type member, or statement block with the
unsafe keyword, you’re permitted to
use pointer types and perform C++ style pointer operations on memory
within that scope. Here is an example of using pointers to quickly
process a bitmap:
unsafe void RedFilter(int[,] bitmap)
{
  int length = bitmap.Length;
  fixed (int* b = bitmap)
  {
    int* p = b;
    for(int i = 0; i < length; i++)
      *p++ &= 0xFF;
  }
}
Unsafe code can run faster than a corresponding safe implementation. In this case, the code would have required a nested loop with array indexing and bounds checking. An unsafe C# method may also be faster than calling an external C function, since there is no overhead associated with leaving the managed execution environment.
The fixed Statement
The fixed statement is
required to pin a managed object, such as the bitmap in the previous
example. During the execution of a program, many objects are allocated
and deallocated from the heap. In order to avoid unnecessary waste or
fragmentation of memory, the garbage collector moves objects around.
Pointing to an object is futile if its address could change while
referencing it, so the fixed
statement tells the garbage collector to “pin” the object and not move
it around. This may have an impact on the efficiency of the runtime,
so fixed blocks should be used only briefly, and heap allocation
should be avoided within the fixed block.
Within a fixed statement, you
can get a pointer to any value type, an array of value types, or a
string. In the case of arrays and strings, the pointer will actually
point to the first element, which is a value type.
Value types declared inline within reference types require the reference type to be pinned, as follows:
class Test
{
  int x;
  static void Main(  )
  {
    Test test = new Test (  );
    unsafe
    {
       fixed(int* p = &test.x)  // pins test
       {
         *p = 9;
       }
       System.Console.WriteLine(test.x);
    }
  }
}
We describe the fixed
statement further in the section "Mapping a Struct to Unmanaged Memory" in Chapter 22.
The Pointer-to-Member Operator
In addition to the & and
* operators, C# also provides the
C++ style -> operator, which can
be used on structs:
struct Test
{
  int x;
  unsafe static void Main(  )
  {
    Test test = new Test(  );
    Test* p = &test;
    p->x = 9;
    System.Console.WriteLine(test.x);
  }
}
Arrays
The stackalloc keyword
Memory can be allocated in a block on the stack explicitly
using the stackalloc keyword.
Since it is allocated on the stack, its lifetime is limited to the
execution of the method, just as with any other local variable. The
block may use the [] operator to
index into memory.
int* a = stackalloc int [10];
for (int i = 0; i < 10; ++i)
   Console.WriteLine(a[i]); // print raw memory
Fixed-size buffers
Memory can be allocated in a block within a struct using the
fixed keyword:
unsafe struct UnsafeUnicodeString
{
  public short Length;
  publicfixed byte Buffer[30];
}

unsafe class UnsafeClass
{
  private UnsafeUnicodeString uus;
  public UnsafeClass (string s)
  {
    uus.Length = (short)s.Length;
    fixed (byte* p = uus.Buffer)
      for (int i = 0; i < s.Length; i++)
        p[i] = (byte)s[i];
  }
}
class Test
{
  static void Main(  ) {new UnsafeClass("Christian Troy");}
}
The fixed keyword is also
used in this example to pin the object on the heap that contains the
buffer (which will be the instance of UnsafeClass).
void*
A void pointer (void*) is a
pointer that makes no assumptions about the type of the underlying
data. This approach is useful for functions that deal with raw memory.
An implicit conversion exists from any pointer type to void*. A void* cannot be dereferenced, and arithmetic
operations cannot be performed on void pointers. For
example:
class Test
{
  unsafe static void Main (  )
  {
    short[ ] a = {1,1,2,3,5,8,13,21,34,55};
      fixed (short* p = a)
      {
        //sizeof returns size of value-type in bytes
        Zap (p, a.Length * sizeof (short));
      }
    foreach (short x in a)
      System.Console.WriteLine (x); // prints all zeros
  }

  unsafe static void Zap (void* memory, int byteCount)
  {
    byte* b = (byte*)memory;
      for (int i = 0; i < byteCount; i++)
        *b++ = 0;
  }
}
Pointers to Unmanaged Code
Pointers are also useful for accessing data outside the managed heap (such as when interacting with C DLLs or COM), or when dealing with data not in the main memory (such as graphics memory or a storage medium on an embedded device).
Preprocessor Directives
Preprocessor directives supply the compiler with additional information about regions of code. The most common preprocessor directives are the conditional directives, which provide a way to include or exclude regions of code from compilation. For example:
#define DEBUG
class MyClass
{
  int x;
  void Foo(  )
  {
    # if DEBUG
    Console.WriteLine("Testing: x = {0}", x);
    # endif
  }
  ...
}
In this class, the statement in Foo is compiled as conditionally dependent
upon the presence of the DEBUG
symbol. If we remove the DEBUG
symbol, the statement is not compiled. Preprocessor symbols can be
defined within a source file (as we have done), and they can be passed
to the compiler with the /define:
symbol command-line option.
The #error and #warning symbols prevent accidental misuse of
conditional directives by making the compiler generate a warning or
error given an undesirable set of compilation symbols. See Table 4-3 for a list of
preprocessor directives and their actions.
Preprocessor directive | Action |
| Defines
|
| Undefines
|
|
|
| |
| Executes code to
subsequent |
| Combines |
| Ends conditional directives. |
|
|
|
|
|
|
| Marks the beginning of an outline. |
| Ends an outline region. |
Conditional Attributes
An attribute decorated with the Conditional attribute will be compiled only
if a given preprocessor symbol is present. For example:
// file1.cs
#define DEBUG
using System;
using System.Diagnostics;[Conditional("DEBUG")]
public class TestAttribute : Attribute {}

// file2.cs
#define DEBUG
[Test]
class Foo
{
  [Test]
  private string s;
}
The compiler will not incorporate the [Test] attributes if the DEBUG symbol is in
scope for file2.cs.
Pragma Warning
The compiler generates a warning when it spots something in your code that seems unintentional. Unlike errors, warnings don’t ordinarily prevent your application from compiling.
Compiler warnings can be extremely valuable in spotting bugs. Their usefulness, however, is undermined when you get an excessive number of them. In a large application, maintaining a good signal-to-noise ratio is essential if the “real” warnings are to get noticed.
To this effect, the compiler allows you to selectively suppress
warnings with the #pragma warning
directive. In this example, we instruct the compiler not to warn us
about the field Message not being
used:
public class Foo
{
  static void Main(  ) { }#pragma warning disable 414
  static string Message = "Hello";
  #pragma warning restore 414
}
Omitting the number in the #pragma
warning directive disables or restores all warning
codes.
If you are thorough in applying this directive, you can compile
with the /warnaserror switch—this
tells the compiler to treat any residual warnings as errors.
XML Documentation
Documentation comments are composed of embedded XML tags.
Documentation comments start with three slashes (///), and apply to a type or type-member
definition.
Tip
You can also use /** / for
documentation comments (notice the extra star), but this format is
less supported by the IDE.
The compiler can extract the documentation comments and output an XML file. Since the compiler understands the source code, it is able to validate the comments for consistency and expands cross-references into fully qualified type IDs.
The XML documentation file can be placed in the same directory as the application or library. The Visual Studio .NET IDE will automatically load this XML file, such that the documentation is integrated with IntelliSense. If you’re producing a component library, you can use a tool such as NDoc or Sandcastle to produce HTML help files.
Here is an example of documentation comments for a type. If you’re
using Visual Studio .NET, typing a /// before a member automatically gets the IDE
to prepopulate the summary and parameter tags. Within the documentation,
starting a tag with < causes
IntelliSense to give you a list of built-in XML documentation
annotations.
// Filename: DocTest.cs
using System;

class Test
{
  /// <summary>
  /// The Foo method is called from
  ///   <see cref="Main">Main</see>
  /// </summary>
  /// <mytag>user defined tag info</mytag>
  /// <param name="s">Description for s</param>
  static void Foo(string s) { Console.WriteLine(s); }

  static void Main(  ) { Foo("42"); }
}
When run through the compiler using the /doc:<filename>
command-line option, the following XML file is generated:
<?xml version="1.0"?>
<doc>
  <assembly>
    <name>DocTest</name>
  </assembly>
  <members>
    <member name="M:Test.Foo(System.String)">
      <summary>
      The Foo method is called from
        <see cref="M:Test.Main">Main</see>
      </summary>
      <mytag>user defined tag info</mytag>
      <param name="s">Description for s</param>
     </member>
  </members>
</doc>
Every member with a documentation comment has a <member> tag with a name attribute that uniquely identifies the
member. The cref attribute in the
<see> tag has been expanded to
correctly refer to another code element. The custom documentation
element <mytag> is just carried
along with the member payload.
Predefined XML Tags
Here is a list of the predefined set of XML tags that can be used to mark up the descriptive text:
<summary><summary>
description</summary>This is the first thing you will see when IntelliSense shows the tool tip for the member
<remarks><remarks>
description</remarks>This is the additional text you will see when IntelliSense shows the tool tip for the member. This tag provides additional information regarding a particular member. Information about side effects within the method, or particular behavior that may not otherwise be intuitive (such as the idea that this method may throw an
ArrayOutOfBoundsExceptionif a parameter is greater than 5) is listed here.<param><param name=”
name“>description</param>This tag describes a parameter on a method. If this tag is applied to any parameter on a method, all of the parameters on that method must be documented
<returns><returns>
description</returns>This tag describes the return value for a method
<exception><exception [cref=”
type“]>description</exception>This tag documents the exceptions a method may throw. If present, the optional
crefattribute should refer to the type of the exception. The type name must be enclosed in double quotation marks ("").<permission><permission [cref=”
type“]>description</permission>This tag documents the permissions requirement for a type or member. If present, the optional
crefattribute should refer to the type that represents the permission set required by the member, although the compiler does not validate this. The type name must be enclosed in double quotation marks ("").<example><example>
description</example>This tag provides a description and sample source code explaining the use of a type or member. Typically, the
<example>tag provides the description and contains the<c>and<code>tags, although they can also be used independently.<c><c>
code</c>This tag indicates an inline code snippet. Typically, this tag is used inside an
<example>block (described previously).<code><code>
code</code>This tag is used to indicate multiline code snippets. Again, this is typically used inside an
<example>block (described previously).<see><see cref=”
member“>text</see>This tag identifies cross-references in the documentation to other types or members. Typically, the
<see>tag is used inline within a description (as opposed to the<seealso>tag, which is broken out into a separate “See Also” section). This tag is useful because it allows tools to generate cross-references, indexes, and hyperlinked views of the documentation. Member names must be enclosed by double quotation marks ("").<seealso><seealso cref=”
member“>text</seealso>This tag identifies cross-references in the documentation to other types or members. Typically,
<seealso>tags are broken out into a separate “See Also” section. This tag is useful because it allows tools to generate cross-references, indexes, and hyperlinked views of the documentation. Member names must be enclosed by double quotation marks ("").<value><value>
description</value>This tag describes a property on a class
<paramref><paramref name=”
name“/>This tag identifies the use of a parameter name within descriptive text, such as
<remarks>. The name must be enclosed by double quotation marks ("").<list><list type=[ bullet | number | table ]> <listheader> <term>name</term> <description>description</description> </listheader> <item> <term>name</term> <description>description</description> </item> </list>This tag provides hints to documentation generators about how to format the documentation—in this case, as a list of items.
<para><para>
text</para>This tag sets off the text as a paragraph to documentation generators
<include><include file='
filename' path='path-to-element'>This tag specifies an external file that contains documentation and an XPath path to a specific element in that file. For example, a path of
docs[@id="001"]/*retrieves whatever is inside<docs id="001"/>. Thefilenameandpathmust be enclosed by single quotation marks (''), but you must use double quotation marks ("") for theidattribute within thepath-to-elementexpression.
User-Defined Tags
There is little that is special about the predefined XML tags
recognized by the C# compiler, and you are free to define your own.
The only special processing done by the compiler is on the <param> tag (in which it verifies the
parameter name and that all the parameters on the method are
documented) and the cref attribute
(in which it verifies that the attribute refers to a real type or
member and expands it to a fully qualified type or member ID). The
cref attribute can also be used in
your own tags and is verified and expanded just as it is in the
predefined <exception>,
<permission>, <see>, and <seealso> tags.
Type or Member Cross-References
Type names and type or member cross-references are translated into IDs that uniquely define the type or member. These names are composed of a prefix that defines what the ID represents and a signature of the type or member.
Table 4-4 lists the set of type or member prefixes.
XML type prefix | ID prefixes applied to |
| Namespace |
| Type (class, struct, enum, interface, delegate) |
| Field |
| Property (includes indexers) |
| Method (includes special methods) |
| Event |
| Error |
The rules describing how the signatures are generated are well documented, although fairly complex.
Here is an example of a type and the IDs that are generated:
// Namespaces do not have independent signatures
namespace NS
{
  /// T:NS.MyClass
  class MyClass
  {
    /// F:NS.MyClass.aField
    string aField;

    /// P:NS.MyClass.aProperty
    short aProperty {get {...} set {...}}

    /// T:NS.MyClass.NestedType
    class NestedType {...};

    /// M:NS.MyClass.X(  )
    void X(  ) {...}

    /// M:NS.MyClass.Y(System.Int32,System.Double@,System.Decimal@)
    void Y(int p1, ref double p2, out decimal p3) {...}

    /// M:NS.MyClass.Z(System.Char[ ],System.Single[0:,0:])
    void Z(char[ ] 1, float[,] p2) {...}

    /// M:NS.MyClass.op_Addition(NS.MyClass,NS.MyClass)
    public static MyClass operator+(MyClass c1, MyClass c2) {...}

    /// M:NS.MyClass.op_Implicit(NS.MyClass)˜System.Int32
    public static implicit operator int(MyClass c) {...}

    /// M:NS.MyClass.#ctor
    MyClass(  ) {...}

    /// M:NS.MyClass.Finalize
    ˜MyClass(  ) {...}

    /// M:NS.MyClass.#cctor
    static MyClass(  ) {...}
  }
}
Get C# 3.0 in a Nutshell, 3rd Edition now with the O’Reilly learning platform.
O’Reilly members experience books, live events, courses curated by job role, and more from O’Reilly and nearly 200 top publishers.

