Chapter 4. In-Car Computers
Hacks 41–54: Introduction
In the first three chapters, I covered the basics of automotive computer integration: car power, car audio, and car video. Now you finally get to hook up your computer. There are many considerations that go into what kind of computer to put in a car. A large, modern, multi-gigahertz computer provides the smoothest in-car gaming experience, but it takes a lot of power and space. A laptop seems an obvious choice for in-car use, but laptops are awkward to mount and difficult to smoothly integrate in a vehicle’s interior. Industry standards exist for rugged, low-power-consumption computers, but these are usually too expensive for consumer use. Fortunately, there has been a lot of recent investment and development in the area of set-top boxes and home theater PCs (HTPCs), which has resulted in the creation of small, quiet, low-power, gigahertz-class Intel-compatible motherboards and processors with excellent multimedia capabilities—perfect for in-car computing.
When you go to install a PC in your car, one way to approach it is from an engineering perspective. Draw up a detailed list of requirements, along with notes on the physical and power constraints of your car. Search for industry-standard solutions for rugged, shock-mounted hardware. Locate memory, motherboards, and hard drives that deal well with the temperature extremes of an uninsulated vehicle trunk. Create a budget for your expenditures, and while you’re at it, solicit quotes from at least three vendors for each component.
Well, that’s one way to do it. The more conventional way to hack a computer into a car is to say, “I’m going to build a computer for my car this weekend—I think I have enough spare parts.” This is the approach addressed in this chapter. Each of the following hacks covers one important aspect of getting a computer to work in a car. Once you’ve worked through the hacks in this chapter, you should have a car PC well integrated into your car and ready to use.
Choose an in-Car PC Hardware Platform
Speed, size, noise, power efficiency, and price are some of the trade-offs to consider when building a car PC.
There are many ways to build an in-car PC. The “right” way depends on what you want to use the PC for, and whether you are building from scratch or using parts you have on hand.
If you are an IT guy with too many spare computers to count, you probably want to see if you can put your existing parts together to make a PC for your car. Or perhaps you just upgraded your laptop and you figure that the older one, which can play DVDs and still has 10 minutes of battery life, could be adapted to power your in-car entertainment system. Maybe you’re a gamer with a top-of-the-line Alienware (http://www.alienware.com) machine, and you expect to get in some extra time on your massive multiplayer online role-playing game over your new broadband wireless cell phone connection while someone else drives. Or maybe you’re a hacker who wants the computer to run all the time, so you can remotely control your car windows and an in-car camera through your computer’s wireless Internet connection.
Let’s look over the major considerations that go into selecting a car PC hardware platform.
Fast Computers
If you have a top-of-the-line PC on your desk, your first impulse may be to build the same sort of system for your car. Certainly, if you are doing seriously demanding work, such as playing 3D, 2D, or online games, or running platform game emulation (i.e., emulating a PlayStation, Xbox, Nintendo 64, or older console), you need the fastest computer money can buy.
If you plan to run your high-end PC only when the car is on, you should have enough power if you use a high-wattage inverter [Hack #42] and upgrade your car’s alternator [Hack #9] .
Extremely fast computers have the drawbacks of being expensive, noisy, power-hungry, and bulky. If you mount the computer in your trunk and don’t mind the space it takes up, that solves the size and noise issues. But if you have an SUV, you may not have a sonic barrier between your rear area and the cabin of the car. In this case, you will want to reduce the noise your PC makes.
Another consideration is temperature. Keeping your PC cool enough requires there to be adequate airflow, and the trunk of a vehicle tends to be fairly leaky, allowing some of this hot air to get out. For in-trunk high-end PCs, though, you’d do well to make sure you have fans that are heat-controlled, so that their speed increases (and the computer is possibly even shut down) in response to high-temperature conditions.
If you have an SUV, minivan, or luxury car that has air-conditioning vents in the rear of the vehicle, you can run a ventilating pipe from an A/C vent to the intake fan of your PC. With SUVs, using the A/C can help reduce the effort required by PC fans to keep the computer cool, and tinting the rear windows keeps the sun off the PC and helps it to stay cool.
Cheap Computers
If your main consideration is cost, you can build a car PC out of whatever you have lying around. Depending on what you want to use it for, you can get away with an old or low-powered computer. Older computers tend to run cooler and make less noise than anything you purchase today.
If you only want to play MP3s and run Winamp visualizations on a screen, anything over a 90-MHz Pentium is sufficient. Computers below 200 MHz might even have an old AT power supply (with an on/off toggle switch on the front of the case), which are much easier to get working in a car. (For more on startup and shutdown, see “Start Up and Shut Down Your Car PC” [Hack #43] .)
If you need to play DVDs, you can supplement a slow processor with a circa-1999 DVD decoder board from your junk pile. Software DVD decoding requires a 450-MHz Pentium III at a minimum, but with a DVD decoder board or a video card with onboard DVD decoding capabilities (such as some ATI Rage 128s), any PC can do it.
Even if you can’t play current PC video games on a low-end system, many older video games from the 1980s and 1990s can be run with emulation software. And because these types of games have simple keypad controls (most don’t require a full PC keyboard), they are well suited for in-car passenger entertainment.
If you plan to use the PC just for web surfing, you have even more options— any computer with a processor speed of over 200 MHz should be able to run a web browser without too much trouble.
Small, Power-Efficient Computers
If you want to operate the computer when the car is off, its power usage is a primary consideration. You might only want to use the PC for brief moments while the car is stopped, or you might try to design a system where the computer is always powered so that it can “phone home” for telemetry functionality (remote measurement and control, such as downloading music, video, and emails; tracking your car’s location; or even viewing a live security webcam installed in your car).
When both space and power are considerations, the best solution is to use small motherboards that are designed for compact, low-power environments. Over the last few years, computers have been shrinking—and not in the traditional sense. Instead of packing more functionality into the same ATX form factor, there has been a trend to make smaller, cube-or pizza-box-shaped PCs that can fit in the space of a VCR or a DVD player.
One manufacturer of cube-sized PCs is Shuttle (http://www.shuttle.com). While quiet and high-performance, Shuttle PCs are almost as power-hungry as traditional desktop computers.
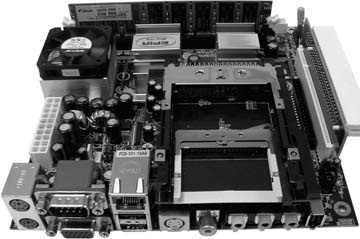
VIA Technologies (http://www.via.com.tw), a major motherboard manufacturer, has developed and standardized entirely new PC form factors that they have dubbed Mini-ITX (pictured in Figure 4-1) and Nano-ITX. On their embedded web site (http://www.viaembedded.com), you can find links to their wide selection of feature-packed EPIA series motherboards.
VIA’s EPIA boards use their own low-power, Intel-compatible processor, running at speeds of around 1 GHz. The boards are only 17 cm square, have every connector and port you could want, and consume only 20–30W of power. Their newest board, the Nano-ITX, is only 12 cm square—about the size of a CD case. The community surrounding these boards is quite extensive, as people have begun using them to hack computers into any conceivable device or object. Mini-ITX.com (http://www.mini-itx.com) has a long list of creative projects for which these boards have been used, as well as links to the many small cases in which you can install these boards.
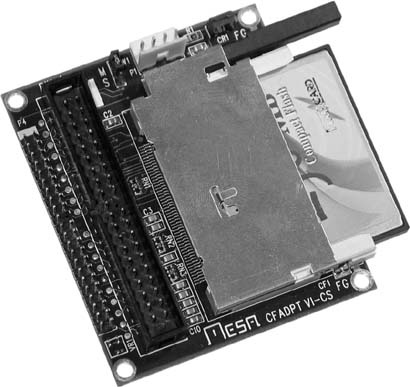
If you are building a car PC from scratch, your best starting point is an EPIA board such as the EPIAM2, which has a PCMCIAslot (essential for the many wireless Internet connectivity options) and a CompactFlash slot (great for shock-resistant nonmechanical flash file storage), and can run at speeds as fast as 1.3 GHz.
If you’re looking for a computer that’s already all put together, you should also take a look at the Mac Mini as a hardware solution [Hack #54] . Capable of running both OS X and Linux, the Mac Mini is almost exactly the size of a single-DIN car radio and has a slot-loading CD drive. Buying one of these can be even cheaper than building an EPIA-based PC (Mac Minis start at about $500); what’s more, they’re more powerful, more compact, and already assembled.
Laptop Computers
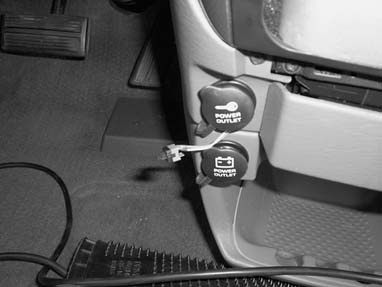
Using a laptop with an automobile power adapter is a quick, easy way to get a computer into your car. You can even leave the laptop plugged into the cigarette lighter adapter when the car is off for several hours without any harm, but if you leave your laptop charging overnight it could discharge your car battery. If you want to permanently install a laptop in your car, you still need to use a startup/shutdown controller [Hack #43] , as you would with a regular PC.
Laptops are great if you simply want to play MP3s and surf the Web in the car on an occasional basis, but it’s difficult for the driver to safely operate a laptop that’s just sitting on the passenger seat, and it can go flying in an accident. The excellent thing about laptops is that they are compact and power efficient; also, many used laptops available on eBay include DVD players, making any laptop over around 600 MHz suitable for in-car audio/video entertainment.
The drawback of laptops is that you can’t disconnect the screen on them and put the laptop in the trunk and the screen in the ceiling, so the screen becomes a wasted resource. Out-of-warranty laptops with cracked screens or many dead pixels are great candidates for in-car computers (“Hey boss, can I take your broken Dell off your hands?”). But if your laptop is slim and stylish enough, you may find you can get the screen and the computer in your car if you mount it on the ceiling [Hack #31] .
Non-Obvious in-Car Computers
Your in-car computer does not have to be a “computer” at all. All the most recent game consoles, such as the Xbox, PlayStation 2, and GameCube, have interfaces for hard drives, networking, and keyboards. Each of these platforms can even run Linux, with easily available modification chips.
The benefits of using a game console as an in-car computer are obvious. For one, consoles are far cheaper than PCs, as well as smaller and quieter. You can install one console for each passenger if you really need to. Although the consoles can’t play ordinary console games when booted to Linux, they can run thousands of other applications, including MP3 players and Linux-based games and game emulators.
The latest Palm (http://www.palmone.com) and PocketPC (http://www.microsoft.com/pocketpc/) devices are multimedia-capable, with processor speeds exceeding 600 MHz. Their portability ensures that their power consumption will be low, making them viable in-car computers. In fact, there are a variety of PocketPC and PalmOS GPS/navigation solutions, where the GPS unit plugs into the top of the handheld device and the handheld is mounted on the dashboard, facing the driver. The only problem is that there aren’t any good docking stations (yet) that enable you to plug this type of portable multimedia device into the dash without having wires everywhere.
Another diminutive option is the recently released OQO (http://www.oqo.com) computer, which uses a low-power Intel-compatible chip to squeeze a 1-GHz processor into a handheld computer. With a simple docking adapter, this device connects to a VGA monitor and a standard keyboard. It has an integrated 800 x 480 touchscreen and a 20-GB hard drive, and it can power itself for a long time when connected to a car battery. You could simply Velcro the OQO to your dashboard and drill a small hole to pass through the USB and power cables.
As more powerful, pint-sized devices like this come on the market, the task of getting computing into the car becomes easier and easier.
Cases and Enclosures
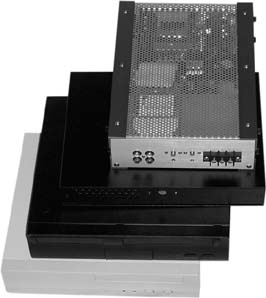
Though a variety of companies make cases for Mini-ITX form factor boards, only a few companies have created motherboard enclosures designed for in-car use. You can see a sampling of car PC cases in Figure 4-2.
Morex (http://www.morex.com.tw) cases are some of the cheapest. They adapt easily to in-car use but don’t have any car-specific power connectors, so power wires will have to pass through some hole into the case.
Opus Solutions (http://www.opussolutions.com), makers of some of the best power supplies [Hack #42] , also make several in-car computer enclosures that are solid, expandable (they add an additional PCI slot for the VIA motherboards), and have optional shock-absorbing rubber spacers for industrial vehicle (or sports car) installations.
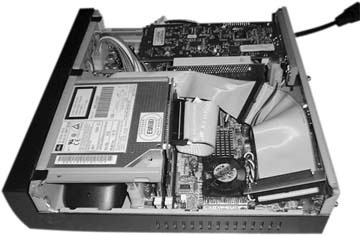
In-Dash PC (http://www.indashpc.org) makes an inexpensive single-DIN enclosure for car PCs. Their approach is unique in that they’ve managed to squeeze a VIA motherboard, a slot-loading optical drive, and bootable flash memory into a box that can fit in your dashboard. This is excellent if you really don’t have room in the trunk, and it saves you the trouble and expense of running wires to a computer in the trunk.
CarBot (http://www.carbotpc.com), my own company, has been selling a very pretty (but expensive) brushed aluminum enclosure for Mini-ITX boards. One of the features of the CarBot case is that it has all the PC-related ports on one side and all the car-related ports (such as 12V, ground, ignition, and RCA audio input and output) on the other side. This makes it possible to take a CarBot case into an install shop and say “hook it up” without getting blank stares from the installers, as you do with many other car PC enclosures.
There are dozens of other cases on the market. The following links will help you find some other options that may fit your needs.
See Also
http://www.mp3car.com—Premier forum on car PCs
http://www.karpc.com—Car PC reseller
http://www.logicsupply.com—Car PC parts distributor/reseller
http://www.carhacks.org—Car PC blog site
Power Your Car PC
While you could just use an inverter to power a normal PC AT or ATX power supply, there are several power supplies on the market designed specifically for in-car computer use.
An in-car computer must be able to run on 12V, instead of the 120–240V found in a house. More accurately, an in-car computer has to put up with a voltage that fluctuates around 12–14V when the engine is on, and that can drop well below 12V when the engine is off or while it is starting. Computers are fairly sensitive to voltage fluctuations and can easily get “fried” by voltage spikes.
A regulated power supply is a power supply that ensures that its output voltages do not fluctuate significantly. All internal computer power supplies and many external AC adapters are regulated, meaning that minor fluctuations of input voltage do not show up on the output to the motherboard.
All laptop computers have batteries, and their battery-charging circuits are usually voltage-regulation circuits as well. Most laptops can run quite easily on 12V; even if they usually expect 18V or some other voltage, you can find power adapters that allow them to run on the 12V available in a car by converting the voltage. iGo (http://www.igo.com) is a good manufacturer of such adapters.
Conventional desktop computers, however, are not designed to run on 12V. To provide the indoor AC power they expect, you need to either use an inverter or replace the computer’s conventional AC-to-DC power supply with a DC-to-DC power supply.
Inverters
Traditional desktop PCs present more of a problem than laptops, because their power supplies expect the 120–240V of AC power. You can use an inverter to convert the car’s 12V into 120V of AC power suitable for a conventional power supply, but voltage isn’t the only issue. You also need to make sure that the inverter can put out enough power. Basic inverters are only rated to 120W, but a top-of-the-line computer with a power-hungry 3D video card can take upwards of 350W. At this wattage, you’ll exceed the power available in your cigarette lighter outlet (you might even melt the wire, if the fuse doesn’t blow first), so you should wire a high-wattage inverter directly to the car battery. “Put Home Power Outlets in Your Car” [Hack #11] gives the full lowdown on power inverter use.
Inverters are in fact DC-to-AC power supplies, which convert a steady 12– 14V of DC current into a sine-wave-shaped flow of 120V or 220V AC current (depending on whether you are based in the U.S. or Europe). The drawback of power inverters is that about 20% of the power is lost in this translation—they also have to be switched off when the car is turned off, or they will eventually run down the battery. But if your car PC demands more than about 200W of power, you’ll need to use an inverter to power it.
DC-to-DC Power Supplies
Most of the power supplies you are used to are AC-to-DC power supplies. Thus, when you use an inverter, you are converting the 12V DC from the battery up to 120–220V AC with the inverter; the computer power supply then converts it back down to 12V and 5V DC, as needed by the motherboard, hard drive, and other components.
A more efficient approach is to use a DC-to-DC power supply, which converts the 12–14V from the car into the DC voltages needed by the computer. While all computer power supplies are regulated, most of the DC-to-DC power supplies made for smaller PCs can accept only a very narrow input voltage of around 12V.
Several companies make DC-to-DC power supplies for automotive use. Morex (http://www.morex.com.tw) makes several units ranging from 60W to 80W, ideal for powering the VIA EPIA series of motherboards. While all of their power supplies are regulated, only one of their power supplies is designed to take fluctuations of automobile input voltage, and that model can’t keep the computer on during engine cranking. You have to go beyond Morex to get a suitable in-car power supply.
Warning
I’ve used VIA EPIA motherboards many times without an automotive-rated power supply (and with all the voltage dips and spikes), but I wouldn’t recommend it. Eventually some component will fry, and 3.5” hard drives definitely don’t like their 12V lines fluctuating. Car voltages are almost always above 12V, as high as the 13–15V range. So, while the EPIA boards can endure voltage fluctuations, make sure they don’t have to by using a regulated DC-to-DC power supply.
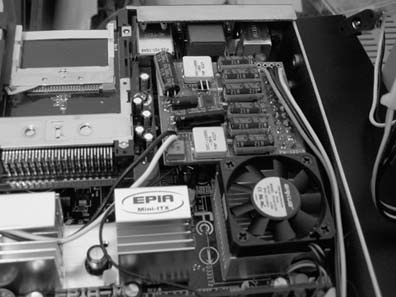
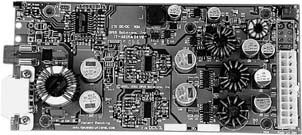
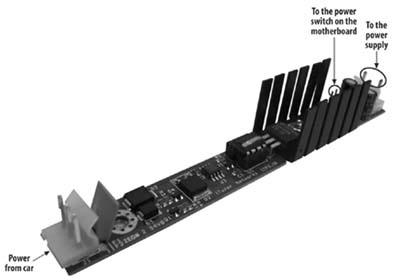
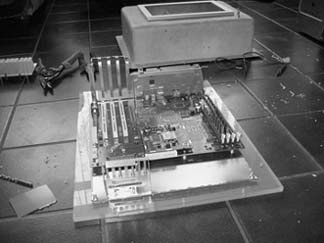
Mini-box, (also known as iTuner Networks Corp.; http://www.mini-box.com) sells a range of DC-to-DC power supplies for Mini-ITX form factor motherboards. These power supplies are not enclosed like ATX power supplies; they look like circuit boards, but they have the conventional ATX power supply connectors on them. These devices provide up to 200W and some of them have the unique feature of mounting tidily on the EPIA motherboard itself (as you can see in Figure 4-3), without requiring a long ATX power supply cable or taking up more space than the motherboard itself.
Tip
Some of the Morex and Mini-box power supplies are designed specifically for Mini-ITX-compatible motherboards (made by VIA and others) and supply only a subset of the full ATX power supply wires. That means that while the connector is the same as an ATX power connector, some of the pins aren’t supplied with power, so you can’t just snap these on to any ATX motherboard and expect it to work. Mini-ITX boards can work with a conventional ATX power supply, however. The moral of the story is, make sure the power supply you’re buying will work with your motherboard.
Mini-box recently came out with the M1-ATX. This 90W power supply comes in a compact form factor that is a drop-in replacement for the Morex supply found in many Mini-ITX cases (see Figure 4-4). It regulates the full range of car voltages (even during engine cranking), and it goes beyond their already excellent ITPS startup controller, providing several jumper-configurable startup settings. It also prevents dead batteries by automatically shutting down if voltage drops below 11V.
Mpegbox (http://www.mpegbox.net) produces a 70W ATX standard DC-to-DC power supply. This can power any of the VIA EPIA boards, as well as any older ATX motherboards (up to a 700-MHz Pentium III), and it can maintain voltage through engine cranking.
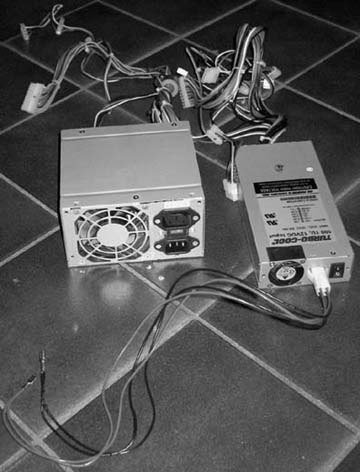
Finally, Opus Solutions, Inc. (http://www.opussolutions.com) has created a power supply that has everything—voltage regulation, 150W true ATX power output, and the ability to automatically turn the computer on and off with the car [Hack #43] . It is also considered the best supply for keeping the computer on during engine cranking [Hack #45] . Its main drawbacks are its size—it doesn’t fit in most small cases—and its $150–200 price tag. This unit can be seen in Figure 4-5.
Mini-box’s M1-ATX is my current favorite, because it seems to do everything the Opus does (and more) for less than $80.
Start Up and Shut Down Your Car PC
Desktop and laptop computers both require some encouragement to power up and down smoothly in a vehicle.
While it’s fairly easy to convert in-car power to run a computer, getting the computer to start up and shut down in the expected manner can be much more challenging.
The basic operation you are probably used to in a vehicle is that of the car radio: accessories such as the radio start up when the key is inserted and turned to the accessory or on positions and power down when the key is removed from the ignition. More recent cars have a lingering accessory feature, where the radio continues to play after the car has been turned off, until the car doors are opened.
It would have been easy to achieve this functionality with the computers of the early 1990s. The old AT power supplies (predating the modern ATX power supply specification) had a very intuitive switch on the front of the computer. If the switch was on, the computer was on. If the switch was off, the computer was off.
New motherboards make use of soft power switches that are controlled by software in order to implement power management. The front-panel switches on most computers don’t actually cut power to the power supply; instead, they politely ask the motherboard to shut down or do whatever else the operating system wants. The new energy-saving features of ATX PCs enable them to sleep (go into a low-power mode) and hibernate (save the contents of memory to disk and completely shut down). What they often don’t allow a computer to do is simply turn on when power is applied, and then turn off when it goes away.
Starting Up
Many computers have a “wake on power loss” feature in their BIOS settings. With this feature activated, they start back up automatically if they lose power while they were running. This feature is primarily designed for servers, where any power loss is usually accidental (due to blackouts, for instance). If, however, the computer is properly shut down through software (i.e., by choosing “shut down” in the operating system) and then power is lost and then reactivated, the computer rarely decides to power back up. This feature prevents most computers from predictably and consistently starting up when installed in a car without additional hardware to monitor the power states of the car and the computer.
A few motherboards actually do behave how we would like them to. The VIA EPIA-M motherboard [Hack #48] has the excellent feature that it will start up whenever power appears, whatever its prior state. Sadly, this board is several years old; its successors have the conventional behavior of powering up only if power was lost while the computer was on.
If you recall the first hack in this book (“Understand Car Electrical Systems” [Hack #1] ), we made a PC power supply automatically turn on by shorting the green ATX wire to ground. Unfortunately, while this does turn on the power supply, and thus the hard drives and other devices, it does not make the motherboard turn on—you still have to press the power switch on the front of the computer.
Laptops have problems similar to desktop PCs. Laptops are programmed to notice and respond to the presence and absence of power, and a laptop’s battery serves as a sort of built-in uninterruptible power supply (UPS). Although laptops can be set to sleep or hibernate after power is lost, when that power comes back, they don’t wake up—you have to press specific keys or click the mouse.
Shutting Down
Shutting down appropriately would seem to be a simple problem. For laptops, it is: loss of power eventually results in the computer smoothly going to sleep, hibernating, or shutting down, depending on its settings. For a desktop PC, however, a sudden loss of power results in a rather violent cessation of whatever the PC was working on. PCs usually have dozens of files open while running, and if any data is being written to the hard disk or other devices when the computer loses power, this can screw up those files and may require you to run disk-repair programs to recover lost data. Occasionally, if the hard disk or other storage device is particularly unlucky, the sudden loss of power while writing can even cause hardware damage.
Tip
When applications primarily read data from the hard disk, as media player applications do, the risk of data corruption from sudden power loss is low. Also, when computers are powered off unexpectedly, they usually run a disk-fix utility when they boot up again, slowing down the boot process by several minutes. Many hackers simply disable this utility and abruptly cut power to their computers when the car turns off, without adverse effects.
The other problem with shutting down is that, unlike with car radios, you may not want your car computer to shut down just because you’re leaving the car. Perhaps you’re using it to send or receive data wirelessly [Hack #64] while you’re parked, or you want to be able to record a radio program while you’re not in the car, à la TiVo. (I’ll cover this more in “Boot Your Car Computer on a Schedule” [Hack #47] .)
Getting a computer to power on is not as simple as supplying it with power. For the computer to boot up, it needs to be triggered somehow, in addition to receiving power. The basic problem of starting up either a laptop or a desktop PC is to get the car to “press” the power button when the power first comes on. Similarly, when shutting down, the nice thing to do is to have the computer know that the power is going away, before it goes away.
Startup/Shutdown Controllers
Fortunately, commercial vendors have created products (with various names, such as “shutdown controller” or “power sequencer”) to solve the problem of the in-car booting process. These devices all essentially do the same thing: perform a sequence of operations to control the state of a PC depending on the state of the car’s power.
A company called iTuner Networks (also known as Mini-box, found at http://www.mini-box.com) created the iTuner power sequencer (ITPS). This device takes three lines in (switched 12V from car accessory, 12V always on, and ground), regulates the power to a clean 12V, and then “presses” the power switch on the computer when the car’s accessory switch is turned on or off (see Figure 4-6).
If the car turns on, the ITPS will “press” the power switch to turn on the PC and let it start booting. When the car turns off, the power switch is hit again—but instead of immediately cutting power to the PC, the ITPS gives the PC another 45 seconds to shut down smoothly. If the computer hangs somewhere in the shutting-down process (as many user-oriented operating systems commonly do, for example by leaving up a dialog box that says “Do you want to save this document before quitting?”), the ITPS will cut the power after 45 seconds to ensure that the PC doesn’t keep running and kill the car battery.
The ITPS doesn’t include a power supply, but it does supply 12V to another power supply or a voltage inverter. ITPS units are relatively inexpensive (less than $40) and work extremely reliably. They draw very little power when the PC is off (around 10 mA).
The drawbacks of the ITPS are that it requires an input of over 13V (not always available with weak batteries when the car is turned off), and it can only pass about 60W (5A), so it can’t be used with larger 120W or 200W power supplies. To solve these problems, Mini-box also just released their M1-ATX [Hack #42] , which integrates ITPS startup controller functionality with a solid, compact 90W power supply. Improving on the ITPS, the M1-ATX has several jumpers that allow you to configure how long you want the computer to stay on after you shut down the car—key for sending and receiving data wirelessly [Hack #64] .
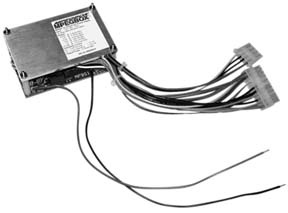
Mpegbox (http://www.mpegbox.net) also makes a startup/shutdown controller: the microShutdown (uSDC20D), pictured in Figure 4-7. Not only does it do the standard job of turning on the car PC when the power is activated, but it has the additional benefits of measuring the automobile battery voltage and the ambient temperature inside your car PC case, and shutting down the PC if either the voltage is too low or the computer is too hot.
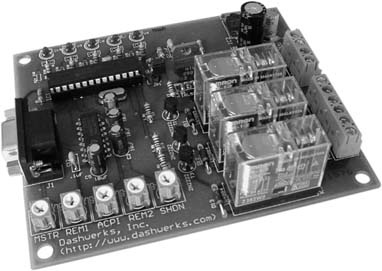
Dashwerks (http://www.dashwerks.com), makers of the Linux in-car software DashPC, also make a feature-rich startup controller board (Figure 4-8). It uses the Advanced Configuration Power Interface, or ACPI (http://www.acpi.info), to control starting up and shutting down the computer via the Wake-on-LAN connection. In addition, the unit interfaces with the serial port of the computer and communicates with software (such as DashPC or the open source Perl scripts provided at http://www.dashwerks.com/dw_dssc.php) to let the OS know when the car is on or off. The unit even allows the computer to control five other 12V devices, such as amplifiers or screens, through software.
As mentioned in “Power Your Car PC” [Hack #42] , Opus Solutions makes 90W and 150W power supplies that combine power regulation and startup/shutdown control.
Carnetix (http://www.carnetix.com) makes an external power regulator and startup controller that also provides power regulation and survives engine cranking, like the Opus, but can work with any other power supply. It also has the unique feature of a delayed 12V output—this line doesn’t turn on the amplifier until after the computer is started, avoiding the loud “pop” that PCs sometimes output to the speakers when they first turn on.
If you’re using an inverter to power your car PC, you need to tie it to a switched 12V voltage source, so that it doesn’t kill your battery when you’re away from the car. However, if the inverter is simply connected to the ACC (on or accessory) 12V, you’ll end up cutting power to your PC when the car turns off. To prevent this from happening, use a startup/shutdown controller with an inverter by wiring the 12V output of the controller to the input of the inverter. When the car power is activated, the inverter will power on; the ITPS, microShutdown, or similar unit will then activate the computer’s power button.
Alternative Solutions
Most people building car PCs simply buy a startup controller, or a power supply with integrated startup control. Nonetheless, there are some circumstances where the startup controller doesn’t do what you want. Here is some additional theory on computer startup and shutdown that you can use in creating a custom startup control system.
There are several things that can make a computer wake up:
To monitor all these conditions and power up successfully, the computer must have a small trickle of current, called standby power. All modern ATX power supplies provide this small 5V signal even when the computer is “off.” (For more on standby power, see “Boot Your Car Computer on a Schedule” [Hack #47] .)
Switches and long wires.
The simplest way to rig up your car computer is to run a switch to the dashboard and manually hit this power switch to power up the PC. You could even run the power switch, the reset switch, and the power LED and hard disk LED wires to the dashboard, drill small holes for them, and mount them in the dash. This technique requires long wires but the least amount of inventiveness, and it’s a straightforward way to get things going.
If you are running wires to a laptop located under the seat or in the trunk, you need to find a way to remotely power the laptop. If you don’t mind voiding your laptop’s warranty (since you’re reading this book, you probably don’t), you can solder a pair of wires to its power button.
Take-apart instructions vary for any laptop, but once you have exposed the power switch, you can solder a pair of wires to the existing switch. You can then either run the wires through an existing hole or slot in your laptop, or poke a new small hole in the plastic casing. Since this is a small switch with probably only 1V going through it, you can use fairly thin wires (such as phone cord), run them to the dash, and hook them up with another switch installed in your dash, as shown in Figure 4-9.
Relay circuits.
Ideally, a car computer should act just like a car radio—it should automatically turn on and off with the car, and be ready to use shortly after you start the vehicle without you having to press a power switch.
The first hack I ever came up with for automatic startup and shutdown was a relay circuit. Relays are simple voltage-activated switches used to isolate one power system from another. They don’t take much circuit-building skill to use. If you look up the specifications of a Wake-on-LAN (WOL) header (the pins sticking up from the motherboard) in your motherboard manual, you will see that it is made up of pins for 5V, ground, and WOL. To get your computer to wake up, you simply have to connect the 5V and WOL pins for a moment (for this to work, WOL must also be enabled in the computer BIOS).
For my hack, I used two relays. One relay was connected to the accessory 12V of the vehicle; it closed one switch and opened another whenever the car was on. The other relay was connected to the 12V of the computer power supply; it closed one switch and opened another whenever the computer was on.
I rigged up the two relays in sequence, so that the 5V pin connected to the WOL pin only when the car’s accessory 12V was on and the computer was off. In other words, WOL is off when the car’s 12V is off and when the computer is already on, but if the computer is off and the car is on, WOL will be triggered until the computer switches on (which activates the second relay, turning WOL off again).
One of the attributes of this solution is that it always keeps the computer on when the car is on. If you manually shut down the computer (i.e., choose “shut down” from an OS menu), it will dutifully shut down, and then the relay circuit will dutifully turn it back on.
This relay circuit is crude, but it works, and it only costs around $10 to build with Radio Shack parts. After I discovered the next solution, however, I stopped using this reliable but complex relay circuit.
Capacitors.
After six months of using the above relay solution, my friend pointed out an elegant solution that made me smack my forehead.
Capacitors are small, cylinder-shaped electronic devices that hold a voltage for a short time. Large capacitors can be used to keep your voltage levels stable [Hack #8] , but this hack uses a tiny capacitor to create the effect of a momentary button press.
Capacitors work by filling up with electricity (up to their capacity, measured in farads) until they match the voltage that’s being fed to them. They don’t let any voltage pass through; they only fill up. Normally, when you press the power switch that connects to a motherboard, you are shorting (connecting) the power switch pins on the motherboard, which causes a voltage on one pin to travel to the other pin.
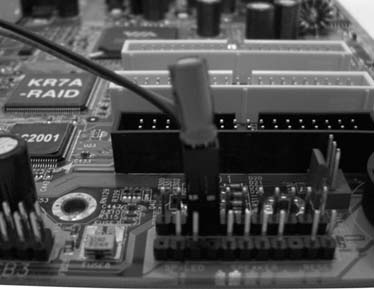
If you put a capacitor across these pins, as in Figure 4-10, when the motherboard first gets standby power (the trickle of 5V power from the power supply when the computer is off but plugged into a wall socket), the power switch will also have power. The capacitor will start to fill up, and during this filling period the other power pin will feel a surge in voltage, turning on the computer. Once the capacitor is filled (within a second or less) it doesn’t change the voltage, so the computer will remain on until it is manually shut down or the power to the unit is cut.
In my experience, a 10uF capacitor works well with the EPIA M2 motherboards. Increasing that number increases the length of time for which the button is “pushed”; you may need to experiment with a couple of different capacitors for your particular motherboard. The capacitor has a little + and - diagram on its label, and these should correspond to the + and - pins on the power header on the motherboard.
This capacitor trick can be used for other soft power devices, too. For instance, some video displays have power switches and don’t automatically turn on when power is supplied. To solve this problem, you simply solder a capacitor across the power switch. Now, instead of having to hit the switch, the unit will always turn on when it receives power.
Shutting down.
Although both the relay and capacitor solutions get the computer turned on, you also need some way to turn it off.
Manually powering down in software is one approach. If you choose “shut down” in your OS, the computer will turn off. If you used a capacitor to power up, it won’t power on again until you turn the car off and on again. If you used a relay circuit and the car is still running, the computer will shut down and the WOL relays will cause it to power right back up, as mentioned earlier.
However, depending on the driver to manually shut down the computer every time is a recipe for a dead battery. A more automatic solution is to use your OS’s energy-saving features. Most OSs have a control panel where you can tell the computer to shut down after a set period of inactivity. If you set it for 30 minutes, the computer should usually shut down (or hibernate) about 30 minutes after you leave the car.
Yet another option is the simple hack I did for some versions of my company’s (http://www.carbotpc.com) in-car computers. I wanted the ability to let our software determine when to shut down the computer, based on whether it was done downloading email or software from the house when the driver parked at the house at the end of the day.
I used a "car is on” relay—simply the ACC 12V and ground across a relay— to tell the computer whether or not the car was on. Many small motherboards have one serial port on the back and another as a header on the board itself. In my hack, I ran pin 1 (the carrier detect, or CD, pin, usually used to notify the computer if a modem is online) through the relay switch to pin 4 (the data terminal ready, or DTR, pin, usually used to tell the modem the computer is ready). Since my motherboard has COM2 (the second serial port) on the inside, my software can simply open COM2 and monitor the CD line. If it’s up, then the car’s ACC 12V must be on, and our software doesn’t shut down. If it goes down, our software knows the car is off; if it’s off for long enough, and if all software updates and email downloads are finished, the software shuts down the computer.
Reduce the Boot Time of Your in-Car Computer
There are dozens of tricks you can use to reduce the boot time of your in-car PC.
In 1980, if you turned on a car stereo, it turned on. Instantly. If you left the volume up from the last time you’d used it, the sound would come blaring out as quickly as the tape could start spinning and the analog amplifier circuits could charge their capacitors.
Nowadays, when you turn on your car radio, it boots up just like a computer. Since it only loads a tiny bit of microcode out of nonvolatile memory, though, it boots too quickly for most people to really notice. And by saving a bit of state information, it usually returns to the last radio station or CD track you were listening to.
NAV systems also have to boot up. When you turn on your modern navigation screen in a luxury car, you may have to wait a few seconds for everything to settle down, but the splash screen comes up almost instantly, and it feels more like starting an appliance than like booting a computer.
User-interface designers have often been critical of the modern PC boot process. Every modern operating system usually takes several minutes to boot up and load its graphical user interface. But why? You’d think that an operating system would be able to figure out what hardware is in the machine and, barring any changes, simply snap right back to where it was the last time the machine was shut down.
The general solution to the lengthy boot process has been to create energy-saving modes. Instead of shutting the machines off when not in use and then making them boot faster, the simpler approach is to allow the computers to sleep, by turning off some of the most power-hungry devices during down time (i.e., the monitor and the CPU) and supplying power only to keep the OS and programs paused in memory.
Another energy-saving mode is hibernation, where the contents of memory are quickly saved to the hard disk, and the computer is shut down completely. Then, when it boots up again, it restores the memory from the hard disk and picks up where it left off.
Hibernation is one of the most common tricks used for getting a car PC to boot a bit quicker. Most PCs can be configured to hibernate when the power button is pressed, instead of shutting down. This can cut boot times down to 30 seconds or so, but awakening from hibernation still takes a long time because hundreds of megabytes of memory have to be refilled—and the more memory you have, the more Windows will fill, and thus the longer it will take to restore. A trick for quicker hibernation wake-ups is to reduce the amount of RAM to the minimum you really need.
Breaking It Down
It isn’t just the operating system that contributes to boot time. The BIOS power-on self-test (POST) and device detection, the hard drive spin up, and the boot loader delays are all factors, not to mention the multi-second delays added by startup/shutdown controllers [Hack #43] in an attempt to stabilize the car power.
Figure 4-11 breaks down the boot process into all the steps, from turning the key to hearing the audio resume where it left off when the computer last shut down.
Stabilizing power.
The power stabilization step is just how long it takes for the voltage to level out in the car. When you start to crank the engine, the 12–14V suddenly drops to 8V or lower. Your computer’s startup process will be reset unless its power supply can deal with this much of a voltage drop. “Keep Your Computer on During Engine Cranking” [Hack #45] discusses how to alleviate this problem. You’re pretty much stuck with the delays built into your chosen hardware and power supplies, but having a good alternator and a good strong battery can save a little time.
Once the power has stabilized in both the car and the power supply, whatever on/off circuit you are using will “press” the power switch to turn on the computer. The computer’s POST takes a few seconds at a minimum, just to test the memory. If you’re adventurous you can actually replace the computer’s BIOS (http://sourceforge.net/projects/freebios) to reduce the boot time, but normally you’ll only be able to optimize the BIOS by changing settings, as outlined next.
Optimizing the BIOS settings.
There are several simple setting changes that can greatly reduce boot time. For one, setting the desired boot device as the only boot option simplifies the process of looking for CD-ROMs and floppy disks to boot from. Eliminate legacy devices and settings such as floppy disks, floppy seek at boot, the floppy controller, and any other setting having to do with floppy disks to prevent hardware detection delays. Definitely disable any LAN boot, as this is useful only when booting from a server (i.e., quite useless for a car PC). Set the BIOS error setting on the main page to not stop on any errors—you want the car PC to boot even if no keyboard is attached.
Whether you are using Linux or Windows, you can gain time by disabling onboard devices. If you aren’t using the onboard Ethernet for anything, disable it. If you aren’t using serial ports or parallel ports, disable those as well. Every device that must be auto-detected and configured takes a few milliseconds to a few seconds. If you aren’t using the second IDE channel for hard disks, disable that—and definitely disable any unused onboard SCSI cards, as this setting consumes a lot of time during boot.
You can sometimes also disable the summary screens and graphical splash screens of the BIOS—although these don’t add much time (if any), they add visuals you probably don’t need to see in a car PC.
Optimizing boot loading.
Once you have trimmed down the BIOS, you should have a computer that hits the boot loader screen within a few seconds. Many boot loaders for either Linux or Windows sit there for several seconds to give you the option of pressing keys to change the booting process. Since your car computer system is supposed to boot the same way each time, you can disable these options—you want the OS to start booting immediately. Depending on the boot loader, this change can save another two or more seconds in the boot process.
Trimming the operating system.
If you are going to rely on hibernation to decrease your boot times, you need to actually reduce your total system memory. Counterintuitive as it is, less memory makes for faster resumption from hibernation. The more memory there is, the more the operating system uses, and thus the more “stuff” there is in memory that must be saved to disk and later restored. Since the multitasking demands of a car PC can be less than those of a desktop, you should be able to get by with less memory than you might think—even 128 MB might be sufficient.
If you are going to do a full OS boot instead of restoring from hibernation, however, you should trim down services and disable anything not needed that tries to find and dynamically configure devices. While this is fairly easy to do on Linux, Windows has less granular control over the boot process.
An excellent reference for optimizing boot times on Windows XP, titled “Beginners Guides: 99 Performance Tips for Windows XP,” is located at http://www.pcstats.com/articleview.cfm?articleid=1590.
Optimizing Linux can vary by distribution, but the complete configurability of the sequence of boot processes offers many more options than Windows for tuning the system. An article I wrote, "Reducing Boot Times in Linux” (available at http://www.linuxjournal.com/article.php?sid=7594), summarizes several of these options.
Giving the user something to see and hear.
One of the ways to make a user interface appear to be “working” is to make sure that video is on the screen and sound is coming out of the speakers. The Windows boot loader normally briefly shows the Windows 98 or Windows XP screen. If you’re working with Linux, with either the GRUB or LILO boot loaders, you can get a splash screen up almost instantly, and it can show animation throughout the boot process. You can find GRUB and LILO boot resources at http://ruslug.rutgers.edu/~mcgrof/grub-images/ and http://www.gamers.org/~quinet/lilo/help.html, respectively.
In Linux, if you load the sound drivers early on in the boot process, you can activate a “splash sound” to let the user know that the car PC is booting. You can even put your MP3 player as an extremely early-running service, so that MP3 playback from the last-known position in the playlist resumes before the rest of the software (for instance, an X Windows environment) boots. (However, if you run a new GUI MP3 player, once the GUI boots it will interrupt that command-line MP3 player.)
More Hardware Approaches
After doing everything possible to the software, you’ll still be stuck at 20–30 seconds for booting up. How do you get it down from there? If you are willing to try a brute-force solution, there’s some more hardware you can throw at the problem.
Using faster hard drives.
The 2.5” IDE drives that come in many in-car computers and laptops are usually 4,200-or 5,400-RPM drives. You can upgrade to a 7,200-RPM drive in the laptop form factor, such as the Hitachi Travel-star 7K60. You can also use 3.5” drives, and get a 10,000-RPM drive such as a Western Digital Raptor WD740GD. But these faster hard drives are power hungry, so why not go for a solid-state solution? You can get a multigigabyte drive such as M-Systems’s (http://www.m-systems.com) Fast Flash Disk (FFD) 2.5” Ultra ATA or BitMicro’s (http://www.bitmicro.com) E-Disk. Designed for use in fighter planes, these drives essentially eliminate seek times, reducing them to microseconds. Of course, be prepared for sticker shock—solid-state hard drives can be hundreds of times costlier per megabyte than mechanical hard drives.
Starting the computer earlier.
Another way to “reduce” the boot time is to have the computer already on when you get to your car.
Why should the computer start booting only when you turn the key? One user read an article I wrote and suggested that the car PC should start booting as soon as you open the car door. Another approach is to start the computer with your remote keyless entry system [Hack #46] .
But why wait until you’re near your car? If you drive on a schedule, there’s no reason not to boot your car PC minutes before you get to your car, with your email and traffic information already downloaded and your music queued up. You can set up this solution using “Boot Your Car Computer on a Schedule” [Hack #47] .
Note that these “early-bird” booting approaches only work if your computer can stay on during engine cranking [Hack #45] .
Keep Your Computer on During Engine Cranking
An already booted car PC will reboot whenever you start the car, unless you install the right hardware.
The primary reason cars have large batteries is to turn the starter engine and start the car. When you crank the engine to start the car, the voltage drops—from the normal 12–14V, it can drop all the way to 7V or lower. As soon as the car is started, the voltage goes back up, but in the meantime, your unprotected car PC will hang or reboot.
In many cars, the turning of the ignition switch temporarily cuts power to the radio, the headlights, and the A/C—turn your car on to see if it does this. If so, the other problem that occurs is that the 12V line going to your computer is completely cut off during engine cranking, and your computer shuts down immediately.
After you’ve made sure that the 12V line to your car PC [Hack #11] doesn’t get switched off when cranking the engine, you then have to figure out how to stabilize it.
Stabilizing the Voltage
There are a couple of ways to solve this problem, but they all boil down to keeping the voltage to the computer level while the car’s voltage fluctuates. Normal voltage regulators are designed to level out small fluctuations in the input voltage, not massive brownouts like those caused by engine cranking. To survive it, you need devices that can maintain 12V for as long as it takes to start the engine.
Adding a second battery.
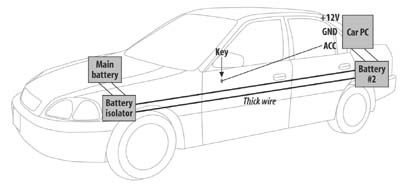
“Add a Second Car Battery” [Hack #10] provides the technical instructions you need on how to set up a car with two different batteries. Figure 4-12 shows how you can run your car PC off the second battery, turning it on either with its own power switch or with a power sequencer connected to the car’s ignition. Doing this ensures that your car PC is unmolested by the power fluctuations in the primary battery.
Adding a small 12V battery.
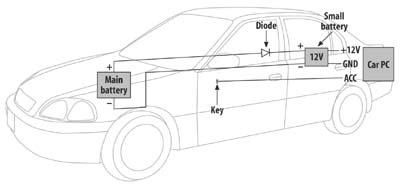
Another, less drastic approach is to get a small 12V battery, rated at around 1–2 Ah, and use it as a voltage stabilizer, as shown in Figure 4-13. You can find these batteries at an electronic surplus store or any larger electronic hobbyist store. Make sure the battery you purchase is deep cycle, so that you can completely discharge it without killing it. You need to put a diode (a device that only lets current go one way) in between the car’s 12V line and the 12V line of the battery, so that if your car is off, the little battery doesn’t try to power your accessories. The trickle current passing through it on the way to the device will charge the battery, and this may slowly drain the main battery over time. So, if you’re not driving the car frequently (which recharges the main battery), you’ll want to make sure the 12V line to this battery and to your computer is switched off when the car is off.
Using a crank-proof power supply.
Opus Solutions, Mpegbox, and Mini-box all make power supplies that can survive engine cranking. Each of these power supplies has its own power range, and they are getting better all the time.
Opus Solutions’s (http://www.opussolutions.com) 150W power supply, which leads the bunch, can deal with input voltages ranging from 7.5V to 18V. Mpegbox (http://www.mpegbox.net) makes a 70W power supply that can regulate to 12V voltages from 8V to 15V. Mini-box (http://www.mini-box.com) has recently released the M1-ATX, a 90W ATX power supply that is the smallest and, at $80, the cheapest fully crank-proof power supply.
Carnetix (http://www.carnetix.com) don’t make a power supply, but they make an external power regulator and startup controller [Hack #43] to supply crank-proof 12V to any non-crank-proof power supply. It takes a battery input of +7.5VDC to +18VDC and provides a regulated +12VDC output at up to 5A. It’s designed to be used with the common ITX cases (such as the Casetronic C-134 case) with their own internal power supplies (which require regulated 12V input) and to replace the external conventional AC/DC power brick with one that’s DC/DC.
Although Morex (http://www.morexintl.com) manufactures 60W and 80W power supplies rated to survive voltages from 9–16V, they are not crank-proof. Their “Car Power Kit” power supplies are intended for automotive applications, but they have not worked in my extensive testing, and I do not recommend them.
For a full rundown on the power supplies, check out “Power Your Car PC” [Hack #42] .
Using a big capacitor.
“Use a Huge Capacitor to Sustain Power” [Hack #8] describes how a large capacitor can help deliver consistent high-amperage output to bass speakers. Capacitors are designed to keep the car lights from dimming when your amplifiers are pumping out sound. If you’re already installing a large farad capacitor for your audio system, check if it lets your computer stay on when you start the car. You have to ensure, however, that the input to the capacitor doesn’t turn off when the car is cranking (i.e., that the car’s battery connects directly to the capacitor).
Turn On Your Car Computer Before You Start Your Car
Most cars today come with keyless entry systems that can be used to turn on your car PC remotely.
“Reduce the Boot Time of Your in-Car Computer” [Hack #44] suggested that one way to reduce the perceived boot time of your car PC is to have it boot when you open the car door. This way, by the time you get the engine started, the computer is fully booted and waiting for your commands.
When you open your car door, the dome light usually comes on. This behavior is controlled by a small plunger between the car door hinges in the frame of the car itself. It turns off when the car door is closed and on when it is open.
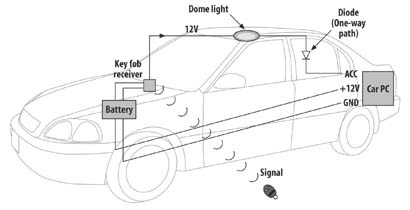
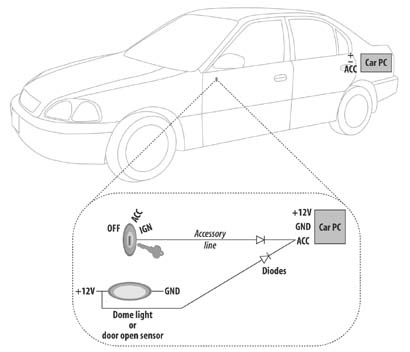
Opening the door causes 12V to activate somewhere in the system. This 12V may not be directly connected to the dome light—for instance, it may trigger some computer that turns on the dome light for a while. Regardless, you can simply use the door opening or dome light 12V signal as a “start” command for the startup controller you selected in “Start Up and Shut Down Your Car PC” [Hack #43] , by running a wire from the door button or dome light to the ACC/KEY input on your startup controller. Figure 4-14 shows how this works.
The door opening or dome light turning on will cause the computer to start booting. Depending on your startup controller, you will then have a short while (from 45 seconds to a couple of minutes) to bring the ACC/KEY line high (up to 12V) again after the door is closed or the dome light goes back off. As long as you start your car, or at least turn the key to the accessory position, in this time window, the startup controller will remain on and the computer will continue to receive power, and thus the computer will finish booting without interruption.
If you start blending different 12V trigger inputs to the car PC, such as dome light and ACC, you must use a diode between each input and the startup controller to ensure the voltages don’t “backwash.” Otherwise, the dome light may come on whenever the car is on, or the car radio may try to power up whenever the door opens. Figure 4-15 shows how you can do this.
Once you’ve completed these steps, your car PC will start to boot the instant a door is opened, because the dome light will go on, which will also make the startup controller think that the car has turned on.
For many cars, using a remote keyless entry device (“key fob”) to unlock the doors also activates the dome light, so using such a device may have the side effect of giving you remote activation. As long as you get to the car before your dome light goes out again, you won’t lose power to your computer. (The light is usually on a timer, and it will go out a little while after you activate the lock or press the remote’s unlock switch.)
You might want your car computer to go on only if you unlock your car. This is almost as straightforward; you need to find a wire that goes to 12V when the car is unlocked. A Chilton’s or other shop manual for your car will provide you with wiring diagrams. Although cars vary, the harness of wires going to the driver’s door will contain the wire you need. The wire that actually triggers the unlock will most likely be 12V, and you will find it running to a small unlocking motor if you pull the panel off your door.
But, if you are using a momentary 12V pulse such as the unlock signal to activate your PC, you need to ensure that the pulse is long enough to turn on the power supply, and that your startup controller doesn’t immediately shut the computer back down when the pulse is over. The Opus power supply (described in both “Power Your Car PC” [Hack #42] and “Start Up and Shut Down Your Car PC” [Hack #43] ) has the ability to wait up to one hour after the ACC/KEY line goes down before it tries to shut down the PC, so it is good for this application. Even better, the P1260 and P1280 startup regulators from Carnetix (http://www.carnetix.com), also described in “Start Up and Shut Down Your Car PC” [Hack #43] , have this “Pulse Start” feature built in, and they are designed to allow you to power up your car PC with momentary door lock, car alarm, or wireless device triggers.
Another option for remote booting is to purchase a remote car starter that has buttons to turn on the car, roll down the windows, open the trunk, and so on. (For more information, Google “remote start.”) If you want a dedicated “turn on my computer” button, you can use one of the remote car starter’s unused switches for this task. If you configure your startup/shutdown controller to boot up the computer and leave it on for a while after it is triggered, you can tie it to any one of the 12V pulses from a remote starter.
Some aftermarket remotes have extended ranges, allowing you to turn on the car PC from very far away (e.g., 1,000 feet).
See Also
“Transfer Data to and from Your Car PC” [Hack #64]
Boot Your Car Computer on a Schedule
To get your in-car computer to do work when the car isn’t on, you’ll need to get it booting on a schedule.
OnStar, a service that comes preinstalled with certain U.S. vehicles, allows you to call a live person over a hands-free cellular connection to obtain a variety of concierge services, such as reservations, directions, and roadside assistance. One of the features of the OnStar computer is that, if you get locked out of your car, you can call them, and within 10 minutes they can unlock your car by sending a code to your OnStar system. You have to wait 10 minutes because this is how often the OnStar computer turns on to “phone home,” making itself available to the OnStar mother ship through a cellular network.
“Phone home” is only one of the important features that can be enabled by periodic wakeups. You could configure your in-car computer to take time-lapse photographs of the parking lot with an attached camera, or to pull down traffic information from an online traffic web site (using your web browser’s timed web site retrieval) so that it’s there when you get in the car before and after work. Or you might want it to sync up every night with a directory on your home computer (using file synchronization software) over a wireless connection, in order to download music, videos, or other data.
Computer BIOS Wakeup
Most computer BIOS settings include the ability to wake up on a schedule. The feature is designed for client/server machines that must perform periodic tasks but may not be powered on when the tasks are due. This is great if you want a computer to turn on at 2 A.M., dial your other office, and perform one or more tasks, or if you want to push software updates to hundreds of machines in the middle of the night.
There are even utilities to set the wakeup time. On Linux, using tools such as NVRAM wakeup (http://sourceforge.net/projects/nvram-wakeup) or Wakeup Clock (http://www.malloc.de/tools/wakeup_clock.html), you can program your computer to wake up every hour (or whenever you need) by using a cron job or scheduled task that shuts down the PC but sets the wakeup time before it goes down.
On Windows, utilities such as PowrClik (http://genntt.webs.com.ua) allow you to set scheduled wakeups and run Visual Basic scripts and command-line programs.
Problems with timed wakeup.
The problems with using timed wakeups in a car are twofold. First, each of these wakeups uses a lot of power, even if the computer only wakes up and shuts down within a span of two minutes. While not as taxing as starting your car, these startup/shutdown sequences take their toll on the battery, especially if the vehicle is only driven every few days or on weekends. Second, the car computer requires something called “standby power”—that is, the computer must still be plugged into a live source of power for periodic wakeups to function, and this means it is constantly drawing small amounts of power.
The OnStar computer is a small, low-power, embedded computer that takes only as much power as a car alarm. A desktop computer, even when powered off, can draw 10 times that power. In a wall-power setting, this tiny trickle of current is no problem. In a car, however, supplying this 300 mA of current is the equivalent of leaving your dome light on—after a couple of days or a week it can kill the car battery.
Using a second battery.
The simplest approach to letting your computer wake up on a schedule is to allocate the power for it. If you install a second deep-cycle battery [Hack #10] , there is no risk of killing your main battery. Since a deep-cycle battery doesn’t mind being completely discharged, there’s no problem if you don’t drive for a week and your computer drains it. And because the standby power for a PC (around 300 mA) is much, much lower than the rated output of the battery, you should be able to get weeks of standby power without discharging the battery too much—perfect for scheduling your car PC to record a radio program for you while you’re on vacation.
Using a startup controller.
Most of the startup/shutdown controllers described in “Start Up and Shut Down Your Car PC” [Hack #43] cut power completely from the car computer when the car is turned off. While this is good for the battery, it essentially precludes the PC from waking up on its own because it has no standby power.
However, the startup controller I like the best, the ITPS (http://www.mini-box.com/itps.htm), can be reprogrammed. Why would you want to do this? Well, when you turn off your car and go into your house or office, you may want your computer to stay on for another 30 minutes so you can copy files to its WiFi connection [Hack #64] , for instance. iTuner Networks even provides the source code to the microcontroller they use, a 12-series PIC chip. You can download the source code at http://www.mini-box.com/ITPS/itps3.zip and reprogram it to suit your needs. You’ll need a PIC chip writer, but these can be purchased for under $50 (Google “PIC programmer”).
Using the ITPS, my own company, CarBot (http://www.carbotpc.com), has tried to solve the problem of starting car computers on a schedule. At CarBot, we wanted a way to have a car computer start up every couple of hours so we could periodically check email and download of new versions of the software.
We also wanted the computer, not the ITPS, to be in charge of when to shut down. Ordinarily, the ITPS has two wires, both of which connect to the power switch on the computer. Since we use a 10uF capacitor across the power switch to automatically start up the computer when power is applied. [Hack #43] , we decided to repurpose the two pins on the ITPS (both of which go directly to pins on the 12-series PIC chip). You can get the source code for our PIC modification at http://www.oreilly.com/catalog/carpchks.
We use one of the pins for output, and one for input. The output pin is wired directly to the carrier detect pin (pin 1) of the onboard COM2, and the status of the ACC line (whether the car’s ignition is on) is sent to the computer. That way, when the car is turned off, the computer knows about it—but then it’s up to the computer to determine how long to stay on. The input pin is wired to a 5V line on the motherboard audio header. This allows the ITPS to monitor when the computer is on. When the computer finally turns off, the ITPS then cuts the power to the motherboard. This drops the power consumption from the 1.5–2A that a normal EPIA-M board takes when running with a laptop hard drive, or 300 mA when turned off, down to the 10–30 mA trickle of current that the ITPS consumes. The ITPS then continues to wait until the car turns on again, and when the power comes back, the motherboard starts up again.
Choose an in-Car PC Software Platform
You can use any major operating system for your in-car PC. Here are a few pointers to help you decide.
The major choices for an in-car operating system are the same as for a desktop: Windows, Linux, and, if you “think different,” Mac OS X. The primary deciding factors are what software you want to run, what hardware you want to run it on, and of course what system is easiest for you to work with.
Windows
Windows XP is your most flexible choice in terms of hardware and software support. Though you can run older versions of Windows, such as Windows 2000 or Windows 98, most of the car computer application development occurs on XP.
Windows tends to have support for the latest multimedia features. I know that sounds very buzzwordy, but it isn’t intended to be; it merely means that you get the best driver support, both hardware and software, when using the latest version of the Windows OS. If you’re trying to run the latest DVD software with surround sound, a handful of video game emulators, and some 3D games, as well as supporting a number of USB networking, storage, and input devices, you’ll have the smoothest experience if you run XP.
One of the drawbacks of Windows XP is the way it handles new hardware. If you so much as change the USB port of a network device, GPS unit, or other similar device, Windows acts as if it has never seen that hardware before. It pops up dialogs asking you to find the driver (even though it knows full well where the driver is), and then it creates a completely unconfigured “new” entry for the device in its hardware list. This has the frustrating result of changing the COM port of your GPS unit, or resetting the “connect to non-preferred networks” setting of a USB network card, making your GPS and networking stop working until you reconfigure them in the Windows control panel.
Another Windows choice is Microsoft’s embedded operating system, Windows CE. Embedded operating systems are designed to run on appliances and other special-purpose computers. The BMW 7 Series uses this OS in its navigation computer, and the Windows automotive group (http://www.microsoft.com/automotive/windowsautomotive) is trying to get this OS into new vehicles from other manufacturers. Windows CE also powers the Pocket PC computing platform, which has gained market share over the Palm Pilot after half a decade of fierce fighting. But while you can install applications on a Pocket PC, Windows CE alone isn’t sold directly to end consumers. Embedded operating systems expect to be configured with only the necessary drivers and software, burned onto a flash disk, and run for years without any changes. While this ultra-reliability is important for an OS that might be communicating with the engine computer, it’s very uninteresting for those of us who want to hack new functionality into our cars on a regular basis.
Windows runs only on x86 instruction set processors, which include Intel, AMD, and VIA Eden processors. Intel’s own market-leading Pentium 4 processors get notoriously hot—not an ideal condition for an in-car computer.
But recently, VIA and Intel itself (with the Pentium M) have begun to make hardware that consumes tens of watts, not hundreds. While the “real” in-car computers that auto manufacturers preinstall in their cars are unlikely to ever be x86 processors (or to run Windows XP or its successors), Windows is still one of the strongest options for in-car entertainment computing.
There are actually several different editions of Windows XP suitable for in-car computing: Home, Professional, Media Center Edition 2005, and Embedded. Windows XP Home edition is the cheapest, at less than $100 for the OEM (Original Equipment Manufacturer) version. You can buy an OEM version of Windows when you purchase computer hardware such as a motherboard or processor, as opposed to the retail version, which upgrades your existing operating system. Windows XP Home has almost everything you need for car PC computing (despite the irony of its name), but it lacks one must-have feature found in Windows XP Pro: Remote Desktop. When that feature is enabled, you can log into your computer remotely (say, when you go into the house after parking your car) and see the full screen, enabling you to control and configure things, run programs remotely, and so on. While there are many other remote desktop services that you can install (including VNC, at http://www.realvnc.com), the one built into XP Pro is probably the most bandwidth-efficient version you can get.
Windows XP Media Center Edition 2005 is essentially Windows XP Pro with a special media player application, and for an additional $30 you can get an infrared remote control designed for it. Like the OEM version of XP Home, you can purchase this in conjunction with just a minimum amount of computer hardware from a licensed vendor. Media Center can play MP3/WMA (Windows Media Audio) collections and WMV (Windows Media Video), but not DVDs—for that, you need a separate DVD player plug-in or application. It also can control a radio or TV tuner if you have the correct hardware (check out http://www.microsoft.com/windowsxp/mediacenter for more info). Since it is designed to be used with a remote and not a keyboard, it is a decent option for rear-seat entertainment, although you will find that most dedicated in-car computer frontend software has far more features.
The final version of Windows XP that I recommend for in-car computing is XP Embedded. This version of the OS is designed to work on embedded (dedicated-purpose) computers, not as a general-purpose computing OS. It is purchasable only from Microsoft’s embedded licensing companies, such as Bsquare (http://www.bsquare.com), and you have to sign several license agreements to get hold of it. The license takes great pains to make sure that you don’t ship XP Embedded with general office-productivity applications as a desktop OS replacement, and it has a lot of other language intended to ensure that you use it only for appliance-type computers.
Once you get through these rings of fire, in small volumes XP Embedded costs about the same as XP Home, and you get a lot of features you’ll wish XP Home had. For instance, XP Embedded has a read-only filesystem driver that allows you to use a hard drive so that unexpected shutdowns won’t corrupt the drive [Hack #49] . Another cool feature of XP Embedded is that you can throw away all the features you don’t want—really. It’s as if you were given a bag of all the thousands of drivers in XP Home/Pro and told, “Have it your way.” The learning curve on XP Embedded is high; it’s designed for system integrators, not car PC nuts. But the results of customization can be vastly reduced boot times; exact control over startup activities and their sequence; and the ability to make bootable, very small footprint XP drives. A reasonably capable XP Embedded image (all the files that boot XP) can be squeezed onto a small flash drive. “Install Windows on a CompactFlash Card” [Hack #49] goes into more detail on using XP Embedded.
Information on a nice selection of in-car frontend software for Windows can be found in the MP3Car.com forums under Mp3Car Technical, Software & Software Development, as well as in Chapter 7 of this book.
Linux
Linux runs a strong second to Windows in terms of versatile in-car multimedia support. Linux has strong hardware support for all the popular hardware peripherals useful in a car, such as wireless remotes, video capture cards, and networking peripherals. Plus, Linux is much more easily customizable than Windows XP. Taking out unneeded drivers and resources is as simple as editing a few text files, and advice abounds on the Net on how to make a good Linux box do all sorts of things.
The drawback with Linux is that it requires familiarity. If you aren’t a command-line edit-config-files type of person, and aren’t willing to learn, Linux can be a rough road for you. However, Linux will ultimately get you the most bang for your buck—your computer will boot faster, react more responsively, and act more predictably between boots than it will with Windows XP. Linux’s graphical user interfaces, to date, lack most of the “helpful” wizards that pop up demanding explanation of new networks, devices, updates, and how much disk space you have left. Although these bells and whistles are arguably useful for a desktop user, they are a hassle to deal with when you don’t have a keyboard or mouse, and they disturb the experience of an in-car computer user.
The major strength of Linux is its command-line and scripting capabilities. Just about every scripting language runs on Linux, and almost everything you would want to do can be done from a command line. This comes in quite handy when you don’t want to write a full-blown program, but you want to, for example, quickly make a nice button on the screen that the driver can press to instantly play a DVD on the car’s second screen (for instance, with MPlayer, available at http://www.mplayerhq.hu).
It’s perhaps somewhat unfair to describe Linux only in terms of how it differs from or is better than Windows, but the common wisdom of the desktop world applies here as well: Linux is more open, more configurable, and arguably better for programmers, but it has fewer available applications. While there are dozens of navigation and car PC frontends for Windows, only a small selection is available for Linux. SourceForge is a good place to look for projects.
An excellent, full-featured, open source in-car PC project for Linux can be found at Dashwerks (http://www.dashwerks.com); the SourceForge project for Dashwerks can be found at http://sourceforge.net/project/showfiles.php?group_ id=43989.
Another Linux-based car PC frontend project is Headunit, found at http://sourceforge.net/projects/headunit. You can find more information about it at the MP3Car web site (http://www.mp3car.com).
Mac OS X
Mac OS X is a strong solution for in-car applications. It’s no secret that the iPod pretty much owns the portable MP3 market, and one obvious (if overkill) way to get your iPod integrated into your car is to use a Macintosh computer running iTunes as the go-between.
OS X has fantastic multimedia support with its QuickTime architecture, and iTunes alone can be used as a dashboard jukebox with a remote control. OS X also has an integrated DVD player application that will play DVD video right off the hard drive or DVD drive, without you having to buy additional software. Almost every application on the system is accessible by the native scripting language AppleScript, and the OS has built-in speech recognition for launching commands. Thus, with a few lines of relatively painless programming, everything in the OS can be made “speakable” (i.e., respond to voice commands).
Besides the built-in apps, there are some really promising individual projects out there [Hack #53] , such as Dash Mac (http://sourceforge.net/projects/dash-mac) and iDash (http://sourceforge.net/projects/idash).
A good resource for Mac car PC software is http://carmac.acmelab.org. Along with iTunes frontends, they have a number of more advanced projects and general discussions. But the biggest reason to switch to a Mac for in-car computing is the new Mac Mini, which is described in “Choose an in-Car PC Hardware Platform” [Hack #41] and installed in “Install a Mac Mini in Your Car” [Hack #54] .
DOS and Other Operating Systems
Depending on the hardware you’re using, DOS may be a viable OS choice for you. DOS, including the simple DOS that comes with Windows 95, 98, or ME, is by far the fastest-booting OS on Intel hardware. Using an MP3 player such as DAMP (http://www.damp-mp3.co.uk), you can get your music playing mere seconds after you start your computer, instead of a minute later, as with modern bloated GUI OSs.
DOS also runs on very old hardware. If you have an old Pentium or AMD processor, for instance, you can underclock it (say, run a 500-MHz chip at 300 MHz or a 200-MHz chip at 133 MHz). Underclocking will reduce the processing power and thus the amount of heat generated. Since you only really need a 90-MHz (or faster) Pentium to play back MP3s, underclocking can let you build a simple media computer that draws small amounts of power and generates little heat.
Any other orphaned OS that still has an online community can be adapted for in-car use, as long as you can get it to talk to whatever touchscreen, remote control, or other user-interface device you want to use. If you just want to have a fixed menu of options (say, music, videos, and some games) and you can develop a simple menu for your computer, there’s no good reason not to, and you may get some brief Internet notoriety when you post screenshots of the only BeOS or OS2/Warp in-car computer system out there.
Install Windows on a CompactFlash Card
Microsoft’s XP Embedded OS can help you do what XP normally can’t—boot off a CompactFlash card.
The car PC community is constantly searching for hardware and software solutions to improve the system’s boot speed and reliability and reduce the physical size of the computer. One of these solutions is to build a system that boots off a CompactFlash (CF) drive. Flash storage is used in many commercial devices because it’s small, has no moving parts, uses less power than a hard drive, and holds up much better than a hard drive when exposed to vibration and extreme temperatures.
Using only a CF-to-IDE adapter (Google “CF to IDE”) and any off-the-shelf CF card (Figure 4-16), flash-based systems can be built relatively easily and affordably. One of the disadvantages of using flash, however, is that due to its construction it can withstand only a limited number of writes. This is fine for digital cameras, but since operating systems like to constantly thrash around on the hard drive with temporary files and virtual memory, flash requires special support by the operating system to filter out or completely disable these writes. Many users have turned to custom versions of Linux, while Windows users have had no viable option other than Windows CE or XP Embedded.
For those willing to try, Microsoft provides a free trial of XP Embedded (XPe) from its web site that allows developers to build a fully functional boot image that will work for 90–120 days. It takes a few tries to get it working right, but it’s a very powerful tool. After spending a good amount of time playing with it and reading as much as I could about it on Microsoft’s MSDN site, I decided to investigate how XPe was able to work on flash disks. Since XPe is just a componentized version of XP, I figured there was no reason why a regular XP install couldn’t be made to use some of the XPe components in order to boot from a CF disk.
Microsoft provides a component called the Enhanced Write Filter (EWF) for developers planning to deploy their systems to a CF disk. EWF is simply a storage filter driver that can be configured to protect one or more volumes from any unwanted writes. All changes to a protected volume are filtered by EWF, which then stores them in RAM rather than writing them to the disk. Upon system shutdown or reboot, changes can be either committed to the volume or discarded. Since the volume is not written to during normal operation, the system is also more resistant to data corruption in case of a sudden power loss.
MinLogon is a component Microsoft added to XPe for devices that need quick boot times and as little overhead as possible. Normally, when an XP system is booted, an executable called WinLogon is started that performs the user login, sets the security policy settings, and runs the logon scripts. This can be a lengthy process and seriously hurt boot times. Car PC developers don’t typically need this level of functionality in our systems—we just want the system to boot up as quickly as possible and start playing music like a normal radio would. MinLogon was created for just these types of devices, and coupled with EWF, you can use it to turn a regular XP install into an OS capable of quickly booting off a CF disk.
The first step in preparing a CF install is downloading the XPe trial from http://msdn.microsoft.com/embedded/windowsxpembedded/default.aspx. The install will create a network share on your system called Repositories. This is where all the XPe components are stored, and all the files I use in this hack come from this directory. The best way to experiment with this hack without corrupting your desktop system is to use machine virtualization software, such as VirtualPC (http://www.microsoft.com/windows/virtualpc/default.mspx) or VM-Ware (http://www.vmware.com). Set up your XP install and make sure you’ve got a way to transfer files between the virtual machine (VM) and the desktop. After I set up my system in VirtualPC, I created a second VM using a differencing drive of the first VM. This was so that if I screwed up I wouldn’t have to go through the lengthy reinstall process all over again. (See the VirtualPC documentation for directions on how to set up a differencing drive.)
If you have any disk-cloning software, such as Symantec’s Ghost (http://www.symantec.com/sabu/ghost/), you can use that too. Clone the drive you want to experiment with onto some old 1-GB drive you have lying around, and try changing that version so that you can re-clone it if you mess it up.
Setting Up MinLogon
First we’ll set up MinLogon. This is an optional component—it is not necessary for running XP from a CF card, but it does improve boot time. Search the Repositories directory on your main hard disk for the latest version of minlogon.exe and transfer it to the test virtual machine or hard drive:
First go to the Windows\System32 directory of your virtual machine and rename the file winlogon.exe to winlogon.exe.bak.
Copy the minlogon.exe file to the Windows\System32 directory and rename it winlogon.exe.
If a Windows File Protection warning comes up warning you about changing the filename, just cancel the dialog to ensure that the new MinLogon file isn’t replaced by Windows File Protection.
Next, create a text file called minlogon.reg. Edit the file and enter the following text:
Windows Registry Editor Version 5.00

[HKEY_LOCAL_MACHINE\SOFTWARE\Microsoft\Windows NT\CurrentVersion\Winlogon]
"Config"=dword:00000017
Save the file and then merge it into the Registry by double-clicking on it. Double-check the Registry to make sure the entries were entered properly.
Reboot the system.
As long as you entered everything properly, the VM will boot into XP using the System account. The first time you boot up it will prepare the user settings for the System account, so it’ll take a bit longer than usual. Once that is done, go ahead and reboot again to make sure everything is working properly. MinLogon may cause problems for some applications, so if you find that it doesn’t fit your needs, just restore the original winlogon.exe.
Setting Up Enhanced Write Filter (EWF)
Now that MinLogon is working properly, you can go ahead and set up EWF. Before you do so, make sure you disable the paging file by right-clicking on My Computer, clicking the Advanced tab, clicking the Performance button, clicking the Change button in the Virtual Memory section, and selecting “No paging file.” You’ll also want to disable system restores, by right-clicking on My Computer, selecting the System Restore tab, and checking “Turn off System Restore.” (These features interfere with EWF.) One bug I’ve found is that when booting with EWF, XP always brings up the recovery options at bootup. You can disable this by deleting the file named bootstat.dat in the Windows directory. You’ll need to search the Repositories directory again for three files: ewf.sys, ewfntldr, and ewfmgr.exe. Since the directories may change with each release, make sure you search for the latest versions and place them on the VM system.
Rename the ntldr file on your root drive to ntldr.bak.
Move the ewfntldr file to your root drive, and rename it ntldr.
Move ewf.sys to your Windows\System32\drivers folder.
Create a text file called ewf.reg and enter the text from Example 4-1. (You can download these files at http://www.oreilly.com/catalog/carpchks.)
Example 4-1. Registry entries to set up Enhanced Write Filter
  Windows Registry Editor Version 5.00
  [HKEY_LOCAL_MACHINE\SOFTWARE\Microsoft\Dfrg\BootOptimizeFunction]
  "Enable"="N"
  [HKEY_LOCAL_MACHINE\SOFTWARE\Microsoft\Windows\CurrentVersion\OptimalLayout]
  "EnableAutoLayout"=dword:00000000
  [HKEY_LOCAL_MACHINE\SYSTEM\CurrentControlSet\Control\FileSystem]
  "NtfsDisableLastAccessUpdate"=dword:00000001
  [HKEY_LOCAL_MACHINE\SYSTEM\CurrentControlSet\Control\Session Manager\Memory
  Management\PrefetchParameters]
  "EnablePrefetcher"=dword:00000000
  [HKEY_LOCAL_MACHINE\SYSTEM\CurrentControlSet\Control\Session Manager]
  BootExecute=""
  [HKEY_LOCAL_MACHINE\SYSTEM\CurrentControlSet\Enum\Root\LEGACY_EWF]
  "NextInstance"=dword:00000001
  [HKEY_LOCAL_MACHINE\SYSTEM\CurrentControlSet\Enum\Root\LEGACY_EWF\0000]
  "Service"="EWF"
  "Legacy"=dword:00000001
  "ConfigFlags"=dword:00000020
  "Class"="LegacyDriver"
  "ClassGUID"="{8ECC055D-047F-11D1-A537-0000F8753ED1}"
  "DeviceDesc"="EWF"
  "Capabilities"=dword:00000000
  [HKEY_LOCAL_MACHINE\SYSTEM\CurrentControlSet\Enum\Root\LEGACY_EWF\0000\Control]
  "ActiveService"="EWF"
  [HKEY_LOCAL_MACHINE\SYSTEM\CurrentControlSet\Services\ewf]
  "ErrorControl"=dword:00000001
  "Group"="System Bus Extender"
  "Start"=dword:00000000
  "Type"=dword:00000001
  [HKEY_LOCAL_MACHINE\SYSTEM\CurrentControlSet\Control\Class\{71A27CDD-812A-11D0-
  BEC7-08002BE2092F}]
  "UpperFilters"="Ewf"
  [HKEY_LOCAL_MACHINE\SYSTEM\CurrentControlSet\Services\ewf\Parameters\Protected\
  Volume0]
  "Type"=dword:00000001
  "ArcName"="multi(0)disk(0)rdisk(0)partition(1)"
Save the file. Before you merge it, you need to alter the permissions on one Registry key. In regedit, navigate to
HKEY_LOCAL_MACHINE\SYSTEM\CurrentControlSet\Enum\Root. Right-click on Root and click Permissions. Set “Everyone” to have Full Control, and then merge the file by double-clicking on it. As you did for MinLogon, ensure that all the values were entered properly, and then reset the Root key permissions to the way they were before.Reboot the system.
Pay special attention to the last entry, ArcName. That points to the volume you want
protected. This script will default to the first partition of the
master drive on the primary IDE controller, so as long as you have
your CF card set as the master drive on the primary IDE controller
you’ll be fine.
The first few entries are optimizations for EWF-enabled systems. To minimize disk writes, we’ve disabled automatic defragmentation and prefetch. I also included a tweak to disable the NTFS last-access file timestamp. If you use NTFS on your system, you don’t want the OS constantly updating timestamps for files you access and creating unnecessary disk writes.
Once the system boots, pull up a command line and run ewfmgr
n: , where n:
is the letter of the protected drive (typically “c”). The output
should be similar to this:
Protected Volume Configuration
 Type            RAM (REG)
 State           ENABLED
 Boot Command    NO_CMD
  Param1         0
  Param2         0
 Volume ID       87 0B 88 0B 00 7E 00 00 00 00 00 00 00 00 00 00
 Device Name     "\Device\HarddiskVolume1" [C:]
 Max Levels      1
 Clump Size      512
 Current Level   1
  Memory used for data 1294336 bytes
 Memory used for mapping 4096 bytes
If instead you get an error stating that no EWF volume could be found, pull up the Registry Editor and recheck your settings, make sure that ewf.sys is in the System32\drivers directory, unplug any other hard drives, and restart.
ewfmgr gives you some important information about your protected volume and tells you how much RAM your overlay is taking up. That’s an important factor to keep in mind: the more changes you make to your protected volume, the more RAM it’ll take up, until you finally run out of memory. So be careful what you do to your system with EWF running.
Here are two important commands to remember:
C:\ ewfmgr c: -commitanddisable –liveThis will immediately disable EWF and commit all changes to the volume.And this command will enable EWF on the next bootup:
C:\ ewfmgr c: -enableThe typical process for making persistent changes to your volume
is to run the commitanddisable
command, make your changes, run the enable command, and restart.
Another useful feature for car PC systems is what Microsoft calls "Hibernate Once, Resume Many” (HORM). If you have hibernation support enabled in your system, this basically allows you to hibernate your system once, and then always resume from that same hibernation state every time you boot up. This minimizes writes to the CF card and improves boot and shutdown times. All it takes is a simple file called resmany.dat on the root of your drive. Just create an empty text file and name it resmany.dat. When this file is present on the root drive, the EWF NTLDR knows not to reset the hibernation file as it normally would; thus, you never have to re-hibernate, unless you specifically request it. If you decide you don’t want to resume from hibernation, just hit F8 while the system is booting to delete the restoration data and boot up normally.
The hibernation process bypasses EWF, so there’s no need to disable EWF before you hibernate. However, make sure to disable EWF when you create the resmany.dat file, or it won’t be written to the flash drive. (You’ll then need to re-enable EWF and reboot before hibernating.) Most likely, you’ll have an external drive containing your MP3s. Microsoft recommends setting the hibernation point without any other hard drives plugged into the system, because if the write cache still has data in it when you hibernate, every time you resume that data will be in the write cache and could potentially corrupt the partition. XP will automatically detect any new drives that are attached to the system, so once you set the hibernation point you can leave your drives plugged in.
Setting Up Your XP Installation
Now that you have successfully created an EWF system in a VM, you can start planning your final system. My recommendation is to first make a customized XP install, using a program such as nLite (http://nuhi.msfn.org/nlite.html) to remove any excess features you don’t need. You want to get your XP installation as small as possible so that it can fit onto a CF card. You’ll probably have to choose between a 512-MB or 1-GB card. Do some research, and try to find the fastest CF card you can afford. Keep in mind that if you plan on using hibernation, your space requirements will increase by the amount of RAM you install in the system. In other words, if your XP installation takes up 320 MB and you have a 256-MB stick of RAM, you’ll use up about 576 MB of space and will need to get a 1-GB card. However, if you don’t need hibernation, you can make do with a 512-MB card and save yourself some money. You’ll also need to buy a CF-to-IDE adapter. Do a search on Google, and you’ll find quite a few different adapters out there. Some can even plug directly into the IDE port rather than using cables, which saves space.
The best way to go about putting your XP installation on a CF card is to first set up your system on a regular hard drive. Load up all your drivers and third-party tools, make the necessary configuration changes, and of course install EWF and MinLogon. Once you’re happy with the system, you need to initialize your CF card. Microsoft recommends using a FAT filesystem to improve the performance of EWF and minimize writes to the drive. Also, many retail CF cards come configured as removable drives, and as Windows XP will not allow you to partition and format a removable drive with NTFS, you must use FAT for these cards (although you can sometimes get a utility from the manufacturer to configure the CF card to appear as a fixed, or non-removable, drive).
XPe includes a special tool called Bootprep.exe that is used to enable FAT-formatted disks to boot into Windows XP. To configure a FAT-formatted CF disk to boot XP, you’ll need a DOS boot disk with fdisk.exe, format.com, and bootprep.exe. Here’s what to do:
Start by installing your CF card as the master drive on the primary controller and your hard drive on the secondary controller.
Boot into DOS and partition your disk, and then run the command
format c: /s. This command formats the disk, and the/sswitch copies over the DOS system files to make the CF disk bootable. Reboot, and if all goes well the system will boot into DOS from the CF disk. If not, you need to check your BIOS settings.Once you’ve confirmed that your CF card boots successfully, boot with your DOS boot disk (not the CF card) and reformat the card by using the command
format c:(without the/sswitch). Then use thebootprep /dccommand (the/dswitch specifies which drive to use) to run Bootprep.
If you are using NTFS, simply use Windows Disk Management to partition the drive and format it.
Now you are ready to copy over your XP install. Since Windows won’t allow copying of files from the currently running OS instance, you need to boot into another OS, or attach both the hard drive and the CF card to another machine. Use whatever method you prefer, whether it’s booting into Knoppix, DOS, or another XP installation. Just make sure that whichever method you use, it copies all hidden and system files and keeps the file attributes (hidden, read-only, archived, and so on) intact.
Once the transfer is done, connect your CF card to your system,
remove all other hard drives, and boot up. As long as all the files
were copied over properly, the system will start booting into your XP
install, just as it did from the hard drive. Once the system boots up,
take a look around and make sure everything is working right. Bring up
a console by running cmd
from the Start menu, and check that EWF is running.
With your system now running on a CF card, you have a small, fast, and reliable installation of XP to use for your car PC or any other small, embedded device you plan to use. I suggest you experiment a little by using the standby power function, as well as taking a look through Microsoft’s MSDN site for embedded technologies (http://msdn.microsoft.com/embedded/) to see what tips they may have.
If you’re going to be making significant changes to the system, you may want to consider doing it on the hard drive first and then redeploying to the CF disk. That way, you can clean out log files, temp directories, and any other leftover junk that’ll take up precious space on your CF disk.
—Silvio Fiorito
Power Your Portable Devices in the Car
Almost any small consumer device can be run on car power, and if you can’t find the right adapter you can usually make one.
There are many portable devices that can bring music to your car, but unless your device is very popular there may not be a specific car adapter for it. Nonetheless, by figuring out a few vital statistics about your device, you can adapt it to work in the car.
The main data you need to get a device working is:
- Voltage
You need to know the voltage of the device, and whether it runs on AC or DC. The ideal candidates for running on car voltage are DC and between 1.5V and 12V.
- Amperage
You need to know how much current your device wants. More amps, in general, require thicker wires and a bigger adapter. The easiest devices to power are under 1 or 2 amps.
- Plug size
The common barrel plug is a cylindrical plug with an inner and an outer metal contact separated by insulating plastic. There are many sizes of these, and you need your power adapter to fit correctly in this plug.
- Polarity
Polarity is simply which of the contacts in your barrel plug is positive (+) and which is negative (-). These are usually indicated by a small diagram.
Most consumer electronics devices, especially those that run on batteries, are designed to run on DC voltage in the 1.5V to 9V range. This is fortunate, because it is very easy to “step down” a car’s 12V to one of these voltages. Figure 4-17 shows one such adapter from Radio Shack with a switch to select 9V, 6V, 4.5V, or 3V, depending on your device.
The second thing to determine is whether your device wants too much current. Any power adapter you purchase should specify a maximum amperage at which it will run, such as 1000 mA (1A). Any device you wish to power should have a corresponding amperage on its label, such as 800 mA. As long as the device’s amperage is less than the maximum for the adapter, you can safely power the device.
Getting plug sizes right is straightforward enough. The 12V, 1A cigarette lighter adapter shown in Figure 4-17 comes with four common plugs on the end. If none of these is the one you need, however, all is not lost. You may need to buy a different plug end, or snip the plug end off the wall adapter that came with the unit and splice it onto the 12V adapter to make it work in your car (you can always splice the original wall adapter back together [Hack #4] if you keep it). If you don’t want to cut your wall adapter, you should be able to find the right adapter; Radio Shack has a full collection of common adapters and wires to hook them up.
As long as you have a proper barrel plug that fits your device, the only thing you have left to worry about is respecting the polarity of the wires (positive to positive and negative to negative).
Warning
You don’t want to reverse the polarity (+ and - connection) of wires to your devices, even for a moment, as it can damage the devices.
There are a few rules of thumb that can help you figure out the polarity of your power supply wires, to make sure that plus goes to plus and minus goes to minus. On AC-to-DC wall adapters, the negative wire is usually black, and the positive wire is often black with a white stripe. Sometimes there is a little diagram on the device and/or the power supply, with a letter C around a dot. The outer C circle indicates the polarity (+ or -) of the outside of the barrel plug, and the inside dot signifies the polarity of the inside of the plug. The key is to make sure that the + and – going into the device are what the device expects.
The most effective way to make sure that you get the polarity right is to purchase and use a multimeter. Set the multimeter to the 20V range, and put one lead on the middle plug and one on the outside of the plug to the wall adapter that came with your device. It should indicate the voltage coming out of the adapter, with a plus or minus sign. Then, when you get your new power adapter wired up, do the exact same test on your new in-car power adapter. The voltage should be around the same (e.g., 5V), and the + or - polarity should be the same as it was for the wall adapter. If you do this, you’ll know you’ve wired it up right.
Powering Hard Drives and Optical Drives
USB is notoriously bad for powering devices such as portable hard drives and DVD drives. The 500-m A limit on many USB ports and hubs is less than the 600–1000 m A needed to power a device with a spinning disk. FireWire is much more reliable with regard to bus power, and since most of the car PC motherboards of choice come with FireWire ports built in, it is a good choice for powering both CD drives [Hack #38] and portable hard drives, assuming you can use a short enough cable (less than 15'). FireWire may fail to power your devices if you use a longer (15–25') cable.
If you have a dual FireWire/USB device and you don’t want to rewire a power supply for it, there is a simpler approach: connect the device to the computer via USB, then power it with 12V on the FireWire port. You can use a device such as the Griffin Powerpod (http://www.griffintechnology.com/products/powerpod) to supply the 12V the FireWire drive needs, even if it isn’t an iPod, and then hook the drive up to the USB port connected to the computer (Figure 4-18). Only the two power pins of the six-pin FireWire cable will be used; the data will go over the USB. Note that you should not connect the device to the computer through both the FireWire and USB ports, as the computer will be confused about which method it should use to connect to the drive.
See Also
“Power Your Car PC” [Hack #42]
“Install USB Ports in Your Car” [Hack #51]
“Transfer Data to and from Your Car PC” [Hack #64]
Install USB Ports in Your Car
Installing USB ports in the front-seat area will give you the ability to easily add peripherals to your in-car PC.
Have you ever thought it would be nice if your car came with USB ports right on the dashboard? If this sort of geek chic is important to you, there are a variety of USB hubs that can fit the bill. The trick is to find a hub with a 2 x 2 stack of ports that is rectangular and has a narrow edge. (Your local computer store probably has dozens of USB hubs to choose from.) This will give a fabricator/installer a good unit to work with when they try to cleanly integrate it with your factory dash.
But there’s no reason you must have the USB ports visible. Many vehicles have a center armrest designed to hide away CDs or other media, and this is a great place to put your USB hub. The glove compartment is another candidate, although it’s a little harder for the driver to reach.
There are a couple of considerations when installing a USB hub. The primary one is power. Even with the upgraded USB 2.0 specification, every USB 2.0 self-powered hub has a 500-m A limit for each port. When the hub is bus-powered (i.e., only gets its power from the computer) that limit is lower, around 100 mA.
So, if you are going to connect a bunch of bus-powered devices, such as USB flash drives, Bluetooth adapters, flash drive readers, keyboards, and mice, you probably want to make sure that the USB hub you’re installing is self-powered. Also, be sure to get a hub without an integrated USB cable. You may need to run the cable a fair distance from your computer, and integrated cables seldom have the length necessary for this.
Since USB hubs almost uniformly expect a 5V input, you’re going to have to get a 12V-to-5V adapter in order to power it. At Radio Shack and elsewhere you should be able to find a cigarette lighter adapter with a variable output, like the one shown earlier in Figure 4-17. You need to run or tap into existing 12V switched or unswitched wires in the glove compartment or center armrest area, and connect these to the 12V-to-5V adapter [Hack #50] . Your best bet is to run what you need from the battery area [Hack #3] .
Tip
You should probably use a switched 12V wire when powering a USB hub to make sure attached USB devices are off when your car is off. You should use unswitched wires only if you have devices that recharge off the USB port, or if for some reason you do not want the devices to lose power.
You’re also going to need to run the USB cable from wherever your car computer is to wherever you’re putting the hub. You’ll want to lift the carpet and run the USB cable underneath so it’s out of sight. You can get a 15–25’ USB 2.0 cable almost anywhere computer cables are sold. I’ve noticed no difference in quality between the $40 gold-plated super USB 2.0 cables and the $8 store special versions.
If you’re running the USB cable to the console between the front seats, your car’s service manual should give you hints as to how to remove and get under the console. Depending on the vehicle, you may be able to just run the cable under the carpet and beneath the passenger seat, and then snake it into the center console from below. (Chapter 1 has more information about running wires in your car.) If you’re installing the hub in the glove compartment, you can run the wires all the way to the front passenger foot area and then run it to the glove compartment through the dashboard (Figure 4-19).
If you know ahead of time that you are going to be using a particular higher-power device, such as an iPod or portable hard drive, it would be best to run a wire for that device now. If your hard drive takes both FireWire and USB, you’re in luck—with the right wire, the FireWire portion can usually be powered straight off of the 12V.
If your drive doesn’t take FireWire, that’s fine too—you’ll just need a second 12V-to-5V adapter to connect the drive to. However, if your USB hub’s 5V barrel connector is the same as your hard drive’s barrel connector, you may have a simpler option—just unplug the USB extension cable from the hub and plug it into your drive. If your USB 2.0 hard drive is designed to work on bus power (some can and some can’t), there may be enough power on the bus if you disconnect the hub. If this works, you can just leave the hub there until it is needed for other devices.
Having a hub in the front is valuable in many ways. You can use it to connect keyboards and mice [Hack #55] , GPS receivers, wireless remote controls [Hack #56] , or Bluetooth adapters [Hack #63] , just to name a few.
See Also
“Power Your Portable Devices in the Car” [Hack #50]
Build an in-Car PC
Having covered all the basics, let’s look at how a U.K.-based IT manager put together his car PC.
My job involves a good deal of travel, so naturally I looked into buying a satellite navigation system when I was buying a new car. But the high cost and minimal features of the factory navigation system compelled me to look at computer-based alternatives.
At first I considered using a laptop with a GPS and PC-based navigation system, but laptops are clunky copilots at best. After a lot of online research, especially on http://www.mp3car.com, I found that I could actually build a small PC for the car that would not only give me a navigation system, but also MP3 and DVD playback, all usable though a nice touchscreen interface. Armed with this knowledge and the cash I had saved by not opting for the factory navigation system, I began piecing together my car PC.
Choosing a Computer and Screen
To get started, I looked for a computer. Cost was a big factor here for me, and after some searching I purchased a used, preassembled 800-MHz VIA Mini-ITX system (Figure 4-20) from an online auction. The low-cost, power-efficient VIA boards [Hack #41] are by far the most popular motherboards for in-car computer use.
The first version of my car PC project used an LCD composite monitor attached to the TV-out port of my video card. I thus learned that using a standard LCD TV screen (with a composite connector) will result in an unacceptably low-resolution picture for anything but watching movies. If you think using a TV for a monitor on your home PC is bad, it’s even worse in the car because the screen is so small.
As far as I am concerned, the screen is the most important part of the whole system. It needs to have high enough resolution that it is readable, looks good, and is able to cope with the resolutions needed to run computer graphical user interfaces. Lilliput’s (http://www.newision.com) 7” touchscreen monitors [Hack #26] are by far the cheapest (less than $300) and most popular screens for in-car PC installation, so that’s what I went with.
I had to do some adjustment to get the sharpest picture on my Lilliput monitor. I invested in a PCI video card with 3D capabilities and TV out, and fortunately the card I bought was compatible with a utility called TVTool (http://tvtool.info/index_e.htm). The Lilliput has a native resolution of 800 x 480 pixels, and TVTool was able to set the resolution to 800 x 484 or 800 x 480, both using the 75-Hz refresh rate. This put Windows in a true 16:9 (wide-screen) resolution and eliminated flickering on the screen. The onboard video of most VI A boards can’t display 800 x 480, but the Lilliput can display an 800 x 600 image—it will just look compressed vertically, which you may be able to compensate for in your application software.
Installing and Mounting the PC and Screen
While a custom-fabricated dash installation of the screen is a very popular option, one of my goals was to have a PC that I could move from car to car. On the Lilliput units, the USB wires for the touchscreen and the VGA input are all contained in a single cable, which means that if need to I can simply unscrew the screen from the dash, unplug the cable, and quickly place the screen out of view from prying eyes.
To mount it on the dashboard I used a special mounting bracket from Dash-mount (http://www.dashmount.co.uk) in the U.K.—the bracket needs no screws, so when I sell the car there will be no holes left in the dash. To attach the screen to the bracket itself I simply used the thumbscrew that came with the monitor, slightly drilled out the center hole of the bracket, and added some sticky rubber pads to hold the screen in position (Figure 4-21).
I decided to install the computer itself in the boot (that’s the trunk, for all you Yanks), still keeping to the goal of minimizing the amount of modifications I made to the car (i.e., drilling holes). To wire up the computer, I needed power [Hack #42] , ignition (ACC/KEY 12V), a very good ground, sound to the head unit [Hack #14] , and VGA and USB extension cords. For the power I used a three-pin “Euro” mains socket and plug and a 13A main cable. I ran the power down one side of the car and the sound and video down the other, to prevent interference [Hack #17] . For the VGA, I bought a 10-foot extension cable from a computer store. Finding audio cables was easy, but I had to fabricate the USB extension cables by soldering a USB socket and plug to CAT4 networking cable.
The benefit of a trunk install is that would-be thieves are unaware of the computer’s existence. However, I needed a method to stop the computer from sliding around the trunk while I was driving that didn’t involve modifying the vehicle. The answer came when I was looking at my brother’s new car. He was in a rush to get his stereo and amps into the car, so he had used Velcro to put them in place. This held the amp to the carpet in the back and also let him quickly remove it at night. I decided to try this myself, so I went down to the local market and bought some Velcro. Once I got it home, I laid it out on the floor in a cross and placed the CPU on top of it. Then, making sure that the plastic hooks were facing down, I measured and cut them as needed. When finished, I simply took the whole unit, with the Velcro wrapped around it, and stuck it to the carpet in the boot (Figure 4-22). Success! And although I planned to replace it with a custom-built metal case drilled into the side of the car, I have never yet had cause to change the design.
One of the questions you may be asking yourself is, “Won’t the hard drive get damaged when I drive over a bump?” It’s possible, but I think in the several years I have been following car computers I have only heard about this happening once or twice. Still, there are ways to minimize the possibility, two of which I have tried myself. The first is to soften the impact by placing rubber in between the hard drive and the mounts where the screw attaches to it. (I got this idea from Hewlett-Packard, who used it in some of their desktop machines that I worked on a lot a few years ago.) The second option is to use a laptop (2.5”) hard drive. Although they tend to be smaller and slower, the advantage you get is that they are built to take more shock and vibration than conventional 3.5” desktop drives—and the speed of laptop hard drives today is quite sufficient to play back audio and video.
Powering the PC
After looking at the various power supply options [Hack #42] , I decided to go for a highly recommended off-the-self option: the 90W supply from Opus Solutions (http://www.opussolutions.com). I knew that if I skimped on the power supply I could come back to my car to find it with a dead battery, or possibly even fry the machine.
Although it was slightly bigger than I expected, it was still smaller than its 150W bigger brother, and it fit very nicely in the unused hard drive bay in my Casetronic case. The Opus cost a fair bit more than many of the other options, but I felt that the extra expense was worth it because it gave me configurable shutdown options and low-battery protection for the car, as well as a clean ATX power output.
Peripherals and Controls
The primary interface for controlling the operation of my car PC is through the touchscreen and the custom skin I’ve made for the FrodoPlayer software [Hack #75] (Figure 4-23). I have also configured a wireless remote [Hack #56] , so that my passengers can control the music playing from anywhere in the car.
Audio Connection
Once I had installed my car PC, I had to decide how I was going to connect it to my existing car audio system [Hack #14] . I tried using an FM modulator, but the sound just wasn’t clear enough for me, so I purchased a Kenwood head unit (KDC-W6527) that had auxiliary audio inputs and even worked with my existing steering-wheel volume controls.
In addition to connecting my car PC to the radio, I connected a USB radio to my car PC [Hack #19] . I used the D-Link DRU100, and I installed the drivers from a program called Radiator (http://radiator-fm.com.ru/indexuk.htm), as they are more stable and work better with Windows XP than the ones that came with the DRU100. With the USB radio, I can tune radio stations and set presets via the same touchscreen interface that controls all my audio.
Networking
One of the popular solutions for getting content from your home PC into your car is WiFi [Hack #64] , but this approach is much slower than good old network cable. Also, because car computers are designed to shut off soon after the car turns off (to save the car battery), if you download content via WiFi you actually have to leave your car on while your music downloads. I tried using WiFi anyway, but my house tended to absorb the WiFi signals too much. Although I could get a connection outside, when I tried to copy large amounts of data the wireless connection dropped a lot of it. To solve this problem, I installed the remote desktop program VNC (http://www.realvnc.com) on both the car PC and my laptop. When I need to copy content to the car PC, I simply use a crossover network cable—this solution cost me far less than buying wireless cards and a WiFi point, and it transfers the data quicker.
If you do want to connect to the Internet while you’re out and about [Hack #62] , you’ll more than likely need a Bluetooth adapter, a Bluetooth phone, and a contract that allows you access to a GPRS data system. You may find this useful for accessing certain web-based travel data sites (such as the U.K. Traffic Master system), so you can plan your route before you leave your departure point [Hack #65] .
Frontend Software
While Linux options exist, I found that most of the free frontend applications developed by and for the in-car PC community are Windows XP–based. The various car PC frontends tend to carry out the same functions, but in different ways. Most of these applications are also skinnable—that is, you can customize the visual look of the user interface to suit your taste. As many of them are under continuous development, I think it’s a good idea to test several options before you make your choice. The main players in the freeware world that I looked at were FrodoPlayer [Hack #75] (http://www.frodoplayer.com) and Neocar Media Center [Hack #74] (http://www.neocarmediacenter.com/?language=EN). I found FrodoPlayer to offer the best options for visual customization.
After I installed all the supporting utilities, I installed FrodoPlayer and set up my preferences (such as my music and movie directories). I also placed a FrodoPlayer icon in my startup folder, so that when my PC started it would be the first application that was shown (hiding the Windows XP interface).
When choosing a skin, bear in mind that a touchscreen can be very hard to read in sunlight, so a darker skin can help the characters stand out better. I adapted one of the more well-known FrodoPlayer skins from Febsperanza (http://febsperanza.3plast.com), and once I’d changed the text and the “glow” of the buttons to match my dashboard color, I had an interface that looked like it came straight from the manufacturer (Figure 4-24).
GPS/Navigation
The first GPS software I used was Microsoft’s AutoRoute, a quick application that supported my GPS system. Later, I switched to Destinator [Hack #71] . Destinator is one of the few PC-based systems that looks as good as factory navigation. It gives you touchscreen menus for planning your journey and excellent 3D views, just like a factory-installed system (Figure 4-25). More and more car PC applications are now supporting it.
I’m on my second GPS receiver now—my first one worked well, but it was purple and round and just didn’t look good on my dash. I originally ran a single USB connection to the front of my car, with all the devices going into a nonpowered USB hub [Hack #51] . My new GPS unit is a power hog and demands more power than that USB hub could provide, though, so I ended up running a separate USB cable just for the new GPS device.
Movies and Music
Beyond navigation, the main benefit of my car PC is that I can play all of my music and digital videos in the car. I have been slowly converting all of my LPs and CDs to MP3 using CDex (http://cdexos.sourceforge.net), and I have a collection of music videos as well. When I finally got my PC fully installed, with my entire music collection available at my fingertips, I knew it was worth all the effort.
Conclusion
A car PC is a great thing to have, and it gives you features available nowhere else. If you put in the effort, you can create a unique, customized system that does exactly what you want and offers far better value than any off-the-shelf solution.
When you’re planning and building your car PC, be sure to take advantage of the many online forums. These forums are extremely useful to the car PC community, as they enable people from all over the world to share ideas and hints, and even arrange local meetings to show off their work. I have attended a number of U.K. meets, and I’ve found them to be excellent opportunities for enthusiasts to meet up, see what others have done, and make new friends.
See Also
http://www.letscommunicate.co.uk—Terran Brown’s web site
http://www.pricepc.com/html/carpc.php—A sampling of car PC installations and pictures
http://www.via.com.tw/en/initiatives/spearhead/Mini-ITX/car-pc.jsp—Several more car PC installations, using VIA motherboards
http://www.mp3car.com—A U.S. car PC forum
http://www.digital-car.co.uk—A U.K. car PC forum
http://www.cpcd.de and http://www.car-pc.info—German car PC forums
http://www.carmedia.org—A French car PC forum
—Terran Brown
Build an in-Car Macintosh
Check out how one programmer used OS X and a PowerMac G4 to meet his in-car computing needs.
Several years ago I got a job in Holland, and I needed a comfortable car for almost-monthly trips to the Czech Republic. I purchased a 1993 Tatra T6134Mi sedan with a rear-mounted 200-HP V8 engine. Ironically, although the car I purchased had been made for the Frankfurt auto show and was originally equipped with fully digital controls, a handful of computers, and features such as voice synthesis, the factory had replaced all this equipment and rewired it with more traditional controls after the show. The moment I bought it, I decided that a computer had to be put back in. I started to design my Tatra computer in the summer, and by Christmas I had a working installation.
The main features that I wanted my in-car computer to provide were a navigation system and the ability to play my MP3 collection—anyone who needs to make 1,000-km trips every month or has ever been lost in Copenhagen can understand the need for a lot of music and a good map.
Of course, I could simply have purchased dedicated navigation hardware (and a head unit that plays MP3s), but I was not very excited about the prospect of spending several thousand euros on a dedicated hardware solution and then having to wait for the manufacturer to release the maps that I needed of the Czech Republic. The use of a standard computer gave me much more freedom in terms of the configuration of the system and of potential software and hardware upgrades.
During the design and construction of my mobile Mac, I also decided to add some functionality that I hadn’t anticipated, including communication with the engine controller and an on-board microcontroller for basic telemetric data.
Choosing a Computer and Screen
My first idea was to use an LCD iMac, and build it into the original dashboard of my Tatra. The base unit was supposed to be placed within the dashboard, and the display with its holder outside. This idea had two basic flaws: the iMac’s 15” screen is really too big for most dashboards, and its LCD screen is not designed for use in full daylight (not to mention direct sunlight).
OK, so no iMac. The second alternative was to install a separate LCD display, built into the original dashboard and connected to a computer (either a PowerMac or a PowerBook) that could be placed under the front seat or behind the dashboard. I also wanted to drive another screen that would allow rear-seat passengers to watch movies or play games. Since a Power-Book cannot easily handle two external screens, I purchased an old 450MHz PowerMac G4 and an industrial 6.5” LCD screen (Figure 4-26) that has contrast and temperature range controls, both of which are necessary for in-car use. The native resolution of this LCD screen is 640 x 480 pixels, but its controller can interpolate various other resolutions. I chose 800 x 600 pixels, the minimal resolution required by the navigation software intended to use (Route 66).
Tip
With the release of the Mac Mini in January 2005, Apple has created a very attractive in-car computing platform. See “Choose an in-Car PC Hardware Platform” [Hack #41] and “Install a Mac Mini in Your Car” [Hack #54] for more information.
Installing and Mounting the PC and Screen
I soon realized that the original dashboard of my Tatra didn’t have an ideal place for a fixed mount of the 6.5” LCD screen, and that a retractable screen would also cause quite a few problems. I therefore decided to rebuild the whole dashboard from scratch. This also allowed me to replace the original gauges, which were not really high-tech (almost unreadable at night, for example). Figure 4-27 is a behind-the-dash look at the rear of the LCD.
The placement of the computer also had to be reconsidered. There was not enough space below the front seats for a PowerMac, so I had to abandon this idea and start thinking about how to install the computer in the trunk (which, in a Tatra, is located in the front of the car). I wanted to use the least possible trunk space for the computer, so in the end I decided to install it in a rectangular case attached to the rear wall of the trunk (see Figure 4-28).
Two important engineering issues to be dealt with were heat and water condensation. The main heat source in older PowerMacs is certainly the hard disk, and the parts that are most vulnerable to condensing humidity are the motherboard and the PCI cards. Based on this knowledge, I decided to separate these two parts of the system.
I installed the motherboard in a fiberglass case and the hard disks on a console next to this case. At first I wanted to completely seal the motherboard case, but later I found that this was not really a good idea, particularly due to temperature changes affecting the air volume inside the case. To fix this problem, I installed two Gore-Tex valves on the case (Figure 4-29). These valves are used in the automotive industry to allow air circulation in the headlight units while keeping any water on the outside.
I did not take any special measures for CPU cooling, although the CPU is mounted in a closed space with minimal air circulation—the 450-MHz G4 processor is known for its low cooling requirements, so I decided to wait and see how it went before over-engineering a solution to a problem that might not exist. This hunch proved to be correct, as even in 35° C days last summer with the computer running for 15 hours, I never had problems with CPU temperature, and the hard disks did not suffer any damage (even on the roads in the Czech Republic and Slovakia, which are not always up to civilized standards!).
Powering the PC
Although my final solution turned out to be simple and reliable, the power supply was probably the biggest problem I encountered during the whole installation. My very first idea was to use an uninterruptible power supply (UPS) without an internal battery, connected to the car’s battery. This idea cost me two UPS units, both of whose transistors burned out. Even a 300W UPS was not able to handle the current surge that occurred when the computer started up.
My second idea was to use an inverter [Hack #11] and the original 220V power supply. This almost worked—I say “almost” because, while it did power the computer, there was a 50-Hz noise on the audio output of the computer that I could not eliminate.
Fortunately, my third idea, a 12V ATX power supply, did work perfectly. I used a commercial Turbo-Cool power supply (see Figure 4-30) that works with input voltages of between 9V and 16V [Hack #42] . The maximum rated power is only 100W, which is much less than the 250W of the original 220V power supply. However, the original power supply was designed for a workstation full of disks and PCI cards, which is certainly not my case. The only problem I have experienced so far is that the 5V output of the power supply is not capable of providing enough current for all of my USB devices, and this problem was very easy to address by using a USB hub powered by a special 5V power source [Hack #51] . The very wide range of the input voltages ensures that the power source is able to power the computer even when I’m cranking the engine [Hack #45] .
The power supply is controlled by the power-on signal from the motherboard, which has an idle current of about 100 mA. Accidental draining of the battery is not much of an issue, since this current is comparable to the idle current of other devices in the car (such as the alarm and the engine controller).
Tip
Motherboards usually draw more standby power—for instance, the VIA motherboards draw 300 mA without any devices attached. The drain of the PowerMac in this installation is quite low, but you might still want to invest in a startup controller [Hack #43] , which will draw less than 10 mA. This is the best way to prevent battery drain, especially if the car is not driven (and recharged) daily.
Peripherals and Controls
There are several basic ways to control the computer, and most of them can be implemented using standard USB peripherals. Many people use touchscreens in similar installations. Although I also considered this option at the beginning, I rejected it pretty quickly. In my opinion, having to look at the screen while driving results in a loss of concentration that can be dangerous. Instead, I decided to use controls with fixed positions that can be used without looking at the screen.
The key control element in my installation is Griffin Technology’s PowerMate rotating controller (http://www.griffintechnology.com/products/powermate), which is used not only for controlling the software [Hack #61] , but also for starting up the computer. I also installed a row of buttons beneath the screen in the dashboard, for auxiliary functions. This is all shown in Figure 4-31.
When I’m not driving, I can control all the functions of the computer using an infrared keyboard with a built in trackpoint that emulates a mouse. Rear-seat passengers can control the movie player and some other functions with another infrared device—Keyspan’s Digital Media Remote (http://www.keyspan.com/products/usb/remote).
For convenience, I installed two USB connectors in the center console to allow ad-hoc connection of other USB devices when required (typically, a keyboard and a mouse).
Audio Connection
The sound output of the PowerMac is connected to a Sony head unit [Hack #14] that is in turn connected to two amplifiers and a total of eight speakers and a subwoofer. There is also another sound output, via a USB adapter, that provides rear-seat passengers with headphone jacks so that they can choose to listen to a different audio source than what’s being played through the main speakers.
Networking
My Tatra has its own Ethernet network, with a small eight-port switch under the rear seats and a total of four outlets in the armrest and the center console (Figure 4-32). Passengers with laptop computers can connect to the network to access data on the car’s hard disk or share the PowerMac’s Internet connection. The PowerMac is also equipped with an AirPort card that can be used to connect to WiFi networks wherever they are available. This feature is used for smaller updates, software and data downloads from my home network, and Internet connection at places with public WiFi hotspots (such as certain fuel stations).
In places without WiFi coverage, the computer uses a mobile phone GPRS-over-Bluetooth interface for its Internet connection [Hack #62] . Of course, the speed is significantly lower, but it’s sufficient for finding out about traffic situations, getting weather data updates, or checking email. This feature once saved me and my company quite a lot of trouble (and money), when I was able to solve a potentially very serious problem from a parking place on a highway in the middle of Germany.
Frontend Software
My Tatra PowerMac uses both standard and custom applications. I tried to use standard applications whenever possible; the custom applications mostly only provide a simplified user interface to some of the standard applications and some car-specific functions, such as the display of speed and fuel consumption.
The main application, called Tatra.app (http://sourceforge.net/projects/dash-mac), was written by Ondra Čada. It runs in full-screen mode and hides the standard OS X menu bar, as well as the Dock. Its screen is divided into several parts. At the top of the screen, there is a space for what we call a “compass module.” The middle and biggest part contains eight slots, each of which can be used by different plug-in modules to display information and user interface elements.
The user can select which modules are installed in the eight slots of the main window, but even a module that is not currently displayed or has no user interface in any slot can display urgent messages or status information, using either icons or pop-up windows. The main application also provides the modules with the ability to speak messages, through Apple’s text-to-speech technology. Spoken feedback allows the user to work with the computer without even looking at the screen.
A module can optionally have a special “setup” part, which is available through the main application in its setup mode. Unlike the main window and activated modules, the user can control it only by standard keyboard and mouse input, not via the PowerMate. (Obviously, this mode is not supposed to be used while driving.)
Here’s a list of the modules I currently use:
Current speed
Current fuel consumption
Fuel status (consumed from last fill-up, remaining, range)
Fuel counter (resettable, multi-instance)
Distance counter (total)
Distance counter (resettable, multi-instance)
Stopwatch (resettable, multi-instance)
Countdown (multi-instance)
Vehicle data input (GUI-less, reads data from onboard systems)
Temperature module (internal CPU temperature and sensors in car)
MP3 player (controls iTunes using AppleScript)
System (switching between apps, turning off power, night display mode)
To support all these vehicle measurement modules, I connected a separate circuit board with its own microcontroller to the car’s engine and installed five digital thermometers and a distance counter on the transmission. (For the interested, the microcontroller was designed and built by Tomáš Struziak, and the schematics can be found at http://aek4470.finalnet.cz/html/palpoc.htm.)
GPS/Navigation
Navigation in my Tatra is handled by Route 66 (currently Route 66 Europe 2004 Professional, to be exact). Although this application was certainly written as route planning rather than navigation software, it does the job well. It has a good database of Europe, offers support for NMEA GPS devices (I use Garmin’s GPS II+ receiver), and, last but not least, can receive real-time traffic information using Internet Traffic Message Channel (TMC) servers for the U.K., Belgium, Luxemburg, the Netherlands, Germany, and Italy.
On the other hand, Route 66 is not easy to control with simplified controllers. It does not use hotkeys that are easy to emulate through simple programming, and the displayed maps are not as good as those in factory navigation systems. The worst problem is that Route 66 only displays the maps “north up,” while most navigation systems work with “track up” display, which is more logical and gives the driver a much better overview of the current situation ahead. With a “north up” map display, the driver must constantly pay attention to the direction, indicated by a little arrow, and make the necessary mental calculations (i.e., when driving south, right turns are left on the screen, and vice versa).
Movies and Music
In Tatra.app, modules can be “activated,” or made responsive to the user’s commands. Figure 4-30 shows an MP3 player module. In the normal state, the module displays information about the track currently being played. In the “active” state, the module displays a dialog box that allows the user to pause the playback and select the track and playlist to be played. All these functions are controllable using the PowerMate rotating controller, so the driver can cycle through the playlists without having to look away from the road.
I had originally planned to install a DVD drive in the center console, but after seeing the high quality of DivX/MPEG movies I decided to implement a video jukebox application [Hack #70] instead of having DVDs strewn all around the car.
I wanted my computer to deliver multi-zone content (i.e., different audio and video in the front and back seats), so I developed another application that could play back a different movie on the second video card and reroute the corresponding audio to separate speakers or headphones. Like the main application, my movie player also runs in full-screen mode and uses a simple user interface, controllable by either the PowerMate controller or the Key-span infrared remote control. It can display the main window on any connected screen, so it can be used on the primary screen in the dashboard as well as on the secondary rear screen (Figure 4-34). It provides only basic playback functions (choose a movie, play it, and pause it), but it gets the job done.
Conclusion
Since the original installation, I have continued to add features to my in-car Macintosh. One change I made was to install a GPS/GSM module, primarily to replace the standard alarm. The one-wire bus is used for user “authentication” with a chip card (to disarm the alarm) and communication with several temperature sensors. The car heater can indeed be controlled by SMS texting, and using SMS I can also get information about the car’s position, lock and unlock it, or stop the engine.
See Also
http://carmac.acmelab.org—The Macintosh car integration forum
http://sourceforge.net/projects/dash-mac/—Location of the open source Tatra.app
http://sourceforge.net/projects/idash—iDash, a graphical frontend for using OS X in a car environment
http://www.popsci.com/popsci/how2/article/0,20967,695577,00.html—A Popular Science article on the Tatra Mac
http://aek4470.finalnet.cz/html/palpoc.htm—Schematics for the custom power board (in Czech)
“Install a VGA Touchscreen in Your Dashboard” [Hack #26]
—Jirka Jirout
Install a Mac Mini in Your Car
Apple’s new Mac Mini has the perfect price, performance, size, and shape for in-car computer installations.
In January 2005, Apple surprised a lot of people by entering the sub-$500 PC market. Their new product, the Mac Mini, was greeted with enthusiastic press and fanfare. The Mac Mini is equipped similarly to Apple’s laptop line, with a 1.25-GHz or 1.42-GHz PowerPC G4 processor, a 2.5” laptop hard drive, and a slot-loading optical drive. It’s small enough to be mistaken for an external CD/DVD drive.
For car PC enthusiasts, the most interesting thing about the Mini is its form factor (i.e., standard size and shape). The Mac Mini is 2” tall and 6.5” wide. For those not keeping track, the standard size of a car radio slot [Hack #12] is an almost identical 2” by 7”—consequently, the Mac Mini can be installed almost seamlessly in a dashboard slot. You can see a picture of a Mac Mini and a single-DIN head unit in Figure 4-35.
Tip
On a personal note, I’ve been an Apple user since the early 1980s and a “Mac guy” since I bought my first used Mac 512 in 1989. I was hooked on a WYSIWYG GUI when Windows 3.0 was just a twinkle in Microsoft’s eye. I’m very cross-platform, though, and although most of the software I develop targets the Windows and Linux platforms, I’ve written this book on a 1.5-GHz G4 PowerBook.
As soon as the Mac Mini came out, I knew I had to put one in my car. I have a young daughter who likes to watch shows on the go in her car seat. I had already set her up with a DVD player, a headrest monitor [Hack #25] , and a stereo surround sound car seat (i.e., speakers built into her car seat)—she seemed satisfied, but I knew that in her heart she really wanted to see Dora the Explorer in high-definition on a VGA screen, so I installed a Mac Mini for her in our 2005 Dodge Caravan (a “MacMiniVan,” if you will).
Choosing a Computer and Screen
One of the coolest things about the Mac Mini is that you don’t have to assemble it—it’s all there, nice and compact and already put together. Furthermore, the processor is powerful enough to do everything I want to do with my car computer. While the VIA EPIA boards do a fair job of DVD playback, the Macintosh is well known for its superior multimedia performance. Plus, DivX and other video codecs have been heavily optimized for the PowerPC G4 chips and OS X. So, although I am the only person I know of who does DivX rips of Nickelodeon shows for his toddler’s in-car video jukebox [Hack #70] , the Mini was a much more turnkey experience for me than any of the cheap compact car PCs I’ve built, hands down.
As you can see in Figure 4-36, the Mini has the standard array of ports you’d expect: two USB ports, a FireWire port, an Ethernet port, and stereo sound in and out. You can also get it preconfigured with optional WiFi and/or Bluetooth.
The Mini has a DVI port, so you can either connect directly to a digital LCD screen or use an adapter to connect to a VGA, S-Video, or composite screen. This versatility makes it easy to connect any screen you want to your Mini. Its screen capabilities are great, although its lack of dual-output video was a bit of a challenge as I usually depend on my car PC to have multi-zone (front and back) video.
Though I had a touchscreen and a CarBot in my minivan for a while, I wanted to go back to a configuration that was a bit more “stealth.” Additionally, in my pursuit of safer in-car experiences, I’ve been trying to get away from the “screensaver on the dashboard” look of a touchscreen and go back to just using button presses and audio feedback. Thus, I decided that I would use the Mac Mini primarily for rear-seat entertainment and music, and not try to operate it using a touchscreen from the driver’s seat.
In addition to the Mini, to complete my install I needed a display. My minivan has the option for a 6” fold-down screen and DVD player from the factory, so a few months ago I called my Dodge dealer and asked how much it would cost to upgrade—$1,800 was the reply. Ouch! Consequently, part of the challenge of this Mini install was to see what I could do for a bit less than that.
The Mini had set me back $599 so far (I opted for the pricier, faster processor and larger hard drive), so I needed a cheap video solution. I went to Fry’s Electronics and CompUSA, compared monitor prices, and made a selection. At first I got a $250 17” monitor from CompUSA that ran on 12V, which was perfect for in-car installation. However, the 17” monitor was actually too big for the car; even when it was folded up, my wife and I bumped our heads against it. So I returned the 17” and bought a 15” for $199 at Fry’s.
Because I wanted the option to run my Mini to multiple composite screens, including my VGA screen, I purchased a pass-through, USB-powered VGA-to-composite adapter from Grandtec (http://grandtec.com/ultimateEZ.htm). Although you can get a composite signal directly out of the Mac DVI port using a $20 adapter, you’ll lose the crisp VGA high-definition output that the Mini is able to produce.
Installing and Mounting the PC and Screen
Taking apart modern cars is literally a snap. Most of the pieces of the car click in and hold in place with friction or small mounting tabs, and the main dash console is held in place with half a dozen Phillips-head screws. Getting the dashboard off (I’ve done it so many times that I can do it in seconds now) involves removing a few screws and then simply seizing the main dash faceplate and pulling it off. This exposes the cavernous center area that holds the radio, A/C controls, and multiple storage slots, perfect for stowing the various wires and adapters needed for this installation (such as AUX-in adapters [Hack #14] , my VGA-to-composite adapter, and the Mac Mini’s huge power block).
Mounting the Mac Mini was actually no challenge at all. As mentioned earlier, its single-DIN form factor makes it a drop-in installation, with only a bit of fabrication required. I took my minivan to a local install shop and explained what I wanted to do. The installer pulled out the rubber-floored coin tray (which is usually replaced with the in-dash DVD player factory option), and using a rotary high-speed cutting tool, he cut the top off the tray. This made a sort of clip to hold the Mini. To protect the Mini case’s edges and to fill the space between the 6.5” Mini and the 7"-wide slot, he stuck a bit of black foamy carpet on the case’s sides. He also put some plastic spacers underneath the rear of the Mini, so that it would angle down slightly to match the slope of the slot. You can see the tray in Figure 4-37.
The huge challenge of this project was not the installation of the Mac Mini, but of the screen. I tested two screens and three mounting approaches before I settled on the final install. As described in “Install a Fold-Down Ceiling-Mounted Screen” [Hack #29] , a heavy screen needs to be connected to the crossbeams of the ceiling; otherwise, it will simply make the headliner sag or even rip it out. I settled on a fold-down undermounting screen support [Hack #30] (the AVF Vector LCD005) that I bought at Home Depot for $80.
Wiring everything was time-consuming but not challenging. I ran a long VGA cable from the center dashboard, along the front passenger pillar, up the column, across the ceiling under the headliner, and out near where the VGA screen was mounted. I also ran an audio cable, a three-prong computer power cord, and a 12V power cord, just to be ready for any screen I might decide to swap in later (Figure 4-38).
Powering the Mac Mini was not as simple as it should have been. Unfortunately, the Mac Mini runs on an 85W, 18V DC power supply brick. Thus, you can’t connect it directly to the 12V of the car. I wanted to get my Mac Mini installed quickly and easily, and I didn’t feel like cutting the power cord (yet), so I took the easy route and installed an inverter [Hack #11] in the center storage bin between the front seats of the van.
I was going to have to install an inverter anyway, because my 15” screen ran on 120V AC (unlike the 17” screen I tried first, which ran on 12V). So, I ran two power cords from the center bin under the carpet and through the dashboard: a long AC power cord to the screen, and the white AC cord that plugs into the Mini’s power adapter.
The only part of powering my Mac that did require some invasive surgery was adding an external power switch. The Mac does have a “boot on power loss” feature, so for a while I was restarting it by just rudely cutting power to it (by hitting the off switch on my power inverter in the center storage bin). However, I found that after a few rude reboots, the Mini gets apathetic and won’t boot up. I think this has to do with powering it up and down and then up again too quickly.
So, when the Mini is off, the only way to reliably get it to turn on is to press a power button on the back of the unit, which is hidden behind and deep inside the dashboard of the car. I needed a way around this problem but didn’t want to mess up the motherboard in any way, so I opened up the Mac Mini and soldered a pair of wires to the power button on the back (Figure 4-39). I then ran the wires out of one of the ventilation slots in the bottom of the Mini case, and connected them to a momentary switch (just a standard PC case switch). Once you have run these wires out of the Mac Mini, you can use any of the standard power sequencing startup controllers
As soon as the Carnetix Mac Mini power adapter becomes available (see the sidebar “Powering the Mac Mini in the Car”), I’ll replace my inverter. The inverter is so well wired to the car battery (with 8-gauge cable) that my Mac survives engine cranking [Hack #45] with no problems right now, but the inverter consumes way too much power, and after about five hours of marathon DVD playback with the car off I found that I couldn’t start the car again. Fortunately, I had already upgraded to a deep-cycle battery [Hack #6] , so the deep discharge didn’t do any damage.
Peripherals and Controls
Ever since I found the Macally KeyPoint remote (http://www.macally.com/spec/usb/input_device/keypads.html), I’ve been in love. It’s my favorite of the many wireless RF remotes I’ve tried—it’s small, has just the few buttons I need, is very programmable, and has a built-in mouse [Hack #56] . I ran a pair of USB wires from the in-dash Mini to my minivan’s center storage bin so I could plug in a USB hub, and that’s where I plug in the receiver for my Macally remote (see Figure 4-40). Since it is RF, it doesn’t need to be in line of sight.
The Macally remote is programmable, so you can set any button to enter any keypress you want, depending on the current application. For example, it has a “menu” button that I’ve configured to always run iTunes, unless I’m in iTunes, in which case it runs the DVD player. Once I am in those applications, the other buttons do what they should do for those applications— seek, pause, go to the next track, and so on.
This arrangement allows me to use iTunes while I’m on the road, without any visual interface. I just put it in shuffle mode before I start driving and then hit the next track button when I want to skip songs. That accomplishes about 90% of what I want to do with audio when I’m on the road.
Tip
Although there are many ways to achieve iPod/car integration [Hack #18] , with a Mac Mini you get all the advantages of an iPod, plus CD ripping capabilities and access to the iTunes music store. If you hear a new song that you’ve just got to have while traveling cross-country, you can purchase it from the ITMS in just a few seconds.
The USB hub in my center console also has a Bluetooth receiver plugged into it. Although the Mac Mini had a factory Bluetooth option, I considered that having the Bluetooth receiver more centered in the car (and not stuffed into the dashboard) would give it better range for rear-seat passengers, the ones most likely to be using Bluetooth input devices.
I keep an Apple Bluetooth keyboard and mouse stashed in the Millenium-Falconesque subcompartments in my minivan, so I can whip them out when people need to use the computer for productivity.
Audio Connection
My minivan has eight speakers installed and has fantastic, enveloping sound, especially in the rear seats. To get the Mac Mini sound into my factory head unit, I needed the appropriate AUX-in audio adapter [Hack #14] .
I wanted to have both XM radio and the Mac Mini as audio options when I drive, and I wanted to keep the factory head unit. To accomplish this, I actually used three different devices: an XM Direct radio receiver, an XM-to-Pioneer adapter, and a Pioneer-to-Dodge adapter. Because the XM adapters use RCA stereo jacks to connect the audio to the adapter, I was able to piggyback the Mac Mini’s mini-jack (too many minis!) onto the XM AUX-in (see Figure 4-41).
When I want to listen to XM radio, I just leave the Mac Mini off or mute it. When I want to listen to the Mac Mini, I turn my XM radio down to station zero (station ID), and it outputs no sound and lets the Mini’s sound come out.
There’s an interesting side effect to all these adapters: my car radio starts up and says Sirius, displays XM radio once the XM adapter initializes, and then starts playing music from iTunes.
Networking
Although I bought a USB WiFi adapter for my Mac Mini, I haven’t even hooked it up yet. I use a Bluetooth connection to my cell phone to do most of my web surfing—luckily, my EDGE-over-Bluetooth connection runs at 60–80 kbps [Hack #62] . My minivan has a nice little mobile-phone holder on the center bin, and this is very close to the Bluetooth adapter (Figure 4-42). Since I’ve paired the Mini and the phone, I set up the Mini so that any time it needs to access the Internet, it just silently dials up through the phone. It can even share this connection with other WiFi laptops in the car, through Sharing → Internet in the System Preferences. This system works so smoothly that once, when iTunes needed to authenticate with the music store to play a song I had bought and copied onto the Mini, I didn’t even realize it had connected until it was asking me for my password and showing me album art for the song in question. I can even stream (low-bitrate) MP3 radio stations in iTunes over the modem. Hmm…maybe soon I won’t need my satellite radio anymore!
Frontend Software
The thing about a rear-seat entertainment computer is that you don’t need frontend software—for the most part, OS X works fine. That said, after having my Mini in the car for a while, I’m looking forward to having more driver-side usability. For instance, it’s very difficult to switch between different functions of iTunes, and when the computer goes silent and unresponsive to my keypresses, I usually find that some dialog box has appeared on the screen and demanded interactive attention. Although such modal dialogs used to be frowned upon in the Mac OS, both the DVD player and iTunes are full of them.
At this writing the Mac Mini has only been out for a few months. There aren’t any really solid completed frontends available, but that’s probably going to change soon. You can find a list of a few of the current options at the end of “Build an in-Car Macintosh” [Hack #53] . I should also mention that my own company, CarBot (http://www.carbotpc.com), is currently porting its CarBot Player software to the Mac.
GPS/Navigation
I don’t have a GPS receiver hooked up to my Mac Mini, since there aren’t that many navigation options for Mac OS X. That said, I do use the Mini for navigation, and I even have features that PC navigation software [Hack #71] doesn’t yet have.
For years I’ve wished I could access MapQuest (http://www.mapquest.com) or something similar while on the road, and with this Mac Mini, I finally can. In fact, Google Maps (http://maps.google.com) has quickly become my favorite mapping service. Google’s maps are very detailed, and once you have them up in a browser window, you can disconnect from the Internet and still scroll around in them. Using Google Maps on my Mac has already saved me more than once. And if it’s real-time traffic information you need, Yahoo! Maps (http://maps.yahoo.com/traffic) is even better than Google.
Movies and Music
I’m absolutely spoiled by the entertainment options that my Mac Mini provides. I recently downloaded the Star Wars Episode III trailer, and I’ve been showing that off to people who get in my van. The stereo sound is breathtaking and sounds as good as my home theater. Because I have a 2005 Dodge Caravan with collapsing seats, I can fold down the middle seats and create a capacious, three-seat in-car theater [Hack #70] . And, of course, it isn’t just DVDs I can play back; I can also copy movies from a hacked TiVo (see Raffi Krikorian’s TiVo Hacks, also published by O’Reilly, for instructions on how to do this) or download them from my computer PVR.
The Mac Mini comes with QuickTime and iTunes preinstalled, but just to make sure you can play everything I recommend that you also install all of these applications and codecs:
- RealPlayer (http://www.real.com)
RealPlayer was the first and best audio streaming technology, and many radio stations around the world simulcast their content in Real format. For in-car radio streaming, RealPlayer is a must.
- Windows Media Player (http://www.microsoft.com/mac)
A large portion of the video content you’re going to find online is encoded in this format, and several of the home PVRs encode in Windows Media, so it’s always good to have this on your Mac.
- DivX (http://www.divx.com)
The vast majority of applications for encoding video save it in this version of MPEG-4, so it’s important for any video aficionado.
- 3ivx (http://www.3ivx.com)
In the Macintosh world, the 3ivx codecs are optimized for the Mac and play MPEG-4 content. It’s best to have them in addition to DivX.
- MPlayerOSX (http://mplayerosx.sourceforge.net)
This OS X port of the popular Linux player has good de-blocking (i.e., it can make DivX and MPEG-4 movies look even smoother). It’s also a great app to have, just to make sure that you can play anything anyone hands you.
Future Plans
I’m planning on making a few additions to this install. So that I can still see behind the vehicle while I’m driving with the fold-down screen in use, I’ve just installed a rearview camera [Hack #33] . Once I get the rearview screen working, I’m going to connect the Mac Mini to it so that I can see a tiny (5”) view of what’s on the Mini screen.
I plan to get the WiFi working soon, and I’m coming up with clever ideas on how to get EVDO [Hack #62] working for the Mac Mini. Although the Mini doesn’t have a PCMCIA slot, I’m going to use a PC laptop with a damaged screen, plug in EVDO and WiFi, run Knoppix on it to make it a wireless router (see Kyle Rankin’s Knoppix Hacks, also published by O’Reilly), and then connect it to the Mac via Ethernet.
Heh heh heh.
See Also
http://www.carbotpc.com—Porting our software to the Mac Mini
http://www.carhacks.org/macmini—Mac Mini hacking resources
Get Car PC Hacks now with the O’Reilly learning platform.
O’Reilly members experience books, live events, courses curated by job role, and more from O’Reilly and nearly 200 top publishers.
