9. Gateways, Databases, and Search/Index Utilities
Imagine a situation where you have an enormous amount of data stored in a format that is foreign to a typical web browser. And you need to find a way to present this information on the Web, as well as allowing potential users to search through the information. How would you accomplish such a task?
Many information providers on the Web find themselves in situations like this. Such a problem can be solved by writing a CGI program that acts as a gateway between the data and the Web. A simple gateway program was presented in Chapter 7, Advanced Form Applications. The pie graph program can read the ice cream data file and produce a graph illustrating the information contained within it. In this chapter, we will discuss gateways to UNIX programs, relational databases, and search engines.
9.1 UNIX Manual Page Gateway
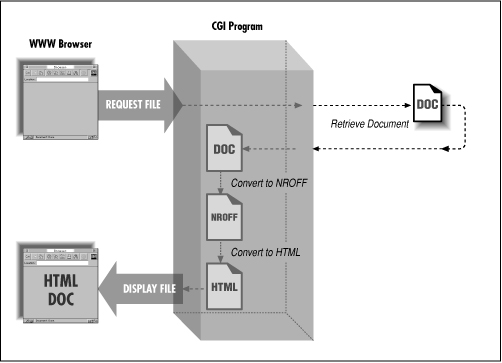
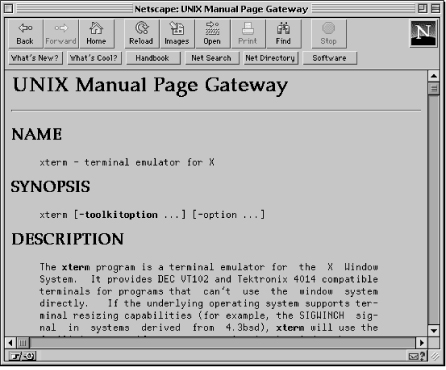
Manual pages on a UNIX operating system provide documentation on the various software and utilities installed on the system. In this section, I will write a gateway that reads the requested manual page, converts it to HTML, and displays it (see Figure 9.1). We will let the standard utility for formatting manual pages, nroff, do most of the work. But this example is useful for showing what a little HTML can do to spruce up a document. The key technique you need is to examine the input expected by a program and the output that it generates, so that you can communicate with it.
Figure 9.1: Converting manual page to HTML
Here is the form that is presented to the user:
<HTML>
<HEAD><TITLE>UNIX Manual Page Gateway</TITLE></HEAD>
<BODY>
<H1>UNIX Manual Page Gateway</H1>
<HR>
<FORM ACTION="/cgi-bin/manpage.pl" METHOD="POST">
<EM>What manual page would you like to see?</EM>
<BR>
<INPUT TYPE="text" NAME="manpage" SIZE=40>
<P>
<EM>What section is that manual page located in?</EM>
<BR>
<SELECT NAME="section" SIZE=1>
<OPTION SELECTED>1
<OPTION>2
<OPTION>3
<OPTION>4
<OPTION>5
<OPTION>6
<OPTION>7
<OPTION>8
<OPTION>Don't Know
</SELECT>
<P>
<INPUT TYPE="submit" VALUE="Submit the form">
<INPUT TYPE="reset"  VALUE="Clear all fields">
</FORM>
<HR>
</BODY></HTML>
This form will be rendered as shown in Figure 9.2.
Figure 9.2: UNIX manual page form
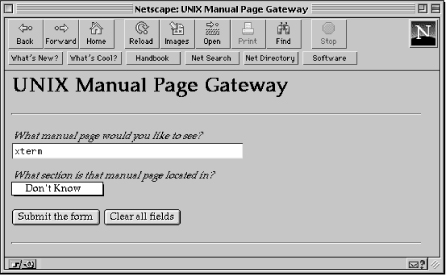
On nearly all UNIX systems, manual pages are divided into eight or more sections (or subdirectories), located under one main directory--usually /usr/local/man or /usr/man. This form asks the user to provide the section number for the desired manual page.
The CGI program follows. The main program is devoted entirely to finding the right section, and the particular manual page. A subroutine invokes nroff on the page to handle the internal nroff codes that all manual pages are formatted in, then converts the nroff output to HTML.
#!/usr/local/bin/perl
$webmaster = "Shishir Gundavaram (shishir\@bu\.edu)";
$script = $ENV{'SCRIPT_NAME'};
$man_path = "/usr/local/man";
$nroff = "/usr/bin/nroff -man";
The program assumes that the manual pages are stored in the /usr/local/man directory. The nroff utility formats the manual page according to the directives found within the document. A typical unformatted manual page looks like this:
.TH EMACS 1 "1994 April 19"
.UC 4
.SH NAME
emacs \- GNU project Emacs
.SH SYNOPSIS
.B emacs
[
.I command-line switches
] [
.I files ...
]
.br
.SH DESCRIPTION
.I GNU Emacs
is a version of
.I Emacs,
written by the author of the original (PDP-10)
.I Emacs,
Richard Stallman.
.br
.
.
.
Once it is formatted by nroff, it looks like this:
EMACS(1)                 USER COMMANDS                   EMACS(1)
NAME
     emacs - GNU project Emacs
SYNOPSIS
     emacs [ command-line switches ] [ files ... ]
DESCRIPTION
     GNU Emacs is a version of Emacs, written by  the  author  of
     the original (PDP-10) Emacs, Richard Stallman.
.
.
.
Sun Release 4.1    Last change: 1994 April 19                   1
Now, let's continue with the program to see how this information can be further formatted for display on a web browser.
$last_line = "Last change:";
The $last_line variable contains the text that is found on the last line of each page in a manual. This variable is used to remove that line when formatting for the Web.
&parse_form_data (*FORM);
($manpage = $FORM{'manpage'}) =~ s/^\s*(.*)\b\s*$/$1/;
$section = $FORM{'section'};
The data in the form is parsed and stored. The parse_form_data subroutine is the one used initially in the last chapter. Leading and trailing spaces are removed from the information in the manpage field. The reason for doing this is so that the specified page can be found.
if ( (!$manpage) || ($manpage !~ /^[\w\+\-]+$/) ) {
    &return_error (500, "UNIX Manual Page Gateway Error",
                        "Invalid manual page specification.");
This block is very important! If a manual page was not specified, or if the information contains characters other than (A-Z, a-z, 0-9, _, +, -), an error message is returned. As discussed in Chapter 7, Advanced Form Applications, it is always important to check for shell metacharacters for security reasons.
} else {
    if ($section !~ /^\d+$/) {
        $section = &find_section ();
    } else {
        $section = &check_section ();
    }
If the section field consists of a number, the check_section subroutine is called to check the specified section for the particular manual page. If non-numerical information was passed, such as “Don't Know,” the find_section subroutine iterates through all of the sections to determine the appropriate one. In the regular expression, “\d” stands for digit, “+” allows for one or more of them, and the “^” and “$” ensure that nothing but digits are in the string. To simplify this part of the search, we do not allow the “nonstandard” subsections some systems offer, such as 2v or 3m.
Both of these search subroutines return values upon termination. These return values are used by the code below to make sure that there are no errors.
if ( ($section >= 1) && ($section <= 8) ) {
        &display_manpage ();
    } else {
        &return_error (500, "UNIX Manual Page Gateway Error",
                            "Could not find the requested document.");
    }
}
exit (0);
The find_section and check_section subroutines called above return a value of zero (0) if the specified manual page does not exist. This return value is stored in the section variable. If the information contained in section is in the range of 1 through 8, the display_manpage subroutine is called to display the manual page. Otherwise, an error is returned.
The find_section subroutine searches for a particular manual page in all the sections (from 1 through 8).
sub find_section
{
    local ($temp_section, $loop, $temp_dir, $temp_file);
    $temp_section = 0;
    for ($loop=1; $loop <= 8; $loop++) {
        $temp_dir  = join("", $man_path, "/man", $loop);
        $temp_file = join("", $temp_dir, "/", $manpage, ".", $loop);
find_section searches in the subdirectories called “man1,” “man2,” “man3,” etc. And each manual page in the subdirectory is suffixed with the section number, such as “zmore.1,” and “emacs.1.” Thus, the first pass through the loop might join “/usr/local/man” with “man1” and “zmore.1” to make ”/usr/local/man/ man1/zmore.1“, which is stored in the $temp_file variable.
if (-e $temp_file) {
            $temp_section = $loop;
        }
    }
The -e switch returns TRUE if the file exists. If the manual page is found, the temp_section variable contains the section number.
return ($temp_section);
}
The subroutine returns the value stored in $temp_section. If the specified manual page is not found, it returns zero.
The check_section subroutine checks the specified section for the particular manual page. If it exists, the section number passed to the subroutine is returned. Otherwise, the subroutine returns zero to indicate failure. Remember that you may have to modify this program to reflect the directories and filenames of manual pages on your system.
sub check_section
{
    local ($temp_section, $temp_file);
    $temp_section = 0;
    $temp_file    = join ("", $man_path, "/man", $section,
                              "/", $manpage, ".", $section);
    if (-e $temp_file) {
        $temp_section = $section;
    }
    return ($temp_section);
}
The heart of this gateway is the display_manpage subroutine. It does not try to interpret the nroff codes in the manual page. Manual page style is complex enough that our best bet is to invoke nroff, which has always been used to format the pages. But there are big differences between the output generated by nroff and what we want to see on a web browser. The nroff utility produces output suitable for an old-fashioned line printer, which produced bold and underlined text by backspacing and reprinting. nroff also puts a header at the top of each page and a footer at the bottom, which we have to remove. Finally, we can ignore a lot of the blank space generated by nroff, both at the beginning of each line and in between lines.
The display_manpage subroutine starts by running the page through nroff. Then, the subroutine performs a few substitutions to make the page look good on a web browser.
sub display_manpage
{
    local ($file, $blank, $heading);
    $file = join ("", $man_path, "/man", $section,
                      "/", $manpage, ".", $section);
    print "Content-type: text/html", "\n\n";
        print "<HTML>", "\n";
    print "<HEAD><TITLE>UNIX Manual Page Gateway</TITLE></HEAD>", "\n";
        print "<BODY>", "\n";
        print "<H1>UNIX Manual Page Gateway</H1>", "\n";
    print "<HR><PRE>";
The usual MIME header and HTML text are displayed.
open (MANUAL, "$nroff $file |");
A pipe to the nroff program is opened for output. Whenever you open a pipe, it is critical to check that there are no shell metacharacters on the command line. Otherwise, a malicious user can execute commands on your machine! This is why we performed the check at the beginning of this program.
$blank = 0;
The blank variable keeps track of the number of consecutive empty lines in the document. If there is more than one consecutive blank line, it is ignored.
while (<MANUAL>) {
        next if ( (/^$manpage\(\w+\)/i) || (/\b$last_line/o) );
The while loop iterates through each line in the manual page. The next construct ignores the first and last lines of each page. For example, the first and last lines of each page of the emacs manual page look like this:
EMACS(1)                 USER COMMANDS                   EMACS(1)
.
.
.
Sun Release 4.1    Last change: 1994 April 19                   1
This is unnecessary information, and therefore we skip over it. The if statement checks for a string that does not contain any spaces. The previous while statement stores the current line in Perl's default variable, $_. A regular expression without a corresponding variable name matches against the value stored in $_.
if (/^([A-Z0-9_ ]+)$/) {
            $heading = $1;
            print "<H2>", $heading, "</H2>", "\n";
All manual pages consist of distinct headings such as “NAME,” “SYNOPSIS,” “DESCRIPTION,” and “SEE ALSO,” which are displayed as all capital letters. This conditional checks for such headings, stores them in the variable heading, and displays them as HTML level 2 headers. The heading is stored to be used later on.
} elsif (/^\s*$/) {
        $blank++;
        if ($blank < 2) {
            print;
        }
If the line consists entirely of whitespace, the subroutine increments the $blank variable. If the value of that variable is greater than two, the line is ignored. In other words, consecutive blank lines are ignored.
} else {
$blank = 0;
s//&/g if (/&/);
s//</g if (/</);
s//>/g if (/>/);
The blank variable is initialized to zero, since this block is executed only if the line contains non-whitespace characters. The regular expressions replace the “&”, “<”, and “>” characters with their HTML equivalents, since these characters have a special meaning to the browser.
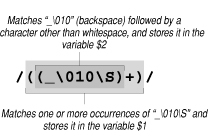
if (/((_\010\S)+)/) {
         s//<B>$1<\/B>/g;
         s/_\010//g;
   }
All manual pages have text strings that are underlined for emphasis. The nroff utility creates an underlined effect by using the “_” and the “^H” (Control-H or \010) characters. Here is how the word “options” would be underlined:
_^Ho_^Hp_^Ht_^Hi_^Ho_^Hn_^Hs
The regular expression in the if statement searches for an underlined word and stores it in $1, as illustrated below.
This first substitution statement adds the <B> .. </B> tags to the string:
<B>_^Ho_^Hp_^Ht_^Hi_^Ho_^Hn_^Hs</B>
Finally, the “_^H” characters are removed to create:
<B>options</B>
Let's modify the file in one more way before we start to display the information:
if ($heading =~ /ALSO/) {
if (/([\w\+\-]+)\((\w+)\)/) {
s//<A HREF="$script\?manpage=$1§ion=$2">$1($2)<\/A>/g;
}
}
Most manual pages contain a “SEE ALSO” heading under which related software applications are listed. Here is an example:
SEE ALSO
     X(1), xlsfonts(1), xterm(1), xrdb(1)
The regular expression stores the command name in $1 and the manpage section number in $2, as seen below. Using this regular expression, we add a hypertext link to this program for each one of the listed applications. The query string contains the manual page title, as well as the section number.
The program continues as follows:
print;
        }
    }
    print "</PRE><HR>", "\n";
        print "</BODY></HTML>", "\n";

    close (MANUAL);
}
Finally, the modified line is displayed. After all the lines in the file--or pipe--are read, it is closed. Figure 9.3 shows the output produced by this application.
Figure 9.3: Manual page gateway
This particular gateway program concerned itself mostly with the output of the program it invoked (nroff). You will see in this chapter that you often have to expend equal effort (or even more effort) fashioning input in the way the existing program expects it. Those are the general tasks of gateways.
9.2 Mail Gateway
Ever wish you could send electronic mail from your web browser? This gateway allows you to do just that.
#!/usr/local/bin/perl
$webmaster = "shishir\@bu\.edu";
$gateway = "CGI Mail Gateway [v1.0]";
$request_method = $ENV{'REQUEST_METHOD'};
$sendmail = "/usr/lib/sendmail -t -n -oi";
This program uses the UNIX sendmail utility to actually send the message. The -t option instructs sendmail to scan the message for the “To:” mail header, and the n option prevents the user from entering aliases for the recipient's email address; you would not want some remote user to use your system's internal aliases, would you?
$address_file = "/home/shishir/httpd_1.4.2/cgi-bin/address.dat";
The address file consists of a list of recipients' mail addresses from which the user is required to select one. The user cannot enter an address that is not included in the address file. The address.dat file should be formatted as follows:
Webmaster,webmaster@bu.edu
Author,shishir@bu.edu
.
.
.
I have chosen a comma to separate nicknames from addresses because Internet standards prohibit a comma from being used in an address.
When the mail form is displayed, the program inserts all of the descriptive names in a scrolled list. If you do not want to have such a file, remove or comment out the line defining $address_file.
$exclusive_lock = 2;
$unlock = 8;
if ( defined ($address_file) && (-e $address_file) ) {
    &load_address (*address);
}
If the address_file variable is defined and the file exists, the load_address subroutine is called to load the list of addresses into the address associative array (for easy retrieval).
&parse_form_data (*MAIL);
The form information is stored in the MAIL associative array. The parse_form_data subroutine is the same as the one used at the beginning of Chapter 7, Advanced Form Applications. Like the guestbook application I presented in Chapter 7, Advanced Form Applications, this program is two in one: Half of the program displays a form, and the other half retrieves the data after the user submits the form, and sends the mail.
if ($request_method eq "GET") {
    &display_form ();
If the GET method was used to access this program, the display_form subroutine displays the form. This gateway can be accessed without any query information:
http://your.machine/cgi-bin/mail.pl
in which case, a mail form is displayed. Or, you can also access it by passing query information:
http://your.machine/cgi-bin/mail.pl?to=shishir@bu.edu&url=/thanks.html
In this case, the “to” and “url” fields in the form will contain the information passed to it. If an address file is being used, the address specified by the “to” field has to match one of the addresses in the list. Instead of specifying the full email address, you can also use the descriptive title from the address file:
http://your.machine/cgi-bin/mail.pl?to=Author&url=/thanks.html
The advantage of passing queries like this is that you can create links within a document, such as:
.
.
If you want to contact me, click <A HREF="/cgibin/mail.pl?to=Author">here.</A>
.
.
All of the fields in the form, including “to” and “url,” will be explained later in this section.
} elsif ($request_method eq "POST") {

    if ( defined (%address) ) {
        $check_status = &check_to_address ();
        if (!$check_status) {
            &return_error (500, "$gateway Error",
                "The address you specified is not allowed.");
        }
    }
This block will be executed if the POST method was used to access this gateway (which means that the user filled out the form and submitted it). If the address associative array is defined, the check_to_address subroutine is called to check for the validity of the user-specified address. In other words, the address has to be listed in the address file. This subroutine returns a TRUE or FALSE value. If the address is not valid, an error message is returned.
if ( (!$MAIL{'from'}) || (!$MAIL{'email'}) ) {
        &return_error (500, "$gateway Error", "Who are you ?");
    } else {
        &send_mail ();
        &return_thanks ();
    }
If the user failed to enter any information into the “from” and “email” fields in the form, an error message is returned (which I will show later). Otherwise, the mail message is sent, and a thank-you note is returned.
} else {
    &return_error (500, "Server Error",
                    "Server uses unsupported method");
}
exit(0);
Now for the load_address subroutine, which reads your address file:
sub load_address
{
    local (*ADDRESS_DATA) = @_;
    local ($name, $address);
    open (FILE, $address_file) || &return_error (500, "$gateway Error",
            "Cannot open the address file [$address_file].");

    flock (FILE, $exclusive_lock);
This subroutine opens the address file, and loads all of the entries into an associative array. Note that $exclusive_lock and $unlock are global variables.
while (<FILE>) {
        chop if (/\n$/);
        ($name, $address) = split (/,/, $_, 2);
        $ADDRESS_DATA{$name} = $address;
    }
The while loop iterates through the file one line at a time. If a line ends with a newline character, it is removed with the chop function. The chop function removes the last character of the line. The if clause is there as a precaution, because the last line of the file may not have a newline character, in which case part of the data would be lost. The split command, which should be familiar by now, separates the name from the address. Then, an entry in the associative array is created to hold the address.
flock (FILE, $unlock);
    close (FILE);
}
The display_form subroutine is executed when the client invokes the program without a query.
sub display_form
{
    local ($address_to);
    print "Content-type: text/html", "\n\n";

    $address_to = &determine_to_field ();
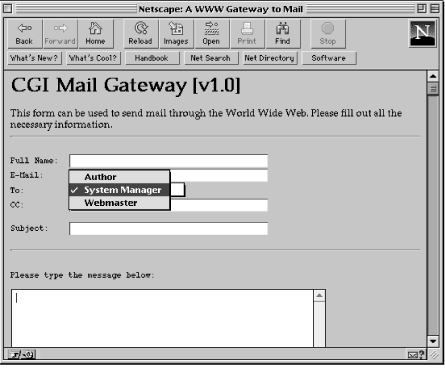
The determine_to_field subroutine creates a scrolled list if the address file is defined. See Figure 9.4 for a snapshot of what this looks like. Otherwise, a simple text field is used. The HTML needed to accomplish these functions is returned by the subroutine, and is stored in the address_to variable.
Figure 9.4: Scrolled-down list of addresses
print <<End_of_Mail_Form;
<HTML>
<HEAD><TITLE>A WWW Gateway to Mail</TITLE></HEAD>
<BODY>
<H1>$gateway</H1>
This form can be used to send mail through the World Wide Web.
Please fill out all the necessary information.
<HR>
<FORM METHOD="POST">
<PRE>
Full Name:  <INPUT TYPE="text" NAME="from" VALUE="$MAIL{'from'}" SIZE=40>
E-Mail:     <INPUT TYPE="text" NAME="email" VALUE="$MAIL{'email'}" SIZE=40>
To:         $address_to
CC:         <INPUT TYPE="text" NAME="cc" VALUE="$MAIL{'cc'}" SIZE=40>
Subject:    <INPUT TYPE="text" NAME="subject" VALUE="$MAIL{'subject'}" SIZE=40>
<HR>
Notice the use of the VALUE attributes in the INPUT statements. These values represent the query information that is passed to this program with a GET request.
Please type the message below:
<TEXTAREA ROWS=10 COLS=60 NAME="message"></TEXTAREA>
</PRE>
<INPUT TYPE="hidden" NAME="url" VALUE="$MAIL{'url'}">
<INPUT TYPE="submit" VALUE="Send the Message">
<INPUT TYPE="reset"  VALUE="Clear the Message">
</FORM>
<HR>
</BODY></HTML>
End_of_Mail_Form
}
The “url” field is defined as a hidden field. This consists of the URL of the document that is displayed after the user completes the form.
The determine_to_field subroutine either creates a scrolled list of all the addresses in the file, or a simple text field in which the user can enter the recipient's address.
sub determine_to_field
{
    local ($to_field, $key, $selected);
    if (%address) {
        $to_field = '<SELECT NAME="to">';
        foreach $key (keys %address) {
The keys function returns a normal array consisting of all of the keys of the associative array. The foreach construct then iterates through each key.
if ( ($MAIL{'to'} eq $key) ||
                 ($MAIL{'to'} eq $address{$key}) ) {

                $selected = "<OPTION SELECTED>";
            } else {
                $selected = "<OPTION>";
            }
If the recipient specified by the user (through a query string) matches either the descriptive title in the address file-- the key--or the actual address, it is highlighted. Remember, this is how you can access this program with a query:
http://your.machine/cgi-bin/mail.pl?to=shishir@bu.edu&url=/thanks.html
Now, the rest of the subroutine:
$to_field = join ("\n", $to_field,
                        $selected, $key);
        }
        $to_field = join ("\n", $to_field, "</SELECT>");
Finally, all of the <OPTION> tags are concatenated to create the kind of scrolled list shown above.
} else {
        $to_field =
        qq/<INPUT TYPE="text" NAME="to" VALUE="$MAIL{'to'}" SIZE=40>/;
    }
    return ($to_field);
}
If an address file is not used, a simple text field is displayed. The qq/../ construct builds a double-quoted string. It should be used when there are many double quotation marks within the string. The same string can be expressed inside the traditional double quotes:
$to_field = "<INPUT TYPE=\"text\" NAME=\"to\" VALUE=\"$MAIL{'to'}\" SIZE=40>";
As you can see, all of the other double quotation marks within the string have to be escaped by putting backslashes in front of them. Using the qq notation in the regular expression is much easier.
Finally, the HTML needed to display the “to” field is returned.
The check_to_address subroutine checks the user-specified recipient to make sure that it is valid. If it is valid, the variable $MAIL{“to”} will be set to the corresponding email address. Finally, a status indicating success or failure is returned.
sub check_to_address
{
    local ($status, $key);
    $status = 0;
    foreach $key (keys %address) {
         if ( ($MAIL{'to'} eq $key) || ($MAIL{'to'} eq $address{$key}) ) {
            $status = 1;
            $MAIL{'to'} = $address{$key};
         }
    }
    return ($status);
}
In this next subroutine, the mail is sent using the UNIX sendmail utility.
sub send_mail
{
    open (SENDMAIL, "| $sendmail");
A pipe to the sendmail utility is opened for input. We do not need to check any of the form values for shell metacharacters because none of the values are “exposed” on the command line. The sendmail utility allows you to place the recipient's name in the input stream, rather than on the command-line.
If the regular mail utility is used, the form information must be checked for metacharacters. This is how we can send mail with the mail utility:
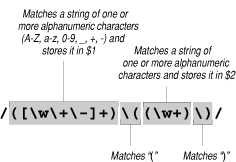
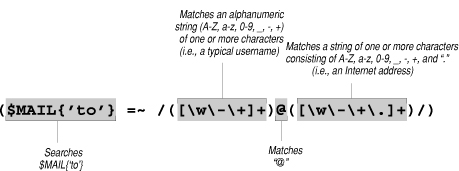
if ($MAIL{'to'} =~ /([\w\-\+]+)@([\w\-\+\.]+)/) {
    open (SENDMAIL, "/usr/ucb/mail $MAIL{'to'} |");
} else {
    &return_error (500, "$gateway Error", "Address is not valid.");
}
The regular expression is described by the figure below. Of course, this allows only Internet-style mail addresses; UUCP addresses are not recognized.
print SENDMAIL <<Mail_Headers;
From: $MAIL{'from'} <$MAIL{'email'}>
To: $MAIL{'to'}
Reply-To: $MAIL{'email'}
Subject: $MAIL{'subject'}
X-Mailer: $gateway
X-Remote-Host: $ENV{'REMOTE_ADDR'}
Mail_Headers
Various mail headers are output. Any headers starting with “X-” are user/program specified, and are usually ignored by mail readers. The remote IP address of the user (the environment variable REMOTE_ADDRESS) is output for possible security reasons. Imagine a situation where someone fills out a form with obnoxious information, and includes a “fake” address. This header will at least tell you where the message came from.
if ($MAIL{'cc'}) {
        print SENDMAIL "Cc: ", $MAIL{'cc'}, "\n";
    }
    print SENDMAIL "\n", $MAIL{'message'}, "\n";
    close (MAIL);
}
If the user entered an address in the “Cc:” field, a mail header is output. Finally, the body of the message is displayed, and the pipe is closed.
It is courteous to output a thank-you message:
sub return_thanks
{
    if ($MAIL{'url'}) {
        print "Location: ", $MAIL{'url'}, "\n\n";
    } else {
        print "Content-type: text/html", "\n\n";
        print <<Thanks;
<HTML>
<HEAD><TITLE>$gateway</TITLE></HEAD>
<BODY>
<H1>Thank You!</H1>
<HR>
Thanks for using the mail gateway. Please feel free to use it again.
</BODY></HTML>
Thanks
    }
}
If a URL was specified as part of the GET request, a server redirect is done with the “Location” HTTP header. In other words, the server will get and display the specified document after the user submits the form. Otherwise, a simple thank-you note is issued.
9.3 Relational Databases
So far in this chapter, we have created pretty simple gateways by piping input to other programs. As long as we create the proper stream of data, it takes very little coding on our part to make these work. But the most interesting uses for gateways involve large, complex sets of data organized into structured databases. Piping a stream does not work for these; we need to use a language that the database understands, such as SQL. This is where we turn in this section.
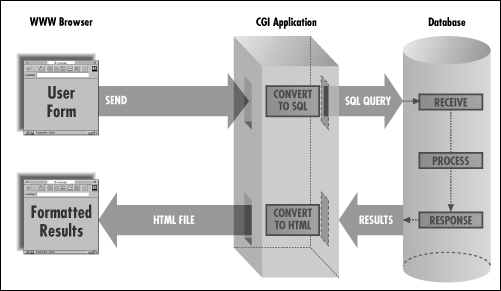
By combining the power of relational database management systems (RDBMS) with the World Wide Web, one can produce impressive results. Put yourself in the shoes of a doctor who wants to establish an “interactive, virtual infirmary” on the Web, where users (patients) can simply enter their symptoms, and the CGI would return with a diagnosis. The doctor has a large database that contains extensive data, including three-dimensional graphics and multimedia, on the various diseases and ailments that affect humans. All that needs to be done is to write a CGI program that decodes the input, assembles a query of some sort, sends it to the database, processes the return data from the database, and creates a hypertext document (with embedded multimedia) for the user. These types of applications are possible by combining databases with the Web.
Before we go any further, let's look at SQL, the query language used to communicate with various RDBMS systems.
Introduction to SQL
SQL--pronounced “S Q L” and not “Sequel”--is a standardized sub-language to access and manipulate data within a relational database system. The original SQL prototype defined a “structured” language, thus the term Structured Query Language, but this is no longer true of the current SQL-92 standard. SQL was designed specifically to be used in conjunction with a primary high-level programming language. In fact, most of the basic constructs that you would find in a high-level language, such as loops and conditionals, do not exist in SQL.
Most of the commercial relational database systems in use today, such as Oracle and Sybase, support SQL. As a result, the code to access and manipulate a database can be ported easily and quickly to any platform. Now, let's look at SQL.
Creating a database
We will start out by discussing how a database is created. Suppose you have the following information:
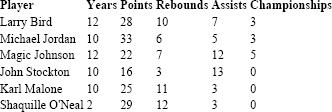
The SQL code to create this database is:
create table Player_Info
(
    Player            character varying (30) not null,
    Years             integer,
    Points            integer,
    Rebounds          integer,
    Assists           integer,
    Championships     integer
);
The create table command creates a database, or a table. The Player field is stored as a non-null varying character string. In other words, if the data in the field is less than 30 characters, the database will not pad it with spaces, as it would for a regular character data type. Also, the database forces the user to enter a value for the Player field; it cannot be empty.
The rest of the fields are defined to be integers. Some of the other valid data types include date, time, smallint, numeric, and decimal. The numeric and decimal data types allow you to specify floating-point values. For example, if you want a five-digit floating-point number with a precision to the hundredth place, you can specify decimal (5, 2).
Accessing data
Let's say you want a list of the entire database. You can use the following code:
select *
    from Player_Info;
The select command retrieves specific information from the database. In this case, all columns are selected from the Player_Info database. The “*” should be used with great caution, especially on large databases, as you might inadvertently extract a lot of information. Notice that we are dealing only with columns, and not rows. For example, if you wanted to list all the players in the database, you could do this:
select Player
    from Player_Info;
Now, what if you want to list all the players who scored more than 25 points? Here is the code needed to accomplish the task:
select *
    from Player_Info
    where (Points > 25);
This would list all the columns for the players who scored more than 25 points:

But, say you wanted to list just the Player and Points columns:
select Player, Points
    from Player_Info
    where (Points > 25);
Here is an example that returns all the players who scored more than 25 points and won a championship:
select Player, Points, Championships
    from Player_Info
    where (Points > 25) and
          (Championships > 0);
The output of this SQL statement would be:
![]()
You could also use wildcards in a select command. For example, the following will return all the players that have a last name of “Johnson”:
select *
    from Player_Info
    where Player LIKE '% Johnson';
This will match a string ending with “Johnson”.
Updating a database
Let's suppose that Shaquille O'Neal won a championship. We need to update our database to reflect this. This is how it can be done:
update Player_Info
    set Championships = 1
    where Player = 'Shaquille O'Neal';
SQL also has methods to modify entire columns. After every basketball season, we need to increment the Years column by one:
update Player_Info
    set Years = (Years + 1);
Now, let's discuss insertion into a table. Say we need to add another player to the database. We could do it this way:
insert into Player_Info
    values
    ('Hakeem Olajuwon', 10, 27, 11, 4, 2);
As you can see, it is very simple to insert an element into the table. However, if you have a database with a large number of columns, and you want to insert a row into the table, you can manually specify the columns:
insert into Player_Info
    (Player, Years, Points, Rebounds, Assists, Championships)
    values
    ('Hakeem Olajuwon', 10, 27, 11, 4, 2);
When used in this context, the order of the fields does not necessarily have to match the order in the database, as long as the fields and the values specified match each other.
Deleting information
If you wanted to delete “John Stockton” from the database, you could do this:
delete from Player_Info
    where Player = 'John Stockton';
SQL also allows you remove entire columns. You should be very careful when attempting such a move. Instead, it is much safer to create another database, and copy only the columns you want to the new database. Here is how you would remove a column:
alter table Player_Info
    drop column Championships;
If you want to delete all the records in the table, the following statement is used:
delete from Player_Info;
And finally, the drop table command deletes the entire database:
drop table Player_Info;
(For more information on SQL, see the reference guide on SQL-92 at http://sunsite.doc.ic.ac.uk/packages/perl/db/refinfo/sql2/sql1992.txt).
Sprite
Never heard of Sprite? That is because I developed it for this book. It is a Perl 5 module that allows you to manipulate text-delimited databases (all data and delimiters are text) using a small but important subset of SQL-92. I offer Sprite so you can create your own databases and access them in CGI scripts, even if you do not have a database product like Sybase or Oracle. See Appendix E, Applications, Modules, Utilities, and Documentation for information on where you can get Sprite.
If you do have a commercial product, you can use techniques like those shown here to issue SQL commands. We will use some Perl interfaces to Oracle and Sybase later in the chapter. Let's look at an example.
Employee database
Let's assume that you have a text file that contains a list of your company's employees, as well as some information about them:
Last,First,Job_Title,Department,EMail,Phone
Supra,John,System Operator,Systems,jsupra,(617) 555-1578
Painton,Todd,Network Engineer,Systems,tpainton,(617) 555-6530
Martin,Robert,Sales Representative,Sales,martinr,(617) 555-7406
Levine,Julia,Administrative Assistant,Administration,julia,(617) 555-3056
Keenan,Jeff,Manager,Software,jeffk,(617) 555-7769
Nets,Laurie,Group Leader,Development,lnets,(617) 555-9962
The first line of the file contains the field names (delimited by commas). This is all you need to use the database. Unlike other databases that store the data in a unique (and strange) format, Sprite operates on plain text.
Here is the form that will act as the front end to the database:
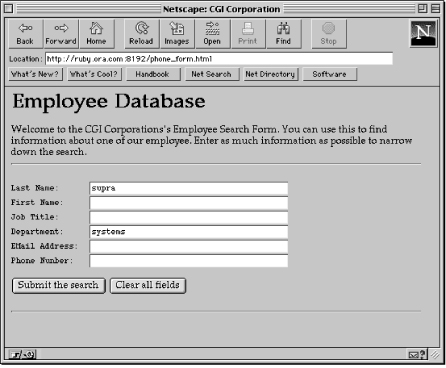
<HTML>
<HEAD><TITLE>CGI Corporation</TITLE></HEAD>
<BODY>
<H1>Employee Database</H1>
Welcome to the CGI Corporations's Employee Search Form. You can use
this to find information about one of our employee.
Enter as much information as possible to narrow down the search.
<HR>
<FORM ACTION="/cgi-bin/db_phone.pl" METHOD="POST">
<PRE>
Last Name:      <INPUT TYPE="text" NAME="Last" SIZE=40>
First Name:     <INPUT TYPE="text" NAME="First" SIZE=40>
Job Title:      <INPUT TYPE="text" NAME="Job_Title" SIZE=40>
Department:     <INPUT TYPE="text" NAME="Department" SIZE=40>
EMail Address:  <INPUT TYPE="text" NAME="EMail" SIZE=40>
Phone Number:   <INPUT TYPE="text" NAME="Phone" SIZE=40>
</PRE>
<INPUT TYPE="submit" VALUE="Submit the search">
<INPUT TYPE="reset"  VALUE="Clear all fields">
</FORM>
<HR>
</BODY></HTML>
The form is shown in Figure 9.5.
Now, let's build the CGI application that will decode the form information, process the user's query, and create a document displaying the results, as seen in Figure 9.6.
Figure 9.6: CGI gateway to database
The program begins:
#!/usr/local/bin/perl5
use Sprite;
$webmaster = "shishir\@bu\.edu";
$query = undef;
The use command instructs Perl to load the module (or extension). You can load more than one module at a time. For example, if we wanted to create dynamic GIF images from the data contained in a database, we would have to load both the GD and the Sprite modules:
use GD;
use Sprite;
To continue with the program:
&parse_form_data(*FORM);
$fields = '(Last|First|Job_Title|Department|EMail|Phone)';
The form data is decoded. The parse_form_data subroutine used in this program is the one we've been using throughout this book. The fields variable contains a list of all the fields in the form. You might wonder why we would need to have such a list when then the parse_form_data subroutine decodes all the fields in the form. The reason for this is to make sure that only valid fields are processed, as the search query is dynamically created from the user-specified information. Remember, forms are very insecure; a cracker can download a form, edit it, add an extra field, and submit the form to the program. If the program is not carefully designed, we could have a major problem!
foreach $key (keys %FORM) {
    if ( ($key !~ /\b$fields\b/o) || ($FORM{$key} =~ /[^\w\-\(\) ]/) ) {
        &return_error (500, "CGI Corporation Employee Database Error",
                            "Invalid Information in Form.");
The foreach construct iterates through all of the fields stored in the FORM associative array, and checks for two things, represented by the two expressions separated by the || operator. First, the field is checked against the list stored in the fields variable for validity. Second, it makes sure the information entered by the user is constrained to the following characters: A-Z, a-z, 0-9, (, ), and the space character. This ensures that no shell metacharacters are passed.
} else {
        $FORM{$key} =~ s/(\W)/\\$1/g;
        if ($FORM{$key}) {
            $query = join (" and ", $query, "($key =~ /$FORM{$key}/i)");
        }
    }
}
The conditional is executed if the field is valid. It checks to see if any information was entered in the field. If there is information, a query is built by joining each field and value with “and”. You would normally have to escape the “/” character if you are using the regular expression search in Sprite. In this case, you don't need to because the user cannot enter “/” in any search field.
Once the loop terminates, a query might look something like the following:
and (Last =~ /Martin/i) and (First =~ /Robert/i) and (Department =~ /Sales/i)
The reason the query has an “and” at the beginning has to do with the way in which the query was created. If you look back at the join command, you can see that the information stored in the query variable is concatenated to a combination of a key and a value with “and”, and is finally stored in query. Remember, $query will be undefined the first time through the loop, and thus will end up with an “and” at the beginning. Let's remove the unwanted initial string.
if ($query) {
    $query =~ s/^ and //;
} else {
    &return_error (500, "CGI Corporation Employee Database Error",
                        "No query was entered.");
}
If the user failed to enter any information, an error message is displayed. Otherwise, the “and” at the beginning of the query is removed to create a normal query:
(Last =~ /Martin/i) and (First =~ /Robert/i) and (Department =~ /Sales/i)
Note that Sprite allows you to use regular expression operators to search for data. If the user entered “M” in the last name field, this program instructs the database to return all records that contain the letter “M” (or “m”, as the “i” flag indicates case insensitivity). There are cases when this is not desirable. In such cases, you would need to modify the way the query is joined:
$FORM{$key} = s/(['"])/\\$1/g;
$query = join (" and ", $query, "($key = '$FORM{$key}')");
This will return only exact matches. Since the value in the field is a string, you need to enclose $FORM{$key} in single quotes and escape all other quotes (or Sprite will return an error).
$rdb = new Sprite ();
$rdb->set_delimiter ("Read", ",");
This is some object-oriented Perl syntax that you saw in Chapter 6, Hypermedia Documents. A new database object is created, and the reference to it is stored in the variable rdb. The set_delimiter function sets the delimiter for the data stored in the database. The set_delimiter function takes two arguments. In the first, we specify that we are reading from the database. In the second, we specify the comma as the field delimiter (so we have to know what the data file looks like).
@data = $rdb->sql (<<End_of_Query);
    select * from phone.db
    where $query
End_of_Query
The query is passed to Sprite with the sql function. In this case, a here document is used to pass the query (so it looks readable to humans). You could just as easily do this:
@data = $rdb->sql ("select * from phone.db where $query");
Sprite returns the matched records as an array, with all the fields in each record joined by the null character “\0”. However, the first element of the array is not a record, but a flag indicating success or failure. For instance, if you passed the following query:
select * from phone.db where (Department =~ /Systems/i)
the array would look like this:
$data[0] = 1
$data[1] = Supra\0John\0System Operator\0Systems\0jsupra\0(617) 555-1578
$data[2] = Painton\0Todd\0Network Engineer\0Systems\0tpainton\0(617) 555-6530
A value of 1 indicates success, while a 0 indicates failure.
$status = shift (@data);
$no_elements = scalar (@data);
The shift statement removes the first element of the array and stores it in the variable status. Then scalar is used to determine the number of elements in the array. You can also evaluate the array in a scalar context, without using the scalar command:
$no_elements = @data;
This is the same as using the scalar command, but different from:
$last_element = $#data;
This returns the index of the last element of the array (so in most cases, it would have a value one less than the number of elements, as arrays are zero-based).
if (!$status) {
    &return_error (500, "CGI Corporation Employee Database Error",
                        "Sprite Database Error!");
} elsif (!$no_elements) {
    &return_error (500, "CGI Corporation Employee Database Error",
                        "The record you specified does not exist.");
Two things are checked: the error status and the number of records returned by Sprite. If either the status is 0 or no records were returned, an error is displayed.
} else {
    print <<End_of_HTML;
Content-type: text/html
<HTML>
<HEAD><TITLE>CGI Corporation Employee Directory</TITLE></HEAD>
<BODY>
<H1>CGI Corporation Employee Directory</H1>
<HR><PRE>
End_of_HTML
This code is executed if valid records were returned by Sprite. We are now formatting the output for display. One of Perl's original attractions was the report-generating features it offered; Larry Wall even said that the “rl” in Perl stood for “Reporting Language.” We will use some of those powerful features here. What we have to do is create a format and assign it to the $~ variable. Then, whenever we issue a write statement, Perl will print the data according to the format.
$~ = "HEADING";
    write;
The “HEADING” format is selected to display header information.
$~ = "EACH_ENTRY";
    foreach (@data) {
         s/([^\w\s\0])/sprintf ("&#%d;", ord ($1))/ge;
        ($last, $first, $job, $department, $email, $phone) =
            split (/\0/, $_, 6);
        write;
    }
    print "</PRE>", "\n";
    print "<HR>";
        print "</BODY></HTML>", "\n";
}
The “EACH_ENTRY” format is selected to display each record from the phone database. The foreach loop iterates through each record, splits it into the different fields, and issues a write to display the data. Note that no variable was supplied as part of the foreach loop. Normally, we would have something like this:
foreach $record (@data) {
    .
    .
    .
}
Since we did not supply a variable, Perl automatically places it in its default variable: $_.
$rdb->close ();
exit (0);
Finally, the database is closed, and the script terminates. Now, let's look at the two format statements:
format HEADING =
Last       First      Job Title      Department   EMail       Phone
----       -----      ---------      ----------   -----       -----
.
This is a simple one! It is used as a header to display all of the fields. The period on a line by itself terminates the format.
format EACH_ENTRY =
@<<<<<<<<  @<<<<<<<<  @<<<<<<<<<<<<  @<<<<<<<<<<  @<<<<<<<<<  @<<<<<<<<<<<<<
$last,     $first,    $job,          $department, $email,     $phone
.
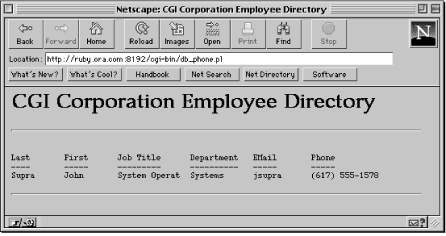
This one is a little more complex. The “@<<<<<<<<” indicates an eight-character, left-justified field holder. The value stored in the variable, which is listed below a field holder, is displayed each time a write is called. This will allow for a neat and clean display, as shown in Figure 9.7.
Figure 9.7: Phone gateway results
Student database
A CGI program is not limited to just reading information from a database; it can also manipulate the information. Here is a CGI program that can read, modify, and delete a database consisting of student information. Before we go any further, let's look at the supporting HTML documents:
<HTML>
<HEAD><TITLE>Welcome to CGI Educational Center</TITLE></HEAD>
<BODY>
<H1>Student Database</H1>
You can use a combination of forms and CGI to access and modify information in
the student database. Please choose one of the following options:
<HR>
<A HREF="/add.html">Add New Student</A><BR>
<A HREF="/modify.html">Modify Student Information</A><BR>
<A HREF="/view.html">View Student Information</A><BR>
<A HREF="/delete.html">Delete Student</A><BR>
<HR>
</BODY>
</HTML>
This is the initial document containing links to the various forms that allow the user to view, add, modify, and delete information from the student database.
<HTML>
<HEAD><TITLE>Welcome to CGI Educational Center</TITLE></HEAD>
<BODY>
<H1>Add New Student</H1>
<HR>
<FORM ACTION="/cgi-bin/student.pl?add" METHOD="POST">
<PRE>
Student Name:       <INPUT TYPE="text" NAME="Student" SIZE=40>
Year of Graduation: <INPUT TYPE="text" NAME="YOG" SIZE=4 MAXLENGTH=4>
Address (Mailing Information):
<TEXTAREA NAME="Address" ROWS=4 COLS=40></TEXTAREA>
</PRE>
<INPUT TYPE="submit" VALUE="Add New Student">
<INPUT TYPE="reset"  VALUE="Clear the Information">
</FORM>
<HR>
</BODY></HTML>
This is the form used to add information into the database. When the user submits this form, a query of “add” is sent to the CGI program.
<HTML>
<HEAD><TITLE>Welcome to CGI Educational Center</TITLE></HEAD>
<BODY>
<H1>Modify Student Information</H1>
<HR>
<FORM ACTION="/cgi-bin/student.pl?modify_form" METHOD="POST">
Student Name: <INPUT TYPE="text" NAME="Student" SIZE=40>
<P>
<INPUT TYPE="submit" VALUE="Modify Student Information">
<INPUT TYPE="reset"  VALUE="Clear the Information">
</FORM>
<HR>
</BODY>
</HTML>
This form allows the user to modify information for a particular student. When this form is submitted, the program builds and displays another form dynamically. Here is the form used to view the results of a specified query.
<HTML>
<HEAD><TITLE>Welcome to CGI Educational Center</TITLE></HEAD>
<BODY>
<H1>View Student Information</H1>
<HR>
<FORM ACTION="/cgi-bin/student.pl?view" METHOD="POST">
Student Name: <INPUT TYPE="text" NAME="Student" SIZE=40>
<P>
Year of Graduation:
<INPUT TYPE="radio" NAME="Sign" VALUE="greater"> Greater Than
<INPUT TYPE="radio" NAME="Sign" VALUE="equal" CHECKED> Equal To
<INPUT TYPE="radio" NAME="Sign" VALUE="less"> Less Than
<INPUT TYPE="text" NAME="YOG" SIZE=4 MAXLENGTH=4>
<P>
Address Information: <INPUT TYPE="text" NAME="Address" SIZE=40>
<P>
<INPUT TYPE="submit" VALUE="View Student Information">
<INPUT TYPE="reset"  VALUE="Clear the Information">
</FORM>
<HR>
</BODY>
</HTML>
This form is used to view records that match certain criteria. The user can select records based on a conditional year of graduation (either greater than, less than, or equal to a certain year). We could have just as easily allowed mathematical operators (>, <, and =) to be entered, but this can be a potential security hole, as some of them have a special meaning to the shell (i.e., shell metacharacters). It is far better and safer to use strings like “equal”, “greater”, and “less”, and let the CGI program convert them to the appropriate operators when creating a query.
<HTML>
<HEAD><TITLE>Welcome to CGI Educational Center</TITLE></HEAD>
<BODY>
<H1>Delete Student</H1>
<HR>
<FORM ACTION="/cgi-bin/student.pl?delete" METHOD="POST">
<PRE>
Student Name:       <INPUT TYPE="text" NAME="Student" SIZE=40>
Year of Graduation: <INPUT TYPE="text" NAME="YOG" SIZE=4 MAXLENGTH=4>
</PRE>
<INPUT TYPE="submit" VALUE="Delete Student">
<INPUT TYPE="reset"  VALUE="Clear the Information">
</FORM>
<HR>
</BODY>
</HTML>
A user can use this form to delete information from the database. In this case, only the student name and year of graduation fields are presented. Records for an entire class can be deleted by specifying the year of graduation, and leaving the name field empty. You should not normally allow such a dangerous option! However, it is shown here to illustrate the power of databases and the Web.
Now, let's look at the CGI program that works with these forms.
#!/usr/local/bin/perl5
use Sprite;
$query_string = $ENV{'QUERY_STRING'};
$script = $ENV{'SCRIPT_NAME'};
$request_method = $ENV{'REQUEST_METHOD'};
$webmaster = "shishir\@bu\.edu";
$database = "/home/shishir/student.db";
$main_form = "/student.html";
$commands = '(add|modify_form|modify|view|delete)';
The Sprite module is loaded. The full path to the student database and the relative path to the main HTML document (the one that contains links to the other forms) are stored in the database, and main_form variables, respectively. Finally, commands contains a list of the valid queries that forms can pass to this program. If you look carefully at the list, you will notice that none of the forms listed above passes the “modify” query. The form that passes this is dynamically created by this program, as you will later see.
$delimiter = "::";
$error = "CGI Student Database Error";
Fields in the student database are delimited by the “::” characters.
if ($query_string =~ /^\b$commands\b$/) {
    &parse_form_data (*DB);
If the query is valid, the POST form data is decoded and placed in the DB associative array. (As always, the parse_form_data subroutine used in this program is the one we've been using throughout all our examples.)
&check_all_fields ();
    &check_database ();
The check_all_fields subroutine iterates through the DB associative array to ensure that there are no shell metacharacters. The check_database subroutine checks to see if the student database exists. If not, a new one is created.
$rdb = new Sprite ();
$rdb->set_delimiter ("Read",  $delimiter);
$rdb->set_delimiter ("Write", $delimiter);
A new database object is created. The set_delimiter function sets the delimiter to be used when reading from and writing to a database.
$command_status = &$query_string ();
This is a construct that you may not have seen before. The subroutine corresponding to the value stored in query_string is called. It is equivalent to saying:
if ($query_string eq "add") {
    $command_status = &add ();
} elsif ($query_string eq "modify_form") {
    $command_status = &modify_form ();
} elsif ($query_string eq "modify") {
    $command_status = &modify ();
} elsif ($query_string eq "view") {
    $command_status = &view ();
} elsif ($query_string eq "delete") {
    $command_status = &delete ();
}
How convenient! Now, let's continue on with the program.
if ($command_status) {
        $rdb->close ($database);
        print "Location: ", $main_form, "\n\n";
    } else {
        $rdb->close ();
    }
Depending on the status returned from one of the subroutines above, a server redirect is done with the Location: header. There is a subtle difference between the two $rdb->close subroutines. If you specify a database as part of the close subroutine, the modifications performed on that database are saved. Otherwise, the changes are discarded.
} else {
    &return_error (500, $error,
                "Invalid command passed through QUERY_STRING.");
}
exit (0);
If an invalid query was passed to this program, an error is returned.
The following subroutine checks to see if the database exists. If it does not, a new database is created, and a header line containing the field names, delimited by “::”, is output.
sub check_database
{
    local ($exclusive_lock, $unlock, $header);
    $exclusive_lock = 2;
    $unlock = 8;
    if (! (-e $database) ) {
        if ( open (DATABASE, ">" . $database) ) {
            flock (DATABASE, $exclusive_lock);
            $header = join ($delimiter, "Student", "YOG", "Address");
            print DATABASE $header, "\n";
            flock (DATABASE, $unlock);
            close (DATABASE);
        } else {
            &return_error (500, $error, "Cannot create new student database.");
        }
    }
}
The check_all_fields subroutine makes sure the form elements do not contain shell meta-characters:
sub check_all_fields
{
    local ($key);
    foreach $key (keys %DB) {
        if ($DB{$key} =~ /[`\!;\\\*\\$[amp   ][lt    ][gt    ]]/) {\n              [amp   ]\|return_error (500, $error,
                                  "Invalid characters in the [$key] field.");
        }
    }
}
The subroutine iterates through the DB associative array checking to make sure that none of the elements contains any dangerous shell metacharacters. If any are found, an error message is displayed.
sub build_check_condition
{
    local ($columns) = @_;
    local ($all_fields, $loop, $key, $sign, $sql_condition);
This is a very useful subroutine that dynamically builds a query. It expects a string in the following format:
"Student,=,Address,=~"
From this, the following query is constructed (assuming that the user entered “Ed Surge” in the student field, and “Elm Street” in the address field):
(Student = 'Ed Surge') and (Address =~ 'Elm Street')
(You might have noticed that the regular expression is not the usual format ($string =~ /abc/). You are correct! However, Perl accepts this format as well.)
@all_fields = split (/,/, $columns);
The all_fields array consists of successive elements of the field name, followed by the operator that should be used to search that field. In this example, the array would look like this:
$all_fields[0] = "Student";
$all_fields[1] = "=";
$all_fields[2] = "Address";
$all_fields[3] = "=~";
Now, let's look at the loop that iterates through this array to build the query.
for ($loop=0; $loop <= $#all_fields; $loop = $loop + 2) {
        $key  = $all_fields[$loop];
        $sign = $all_fields[$loop + 1];
The key and the sign variables consist of the field name and the operator, respectively.
if ($DB{$key}) {
            $DB{$key} =~ s/([\W])/\\$1/g;
            $sql_condition = join (" and ", $sql_condition,
                    "( $key $sign '$DB{$key}' )", );
        }
    }
The query is built in nearly the same manner as in the preceding example, except that the operator can be different for each field.
if ($sql_condition) {
        $sql_condition =~ s/^ and //;
        return ($sql_condition);
    } else {
        &return_error (500, $error, "No query was entered.");
    }
}
If the user did not enter any information into the fields, an error message is displayed. Otherwise, the dynamically created query is returned (to the subroutine that called).
This is a very simple subroutine (if you can call it that) that returns an error.
sub database_error
{
    &return_error (500, $error,
        "Sprite database error. Please check the log file.");
}
The only reason this statement was placed in a subroutine is for convenience. For example, it is much shorter and quicker to say:
$rdb->update (<<Update_Command) || &database_error ();
than to say:
$rdb->update (<<Update_Command) || &return_error (500, $error,
        "Sprite database error. Please check the log file.");
This is especially true if the same error needs to be returned for various problems.
The check_select_command subroutine is generally used after an SQL “select” statement. It checks the first element of the returned data, as well as the number of records returned, and displays an error if either of these values equal 0. Otherwise, a status of 1 is returned.
sub check_select_command
{
    local ($value, $no_elements) = @_;
    if (!$value) {
        &database_error ();
    } elsif (!$no_elements) {
        &return_error (500, $error,
            "The record you specified does not exist.");
    } else {
        return (1);
    }
}
The add subroutine inserts a record into the database.
sub add
{
    $DB{'Address'} =~ s/\n/<BR>/g;
    $DB{'Address'} =~ s/(['"])/\\$1/g;
    $DB{'Student'} =~ s/(['"])/\\$1/g;
    $rdb->sql (<<End_of_Insert) || &database_error ();

insert into $database
    (Student, YOG, Address)
values
    ('$DB{'Student'}', '$DB{'YOG'}', '$DB{'Address'}')
End_of_Insert
    return (1);
}
All newline characters are converted to “<BR>” and all single and double quotes are escaped. Remember, all records in a text-delimited database are delimited by newline characters! This ensures that the data will be correctly displayed by the browser when the user decides to view it.
The format for the “insert” SQL statement is the same as described in the SQL primer earlier. If the record could not be inserted into the database, an error is returned. Otherwise, a status of 1 is returned. This instructs the script to save the database and perform a server redirect to display the main HTML document.
Now for the most complicated action--modifying a row.
sub modify_form
{
    local (@info, $modify_status, $no_elements, $status);
    $DB{'Student'} =~ s/(['"])/\\$1/g;
    @info = $rdb->sql (<<End_of_Select);
select * from $database
where (Student = '$DB{'Student'}')
End_of_Select
    $status = shift (@info);
    $no_elements = scalar (@info);
    $modify_status = &check_select_command ($status, $no_elements);
    if ($modify_status) {
        &display_modify_form ($info[0]);
    }
    return (0);
}
This subroutine performs two actions. First, it uses the student's name, as specified in the modify form (shown with the other forms at the beginning of this section), to retrieve the record for that student. The check_select_command subroutine ensures that data was returned by the database. Second, display_modify_form is called (with the first record in the array as an argument) to display a new form that contains all of the information about the student. The user can then modify the data in the form and submit it.
A status of 0 is returned by this subroutine. As a result, the database is not saved (which is what we want, since it was not modified), and no server redirection is performed.
The display_modify_form subroutine returns a form for changing a student's record.
sub display_modify_form
{
    local ($fields) = @_;
    local ($student, $yog, $address);
    ($student, $yog, $address) = split (/\0/, $fields);
     $address =~ s/<BR>/\n/g;
     $student = &escape_html ($student);
     $yog = &escape_html ($yog);
The record that is passed to this subroutine by modify_form is split on the “\0” delimiter, and the “<BR>” characters are converted back to newlines. In addition, we call the escape_html subroutine to “escape” characters that have a special significance to the browser, such as the double quote, “<”, “>”, and “&”. We perform these steps so that the information is displayed properly.
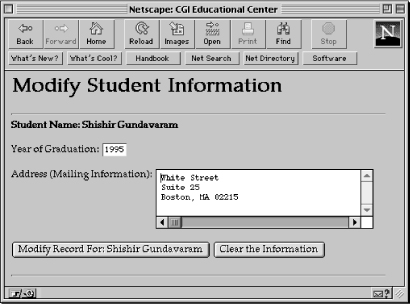
print <<End_of_Modify_Form;
Content-type: text/html
<HTML>
<HEAD><TITLE>CGI Educational Center</TITLE></HEAD>
<BODY>
<H1>Modify Student Information</H1>
<HR>
<B>Student Name: $student</B>
<P>
<FORM ACTION="$script?modify" METHOD="POST">
<INPUT TYPE="hidden" NAME="Student" VALUE="$student">
Year of Graduation:
<INPUT TYPE="text" NAME="YOG" SIZE=4 MAXLENGTH=4 VALUE="$yog">
<P>
Address (Mailing Information):
<TEXTAREA NAME="Address" ROWS=4 COLS=40>
$address
</TEXTAREA>
<P>
<INPUT TYPE="submit" VALUE="Modify Record For: $student">
<INPUT TYPE="reset"  VALUE="Clear the Information">
</FORM>
<HR>
</BODY>
</HTML>
End_of_Modify_Form
}
The form containing the information for the specified student is output. The user can now modify this form. We use $student twice: once to remind the user which student was chosen, and once to pass the name back to this CGI program so it modifies the right row. The form is shown in Figure 9.8.
The escape_html subroutine escapes certain characters so that they are displayed correctly by the browser.
sub escape_html
{
local ($string) = @_;
local (%html_chars, $html_string);
%html_chars = ('&', '&',
'>', '>',
'<', '<',
'"', '"');
$html_string = join ("", keys %html_chars);
$string =~ s/([$html_string])/$html_chars{$1}/go;
return ($string);
}
The view subroutine shows a student's current record.
sub view
{
    local ( $fields, $query, @students, $view_status, $status, $no_elements);
    $fields = 'Student,=,Address,=~';
    if ($DB{'YOG'}) {
        if ($DB{'Sign'} eq 'greater') {
            $DB{'Sign'} = '>';
        } elsif ($DB{'Sign'} eq 'less') {
            $DB{'Sign'} = '<';
        } else {
            $DB{'Sign'} = '=';
        }
        $fields = join (",", $fields, 'YOG', $DB{'Sign'});
    }
    $query = &build_check_condition ($fields);
If the user entered information into the year of graduation field, the search operator is determined. This is then appended to the value stored in the fields variable. The build_check_condition subroutine is called to dynamically construct the search query.
@students = $rdb->sql (<<End_of_Display);
select * from $database
    where $query
End_of_Display
    $status = shift (@students);
    $no_elements = scalar (@students);
    $view_status = &check_select_command ($status, $no_elements);
The query is passed to the select command. The information returned by the database is checked for possible errors. If there are no errors, view_status contains the value of 1.
if ($view_status) {
        &display_results ("View Students", *students);
    }
    return (0);
}
If the data returned by the database is valid, the display_results subroutine is called to display the search results. The two arguments passed to the subroutine are the header for the HTML document and the reference to the array that contains the results.
sub display_results
{
    local ($title, *data) = @_;
    local ($student, $yog, $address);
    print "Content-type: text/html", "\n";
    print "Pragma: no-cache", "\n\n";
        print "<HTML>", "\n";
    print "<HEAD><TITLE>CGI Educational Center</TITLE></HEAD>";
        print "<BODY>", "\n";
    print "<H1>", $title, "</H1>";
    print "<HR>";
The Content-type: and Pragma: MIME headers are output. We do not want the browser to cache the page containing the results. As a result, the displayed data reflects the true status of the database.
foreach (@data) {
        s/([^\w\s\0])/sprintf ("&#%d;", ord ($1))/ge;
        ($student, $yog, $address) = split ("\0", $_, 3);
        $student = "NULL"                      if (!$student);
        $yog     = "Unknown graduation date"   if (!$yog);
        $address = "No address specified"      if (!$address);
If any of the fields for a record are null, certain default values are used, so as not to display empty fields.
$address =~ s/<BR>/<BR>/g;
print "<BR>", "\n";
print "<B>", $student, "</B> ", "($yog)", "<BR>", "\n";
print $address, "<BR>", "\n";
}
print "<HR>", "\n";
print "</BODY></HTML>", "\n";
}
The foreach loop iterates through the matched records, and displays them.
The delete subroutine removes records from the database.
sub delete
{
    local ($fields, $query);
    $fields = 'Student,=,YOG,=';
    $query = &build_check_condition ($fields);
    $rdb->sql (<<End_of_Delete) || &database_error ();
delete from $database
    where $query
End_of_Delete
    return (1);
}
Multiple records can be deleted by leaving the student field empty, but entering a valid year for the YOG field. If the specified records cannot be deleted, an error message is displayed.
Existing records are modified with the modify subroutine.
sub modify
{
    local (@fields, $key);
    @fields = ('YOG', 'Address');
    $DB{'Address'} =~ s/\n/<BR>/g;
    $DB{'YOG'} =~ s/(['"])/\\$1/g;
    $DB{'Student'} =~ s/(['"])/\\$1/g;
    $DB{'Address'} =~ s/(['"])/\\$1/g;
    foreach $key (@fields) {
        $rdb->sql (<<Update_Database) || &database_error ();
update $database
set $key = ('$DB{$key}')
where (Student = '$DB{'Student'}');
Update_Database
    }
    return (1);
}
The current version of Sprite does not support multiple fields in a update statement. As a result, a loop is used to update the record multiple times. If the user entered “1991” in the year of graduation field, and “Elm Street, 02215” in the address field, the two update statements are generated:
update /home/shishir/student.db
set YOG = ('1991')
where (Student = 'Ed Surge')
update /home/shishir/student.db
set Address = ('Elm Street, 02215')
where (Student = 'Ed Surge')
That concludes the section on Sprite.
A Gateway to an Oracle Database
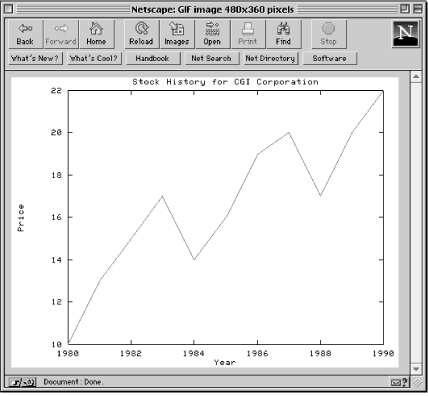
Now, let's look at CGI gateways to the two most popular commercial databases: Oracle and Sybase. Each of these is supported by Perl and Tcl extensions that make our job much easier by letting us submit SQL queries that the database recognizes. I will use Oracle and Sybase to illustrate two different ways to display the results of a query. In this section, I will query an Oracle database and plot the data using gnuplot (available from ftp://prep.ai.mit.edu/pub/gnu/gnuplot-3.5.tar.gz). In the next section, I will use Sybase and display the results in a table using HTML.
Suppose you have a database consisting of stock trading history for various companies over an eleven-year span (from 1980 through 1990). A sample table is shown below:

You would like to present this valuable source of information as crisp graphs or plots to the general public. How would you go about doing it? The first step is to create a form where the user can enter a company's identification:
<HTML>
<HEAD><TITLE>Welcome to CGI Stock Service</TITLE></HEAD>
<BODY>
<H1>Stock Quotes</H1>
<HR>
<FORM ACTION="/cgi-bin/stocks.pl" METHOD="GET">
<EM>Please enter the name of the stock that you would like to get a quote for:</EM>
<P>
<INPUT TYPE="text" NAME="Company_ID" SIZE=10 MAXLENGTH=10>
<P>
<INPUT TYPE="submit" VALUE="Look Up This Stock">
<INPUT TYPE="reset"  VALUE="Clear the Information">
</FORM>
<HR>
</BODY>
</HTML>
The second step is to write a CGI program that sends the query to the database, retrieves the results, and utilizes gnuplot to graph the information. Here is the CGI program that interacts with the Oracle database using oraperl:
#!/usr/local/bin/oraperl
require "oraperl.ph";
oraperl is a derivative of Perl that contains functionality to access and interact with Oracle databases. As of Perl 5, the DBperl extensions (a.k.a. DBI) supersede most of the Perl 4.0 database derivatives (such as oraperl and sybperl). For information on where to get oraperl, syperl, and DBperl, see Appendix E, Applications, Modules, Utilities, and Documentation.
$| = 1;
$webmaster = "shishir\@bu\.edu";
$gnuplot = "/usr/local/bin/gnuplot";
$ppmtogif = "/usr/local/bin/pbmplus/ppmtogif";
Buffering is turned off, and the full path to the gnuplot and ppmtogif commands is defined. (See Chapter 6, Hypermedia Documents for other examples of how these commands are used.)
&parse_form_data (*DB);
($company_id = $DB{'Company_ID'}) =~ s/^\s*(.*)\b\s*$/$1/;
The form information is decoded. In this case, we are dealing with only one field (Company_ID). The information stored in this field is equated to the company_id variable, and the leading and trailing spaces are removed.
if ($company_id =~ /^\w+$/) {
If the field value is an alphanumeric character (A-Z, a-z, 0-9,_), the program continues. Otherwise, an error message is returned. We want to make sure that only the characters that we need are allowed! In this case, shell metacharacters are not allowed to pass through.
$process_id = $$;
    $output_ppm = join ("", "/tmp/", $process_id, ".ppm");
    $data_file =  join ("", "/tmp/", $process_id, ".txt");
We need two temporary files in this program. To make sure that each running instance of the program uses unique temporary files, we borrow a trick from UNIX shell scripting and put our process identification number (PID) into the names. Each time the program runs, it has to have a unique PID, so we know we will not clobber our own temporary file. The output_ppm and data_file variables contain the full file specification for the temporary files that will be created by this program. The current process id number ensures unique filenames.
$color_number = 1;
The color number of 1 indicates Red. This is the color of the plot line.
$system_id = "Miscellaneous";
    $username = "shishir";
    $password = "fnjop673e2nB";
The Oracle system identification (SID), the username, and the password are set. You might wonder if it is safe to hard-code the database password into this program. The answer to that depends on how the database is set up. In cases like this, you should create a generic user, such as “guest,” with minimal access rights (read-only), so that there is no danger to the database.
$lda = &ora_login ($system_id, $username, $password);
The ora_login subroutine is used to log in to the database. The value returned is the login identifier, also referred to as the Oracle Login Data Area. This identifier will be used to execute an SQL command.
$csr = &ora_open ($lda, " select * from Stocks where ID = '$company_id' ");
The ora_open subroutine executes a specified SQL command. It requires a login identifier, and returns a statement identifier or an Oracle Cursor. This statement identifier is needed to retrieve the actual data (resulting from the SQL command).
You are not limited to specifying the SQL command on one line; you can use the block notation:
$csr = &ora_open ($lda, <<End_of_Select);
select * from Stocks
where ID = '$company_id'
End_of_Select
Let's continue with the rest of the program.
if ( open (DATA, ">" . $data_file) ) {
        ($company_id, $company, @stock_prices) = &ora_fetch ($csr);
The ora_fetch subroutine retrieves the information returned by the SQL select command. The first two fields (or columns) are stored in company_id and company, respectively. The rest of the columns, however, are stored in the stock_prices array. This consists of the 11 columns representing 11 years, as shown in the previous table.
&ora_close ($csr);
        &ora_logoff ($lda);
The statement identifier is released with the ora_close subroutine, and the database is closed.
if ($company_id) {
This block of code is executed only if a database record matched the user's selection. Otherwise, an error message is returned.
$stocks_start = 1980;
            $stocks_end = 1990;
            $stocks_duration = $stocks_end - $stocks_start;
            for ($loop=0; $loop <= $stocks_duration; $loop++) {
                $price = $stock_prices[$loop];
                $year  = $stocks_start + $loop;
                print DATA $year, " ", $price, "\n";
            }
            close (DATA);
The loop iterates 11 times to create a data file with all of the year/stock price pairs. For example, here is how the data file would look like if the user selected “Fah”:
1980 37.3
1981 40.4
1982 38.2
.
.
.
When we build our plot, the first column provides data for the x axis, while the second column provides data for the y axis.
&graph_data ("Stock History for $company", $data_file,
                         "Year", "Price", $color_number, $output_ppm);
The graph_data subroutine is called to create a PBM file (which is later converted to GIF). The arguments to this subroutine are the title of the graph, the data file to use, the label for the X axis, the label for the Y axis, the line color, and the output file.
&create_gif ($output_ppm);
The final GIF image is created by the create_gif subroutine, which expects one argument: the name of the PBM file created by gnuplot.
} else {
            &return_error (500, "Oracle Gateway CGI Error",
                "The specified company could not be found.");
        }
An error message is displayed if the user selected a non-existent company name.
} else {
        &return_error (500, "Oracle Gateway CGI Error",
                    "Could not create output file.");
    }
If the data file could not be created, an error is returned.
} else {
    &return_error (500, "Oracle Gateway CGI Error",
                "Invalid characters in company field.");
}
exit (0);
Finally, if the information in the form field contains any non-alphanumeric characters, an error message is sent.
The graph_data subroutine opens a pipe to the gnuplot numerical analysis program, and sends a group of format commands through it. The end result of this is a pbm graphics file, which is later converted to GIF.
sub graph_data
{
    local ($title, $file, $x_label, $y_label, $color, $output) = @_;
    open (GNUPLOT, "| $gnuplot");
print GNUPLOT <<gnuplot_Commands_Done;

        set term pbm color small
        set output "$output"
        set title "$title"
        set xlabel "$x_label"
        set ylabel "$y_label"
        set noxzeroaxis
        set noyzeroaxis
        set border
        set nokey
        plot "$file" w lines $color
gnuplot_Commands_Done
    close (GNUPLOT);
}
The create_gif subroutine uses the ppmtogif utility to convert the pbm file to GIF, for display on the Web (see Figure 9.9).
sub create_gif
{
    local ($output) = @_;
    print "Content-type: image/gif", "\n\n";
    system ("$ppmtogif $output 2> /dev/null");
    unlink $output_ppm, $data_file;
}
Finally, the temporary files are “unlinked,” or deleted.
Accessing a Sybase Database
In this example, the form input (from the user) is used to access a Sybase database to look up information on books. Our interface to Sybase is the sybperl library, which provides Perl subroutines for giving Sybase queries in the form it can recognize. The data returned by Sybase is converted to an HTML 3.0 table format. In other words, the output, when displayed on a browser that recognizes HTML 3.0, resembles a nice table with solid three-dimensional lines separating the different fields.
<HTML>
<HEAD><TITLE>Welcome to CGI Publishing Company</TITLE></HEAD>
<BODY>
<H1>Book Search</H1>
<HR>
<FORM ACTION="/cgi-bin/books.pl" METHOD="GET">
<EM>Please enter the name of the book that you would like to look up:</EM>
<P>
<INPUT TYPE="text" NAME="Book" SIZE=40>
<P>
<INPUT TYPE="submit" VALUE="Look Up This Book">
<INPUT TYPE="reset"  VALUE="Clear the Information">
</FORM>
<HR>
</BODY>
</HTML>
Above is the form that is used to retrieve the input from the user.
Let's look at the program:
#!/usr/local/bin/sybperl
require "sybperl.pl";
$user = "shishir";
$password = "mkhBhd9v2sK";
$server = $ENV{'DSQUERY'} || "Books";
The user, password, and server name are set. If the environment variable DSQUERY is defined, the server is set to the value of that variable. If not, the server is set to “Books”. The following statement:
$server = $ENV{'DSQUERY'} || "Books";
is a simpler of way of doing the following:
if ($ENV{'DSQUERY'}) {
    $server = $ENV{'DSQUERY'};
} else {
    $server = "Books";
}
Next, the dblogin subroutine is used to log in to the Sybase server.
$dbproc = &dblogin ($user, $password, $server);
dblogin returns the identification for the newly created database process into the dbproc variable.
@fields = ('Author', 'Book', 'Publisher', 'Year', 'Pages');
$title = "CGI Publishing Company Book Database";
The fields array holds a list of all the fields in a record. The title variable contains the title of the HTML 3.0 table.
&parse_form_data (*DB);
($book_name = $DB{'Book'}) =~ s/^\s*(.*)\b\s*$/$1/;
Leading and trailing spaces are removed from the Book field.
if ($book_name =~ /^[\w\s]+$/) {
Since we are dealing with book names, the user is allowed to enter only the following characters: A-Z, a-z, 0-9, _, and whitespace. If any other characters are entered, an error message is returned.
To retrieve data from a Sybase database, you attach to the database, execute a query, and then loop through the returned data one row at a time. These standard steps are performed in this CGI application.
&dbcmd ($dbproc, " select * from Catalog where Book = '$book_name' ");
    &dbsqlexec ($dbproc);
    $status = &dbresults ($dbproc);
The dbcmd subroutine associates the SQL command with the current database process (dbproc). The dbsqlexec subroutine executes the SQL command, while the dbresults make the data available to the program. The dbresults subroutine returns either “$SUCCEED” or “$FAIL” (these are variables that are special to sybperl).
if ($status == $SUCCEED) {
        while ( (@books = &dbnextrow ($dbproc)) ) {
            $book_string = join ("\0", @books);
            push (@all_books, $book_string);
        }
If the user-specified records are found, the dbresults subroutine returns “$SUCCEED”. The while loop iterates through all of the data by calling the dbnextrow subroutine each time through the loop, in case there is more than one book that matches the criteria. The books array consists of information in the following format (for a sample book);
$books[0] = "Andy Oram and Steve Talbott"
$books[1] = "Managing Projects with make"
$books[2] = "O'Reilly & Associates, Inc."
$books[3] = 1991
$books[4] = 152
We need to create this intermediate array because that is the structure of the data returned by dbnextrow. But what we really want is a single string, because then we could store all the information on a single book in one element of the @all_books array. So we use the join statement to form the following string:
$book_string = "Andy Oram and Steve Talbott\0Managing Projects with make\0O'Reilly & Associates, Inc.\01991\0152"
This string is then pushed into the all_books array. This process is repeated for all matches.
&dbexit ($dbproc);
        &display_table ($title, *fields, *all_books, "\0");
The database is closed by calling the dbexit subroutine. Finally, the table is displayed by calling a generic subroutine, display_table. The subroutine expects the following arguments: the title of the table, the array consisting of the header (or field) names, the array consisting of the strings, and the delimiter by which these strings are concatenated.
} else {
        &return_error (500, "Sybase Database CGI Error",
            "The book title(s) you specified does not exist.");
    }
} else {
    &return_error (500, "Sybase Database CGI Error",
                "Invalid characters in book name.");
}
exit(0);
Error messages are returned if either the specified book name does not exist, or the input contains invalid characters.
The display_table subroutine prints out the table.
sub display_table
{
    local ($title, *columns, *selected_entries, $delimiter) = @_;
    local ($name, $entry);
    print "Content-type: text/html", "\n\n";
        print "<HTML>", "\n";
    print "<HEAD><TITLE>", $title, "</TITLE></HEAD>", "\n";
        print "<BODY>", "\n";
    print "<TABLE BORDER=2>", "\n";
    print "<CAPTION>", $title, "</CAPTION>", "\n";
    print "<TR>", "\n";
A MIME type of text/html is output, along with some HTML 3.0 tags to create a table.
foreach $name (@columns) {
        print "<TH>", $name, "\n";
    }
This loop iterates through and displays all of the field headers.
foreach $entry (@selected_entries) {
        $entry =~ s/$delimiter/<TD>/go;
        print "<TR>", "<TD>", $entry, "\n";
    }
    print "</TABLE>", "\n";
        print "</BODY></HTML>", "\n";
}
The foreach loop iterates through the matching records, substitutes the delimiter with the <TD> tag, and prints out the HTML needed to create a new row. There is no delimiter before the first item in $entry, so the print statement supplies the first <TD> tag. Finally, the table is closed. Figure 9.10 shows what the table looks like.
Figure 9.10: Results of search gateway
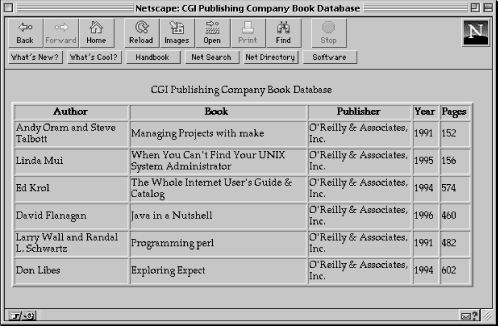
9.4 Search/Index Gateway
One of the most useful CGI applications is a web server search/index gateway. This allows a user to search all of the files on the server for particular information. Here is a very simple gateway to do just that. We rely on the UNIX command fgrep [1] to search all our files, and then filter its output to something attractive and useful. First, let's look at the form's front end:
<HTML>
<HEAD><TITLE>Search Gateway</TITLE></HEAD>
<BODY>
<H1>Search Gateway</H1>
<HR>
<FORM ACTION="/cgi-bin/search.pl" METHOD="POST">
What would you like to search for:
<BR>
<INPUT TYPE="text" NAME="query" SIZE=40>
<P>
<INPUT TYPE="submit" VALUE="Start Searching!">
<INPUT TYPE="reset"  VALUE="Clear your form">
</FORM>
<HR>
</BODY>
</HTML>
Nothing fancy. The form contains just one field to hold the search query. Now, here is the program:
#!/usr/local/bin/perl
$webmaster = "Shishir Gundavaram (shishir\@bu\.edu)";
$fgrep = "/usr/local/bin/fgrep";
$document_root = $ENV{'DOCUMENT_ROOT'};
The fgrep UNIX command is used to perform the actual searching in the directory pointed to by the variable document_root. fgrep searches for fixed strings; in other words, wildcards and regular expressions are not evaluated.
&parse_form_data (*SEARCH);
$query = $SEARCH{'query'};
The form data (or one field) is decoded and stored in the SEARCH associative array.
if ($query eq "") {
    &return_error (500, "Search Error", "Please enter a search query.");
} elsif ($query !~ /^(\w+)$/) {
    &return_error (500, "Search Error", "Invalid characters in query.");
} else {
If the query entered by the user contains a non-alphanumeric character (A-Z, a-z, 0-9, _), or is empty, an error message is returned.
print "Content-type: text/html", "\n\n";
        print "<HTML>", "\n";
    print "<HEAD><TITLE>Search Results</TITLE></HEAD>";
        print "<BODY>", "\n";
    print "<H1>Results of searching for: ", $query, "</H1>";
    print "<HR>";
    open (SEARCH, "$fgrep -A2 -B2 -i -n -s $query $document_root/* |");
The pipe is opened to the fgrep command for output. We use the following command-line options:
- -A2 and -B2 display two lines before and after the match
- -i indicates case insensitivity
- -n displays the line numbers
- -s instructs fgrep to suppress all error messages.
Here is what the output format looks like:
/abc/cde/filename.abc-57-Previous, previous line
/abc/cde/filename.abc-58-Previous line
/abc/cde/filename.abc-59:Matched line
/abc/cde/filename.abc-60-Following line
/abc/cde/filename.abc-61-Following, following line
As you can see, a total of five or more lines are output for each match. If the query string is found in multiple files, fgrep returns the “--” boundary string to separate the output from the different files.
$count = 0;
    $matches = 0;
    %accessed_files = ();
Three important variables are initialized. The first one, count, is used to keep track of the number of lines returned per match. The matches variable stores the number of different files that contain the specified query. And finally, the accessed_files associative array keeps track of the filenames that contain a match.
We could have used another grep command that returned just filenames, and then our processing would be much easier. But I want to display the actual text found, so I chose more complicated output. Thus, I have to do a little fancy parsing and text substitution to change the lines of fgrep output into something that looks good on a web browser. What we want to display is:
- The name of each file found, with a hypertext link so the user can go directly to a file
- The text found with the search string highlighted
- A summary of the files found
The following code performs these steps.
while (<SEARCH>) {
        if ( ($file, $type, $line) = m|^(/\S+)([\-:])\d+\2(.*)| ) {
The while loop iterates through the data returned by fgrep. If a line resembles the format presented above, this block of code is executed. The regular expression is explained below.

unless ($count) {
                if ( defined ($accessed_files{$file}) ) {
                    next;
                } else {
                    $accessed_files{$file} = 1;
                }
                $file =~ s/^$document_root\/(.*)/$1/;
                $matches++;
                print qq|<A HREF="/$file">$file</A><BR><BR>|;
            }
If count is equal to zero (which means we are either on line 1 or on the line right after the boundary), the associative array is checked to see if an element exists for the current filename. If it exists, there is a premature break from the conditional, and the while loop executes again. If not, the matches variable is incremented, and a hypertext anchor is linked to the relative pathname of the matched file.
Remember, if there is more than one match per file, fgrep returns the matched lines as separate entities (separated by the “--” string). Since we want only one link per filename, the associative array has to be used to “cache” the filename.
$count++;
$line =~ s/<(([^>]|\n)*)>/<$1>/g;
The count variable is incremented so that the next time through the loop, the previous block of code will not be executed, and therefore a hypertext link will not be created. Also, all HTML tags are “escaped” by the regular expression illustrated below, so that they appear as regular text when this dynamic document is displayed. If we did not escape these tags, the browser would interpret them as regular HTML statements, and display formatted output.
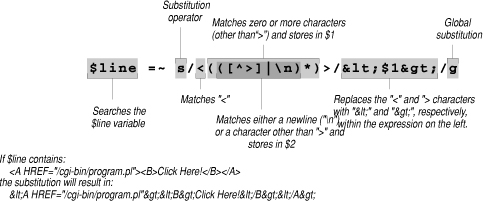
We could totally remove all tags by using:
$line =~ s/<(([^>]|\n)*)>//g;
Let's continue with the program:
if ($line =~ /^[^A-Za-z0-9]*$/) {
                next;
            }
If a line consists of any characters besides the subset of alphanumeric characters (A-Z, a-z, 0-9), the line will not be displayed.
if ($type eq ":") {
                $line =~ s/($query)/<B>$1<\/B>/ig;
            }
            print $line, "<BR>";
For the matched line, the query is emboldened using the <B> ... </B> HTML tags, and printed.
} else {
            if ($count) {
                print "<HR>";
                $count = 0;
            }
        }
    }
This conditional is executed if the line contains the boundary string, in which case a horizontal rule is output and the counter is initialized.
print "<P>", "<HR>";
    print "Total number of files containing matches: ", $matches, "<BR>";
    print "<HR>";
        print "</BODY></HTML>", "\n";
    close (SEARCH);
}
exit (0);
Finally, the total number of files that contained matches to the query are displayed, as shown in Figure 9.11.
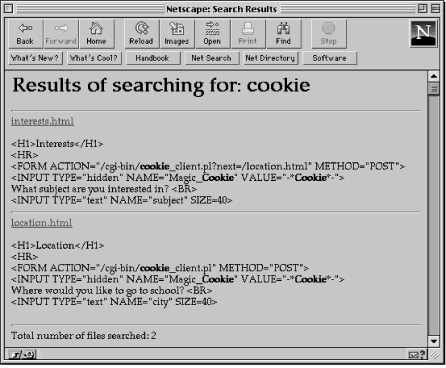
This is a very simple example of a search/index utility. It can be quite slow if you need to search hundreds (or thousands) of documents. However, there are numerous indexing engines (as well as corresponding CGI gateways) that are extremely fast and powerful. These include Swish and Glimpse. See Appendix E, information on where to retrieve those packages.
[1] The fgrep used in the example is GNU fgrep version 2.0, which supports the -A and -B options.
Get CGI Programming on the World Wide Web now with the O’Reilly learning platform.
O’Reilly members experience books, live events, courses curated by job role, and more from O’Reilly and nearly 200 top publishers.

