Chapter 1. HTML for CSS

To get the most out of CSS, your HTML code needs to provide a solid, well-built foundation. This chapter shows you how to write better, more CSS-friendly HTML. The good news is that when you use CSS throughout your site, HTML actually becomes easier to write. You no longer need to worry about trying to turn HTML into the design maven it was never intended to be. Instead, CSS offers most of the graphic design touches you’ll likely ever want, and HTML pages written to work with CSS are easier to create since they require less code and less typing. They’ll also download faster—a welcome bonus your site’s visitors will appreciate (see Figure 1-1).

HTML: Past and Present

As discussed in the Introduction, HTML provides the foundation for every page you encounter on the World Wide Web. When you add CSS into the mix, the way you use HTML changes. Say goodbye to repurposing awkward HTML tags merely to achieve certain visual effects. Some HTML tags and attributes—like the old <font> tag—you can forget completely.

CSS-driven web design makes writing HTML easier. The two designs pictured here look similar, but the top page is styled completely with CSS, while the bottom page uses only HTML. The size of the HTML file for the top page is only 4k, while the HTML-only page is nearly 4 times that size at 14k. The HTML-only approach requires a lot more code to achieve nearly the same visual effects: 213 lines of HTML code compared with 71 lines for the CSS version.

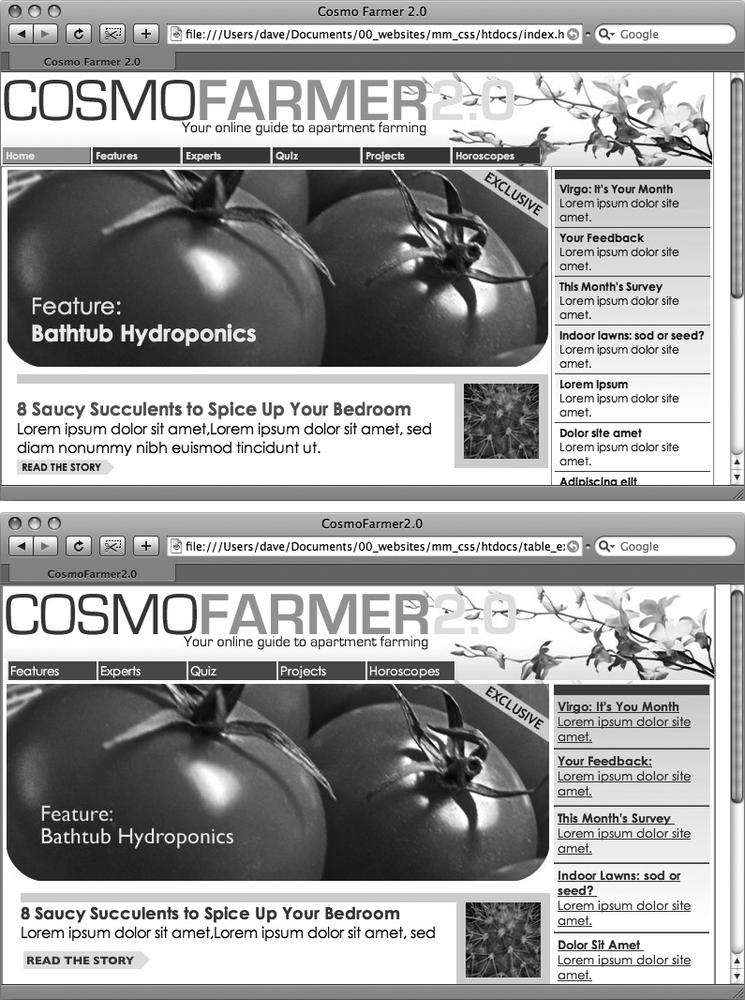
Figure 1-1. CSS-driven web design makes writing HTML easier. The two designs pictured here look similar, but the top page is styled completely with CSS, while the bottom page uses only HTML. The size of the HTML file for the top page is only 4k, while the HTML-only page is nearly 4 times that size at 14k. The HTML-only approach requires a lot more code to achieve nearly the same visual effects: 213 lines of HTML code compared with 71 lines for the CSS version.

HTML Past: Whatever Looked Good

When a bunch of scientists created the Web to help share and keep track of technical documentation, nobody called in the graphic designers. All the scientists needed HTML to do was structure information for easy comprehension. For example, the <h1> tag indicates an important headline, while the <h2> tag represents a lesser heading, usually a subheading of the <h1> tag. Another favorite, the <ol> (ordered list) tag, creates a numbered list for things like “Top 10 reasons not to play with jellyfish.”

But as soon as people besides scientists started using HTML, they wanted their web pages to look good. So web designers started to use tags to control appearance rather than structure information. For example, you can use the <blockquote> tag (intended for material that’s quoted from another source) on any text that you want to indent a little bit. You can use heading tags to make any text bigger and bolder—regardless of whether it functions as a heading.

In an even more elaborate workaround, designers learned how to use the <table> tag to create columns of text and accurately place pictures and text on a page. Unfortunately, since that tag was intended to display spreadsheet-like data—research results, train schedules, and so on—designers had to get creative by using the <table> tag in unusual ways, sometimes nesting a table within a table within a table to make their pages look good.

Meanwhile, browser makers introduced new tags and attributes for the specific purpose of making a page look better. The <font> tag, for example, lets you specify a font color, typeface, and one of seven different sizes. (If you’re keeping score at home, that’s about 100 fewer sizes than you can get with, say, Microsoft Word.)

Finally, when designers couldn’t get exactly what they wanted, they often resorted to using graphics. For example, they’d create a large graphic to capture the exact font and layout for web page elements and then slice the Photoshop files into smaller files and piece them back together inside tables to recreate the original design.

While all of the preceding techniques—using tags in creative ways, taking advantage of design-specific tag attributes, and making extensive use of graphics—provide design control over your pages, they also add a lot of additional HTML code (and more wrinkles to your forehead).

HTML Present: Scaffolding for CSS

No matter what content your web page holds—the fishing season calendar, driving directions to the nearest IKEA, or pictures from your kid’s birthday party—it’s the page’s design that makes it look like either a professional enterprise or a part-timer’s hobby. Good design enhances the message of your site, helps visitors find what they’re looking for, and determines how the rest of the world sees your website. That’s why web designers went through the contortions described in the previous section to force HTML to look good. By taking on those design duties, CSS lets HTML go back to doing what it does best—structure content.

Using HTML to control the look of text and other web page elements is obsolete. Don’t worry if HTML’s <h1> tag is too big for your taste or bulleted lists aren’t spaced just right. You can take care of that later using CSS. Instead, think of HTML as a method of adding structure to the content you want up on the Web. Use HTML to organize your content and CSS to make that content look great.

Writing HTML for CSS

If you’re new to web design, you may need some helpful hints to guide your forays into HTML (and to steer clear of well-intentioned, but out-of-date HTML techniques). Or if you’ve been building web pages for a while, you may have picked up a few bad HTML-writing habits that you’re better off forgetting. The rest of this chapter introduces you to some HTML writing habits that will make your mother proud—and help you get the most out of CSS.

Think Structure

HTML adds meaning to text by logically dividing it and identifying the role that text plays on the page: For example, the <h1> tag is the most important introduction to a page’s content. Other headers let you divide the content into other, less important, but related sections. Just like the book you’re holding, for example, a web page should have a logical structure. Each chapter in this book has a title (think <h1>) and several sections (think <h2>), which in turn contain smaller subsections. Imagine how much harder it would be to read these pages if every word just ran together as one long paragraph.

Note

For a tutorial on HTML, visit www.w3schools.com/html/html_intro.asp. For a quick list of all available HTML tags, visit Sitepoint.com’s HTML reference at http://reference.sitepoint.com/html.

HTML provides many other tags besides headers for marking up content to identify its role on the page. (After all, the M in HTML stands for markup.) Among the most popular are the <p> tag for paragraphs of text and the <ul> tag for creating bulleted (non-numbered) lists. Lesser-known tags can indicate very specific types of content, like <abbr> for abbreviations and <code> for computer code.

When writing HTML for CSS, use a tag that comes close to matching the role the content plays in the page, not the way it looks (see Figure 1-2). For example, a bunch of links in a navigation bar isn’t really a headline, and it isn’t a regular paragraph of text. It’s most like a bulleted list of options, so the <ul> tag is a good choice. If you’re saying, “But items in a bulleted list are stacked vertically one on top of the other, and I want a horizontal navigation bar where each link sits next to the previous link,” don’t worry. With CSS magic you can convert a vertical list of links into a stylish horizontal navigation bar as described in Chapter 9.

Old school, new school. Before CSS, designers had to resort to the <font> tag and other extra HTML to achieve certain visual effects (top). You can achieve the same look (and often a better one) with a lot less HTML code (bottom). In addition, using CSS for formatting frees you up to write HTML that follows the logical structure of the page’s content.

Figure 1-2. Old school, new school. Before CSS, designers had to resort to the <font> tag and other extra HTML to achieve certain visual effects (top). You can achieve the same look (and often a better one) with a lot less HTML code (bottom). In addition, using CSS for formatting frees you up to write HTML that follows the logical structure of the page’s content.

Two HTML Tags to Keep in Mind

HTML’s motley assortment of tags doesn’t cover the wide range of content you’ll probably add to a page. Sure, <code> is great for marking up computer program code, but most folks would find a <recipe> tag handier. Too bad there isn’t one. Fortunately, HTML provides two generic tags that let you better identify content, and, in the process, provide “handles” that let you attach CSS styles to different elements on a page.

Understanding the <Div> and <Span> Tags

The <div> tag and the <span> tag are like empty vessels that you fill with content. A div is a block, meaning it has a line break before it and after it, while a span appears inline, as part of a paragraph. Otherwise, divs and spans have no inherent visual properties, so you can use CSS to make them look any way you want. The <div> (for division) tag indicates any discrete block of content, much like a paragraph or a headline. But more often it’s used to group any number of other elements, so you can insert a headline, a bunch of paragraphs, and a bulleted list inside a single <div> block. The <div> tag is a great way to subdivide a page into logical areas, like a banner, footer, sidebar, and so on. Using CSS, you can later position each area to create sophisticated page layouts (a topic that’s covered in Part III of this book).

The <span> tag is used for inline elements; that is, words or phrases that appear inside of a larger paragraph or heading. Treat it just like other inline HTML tags such as the <a> tag (for adding a link to some text in a paragraph) or the <strong> tag (for emphasizing a word in a paragraph). For example, you could use a <span> tag to indicate the name of a company, and then use CSS to highlight the name by using a different font, color, and so on. Here’s an example of those tags in action, complete with a sneak peek of a couple of attributes—id and class—frequently used to attach styles to parts of a page.

<div id="footer">
  <p>Copyright 2006, <span class="bizName">
CosmoFarmer.com</span></p>
  <p>Call customer service at 555-555-5501 for more information</p>
</div>

This brief introduction isn’t the last you’ll see of these tags. They’re used frequently in CSS-heavy web pages, and in this book you’ll learn how to use them in combination with CSS to gain creative control over your web pages.

Additional Tags in HTML5

The <div> tag is rather generic—it’s simply a block-level element used to divide a page into sections. One of the goals of HTML5 is to provide other, more semantic tags for web designers to choose from. Making your HTML more semantic simply means using tags that accurately describe the content they contain. As mentioned earlier in this section, you should use the <h1> (heading 1) tag when placing text that describes the primary content of a page. Likewise, the <code> tag tells you clearly what kind of information is placed inside—programming code.

HTML5 includes many different tags whose names reflect the type of content they contain, and can be used in place of the <div> tag. The <article> tag, for example, is used to mark off a section of a page that contains a complete, independent composition…in other words, an “article” as in a blog post, an online magazine article, or simply the main text of the page. Likewise, the <header> tag indicates a header or banner, the top part of a page usually containing a logo, site-wide navigation, page title and tagline, and so on.

Note

To learn more about the new HTML tags, visit HTML5 Doctor (http://html5doctor.com) and www.w3schools.com/html/html5_intro.asp.

Many of the new HTML5 tags are intended to expand upon the generic <div> tag, Here are a few other HTML5 tags frequently used to structure the content on a page:

  • The <section> tag contains a grouping of related content, such as the chapter of a book. For example, you could divide the content of a home page into three sections: one for an introduction to the site, one for contact information, and another for latest news.

  • The <aside> tag holds content that is related to content around it. A sidebar in a print magazine, for example.

  • The <footer> tag contains information you’d usually place in the footer of a page, such as a copyright notice, legal information, some site navigation links, and so on. You’re not limited, however, to just a single <footer> per page; you can put a footer inside an <article>, for example, to hold information related to that article, like footnotes, references, or citations.

  • The <nav> element is used to contain primary navigation links.

  • The <figure> tag is used for an illustrative figure. You can place an <img> tag inside it, as well as another new HTML5 tag—the <figcaption> tag, which is used to display a caption explaining the photo or illustration within the <figure>.

Tip

Understanding which HTML5 tag to use—should your text be an <article> or a <section>?—can be tricky. For a handy flowchart that makes sense of HTML5’s new sectioning elements, download the PDF from the HTML5doctor.com at http://html5doctor.com/downloads/h5d-sectioning-flowchart.pdf.

There are other HTML5 elements, and many of them simply provide a more descriptive alternative to the <div> tag. This book uses both the <div> tag and the new HTML5 tags to help organize web-page content. The downside of HTML5 is that Internet Explorer 8 and earlier don’t recognize the new tags without a little bit of help (see the box below).

In addition, aside from feeling like you’re keeping up with the latest web design trends, there’s really no tangible benefit to using some of these HTML5 tags. For example, simply using the <article> tag to hold the main story on a web page, doesn’t make Google like you any better. You can comfortably continue using the <div> tag, and avoid the HTML5 sectioning elements if you like.

Keep Your Layout in Mind

While you’ll use the <h1> tag to identify the main topic of the page and the <p> tag to add a paragraph of text, you’ll eventually want to organize a page’s content into a pleasing layout. As you learn how to use CSS to lay out a page in Part Three of this book, it doesn’t hurt to keep your design in mind while you write the page’s HTML.

You can think of web page layout as the artful arrangement of boxes (see Figure 1-3 for an example). After all, a two-column design consisting of two vertical columns of text is really just two rectangular boxes sitting side-by-side. A header consisting of a logo, tagline, search box, and site navigation is really just a wide rectangular box sitting across the top of the browser window. In other words, if you imagine the groupings and layout of content on a page, you’d see boxes sitting on top of one another, next to each other, and below each other.

This basic two-column layout includes a banner (top), a column of main content (middle, left), a sidebar (middle, right), and a footer (bottom). These are the main structural boxes making up this page’s layout.

Figure 1-3. This basic two-column layout includes a banner (top), a column of main content (middle, left), a sidebar (middle, right), and a footer (bottom). These are the main structural boxes making up this page’s layout.

In your HTML, you create these boxes, or structural units, using the <div> tag. Simply wrap the HTML tags that make up the banner area, for example, in one div, a column’s worth of HTML in another, and so on. If you’re HTML5 savvy, you might create the design pictured in Figure 1-3, with a <header> tag for the top banner, an <article> tag for the main text, an <aside> or <section> tag for the sidebar, and a <footer> tag for the page’s footer. In other words, if you plan to place a group of HTML tags together, somewhere on a page, then you’ll need to wrap those tags in a sectioning element like a <div>, <article>, <section>, or <aside>.

HTML to Forget

CSS lets you write simpler HTML for one big reason: You can stop using a bunch of tags and attributes that only make a page better looking. The <font> tag is the most glaring example. Its sole purpose is to add a color, size and font to text. It doesn’t do anything to make the structure of the page more understandable.

Here’s a list of tags and attributes you can easily replace with CSS:

  • Ditch <font> for controlling the display of text. CSS does a much better job with text. (See Chapter 6 for text-formatting techniques.)

  • Don’t use the <b> and <i> tags to emphasize text. If you want text to really be emphasized, use the <strong> tag, which browsers normally display as bold. For a slightly less emphatic point, use the <em> tag, which browsers display as italic.

    While HTML4 tried to phase the <b> and <i> tags out, HTML5 has brought them back. In HTML5 the <b> tag is meant to merely make text bold without adding any meaning to that text (that is, you just want the text to be bold looking but you don’t want people to treat that text like you’re shouting it). Likewise, the <i> tag is used for italicizing text, but not emphasizing its meaning.

    Note

    To italicize a publication’s title, the <cite> tag kills two birds with one stone. It puts the title in italics and tags it as a cited work for search engines’ benefit. This one’s a keeper.

  • Skip the <table> tag for page layout. Use it only to display tabular information like spreadsheets, schedules, and charts. As you’ll see in Part Three of this book, you can do all your layout with CSS for much less time and code than the table-tag tango.

  • Avoid the awkward <body> tag attributes that enhance only the presentation of the content: background, bgcolor, text, link, alink, and vlink set colors and images for the page, text, and links. CSS gets the job done better (see Chapter 7 and Chapter 8 for CSS equivalents of these attributes).

  • Don’t abuse the <br> tag. If you grew up using the <br> tag (<br /> in XHTML) to insert a line break without creating a new paragraph, then you’re in for a treat. (Browsers automatically—and sometimes infuriatingly—insert a bit of space between paragraphs, including between headers and <p> tags. In the past, designers used elaborate workarounds to avoid paragraph spacing they didn’t want, like replacing a single <p> tag with a bunch of line breaks and using a <font> tag to make the first line of the paragraph look like a headline.) Using CSS’s margin controls, you can easily set the amount of space you want to see between paragraphs, headers, and other block-level elements.

Note

In the next chapter, you’ll learn about a technique called a “CSS Reset,” which eliminates the gaps browsers normally insert between paragraphs and other tags (see Starting with a Clean Slate).

As a general rule, adding attributes to tags that set colors, borders, background images, or alignment—including attributes that let you format a table’s colors, backgrounds, and borders—is pure old-school HTML. So is using alignment properties to position images and center text in paragraphs and table cells. Instead, look to CSS to control text placement (Aligning Text), borders (Adding Borders), backgrounds (Coloring the Background), and image alignment (Discovering CSS and the <img> Tag).

The W3C HTML validator located at lets you quickly make sure the HTML in a page is sound. You can point the validator to an already existing page on the Web, upload an HTML file from your computer, or just paste the HTML of a web page into a form box and then click the Check button.

Figure 1-4. The W3C HTML validator located at http://validator.w3.org lets you quickly make sure the HTML in a page is sound. You can point the validator to an already existing page on the Web, upload an HTML file from your computer, or just paste the HTML of a web page into a form box and then click the Check button.

Tips to Guide Your Way

It’s always good to have a map for getting the lay of the land. If you’re still not sure how to use HTML to create well-structured web pages, then here are a few tips to get you started:

  • Use headings to indicate the relative importance of text. Again, think outline. When two headings have equal importance in the topic of your page, use the same level header on both. If one is less important or a subtopic of the other, then use the next level header. For example, follow an <h2> with an <h3> tag (see Figure 1-5). In general, it’s good to use headings in order and try not to skip heading numbers. For example, don’t follow an <h2> tag with an <h5> tag.

    Use the headline tags (<h1>, <h2>, and so on) as you would if you were outlining a school report: Put them in order of importance, beginning with an <h1> tag, which should shout “Listen up! This is what this whole page is about.”

    Figure 1-5. Use the headline tags (<h1>, <h2>, and so on) as you would if you were outlining a school report: Put them in order of importance, beginning with an <h1> tag, which should shout “Listen up! This is what this whole page is about.”

  • Use the <p> tag for paragraphs of text.

  • Use unordered lists (<ul>) when you’ve got a list of several related items, such as navigation links, headlines, or a set of tips like these.

  • Use numbered lists (<ol>) to indicate steps in a process or define the order of a set of items. The tutorials in this book are a good example, as is a list of rankings like “Top 10 websites popular with monks.”

  • To create a glossary of terms and their definitions or descriptions, use the <dl> (definition list) tag in conjunction with the <dt> (definition term) and <dd> (definition description) tags. (For an example of how to use this combo, visit www.w3schools.com/tags/tryit.asp?filename=tryhtml_list_definition.)

  • If you want to include a quotation like a snippet of text from another website, a movie review, or just some wise saying of your grandfather’s, try the <blockquote> tag for long passages or the <q> tag to place a short quote within a longer paragraph, like this:

    <p>Mark Twain is said to have written <q>The coldest winter I ever spent
    was a summer in San Francisco</q>. Unfortunately, he never actually wrote that
    famous quote.</p>
  • Take advantage of obscure tags like the <cite> tag for referencing a book title, newspaper article, or website, and the <address> tag to identify and supply contact information for the author of a page (great for a copyright notice).

  • As explained in full on HTML to Forget, steer clear of any tag or attribute aimed just at changing the appearance of a text or image. CSS, as you’ll see, can do it all.

  • When there just isn’t an HTML tag that fits the bill, but you want to identify an element on a page or a bunch of elements on a page so you can apply a distinctive look, use the <div> and <span> tags (see Two HTML Tags to Keep in Mind). You’ll get more advice on how to use these in later chapters.

  • Don’t overuse <div> tags. Some web designers think all they need are <div> tags, ignoring tags that might be more appropriate. For example, to create a navigation bar, you could add a <div> tag to a page and fill it with a bunch of links. A better approach would be to use a bulleted list (<ul> tag), After all, a navigation bar is really just a list of links. As discussed on Additional Tags in HTML5, HTML5 provides several new tags that can take the place of the <div> tag, like the <article>, <section>, and <footer> tags. For a navigation bar, you could use the HTML5 <nav> tag.

  • Remember to close tags. The opening <p> tag needs its partner in crime (the closing </p> tag), as do all other tags, except the few self-closers like <br> and <img> (<br /> and <img /> in XHTML).

  • Validate your pages with the W3C validator (see Figure 1-4 and the box on Validate Your Web Pages). Poorly written or typo-ridden HTML causes many weird browser errors.

The Importance of the Doctype

HTML follows certain rules—these rules are contained in a Document Type Definition file, otherwise known as a DTD. A DTD is a text file that explains what tags, attributes, and values are valid for a particular type of HTML. And for each version of HTML, there’s a corresponding DTD. By now you may be asking, “But what’s all this got to do with CSS?”

Everything—if you want your web pages to appear correctly and consistently in web browsers. You tell a web browser which version of HTML or XHTML you’re using by including what’s called a doctype declaration at the beginning of a web page. This doctype declaration is the first line in the HTML file, and defines what version of HTML you’re using (such as HTML5 or HTML 4.01 Transitional). When you mistype the doctype declaration or leave it out, you can throw most browsers into an altered state called quirks mode.

Quirks mode is browser manufacturers’ attempt to make their software behave like browsers did circa 1999 (in the Netscape 4 and Internet Explorer 5 days). If a modern browser encounters a page that’s missing the correct doctype, then it thinks, “Gee, this page must have been written a long time ago, in an HTML editor far, far away. I’ll pretend I’m a really old browser and display the page just as one of those buggy old browsers would display it.” That’s why, without a correct doctype, your lovingly CSS-styled web pages may not look as they should, according to current standards. If you unwittingly view your web page in quirks mode when checking it in a browser, you may end up trying to fix display problems that are related to an incorrect doctype and not the incorrect use of HTML or CSS.

Note

For more (read: technical) information on quirks mode, visit www.quirksmode.org/css/quirksmode.html and https://developer.mozilla.org/en/Mozilla%2527s_Quirks_Mode.

Fortunately, it’s easy to get the doctype correct. All you need to know is what version of HTML you’re using. If you’re using HTML5, things are easy. The doctype is simply:

<!doctype html>

Put this at the top of your HTML file and you’re good to go. If you’re still using older versions of HTML or XHTML such as HTML 4.01 Transitional and XHTML 1.0 Transitional, then the doctype is a lot more convoluted.

If you’re using HTML 4.01 Transitional, for example, type the following doctype declaration at the very beginning of every page you create:

<!DOCTYPE HTML PUBLIC "-//W3C//DTD HTML 4.01 Transitional//EN" "http://www.
w3.org/TR/html4/loose.dtd">

The doctype declaration for XHTML 1.0 Transitional is similar. It’s also necessary to add a little code to the opening <html> tag that’s used to identify the file’s XML type—in this case, it’s XHTML—like this:

<!DOCTYPE html PUBLIC "-//W3C//DTD XHTML 1.0 Transitional//EN" "http://www.
w3.org/TR/xhtml1/DTD/xhtml1-transitional.dtd">
<html xmlns="http://www.w3.org/1999/xhtml">

If this entire discussion is making your head ache and your eyes slowly shut, keep your life simple by using the HTML5 doctype. It’s short, easy to remember, and works in all browsers. You can use this doctype even if you don’t touch any of the new HTML5 tags.

Note

Most visual web page tools like Dreamweaver and Expression Web automatically add a doctype declaration whenever you create a new web page, and many HTML-savvy text editors have shortcuts for adding doctypes.

Making Sure Internet Explorer Is Up-to-Date

Thanks to Microsoft’s auto-update feature, Windows PCs now update Internet Explorer to the latest version. Windows 7 and 8 users have the latest version of Internet Explorer installed—IE 10 at the time of this writing. IE 10 supports many of the exciting and powerful new HTML5 and CSS3 properties. As you’ll learn in this book, CSS3 provides many exciting design possibilities like drop shadows (Adding Drop Shadows), gradient backgrounds (Utilizing Gradient Backgrounds), and rounded corners (Creating Rounded Corners), to name a few.

Unfortunately, not all Windows users will be able to take advantage of these advancements in web design. As explained in the box on Should I Care About IE 6, 7, or 8?, the widely used Windows XP operating system can run only Internet Explorer 8 or earlier. In fact, IE 8 is still the most common version of Internet Explorer used on the Web. This book will point out CSS properties that won’t work in IE 8, as well as possible workarounds.

Because IE 8 is still very popular, you need to keep a couple of things in mind. IE 8 is sort of like a chameleon: It can take on the appearance of a different version. If you’re not careful, it may not display your web pages the way you want it to. For example, and most importantly, you must include a proper doctype. As mentioned in the previous section, without a doctype, browsers switch into quirks mode. Well, when IE 8 goes into quirks mode, it tries to replicate the look of IE 5 (!?).

But wait—there’s more! IE 8 can also pretend to be IE 7. When someone viewing your site in IE 8 clicks a “compatibility view” button, IE 8 goes into IE 7 mode, displaying pages without IE 8’s full CSS 2.1 goodness. The same thing happens if Microsoft puts your website onto its Compatibility View List—a list of sites that Microsoft has determined look better in IE 7 than in IE 8. If you’re designing a site using the guidelines in this book, you won’t want IE 8 to act like IE 7…ever.

Fortunately, there’s a way to tell IE 8 to stop all this nonsense and just be IE 8. Adding a single META tag to a web page instructs IE 8 to ignore Compatibility View and the Compatibility View List and always display the page by using its most standards-compliant mode:

<meta http-equiv="X-UA-Compatible" content="IE=edge" />

Put this instruction in the page’s <head> section (below the <title> tag is a good place). This tag works for current versions of IE, too: The “IE=edge” part of the tag will instruct versions of Internet Explorer later than IE 8 to also display web pages in their standard mode. Unfortunately, you must do this on every page of your site.

Now that your HTML ship is steering in the right direction, it’s time to jump into the fun stuff (and the reason you bought this book): Cascading Style Sheets.

Get CSS3: The Missing Manual, 3rd Edition now with the O’Reilly learning platform.

O’Reilly members experience books, live events, courses curated by job role, and more from O’Reilly and nearly 200 top publishers.