Chapter 4. Organizing and Playing Music
Once you have your music collection on your computer, you gain an enormous amount of flexibility and control. You have instant access to any song, and you can organize your music in ways that were not previously possible. Your CD player, tape deck, turntable, and all of the equipment that a DJ uses for mixing music are replaced by software on your computer. If someone has a request, or you want to change the music to match the mood, you can do it in seconds with a few mouse clicks. You can even configure some programs to choose songs based on your personal music tastes and to automatically crossfade between songs.
This chapter covers the basics of organizing and playing music with iTunes, Media Jukebox, and Musicmatch Jukebox. You will learn how to import downloadable songs, navigate your music collection, and create custom playlists, as well as how to master features such as automatic crossfading and volume leveling so that you can go head to head with any DJ. You will also learn about the options for customizing your jukebox program with skins, visualization effects, and remote controls.
You can download most jukebox programs for free. Some, including Media Jukebox and Musicmatch, sell “plus” versions that offer additional features, such as faster CD burning, the ability to print CD jewel case inserts, and advanced features for organizing your music. Table 4-1 shows the web sites where you can download the jukebox programs covered in this book.
Getting Music onto Your Computer
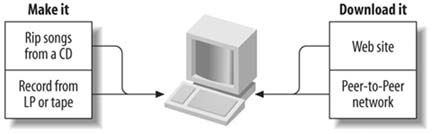
There are several options for acquiring and storing music on your computer. The easiest way is to download songs from a web site, online music store, or peer-to-peer network. Another option is to convert your existing records, tapes, and CDs into a compressed format such as MP3. Figure 4-1 illustrates these methods, and we cover each one in depth later in the book.
Digital audio formats
However you acquire music, it helps to understand the differences between the various formats for digital audio. Following are descriptions of the most common formats and file types (we’ll cover digital audio formats in much more depth in Chapter 9):
- MP3
A compressed audio format that’s part of the MPEG family of standards. MP3 is currently the most widely used format for downloadable music.
- AAC
A very high quality compressed audio format that’s part of the MPEG family of standards.
- M4A
File extension for copy-protected AAC files downloaded from the iTunes Music Store.
- M4P
File extension for unprotected AAC files created with iTunes.
- Real Audio
A proprietary compressed audio format used by many Internet radio stations.
- WMA
A proprietary compressed audio format developed by Microsoft.
- AIFF
An audio file format common to the Mac (typically uncompressed).
- WAV
An audio file format common to Windows PCs (typically uncompressed).
Downloading music
You can download songs and entire albums from a variety of web sites, or you can acquire them via peer-to-peer file-sharing programs such as Kazaa and Morpheus. However, peer-to-peer sites carry legal consequences and pitfalls, so the safest choice is to stick with reputable sites such as eMusic and the iTunes Music Store (see Chapter 5). The songs you download will be authorized copies of a consistent quality. If you decide to go the peer-to-peer route, you should first learn a little about the legalities of copyright law (see Chapters 5 and 17)—thousands of users of peer-to-peer networks have unwittingly ended up on the receiving end of lawsuits from the RIAA. We’ll cover peer-to-peer file sharing in depth in the next chapter.
Converting your existing music collection
If you have an extensive collection of records or CDs, you should convert them to a compressed format such as MP3. To create MP3 files from records or tapes, you’ll need to record them through your sound card (see Chapter 11). If you have a Windows-based PC, you should get a good standalone recording program such as Sound Forge, as the Sound Recorder program included with Windows is very limited. Mac OS X includes a decent but not full-featured recording and editing program called Sound Studio, but if you plan to record and clean up audio, you’ll be better off with a more advanced program like Peak.
To create MP3 files from CDs, you can bypass the sound card and rip the audio directly to your hard disk (see Chapter 11). Ripping results in a perfect copy, and because it is a digital process, it is much faster than recording. For example, while a system with a fast CD-ROM drive can rip a four-minute song in less than 30 seconds, recording the same song through a sound card will take the full four minutes.
Warning
It’s perfectly legal to make MP3 files from records or CDs you own, but it’s a violation of copyright law to share them with other people or upload them to a web site. See Chapter 17 for more information on copyright laws.
Importing songs
Before you can take advantage of its capabilities, you must import some songs into your jukebox program. If you purchase songs from a music store that is integrated with your jukebox program, as in the case of iTunes, they are imported automatically. If you use your jukebox program to create MP3 files from prerecorded music, they are imported automatically as well.
For songs from other sources (i.e., file-sharing programs or online stores not supported by your jukebox program), you need to manually import them or set your jukebox program to periodically scan certain folders and import any new songs it finds (not all programs can do this, however).
The simplest method of importing songs is to drag and drop them from Explorer or the Finder into the music library of your jukebox program. For importing a large number of files, follow the instructions below.
Warning
When you import a song into your jukebox program, it stores the name and location of the file (i.e., \Music\MP3\SongName.mp3), but not the file itself. If a song is deleted or moved through Explorer or the Finder, the entry will remain in the music library, but the song will not play.
iTunes
To import music into iTunes, select File → Add to Library. Browse to and select the folder that contains the songs, then click OK. All songs in that folder and any subfolders will be imported. To selectively import songs, follow the same method but select specific songs instead of entire folders.
Media Jukebox
To import music into Media Jukebox, select File → Library → Import Media. Check the file types you want to import, or click the “Def” button to choose the default file types. Click the “Browse” button and navigate to the folder that contains the files. Click “OK,” then click “Start Search” to begin the import. All songs in the selected folder and any subfolders will be imported.
Musicmatch
To import songs into Musicmatch, select File → Add New Tracks to Music Library. Browse and select the folder that contains the songs. Select one or more files, or click “Select All” to select all files. Check “Also add tracks from subfolders” to import files from any subfolders. Click “Add” to import the files.
Organizing Your Music
Jukebox programs use databases that allow you to organize and access your music collection in many different ways. For example, you can browse your collection by artist to display all songs by a particular artist, regardless of the genre, or you can browse by genre to display all songs within a certain genre, regardless of the artist.
In addition to the music, each audio file can contain metadata (related information, such as the song title, artist name, and album title). The place in the file where the metadata is stored is called a tag (see the “Metadata Tags” sidebar). The tag contains a field for each category of information (artist, album, etc.).
When you import songs into a jukebox program, metadata from each file’s tag is read and stored in a database, which is called a music (or media) library. The fields from the tags are displayed as columns and/or folders that allow you to sort and browse the library. The music library contains additional metadata, such as the last time the song was played, that is not stored in the file’s tag. Optional fields, such as rating, tempo, and mood, often exist in the library database, but not in the tags of individual songs.
Warning
Jukebox programs automatically add additional metadata (such as how many times each song has been played) to the music library database. This information is not stored within each song, so if you switch jukebox programs you will not have access to it.
Sorting
To sort your music in any jukebox program, simply click on a column label in the music library. The songs will automatically be sorted by that criterion. To sort the same column in reverse order, click on its label a second time. To add or remove columns, right-click (PC) or control-click (Mac) on any column label and check the columns you want displayed.
To quickly jump to the entries in the sort column that begin with a certain character, just press that key on your keyboard. For example, if your sort column is Artist, typing “G” will take you to the section of the list where the artist name begins with the letter G—i.e., songs by Garth Brooks, Green Day, etc. Note that with some programs, you must first highlight one entry in the list before you type the character.
Searching
All the jukebox programs covered in this chapter include a simple search feature. Both iTunes and Media Jukebox have a search box near the top of the library window. To display the search box in Musicmatch, click the “Find Tracks” button. To search for songs, simply type in a value (rock, love, dance, etc.). In iTunes and Media Jukebox, the search begins as soon as you start typing. In Musicmatch, you need to click “Go” after you type the search term. The list of songs displayed will be limited to songs that contain the search term in any field. For example, the search term “rock” would display songs that contain that word in the title or artist name, plus any song with “rock” in the genre field (e.g., rock, classic rock, or alternative rock).
Browsing
Browsing works differently in each jukebox program. It helps to think of each column or folder in the jukebox’s library as a filter that progressively narrows the list of songs. Following are some tips.
iTunes
The iTunes jukebox program allows you to easily browse your music collection by information such as artist, genre, and album (Figure 4-2). The values displayed in the first three columns are obtained from the metadata tag of each song. Values in the Play Count and Last Played columns are generated by iTunes. To browse the iTunes music library, click the Library icon in the Source pane of the main window. If you see only the list of songs in the Library, click the “Browse” button or press Control-B to display the iTunes Browser in the top half of the library pane. The “All” choice at the top of any column means that particular filter is not active.

The easiest way to browse is to start with “All” selected for each column, and then work your way from left to right. To narrow the list to a specific genre, select a value in the Genre column (see Figure 4-2). To further narrow the list, make a selection in the Artist column. The list of songs displayed in the bottom pane will include only those that match both the genre and artist. To display all songs by a particular artist, click “All” in the Genre column before you select the artist. Making a selection in the Album column further narrows the list.
At any point, you can select from the songs listed in the bottom pane to play them or add them to a playlist. To display all songs, select “All” at the top of each column.
Media Jukebox
To browse the Media Jukebox library, click the plus sign to the left of the Media Library icon. Several choices will appear. To browse by Genre, click the plus sign next to that choice and select a genre from the list. To further narrow the list, select an Artist, and then an Album. To display all songs by a particular artist, use the “Artist/Album” choice. To display all songs in the library, click the Media Library icon.
Musicmatch
To browse the music library in Musicmatch, click the “View Library by” button on the left, just above the Library window. You can view tracks grouped according to various criteria, such as artist, album, genre, and so on. For example, if you choose “View By Artist,” a list of all the artists will appear. To display all the tracks for a specific artist, in the Library window, click the plus sign next to the artist’s name. To display the songs in the library in one long list, choose “View All Tracks.” To play all songs for an artist, right-click the artist’s name in the Library window and choose “Play Now.” The tracks will be added to the playlist window at the top and the first track will begin playing.
Playing Music
Songs on your computer are stored as individual files, in one of a variety of formats (.mp3, .wav, .wma, and so on). The player software needs to “open” a file to play it. You can select songs or playlists from within your jukebox program, or you can select them from Windows Explorer or the Mac Finder.
The jukebox programs covered in this chapter give you several options for playing songs and playlists. Most of them allow you to play a song either by double-clicking it or by highlighting it and then clicking the “Play” button in the player window. The differences between these programs are more apparent in the way they handle playlists, which we will discuss momentarily.
To play a digital audio file (or playlist file) from Windows Explorer or the Mac Finder, just double-click the filename. If the player program is not already running, the system will launch the program associated with the file type (more on that later) and then play the file.
Player controls
The player section of each jukebox program has buttons for common options, such as Play, Pause, Next Track, and Previous Track. In both iTunes and Media Jukebox, the “Play” button morphs into a “Pause” button once a song starts playing. When the song is stopped, the button then morphs back to “Play.” Nearby are a volume control and a slider that shows the track’s progress. You can drag the progress indicator to move forward or backward in the song.
Jukebox players have several modes. Loop and Repeat modes play the same song or playlist over and over again. Random (sometimes called Shuffle) mode plays songs in a random order, rather than in sequence. This feature is nice if you have a playlist with hundreds of songs, because it keeps you from getting bored by hearing the songs in the same order every time.
Playlists
A playlist is a list of songs to be played in a certain order. Playlists can be used like tapes, but without the limitations of recording songs onto physical media (time-consuming, high cost, limited capacity, difficult to make changes).
Creating and managing playlists is one of the most important functions of your jukebox program. Without some way to automatically feed the player program with one song after another, you would have to sit at your computer and select each song at the time it was to be played. With a jukebox program, you can easily create a playlist that contains hundreds of songs in a just few minutes. It would take you dozens of hours to record the same songs on cassette tapes, plus you would have to buy all those blank tapes!
You can have as many playlists as you want, with as many songs as you like in them. The same song may appear in multiple lists, or multiple times on the same list. Playlists can even contain a mix of audio file types, as long as the player software supports them.
You might want playlists for specific occasions, such as parties or weddings. You might like to have playlists for certain types of music (classical, ’60s rock, jazz, etc.). Or you might want playlists for certain situations (dance music, romantic music, easy listening) or for certain moods (broken-hearted, energetic, mad as hell). Your imagination, music collection, and musical tastes are the only limiting factors.
You can burn songs in a playlist to a CD, or send them to your portable digital audio player. You can also print playlists for easy reference, so if someone compliments your music selection, you can give them a copy and they can use it as a shopping list. Just don’t give them copies of the audio files, because that would be copyright infringement (more on that in Chapter 17).
Creating and editing playlists
Creating playlists is easy, and to populate them you simply drag and drop files from the music library. Once a playlist is loaded, you can play individual songs either by double-clicking on them or by highlighting them and clicking the “Play” button. The Loop and Random (shuffle) play modes are useful if you want to recycle a long playlist, because the order of the songs will be different each time.
Once you have a playlist, it’s very easy to add and delete songs or change the order. To change the order, select one or more songs and drag them to a different location in the list. To delete a song, highlight it and then press the Delete key.
Following are instructions for creating playlists in each jukebox program.
iTunes
To create a playlist in iTunes, click the plus sign at the bottom-left corner of the main window, or select “New Playlist” from the File menu. Type a name for the playlist, then click “Library” in the Source window and drag and drop songs into the playlist.
Media Jukebox
To create a playlist in Media Jukebox, right-click the “Playlists” folder and choose “Add playlist.” Type in a name for it, then drag and drop songs from the Media Library into the list. To save the playlist with the new order, right-click on it, then select “Update Order.”
Musicmatch
To create a playlist in Musicmatch, click “My Library” to display the Music Library, then drag and drop songs from the library into the playlist window. If an existing playlist is already loaded, click “Clear” to remove the songs from the window. To save a playlist, click “Save,” type in a name, then click “Save” again to store it.
Automatically generated playlists
If you’re having a party and someone suggests that you play some killer dance music from the ’90s, you can use iTunes’s Smart Playlists, Media Jukebox’s Smartlists, or Musicmatch’s AutoDJ to automatically create a playlist based on those criteria—that is, you can specify that the playlist include all songs released later than 1990, but only those that are identified as suitable for dancing. You can also specify that the genre be either rock or techno, but not funk or disco. Songs that meet these criteria will be selected and added to the playlist. You can then play individual songs or all songs on the list, and you can save it for future occasions.
Note
Before you can automatically create playlists based on criteria such as mood, situation, tempo, or preference, the relevant information must be added to the metadata of each song. You can edit the metadata manually, which is very time-consuming, or you can use a program such as MoodLogic (covered later in this section), which works with an online database of thousands of songs that have already been profiled with this type of information.
iTunes
To create a Smart Playlist in iTunes, select File → New Smart List. Select a field from the first column and a criterion (contains, starts with, etc.) from the second column. Next, enter a value in the third column. Click the plus sign to add additional conditions. In the drop-down box next to “Match,” choose all or any. The “any” choice acts as an “OR” function between conditions. Check “Live updating” to have iTunes automatically update the list whenever new songs are added to the library.
Figure 4-3 shows the properties of an iTunes Smart Playlist that includes only big band music by Frank Sinatra released prior to 1970. If “all” were changed to “any,” the list would include all big band music in your library, regardless of the year, all songs by Frank Sinatra, regardless of genre, plus any songs released before 1970, regardless of artist or genre.

The iTunes Party Shuffle feature (added in Version 4.5) automatically generates a playlist from songs randomly selected from your music library. To use this feature, simply click on “Party Shuffle” in the Source pane. The “Source” box below the list of songs in the main window allows you to have Party Shuffle select songs from your entire library or just from an existing playlist. Click the “Refresh” button to generate a new list. If you’ve entered your own ratings for individual songs, click “Play higher rated songs more often” before you click “Refresh.”
Media Jukebox
To create a Smartlist in Media Jukebox, right-click the "Playlists” folder, choose “Add Smartlist,” then type in a name for it. Click “Add Rule,” then select a field and check one or more choices from the list of possible values. To add additional rules and narrow the list, click “Add Rule.” To insert an “OR” function between rules, right-click anywhere in the summary window and choose Add Keyword → OR.
Media Jukebox’s Smartlists are very flexible and allow users to include or exclude songs that match the given criteria. The “OR” function allows advanced users to create complex combinations of rules. The use of brackets allows nested functions within a rule.
Figure 4-4 shows a Media Jukebox Smartlist that includes songs from either the pop or rock genres, plus any songs by Sheryl Crow or the Talking Heads (regardless of the genre), and absolutely no songs by the Village People.

Musicmatch
To create a playlist with Musicmatch’s Auto DJ, select the “Playlists” button, then choose “AutoDJ.” Enter a value in the “Enter Play Time” box to control the length of the list. Select a field from the list, then select one or more values. To add another criterion, check “Second Criteria” and follow the same procedure. Check either “And” or “And Not.”
Click the “Preview” button to see a list of the tracks that meet the criteria. Click the “Get Tracks” button to add the tracks to Musicmatch’s playlist window. Modify the order of the list if needed, then click “Save,” enter a name for the playlist, and click “Save” again to store it. As of Version 9.0, Musicmatch’s AutoDJ does not have an option to automatically update playlists as new songs are added to its library.
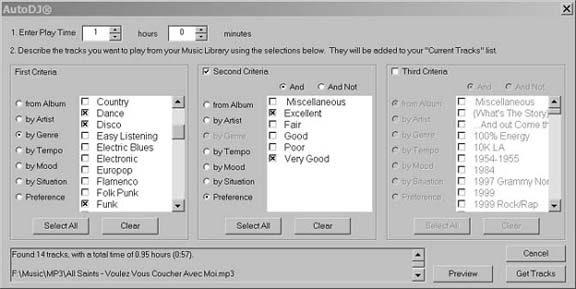
AutoDJ allows you to automatically generate playlists based on up to three sets of criteria. You can also limit the number of songs selected by specifying a maximum playtime. Figure 4-5 shows the criteria for an AutoDJ playlist that is limited to a maximum of one hour, with either Dance, Disco, or Funk as the genre and Excellent or Very Good as the preference. For this to work, you must first edit the properties of each song and specify a value for the “Preference” field.
MoodLogic
MoodLogic is a sophisticated playlist generator that works in conjunction with an online database of “verified” metadata that has been compiled for thousands of songs. The online database is compiled via input from MoodLogic users who contribute by profiling songs that are not already in the database, or songs that are included but not fully profiled.
When profiling a song, the profiler enters information for 40 to 50 “data points.” Data points include characteristics, such as tempo, energy level, main genre and subgenres, the mood the music evokes, and the types of vocals and instruments. The profiler also selects groups of artists who have similar music.
When you install MoodLogic, it scans your computer for music and analyzes each song to generate a “fingerprint” from the audio content of the file. The fingerprints are cross-referenced against the online database. Whenever a match is found, the metadata for that song is downloaded to a local database on your computer.
Songs that have been fully profiled are listed next to a round icon that contains the letter “m.” You can manually profile any songs that are not profiled in the online database; the MoodLogic profiler walks you through a series of questions, and when you are done the song profile is uploaded to the database so other users can benefit from the information.
Once you “activate” your music library, you can generate playlists in a number of ways. One of the most interesting methods is to select a song and have MoodLogic generate a “mix” that contains songs with similar characteristics. To do this, just select a song with a circled “m” next to it and then click the “Mix” button.
To generate a mix containing songs by artists whose music is similar to that of a particular artist, select any artist with a circled “m” next to the listing before you click “Mix.” To generate the mix, click one of the mood buttons, or click the surprise button to let MoodLogic choose for you.
The Variety slider in the Instant Mix window controls how closely songs must match the “Feels like” choice (song or artist) to be included in the mix. The “Shuffle” button randomly reorders the songs in the list.
The system is not perfect, but it’s a huge timesaver. You can easily remove from the mix any songs that are not appropriate, and you can add songs to existing mixes by dragging them from the library and dropping them onto the icon for the mix.
You can also export mixes to playlist files (with an .m3u extension), which you can then import into your jukebox program. To export a mix, right-click on its icon and choose “Export mix as .m3u.” Browse to the location where you want to store the file and click “Save.” With the optional DeviceLink ($19.95) feature, you can even copy MoodLogic playlists and the associated songs to portable players.
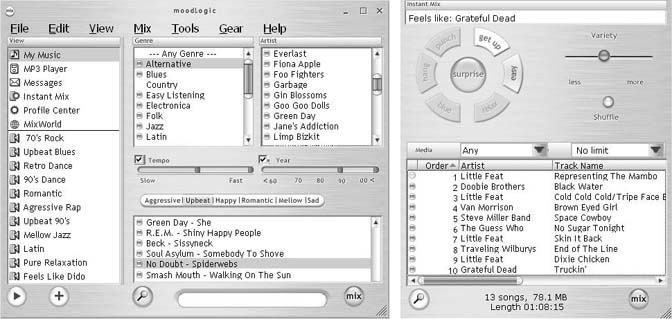
In the MoodLogic main window, you can generate mixes by selecting genres and/or artists. To further narrow the selection, check “Tempo” or “Year” and drag each end of the slider to specify a range of values. The row of “mood” buttons below the slider allows you to further narrow the list. Once you’ve made your selections, click the “Mix” button to generate the playlist. Figure 4-6 shows the MoodLogic main window (left), along with an instant mix of songs (right) from artists whose music is similar to music by the Grateful Dead.
Turn Up the Volume
When you play music on your computer, there are several controls in different locations that allow you to adjust the volume: the player program, the system mixer, and the power amplifier. Choosing the right setting for each volume control will help minimize distortion and noise.
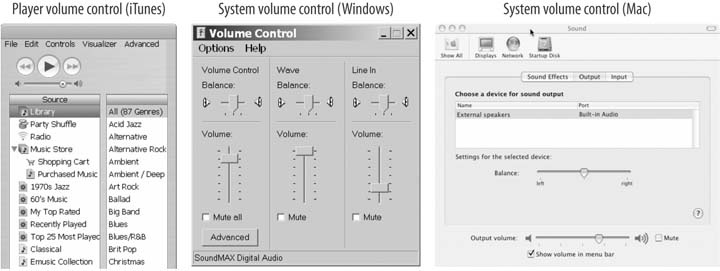
Most sound cards allow for multiple inputs, each with its own volume control. The system volume control has sliders that regulate the volume levels of each of the sound card’s inputs (CD, mic, player program, etc.), plus a master volume control that regulates the sound card’s output level (Figure 4-7). Sometimes the volume control of the player software also controls the system volume control. Most computer speakers also have a volume control that regulates the level of their built-in amplifiers. If your computer is connected to your stereo, use the main volume knob on your receiver to set the speaker volume.
Windows volume
The Windows Volume Control program controls the input and output levels of the sound card and has separate screens for recording and playback levels. The Playback Control screen has a slider labeled “Wave” (or “Wave/Direct Sound”) that sets the input level of the audio coming from your player program. The slider labeled “CD” controls the input level coming from an audio CD played in your CD-ROM drive.
A master-level control (labeled Play Control, Speaker Control, Master Out, or Volume Control) sets the output level of the sound card (which is the same as the input level fed into the power amplifier).
To access Windows Volume Control, double-click the speaker icon in the system tray. If the icon is not visible, you can launch the Volume Control program via the Start menu, by selecting Programs → Accessories → Entertainment → Volume Control.
Mac volume
On Macs, the volume control can be accessed through the player program and through the “Sound” option located under System Properties in Mac OS 9.2 or under System Preferences in Mac OS X. In Mac OS X, you can also adjust the sound level by clicking on the “Sound” icon on the righthand side of the menu bar. The slider control (sometimes labeled “Output Volume”) adjusts the playback level. The keyboards on some newer Macs also have volume-control keys built in. These volume-control keys are linked to the Output Volume slider and vice versa. The volume control within iTunes is independent of the system volume control.
Minimizing noise
The key to minimizing noise is to keep the signal level as high as possible as it passes through the sound card without overdriving the audio circuits. The speaker volume should be turned up just high enough to reach the loudest undistorted volume that you would normally listen to.
Here’s how to set your volume controls for the best sound:
Set your player volume control to 100%.
Set your input volume control to 100%. (The input slider is labeled “Wave” in the Windows system volume control shown in Figure 4-7.)
Set your master volume control to 70%. (The master slider control is labeled “Volume Control” in the Windows system volume control shown in Figure 4-7.)
Turn the volume on your speaker (or stereo receiver) all the way down.
Play the loudest song that you would normally listen to.
Gradually turn up your speaker volume until you begin to hear distortion.
Reduce the speaker (or stereo receiver) volume level slightly, until the sound is clear.
Regulate your listening level by using the master volume control.
The volume control in some player programs (such as Media Jukebox) is linked to the master system volume control. In this case, you can use the player volume control to regulate the volume. Multimedia keyboards that have volume up and down buttons also control the master system volume control.
Sometimes it’s more convenient to use the player program’s volume control than to use the master control, even if they aren’t linked. It’s okay to do some volume adjustment here, as long as the levels are kept fairly high. After following the above procedure, reduce your player volume control level to about 75% and play a song of average volume. Adjust the speaker volume as necessary to reach the desired loudness. You can then adjust the player program volume control from about 50% to 100%, as needed for songs of varying levels.
File Type Associations
Any time you open a file from within Windows Explorer or the Mac OS Finder, the operating system checks to see what program is associated with that particular type of file (word-processing document, JPEG image, MP3 file, etc.). The operating system then launches the program (if it is not already running) and automatically loads the file. For example, if you double-click an MP3 file and iTunes is the default program for that file type, the iTunes program will launch and begin playing the file.
The links between file types and programs are referred to as file type associations. In Mac OS X, file type associations are determined either by a code embedded in the file or by the file’s extension (e.g., .doc, .mp3). In all versions of Windows, only the file extension is used for file type associations.
When you install a program that plays or edits audio, if you don’t specify otherwise, it will most likely assign itself to the types of files it supports. This should not be a problem if you have just one audio program installed. But if you install a second audio program and don’t pay attention, you may find that double-clicking an audio file launches the second rather than the first program.
Why would you need more than one audio program? One example would be that you use iTunes to organize and play your music and access the iTunes Music Store, but you prefer a different program to listen to Internet radio. Or you may use a program like Sound Forge to record and edit audio, and Media Jukebox to play music.
Reclaiming file type associations
If you install more than one player program on your system, you’ll need to decide which program will be associated with each type of digital audio file. For example, if you have more than one MP3 player, you will need to specify one of them to be the default—i.e., the player that will launch when you double-click an MP3 file or play an Internet radio station that uses the streaming MP3 format.
This can be accomplished in several ways, but the easiest method is to use the player program’s feature to set and reclaim file type associations that have been “stolen” by other programs. Following are instructions for reclaiming file type associations for the programs covered in this chapter.
iTunes
To make iTunes the default player for audio files, select Edit (iTunes on the Mac version) → Preferences and choose the “General” tab of the configuration window. Check “Use iTunes as the default player for audio files,” then click “OK.” Occasionally you may have to uncheck this choice and then check it again before the file types will be reclaimed.
Customize Your Jukebox
Once you have organized your music and are comfortable working with playlists, you may want to experiment with some of the customization options of your jukebox program. Most jukebox programs can be customized with skins and plug-ins. All of them include visualization effects that pulse and move to the beat of the music.
Skins
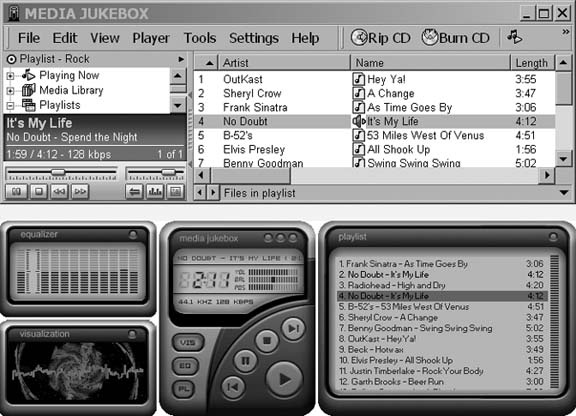
Skins are options that change the look of a program’s interface. The default skins included with many player programs can be pretty dull. Fortunately, most jukebox programs support skins that can liven them up and personalize them. Figure 4-8 shows screenshots of the standard skin for Media Jukebox (top) and a custom skin called Amped3 (bottom).
Crossfading
Crossfading is what DJs do to create smooth transitions between songs. This normally requires a mixer and two sources of music (CD players, turntables, or tape decks). The DJ also has to be there to cue up each successive song. With the right software, your computer can do this automatically, and you can go mingle with the crowd for extended periods while your computer does all the work.
Both iTunes and Media Jukebox have built-in automatic crossfading features that work very nicely. Musicmatch currently does not support crossfading, but hopefully they’ll add this feature to a future version. Following are instructions for enabling crossfading in iTunes and Media Jukebox.
iTunes
To enable crossfading in iTunes, choose Edit (iTunes on the Mac version) → Preferences → Effects and check “Crossfade playback.” Adjust the slider to control the length of the overlap between songs.
Media Jukebox
To enable crossfading in Media Jukebox, select Settings → Options → Playback. In the Between Tracks menu, select “Cross-fade (smooth)” or “Cross-fade (aggressive).” Move the slider to change the duration of the crossfade.
Automatic volume adjustment
Another nice feature shared by most jukebox programs is automatic volume adjustment, which makes all songs play at roughly the same loudness. If you’ve ever recorded cassette tapes and had to set different levels for certain songs, you’ll really appreciate this capability.
In iTunes, this feature is called "Sound Check”; Media Jukebox calls it “Replay Gain,” and Musicmatch uses the term “Volume Leveling.” In all three programs, the tracks must first be analyzed to determine the optimum level. The setting for each song is then stored and recalled whenever the song is played. Following are instructions for each jukebox program.
iTunes
To enable Sound Check in iTunes, choose Edit → Preferences → Effects, and check “Sound Check.” Sound Check will now process all the songs in your music library. The Sound Check settings also transfer to your iPod player when it’s synchronized with the iTunes music library. New tracks are automatically processed when they are imported into iTunes.
Media Jukebox
To use Replay Gain in Media Jukebox, highlight the tracks to be processed, then right-click and choose Properties. Next select Tools → Analyze Replay Gain. Make sure “Skip analyzed files” is checked. The first time you run Replay Gain it can take a long time to process your entire library because each track is fully analyzed, rather than just a sample. To enable Reply Gain during playback, select Player → DSP Studio and check Replay Gain.
Musicmatch
To use Volume Leveling in Musicmatch, choose Options → Player → Volume Leveling. Next, choose “Prepare all tracks in Music Library for Volume Leveling.” Musicmatch will then process each track and store a volume setting for it. To prepare additional tracks, select them and use the same procedure, but instead choose the “Prepare selected tracks …” option.
Visualization
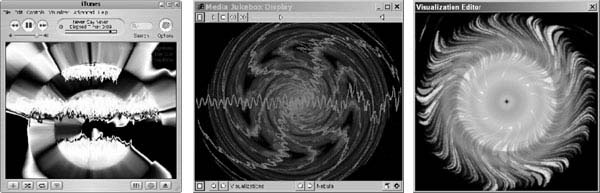
Visualization effects, included with most jukebox programs, generate geometric forms and objects that change colors and move and morph to the music. Visualization is a built-in feature of most jukebox programs. You can use menus or shortcut keys to toggle between visualization modes, styles, and color schemes. Additional visualization styles and effects can be added through third-party plug-ins. Figure 4-9 shows examples of visualization effects (from left to right) in iTunes, Media Jukebox, and Musicmatch.
iTunes
To enable visualization in iTunes, press Control-T (or Command-T on a Mac), or select the Visualizer pull-down menu and check “Turn Visualizer On.” To turn off visualization, press Control-T or Command-T, or use the Visualizer pull-down menu. Table 4-2 lists some secret keystrokes for controlling visualization. Plug-ins for additional visualization effects can be downloaded from http://www.pluginsworld.com.
|
Key |
Function |
|
? |
Displays a list of options |
|
I |
Shows or hides information about the current song |
|
C |
Shows or hides information about the current visualization style |
|
B |
Shows or hides the Apple logo |
|
M |
Toggles between slideshow modes and freezing the current visualization style |
|
R |
Chooses a new visualization style/color at random |
|
Q or W |
Cycles through available visualization styles |
|
A or S |
Cycles through variations of the currently selected style |
|
Z or X |
Cycles through different color schemes |
|
D |
Restores the default settings |
Media Jukebox
To enable visualization in Media Jukebox, click “Playing Now” and make sure the main window is split into two panes. If only a single pane is displayed, click the splitter bar and drag it down to show the upper pane. (The splitter bar is a narrow horizontal bar with a row of indented dots in the middle, located just above the column labels.) To toggle between visualization modes (On/Off and Track Info), click one of the arrows above the left end of the splitter bar. Use the set of arrows to the right to toggle between different visualization styles. If the menu bar at the bottom of the pane disappears, click anywhere within the visualization window to bring it back.
Musicmatch
To enable Musicmatch’s visualization feature, click View → Visualizations from the pull-down menu and check “Show.” The visualization window should appear in place of the Musicmatch logo (this is also where album artwork is displayed). You can also right-click over the Musicmatch logo (or album artwork) and select Visualization → Show. To configure the effects, select View → Visualizations → Configure. To display the visualization in a separate window, double-click anywhere within the window.
Musicmatch has a nice slideshow feature that can display JPEG images, which can be any combination of graphic images or digital photos. To enable the slideshow, select View → Visualizations → Musicmatch Slideshow Visualization. By default, the slideshow will cycle through JPEG images in your “My Pictures” folder. To change the folder, select View → Visualizations → Chooser. Click the “Configure” button, then enter the path to the new folder, or use the button to the right of the “Picture Folder” box to browse to a new folder. You can specify the interval between pictures and the type of transition (fade, dissolve, etc.)
Remote controls
One last thing required to make your computer jukebox as convenient as your TV and VCR is a remote control—you don’t want to have to get up and go to the computer every time you want to skip a song or adjust the volume, do you?
There are many types of remote-control interfaces for personal computers. These range from Bluetooth-enabled cell phones, to remotes that work with infrared receivers plugged into USB or serial ports, to remotes that work over wireless networks to control multiple computers and digital audio receivers.
The best remote controls are bundled with digital audio receivers (see Chapter 3). A digital audio receiver can transmit high-quality audio from your computer to any stereo or home theater system in your house. An infrared receiver transmits the commands from the remote control to your jukebox program and your stereo receiver.
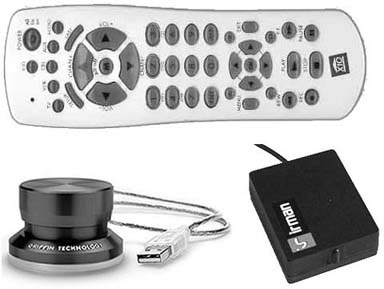
Figure 4-10 shows some different types of remote controls. The Entertainment Anywhere (top), by X10 (http://www.x-10.com), is a general-purpose remote control that works through an infrared receiver that plugs into a serial port. The PowerMate (bottom left), by Griffin Technologies (http://www.griffintechnologies.com), connects to a Mac or PC via a USB port and works as a volume control, or a programmable control for any type of program. The IRman (bottom right), by Evation (http://www.evation.com), is an infrared receiver that allows any infrared remote to communicate with a PC through a serial port.
Get Digital Audio Essentials now with the O’Reilly learning platform.
O’Reilly members experience books, live events, courses curated by job role, and more from O’Reilly and nearly 200 top publishers.

