Chapter 4. Introducing Cascading Style Sheets
What you see on a Web page when you use garden-variety HTML tags like <h1>, <p>, and <ul>, pales in comparison to the text and styling on display in, say, a print magazine. If Web designers had only HTML to make their sites look great, the Web would forever be the ugly duckling of the media world. HTML doesn’t hold a candle to the typographic and layout control you get when creating a document in even the most basic word processing program.
Fortunately for us designers, we can change the ho-hum appearance of HTML using a technology called Cascading Style Sheets. Cascading Style Sheets (CSS) are a way of making HTML look beautiful. If you think of HTML as the basic structure of a house (the foundation, walls, and rooms), then CSS is the house’s interior decoration (the paint, carpeting, and the color, style, and placement of furniture). CSS gives you much greater control over the layout and design of your Web pages. Using them, you can add margins to paragraphs (just as in a word processor), colorful and stylish borders to images, and even dynamic rollover effects to text links. Best of all, Dreamweaver’s streamlined approach lets you combine many of these design properties into powerful style sheets with just a few mouse clicks.
CSS is a large topic. It’s also the heart of today’s cutting edge Web design. So instead of dedicating just a single chapter to the topic, this book provides instruction in the fine art of using CSS in nearly every chapter. In this chapter, you’ll learn the basics of CSS, and how to use Dreamweaver CS3’s powerful CSS tools. In the next few chapters you’ll learn how CSS can improve the look of common Web page elements like links, images, and tables. Once you’re comfortable with the basics, you’ll find in-depth information on CSS—the kind of information that really makes your head ache—in Chapter 8. And, in Chapter 9, you’ll learn how to harness the power of CSS to fully control the layout of a Web page.
Cascading Style Sheet Basics
If you’ve used styles in word processing programs like Microsoft Word or page layout programs like Adobe InDesign, CSS will feel familiar. A style is simply a rule describing how to format a particular piece of HTML. (A style sheet is a set of these styles.)
You can create a single style, for example, that formats text with the font Arial, colored red, and with a left margin of 50 pixels. You can also create styles specifically for working with images; for instance, a style can align an image along the right edge of a Web page, surround the image with a colorful border, and place a 50-pixel margin between the image and the surrounding text.
Once you’ve created a style, you can apply it to text, images, or other elements on a page. For example, you could select a paragraph of text, and then apply a style to instantly change the text’s size, color, and font. You can also create styles for specific tags, so that all <h1> tags in your site, for example, are displayed in the same style, no matter where they appear.
You’ve already encountered CSS in the tutorial in the first chapter, and the previous chapter discussed how to use the Property inspector to apply basic formatting to text. The Property inspector’s text formatting choices are the most basic way to create a CSS style. But there are a lot more powerful uses of Cascading Style Sheets, and you’ll learn about many of these in the following pages.
Why Use CSS?
Although HTML alone provides basic formatting options for text, images, tables, and other Web page elements, Cascading Style Sheets have many advantages that make them a superior choice for most formatting tasks. In fact, the World Wide Web Consortium (W3C), the organization responsible for defining standards for the Web, has already phased out the <font> tag from the current HTML standard in favor of CSS. (For a list of other obsolete tags, see www.codehelp.co.uk/html/deprecated.html.)
But even if the threat of obsolescence doesn’t motivate you to use CSS, consider this: Style sheets offer far more formatting choices than HTML. With CSS, you can format paragraphs as they appear in a book or newspaper (the first line indented and no space between each paragraph, for example), and control the leading (the space between lines of type in a paragraph). When you use CSS to add a background image to a page, you get to decide how (and whether) it tiles (repeats). HTML can’t even begin to do any of these things.
Even better, CSS styles take up much less space than HTML’s formatting options, such as the much-hated <font> tag. You can usually save a lot of kilobytes on text-heavy Web pages using CSS while maintaining a high level of formatting control. As a result, your pages look great and load faster.
Style sheets also make updating your site easier. You can collect all of your styles into a separate file that’s linked to every page in your site. When you edit a style in the style sheet file (called an external style sheet), that change immediately ripples through your site, wherever that style is used. You can thus completely change the appearance of a site by simply editing a single style sheet file.
Cascading Style Sheets may sound like a cure-all for HTML’s anemic formatting powers, but they’re tricky to use. For example, CSS support varies from browser to browser, so you need to test your pages thoroughly in a wide variety of browsers. Even modern browsers—like Internet Explorer 6 for Windows, Firefox, Opera, and Safari—have their share of weird CSS behavior.
Fortunately, Dreamweaver CS3 is better than ever at displaying complex CSS-based designs, so you can develop your general design in Dreamweaver, and then use the preview feature to fine-tune your designs for different browsers. (The new “Check Browser Compatibility” tool described on Duplicating a Style is also a big help in troubleshooting CSS problems.)
Internal vs.External Style Sheets
Each new style you create gets added to a style sheet that’s stored either in the Web page itself (in which case it’s an internal style sheet), or in another file called an external style sheet.
Internal style sheets appear in the <head> portion of a Web page, and contain styles that apply only to that page. An internal style sheet is a good choice when you have a very specific formatting task for a single page. For example, perhaps you want to create styles to format the text and table of a chart that appears only on a single page.
Tip
It’s often easier, when creating a new design, to add styles to an internal style sheet. Once you’re satisfied with the design, you can then export the styles to an external style sheet—for use by all your site’s pages—as described on More about CSS.
An external style sheet, on the other hand, contains only styles—no HTML—and can be linked to numerous pages. In fact, it can be linked to every page on your Web site to provide a uniform, sitewide style. For instance, you can put a headline style in an external style sheet and link that sheet to every page in the site. Every headline on every page then shares the same look—instant design consistency! Even better, when the boss (or the interior decorator in you) calls up and asks you to change the color of the headlines, you need to edit only a single file—the external style sheet—to update hundreds or even thousands of Web pages.
You can create both types of style sheets easily in Dreamweaver, and you aren’t limited to choosing one or the other. A single Web page can have both an external (for styles that apply to the whole site) and an internal style sheet (for page-specific formatting). You can even attach multiple external style sheets to a single page.
Types of Styles
Styles come in several different flavors. The two most common are class and tag styles.
A class style is one that you create, name, and attach manually to text or an HTML tag. Class styles work much like styles in word processing and page-layout programs. If you want the name of your company to be displayed in bold and red wherever it appears in the text of a Web page, you can create a class style named Company with boldface and red text-color formatting. You would then select your company’s name on the page, and apply this style.
You may actually already be using class styles without even knowing it. The Property inspector’s basic text-formatting controls, discussed in Chapter 3, generate basic class styles whenever you use them. See page xx for more details.
The other major type of CSS style is called a tag style, and applies globally to an individual HTML tag, as opposed to individual selections. Suppose you wanted to display every Heading 1 paragraph in the Arial font. Instead of creating a class style and applying it to every Heading 1 on the page, you could create an HTML tag style for the <h1> tag. In effect, you redefine the tag so that it’s displayed in Arial.
The main benefit of redefining an HTML tag in this way is that you don’t have to apply the style by hand. Since the new style says that all <h1> tags must use Arial, wherever a Web browser encounters an <h1> tag, it displays the text in Arial, the specified font.
These HTML tag styles are the easiest way to format a page. For one thing, there’s no need to select the tag and apply the style; the page needs only to contain an instance of the tag—<h1>, for example—that you’ve redefined.
Nevertheless, there are times when only a class style will do, such as when you want to format just a few words in a paragraph. Simply redefining the <p> tag won’t do the trick, since that would affect the entire paragraph. Instead, you have to create a class style and apply it to just the words you wish to style. In addition, class styles are handy when you want to format just one instance of a tag differently from others. If you want to format the introductory paragraph on a page differently from all other paragraphs on the page, you’d create a class style and apply it to that first paragraph.
Note
In addition to classes and tag styles, other types of styles provide added control for particular situations. Dreamweaver considers these advanced styles, and you can read about them starting on Advanced Styles.
Creating Styles
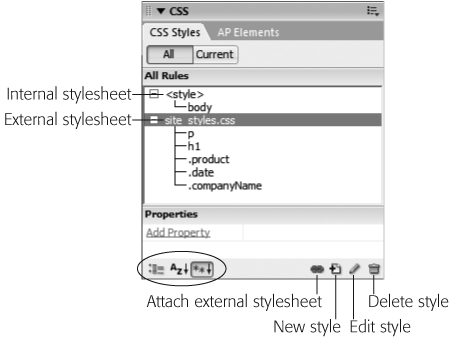
You begin most CSS-related tasks in the CSS Styles panel, which is Dreamweaver’s command center for creating and managing styles (see Figure 4-1). To open it, choose Window → CSS Styles (or press Shift+F11).
Phase 1: Set Up the CSS Type
To create a new style, click the new style button on the CSS Styles panel (see Figure 4-1); right-click anywhere in the CSS Styles panel, and then select New from the menu that appears. Or choose Text → CSS Styles → New. The New CSS Rule dialog box appears (Figure 4-2), where you begin the process of creating your new style. (In the technical language of CSS, a style is actually called a rule, but for simplicity’s sake this book just uses the term style. After all, Cascading Rule Sheets doesn’t have much of a ring to it.) Here’s a quick tour of your choices:
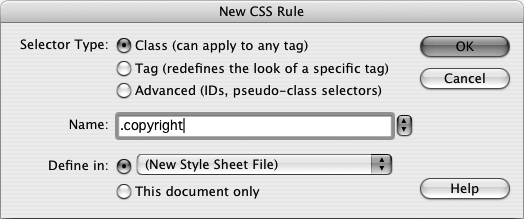
Selector Type. Click the appropriate radio button for the kind of style you’re creating: Class (to create your own style from scratch) or Tag (to create an HTML tag style that Dreamweaver automatically applies to each occurrence of the tag). See the previous section (Types of Styles) for a discussion of these two types.
The third type offered here, Advanced, lets you create advanced style types such as IDs, pseudo-classes, and descendent selectors. (You’ll learn about these types in various parts of the book; you can find a detailed discussion of them starting on Advanced Styles.)
Name. If you clicked the Class button, type a name for the new style. All class styles begin with a period, according to standard Cascading Style Sheet convention.
Another Class style name rule: A letter must follow the period. After that, you can use any combination of letters and numbers, but avoid unusual characters and spaces. For example, .logo, .main_content, .column2 all work fine. Dreamweaver lets you know if you use any invalid characters for the name.
If you chose Tag instead, then, from the Tag pop-up menu (which appears when you turn on the Tag radio button), select the HTML tag you want to redefine.
Tip
If you’re an HTML guru, you may find it faster to skip the Tag pop-up menu and just type the tag (minus the brackets) in the Name box. For example, if you want to create a style for all unordered (bulleted) lists, type ul.
If you clicked the Advanced button, Dreamweaver lets you type any valid CSS selector type in the Selector field (you’ll learn about selectors on Advanced Styles). You’ll use this feature for some advanced CSS tricks, but you can also use it just to create a tag or class style.
Define in. Click “This document only” if you want the styles to apply only to the current Web page (creating an internal style sheet, as described on Internal vs.External Style Sheets). To create a new external style sheet, choose New Style Sheet File from the “Define in” pop-up menu. This option not only creates a new external CSS file (which you can save anywhere in your site folder), but also adds the necessary code in the current document to link it to that file.
If you’ve previously linked this document to an external style sheet (see page xx), that style sheet’s name appears in the pop-up menu, indicating that Dreamweaver is going to store the new style in this style sheet file.
Note
If you create a bunch of internal styles in a particular page, and later realize you’d like to turn them into an external style sheet that you can use in other pages, you’re in luck. Dreamweaver CS3 introduces many new tools for managing your style sheets. You’ll learn how to use them starting on Moving and Managing Styles.
If you indicated that you want to create an external style sheet, clicking OK makes a Save Style Sheet As dialog box appear. Navigate to your site’s folder, and then type a name for the new external CSS file. Just as HTML files end in .html, CSS files end in .css.
Note
If you’ll be using this style sheet for all your site’s pages, you may want to save it in your site’s root folder, or in a folder specifically dedicated to style sheets, and give it a general name like site_styles.css or global.css. (You don’t have to type the .css file name extension, by the way. In this case, Dreamweaver adds it.)
No matter what “Define in” option you selected, clicking OK eventually brings you to the CSS Rule Definition window.
Phase 2: Defining the Style
The CSS Rule Definition window provides access to all of the formatting options available to you and your Web page text and graphics (see Figure 4-3). You’ll learn about each of the different properties throughout this book.
Once you’ve defined the style, click OK at the bottom of the Rule Definition window. Dreamweaver adds the style to the specified style sheet, and displays it in the CSS Styles panel (Figure 4-1).
The real trick to creating a style is mastering all of the different properties available, such as borders, margins, and background colors, and then learning which ones work reliably in the different browsers.
Using Styles
Once you’ve created styles, applying them is easy. In fact, if you created HTML tag styles, you don’t need to do anything to apply them, because their selectors (see the box to the right) automatically dictate which tags they affect.
Linking to an External Style Sheet
Whenever you create an external style sheet, Dreamweaver automatically links it to the current document. To use its styles in a different Web page, however, you must attach it to the page.
To do so, open the Web page to which you wish to add the style sheet. Then, on the CSS Styles panel, click the Attach External Style Sheet button (see Figure 4-1). (If the CSS Styles panel isn’t open, choose Window → CSS Styles or press Shift-F11.)
Tip
You can also use the Property inspector to attach a style sheet. Just select “Attach Style Sheet…” from the Style menu.
The Attach External Style Sheet window appears (see Figure 4-4). Click Browse. In the Select Style Sheet File dialog box that appears, navigate to and double-click the CSS (.css) file you wish to attach to the document. If the style sheet you select is outside the current site—for example, you’ve selected a style sheet you like from another one of your Web sites—Dreamweaver offers to copy the style sheet file into your site’s root folder; click Yes.
The Attach External Style Sheet window provides two other options: how to attach the style sheet, and what type of “media” you want the styles to apply to. The “media” setting is optional and dictates when the styles from the style sheet are applied (for example, you can apply a different set of styles when a page is printed vs. when it displays on a computer monitor.) You’ll find in-depth information on media types and how to use them on Styling for Print.
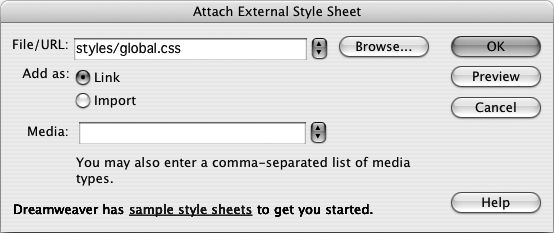
When attaching an external style sheet, you can either “link” it or “import” it. These two choices are nearly identical; they’re simply two different methods of attaching an external style sheet to a Web page. To save you one extra click, just go with Dreamweaver’s suggestion: link.
Tip
You can preview the effect of the style sheet on your page by clicking the Preview button in the Attach External Style Sheet window.
After choosing your options, click OK, and Dreamweaver adds the necessary HTML code to the head of the Web page, and automatically formats any tags in the document according to the style sheet’s HTML tag styles. You’ll see the formatting changes take place in the document window immediately after attaching the external style sheet.
If the style sheet contains class styles, on the other hand, you won’t see their formatting effects until you apply them to an element on the page, as described next.
Applying a Class Style
You can apply class styles to any selection in the document window, whether it’s a word, an image, or an entire paragraph. (You can apply any class style to any element, although doing so doesn’t always make sense. If you format a graphic with a style that specifies bold, red Courier type, it won’t look any different.)
Suppose your company’s name appears in a paragraph of text on a Web page that includes (either in an internal style sheet or in a linked, external style sheet) a class style named .company. To format that text using the class style, you select the company name in the document window, and then apply the style, as described below.
Similarly, to format larger selections, such as an entire paragraph, you’d select the paragraph, and then apply the class style. In fact, you can apply a class style to any HTML tag, such as the <p> (paragraph), <td> (table cell), or <body> tags.
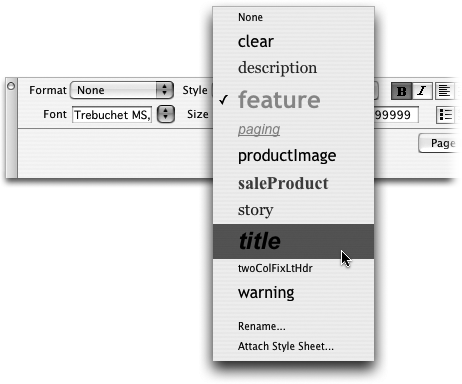
To apply a class style to text, start out by selecting some words. Then, from the Style menu in the Property inspector, select the style name (Figure 4-5). To style an entire paragraph, you need only to place the cursor anywhere inside the paragraph (or heading) before using the Property inspector.
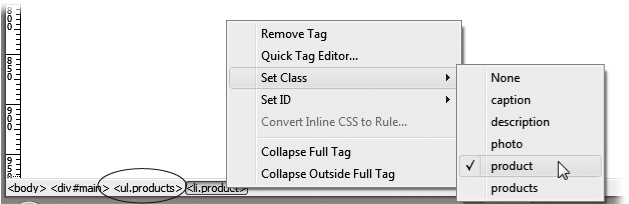
To apply a class style to an object like an image, start by selecting the object (as always, the Tag selector at the bottom of the document window is a great way to select a tag). Then use the Class pop-up menu at the top right of the Property inspector to select the style name.
You can also apply a class style by selecting whatever element you wish to style, choosing Text → CSS Styles, and then selecting the style from the submenu. Or you can right-click (Control-click) the style’s name in the CSS Styles panel, and then, from the pop-up menu, choose “Apply”. Finally, you can also apply a class from the document window’s Tag selector, as shown in Figure 4-6.
When you apply a class style (.company, for example) to a tag, Dreamweaver adds a special class property to the page’s code, like this: <p class="company">. On the other hand, if you apply a class to a selection that isn’t a tag—like a single word that you’ve double-clicked—Dreamweaver wraps the selection within a <span> tag like this: <span class="company">CosmoFarmer</span>. This tag, in other words, applies a style to a span of text that can’t be identified by a single tag.
As you can see, it doesn’t take much code to add a style to a Web page. A single application of a CSS style may add only 15 characters to your document (<p class="company">). When you compare that compact instruction with the equivalent HTML code required to produce the same formatted text (such as <font size="5” face="Georgia, Times New Roman, Times, serif” color="#999933">CosmoFarmer</font>), class styles look downright petite
Un-Applying a Class Style
To remove a style from an object on a Web page, simply select the element, and then, from the Property inspector’s Style menu, select None (see Figure 4-5). You can also choose Text → CSS Styles → None to remove a style from any selection (even nontext elements like images or tables).
Tip
If you’ve applied a class style to a selection of text, you don’t actually have to select all the text to remove the style. Just click anywhere inside it, and then select None from the Property inspector’s Style menu (or choose Text → CSS Styles → None). Dreamweaver is smart enough to realize you want to remove the style applied to the text. (If you applied the style to a tag, Dreamweaver removes the Class property. If you applied the style using the <span> tag, Dreamweaver removes the span tag.)
You can’t, however, remove tag styles from HTML tags. For example, suppose you’ve redefined the <h1> tag using the steps outlined on Creating Styles. If your page has three Heading 1 (<h1>) paragraphs, and you want the third heading to have a different style from the other two, you can’t simply “remove” the <h1> style from the third paragraph. Instead, what you need to do is create a new class style with all of the formatting options you want for that third heading and apply it directly to the <h1> tag (by the magic of CSS, the class formatting options override any existing tag style options—see The Cascade for more on this sleight of hand).
Manipulating Styles
As with anything in Dreamweaver, styles are easy enough to edit, delete, or duplicate; all you need is a map of the terrain.
Editing Styles
While building a Web site, you continually refine your designs. That chartreuse color you assigned to the background of your pages may have looked great at 2 a.m., but it loses something in the light of day.
Fortunately, one of CSS’s greatest selling points is how easy it makes updating the formatting on a Web site.
Tip
Although this section focuses mainly on how to style your text, you also use CSS styles to add back-ground colors, background images, borders, and accurately position elements on page. The next few chapters will show you how to style links, images, tables, forms, and other page elements with CSS.
Dreamweaver provides many ways to edit styles:
Select a style in the CSS Styles panel (Figure 4-1), and then click the Edit Style button to open the Rule Definition window (Figure 4-3). (This is the same window you used when first creating the style.) Make your changes, and then click OK to return to the document window. Dreamweaver reformats the page to reflect any changes you made to styles used in the current document.
Double-clicking the name of a style in the CSS panel also opens the Rule Definition window. Actually, depending on a preference setting—or a setting some-one else may have tweaked while using your computer—double-clicking a style in the CSS panel may display the—eeck!—raw CSS code in Code view. To change this behavior, open the Preferences window (Ctrl+U [⌘-U]), click the CSS Styles category, and then select the “Edit using CSS dialog” button.
Right-click (Control-click) the name of a style in the CSS Styles panel, and then choose Edit from the shortcut menu, which also opens the Rule Definition window. Make your changes to the style, and then click OK to return to the document window.
Note
The properties pane in the CSS Styles panel offers yet another, faster method of editing a style. This advanced technique requires a bit of CSS savvy and is discussed on Font Color.
Deleting a Style
At some point, you may find you’ve created a style that you don’t need after all. Maybe you redefined the HTML <code> tag, and realize you haven’t even used the tag in your site. There’s no need to keep it around, taking up precious space in the style sheet.
To delete a style, make sure the CSS Styles panel is open (Window → CSS Styles), and the All button is highlighted (see Figure 4-1). Click the name of the style you wish to delete, and then press your keyboard’s delete key (you can also click the Trash can icon at the bottom of the panel). You can also remove all the styles in an internal style sheet (as well as the style sheet itself) by selecting the style sheet—indicated by “<style>” in the CSS Styles panel (see Figure 4-1)—and pressing Delete (or clicking the Trash can icon). If you “trash” an external style sheet, however, you merely unlink it from the current document without actually deleting the .css file.
Unfortunately, deleting a class style doesn’t delete any references to the style in your site’s pages. For example, if you’ve created a style called .company and applied it throughout your site, and you then delete that style from the style sheet, Dreamweaver doesn’t remove the <span> tags or class properties that refer to the style. Your pages are still littered with orphaned code like this—<span class="company">CosmoFarmer</span>—even though the text loses the styling. (See how to solve this problem using Dreamweaver’s powerful Find and Replace tool on Find and Replace.)
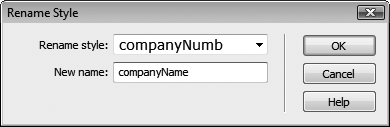
Renaming a Class Style
You can rename a style by selecting it in the CSS Styles panel, pausing a second, and then clicking the name again. This makes the name editable, at which point you can type a new name in its place. Alternatively, you could open the .css file in Code view, and then edit the name. However, just changing the name doesn’t do much good if you’ve already applied a class style throughout your site. The old name still appears in each place you used it.
What you really need to do is rename the style, and then perform a find-and-replace operation to change the name wherever it appears in your site. Dream-weaver includes a handy tool to simplify this process.
To rename a class style:
In the Style menu (or Class menu) on the Property inspector (Figure 4-5), choose Rename.
The Rename Style window appears (Figure 4-7).
From the top menu, choose the name of the style you wish to rename.
This menu lists all class styles available on the current page, including external and internal styles.
Type the new style name in the “New name” box.
You must follow the same rules for naming class styles described on Creating Styles. But, just as when creating a new class, you don’t need to precede the name with a period—Dreamweaver takes care of that.
Click OK.
If the style whose name you’re changing is an internal style, Dreamweaver makes the change. Your job is complete.
However, if the style belongs to an external style sheet, Dreamweaver warns you that other pages on the site may also use this style. To successfully rename the style, Dreamweaver must use its “Find and Replace” tool to search the site and update all pages that use the old style name. In that case, continue to step 5.
If you get cold feet, click Cancel to call off the name change, or click Yes to open the “Find and Replace” window, where you should click Replace All.
One last warning appears, reminding you that this action can’t be undone.
Click Yes.
Dreamweaver goes through each page of your site, dutifully updating the name of the style in each place it appears. This hidden gem is a great tool, and particularly useful if you use the Property inspector to set font colors, types, and sizes. In that case, you can use this feature to rename the nondescriptive class names—Style1, Style2, and so on—with which Dreamweaver starts you off. (The tutorial for Chapter 1 takes you through the steps of renaming styles Dreamweaver creates when you use the Property inspector to format text. See step 10 onPhase 4: Adding Images and Text.)
Duplicating a Style
Dreamweaver makes it easy to duplicate a CSS style, which is handy when you’ve created, say, an HTML tag style, and then decide you’d rather make it a class style. Or you may want to use the formatting options from one style as a starting-off point for a new style. Either way, you start by duplicating an existing style.
You can duplicate a style in two ways. The easiest method is to open the CSS Styles panel (Window → CSS Styles), right-click (Control-click) the name of the style you wish to duplicate, and then choose Duplicate from the shortcut menu.
The Duplicate CSS Rule window appears (Figure 4-8), where you can give the duplicated style a new name, reassign its Type setting, use the “Define in” menu to move it from an internal to an external style sheet, and so on.
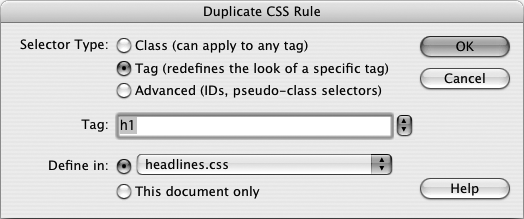
When you click OK, Dreamweaver adds the duplicate style to the page or external style sheet. You can then edit the new style just as you would any other, as described on Un-Applying a Class Style.
Checking Browser Compatibility
As if learning Dreamweaver, HTML, and CSS weren’t big enough challenges, Web designers also have to contend with the fact that not all browsers display CSS in the same way. What looks great in Firefox may look terrible in Internet Explorer 6—and vice versa. Unfortunately, a lot of CSS display problems aren’t the fault of the Web designer or CSS, but are caused by bugs in the browsers. This sad fact of browser life usually forces Web designers to spend lots of time testing Web pages in different browsers to identify and fix problems.
Fortunately for us, Dreamweaver CS3 introduces a new tool to help diagnose CSS problems, and advise you on the best way to fix them, saving you many hours of testing and troubleshooting. The Check Browser Compatibility tool scans a page’s HTML and CSS, and determines if it’s likely that one or more browsers will have trouble displaying your page. It actually checks two things: whether you’ve included any CSS properties or values that one or more browsers don’t understand, and whether the particular combination of HTML and CSS you’re using might trip up a particular browser.
For example, the blink value of the CSS Decoration property (Block Properties) isn’t sup-ported by Internet Explorer or Safari. If you place that value in a style on a page, and then use the Check Browser Compatibility tool, Dreamweaver lets you know those browsers won’t do anything with the blink setting. These types of errors are straightforward: You either change the property (or remove it) so that the style works in all browsers, or live with the fact that the specified browser will ignore the particular style instruction.
The second type of problem is more nebulous. Dreamweaver also warns you of potential browser problems that might arise because of the way you’ve used HTML and CSS. The warning Dreamweaver gives in this case is not as clear-cut as, "That browser doesn’t understand that CSS property;” it’s more like, “That browser does understand that CSS property, but in this one instance, the browser may get it horribly wrong, and mess up your Web page.”
For example, Internet Explorer knows what a bulleted list is; it also knows what the CSS display property is (see List Properties). In most cases, Internet Explorer has no problem displaying both bulleted lists and items styled with a “block” value for the display property. But, in one case—when a link inside a list item has a display value of block—the list items appear with a mysterious extra space below them. The result: an unattractive white space between an otherwise orderly stack of navigation buttons…but this happens only with Internet Explorer. These are the types of obscure problems that make Web designers consider a new career.
Fortunately, the Check Browser Compatibility tool is aware of many of the most common, hair-pulling, browser bugs and can save you lots of time by letting you know when a page might have a problem. To use the tool:
Open a Web page that you’d like to test.
You can open any Web page; if the page has an external style sheet, Dreamweaver checks that as well. You can even open an external style sheet (.css) file and run this command on it to identify CSS properties and values that might not be understood by some browsers.
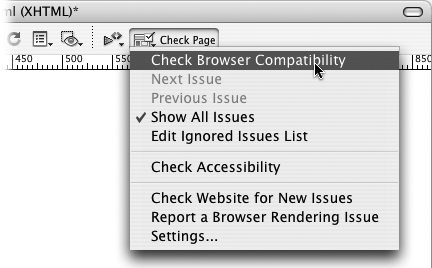
Choose File → Check Page → Browser Compatibility.
Alternatively, you can choose Check Browser Compatibility from the Check Page menu at the top right of the document window (see Figure 4-9). In either case, Dreamweaver analyses the HTML and CSS for the page, and spits out the results in the Browser Compatibility tab of the Results panel (see Figure 4-9).
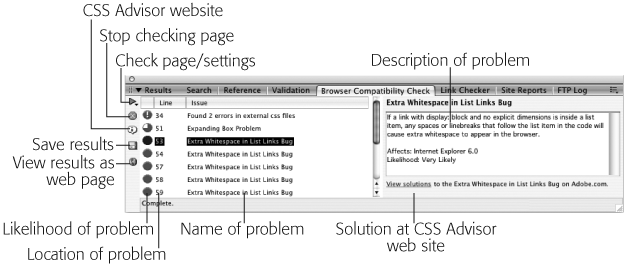
Each issue that Dreamweaver discovers is displayed with an icon indicating the severity of the problem, the line number in the HTML code where the potential problem occurs, and a short description of the issue.
An icon in the far left column of the results panel indicates the type of issue and its likelihood of causing a browser problem. An ! mark indicates an error—a problem with the CSS such as a property or value that’s either invalid or isn’t understood by a particular browser. Problems identified by a red pie graph are warnings, and they represent the likelihood of encountering a problem in a particular browser: A single slice means that yes, the page has something that might cause difficulty for a particular browser, but then again the browser may display the page just fine. You’ll see this icon for an issue that’s rare or crops up only when a very particular set of HTML and CSS are in place (and Jupiter’s rising while Mars descends).
A fully red circle indicates that it’s very likely you’ll see a problem in the specific browser. For example, the Internet Explorer problem related to links, lists, and the display property mentioned previously is nearly a sure thing. If you’ve set up your CSS and HTML in that way, you will see that problem in Internet Explorer.
You should always test any page that shows an error or warning, even if Dreamweaver thinks the problem is only slightly likely to occur.
Figure 4-9. The Check Page menu lets you examine a page and see how compatible the page’s HTML and CSS are with a variety of Web browsers. To change the browsers Dreamweaver uses for its analysis, select the Settings option. A window listing the most common browsers appears, from which you specify the earliest version of the browser you wish to check against. For example, if you don’t worry about Internet Explorer 5 any longer, choose 6 from the menu. Now Dreamweaver will check only for problems that occur in version 6 or later.Select an issue in the Results panel (Figure 4-10).
After selecting an issue in the Results panel, a detailed explanation of the problem appears in the right side of the panel; in addition, you see a list of which browsers this problem may affect, and the likelihood that the problem will crop up. In Figure 4-10, the issue “Extra Whitespace in List Links Bug” is selected. You can see what causes it and see that it affects Internet Explorer 6 (alas, this bug can also crop up in IE 7).
Figure 4-10. Don’t bother with the “Save Results” button in the left edge of the Results panel. Clicking this button creates a hard to read and not so useful XML file that lists the same information you find in the Results panel. (That said, perhaps this file could come in handy if you want to report back to your pet robot about how your day went.)Fix the problem.
Dreamweaver just identifies the problem, it doesn’t fix it. However, Adobe hasn’t left you in the lurch. When you select a problem in the Results panel, a link (“View solutions”) appears at the bottom right of the panel (see Figure 4-10). Clicking that link launches a Web browser, and opens a page on Adobe’s CSS Advisor site. This Web site is an ever-evolving catalog of CSS browser problems and recommended solutions. Dreamweaver’s Results panel integrates with this site, so the link on the panel takes you to a page that addresses the very problem you’re trying to solve. Nice.
In most cases the solution to an issue involves adding an additional style or editing an already created style. You shouldn’t try to make too much sense out of the solutions—many don’t make any technical sense. For example, the solution for the “Extra White Space in List Links” bug is to create two styles (both of which target the link tag inside the affected list), and apply two different display properties (see List Properties): the first style uses the inline-block value, and the second applies the block value. It’s not logical, but it does knock some sense into IE. Most of the solutions are the results of countless hours of trial and error by exasperated and industrious Web designers. Just be thankful the answers to these problems are just a click away.
Text Formatting with CSS
One of the best uses for Cascading Style Sheets is to convert the drab appearance of HTML text into lavishly designed prose. Or, if you like a somber, corporate style, CSS can help with that too. Whatever your design inclination, you can improve the look of your Web text using CSS.
Dreamweaver divides the many CSS properties into eight categories (see Figure 4-3). The most commonly used properties for text are stored in the Type and Block categories, while the List category offers several options for formatting bulleted and numbered lists.
Note
You can apply nearly every CSS property to text. For example, you can use the border property to underline text, and the margin property to remove space between paragraphs. Those properties and others not listed in the Type or Block categories are introduced later in this book (don’t want to blow your circuits too quickly). For now, you’ll learn the most type-centric properties.
Type Properties
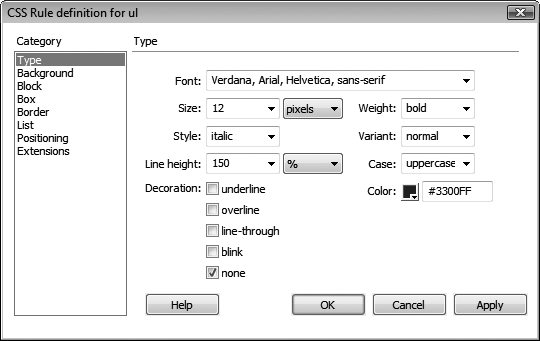
As the name implies, the Type category of the Rule Definition window lets you set formatting options that affect text (see Figure 4-11). Here are the settings you can adjust:
Font. You choose a font for the style from the Font menu. As when using the Property inspector to select a font (see Applying font formatting), you choose from groups of fonts rather than the specific one you have your heart set on. Dreamweaver also lets you create your own “first-choice, second-choice…” font choices from this menu, exactly as described on Creating custom font lists.
Size. Unlike HTML, where font size is defined using a number from 1 to 7, CSS offers a dizzying array of size choices—everything from the screen-dependent pixel to picas, points, and more. Most of these aren’t relevant to designing pages that display on a computer screen. After all, a monitor doesn’t really understand the concept of an inch—even if your display is set to 72 dots per inch, 72 dots may occupy a half inch, an inch, or more depending on the screen’s resolution (which you can change from 800 x 600 to 1600 x 1200 on the same monitor). The same goes for centimeters and millimeters. The bottom line? Skip ‘em. In general, as described on Font Size, stick to pixels, ems, and percentages.
Pixel values are useful for dictating exact sizes on the screen; many Web designers adore pixel values because they make text display consistently between different browsers and operating systems. However, people with Internet Explorer 6 and earlier on Windows can’t increase or decrease the size of text sized in pixels (a real pain, if your vision isn’t the best).
Note
This isn’t entirely true. You can tweak Internet Explorer to allow resizing of pixel-sized text, but you have to change some of the default settings of the browser. That’s something most people would never do.
An alternative to pixels are ems or percentages, which are both relative measurements based on the default text size of the browser viewing the page. Ems and percentages are functionally the same for text, so you can use either one and get the same results: 100% is the same as 1em; 90% is the same as .9em; 150% is 1.5em; and so on. Since most browsers display basic text as 16 pixels tall, a font size of 100% (or 1em) would make text 16 pixels tall. However, since an em is a relative measurement, if some visitor changed his default font size to 20 pixels, any text sized to 1 em would appear 20 pixels tall in his browser.
Note
As you get more advanced with CSS, you’ll probably run into some weird problems with em or percentage text sizes due to an advanced concept known as the cascade. The gruesome details begin on The Cascade.
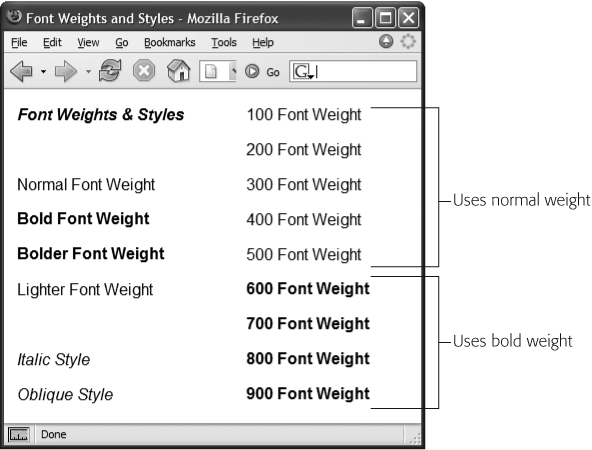
Weight. Weight refers to the thickness of the font. The Weight menu offers 13 different choices. Normal and bold are the most common, and they work in all browsers that understand CSS. See Figure 4-12 for details.
Figure 4-12. CSS was designed so that each of the nine numeric weight values between 100 and 900 would tweak the thickness of fonts that have many different weights (ultrathin, thin, light, extra bold, and so on). 400 is normal; 700 is the same as bold. However, given the limitations of today’s browsers, you’ll notice no difference between the values 100 and 500 (top text in right column). Similarly, choosing any of the values from 600 to 900 just gets you bold text (bottom text in right column). You’re better off keeping things simple and choosing either “normal” or “bold” when picking a font weight.Style. In this peculiar instance, Style means italic, oblique, or normal. Technically, italic is a custom-designed, emphatic version of a typeface, like this. Oblique, on the other hand, is just a computerized adaptation of a normal font, in which each letter is inclined a certain number of degrees to the right. In practical application, there’s no visible difference between italic and oblique in Web browsers.
Variant. This pop-up menu simply lets you specify small-caps type, if you like—a slightly formal, fancy-looking type style much favored by attorneys’ offices.
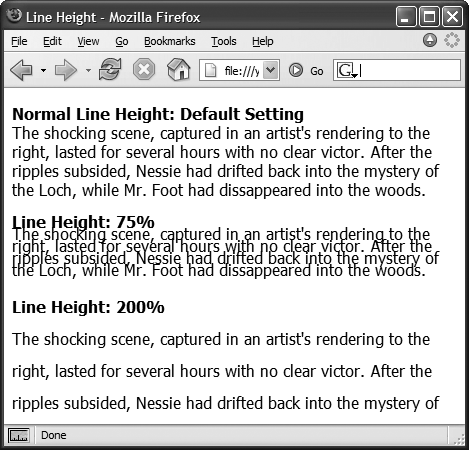
Line Height. Line height, otherwise known as leading (pronounced “LED-ing”), refers to the space between lines of text in a paragraph (see Figure 4-13). To create more space between lines, set the line height greater than the font size. (If you type a number without a % sign, Dreamweaver assumes you’re specifying a line height in pixels. You can change the units of measurement using the pop-up menu to the right of the Line Height field.)
Note
A good approach for line height is to type in a percentage measurement, such as 120%, which is relative to the size of the text (see Font Size); if your text is 10 pixels tall, the space from the base of one line of text to the next is 12 pixels (120% of 10). Now, if you change the size of the text, the relative space between lines remains the same.
“Normal,” the default setting (top paragraph in Figure 4-13), uses a line height that’s slightly larger than the height of the text. You don’t get access to the pop-up menu of measurement units (pixels, points, %, and so on) unless you choose “value” from this menu.
Case. From this menu, you can automatically capitalize text. To capitalize the first letter of each word, choose “capitalize.” The “uppercase” option gives you all-capitals typing, while “lowercase” makes all letters lowercase. The factory setting is “none,” which has no effect on the text.
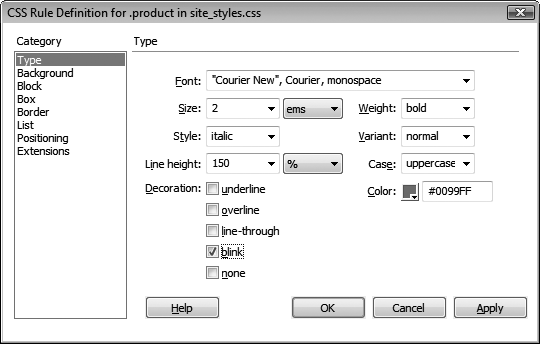
Decoration. This strange assortment of five checkboxes lets you dress up your text, mostly in unattractive ways. "Underline,” "overline,” and “line-through” add horizontal lines below, above, or directly through the affected text, respectively. Turning on "blink” makes affected text blink on and off (but only in a few browsers); unless you want to appear on one of those “worst Web site of the week” lists, avoid it. You can apply any number of decorative types per style, except with “none,” which, obviously, you can’t choose along with any of the other options.
Color. Set the color of the style’s text using Dreamweaver’s color box, which is described on Phase 4: Adding Images and Text.
Block Properties
The Block Properties panel is a hodgepodge of CSS settings that affect how letters and words are displayed (see Figure 4-14).
Tip
To completely remove the space between paragraphs, set the Top and Bottom margin for paragraphs to 0 in the CSS Rule Definition window’s Box category. This setting also helps to remove space that appears before and after headlines. To indent paragraphs, set the Left and Right margin properties.
Despite this category’s name, these properties don’t just apply to block-level elements (paragraphs, headlines, and so on). You can apply a style with these properties to even a single word or two. (The one exception is the Text Align property, which can apply only to paragraphs and other block-level elements.) Here are your choices:
Word spacing. This property helps you clean up text by adding or removing space between words. The default value, “normal,” leaves a normal, single space between words. If you want words in a sentence to be spaced apart like this, then type a value of about 10 pixels. (Choose Value from the first pop-up menu, then the units you want from the second one.) The bigger the number, the larger the gap between words. You can also remove space between words by using a negative number—a great choice when you want to make your pages difficult to read.
Letter spacing. This property works just like word spacing, but governs the space between letters. To add space l i k e t h i s, type a value of about 5 pixels. The result can make long passages of text hard to read, but a little space between letters can add a dramatic flair to short headlines and movie titles.
Vertical alignment. With this property, you can change the vertical placement of an object—such as an image or text—relative to other items around it. For example, you could move text above or below surrounding text to format a trademark, copyright symbol, or footnote reference. The options—“sub” and “super”—can be used in this situation to create subscript and superscript styles. If you wanted to add the trademark symbol to, say, CosmoFarmer ™, then you’d select the letters TM and set the vertical alignment to “super”. In addition, for more accurate control, you can type a value (like 10%) to raise an object above its normal baseline, or a negative value (like -10% or -5 pixels) to move an object down.
Vertical alignment also works with graphics, and designers often use the options top, bottom, and middle with HTML table cells to place content within a cell (see Alignment Properties for details on how that works).
Text align. This property controls the alignment of a block-level element like a paragraph or table. You can choose from among the usual suspects—“left,” “center,” “right,” or even “justify.” (Like the text in this paragraph, justified text has both the left and right edges of the text aligned.)
Use the “justify” option with care, however. Because Web browsers don’t have the advanced controls that page-layout software does, they usually do an awful job of justifying text on a computer screen. The results are often difficult to read, and ugly.
Text indent. This useful option lets you indent the first line of a paragraph. If you enter 15 pixels, each paragraph gets an attractive first-line indent, exactly as in a real word processor.
You can also use a negative number, which makes the first line extend past the left margin of the paragraph, creating a hanging indent (or outdent)—a nice effect for bulleted lists or glossary pages.
Whitespace. This property controls how the browser displays extra white space (spaces, tabs, returns, and so on). Web browsers normally ignore extra spaces in the HTML of a page, reducing them to a single space character between words and other elements (see Nonbreaking Spaces). The “pre” option functions just like the HTML <pre> tag: Extra white space (like tabs, multiple spaces, and carriage returns) in the HTML code appear in the document window (see Preformatted Text for more on this option). The “nowrap” option prevents lines from breaking (and wrapping to the next line) when they reach the end of the browser window.
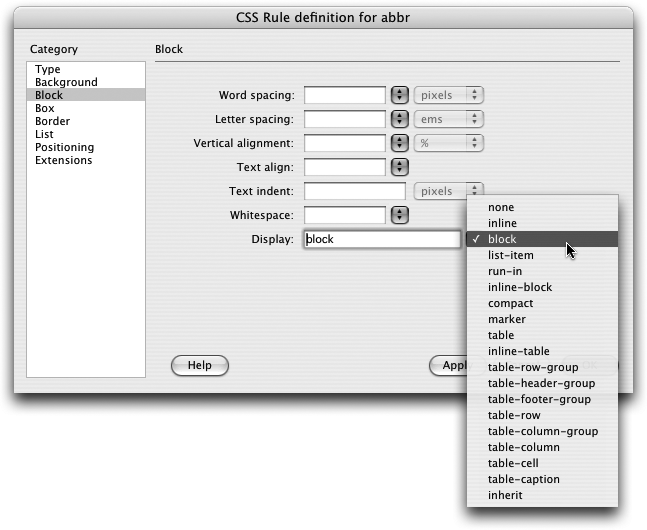
Display defines how a Web browser should display a particular element like a paragraph or a link. You may be overwhelmed by the range of choices for this property—and you may be underwhelmed when you find out that most of these options aren’t supported by most browsers.
The only three options that work reliably across browsers are “none,” “inline,” and "block.” The “block” option treats any item styled with this property as a block—separated from other content by space above and below it. Paragraphs and headings normally appear this way. But you can apply this value to a link (which normally appears inside a block-level element like a paragraph) to turn it into its own block. Normally, you have to click directly on the text or image inside a link to jump to the linked page. But when you set a link’s display to “block,” its entire width—even areas where no text appears—are clickable.
The “inline” option treats the item as though it’s part of the current block or paragraph, so that any item styled with this property (like a picture) flows together with other items around it, as if it were part of the same paragraph. People frequently use this property to take a bulleted list of links and turn it into a horizontal navigation bar. The new Spry Menu bar, discussed on Creating a Navigation Menu, uses this technique to create a horizontal menu. For a good tutorial on this topic, visit http://css.maxdesign.com.au/listutorial/horizontal_introduction.htm.
The “none” option is the most fun: It turns off the display of an item. In other words, any text or item styled with this option doesn’t appear on the page. You can use JavaScript programming to switch this property on and off, making items seem to appear and disappear. In fact, Dreamweaver’s Change Property behavior provides one simple way to do this (see Change Property).
List Properties
To exercise greater control over bulleted and numbered lists, use the CSS options on the List panel of the CSS Rule Definition window (see Figure 4-15).
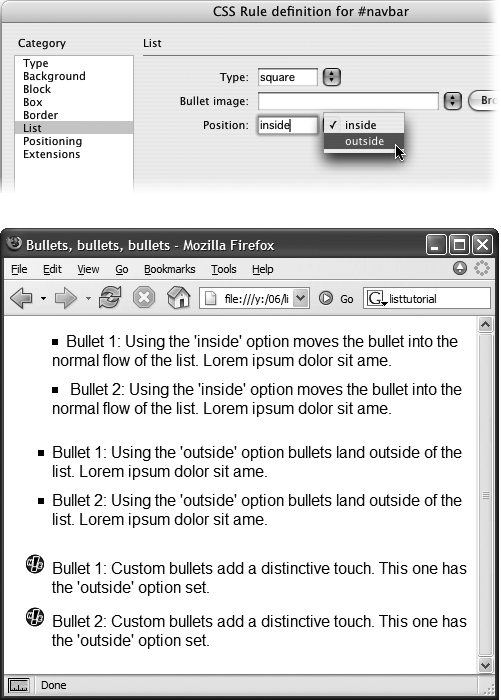
Type. Select the type of bullet you’d like to use in front of a list item. Options include: “disc,” “circle,” “square,” “decimal” (1., 2., 3.), “lower-roman” (i, ii, iii), “upper-roman” (I, II, III), “lower-alpha” (a, b, c), “upper-alpha” (A, B, C), and “none” (no bullet at all).
Bullet image. For the ultimate control of your bullet icon, skip the boring options preprogrammed into a Web browser (like disc, circle, square, or decimal) and supply your own. Click the Browse button, and then select a graphics file from your site folder. Make sure the graphic is appropriate bullet material—in other words, small.
Tip
The Background Image property (see Background image) is a more versatile solution to adding bullet images to a list. Since you can accurately position a background image, you can easily tweak the placement of your bullets. Here’s how to do it: Create a style for the <li> tag (or a class style that you apply to each <li> tag); make sure you set the List property type to “none” (this hides the bullet); set the background image to your graphical bullet; and play with the background position values (Editing Graphics). Playing with the pad-ding values (Understanding the Box Model) helps position the text relative to the image.
Position. This property controls how the bullet is placed relative to the list item’s text. The “outside” option places the bullet outside the margin of the text, exactly the way bulleted lists normally appear on a Web page. “Inside,” on the other hand, displays the bullet within the text margin, so that the left edge of the bullet aligns with the left margin; Figure 4-15 should make the effect clearer.
Tip
If you want to adjust the amount of space Web browsers normally use to indent lists, set the left padding property (see Understanding the Box Model) to 0, and set the left margin (see Understanding the Box Model) to the amount of indent you’d like. Sometimes you want no indent at all—for example, if you’re creating a list of links that should look like buttons, not bulleted items—set both the left padding and left margin to 0 (while you’re at it, set the bullet type to “none” as described above).
Cascading Style Sheets Tutorial
In this tutorial, you’ll practice the basic techniques required to create and edit styles. Make sure you grasp the fundamentals covered in this tutorial: you’ll be building lots of style sheets in the other tutorials throughout this book using these same methods. For this tutorial, you’ll create an external style sheet for formatting pages on the CosmoFarmer Web site.
Note
Before getting started, download the tutorial files from www.sawmac.com/dwcs3/. See the Note on Phase 1: Getting Dreamweaver in Shape for more details.
Setting Up
Once you’ve downloaded the tutorial files and opened Dreamweaver, define a new site as described on Setting Up a Site: Name the site Introducing CSS, and then select the Chapter04 folder (inside the MM_DWCS3 folder). (In a nutshell: choose Site → New Site. In the Site Definition window, click the Advanced tab, type CSS Tutorial into the Site Name field, click the folder icon next to the Local Root Folder field, navigate to and select the Chapter04 folder, and then click Choose or Select. Finally, click OK.)
To ensure that your files preview correctly, you need to make sure that a particular Dreamweaver preference is set:
Press Ctrl+U (⌘-U) to open the Preferences window.
Alternatively, you can use Edit → Preferences (Dreamweaver → Preferences on Mac).
Select the CSS Styles category, and make sure the “Open CSS files when modified” checkbox is turned on.
When this setting is turned on and you edit a CSS style in an external style sheet, Dreamweaver opens the CSS file. You can undo any changes you make to that style sheet.
Make sure the “Edit using CSS dialog” button is selected.
This option makes sure the friendly and easy-to-use Rule Definition window appears whenever you double-click a style listed in the Styles panel, making it easy for non-CSS experts to edit and update styles.
Click OK to close the window.
Now you’re ready to create a style sheet.
Creating an External Style Sheet
In this example, you’ll create a collection of styles for the feature stories on the CosmoFarmer Web site.
Choose File → Open; click the Site Root button (at the lower left of the open file window).
The Site Root button, new in Dreamweaver CS3, is a handy tool. It automatically takes you to the local root folder for the site you’re currently working on, saving you the effort of having to manually navigate to that folder.
Double-click the file named confessions.html.
The Web page contains a feature story from the CosmoFarmer site. The page’s text is plain, boring-looking HTML, so you’ll use CSS to spiff it up.
To start, you’ll create a style for basic paragraphs and create an external style sheet at the same time.
If the CSS Styles panel isn’t already open, choose Window → CSS Styles.
The CSS Styles panel opens. Windows users can use the keyboard shortcut, Shift+F11, to open the panel. (Mac people, you aren’t out of luck. You can define any keyboard shortcut you’d like to open this panel. See Keyboard Shortcuts for details.)
At the bottom of the CSS Styles panel, click the New Style (+) button (see Figure 4-1).
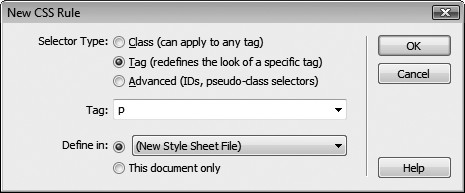
The New CSS Rule window opens (see Figure 4-16). You’ll first pick the type of style you wish to create.
Figure 4-16. If you’ve already attached an external style sheet to a page, you can select its name from the “Define in” menu. That way, Dreamweaver adds the new style to that file. Your other option, which is what you’re doing at this point in the tutorial, is to create the new style sheet when you first create a style.This lets you create a style for a particular HTML tag—in this case, the <p> tag. In other words, you’re going to create a formatting rule that applies automatically to every basic paragraph.
Type p into the Tag box, or choose “p” from the menu.
Next you’ll choose where you’ll store the CSS code for this new style—in this case, in an external style sheet.
In the “Define in” section of the New CSS Rule window, click the New Style Sheet File button as pictured in Figure 4-16. Click OK.
The Save Style Sheet File As dialog box appears. You’re about to create the file—an external style sheet—that stores the styles for this page.
Type feature.css in the File Name box (the Save As field on the Mac), and then click Save to save the file.
Cascading Style Sheet files always end in .css; that’s how Web servers and browsers can tell what kind of file they are.
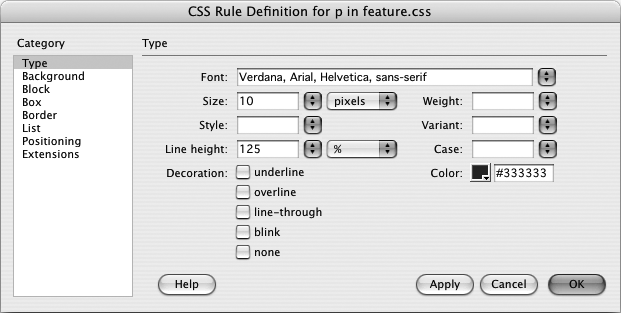
Having created the external style sheet, you can now create the first style, as suggested by the sudden appearance of the CSS Rule Definition window. You’ll choose a font, set a size, and assign a color to the <p> tag.
From the Font menu, choose “Verdana, Arial, Helvetica, sans-serif”; in the Size box, type 10; and, next to the Color field, click the color selection box and choose a dark gray color (#333333 works well.)
Next, you’ll add a little leading (space between lines of text) to the paragraph to make the page easier to read.
In the “Line height” box, type 125, and then, from the menu to the right, select “%.”
The CSS Rule Definition window should look like Figure 4-17. Percentages are just one of the many different methods CSS can use to define the size of type, leading, margins, and borders.
Click Apply.
You can preview the look of a tag style without closing the CSS Rule Definition window—just drag the window out of the way.
Click OK.
The CSS Rule Definition window closes, and the paragraphs of text on the page are now formatted according to the style you just created. (If you think the text looks a bit small, you’re right. You’ll fix that when you learn how to edit styles later in this tutorial.) As you may have noticed, you didn’t have to select the text to apply this style. Since it’s an HTML tag style, it’s applied automatically wherever the tag appears on the page.
Figure 4-17. You can set the CSS equivalents of HTML text formatting options from the Type category of the CSS Rule Definition window. (If storm cloud gray doesn’t do anything for you, click the color box and choose a color you prefer.)Look at the CSS Styles panel. Notice that the new style sheet, feature.css, appears (make sure the All button is selected). Click the + (arrow on the Mac) to the right of feature.css to expand the list. There’s the p tag style you just created.
Now, you’ll create a style for the subheads of the story, which are <h2> tags.
On the CSS Styles panel, click the New Style button.
The New CSS Rule window opens. The Tag button is already selected, and the menu in the “Define in” option lists the new external Style Sheet—feature.css. In other words, Dreamweaver will add the new style to this external style sheet. All you need to do now is identify which tag you want to redefine.
In the Tag box, type h2, or choose “h2” from the menu, and then click OK.
The CSS Rule Definition Window appears.
From the Font menu, choose “Georgia, Times New Roman, Times, serif”; in the Size box, type 22.
Time for a little color and other formatting.
In the Color box, type #D60000; from the Weight menu select “normal”.
Click Apply to preview the new headline style. Although the bright red headlines stand out, you’ll add a bit of sophistication with a border line.
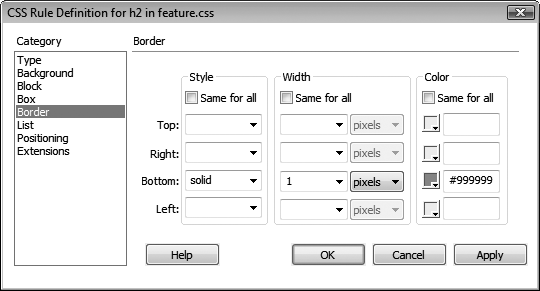
In the category list, click Border.
The CSS Rule Definition window now displays all the properties used to put a border around a style. You can control each border individually, or use the same line style for all four edges. In this case, you’ll add a line to just the bottom of the headline.
Click to turn off all three “Same for all” checkboxes. For the Bottom border, choose “solid” from the Style menu, type 1 in the Width box, and type #999999 in the color box.
The window should now look like Figure 4-18.
Click OK.
The window closes, and the three subheads appear with their new formatting. Now, you’ll explore more text formatting properties to improve the look of the top headline. But first, make sure you save your work.
Choose File → Save All.
The Save All command can be a real lifesaver when working with external style sheets. Even though you’re looking at and working on the Web page (confessions.html), each time you add a style, Dreamweaver updates the external style sheet file (feature.css). So most of the work you’ve done so far in this tutorial has caused Dreamweaver to update the feature.css file. Unfortunately, the regular keyboard shortcut to save a file, Ctrl+S ( ⌘-S), saves only changes to the Web page (the file currently visible to you). Make sure you visit the Save All command frequently, otherwise if Dreamweaver or your computer crashes, you could lose all the changes you’ve made to an external style sheet. (You can even set your own keyboard command for the Save All command. See Keyboard Shortcuts for details.)
Using CSS Text Properties
So far, the text formatting you’ve used is run-of-the-mill stuff: font, size, color (although the underline for the heading 2 was pretty exciting). In this section of the tutorial, you’ll tap into more powerful CSS properties that add design elements that you could never create with HTML alone. The first step is creating a new style.
On the CSS Styles panel, click the New Style button.
Make sure the Tag button is selected, and the “Define In” option lists the feature.css file. In the Tag box, type h1, or choose “h1” from the menu, and then click OK.
The CSS Rule Definition Window appears. You’ll start by adding a new option to the list of fonts Dreamweaver offers.
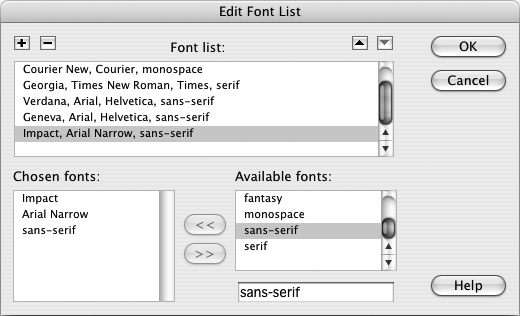
From the Font menu, choose Edit Font List.
The Edit Font List window appears (see Figure 4-19). You’re now going to create your own custom list of fonts (for a full description of this process, see Creating custom font lists).
Scroll down the list of available fonts in the lower right of the window, until you see Impact listed. Select Impact, and then click the << button.
Impact is added to the list of “Chosen fonts.” Impact is a bold, headline font that you’ll find on nearly all Windows and Mac systems. But because it might not be available to everyone, you’ll add a couple more options (see Fonts for the reasoning behind this font choice setup).
Locate Arial Narrow in the list of fonts and press the << button; scroll to the bottom of the font list, select “sans-serif,” and then press the << button one last time.
The Edit Font List should look like Figure 4-19.
Figure 4-19. You can easily make your own set of custom fonts for your Web pages. Just be aware that the fonts will show up only when a visitor who views your site also has the same fonts installed on her computer (see Fonts for details).Click OK to close the window, and then select your newly created font set from the Font menu in the Rule Definition window.
Type 28 in the Size box, and #152D6A in the Color box; choose Uppercase from the Case menu; choose Normal from the Weight menu.
The headline is now entirely uppercased (usually a bad choice for text, but this setting can have a lot of impact for short headlines). Setting the Weight to normal removes the bold usually applied to headlines. Because Impact is already a bold font, leaving it bold doesn’t do anything. (There’s a bug in the Safari Web browser as well that prevents the Impact font from even appearing when bold is also applied.)
Press the Apply button and look at the headline “Confessions of an Apartment Farmer” if you want to see how this style is shaping up.
In the Rule Definition window, select the Block category. Type 5 in the “Word spacing” box, and select pixels from the menu to the right; type 1 in the “Letter spacing” box, and select pixels from the menu.
Adding space between the words and letters in this headline gives it a more sophisticated look. While Dreamweaver CS3 does display letter spacing in Design view, it doesn’t display word spacing. So you’ll need to preview the page to see the real effect.
To finish off this style, you’ll add a line under the headline just like the heading 2 style you created earlier.
Repeat steps 17 and 18 on creating_an_external_style_sheet, but make the border 2 pixels wide, and make its color #B2F511.
Click OK to finish this style, and then press F12 (Option-F12) to preview the page.
Dreamweaver reminds you that you need to save the CSS file as well; click the Yes button, and you’ll finally see the new design in your Web browser.
Editing a Style
The paragraph text is a tad too small, so you’ll edit the <p> tag style you just created to make the text bigger:
Return to Dreamweaver. At the top of the CSS Styles panel, make sure the All button is selected.
This displays all the style sheets attached to this page (in this case, just feature.css).
If it isn’t already, expand the list of styles in the feature.css Style Sheet by clicking the + icon (arrow on the Mac) to the left of “feature.css.”
This lists all of the styles you’ve added to the external style sheet.
In the list, double-click “p”.
This reopens the Define Rule window—the same window you used when you first created the style.
In the “Size” row, replace 10 with 13, and then press the Apply button.
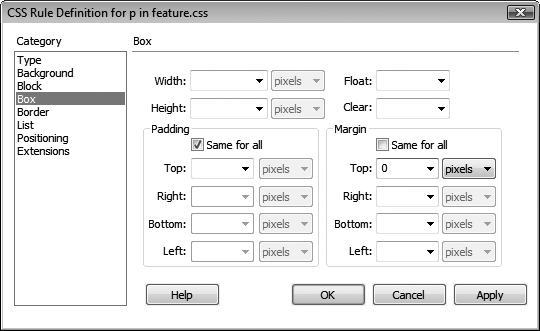
The font size of the paragraph increases to 13 pixels. Another problem with this design is the large gap between the subheads and the paragraphs following them. The heading 2 paragraphs (“A Green Thumb in the Big City,” for example) introduce the paragraph that follows. Removing the gap that appears between the heading and the following paragraph would visually tie the two together better. To make this change, you must first remove the margin above each paragraph.
Select Box in the left hand list of CSS categories. Turn off the “Same for all” checkbox in the Margin area; type 0 in the Top box.
The window should now look like Figure 4-20. This action should remove any space that appears above paragraph tags.
Click OK to close the Rule Definition window and finish editing the style.
The space between the headlines and the paragraphs hasn’t changed a bit. What gives? Paragraphs and headlines have space both above and below. The space you’re seeing is actually the bottom margin of the h2 tag.
Top and bottom margins have a peculiar feature: They don’t add up like 1+1=2. In other words, the bottom margin of the heading 2 isn’t added to the top margin of the paragraph in order to calculate the total space between the two blocks of text. Instead, a Web browser uses the margin with the largest value to determine the space between paragraphs (a lot of text layout programs, including word processors, share this property).
For example, say the h2 tag has a bottom margin of 12 pixels, while the paragraph following has a top margin of 10 pixels. The total space between the two isn’t 22 pixels (10+12)—it’s 12 pixels (the value of the larger margin). So, if you remove the top margin of the paragraph, the gap between the two blocks of text is still 12 pixels (the h2’s bottom margin). That’s exactly what’s happening here, so you need to modify the h2 style’s bottom margin to close the gap.
In the CSS Styles Panel, double-click the h2 style.
The Rule Definition window for the h2 style appears. As with the p tag style, you must go to the Box category to adjust margins.
Click the Box category in the left hand list of CSS categories. Turn off the “Same for all” checkbox in the Margin area and type 5 in the “bottom” box.
Removing the whole margin will make the h2 and paragraph seem too close together. 5 pixels is a good amount.
Click OK; choose File → Save All.
You can remove space between the lead headline and the paragraph that follows by repeating steps 7–9 for the h1 tag style.
Creating a Class Style
Now you’ll create a style to format the copyright notice at the bottom of the page. It’s inside a regular paragraph (<p> tag), so it’s getting all its formatting from the p tag style. Here’s an instance where you’d like to style a single paragraph, without affecting the other paragraphs on the page. A class style is perfect for this kind of specific styling task.
On the CSS Styles panel, click the New CSS Style button (+).
The New CSS Rule window opens. This time, you’ll create a class style rather than an HTML tag style.
Click the Class radio button. In the Name box, type .copyright (with a period before it).
Class styles always begin with a period.
Since you want to add the style to the external style sheet, you don’t need to do anything else in this dialog box; Dreamweaver already proposes storing it there.
Note
Some beginners think that whenever you create a new style, you also need to create a new external Style Sheet. On the contrary, you can—and should—store more than one style in a single external style sheet. In fact, if you’re creating a set of styles for an entire site, put them all in the same external style sheet.
Click OK.
The CSS Rule Definition window appears. You’ll add a few new properties to make this style look different from the rest of the text on the page.
In the size box, type 11; from the Weight menu, choose “bold”; and in the Color box, type #666666.
The smaller text and lighter gray color make the copyright less prominent on the page; the bold setting makes it stand out from the other paragraphs. Finally, you’ll add a line above the copyright to separate it from the page.
In the category list, click Border.
The CSS Rule Definition window now displays all the properties used to put a border around a style. In this case, you’ll add a line above the copyright notice.
Click to turn off all three “Same for all” checkboxes. For the Top border, choose “dashed” from the Style menu, type 1 in the Width box, and type #999999 in the color box.
There are several different styles of borderlines, including dashed (see Adding Borders for the different types of borders). Lastly, you’ll add a little space between the border and the text.
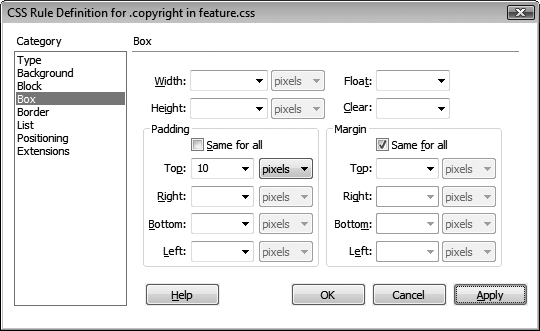
Click the Box category in the left hand list of CSS categories. Uncheck the “Same for all” box in the Padding area, and then type 10 in the Top box.
The window should look like Figure 4-21. While margins control the space between elements (like the gap between paragraphs), padding controls the space from the content to the content’s border. In other words, adding padding pushes a border further away from the text (or other content) you’re styling. You’ll learn more about padding on Background Images.
Figure 4-21. The difference between padding and margin is subtle, but important. Both properties add space around the content that’s being styled. And if you don’t have a background color, image, or border, both properties pretty much act the same. However, when you do have a background color, image, or border, padding adds space between the content and the edge of the backgrounds and borders. Margins add space outside of the border and background.Click OK.
The Rule Definition window closes, but this time, nothing’s changed in the document window. Unlike HTML tag styles, class styles don’t show up anywhere until you apply them by hand.
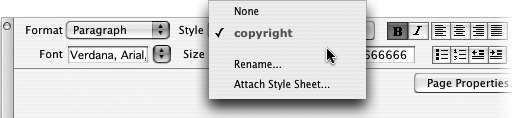
Scroll to the bottom of the page, and select the last paragraph with the copyright notice.
This action sets you up for applying the style. You can also just click anywhere inside the paragraph (without selecting any text) to apply a class style to it.
From the Property inspector’s Style menu, choose “copyright” (see Figure 4-22).
Boom—the copyright notice suddenly changes size, color, and grows a line above it. Magic. You may also notice that the copyright still uses the same font as the other paragraphs. In fact, it has “inherited” that font type from the p tag style—you’ll learn about inheritance, an advanced CSS concept, on More about CSS.
Attaching an External Style Sheet
Now that you’ve created these styles, you may be wondering how you can use them on other pages—after all, that’s the beauty of external style sheets. Once created, it’s a simple process to add a style sheet to other pages in the site.
Choose File → Save All; close the confessions.html Web page.
You’ll need to open a new Web page to attach the external style sheet.
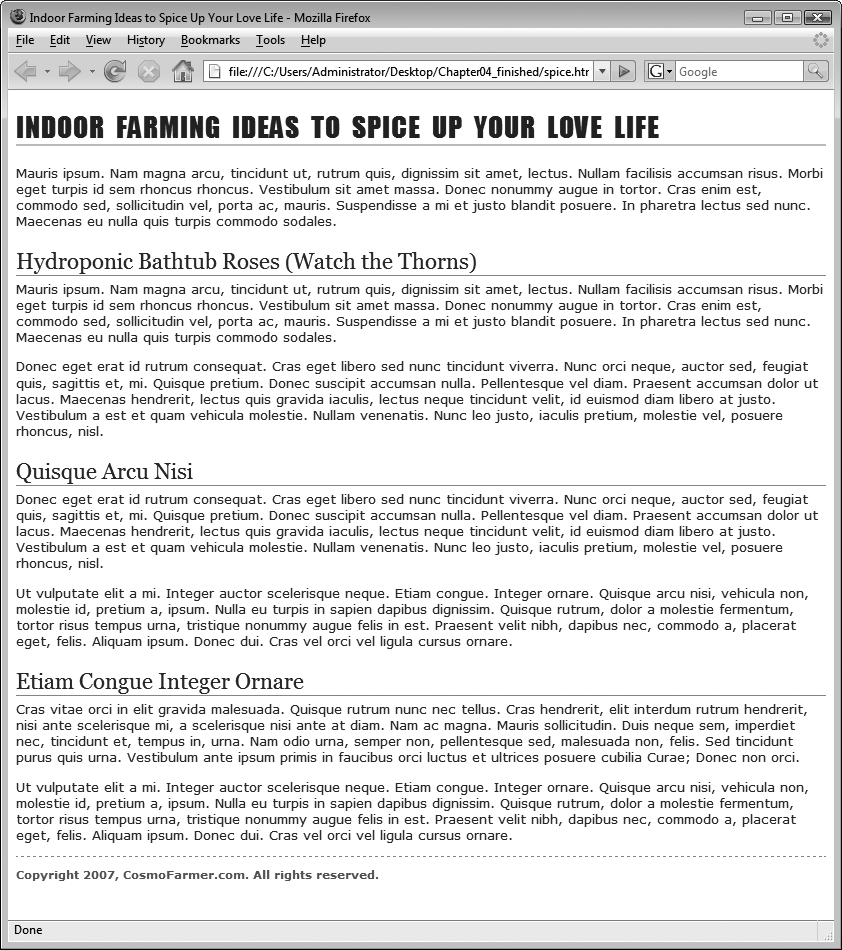
Choose File → Open. In the Chapter04 folder, double-click the file spice.html.
This is another story for the CosmoFarmer Web site. It has no formatting yet, so you’ll attach the external style sheet you just created.
On the CSS Styles panel, click the Attach External Style Sheet button (see Figure 4-1).
The Link External Style Sheet window appears.
Click the Browse button.
The Select Style Sheet dialog box appears.
Navigate to the Chapter04 folder (or click the Site Root button), and then select the feature.css file.
Don’t forget the Site Root button. It appears on every window in which you need to save, open, or select a file. It’s a great shortcut to make sure you’re working in the correct folder for your site.
Click OK (Choose on Macs) to insert the path to the Link External Style Sheet window.
You can ignore the other settings in the Attach External Style Sheet window for now (they’re described on Styling for Print).
Click OK to attach the style sheet to the page.
Dreamweaver instantly formats the headlines and main text of the story. Pretty cool—and very efficient. You need to apply the .copyright class style only to the last paragraph on the page.
Scroll to the bottom of the page, and then click anywhere inside the paragraph with the copyright notice.
Next you’ll add a style to the tag.
From the Style menu on the Property inspector, select “copyright” (see Figure 4-22).
This page is done. Time to view it.
Press F12 (Option-F12 on Mac) to preview the page.
Dreamweaver probably prompts you to save your files; go ahead and do that. The finished page should look something like Figure 4-23. If you’d like to com-pare your finished product to the professionally completed version, you’ll find those pages in the Chapter04_finished folder in the tutorials folder.
Note
You may need to hit your browser’s refresh button to see the most recent changes you made to the style sheet. This is one problem related to designing with external style sheets—they’re often cached by a Web browser (see Download Statistics). Normally that’s a good thing—it means visitors to your site have to wait only once for the file to download. But when you’re in the midst of a design, frantically switching back and forth between Dreamweaver and a Web browser preview, the browser might retrieve the older version of the external style sheet that’s saved in its cache, rather than the newly updated file on your computer.
You can work around this problem: Open the Preferences window (Edit → Preferences [Dreamweaver → Preferences on Mac]); select the “Preview in Browser” category, and then turn on the “Preview using temporary file” box. Now, when you preview the page, Dreamweaver actually makes a temporary file on your computer that incorporates both the CSS and HTML of the page. This defeats a browser’s cache so that now you’re seeing the very latest changes. This setting has the added benefit of stopping Dreamweaver’s annoying “You must save your file before previewing” dialog box each time you preview a page.
Get Dreamweaver CS3: The Missing Manual now with the O’Reilly learning platform.
O’Reilly members experience books, live events, courses curated by job role, and more from O’Reilly and nearly 200 top publishers.

