Once you create styles, you can easily apply them. In fact, if you created HTML tag styles, you don’t need to do anything to apply them: Their selectors (see the box on Anatomy of a Style) automatically dictate which tags they affect.
You can apply class styles to any selection in the document window, whether it’s a word, an image, or an entire paragraph. In fact, you can apply a class style to any individual HTML tag, such as a <p> (paragraph), <td> (table cell), or <body> tag. You can even select just a single word within a paragraph and apply a style to it.
Start out by selecting some words. Then, from the Property inspector, select the style name—you can do this either in HTML mode, in which case you select the name from the class menu (Figure 4-5 top), or in CSS mode, where you use the Targeted Rule menu (Figure 4-5 bottom).
To style an entire paragraph, triple-click within the paragraph (or heading) to select it, and then use the Property inspector to select a style. When you style an entire paragraph, you’re actually telling Dreamweaver to apply the style to the <p> tag. In that case, Dreamweaver adds a special class property to the page’s code, like this: <p class="company"> (for a class style named .company).
Tip
You can also add a class to an entire paragraph or heading simply by clicking anywhere inside the paragraph, and then, from the Property inspector, choosing the class name—just make sure you don’t select a piece of text, or Dreamweaver applies the style just to the selected text, not the entire paragraph.
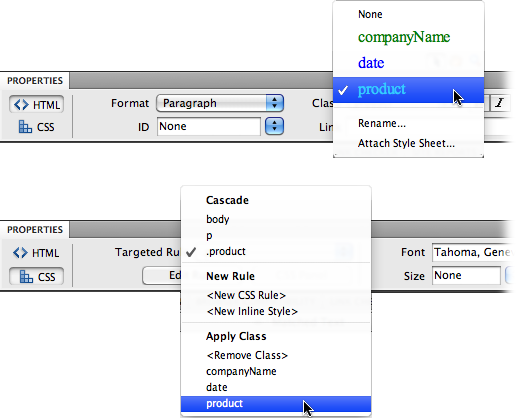
Figure 4-5. The easiest way to apply a class style is through the Property inspector. For non-text elements like images or tables, a Class menu appears in the top right of the Property inspector. For text, you apply class styles by using either the Class menu if the Property inspector is in HTML mode (top) or the Targeted Rule Menu when it’s in CSS mode (bottom). Dreamweaver uses only the bottom section of the Targeted Rule Menu (the stuff below “Apply Class”) to add (or remove) a class from a text selection. The other items listed let you create new styles, or view the styles that apply to the selection.
On the other hand, if you apply a class to a selection that isn’t a tag—like a single word that you double-click—Dreamweaver wraps the selection within a <span> tag like this: <span class="company">Chia Vet</span>. This tag, in other words, applies a style to a span of text that Dreamweaver can’t identify by a single tag.
To apply a class style to an object (like an image or a table), start by selecting the object. As always, the Tag selector at the bottom of the document window is a great way to select a tag. Then, at the top right of the Property inspector, use the Class pop-up menu to select the style name.
You can also apply a class style by selecting whatever element you wish to style, choosing Format→CSS Styles, and then, from the submenu, selecting the style. Or you can right-click (Control-click) the style’s name in the CSS Styles panel, and then, from the pop-up menu, choose Apply. Finally, you can also apply a class from the document window’s Tag selector, as shown in Figure 4-6.
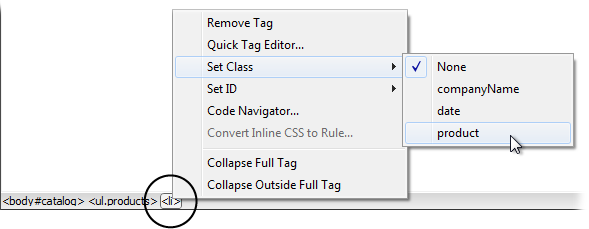
Figure 4-6. You can apply a class style directly to a tag by using the document window’s Tag selector at the bottom of the window. Just right-click (Control-click) the tag you wish to format (circled), and then, from the Set Class submenu, select a class style. In addition, the Tag selector lets you know if a tag has a class style or an ID style applied to it. If so, the style’s name is added at the end of the tag. For example, in this figure, the body has an ID of catalog applied to it (<body#catalog>) and an unordered list has the class products applied to it (<body.products>).
To remove a class style from text on a web page, select the text, and then, from the Property inspector (see Figure 4-5), choose None from the Class menu (HTML mode) or <Remove Class> from the Targeted Rule menu (CSS mode). To remove a class style from another object (like an image), select the object, and then, from the Property inspector’s Class menu, choose None. You can also choose Format→CSS Styles→None to remove a style from any selection (even non-text elements like images or tables).
Note
If you applied a class style to a selection of text, you don’t have to select all the text to remove the style. Just click anywhere inside it, and then select None from the Property inspector’s Class menu or <Remove Class> from the Targeted Rule menu. Dreamweaver is smart enough to realize that you want to remove the style applied to the text. (If you applied the style to a tag, then Dreamweaver removes the Class property. If you applied the style using the <span> tag, Dreamweaver removes the <span> tag.)
You can’t, however, remove tag styles from HTML tags. For example, suppose you redefined the <h2> tag using the steps outlined on Creating Styles. If your page has three Heading 2 (<h2>) paragraphs, and you want the third heading to have a different style from the other two, you can’t simply “remove” the <h2> style from the third heading. You need to create a new class style with all the formatting options you want for that third heading, and then apply it directly to this particular <h2> tag. (By the magic of CSS, the class formatting options override any existing tag style options—see More about CSS for more on this sleight of hand.)
To apply an ID to text, just select the text, and use the ID menu in the HTML mode of the Property inspector (see Figure 4-5 top). Since you can apply each ID name only once per page, the menu lists only unassigned IDs—IDs that exist in your style sheet but that you haven’t applied to a tag on the page.
For non-text elements, select the element, and then, in the Property inspector, type the ID name into the ID field. (For some elements, the ID field is unlabeled, but you can always find it on the far left of the Property inspector.)
You can also use the Tag selector as outlined in Figure 4-6. Just use the Set ID menu in the contextual menu that appears when you right-click (Ctrl-click) the tag.
Tip
The Tag selector tells you whether you applied an ID to a tag by including the # symbol with the ID name. In Figure 4-6, for example, body#catalog indicates that the <body> tag has an ID named “catalog” applied to it.
Whenever you apply an ID to a tag, Dreamweaver adds a bit of HTML code to your page. For instance, an ID style named #copyright applied to a paragraph looks like this in the HTML: <p id="copyright"> (this is just like the “class” property that’s added when you use class styles, as described on Using Styles).
To remove an ID from a text element, select the text, and then, from the Property inspector’s ID menu, select None. For non-text elements, select the element, and then, in the Property inspector’s ID field, delete the ID name.
Whenever you create an external style sheet while adding a style to a web page, Dreamweaver automatically links it to the current document. To use its styles in a different web page, you must attach it to the page.
To do so, open the web page to which you want to add the style sheet. Then, on the CSS Styles panel, click the Attach External Style Sheet button (see Figure 4-1). (If the CSS Styles panel isn’t open, choose Window→CSS Styles or press Shift-F11.)
Tip
You can also use the Property inspector to attach a style sheet. Just select “Attach Style Sheet” from the Class menu in HTML mode (see Figure 4-5 top).
The Attach External Style Sheet window appears (see Figure 4-7). Click Browse. In the Select Style Sheet File dialog box that appears, navigate to and double-click the CSS (.css) file you wish to attach to the document. If the style sheet you select is outside the current site—for example, it’s in another one of your websites—Dreamweaver offers to copy the style sheet file into your site’s root folder; click Yes.
The Attach External Style Sheet window provides two other options: how to attach the style sheet, and what type of “media” you want the styles to apply to. The “media” setting is optional and dictates when Dreamweaver applies the styles. For example, you can one set of styles for when you print a page and another set for when a browser displays it. You’ll find in-depth information on media types and how to use them on Previewing Media Styles in Dreamweaver.
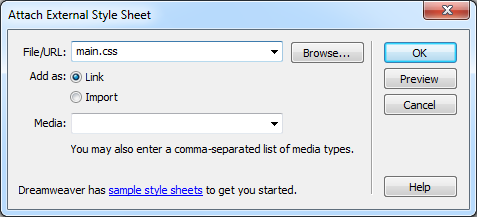
Figure 4-7. Adding styles from an external style sheet is as simple as browsing for the file, and then clicking OK. Choosing a media type is optional.
When you attach an external style sheet, you can either “link” it or “import” it. These two choices are nearly identical; they’re simply two different ways to attach an external style sheet to a web page. The method preferred by the pros, link, is also Dreamweaver’s suggested choice. Save yourself an extra click, and just go with the link option.
Tip
You can preview the effect of the style sheet on your page by clicking the Preview button in the Attach External Style Sheet window.
After choosing your options, click OK, and Dreamweaver adds the necessary HTML to the head of the web page, and automatically formats any tags in the document according to the style sheet’s tag styles. You see the formatting changes take place in the document window immediately after you attach the style sheet.
If the style sheet contains class styles, on the other hand, you don’t see their formatting effects until you apply them to an element on the page, as described on Using Styles.
Get Dreamweaver CS5: The Missing Manual now with the O’Reilly learning platform.
O’Reilly members experience books, live events, courses curated by job role, and more from O’Reilly and nearly 200 top publishers.

