Clicking a link usually loads a Web page into the browser window. But what if you want to link not only to a Web page, but to a specific spot on the page? See Figure 4-8 for an example.
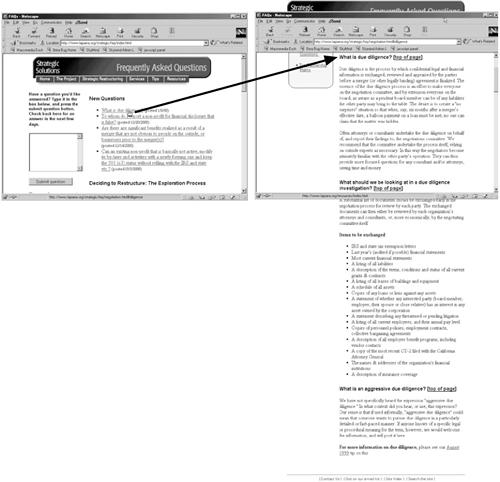
Figure 4-8. Imagine a Web page with a list of Frequently Asked Questions. To make it easier to update, all of the answers are listed together on a single page. Adding anchors to the Answers page makes it possible to jump from the Questions page to the precise location of the answer on the Answers page.
Introducing the anchor link, a special link type that’s designed to auto-scroll to a particular spot on a particular page.
Creating an anchor link is a two-step process: First add and name an anchor, thus identifying the destination for the link; then add a link that goes to that named anchor. For instance, in the Answers page example of Figure 4-8, you would place a named anchor at the beginning of each answer.
To create a named anchor:
In the document window, click where you want to insert the named anchor.
The named anchor is the place where you want the link to jump to.
Insert a named anchor.
You can do so using any of three methods. Using a menu: Choose Insert→Named Anchor. From the keyboard: Press Ctrl+Alt+A (Option-
 -A). In the Insert bar: Select the Common tab and click the Named Anchor icon—see Figure 4-6.
Type the name of the anchor in the Insert Named Anchor dialog box.
Each anchor on a page should have a unique name, something short and easy to remember. No spaces are allowed, however. Punctuation is illegal, too; stick to letters and numbers. If you violate any of these regulations, Dreamweaver will remind you with an error message.
Click OK to insert the named anchor.
You’ll see a gold shield with an anchor on it at the point where you created the anchor. Click this icon to show the anchor’s name in the Property inspector. (If you don’t see it, refer to page 106 for details on hiding and showing anchors.)
The anchor icon is the key to removing or editing the anchor later: Just click the icon and press Delete to get rid of it, or click it and change its name in the Property inspector. (Deleting the name in the Property inspector deletes the anchor from the page entirely.)
Creating a link to a named anchor is not all that different from linking to a Web page. Once you’ve created and named an anchor, you can link to it from within the same Web page, or from a different page.
To link to an anchor on the same page:
In the document window, select the text or image you want to make into a link.
For example, drag across some text, or highlight a graphic.
In the Property inspector, type # , followed by the name of the anchor into the Link field.
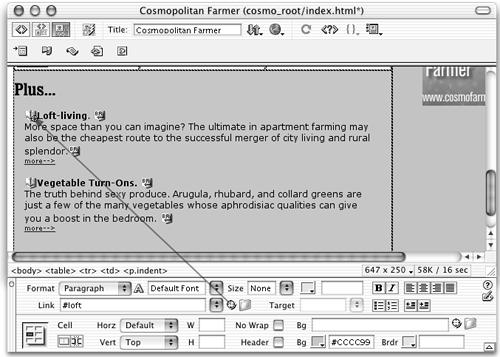
Alternatively, use the Point-to-File icon, as shown in Figure 4-9.
Figure 4-9. You can use the Property inspector’s Point-to-File icon to link to a named anchor on a page. Simply select some text or an image in an open page. Then drag the Point-to-File icon to an anchor on any other open document to set the link. If you can’t see the shield icons that mark anchors, see page 106 for instructions on how to make them visible.
The # sign indicates that the link goes to a named anchor. In other words, if you wish to link to an anchor named directions, the link would be # directions.
You can also link from one Web page to a particular location on another Web page in your site. The process is the same as linking to an anchor on the same page, except that you have to specify both the path to the Web page and the name of the anchor:
In the document window, select the text or image you want to turn into a link.
In the Link field of the Property inspector, type or choose the URL or path of the page you wish to link to.
You can use any of the methods described above: browsing, point-to-file, or typing the path.
Unfortunately, if you browse to select the linked file, Dreamweaver doesn’t display any anchors on that page, so you need to perform one extra step to link to the anchor:
Click at the end of the URL or path. Type #, followed by the name of the anchor.
What you see in the Link field should something look like this: contact.html#directions.
A named anchor isn’t visible in a Web browser; it’s represented in Dreamweaver as an anchor-on-a-gold-shield icon. As with other invisible elements—line breaks, for instance—you can make named anchors show up by choosing View→Visual Aids→Invisible Elements, or choosing Visual Aids→Invisible Elements from the Options menu in the toolbar (see page 18). (If anchors still don’t appear, visit the Preferences window and make sure the Anchor box is turned on, as shown in Figure 1-8.)
Get Dreamweaver MX: The Missing Manual now with the O’Reilly learning platform.
O’Reilly members experience books, live events, courses curated by job role, and more from O’Reilly and nearly 200 top publishers.

