Chapter 4. Music
The Droid 2 does a great job of playing and managing music, so much so that you may no longer feel the need to carry around another music player. It includes an excellent built-in music player and manager, and a 3.5 mm headset stereo jack that you can connect to headphones or external speakers. Read this chapter and get ready to plug in and turn up the volume.

Where to Get Music
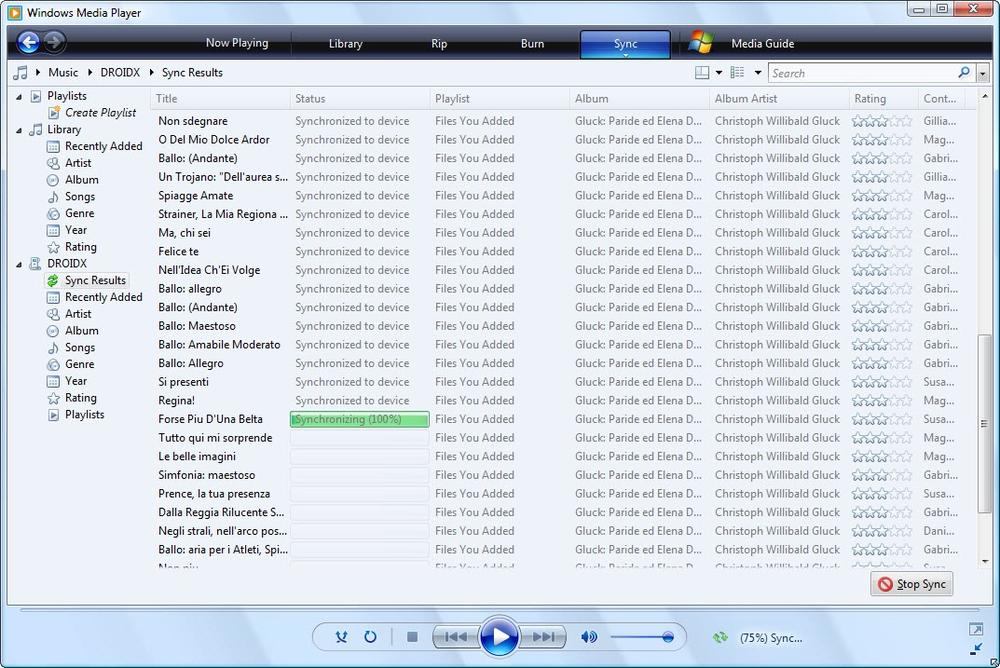
Before you play music, of course, you first need to get it onto your Droid 2. The best way to do that is to transfer music from your PC or Mac to your Droid 2 using Windows Media Player. For details about how to do that, turn to Chapter 12.
You can also buy or download music via Droid 2 apps, such as the Amazon MP3 app that comes with the Droid 2. Tap the Amazon MP3 icon from the Application Tray to run the app. You’ll need to have an Amazon account to pay for and download music, so set one up first if you want to use the app.

Using the Music App
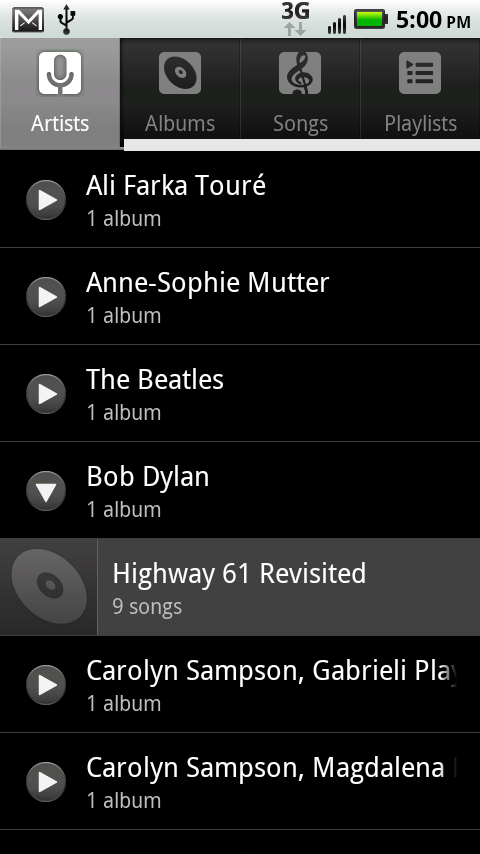
You play and manage your music using the Droid 2’s Music app. Tap the Music icon in the Application Tray to launch it. The app organizes your music by four lists, through which you scroll like all other scrollable lists on the Droid 2:
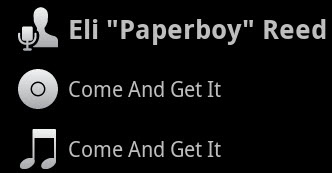
Artists. Lists every singer, composer, and band in your collection, and number of songs or albums you have from that particular artist.
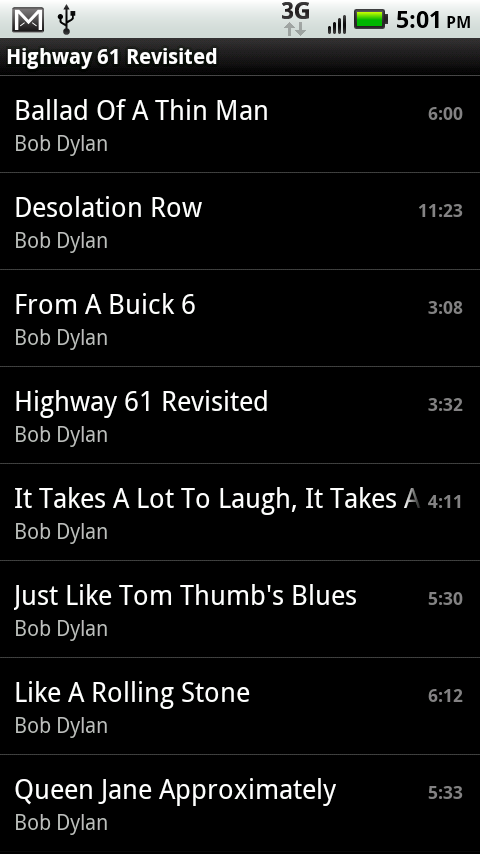
Tap the artist’s name, and you see a list of all of her albums, including the album name, and how many songs are included from that album, even if that’s only one song. Tap an album’s name, and you see a list of all the songs it contains. To play any song, tap it.
Note
At the bottom of the screen, you see the name of the song you’re playing, or if you’re not playing a song, the last song you played. At its right is a green Play button—tap it to play the song again. The green Play button also shows up in the list next to the artist, song, and album that you’re playing or previously played.
Albums. Lists all the CDs (albums) in your music collection. If a thumbnail picture of the album is available, you see it next to the album listing. Each album lists its name and its singer, composer, band, or orchestra. Tap the album to see a list of all the songs in the album. To play any song, tap it.
Songs. An alphabetical list of every song in your music collection. It shows the song name and artist. Tap a song to play it.
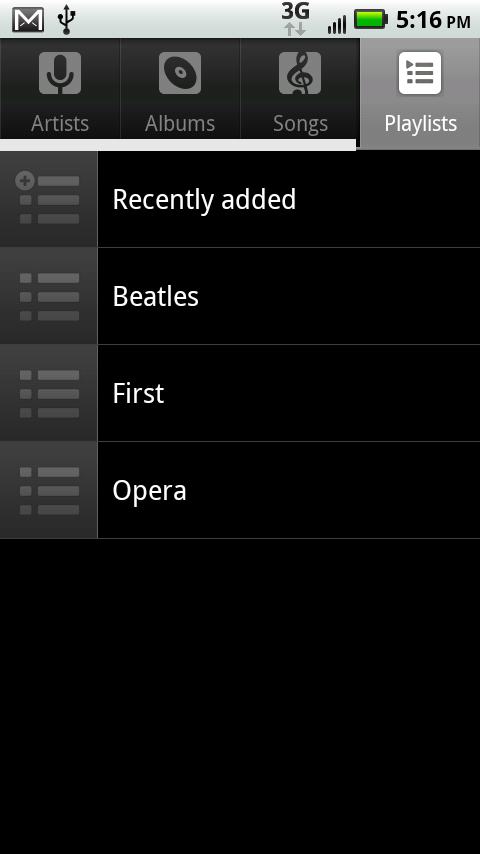
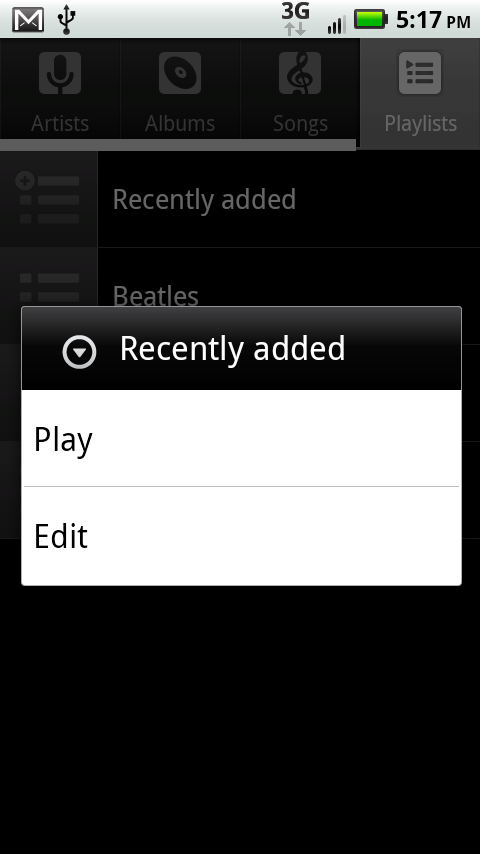
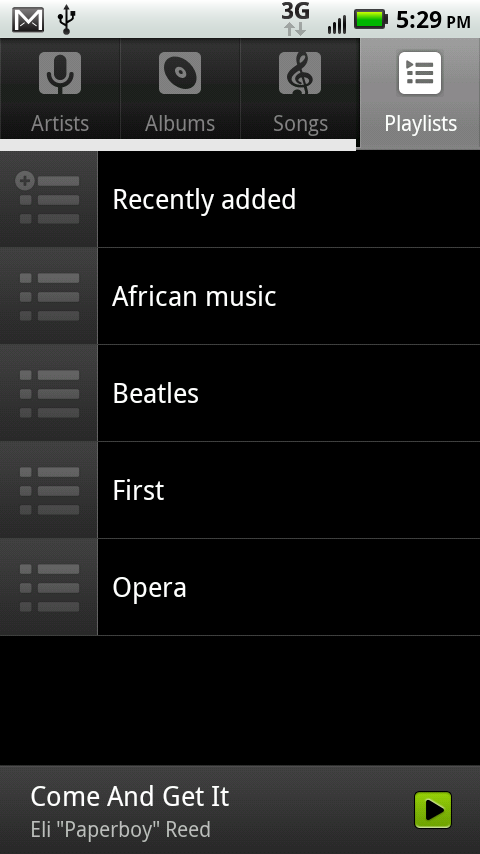
Playlists. Here’s where you’ll find all your playlists—groups of songs that you’ve put together in a specific order for a specific reason. You might have several party playlists, a playlist of songs you like to listen to while you work, another for working out, and so on.
To see the contents of a playlist, tap the playlist. Tap any song to play it from that point until the end of the playlist. To play the entire playlist, hold your finger on the playlist, and then tap Play.


Choosing from the 3D Gallery
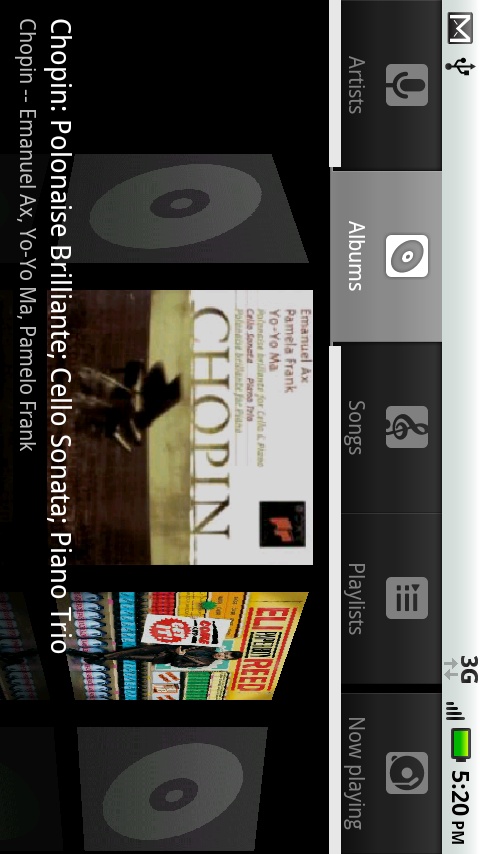
Choosing music from a list works just fine, but it’s not very exciting. The Droid 2’s 3D Gallery makes choosing an album as visual and intuitive as flipping through a rack of colorful CD covers. When you’re in the Albums list, simply rotate the phone 90 degrees, and the screen flips to a horizontal view. You see all your album covers in what appears to be three-dimensional space. Scroll and flick through them, and they move into focus and recede in turn. Tap an album cover to see and play the album’s songs.
Playing Music
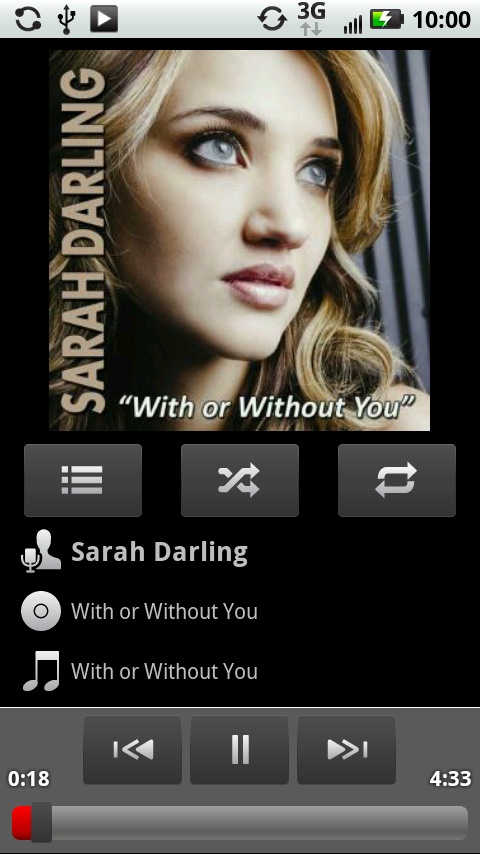
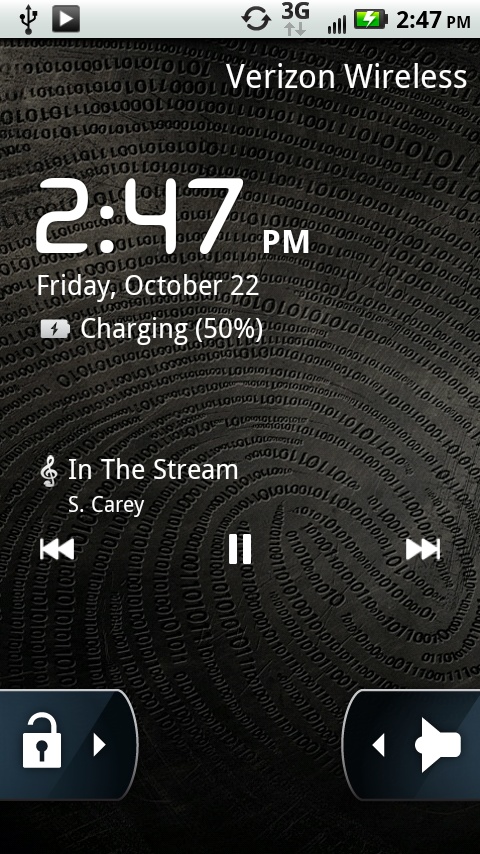
Tap a song to play it, and a screen appears loaded with information, and all kinds of controls and widgets.
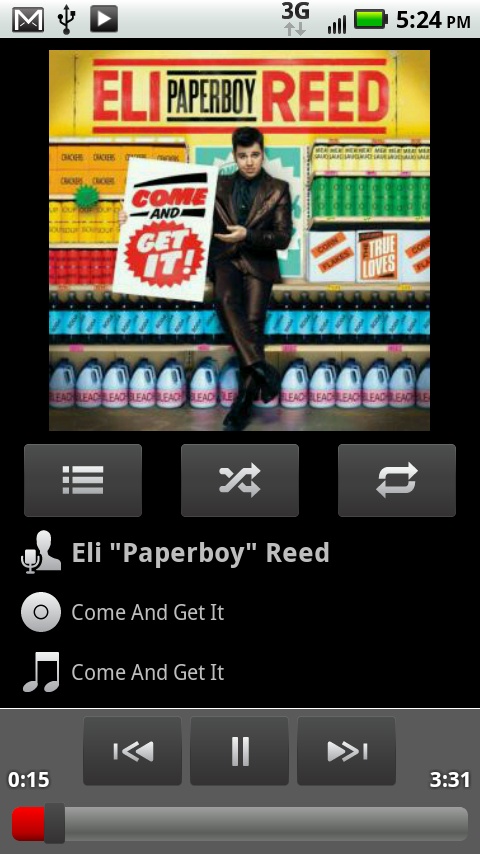
Among other controls, you’ll find:
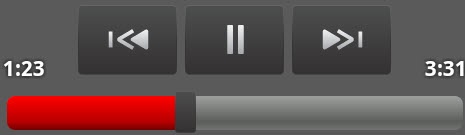
Pause/Play. When music is playing, the button looks like this
 . Tap it to pause, and the button then looks like this
  . Tap it to resume playing.
Previous, Next. These controls work just as you’d expect. Tap
 to skip to the beginning of the song you’re playing or, if you’re already at the beginning, to skip to the previous song. Tap next
  to skip to the next song.
Hold down one of the buttons, and you rewind or fast-forward through the song. As you hold, the speed of rewind or fast-forward accelerates. You’ll hear the music as you speed forward or backward, sounding like a bizarre foreign language.
The length of the song is displayed on the right side of the controls, and the amount of time already played is on the left.
Slider. At the bottom of the screen is a slider that shows you the progress of the song. It includes the total length of the song, and how much of it you’ve already played. Move the slider to go to a specific location in the song.
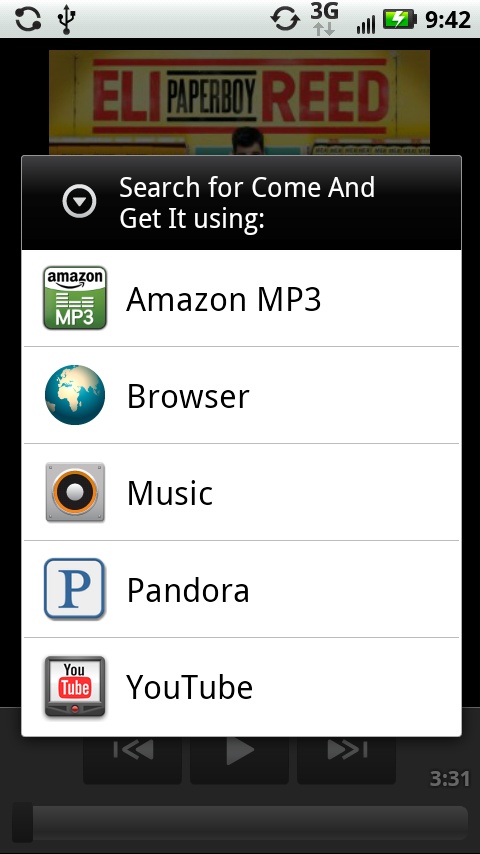
Song and album information. Here you’ll find the name of the singer, the name of the album, and the song being played.
That information is “live”: Hold your finger on any item, and a screen pops up that lets you search for it in the Amazon MP3 app, in your browser, in the Music app, on YouTube, or on any other music-related app on your Droid 2, such as the Pandora music-streaming service. If you like the current artist, for example, you can get more information about him, or more of his music.
Playlist or album. Tap
 , and if the song is part of a playlist, or if it’s part of an album in which you have other songs, you’ll come to the playlist or album listing of individual songs. From here, you can tap any other song to play it.
Shuffle. The Droid 2 music player normally plays the songs in your playlist or album in order, from first to last. Tap the shuffle button to have the songs in your current album or playlist play in a random order—you’ll never know what’s coming next.
Tap the Shuffle button
 and it turns green, and you get a notification that Shuffle is on. Tap it again to turn it off.
Note
Don’t confuse the Shuffle and Party Shuffle features. For information about Party Shuffle, see More Music Options.
Loop. Can’t get enough of the current album or playlist? Tap the loop button
 , and it plays endlessly from beginning to end, from beginning to end, from beginning to…you get the idea. When you tap it, the loop button turns green. Tap it again, and it plays the current song continuously. The loop button displays the number 1
  to show you that you’re in this mode. Tap the button again to turn looping off.
Album cover/visualization. Want to feel psychedelic and groovy when listening to music? Tap the picture of album art at the top of the screen, and it turns into what’s called a visualization—psychedelic patterns and colors that change as your music plays.

Creating Playlists
When you transfer music from your PC or Mac to your Droid 2 using Windows Media Player, you also transfer over your playlists. But you’re not dependent on that to create playlists—you can also create and edit them from your Droid 2.
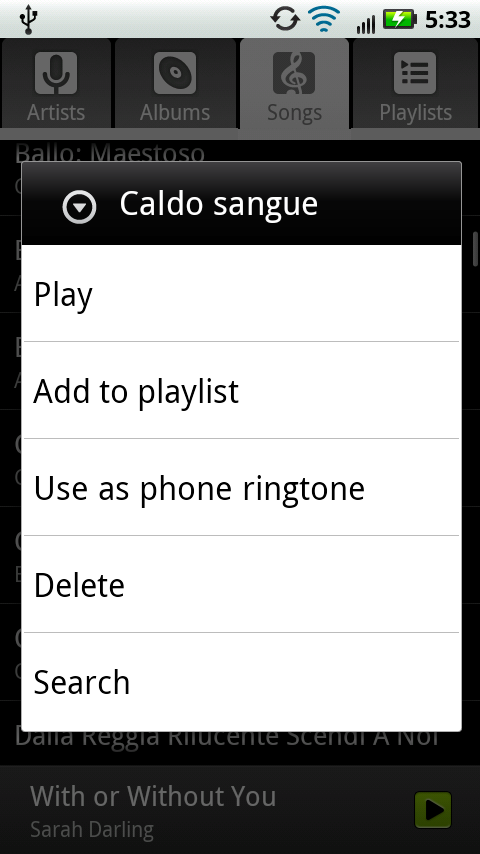
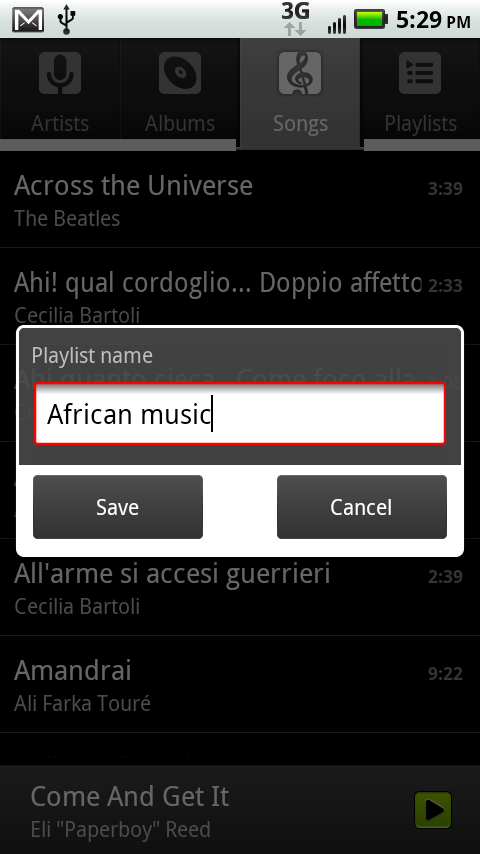
To do so, hold your finger on a song, artist, or album, and from the screen that appears, tap “Add to playlist”. A new screen appears. To add the song to your current playlist or an existing playlist, tap the appropriate button. To create a new playlist and add this song to it, tap New, type a name for the playlist, and then tap Save. The playlist is created with the song, album, or all of the artist’s songs on it. The playlist then appears in the Playlist area.
Once you’ve created a playlist, you have the following ways to edit it:
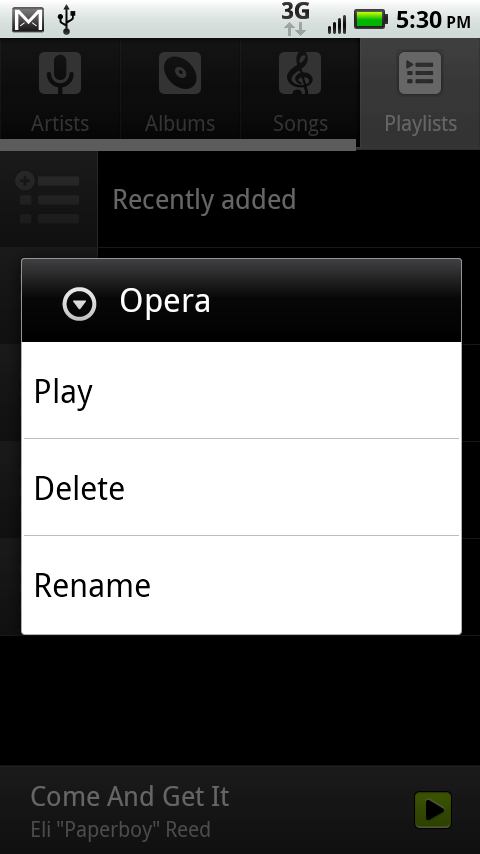
In the playlist listings area, hold your finger on the playlist. From the screen that appears, you can delete it or rename it—or play it, although it’s simpler to just tap the listing to play it.
When you’re displaying the list of the songs in a playlist, hold your finger on a song, and from the menu that appears, select “Remove from playlist”. The song disappears from the playlist but remains on your Droid 2.
Note
If you’re displaying a list of songs in an area other than the playlist area—for example, in the Songs or Albums listings—when you hold your finger on the song, the “Remove from playlist” option doesn’t appear.
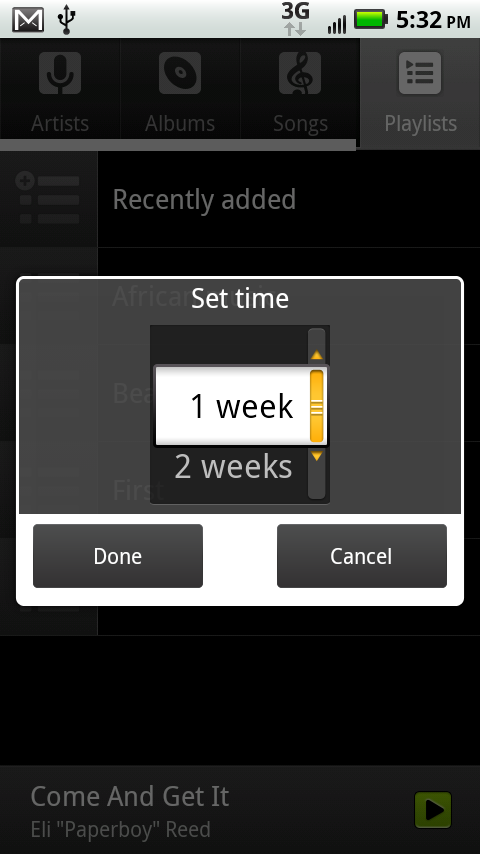
Even if you haven’t imported or created any playlists, the Droid 2 creates one automatically for you—“Recently added”. As the name says, that’s a list of all the music you’ve most recently added to your Droid 2. The “Recently added” playlist can get extremely long if you often add music, so you can change the length of time the Droid 2 uses to compile the playlist. Press and hold the playlist and then tap Edit. Use the slider to select any time period from 1 week to 12 weeks, and then tap Done.
More Music Options
The Droid 2’s Music app gives you plenty of options that aren’t immediately obvious. The best way to find them all is to press the Menu key wherever you are—whether you’re playing a song or browsing the library in the Artists, Albums, Songs, or Playlists areas. When you press the Menu key, a menu pops up at the bottom of the screen with some combination of these options:
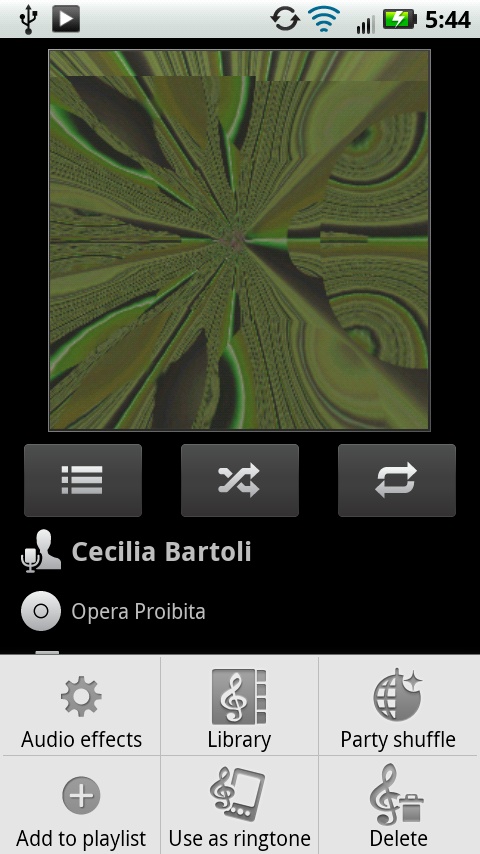
Audio effects
 . Tap this option from the menu, and you can add cool audio effects to your music—like surround sound. When you tap “Audio effects”, two choices appear, one for wired stereo devices, and one for the phone speaker. You get to add more effects if you’ve plugged your phone into a stereo device, which includes speakers as well as headphones.
Tap “Wired stereo devices”, and then tap “Enable audio effects”. The most important setting here is “Effects profile”, which lets you choose from a variety of effects, including giving your Droid 2 the sound of a home theater, a live stage show, or a 3D stereo. If you want, you can also choose Custom to create your own settings.
If you choose 3D Stereo, Home Theater, or Live Stage, the other settings on the “Wired stereo devices” screen—Surround and Equalizer—can’t be changed, since they’re controlled by the effects profile. However, if you choose Custom for your effects profile, you can change the surround sound type and select a different kind of equalizer.
Note
An equalizer changes the emphasis given to certain parts of a piece of music—emphasizing bass, treble, or voice, for example. On the Droid 2, the equalizer settings are self-explanatory: for example Extreme Bass, Brilliant Treble, Balanced, and so on.
If you tap “Phone speaker” instead of “Wired stereo devices”, your choices are much more limited. You’ll be able to change only the equalizer.
Party shuffle
 . Similar to the Shuffle feature, with one big difference: It shuffles and plays music from your entire music collection, not just from the current album or playlist. When you choose “Party shuffle”, the Shuffle icon changes to show you what looks like a globe with a plus sign on it. Tap that icon to turn off “Party shuffle”. You can also turn off “Party shuffle” by pressing the Menu key and then tapping the “Party shuffle” button, which now reads “Party shuffle off”.
Add to playlist
 . Adds the current song or album to a playlist, and lets you create a new playlist, as detailed back on Creating Playlists.
Use as ringtone
 . Don’t like the choice of ringtones on your phone? No problem! You can set any song in your library as your ringtone—your phone will play the beginning of the song instead of a ringtone. Just tap this option when it appears.
Delete
 . Deletes the song or album from your music collection.
Note
The Droid 2 can’t play DRM-protected music purchased on another device and then transferred to the Droid 2. DRM stands for digital rights management, and it’s a technique used to limit the distribution of for-pay music files. So if you transfer a DRM-protected file to your Droid 2, it won’t play.
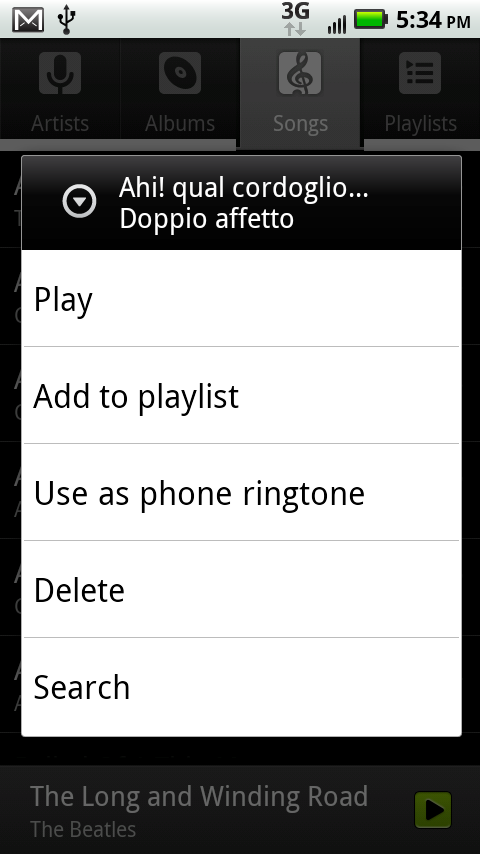
Press and Hold Options
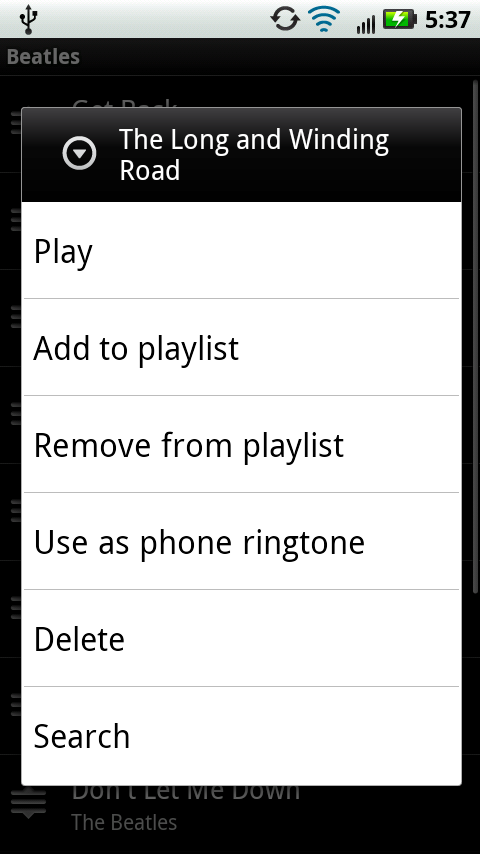
Another way to access many of the options described in the previous section is to hold your finger on a song or album listing. A screen pops up with a list of options. If you’re holding your finger on a song, you can play the song, add it to a playlist, use it as a ringtone, delete it, or search for more information about it. When you hold your finger on an album, you get the same choices, except you can’t add the entire album as a ringtone.
Note
You can also play music by using your Droid 2 as an FM radio, or by using an app that streams music wirelessly to your Droid 2. To use your Droid 2 as an FM radio, tap the FM Radio icon in the Application Tray, and you’ll run the Droid 2’s built-in radio tuner. There are many apps that play streaming music to your Droid 2, but everyone seems to love Pandora. Find it by searching for Pandora in the Market (Using Market). If you already have a Pandora account that you use to play music from the Web, all your stations will already be set up when you use the Droid 2’s Pandora app.
Using Your Droid 2 While Playing Music
Because the Droid 2 is built for multitasking, you can play music even when you’re doing something else with your Droid. Open the Music app, start the music, and then feel free to use other apps and features. The music keeps playing. While music is playing, a small button appears in the Notification bar ![]() . Drag down the Notification bar and tap the song playing, and you’ll be sent back to the Music app.
. Drag down the Notification bar and tap the song playing, and you’ll be sent back to the Music app.
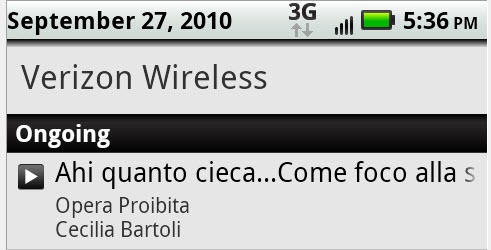
Even when your phone is locked, you can still listen to music and control the music player. If you were listening to music before the Droid 2 locked itself, it keeps playing.
Wake up the Droid 2 (Location & Security), and you can see the player’s controls even though the phone remains locked. You can pause and play music as well as skip to the next song or go back to a previous song.
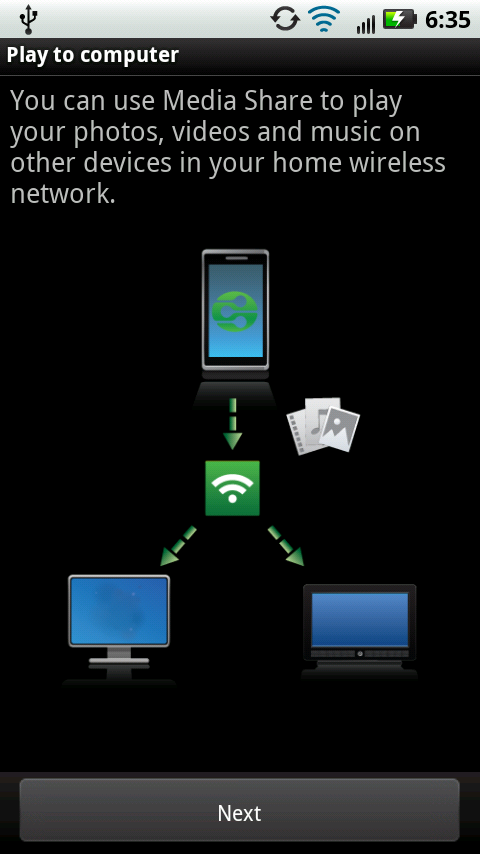
Playing Music and Media on Other Devices
The Droid 2 lets you share, view, and play music, videos, and photos using a standard called DLNA, short for Digital Living Network Alliance. The Droid 2 is DLNA compliant, which means that it can share media with other DLNA devices, such as TVs, computers, and mobile devices. When you buy a device, look in the documentation to see if it’s also DLNA compliant. You can also look for this logo on packaging or documentation: ![]() .
.
Note
If you’re not sure whether you have a device that’s DLNA compliant, go to www.dlna.org. In addition to finding out more information about DLNA, you can do a search for your device and see if it’s a DLNA one.
Here’s just some of what you can do with your Droid 2 and other DLNA devices:
Stream your music, videos, and photos from your Droid 2 to a DLNA device, such as a TV, PC, Xbox, or Playstation 3.
Transfer music files from your phone to your PC.
Transfer pictures from your Droid 2 to your PC.
Stream videos from the Droid 2 to your TV.
Browse any videos you have stored on your PC using the Droid 2.
There are more possibilities and permutations with your Droid 2 and DLNA; this section can’t cover them all. Set up your Droid 2 as described in this section, and then follow the information that appears onscreen.
To do any DLNA magic, your Droid 2 needs to be connected to a network or a DLNA device—which means a Wi-Fi connection or a USB cable connection. In fact, when you connect to a Wi-Fi hotspot, or connect your Droid 2 to a computer, you may see this icon ![]() in the Notification bar. Pull it down, and you’ll see that there’s a DLNA device somewhere near you.
in the Notification bar. Pull it down, and you’ll see that there’s a DLNA device somewhere near you.
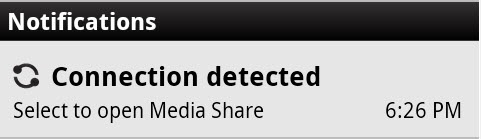
You set up DLNA and then share media with DLNA using the Media Share app. Launch it by tapping the notification, or by tapping the Media Share app in the Application Tray. You’ll come to the initial setup screen.
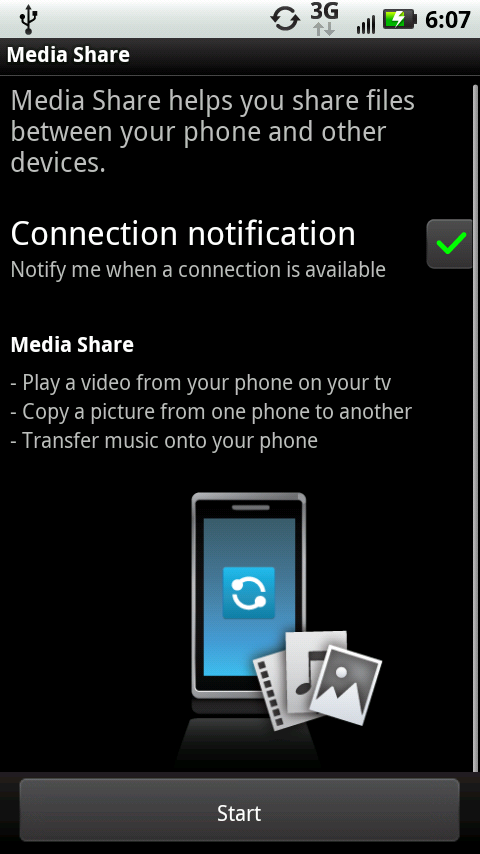
To begin setup, tap Start. If you don’t want to get notifications in the future when you connect to a Wi-Fi network or a computer, then turn off the checkbox next to “Connection notification”.
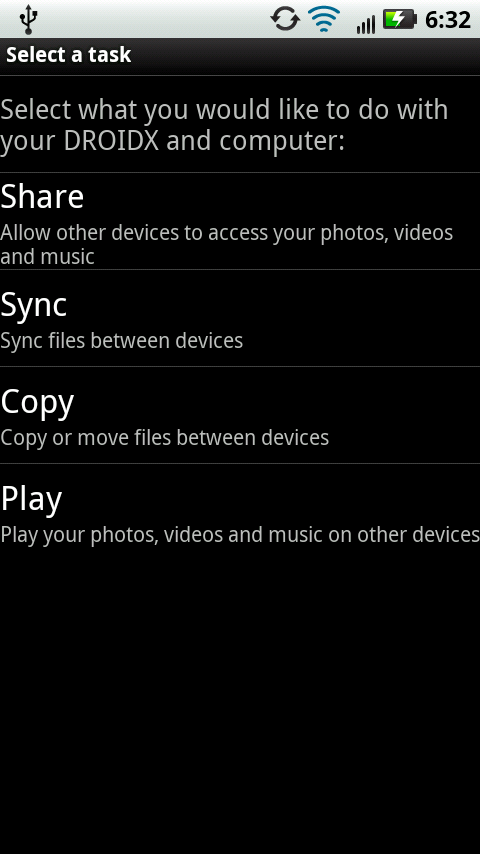
From the screen that appears, select the kind of device you want to connect to your phone, including a computer, a network drive for accessing files such as a home media server, a phone, a TV, or a video game console.
Once you select a device, you then choose how you want to share files. If you choose a computer, for example, you can share, sync, or copy files to the Droid, or play the Droid’s videos and music on the computer. If you choose a TV, you can play or share music, videos, or photos on its nice big screen.
Depending on what you’re sharing, and the type and model of device, the next set of screens will vary. Generally, though, you should choose the content you want to share from your Droid 2, and then copy it to the device with which you want to share it, or go to the device, and play the media from your Droid 2 over the network.
Note
There’s another app you can use on your Droid 2 to play media from another DLNA device—the DLNA app. It serves much the same purpose as the Media Share app. To get started, tap the DLNA icon in the Application Tray, and then follow the instructions. You’ll likely find Media Share simpler to use, but you may want to give the DLNA app a try to see how you like it.
Get Droid 2: The Missing Manual now with the O’Reilly learning platform.
O’Reilly members experience books, live events, courses curated by job role, and more from O’Reilly and nearly 200 top publishers.

