Welcome to DVD Studio Pro 3! This chapter provides a detailed overview of Apple's DVD Studio Pro 3 (DVDSP 3) software to make sure everyone is on the same page.
Frankly speaking, DVDSP 3 gives you access to all the best features of DVDs: great video, multiple audio tracks, interactive activities, and fantastic menus. If you're new to DVDSP, you should read this chapter and try building the simple projects we cover. They give you a chance to play with the key parts of DVDSP 3 and leave you in good shape for the remaining chapters. Those of you upgrading from Version 2 might want to skim the section on using templates, which Apple introduced in Version 2 of the software. If you're upgrading from Version 2 or you're already comfortable with the basics, feel free to skip this chapter and get into the fun stuff. Chapter 2 covers the supported media types and various conversion notes. Chapter 3 is where we begin the real projects. Pick your starting point and get burning!
As with anything, the more you practice and experiment, the more skilled you'll become. We heartily recommend you pick up a spool of DVD-R media and give yourself permission to make a few (dozen!) coasters. You'll learn a lot along the way, and future projects will only benefit.
With that said, let's get started!
DVDSP 3 gives you an abundant workspace for building your DVD projects. You can arrange your projects in a way that is visually intuitive and easy to follow. You also have easy access to all the various properties of the DVD and your media. In short, you'll find everything you need to lay out great projects. That's not to say that there aren't a few quirks, but we'll warn you about these as we come across them.
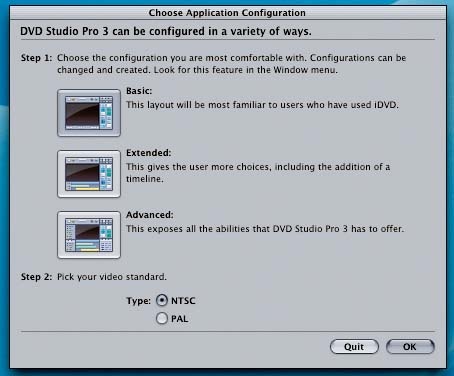
After you install DVDSP 3, and you run it for the first time, you'll be presented with the dialog shown in Figure 1-1. From this dialog you can choose an interface configuration that you're comfortable with. Your choices are as follows.
- Basic
This layout is somewhat similar to the layout in iDVD, Apple's consumer-level DVD authoring tool that ships as part of iLife. If you're used to using iDVD, you might want to start off with this configuration for simplicity.
- Extended
This layout expands the Basic layout, adding two additional subwindows and a Property Inspector window below the Palette window. This is a good place to start if you enjoy using DVDSP for simple projects.
- Advanced
This layout brings out all the options and tabs that you can configure with DVDSP. This interface can be a little overwhelming at first, so I recommend this to users who are either intensely curious or already familiar with using previous versions of DVDSP for creating advanced projects.
The Advanced dialog is where you can choose the default video standard that you will be using for your DVDs. You probably already know which one you want, but here's a brief rundown of each.
- NTSC (National Television System Committee)
The NTSC standard has a fixed vertical resolution of 525 horizontal lines. It has varying amounts of horizontal resolution, depending on the electronics and formats involved. A total of 59.94 fields (sets of even or odd lines) are displayed per second. The odd and even fields are displayed sequentially, thus interlacing the full frame. Consequently, one full frame is composed of two interlaced fields, and is displayed about every 1/30 of a second. You should choose NTSC if you are creating DVDs for North America, including the United States and its territories, Canada, and Mexico.
- PAL (Phase Alternation by Line)
PAL has a vertical resolution of 625 lines. Instead of 60 fields, however, PAL interlaces 50 fields per second, resulting in a 25-frame-per-second display system. PAL is used throughout Europe and in parts of Africa and Asia.
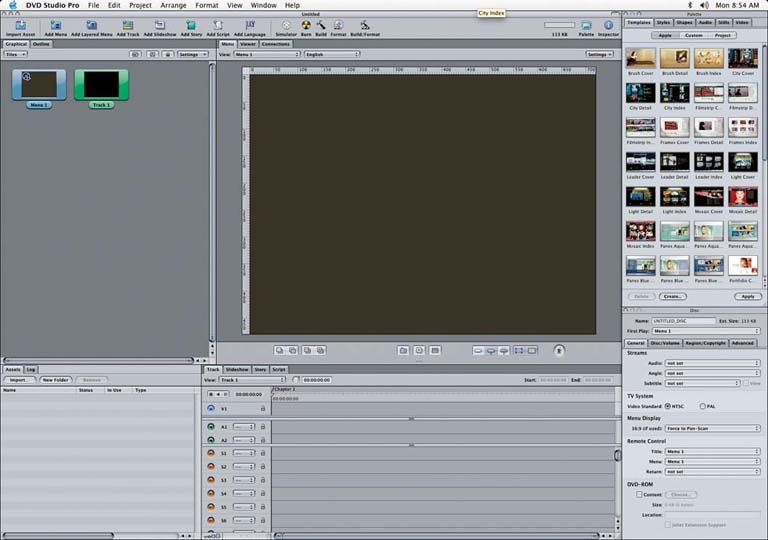
Let's start off with the Advanced interface configuration so that we can explain all the windows and their options. Figure 1-2 shows DVDSP 3's Main window, which has a very similar interface to Version 2. For the simple projects in this chapter, the only real difference you'll notice between Versions 2 and 3 of the software is the number of templates available in the Palette. In this chapter we tried to include projects you can accomplish in either version of the software, but there are a few new features that exist only in DVDSP 3. We'll be sure to point those out where appropriate.
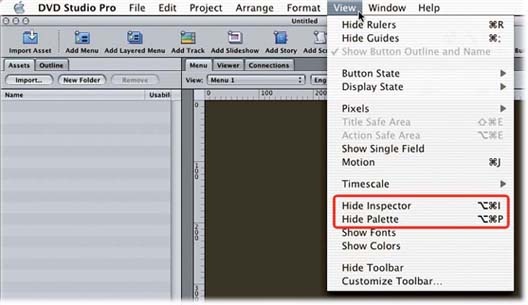
In Figure 1-2 you can see three windows: the Main window, the Property Inspector (labeled Disc in the screenshot), and the Palette. If you ever misplace these windows, you can toggle them through the View menu (see Figure 1-3) or via the icons on the toolbar.
At first glance, this looks like a mind-numbing number of components and options. So, let's quickly go over the purpose of these windows, and then we'll pare things down to the few pieces you really need to get started.
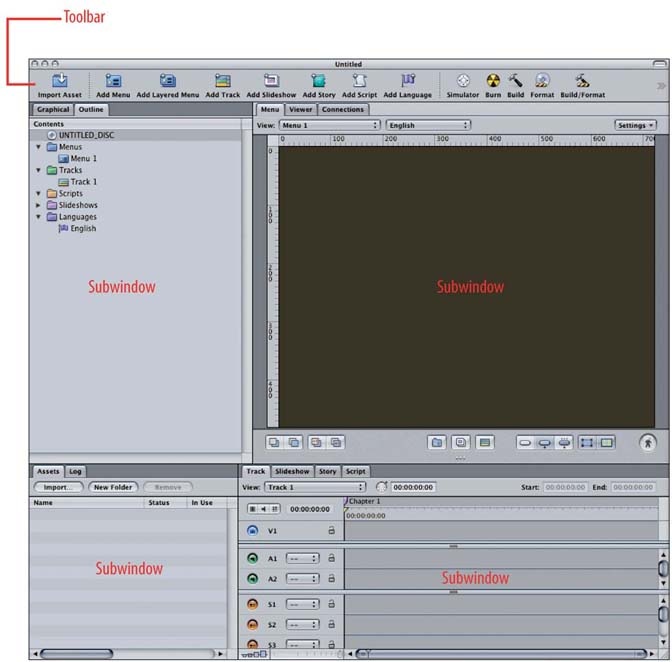
The Main window, shown in Figure 1-4, is the largest of the three windows; this is where you create your DVD projects. Note that the Main window defaults to having four subwindows, and each subwindow consists of one or more tabs. In a typical workflow, first you import various resources (e.g., menus, buttons, etc.) into DVDSP 3 as assets, which then are stored under the Assets tab (as shown in the lower-left subwindow in Figure 1-4). Alternatively, you can use the various Add buttons (e.g., Add Menu, Add Track, Add Story, etc.) along the toolbar at the top to do the same thing. Then you can build a DVD by dragging and dropping these items from the Assets tab to an appropriate tab somewhere else. At this point, the assets become objects in your project, and you can "edit" them. Note that I enclosed edit in quotation marks, as it can mean different things based on context.
For example:
Editing a menu means creating the buttons and setting their actions. This means dragging assets onto the Menu tab in the upper-right subwindow.
Editing a movie clip means setting the chapter stops, audio tracks, and subtitles. You can edit clips by dragging them onto the Track tab on the lower right.
Editing a script doesn't mean editing a movie script. Instead, it refers to editing programmatic instructions that you want the DVD player to follow when it reaches a certain point. You can edit scripts using the Script tab, also on the lower right.
You also can edit other things such as stories and slideshows, but we'll get to those later.
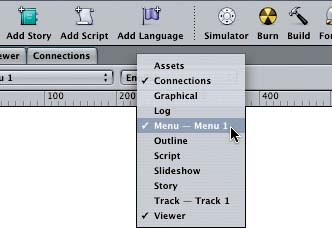
Finally, right-clicking (or holding down the Control key and clicking, for you one-button mouse folks) in any subwindow tab area enables you to choose the tabs for that subwindow from a pop-up menu, as shown in Figure 1-5.
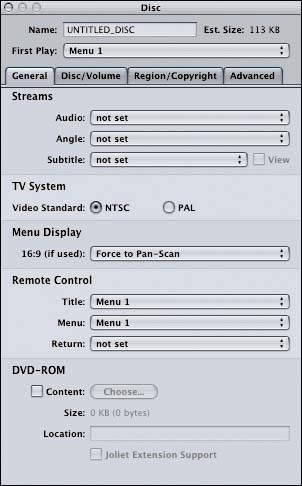
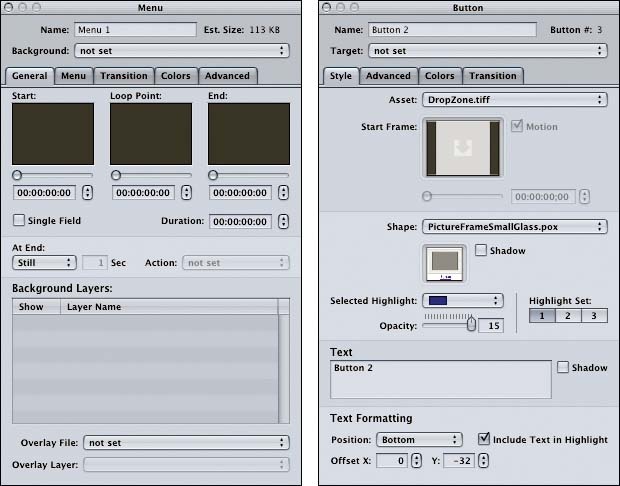
The Property Inspector tracks the object currently selected in the Main window and enables you to configure all the relevant options for that object. For example, in Figure 1-6, you can see the properties available for the DVD disc itself. Other property sheets appear when you work on menus, movie clips, or buttons. Note that they all have a slightly different format. For example, compare the option sheets for both menus and buttons, shown in Figure 1-7.
If you want to know which object the Property Inspector is currently "inspecting," the easiest way is to check out the listing of objects in the Outline tab of the Main window. Whatever object is selected there is the object that shows up in the Inspector.
In my experience, it's easy to lose the Property Inspector window when you're working on a DVD project. However, as we mentioned earlier, you can get your Inspector back by selecting View → Show Inspector, pressing Option-
I, or clicking the Inspector icon in the toolbar.
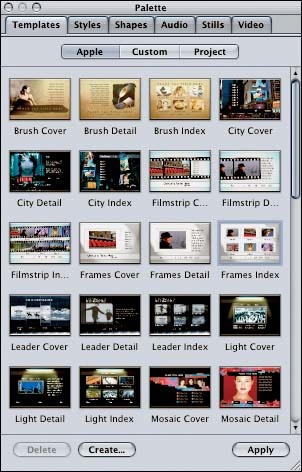
The view shown in Figure 1-8 is a complete list of your raw materials. All your assets—your clips, audio files, and images—appear here. The Palette window organizes assets available to your project into quick-glance lists. Through the tabs you can access lists for things such as the currently defined templates, styles of text and buttons available, music you have in iTunes, etc. You can quickly grab items from the Palette and drop them into your project without importing them explicitly. (But any asset you grab from the Palette will be added to your regular asset list as well.)
The Palette is essential for playing with templates and building menus. Or rather, we should say that the Palette makes child's play of working with templates and building simple menus. You still can roll your own if you need to.
As with the Property Inspector, the Palette can get lost. You can get it back by selecting View → Show Palette, by pressing Command-Option-P, or by clicking the Palette icon on the toolbar.
The toolbar sits at the top of your Main window and gives you quick access to a number of common tasks. Figure 1-9 shows a sample toolbar.
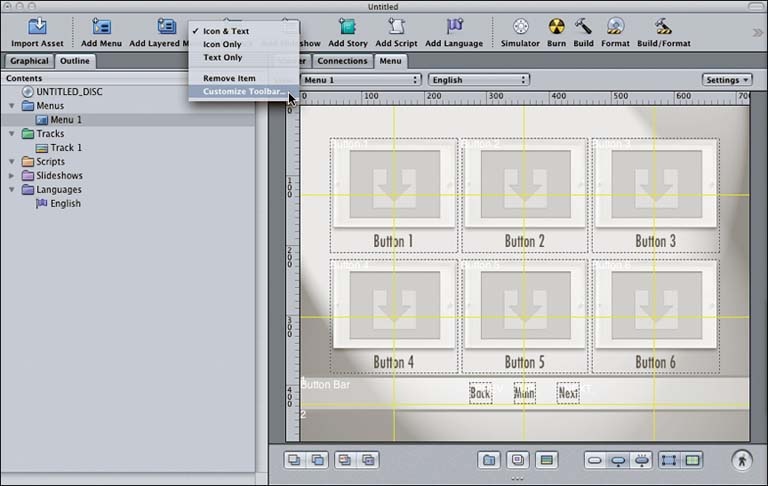
We say sample because the toolbar is customizable and enables you to keep your favorite actions close by. You can configure the toolbar by Control-clicking or right-clicking anywhere along the toolbar. If you want to remove an item from the toolbar, click above that item and select Remove Item. If you want to add one or more items, select the Customize Toolbar option from the menu that pops up, as shown in Figure 1-10.
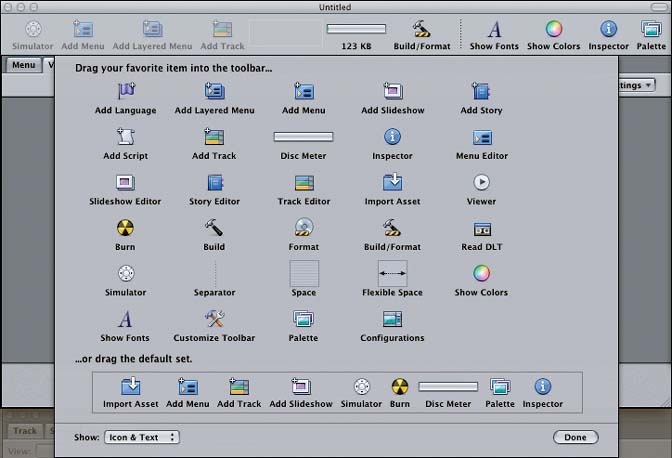
This brings up the Toolbar Customizer dialog, shown in Figure 1-11. Here, you can drag items to and from the toolbar to suit your needs. Or you can drag to the toolbar the entire default setup at the bottom and go with that.
Simply click the Done button in the lower-right corner when you're satisfied with the toolbar's configuration.
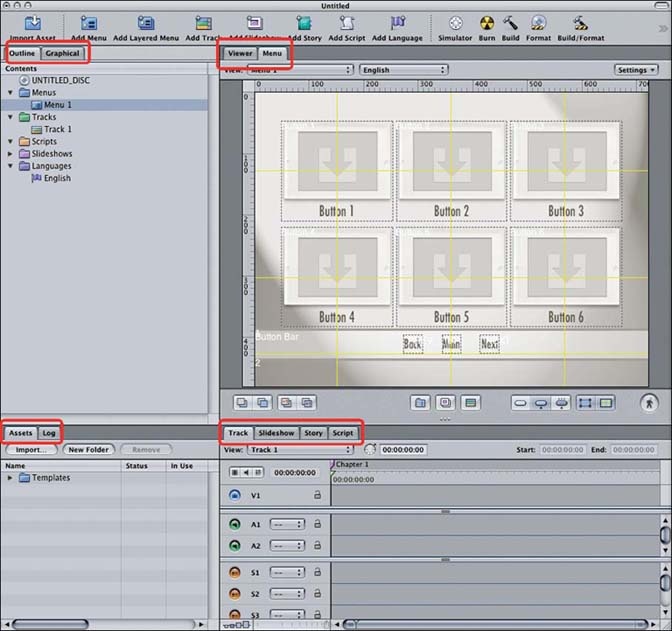
A few of the tabs available are worth mentioning here. Look at Figure 1-12. We've chopped up the interface a bit to zoom in on the interesting areas.
We'll be using the following tabs on every project:
- Assets
This tab shows you the various audio, video, and still resources (files) you have associated with your project. To use a video clip, you can import it so that it is listed here in the Assets tab. You also can just drag a clip from the Finder (or another application) and drop it into DVDSP. It will be imported automatically and listed here as well.
- Outline
This tab shows you the contents of your DVD in a hierarchical view. You can use it to get a quick overview of what's going on in the DVD. You'll also use this tab quite often to select a particular item so that you can edit its properties.
- Track
This tab details the video, audio, and subtitle streams you have active. You can use the pop-up window to select the track to view. You can organize multiple clips into one track, and define multiple audio, video, and subtitle streams in this tab.
- Menu
In this tab you arrange your DVD menu items and hook up their jump targets (where the user is taken when he selects a menu item). You also can configure any background audio or video you want for the menu. Most of the work we'll be doing in the first four chapters of this book will happen in this tab. The Menu tab shows one menu at a time, but you quickly can switch between them using the pop-up button in the upper-left corner.
- Viewer (contents not shown in Figure 1-12)
This tab enables you to preview an asset without starting up the Simulator. This can be handy if you haven't yet set up a menu for the project.
We'll explore the other tabs, such as the Log and Graphical views, later in specific projects. One quick note for DVDSP 2 users: the Graphical tab is new to DVDSP 3. It provides you with a quick, visual view of your project, which can be great for dealing with complex projects, but it does not provide any new functionality. You can do nothing in the Graphical view that you can't accomplish elsewhere in DVDSP.
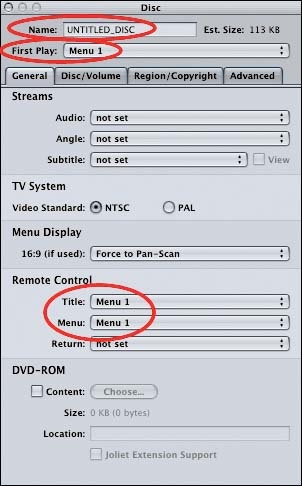
The Property Inspector for the Disc object contains a few options that you should set on every project. They are highlighted in Figure 1-13.
The Disc Name. You should always name your disc. Otherwise, inserting the DVD into a computer will bring up a disc with the ever-popular default name, Untitled Disc.
The First Play. This is critical. Be sure to pick an initial menu or movie to show when you put the disc in a player. DVDSP 3 always defaults to the first menu that you create. If you want your movie to start immediately when the disc is inserted into a player, this is the place to specify it.
The Remote Control Settings. These properties determine how the remote control will work with the disc. At a minimum, you'll want the Title and Menu controls to take you to your main standard menu. The default on these settings is also the first menu.
You should get into the habit of specifying these values as soon as possible. That usually happens just before you save the project for the first time. That being said, I burned a few coasters before learning these little tidbits, so don't feel bad if you forget.
Get DVD Studio Pro 3: In the Studio now with the O’Reilly learning platform.
O’Reilly members experience books, live events, courses curated by job role, and more from O’Reilly and nearly 200 top publishers.
