Chapter 4. Tagging and Branching
One of the most helpful—yet underused—facilities of CVS is the tag. CVS’s tagging feature allows you to label a revision for later retrieval. This feature also allows you to fork development so that you can work on two or more lines of development of your project simultaneously. The line that has been forked off is called a branch, and the original line is called the trunk.
This chapter explains tags, branches, and how to merge branches and trunks. It also discusses why and when to branch and provides strategies and hints for using branches effectively in your project.
Tagging
CVS allows you to retrieve any checked-in revision of a file. Although retrieving revisions of individual files is useful, it’s even more useful to be able to retrieve the compatible set of revisions that make up a complete, functional version of a project, such as all the revisions that become release 1.0 of a program, or that become the first edition of a book. This ability is also important for compliance with standards and regulations.
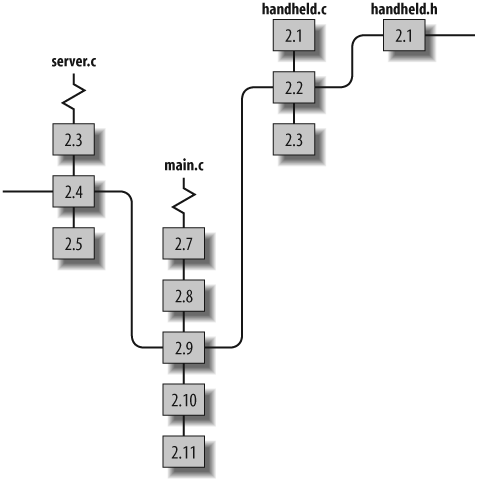
Tagging is a way of marking a group of file revisions as belonging together. You can’t use the revision numbers for this purpose, because revision 2.3 of one file might belong with revision 2.17 of another. Figure 4-1 shows a group of file revision numbers, with an imaginary string denoting which revision numbers belong to the same release.
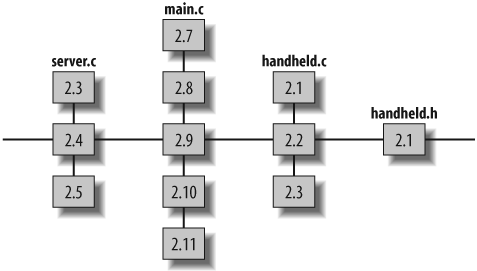
CVS allows you to create a single tag that denotes all the file revisions that connect to that virtual string. When you want to look at all the file revisions that belong to a tag, CVS can “pull the string” to locate the tagged revisions. Figure 4-2 shows the same group of files, with the string pulled tight to show which set of revisions belong to that tag.
A tag can mark a specific revision of a single file or a specific set of revisions of a group of files—in essence, naming the string. The tag then gives you a convenient way to retrieve that revision or matched set of revisions. Remembering the significance of a text string is much easier than remembering a version number, not to mention a handful of different version numbers for each file. Tags are often used to record the version number used by the developers, rather than the CVS revision number, which is used primarily as a CVS internal designation.
Tip
An advanced technique is to use floating tags, which indicate a current release, such as the current production release in use in a particular department in a university. The tag is moved when the production release is changed. Floating tags are explained later in this chapter in the sidebar "Floating Tags.”
Tag Names
Tag names must start with a letter and can contain alphanumeric characters, hyphens (-), and underscores (_). Each tag must be unique within the tagged file. You tag files with the cvs tag and cvs rtag commands, explained in "Tagging by Sandbox" and "Tagging by Date or Revision" later in this chapter.
I recommend that you use meaningful tag names. Tag names should immediately tell you something about the revisions they tag and, if they tag across several files, why those revisions belong together. For example, release-1-3-beta, release-2-13-patch-5, testing-1-5-alpha, and release-2-5-stable are all effective tag names.
Set a standard tag name format for your project and encourage your developers to use it. Assign names that describe versions of the project, using the version-naming convention that your developers are familiar with. Create tag names from which your team can identify revisions, rather than allowing them to rely on the CVS revision numbers. The CVS numbers are intended for internal reference by CVS, and do not map to the way that people typically number software releases.
Tip
"The taginfo File" in Chapter 7 includes the first part of a script that can be used to enforce tag name standards automatically.
Reserved Tag Names
There are two reserved tag names. CVS uses the BASE tag name for the revision that was last synchronized with the repository. CVS uses the HEAD tag name for the most recent revision of the trunk in the repository.[*]
If you and your coworker both check out revision 1.23 of the main.c file, you both start with a BASE of 1.23. If your coworker commits twice, the BASE revision for your sandbox is still 1.23, because you haven’t synchronized with the changes in the repository. The HEAD revision is now 1.25, because your coworker’s two commits were given revision numbers 1.24 and 1.25. The BASE revision for your coworker’s sandbox has become 1.25, because his sandbox copy of main.c was synchronized to revision 1.25 when he committed his second change.
Tagging by Sandbox
Use the cvs tag command to tag the files in the current sandbox directory and all subdirectories. By default, cvs tag adds the tag to the BASE revision. You can specify files to tag by providing their filenames as an argument to cvs tag.
The syntax for the cvs tag command is:
cvs [cvs-options] tag [command-options]tagname[filenames]
cvs tag determines which files and revisions to mark based on your sandbox, but it marks them based on the revision that was most recently synchronized with the repository. If changes have occurred in the sandbox since the files were last synchronized with the repository, those changes will not be reflected in the tagged revisions.
The -c command option to cvs tag allows you to check whether your sandbox files have been modified and not committed before you tag the files. If cvs tag -c finds uncommitted changes, it will stop without tagging any files. If you want to tag the revision in the repository, without the uncommitted changes, omit the -c and rerun the cvs tag command. If you want to tag the revision in the sandbox, commit your changes before rerunning cvs tag.
You can use dates, existing tags, or revision numbers to determine which revisions to tag. Use the -r
revision or -r
tagname options of cvs tag to specify a revision or an existing tag, and use the -D
date option to specify a date. If you’re using a date, CVS tags the latest revision before the date you specify. See Chapter 11 for more information on dates.
The -f option can be used only in combination with -r or -D. This option instructs CVS to use the HEAD revision if no revision can be found to match the revision specified by -r or -D.
By default, cvs tag acts recursively down the sandbox subdirectories. The -l option restricts it to the local directory. You can also use -R to explicitly instruct CVS to act recursively.
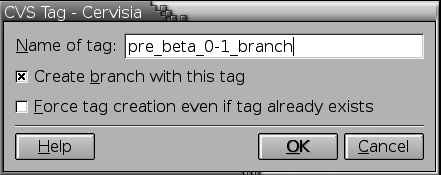
Example 4-1 shows how to use cvs tag to tag the files in the current sandbox directory with the tag name pre_alpha_0-1. Figure 4-3 shows tagging in the graphic client Cervisia.
bash-2.05a$ cvs tag pre_alpha_0-1
cvs server: Tagging .
T Changelog
T INSTALL
T Makefile
T README
T TODO
cvs server: Tagging doc
cvs server: Tagging doc/design
T doc/design/AcceptanceTest.doc
T doc/design/Analysis.rtf
T doc/design/Requirements.doc
T doc/design/Specification.rtf
cvs server: Tagging doc/plan
T doc/plan/Schedule.rtf
cvs server: Tagging lib
cvs server: Tagging man
cvs server: Tagging src
T src/config.h
T src/main.c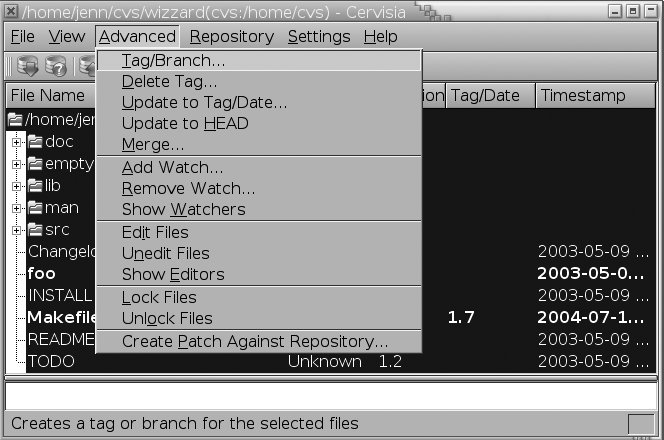
Tagging by Date or Revision
The cvs rtag command allows you to tag files without referring to a specific sandbox. Instead of using the sandbox to determine which revisions of which files to tag, rtag relies on the parameters to the command. You must use either the -r or -D options to specify which revision of the files in question to tag, and you must specify at least one directory name, filename, or module name. Modules are explained in Chapter 7. If you specify multiple directories, files, or modules, separate them with spaces.
The syntax for the cvs rtag command is:
cvs [cvs-options] rtagcommand-options tagname filenames
Example 4-2 shows the cvs rtag command being used to apply the pre_alpha_0-2 tag to all files within the wizzard directory and its subdirectories. The -r HEAD option specifies that the pre_alpha_0-2 tag be applied to the HEAD revision of all files (the HEAD is the most recent revision on the trunk; see "Reserved Tag Names,” earlier in this chapter). Figure 4-4 shows tagging in TkCVS.
bash-2.05a$ cvs -d cvs_server:/var/lib/cvs rtag -r HEAD pre_alpha_0-2 wizzard
cvs rtag: Tagging wizzard
cvs rtag: Tagging wizzard/doc
cvs rtag: Tagging wizzard/doc/design
cvs rtag: Tagging wizzard/doc/plan
cvs rtag: Tagging wizzard/lib
cvs rtag: Tagging wizzard/man
cvs rtag: Tagging wizzard/src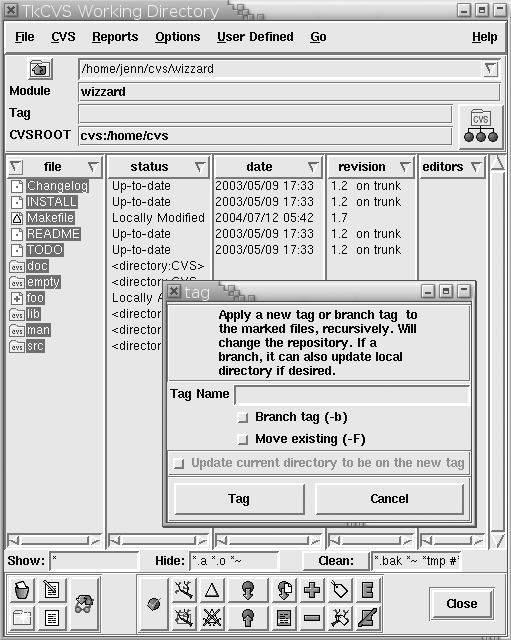
If you are in a sandbox when you use the cvs rtag command, CVS can use the repository referenced in that sandbox’s CVS directory as the repository to search for the files to be tagged. If you are in a sandbox that is connected to a repository other than the one you want to act on, leave the sandbox using the cd command or use the -d
repository_path CVS option, as I’ve done in Example 4-2.
If your current working directory is not a sandbox, you can specify the repository with either the CVSROOT environment variable on the client machine or the -d
repository_path CVS option.
When you want to tag the most recent revision of any file in the repository, use -r HEAD. Be aware that CVS operations are not atomic, so if someone commits while you are tagging and you use -r HEAD, you may find that one directory has been tagged at the point before your coworker’s commit and another has been tagged after it. To avoid this problem, tag the sandbox with cvs tag, or use a date. In some cases, you can also use -r with a preexisting tag name (such as when creating a branch, explained later in this chapter).
When using the -D option, be aware that unless a time has been specified, CVS tags the most recent revision at midnight on the day in question. This means that if you use -D 12 Feb 2002, CVS tags the file revisions as they were at 12:00 A.M. on 12 February 2002, local time. Date formats are listed in Chapter 11.
Most of the options to cvs tag can be used the same way with cvs rtag. The -l and -R options control recursion, and the -r, -D, and -f options specify revisions as they do with cvs tag. The -c option to cvs tag is not used with cvs rtag.
Retrieving Tagged Files
To list the tags on a file, use cvs status -v in a sandbox that includes the file. This command also provides information, such as the current sandbox (or working) revision, the current repository revision, and any sticky information in the current sandbox. The tags are listed at the bottom of the report. You may note that some tags have the word branch beside the revision number; these are the tags at the base of a branch, as explained in "Branching" later in this chapter. Example 4-3 shows the use of cvs status to show tags for main.c. Figure 4-5 shows the tag list in TkCVS.
bash-2.05a$ cvs status -v src/main.c
=============================
File: main.c                Status: Up-to-date

   Working revision:    1.9
   Repository revision: 1.9     /var/lib/cvs/wizzard/src/main.c,v
   Sticky Tag:          (none)
   Sticky Date:         (none)
   Sticky Options:      (none)

   Existing Tags:
     pre_alpha_0-2                 (revision: 1.9)
     pre_alpha_0-1                 (revision: 1.9)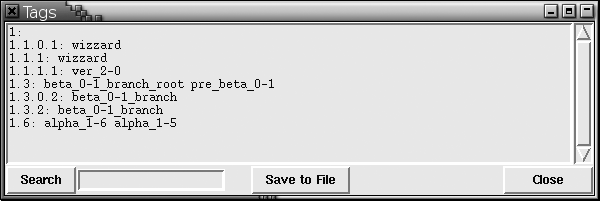
To retrieve a tagged file or set of files, use the -r
tagname option to cvs checkout or cvs update. Use checkout to create a new sandbox, and update to modify an existing sandbox. If you retrieve a set of tagged files into an existing sandbox, any existing files will be overwritten with the tagged revisions, but changes you have made since the files were last synchronized with the sandbox will be merged forward into the new revisions.
Tip
If you want a copy of the specified revision that doesn’t include any new changes, use cvs
update -C -r
tagname. If you have any unsynchronized changes, CVS will store them in .#filename.revision in the same directory.
Example 4-4 shows a checkout of a tagged sandbox, and Figure 4-6 shows checking out a tagged sandbox in Cervisia.
bash-2.05a$ cvs -d cvs_server:/var/lib/cvs checkout -r pre_alpha_0-2 wizzard
cvs server: Updating wizzard
U wizzard/Changelog
U wizzard/INSTALL
U wizzard/Makefile
U wizzard/README
U wizzard/TODO
cvs server: Updating wizzard/doc
cvs server: Updating wizzard/doc/design
U wizzard/doc/design/AcceptanceTest.doc
U wizzard/doc/design/Analysis.rtf
U wizzard/doc/design/Requirements.doc
U wizzard/doc/design/Specification.rtf
cvs server: Updating wizzard/doc/plan
U wizzard/doc/plan/Schedule.rtf
cvs server: Updating wizzard/lib
cvs server: Updating wizzard/man
cvs server: Updating wizzard/src
U wizzard/src/config.h
U wizzard/src/main.c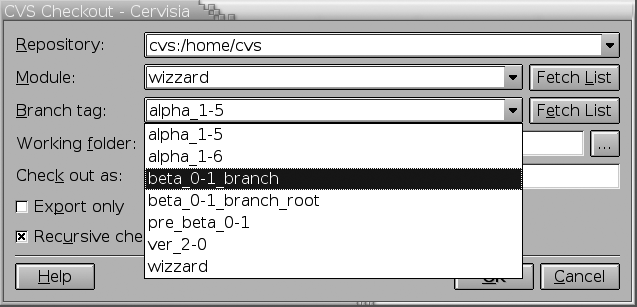
When you check out or update a sandbox via a nonbranch tag or a date (branches are explained later in this chapter), the tag or date is sticky on the files in that sandbox. A sandbox checked out with a date or a nonbranch tag is a static representation of the project at that point. You cannot commit changes to a file that was checked out as static. Stickiness applies only to the sandbox copy of a file and does not affect the repository. See the "Stickiness" section later in this chapter for more details.
Removing and Moving Tags
Normally, tags are intended to remain fixed, to mark a specific moment in time. Sometimes, you do need to remove, rename, or move a tag. Do this with caution, as these actions may discard historical information and may be impossible to undo.
There are special tags called branch tags, explained in "Branching,” later in this chapter. If you try to remove or move a branch tag, CVS returns an error message and does not delete or move the tag, though you can force CVS to remove or move the branch tag with the -B option.
Warning
Do not delete, move, or rename a branch tag without an extremely good reason and a very recent backup of the repository, as doing so can cause data loss.
Removing a tag
There usually is no need to remove a correctly placed tag from a file. However, if you make an error when tagging, you may want to remove the tag and try again.
To remove a tag, use the -d option:
cvs tag -dtagname[filename]
or:
cvs rtag -dtagnamefilename
If you use the rtag command outside a sandbox, you need to specify the repository path. If you use rtag inside a sandbox, CVS searches the CVS subdirectory to determine the repository.
The tag command must be issued from within a sandbox, and by default acts on the files in the current sandbox directory and its subdirectories. CVS searches the CVS subdirectory to determine the repository.
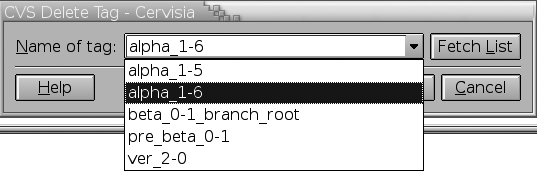
Example 4-5 shows the use of cvs tag to remove a tag. The user is in the top level of the project’s sandbox. Figure 4-7 shows tag removal in Cervisia.
Moving a tag
The most common reason to move a tag is to correct a tagging mistake. Some project teams also like to have a mobile tag that marks the most recent version that is ready for release or the current bugfix version of the project, and they move that tag when they finish a new version.
To move a tag from one revision to another revision in the same file or set of files, use the -F option to cvs tag and cvs rtag. Use -r to designate the revision to move the tag to and -F to designate the tag to move. Example 4-6 shows the use of cvs rtag to move a tag, from within a sandbox. The status report for the file is shown before and after the move. Because I am using rtag rather than tag, I need to specify the full path from the repository root directory to main.c, including the project name. I don’t need to specify the full path with cvs status, because I’m in the sandbox.
bash-2.05a$cvs status -v src/main.c============================= File: main.c Status: Up-to-date Working revision: 1.9 Repository revision: 1.9 /var/lib/cvs/wizzard/src/main.c,v Sticky Tag: (none) Sticky Date: (none) Sticky Options: (none) Existing Tags: pre_alpha_0-1 (revision: 1.9) bash-2.05a$cvs rtag -r 1.8 -F pre_alpha_0-1 wizzard/src/main.cbash-2.05a$cvs status -v src/main.c============================= File: main.c Status: Up-to-date Working revision: 1.9 Repository revision: 1.9 /var/lib/cvs/wizzard/src/main.c,v Sticky Tag: (none) Sticky Date: (none) Sticky Options: (none) Existing Tags: pre_alpha_0-1 (revision: 1.8)
Moving or removing tags from Attic files
Files that have been removed from the main trunk using cvs remove, or that were never on the trunk, are stored in an Attic subdirectory in the repository. These files may be associated with old tags that should be removed, moved, or renamed. There is no easy way to perform these tasks for files in the Attic directory using cvs tag, but cvs rtag provides the -a option, which applies -d and -F to tags in removed files (i.e., in the Attic) from the appropriate module or directory.
If you are using the -r
revision option with tag or rtag, CVS searches Attic files to determine whether the revision existed in those files. The -a option is unnecessary if -r is specified.
Renaming a tag
If you or one of your development team has added a tag that does not conform to your tag name standards, or that is inaccurately named, you can rename it.
CVS does not include a command to rename a tag, but the -r option to tag and rtag makes it easy to add a new tag to the revisions that were tagged with an existing tag. Then you can remove the old tag. (Do not try to use this approach with branches.)
Example 4-7 shows how to rename a tag. The goal is to rename pre_alpha_0-1 to pre_beta_0-1. First, cvs tag -r is used to tag all the pre_alpha_0-1 files with pre_beta_0-1. Next, the unwanted pre_alpha_0-1 tag is deleted via a cvs tag -d command. The effect is the same as renaming pre_alpha_0-1 to pre_beta_0-1.
bash-2.05a$cvs tag -r pre_alpha_0-1 pre_beta_0-1cvs server: Tagging . T Changelog T INSTALL T Makefile . . . cvs server: Tagging src T src/config.h T src/main.c bash-2.05a$cvs tag -d pre_alpha_0-1cvs server: Untagging . D Changelog D INSTALL D Makefile . . . cvs server: Untagging src D src/config.h D src/main.c
Removed Files
If a file has been removed from the project in the revisions you’re tagging, the file will not be tagged. If the file is not added again, this won’t matter.
If a file has been removed and then added again, there is no simple way to show whether the tag doesn’t exist in that file because the tag was created between the remove and the second addition, or because the tag is older than the file. You can use dates to determine which is the case, or you can issue the command cvs rdiff -s -r
tagname project. The -s option to rdiff provides a summary report that lists files that have been changed, added, or removed.
To tag a removed file as well as existing files, use the -r option to cvs tag and cvs rtag. Using -r HEAD is typical, as this refers to the most recent revision (of the trunk) in the repository.
If you are tagging against the HEAD, you may want to find a way to prevent others from changing the repository between the time you decide the files are ready to be tagged and the time you actually tag them. Some suggestions for doing this are included in "Freezing a Repository" in Chapter 6.
Tagging Strategies
Tagging makes it easier to retrieve snapshots of a project. The basic rule is to tag every time you reach a significant stage of a project. At an absolute minimum, tag every time you branch and tag on completion of each release of a project.
Devise your own in-house tagging strategy. The following list of times to consider tagging is heavily biased toward programmers:
On completion of each major feature
At each milestone or each major phase of a project
Just before dropping an existing feature
Just before testing begins
Before making changes that might break working code
Just before splitting off a branch
Just after merging a branch
Use meaningful tag names in a fixed format, including all the essential information in the tag name. This is one possible, but very detailed, format for tag names:
version-[alpha-|beta-][test-|final-|patch-][patch#-][pub|priv]
When you need to check out an older version of the code to test it or create a patch, you need an easy way to identify the exact version you’re after. This tag name format lists the version number, whether the tagged release is a test or final release, the release’s stage of testing, and whether it is an internal or external release.
Remember, this format is just an example. Use your own format, based on your own project team’s needs. Most project teams prefer a shorter format than the one shown here.
Stickiness
Stickiness is an important concept in CVS, especially when talking about tagging and branching. Stickiness is primarily internal to CVS, but it affects what can be done in a sandbox.
When a file in a sandbox has a persistent state that is not the default state in the repository, the persistent state is said to be sticky. A sandbox copy of a file can be set to a specific revision, belong to a branch, or have specific keyword options. Any of these things can cause a file to be sticky.
A file can be set to a specific revision by being retrieved from the repository with a tag, revision number, or date. If the file is retrieved with a date, it is said to have a sticky date. If it is retrieved with a tag, it is said to have a sticky tag, and if it is retrieved with a revision number, it is said to have a sticky revision.
Along the same lines, a sandbox file that belongs to a branch is said to have a sticky branch, and a sandbox file with sandbox-specific keywords has sticky keywords.
A sticky state applies to all commands run on the file. A file with a sticky date, revision, or nonbranch tag will not be updated to a more recent copy; nor can such files be committed. A file with a sticky branch is always committed to or updated from the branch in question.
Sticky states on a file can be viewed with cvs status. For example, use the command cvs status index.htm to see the status for the index.htm file. Example 4-8 shows a cvs status report that lists a sticky branch.
bash-2.05a$ cvs status main.c
=============================
File: main.c                Status: Up-to-date

   Working revision:     1.9
   Repository revision:  1.9     /var/lib/cvs/wizzard/src/main.c,v
   Sticky Tag:           beta_0-1_branch (branch: 1.9.2)
   Sticky Date:          (none)
   Sticky Options:       (none)
Sandbox directories can also have sticky states, and a directory with a sticky state applies that state as the default to any file added to that directory. Sticky states in a directory can be seen in the Tag file in the CVS subdirectory of that directory. Example 4-9 shows a Tag file.
Stickiness is created or changed using the -k, -D, or -r options to cvs checkout or cvs update. It can be removed with cvs update -A, which retrieves the current HEAD revision from the trunk of the repository, resets the state to the default for the appropriate files, and clears any directory stickiness.
To clear stickiness from a directory, you must run cvs update -A on the directory. Using cvs update -A
files, where files refers to a file or files, does not clear directory stickiness or affect other files in the directory.
Branching
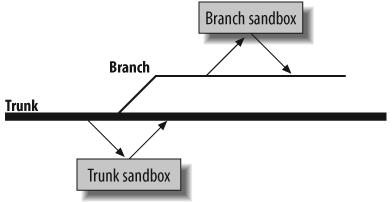
In the introduction to this chapter, I defined a branch as a forked line of development in your project, with the line that has been forked off called the branch, and the main line the trunk. CVS builds the branch and the trunk from the same source data, up until the point at which they diverge, which is called the base of the branch. From that point, CVS stores the changes made to the branch separately from the changes in the trunk. Revisions on the branch are given their own revision numbers, based on the revision number of the base of the branch.
You can branch a single file, any group of files, or a whole project, just as you can tag individual files or any group of them. I usually recommend branching a project. In my experience, if you branch one file, you will eventually need to branch others in the project for the same reason. It is much easier to keep track of a single branch over the whole project than a group of unrelated branches of individual files.
A tag marks a specific revision of each tagged file, and a sandbox checked out with that tag cannot be changed (you can edit the files, but when you try to check them in, you’ll get the error sticky tag ‘tag’ for file ‘file’ is not a branch). In contrast, a branch creates revisions that can be edited, committed, checked out, updated, and tagged independently of the revisions on the trunk. In many ways, a branch can be treated as an independent development line of a project.
You can tag a file with any number of tags, as long as each tag name in that file is unique, including any tags on the branch. CVS relies on each tag and branch name to be unique within each file, so it considers the branch name to be a tag name when determining tag uniqueness.
A branch is an ongoing line of development, and any tags on the branch are used to mark the specific revisions when significant events occur. Though branches are created with the cvs tag command, branches and tags are different things. A branch represents multiple revisions and a tag represents a single revision.
Tip
For some commands, such as cvs diff, CVS needs a branch to resolve to a single revision. In these cases, CVS resolves to the most recent revision on the branch.
Branches are often used when a public release of a project is due, to allow testers to work on the release candidate while new development goes on independently of the testing. Branches can also keep major changes or experimental work, such as a complete rewrite of a code library, separate from the main line of development.
Ideally, you will know you want a branch before you start modifying your sandbox copies of a project’s files. You can then create a branch from the sandbox, as shown in "Making a Branch,” later in this section.
Sometimes you realize after making changes that your work is experimental or will require a section of the project to be redesigned. At such times, you might create a branch to allow you to keep your revision under version control without affecting the rest of the project’s development. See "Retroactive Branching,” later in this chapter, for instructions on how to do so. Retroactive branching can be more difficult than standard branching, so try to plan branches in advance.
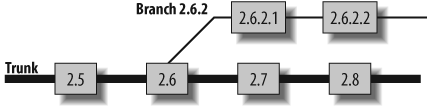
Figure 4-8 shows how a branch is developed from a trunk. Revision 2.6 is the base of the branch, and the branch itself is represented by the revision number 2.6.2. The branch has independent revisions from the trunk, starting with revision 2.6.2.1. The trunk continues with revision 2.7.
The branch is dependent on the main trunk. However, the trunk and the branch are stored in the same file in the repository, and commands that operate on that file at the repository level can affect both trunk and branch. For example, the same tag cannot be used twice in the same file, even if one use is on the trunk and the other is on the branch. Also, the cvs status and cvs log commands show the overall state of the file, including the trunk and the branch.
Changes from the trunk can be merged onto a branch, and changes from a branch can be merged back into the main trunk. The branch can either be abandoned or continued, depending on the purpose for the merge.
Uses for Branches
Branching has many uses. A project’s trunk is usually used for the main line of development, and branches are usually used for variations on that line.
In programming projects and content management, branches are often used for experimental work, candidates for product releases to the users, refactoring code or content, or bug fixes. For configuration management, the trunk can be used for the default configuration, and branches can be the standard variants—one branch for web servers, one for mail servers, and so on.
The following list describes some common uses for different types of branches (branch types are explained in detail in "Branching Strategies,” later in this chapter):
- Variations on a theme, such as stored configurations for similar servers
Use long branches, and occasionally nested branches, for variations on similar themes. Make changes on the trunk and merge them to the branch if the branch needs those changes.
- Bugfix management
Use long branches for bug fixes, and merge the changes to the trunk.
- Experimental work, such as experimental code or a new web page design
Use short branches, and merge changes back to the trunk.
- Major changes, such as a complete code rewrite
Depending on how major the rewrite is, you can use long branches merged to the trunk, long branches merged in both directions, or short branches.
- Release candidates for testing
Use long branches, and merge changes to the trunk. You can convert the branch to a bugfix-management branch after release.
- Standards compliance
Some development standards require that the production line of a project be kept separate from ongoing development. Branching the project complies with all of such standards that I am aware of.
Making a Branch
You can make a branch with the -b option to the cvs tag or cvs rtag commands. This option can be combined with any of the other tag-creation options of those commands. You can use a date, existing tag, or revision number to specify the revision to be branched from.
If you use cvs tag, you can also make a branch from the most recently synchronized sandbox revision. Doing so acts like tagging from the sandbox revision, as shown earlier in this chapter, under "Tagging by Sandbox.”
Example 4-10 demonstrates the creation of a branch from an existing tag using cvs tag. The cvs update command ensures that all files in pre_beta_0.1 are present in the sandbox. The output from the cvs update command can be used to confirm that no files have changed. Figure 4-9 shows branch creation in Cervisia.
bash-2.05a$cvs update -d -r pre_beta_0-1. . . bash-2.05a$cvs tag -r pre_beta_0-1 -b pre_beta_0-1_branchcvs server: Tagging . T Changelog T INSTALL T Makefile T README T TODO cvs server: Tagging doc cvs server: Tagging doc/design T doc/design/AcceptanceTest.doc T doc/design/Analysis.rtf T doc/design/Requirements.doc T doc/design/Specification.rtf cvs server: Tagging doc/plan T doc/plan/Schedule.rtf cvs server: Tagging src T src/config.h T src/main.c
Branch creation occurs in the repository, not the sandbox. To edit the branch revisions of the files, check out a branch sandbox or use update to alter the current sandbox to the branch.
It is good practice to tag the trunk just before splitting off a branch, because this makes it easier to merge the changes back later. To be absolutely certain that the revisions tagged with the prebranch tag (the tag you are basing the branch on) are the revisions used as the base of the branch, use cvs rtag -r
prebranch-tag
-b
branch-tag
project to create the branch. This command uses the prebranch tag to specify the revisions the branch is created from.
Example 4-11 shows how to create a prebranch tag and then the branch. Then, cvs status is run to show the tag status of one of the files.
bash-2.05a$cvs tag beta_0-1_branch_rootcvs server: Tagging . T Changelog T INSTALL . . . cvs server: Tagging src T src/config.h T src/main.c bash-2.05a$cvs rtag -r beta_0-1_branch_root -b beta_0-1_branch wizzardcvs rtag: Tagging wizzard cvs rtag: Tagging wizzard/doc cvs rtag: Tagging wizzard/doc/design cvs rtag: Tagging wizzard/doc/plan cvs rtag: Tagging wizzard/lib cvs rtag: Tagging wizzard/man cvs rtag: Tagging wizzard/src bash-2.05a$cvs status -v src/main.c============================= File: main.c Status: Up-to-date Working revision: 1.9 Repository revision: 1.9 /var/lib/cvs/wizzard/src/main.c,v Sticky Tag: (none) Sticky Date: (none) Sticky Options: (none) Existing Tags: beta_0-1_branch (branch: 1.9.2) beta_0-1_branch_root (revision: 1.9) pre_beta_0-1 (revision: 1.8)
Retroactive Branching
If you make changes and realize at the time you’re ready to commit that you want to make a branch, you need to try to make a branch from the revisions before the changes. If you have not committed any of the changes, you can retroactively create a branch from the current sandbox using the following process:
Do not commit your changes until after you have made the branch. This is important, because you are using a feature of the tag command to make the branch point before the latest set of changes.
Because you can’t commit your changes before starting, it is a good idea to back up the changed files with your operating system’s copy command. Copy the whole sandbox to a temporary directory until after the changes have been successfully committed into CVS.
Use the command cvs tag -b
branchnameto create the branch. The tag command tags the last revisions that were committed to the repository or updated from the repository, which hopefully are the revisions before the changes you want to branch off of. The cvs tag command does not modify your sandbox.Use the command cvs update -r
branchnameto change your sandbox to a branch sandbox. This command causes CVS to try to merge the branch revisions into the files currently in the sandbox, but because the sandbox files are based on the branch revisions, this merge results in unchanged files. CVS sets sticky branch tags on the files in the sandbox, marking them as belonging to the branch.Issue cvs commit to upload your changes in the files to the repository as the next revision on the branch.
Confirm that the files are correct, then delete the temporary backup copy.
This technique relies on the fact that cvs tag marks the repository at the point when the sandbox was last synchronized with the repository. The branch is created at that time, so when you update the sandbox to your branch, CVS tries to merge the base files your sandbox was created from with the files in the sandbox, leaving your sandbox unchanged.
Example 4-12 shows an example of retroactive branching.
bash-2.05a$cvs tag -b test_0-1_branchcvs server: Tagging . T config.h T main.c bash-2.05a$cvs update -r test_0-1_branchcvs server: Updating . M config.h bash-2.05a$cvs commit
If you have committed changes, you can retroactively make a branch from a date with the method shown in Example 4-12, but use the -D
date command option to the cvs tag command.
Creating a Branch Sandbox
To change the files in a branch, check out a sandbox that is based on the branch you want to change. In a branch sandbox, cvs commit commits the changes to the branch in the repository and cvs update brings down changes from the repository copy of the branch to the sandbox.
Create a branch sandbox with the -r
branch-tag-name argument to cvs checkout or cvs update. Figure 4-10 illustrates the results of checking out a branch sandbox. Figure 4-6, in the "Tagging" section of this chapter, shows how to check out a branch sandbox in Cervisia. The only difference is that you select a branch tag rather than a static tag.
CVS marks the sandbox copies of files in a branch sandbox with a sticky tag to record that those files belong to the branch. See Example 4-13 for an example of creating a branch sandbox and a status report of one of the files with a sticky branch tag.
bash-2.05a$cvs -d cvs_server:/var/lib/cvs checkout -r beta_0-1_branch wizzardcvs server: Updating wizzard U wizzard/Changelog U wizzard/INSTALL . . . cvs server: Updating wizzard/src U wizzard/src/config.h U wizzard/src/main.c bash-2.05a$cd wizzard/src/bash-2.05a$cvs status main.c============================= File: main.c Status: Up-to-date Working revision: 1.9 Repository revision: 1.9 /var/lib/cvs/wizzard/src/main.c,v Sticky Tag: beta_0-1_branch (branch: 1.9.2) Sticky Date: (none) Sticky Options: (none)
You can also retrieve individual branch files to a normal sandbox, but I do not recommend allowing yourself to have a sandbox of mixed branch and trunk files. Use checkout from a nonsandbox directory if you want to check out individual files that do not belong to the same branch or trunk as the current sandbox.
Tip
The -A flag with update allows you to revert from a branch sandbox to a trunk. It removes the sticky flags and retrieves the most recent trunk versions of the files. Any changes in your sandbox since the revision that the sandbox files are based on (the BASE revision) are merged into the retrieved files.
Use a branch sandbox like a normal sandbox. Actions based on revisions of a file affect the branch rather than the trunk. Actions based on the repository copy of the file as a whole reflect the full file. For instance, running cvs status in a branch sandbox reports the status of the local copy of the files, the trunk revision numbers for the working and repository revisions, and the current branch tag and revision as the sticky tag.
Adding and Removing Files
When cvs add or cvs remove are applied to files in a branch sandbox, the addition or removal applies only to the branch and does not affect the trunk. Example 4-14 shows the response from CVS after adding a file to a branch.
Merging Branches
Merging a branch to the trunk applies the differences created during the life of the branch to the most recent revisions of the trunk code. Whether this is desirable depends on the reason for the branch; you may want to apply bug fixes to the main code, or an experimental branch may have content you want to merge into the main code. It is also possible to merge changes from the trunk to the branch, or to merge the contents of two branches together.
When you merge a branch, it is good practice to tag the branch at the merge point. Such tags on the branch act as markers to show you when you did each merge.
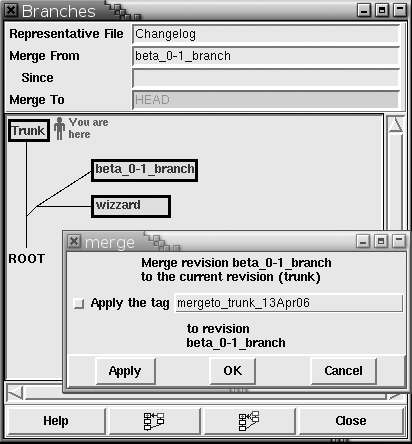
Graphic tools such as TkCVS often include branch merging tools, and some automatically apply a tag at the merge point. Figure 4-11 shows the TkCVS branch merging tool.
Once you have merged two branches, or a branch and a trunk, usually you are left with one unchanged and one changed. If you merge the changes from a branch to the trunk and commit the changed sandbox, the next revision of the trunk will include those changes. If you want to have a copy of the trunk to work from that doesn’t have those changes, you may want to consider merging the trunk to the branch instead, or creating another branch to hold both the current trunk and branch data.
Tip
Remember that HEAD is a special tag that signifies the most recent revision on the trunk (see "Reserved Tag Names" earlier in this chapter).
You will use the HEAD tag during branch merging.
When you finish with a branch, it can seem logical to remove it or somehow close it. However, CVS does not expect you to delete branches. Instead, it keeps them as part of the record of the project. There is no command to mark a branch as no longer to be used. Use a log message to mark the end point of the branch.
Tip
Use the -f flag to cvs commit to force CVS to commit unchanged files, thus storing the fact that you have just merged into the log messages for those files.
Merging from branch to trunk
To merge changes from a branch to the trunk (for example, when you want to merge the development line back into the production line), check out a current sandbox of the trunk and run cvs update -j
branchbasetag
-j
branchname, where branchbasetag is the root of the branch, and branchname is the tag of the branch you need to merge into the root. Resolve any conflicts the merge creates and commit the changes. If the changes are complex, the developers or project leads who manage the branch and the trunk should perform this conflict resolution.
If the branch has previously been merged to the trunk and you tagged the branch at that point, the command cvs update -j
lastmergetag
-j
branchname in the same sandbox merges only the changes since the last merge tag.
Example 4-15 demonstrates merging a branch to a trunk. Here, CVS refuses to remove a file that was changed in the trunk but removed in the branch. The developer doing the merge will have to decide whether to keep or remove the file: in this example, he removed the file. This example also shows an update of the handheld.c file.
bash-2.05a$cvs checkout wizzardcvs server: Updating wizzard U wizzard/Changelog U wizzard/INSTALL . . . cvs server: Updating wizzard/src U wizzard/src/config.h U wizzard/src/main.c bash-2.05a$cd wizzardbash-2.05a$cvs update -j beta_0-1_branch_root -j beta_0-1_branchcvs server: Updating . cvs server: file config.h has been modified, but has been removed in revision beta_0-1_ branch U handheld.c bash-2.05a$rm config.hbash-2.05a$cvs remove config.hcvs remove: scheduling 'config.h' for removal cvs remove: use 'cvs commit' to remove this file permanently bash-2.05a$cvs commitcvs commit: Examining . /home/cvs/wizzard/src/config.h,v <-- config.h new revision: delete; previous revision: 1.4 /home/cvs/wizzard/src/handheld.c,v <-- handheld.c new revision: 1.4; previous revision 1.3
Merging from trunk to branch
To merge changes from the trunk to a branch (for example, when you want to merge the most recent bugfixes from the production line into the development line), check out a current sandbox of the branch and run cvs update -j
branchbasetag
-j HEAD from that sandbox. Resolve any conflicts the merge creates and commit the changes. If the changes are complex, the developers or project leads who manage the branch and the trunk should perform this conflict resolution.
If the trunk has previously been merged to the branch and you tagged the trunk at that point, the command cvs update -j
lastmergetag
-j HEAD in the same sandbox merges only the changes since the last merge tag.
Example 4-16 shows the result and error messages caused by attempting to merge a trunk to a branch. The config.h file has been removed from the branch but is still active in the trunk. This issue needs to be resolved, probably by reverting the removal. The handheld.c file did not previously exist in the trunk but was added to the trunk when the branch was merged to it; the related error message can be ignored.
bash-2.05a$cvs checkout -r beta_0-1_branch wizzardcvs server: Updating wizzard U wizzard/Changelog U wizzard/INSTALL . . . cvs server: Updating wizzard/src U wizzard/src/handheld.c U wizzard/src/main.c bash-2.05a$cd wizzardbash-2.05a$cvs update -j beta_0-1_branch_root -j HEADcvs server: Updating . cvs server: file config.h does not exist, but is present in revision HEAD cvs server: file handheld.c exists, but has been added in revision HEAD U server.c
Merging from branch to branch
To merge changes from one branch to another branch, check out a sandbox of the target branch and run cvs update -j
branchbasetag
-j
otherbranch, merging from the other branch to the checked-out branch’s sandbox.
If the branches have been previously merged and you tagged the source branch at the time of the merge, the command cvs update -j
lastmergetag
-j
branchname in the sandbox of the target branch merges the changes since the last merge.
Keyword issues when merging branches
Keyword expansion (see Chapter 3) can cause conflicts when merging two different revisions of files together. The Revision keyword is the most obvious cause of conflicts, because it expands to display the current revision of a file. Avoid these conflicts by using the -kk keyword-expansion mode, which prevents keywords from being replaced by their associated values.
Merging binary and special files
Changes to binary files and other nonmergeable files cannot be merged from the branch to the trunk automatically. If there are utilities similar to diff and patch for the file type in question, it may be possible to merge such files using those utilities. Otherwise, you’ll need to merge changes manually. You should consider this issue when deciding whether to branch development of such files.
Branch Revision Numbers
An ordinary file’s revision numbers consist of a prefix and an incrementing revision identifier; thus, revision 1.1 is succeeded by 1.2, 1.3, and 1.4 as each change is committed.
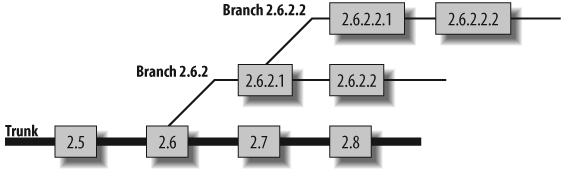
A branched file’s branch number is based on the revision from which it is branched. So, a branch based on revision 1.4 of a file may be branch 1.4.2. Each revision within that branch uses the branch number as its base number and then adds its own number to the end. So, revision numbers for branch 1.4.2 would be 1.4.2.x, where x is the incrementing revision identifier. Remember that a branch is not a single revision; a branch is a line of revisions.
Figure 4-12 shows a branched file and its revision numbers.
CVS never gives a user-created branch the branch number 1.1.1; this number is used for a special branch called the vendor branch.
Magic Branch Numbers
CVS sometimes inserts a 0 in the second-rightmost position of a branch number to make internal code more efficient. This sometimes shows up in cvs log and may affect cvs admin commands on that branch, but it is otherwise hidden by CVS. If this happened to branch 1.4.2, the branch number would be displayed as 1.4.0.2. Revisions on the branch would not have the 0, so the first revision on branch 1.4.0.2 would be 1.4.2.1 and the second would be 1.4.2.2.
This vagary with respect to zeros in branch numbers does not affect how you use CVS; you can refer to a branch without the 0. For example, the commands cvs update -r 1.4.2 and cvs update -r 1.4.0.2 retrieve the same revisions of the same files.
Deleting or Moving a Branch
Deleting or moving a branch is done with the -d or -F command options to cvs tag and cvs rtag, in the same way you delete or move any other tag. CVS also requires the -B option in the command as a way of indicating that you know the tag denotes a branch and that you really mean to move or delete it.
Unless the branch has just been created and no work has been done on it, I recommend against deleting or moving a branch. (Even with a newly created branch, be careful and have a backup.) Most tags can be deleted or moved without affecting a project’s history, but changes on a branch become part of the change record of each file in the branch.
Example 4-17 shows how to delete a just-created branch. (You may also want to delete the branch root tag.)
bash-2.05a$ cvs tag -d -B pre_beta_0-1_branch
cvs server: Untagging .
D Changelog
D INSTALL
D Makefile
D README
D TODO
cvs server: Untagging doc
cvs server: Untagging doc/design
D doc/design/AcceptanceTest.doc
D doc/design/Analysis.rtf
D doc/design/Requirements.doc
D doc/design/Specification.rtf
cvs server: Untagging doc/plan
D doc/plan/Schedule.rtf
cvs server: Untagging src
D src/config.h
D src/main.c
Branching Strategies
This section explains the basis of branching strategies and the two main philosophies of branching. It also provides some answers to the question of when and why you should branch on a project.
Branching Philosophies
The general rule of thumb for branching is that you should keep the main line of development on the trunk; everything else can be branched. The problem is determining the main line of development. Should the trunk contain stable code or unstable code? Should each release be branched when it goes to be tested? Should new features be developed on the trunk or on a branch?
These decisions all stem from two distinct definitions of “the main line of development.” These two definitions result in two different branching philosophies, distinguished here as basically stable and basically unstable.
Basically stable
The basically stable branching philosophy states that the trunk should contain project data that is always close to being ready for release. Branches are used for development, bug fixes, prerelease quality assurance (QA), and refactoring. Branches are also used for experimental code.
The strictest variation of this philosophy states that nothing should be merged to the trunk until it has been through QA. This ensures that at any time a release candidate can be taken from the trunk, put through a small amount of QA, and then published or sold.
More lenient variations of this philosophy allow anything that passes developer unit-testing to be merged into the trunk. Such a relaxed approach requires a release candidate to be branched off and put through a full QA analysis before publication.
Advantages of the basically stable method include the following:
You can take a snapshot of the trunk at any time, run it through QA, and publish it.
Because the trunk contains stable code that changes slowly, you can perform experimental work on a branch with little likelihood of causing errors in someone else’s work when the branch is merged back into the trunk.
The greatest disadvantage of the basically stable philosophy is that merging usually gets done by a QA tester rather than by a person who understands the semantics of the code being merged. Also, the trunk may change significantly between the original time a branch was split from it and the time the branch is merged back. Both of these problems can be reduced by having the developer merge the trunk to the branch periodically, or by using a less strict variation.
Basically unstable
The basically unstable philosophy states that the trunk should contain the latest code, regardless of its stability, and that release candidates should be branched off for QA.
The strictest variation states that all development takes place on the trunk and that branches are used only for release candidates, bugfix branches, and releases.
More lenient variations also allow branching for experimental code, refactoring, and other special-case code. Merging of a branch back into the trunk is done by the managers of the branch.
The advantage of this philosophy is that merging doesn’t happen often and is easier to do, because it is usually done by people familiar with the code.
The disadvantage of this philosophy, especially when applied in its strictest form, is that the main trunk often contains buggy code, experimental work, and sometimes code that doesn’t compile at all. Frequent tagging can reduce this disadvantage, so tag every time there’s good code or whenever someone starts to experiment or refactor. More lenient variations keep the buggiest code and the code most likely to cause significant breakage off the trunk, reducing the time it takes to prepare a release for publication.
Branch Styles
CVS includes code to create and use branches, but it doesn’t enforce any particular technique for using them. This section explains several styles for using branches.
In this section, the term long branch means either ongoing branches or branches that merge several times and then are no longer used. A short branch is merged back to the trunk once and never again used.
CVS permits a branch to be activated again at any time; it has no way of saying that a branch is no longer valid. Ending a branch is done by telling all developers that it will never again be used for active development.
Long branch, merging to branch
An ongoing branch for which the trunk merges repeatedly to the branch is useful for situations in which the trunk should not be affected by changes in the branch, but the branch needs changes from the trunk. Mirror web sites may use this method. See Figure 4-13 for an illustration of how this method works.

Long branch, merging to trunk
An ongoing branch that merges repeatedly to the trunk is useful in situations in which the branch should not be affected by ongoing trunk development, but the trunk needs changes made in the branch. Any situation in which a branch is being tested and prepared for publication can use this branch style. Projects that are in testing can use this method, putting the content that is being tested on the branch and merging corrections back to the trunk. See Figure 4-14.

Long branch, merging both trunk and branch
A long branch that merges in both directions ensures that changes from the branch are integrated to the trunk and that changes in the trunk are integrated into the branch. If the developers working on the branch are doing ongoing development of unstable code, the branch can be merged back to the trunk when each stage is completed, and the branch can be synchronized with changes from the trunk whenever the branch developers are prepared to merge those changes. This method can be useful when mature code is being rewritten one section at a time, while new features are being added on the trunk. See Figure 4-15.

Short branches
A short branch can be a standalone branch used for a simple change. If you want to add a single feature, write experimental code, or prepare for a release, a short, single-purpose branch may be ideal.
You can also use a series of short branches to simulate a long branch merged to and from the trunk. By using a series of short branches, you avoid having to merge branch changes to the trunk and then trunk changes to the branch. Instead, you merge changes from a branch to the trunk, and then start a new branch from the trunk. This method may be useful when both the trunk and the branch have significant changes. See Figure 4-16.

Nested branches
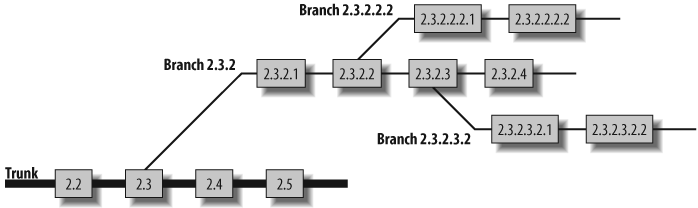
CVS permits you to create branches off of branches. You then treat the root branch as a trunk and manage the subbranch using any of the branch styles discussed in the preceding sections. Nested branches are most useful when using CVS for configuration management. Minimize the nesting complexity to reduce confusion.
If you are writing a new set of features on a branch and need to give a feature to a tester while you continue to work on the branch, you can create a test branch off your feature branch. Figure 4-17 shows a set of nested branches off a trunk.
Branch Policies
Consistent policies can help ensure that branching assists your project. Without consistent rules, you may end up with a mess of branches that are difficult to keep track of.
Having and using consistent policies can also keep merging as simple as possible. Minimizing the amount of merging requires communication between the developers working on the branch and those working on the trunk.
Develop policies that work for your projects and your team. My coworkers and I have found the following policies useful:
Have an overall design for the project.
Ensure that each branch has a definite purpose and minimize the number of currently active branches.
Minimize the complexity of your branching scheme. CVS permits nested branches, but there are few situations where multiple layers of nesting help a project.
Use a consistent branch-naming scheme that expresses the purpose of each branch.
Be aware of semantic differences between a branch and the trunk; good design and good communication can reduce these differences.
An example of semantic difference is when a developer has changed the number (or worse, the order) of parameters in a function and other developers call the function with the old parameters.
Avoid binary files where possible to allow CVS to merge files automatically.
Merge back frequently; the fewer changes there are to the trunk, the easier they are to merge.
Tag the branch at every merge point, so you can avoid merging the same changes twice.
Tag the trunk at every branch point and just before and after every merge, in case you need to retrieve the trunk state at that time.
Use consistent tag-naming schemes for the tags associated with the branches.
Merging Strategies
Chapter 3 contains a section on merging and resolving conflicts (”Updating the Sandbox Files from the Repository“). Conflicts are rare when the developers are working solely on the trunk and frequently committing to the same line of development. However, once a development team starts using branches, there is the potential for lines of development to be kept separate from each other for months at a time. This vastly increases the possibility for conflict, so I am expanding on the process of merging and resolving conflicts. Please read the section in Chapter 3 first, however, as this discussion is based upon knowledge of the information provided there.
The process for a merge is as follows:
If you’re trying to merge a branch to a trunk, a branch to another branch, a trunk to a branch, or any other such combination, go to step 2. In all other cases, try to commit. If the commit succeeds, the process is finished. Otherwise, continue.
Run update to blend the files. Watch to see whether any files have conflicts. If none do, the process is finished. Otherwise, continue.
For each file that has a conflict, edit the file (text mode) or use the merge tool in your graphic client. Note the conflicting lines.
If the conflicting lines can peacefully coexist in the file, edit out the conflict markers and any duplicate lines. Go on to step 7.
If you need to consult with a coworker to decide what to do about the conflicting lines, use log or annotate to determine who wrote them. Consult with your coworkers and decide how to correct the conflict.
Edit the files to correct the conflict, remove conflict markers and remove any duplicate lines.
Check for any additional conflict markers in the current file. If there are no additional markers, commit the file. Otherwise, go back to step 3.
Use status to remind yourself which files still have conflicts. If there are any, choose one and go back to step 3. Otherwise, you are finished.
When Merging Is Easy
The easiest merges are the ones CVS can do by itself, with no human intervention. Those occur when a cvs update produces an M or P result against a file, and doesn’t require any work from you. Those merges don’t need any particular explanation, so this section is about the second-easiest merges.
Merging is easy when you can simply include both sets of changes. Let’s look at a case where the two changes are a comment on an existing function and the creation of a new function. In cases like this, where the changes don’t affect each other, you can remove the conflict markers and any duplicate lines and recommit the file.
Both Bob and Lisa check out revision 1.3. The relevant section of revision 1.3 looks like this:
                TotalTime+=temp-time;
                Add(event,temp-time);
                }
        time=temp;
        }
Record[total++]=time;
}
Bob adds a comment at the end of the function. He commits, and his version now becomes revision 1.4. His section now looks like this:
                TotalTime+=temp-time;
                Add(event,temp-time);
                }
        time=temp;
        }
Record[total++]=time;
}

/* Have we considered the null event? */
Lisa starts a new function on the same line. Her code looks like this:
                TotalTime+=temp-time;
                Add(event,temp-time);
                }
        time=temp;
        }
Record[total++]=time;
}

long GetEvent(  )
{
She tries to commit, but gets the conflict warning.
bash$ cvs commit
cvs commit: Examining .
cvs server: Up-to-date check failed for 'timed-events.c'
cvs [server aborted]: correct above errors first!
cvs commit: saving log message in /tmp/cvsgmS8tS
So she runs update and crosses her fingers that she just gets an M or a P (merge or patch). But no, she gets a C, for conflict.
bash$ cvs update
cvs server: Updating .
RCS file: /home/cvs/src/timed-events.c,v
retrieving revision 1.3
retrieving revision 1.4
Merging differences between 1.3 and 1.4 into timed-events.c
rcsmerge: warning: conflicts during merge
cvs server: conflicts found in timed-events.c
C timed-events.c
She opens the file, and sees this:
                TotalTime+=temp-time;
                Add(event,temp-time);
                }
        time=temp;
        }
<<<<<<< timed-events.c
 Record[total++]=time;
  }

/* Have we considered the null event? */
=======
  Record[total++]=time;
  }

long GetEvent(  )
{
>>>>>>> 1.4
Oh well. It’s not a major issue. She edits the file, removing the conflict markers, and commits. The new revision 1.5 is this:
                TotalTime+=temp-time;
                Add(event,temp-time);
                }
        time=temp;
        }
Record[total++]=time;
}

/* Have we considered the null event? */

long GetEvent(  )
{
When Merging Is Difficult
Having had it so easy, Bob and Lisa have become overconfident. They’re not talking to each other enough, and they are both working on the same function. This often leads to problems. They check out revision 1.8, which looks like this:
long GetEvent(  )
{
    /* FIXME: Currently returns true regardless of events */
    return TRUE;
}
Lisa commits first, and revision 1.9 has a change to the parameters of the function.
long GetEvent(int* currentkey)
{
    /* FIXME: Currently returns true regardless of events */
    return TRUE;
}
Bob also changes the parameters (obviously, they both intend to change the content of the function as well):
long GetEvent(char* name)
{
    /* FIXME: Currently returns true regardless of events */
    return TRUE;
}
Bob tries to commit and has the same problem Lisa did. He tries the update, just as she did, and gets a conflict marker. He opens the file and sees this:
<<<<<<< timed-event.c
long GetEvent(int* currentkey)
=======
long GetEvent(char* name)
>>>>>>> 1.9
{
    /* FIXME: Currently returns true regardless of events */
    return TRUE;
}
He’s not entirely sure who the other person editing the file is. He thinks it’s Lisa, but just to be certain, he uses cvs annotate on the file.
Annotations for timed-event.c
***************
.
.
.
1.9        (lisa    13-Apr-2006): long GetEvent(int* currentkey)
1.5        (lisa    11-Apr-2006): {
1.5        (lisa    11-Apr-2006):         /* FIXME: Currently returns true
regardless of events */
.
.
.
It is Lisa. He goes to her desk with the issue, and the pair of them discuss it. They agree on which parameters the function needs, and Bob then edits the file and commits. The function signature in revision 1.10 looks like this, and all is right in the world (until the next merge!):
long GetEvent(int* currentkey, char* name)
[*] The trunk is the default line of development. If you are using branches, the trunk is the original line of development and the branches are the lines you have added. If you aren’t using branches, your development is automatically on the trunk. See "Branching" later in this chapter for a detailed explanation.
Get Essential CVS, 2nd Edition now with the O’Reilly learning platform.
O’Reilly members experience books, live events, courses curated by job role, and more from O’Reilly and nearly 200 top publishers.

