Excel is one of a series of computer programs commonly referred to as "spreadsheet software.” Spreadsheet programs have become quite popular, because they provide the ability to work with data, typically numeric data, by placing it in a series of rows and columns. The location where a specific row or column intersects is referred to as a cell. Each cell typically holds a specific value that could be text, numeric, logical, or a formula, as shown in Figure 1-1. Calculations can be performed on the values in specific cells. If the values used in a calculation change, Excel automatically recalculates.
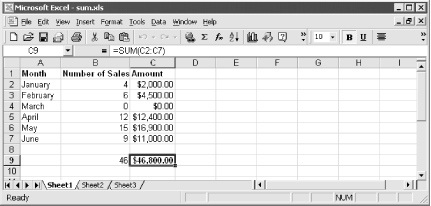
Figure 1-1. Spreadsheet programs provide convenient methods for performing calculations and organizing related data
Excel provides a multitude of unique features, which are covered in detail in this book. Some of the most prominent features include:
- Extensive File Compatibility
Although Excel workbooks have the file extension of XLS, Excel has the ability to open files from several different sources including all Microsoft Office products, HTML, and other major spreadsheet programs. Excel can also save workbooks in several different formats so that they can be opened by other programs. (See Chapter 3.)
- Workbooks for Organizing Common Files
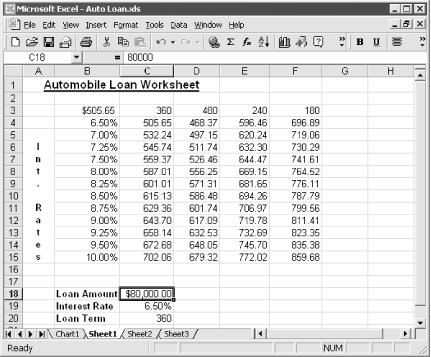
Excel uses workbooks to store multiple related worksheets (commonly referred to as spreadsheets by other programs) and charts. You can switch between different sheets in the workbook by clicking on the corresponding tab, as shown in Figure 1-2. By default, each workbook is created with three worksheets. Additional worksheets can be added using Insert → Worksheet and new charts are added using Insert → Chart. Refer to Chapter 6, for more information. The default worksheet names are Sheet1, Sheet2, and Sheet3.
- SDI (Single Document Interface)
Excel 2000 uses a Microsoft Windows feature called Single Document Interface. This feature allows you to have multiple workbooks open simultaneously but only one version of Excel is actually running. On the View tab on the Options window (Tools → Options) you can specify whether each open workbook should be listed on the toolbar. By default, Excel displays an icon for each workbook so that you can switch between the open workbooks by clicking on the corresponding icon on the toolbar.
- Extensive List of Built-In Functions
Excel comes with a multitude of built-in functions that can be used to add more complex calculations and data manipulations to your workbook. These functions can be selected using the Insert → Function command. Additional functions are available by loading the Analysis ToolPak that comes with Excel. This book provides detailed descriptions of the Excel functions. For more information, refer to Part II of this book.
- Extensive Text Formatting
Excel allows you to perform extensive text formatting. Not only can you apply different formatting to each cell in the worksheet, but Excel allows you to format each character within the cell differently. For example, you may want the first character in the word to be bold and the remaining characters to be in italics. You can also change the orientation of the text within the cell, as shown in Figure 1-2, where the text “Int. Rates” displays vertically within the cell.
- Useful Charts
Excel comes with several different default chart types that can be used to chart the data within a worksheet. These charts can be selected using the Insert → Chart option. You can also create custom chart types. For more information, refer to Chapter 10.
You will be installing Excel 2000 from either the Office 2000 or the Excel 2000 CD-ROM. When you insert either one of these CDs the installation process should begin automatically. The installation program will prompt you for your name and company name, request the CD key listed on the back of the CD case, and then prompt you for the components to load.
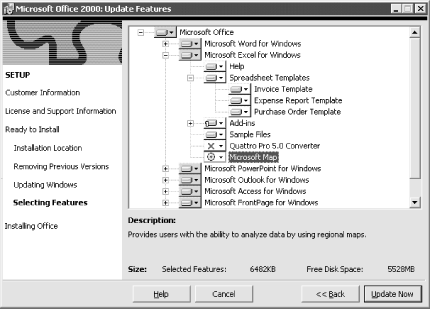
Office 2000 products provide a different approach to the installation process. Figure 1-3 shows the Excl installation options. The Selecting Features option presents a Windows Explorer tree where you select the method for installing each of the components. You can expand the component list by clicking on the + next to each list.
Note
Figure 1-3 is from the installation of the Office 2000 Professional CD. If you purchased Excel as a separate product, you will not have the option of selecting the other Office products.
You can choose to install each Excel component in a number of ways:
- Run from My Computer
This installs the selected component on your hard drive.
- Run all from My Computer
Taking things one step further, this option installs the software and all of its components on your hard drive. This eliminates the need to keep the CD handy because everything is installed on your machine, but it does require more hard disk space.
- Run from Network
You won’t see this if you’re installing on a stand-alone PC. This option lets you run Excel from a network server, and not from the local drive. You don’t want to choose this unless you have continuous access to the network server, or you risk not being able to run the software later.
- Run all from Network
Again, you will not see this option if you do not have access to a network. This option installs every component of Excel on the network, not just the main program.
- Run from CD
This type of installation sets your computer up to initiate the program and then demand the Office or Excel CD whenever you attempt to run that component of the program.
- Run all from CD
This option puts a shortcut to the program on your computer. When you double-click the shortcut (or select it from the Start menu), you’re prompted to insert the CD, and then the program runs. When you choose this option, the main program and all of its parts are run from the CD, and none of it is loaded on your computer.
- Installed on First Use
This is a good option if you’re not sure which components you will need. Components are installed only when they are first used and the Office installation files are required. Again, make sure you keep the CD handy so that you can insert it if requested.
- Not Available
Choose this option to make a component completely unavailable within Excel. For example, in Figure 1-3 I marked the Quattro 5.0 Converter component as not available because I do not anticipate needing that feature. If you choose to make a component unavailable and then later decide you want it, you have to rerun Setup to get it.
When you select the installation method the icon next to the selected component changes to reflect the type of installation selected for the component.
Note
If you insert the Office 2000 CD into a computer on which Office 2000 is already installed, the installation options change to allow you to add or remove components from your installation, repair your existing installation, or remove the installation from your computer altogether. You will want to select the Repair option if you need to reinstall your Office 2000 programs based upon the original settings.
Get Excel 2000 in a Nutshell now with the O’Reilly learning platform.
O’Reilly members experience books, live events, courses curated by job role, and more from O’Reilly and nearly 200 top publishers.

