Chapter 1. Your First Database
FileMaker Pro databases can be as simple as a phone list for the soccer team or as complex as a company-wide system for purchasing, sales, inventory, invoicing, shipping, and customer tracking. But they all have a few important aspects in common and essentially work the same way. This chapter gives you a tour of FileMaker’s major features and gets you up and running on your very first database.
FileMaker’s vast assortment of tools and options can make its window as intimidating as a jumbo-jet cockpit. But the program’s menu commands, dialog boxes, keyboard shortcuts, and other options stay largely consistent across all databases, from the most basic to the most high-powered. Almost everything you learn in the next few pages applies to every database you’ll ever use.
Note
Because a database usually solves a problem of some kind, some FileMaker experts call a database a solution, as in, “I can create an inventory solution for your bakery, but it’s going to cost you some dough.” Usually, database and solution mean the same thing, although the term solution sometimes implies a system of several connected databases (more on that in Part 3).
A Very Quick Database Tour
Every FileMaker Pro database has two things in common: One, it stores heaps of information; and two, it gives you the tools to manage that information. Whether you start from one of FileMaker’s templates (Section 1.1.2.2) or a completely blank slate (Section 1.2.1), your new database starts out data-free. It’s an empty vessel waiting to be filled. (It would be nice if the program could figure out what data you want and enter it for you, but that probably won’t happen until FileMaker Pro 8008.) You have to take care of the data entry yourself. At first, all you see in the window are the tools—buttons, controls, and pop-up menus—that you use to fill the database up with data.
Every database window has the same basic structure. FileMaker provides a handful of special items around the window, as you can see in Figure 1-1.
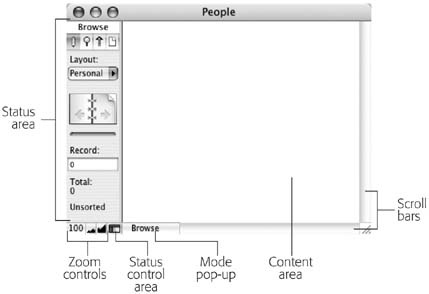
Content Area
While some features like the status area, zoom controls, and Mode pop-up menu stay the same no matter which database you’re using, what’s inside the content area is the actual information (data) that makes each database unique.
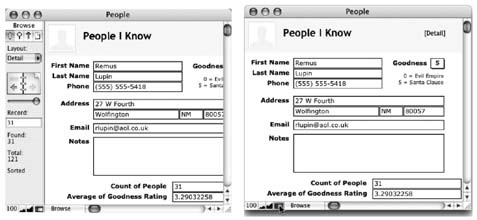
When you create a new FileMaker database, you start with something that looks a little like Figure 1-1: plain and simple. That’s because you haven’t added any content yet. In Figure 1-2, you can see what your database will look like once you’ve started to fill it in. Depending on how you want to look at your information, you can use the controls described below to alter how your content appears onscreen.
Mode pop-up menu
This unassuming menu may not be the most prominent control in the window, but it’s one of the most important. Each of FileMaker’s four modes is a work environment unto itself, specially designed to help you view, edit, organize, or present your information in a specific way. Use this menu to switch modes depending on what you need to do.
In stark contrast to rational expectations, you use Browse mode for more than browsing. In this mode, you can add, change, and view data in your database. Browse is the view shown in Figure 1-2, and it’s where you’ll spend most of this chapter.
When you have a lot of data, looking through it all for a particular bit of info can be tedious. Use Find mode to let FileMaker do the looking for you. You tell FileMaker what you’re looking for in Find mode; when it’s done looking, FileMaker returns you to Browse mode and shows what it found. You’ll see Find mode in action on Section 1.6.3.
Figure 1-2. Unlike the stark emptiness shown in Figure 1-1, this database is well underway, as you can see by the abundance of the content area. Left: The status area is part of all FileMaker databases, regardless of what they contain. Right: Maximize your view of the content area by hiding the status area with a simple click on its control.In addition to using databases (viewing, finding, sorting, adding, and changing data), you can use FileMaker to build databases. Layout mode is where you design the screens (or layouts) that present your database information to best advantage. Part 2 is all about Layout mode.
Although computers make maintaining and manipulating mountains of information a breeze, there’s still no avoiding paper. Eventually you’ll want to print something out, like a set of mailing labels or a paper backup of all your records. If you’re ever curious about how something will look when printed, switch to Preview mode. It shows a one-page-at-a-time view of your data exactly as it will appear when printed.
To use the Mode pop-up menu, just click it and choose one of the four modes. Your FileMaker window instantly switches to the new mode. You can also glance at the pop-up menu to see which mode you’re currently in. (The Mode pop-up menu is the most popular way to mode-hop, but there are plenty more; see the box on Section 1.2.)
Status area and the status area control
No matter what mode you’re in, the status area (Figure 1-1, left) is your central command center. This slim panel lets you see how much information you’ve got in your database and your current position within it. It also has the controls you’ll use most often for both adding information to your database and accessing it later. If you’re like most people, at some point you’ll come to resent the fact that the status area takes up so much space on your screen. Despite the fact that it usually contains just a few numbers and icons, it eats up a good inch of space along the entire left edge of every window. Luckily, you can easily conceal the status area when you don’t need it, as shown in Figure 1-2.
Zoom controls
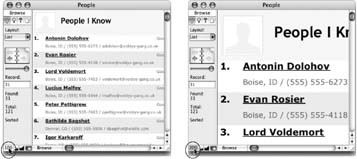
One of FileMaker’s neatest features is the zoom control. No matter what you’re doing, you can always zoom in for a closer look or zoom out for the big picture. This feature works no matter what mode you’re in—even when you’re previewing a printout.
To use FileMaker’s zoom control, click the Zoom In button for a closer look (each click zooms in a little more). You can zoom in up to 400%, so that everything is four times bigger than normal. If you click Zoom Out, everything shrinks, as small as one quarter of its normal size. The Zoom Level shows your current level, and clicking it takes you back to 100%. Clicking the Zoom Level a second time returns you to the last zoom level you were viewing (see Figure 1-3).
Note
Since you probably don’t need to examine the words and numbers in your database on a microscopic level, you’ll probably use the zoom control mostly in Preview mode to fit the whole page on the screen, or to adjust the contents of your FileMaker window to the most easily readable size (depending on the resolution of your monitor).
Scroll bars
Every window has horizontal and vertical scroll bars that appear whenever you have more content than the window can display. (For an example, see Figure 1-3.) If everything in the content area fits in the window, you won’t see scroll bars—after all, you don’t need them. FileMaker’s scroll bars work just like the ones in any other program, and you can use your keyboard to scroll up and down as well. Press Page Up to scroll up one screenful. Page Down scrolls the other direction. To scroll all the way to the top or bottom, use the Home and End keys respectively. (Don’t toss out your mouse yet, though. There’s no way to scroll right or left with the keyboard.)
If your mouse has a scroll wheel, you’ll notice that it works a little differently in FileMaker. What you scroll through varies based on where you put your mouse cursor—a feature called contextual scrolling. The wheel scrolls through the window when the cursor is inside the content area of the window. It scrolls through the records in your database if you run the cursor over the Book icon in the Status area (Section 1.1.2.1). And if you put your cursor over a field that has a scroll bar (Section 4.4.7.2), the scroll wheel scrolls through the text in the field.
Note
Don’t be alarmed when the menus across the top of your screen change a bit when you switch modes. That’s just FileMaker being smart. Some commands aren’t useful in some modes, so the program doesn’t clutter up your screen—or your brain space—with menus when you don’t need them. For example, the Insert and Format menus change from black to gray (meaning unavailable) when you enter Find mode. The Request menu, though, appears only in Find mode.
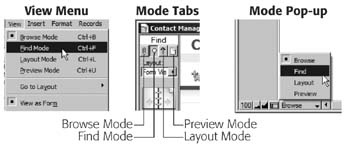
Switching between FileMaker’s four modes is such a common task that the program actually gives you four ways to do it. The Mode pop-up menu (Section 1.1.1) is just one way. You can also use the Mode tabs in the status area (shown here at left), or pick a mode from FileMaker’s View menu (right).
The keyboard shortcuts are speediest of all:
Press Ctrl+B (⌘-B) to switch to Browse mode.
Press Ctrl+F (⌘-F) to switch to Find mode.
Press Ctrl+L (⌘-L) to switch to Layout mode.
Press Ctrl+U (⌘-U) to switch to Preview mode.
If you ever forget these shortcuts, check the View menu to refresh your memory.
FileMaker also gives you several ways to find out which mode you’re in. The Mode pop-up always displays the current mode, and since it’s always visible, it’s the easiest place to check your mode. But the Mode tabs also reveal the current mode, and the View menu indicates the current mode with a checkmark. So when you return to FileMaker after checking email, you’ve got plenty of ways to reorient yourself.
Creating a New Database
The best way to understand the concepts introduced in this chapter is to get some mouse-on experience. Fortunately, FileMaker Pro gives you a quick way to jumpstart a new database.
Although a database can do just about anything, most people want to do a few of the same things (like keep track of their contacts). Accordingly, FileMaker Pro comes with dozens of prebuilt templates: sample databases that you can fill in with your own data and even customize as you see fit. A template is essentially a sample database, without any information filled in yet. Templates let you start up a database quickly, and as you go along, change or expand it to suit your needs. Almost any conceivable database can be built on one of these foundational layouts; see the box on Section 1.1.2.2 for the full catalog.
Tip
if you’re the DIY type, see Chapter 3 for instructions on designing your own database layout from scratch.
Since just about everybody in the world needs to keep track of people, a good place to start your FileMaker experience is with a Contact Management database, which does just what its name suggests: It keeps track of people and their various numbers and addresses. This is the template you might use if, for example, you volunteer for a local repertory company and need a place to store the names and addresses of all season-ticket holders. Once you’ve entered all the information, you can use the database to, say, print letters asking your subscribers for donations to provide new cup holders for the orchestra pit.
Choosing a Template
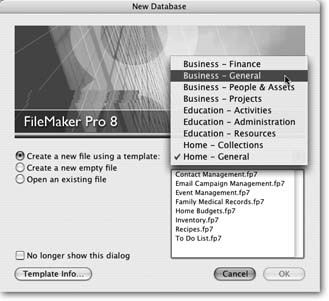
To start a new database from a template, you start by opening the template. Launch FileMaker Pro (by using the Start → Programs menu in Windows, for example, or clicking its Dock icon on the Mac) and choose File → New Database. The New Database dialog box appears, as shown in Figure 1-4.
Note
Keyboard shortcut aficionados beware. If you’re used to typing Ctrl+N (⌘-N) for a new document, you’re in for a surprise. In FileMaker, that command makes a new record, not a new file. So when you really do want a new file, you’ll have to resort to using the mouse and the menu.
To open the Contact Management template:
In the New Database dialog box, select the Business – People & Assets category from the pop-up menu.
The list shows each template in this category. You can, of course, choose any template that looks like the database of your dreams, but in this example you’re looking for Contact Management.
In the Business – People & Assets list, select Contact Management.fp7, and then click OK.
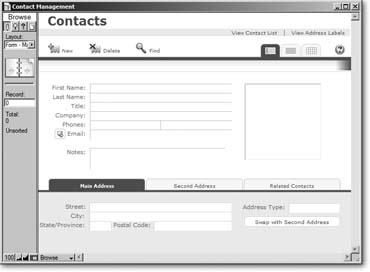
FileMaker displays a standard Save dialog box.
Name the new database and save it somewhere on your hard drive.
The new database appears onscreen, as shown in Figure 1-5.
Opening and Closing Database Files
Each database you create with FileMaker Pro is stored in a file on your hard drive—just like your Microsoft Word documents, Excel spreadsheets, and all the PowerPoint presentations you’ve ever created. This file contains all the information about how the database is structured, plus all the information stored inside it, which means you can open, close, copy, or back up a database as you would any other file. But if you need a bit more explanation, this section explains how to do those tasks, including some quirks that are particular to FileMaker files.
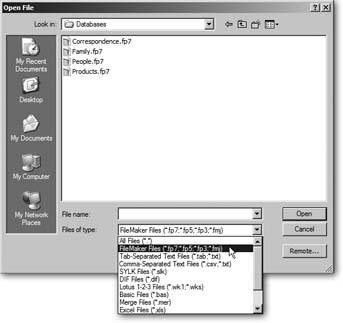
Opening a Database
To open a database that already exists, open FileMaker Pro and choose File → Open Database. Now select the file you want to work with (Figure 1-6). If you prefer, you can find the file using Windows Explorer (Windows) or the Finder (Mac OS X) and double-click its icon.
When you open a database, you’ll see one or more windows on your screen. If you’ve opened the Contact Management Template you created on Section 1.1.2.2, you have one database open, and that database has one window displayed.
Closing a Database
To close a database, close all of its windows in FileMaker: Choose File → Close or press Ctrl-W (⌘-W) When you have more than one database open, it isn’t always easy to tell which windows go with each database.
If you’re not sure what to close, there’s an easy way to close all the windows in all the databases you currently have open. Hold down the Alt key (Windows) or the Option key (Mac), then click the trusty File menu. In place of the Close command, you’ll see the more powerful Close All. Choose it and FileMaker closes all its open windows, which also closes all your open databases.
If you don’t see the box pictured in Figure 1-4 when you choose File → New Database, you may have told FileMaker to stop showing it to you (probably by turning on the “No longer show this dialog” checkbox also shown in that figure). To get the template-filled box back, follow these steps:
Click Cancel in the dialog box that did appear, if you haven’t already. The imposter window goes away.
If you’re on Mac OS X, choose FileMaker Pro → Preferences. If you’re on Windows, choose Edit → Preferences. The Application Preferences dialog box appears automatically, with the General tab in front by. At this point, you can change a handful of settings that apply to the FileMaker Pro program itself.
Make sure “Show templates in New Database dialog box” is turned on.
Click OK. Bye-bye preferences.
Choose File → New Database again. Now the New Database window shows the full complement of templates.
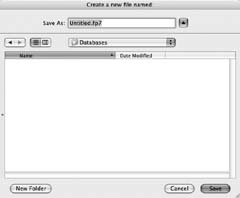
If templates aren’t your bag, you might find the New Database dialog box a bit of a drag, since you have to turn on “Create a new empty file” and then click OK every time you make a new database. Instead, just follow the steps above, but turn “Show templates in New Database dialog box” off. Now, when you choose File → New Database you’ll see the template-free “Create a new empty file named” dialog box right away.
Saving Your Databases
Everybody knows that it’s important to save files early and often, right? So you’re working along in FileMaker entering information about your office birthday roster, and as good habit dictates, you type the keyboard shortcut that saves in practically every program in the known universe (that’d be Ctrl+S on Windows and ⌘-S on the Mac). Up pops the wrong dialog box. This one’s asking you how you want to sort your data! What gives?
Don’t worry, FileMaker has you covered. The program automatically saves all your work in a cache, which is part of your computer’s RAM (Random Access Memory). Then, periodically, FileMaker transfers the information from the cache to your hard drive—where it’s secure.
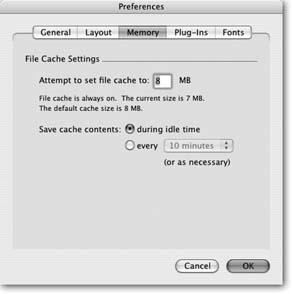
You can control how much work is held in cache before it’s saved to your hard drive, as described in Figure 1-7. In Windows, choose Edit → Preferences, then click the Memory tab. On the Mac, choose FileMaker Pro → Preferences, then click the Memory tab.
Saving a Copy of Your Database
Chances are the data in your database is important (would you really go to all this trouble if it weren’t?). Although FileMaker automatically saves your work as you go, what if the database file itself gets lost or suffers some digital harm? It’s in your best interest to back up your database periodically. You can perform a backup by simply copying the database file. For example, you can copy it to a CD, email it to a friend, or duplicate it and tuck the copy away in another folder. The easiest way to make a backup is to choose File → Save a Copy As. You’ll see the typical Save dialog box. Just make sure that “copy of current file” is selected as the Type option. When you click OK, FileMaker makes your copy in the background, then you can continue working in the original file.
But if you want to start working in the copy you’ve just made, select the “Automatically open file” option before you click OK. FileMaker makes the copy of your file, then helpfully opens it for you. FileMaker doesn’t close the original file for you, so if you’re finished with the original, choose it from the Window menu, then close it to avoid confusion. Now only your new copy of the file is open.
If you want to make a copy of your database to send to an associate in another office, chose the “Create email with file as attachment” option. FileMaker copies your file, then launches your email program, creates a new email, and attaches your newly minted file copy to it. All you have to do is provide an email address, type your message, and click Send. See Section 17.2.1 to see how you can use similar options if you only want to send data to your associate in another format, like Excel or a PDF file.
Warning
You should always make sure a database is closed before you copy its file using any of the desktop methods (like Edit → Copy in Windows Explorer or the Mac’s Finder, for example). If you copy the database file onto another disk while it’s open in FileMaker, the copy you made may be damaged or missing information.
Saving a clone of your database
There’s no ban on cloning in FileMaker. Clones are clean copies of your database, but without any of your valuable data. Clones are really useful, like when you’ve designed a killer database for running sales in your Dart and Billiards Supply Shop and you want to send the files to all your franchisees without giving away your store’s sales data. Just make clones of your files and give them to your proud new owners. To make a clone, chose File → Save a Copy As, then make sure “clone (no records)” is selected as the Type option.
Adding Records to Your Database
When you first open a new FileMaker database (the Contact Management template in this example), it has everything you need to make a database except…well, data. Now that you understand the basic components of a FileMaker database, it’s time to start adding your own content. Whether your database contains information about individual persons, objects, pictures, dung beetles, or whatever, FileMaker always thinks of that information in individual chunks called records. Each record contains everything the database knows about that person, thing, insect, or whatever.
Now, because you need to store many smaller pieces of information in each record (like a person’s phone number, address, birthday, and so on), FileMaker can bestow each record with an almost infinite number of fields—the specific bits of data that define each record and make it unique.
For example, each person in a database of magazine subscribers gets her own record. Her first name, last name, phone number, street address, city, state, zip code, and the expiration date of her subscription are all examples of fields each record might include.
The techniques in this section work the same whether you’re creating a new database for the first time (from the Contact Management template described on Section 1.2.1, for example), or adding to an existing one (like the example file described on Section 1.6.1).
Note
All records in a database must contain the same fields, but that doesn’t mean you have to have to fill them all in. For instance, in a gift list database, if your boyfriend refuses to disclose his hat size, you can just leave that field blank in his record.
Creating a Record
When you opened the template for your Contact Management database (Section 1.2.1), it was blank and lacking in even a single record, so the first thing you need to do is create one. It’s simple: Choose Records → New Record or press Ctrl+N (⌘-N). (Since you’ll be creating lots of records in your FileMaker career, this is one keyboard shortcut you’ll want to memorize.)
Note
When you’re adding new records, you must be in Browse mode (see Section 1.1.1).
Editing a Record
Now that you’ve created a record, you can enter information about the first person you want to keep track of. This is where those fields come in handy. To enter information in any field in a record, just point, click, and type. What to type? As Figure 1-8 illustrates, each field in this database has a label to its left, which indicates the type of information the field contains. Each field is also outlined in a light gray color.
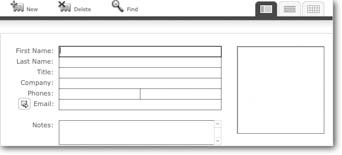
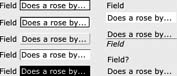
Fields are inside the content area (see Section 1.1.1), so don’t be surprised if they don’t always look the same. Unlike the status area, FileMaker Pro’s content area is one place you can let your creative urges go wild. You can design your database to make them look almost any way you want. A field can have a label to the right of—or below or above—where you enter text, or no label at all.
A field can be white, blue, green, or any other color. The same goes for the border around a field. In fact, if mystery is your thing, you can make your field invisible—no label, no border, and no color. (But here’s a tip: When designing your own databases, make sure folks can tell where the fields are and what goes in them.)
Usually, if you click in a blank space in the content area, all the fields appear with the dotted outline shown in Figure 1-14, but you can’t count on this (you can turn this feature off, as described on Section 4.4.3.1). So don’t expect every field to look like those shown here.
See Chapter 3 for more detail on customizing and beautifying the fields in your database.
Moving between fields
To get from the field you’re in to another where you can add or edit text, the most obvious way is to reach for the mouse, slide over to the new field, and click. Unless you’re eager to burn that extra half a calorie, you may want to try a quicker, less exercise-intensive way, like the following:
Press the Tab key to move to the next field. If you’re not in any field, the Tab key puts you in the first field.
Hold down the Shift key and press Tab to move to the previous field. This time, if you’re not in any field, FileMaker puts you in the last field.
Note
If you’re wondering who decides which field is next or previous, dig this: you do. When you design a database, you get to set the Tab Order, or the order FileMaker follows when you press Tab or Shift-Tab to move among fields. See Section 6.4 for details.
Adding More Records
When you’ve filled in all the fields and you’re ready to move on to your next subscriber, you must create an additional record to hold that contact, as each record can contain only one person’s information. You’ve probably already figured out that you can just select Records → New Record again, and get another empty record to fill. You’ve also figured out you’ll be creating records a lot as you enter all your subscribers. To speed things along, you can use the New Record keyboard shortcut: Ctrl+N (⌘-N).
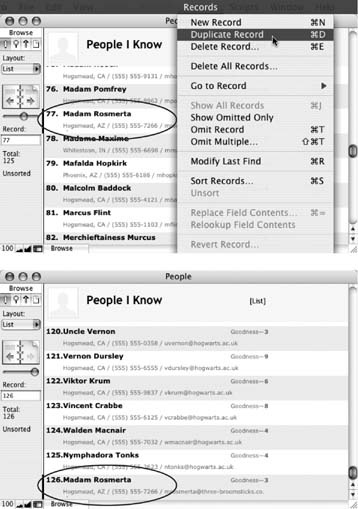
Duplicating a record
While no two people are alike, it may not always seem that way from their contact information. For instance, if you want to include three people from the same company in your database, the data in the Company field is the same for each person.
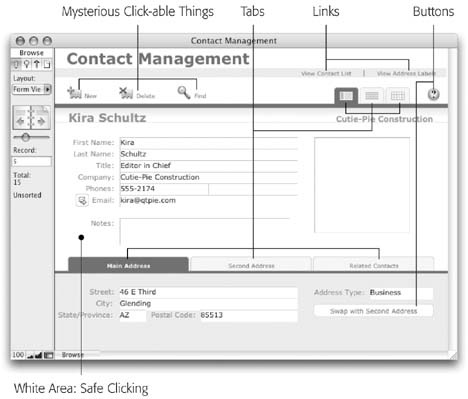
The database template you’re using in this chapter has an assortment of buttons in its content area (they’re all labeled here). They can look like tabs, text links, or just about anything else (a few even look like buttons). A click on one of these might show you things you’re not familiar with—maybe even make you feel like you’ve lost your place.
To avoid an accidental left turn when you try to commit the record, avoid clicking a button by clicking somewhere in the empty white area around the fields (see figure below).
If you’ve already clicked a button, and now you’re lost in the wilderness, finding your way back won’t require a trail of breadcrumbs.
Just follow these steps, in order.
If you see a button in the status area called Continue, click it. (If you don’t see that button, don’t worry—just skip to the next step.)
If the Mode pop-up doesn’t say Browse, click it and choose Browse from the menu that appears.
In the status area, under Layout, you should see a pop-up menu. Make sure this menu reads “Form – Main Address.”
The Email and Phone fields won’t be the same, but they might be close. It’s time for a little organized laziness to kick in: Instead of making new blank records and retyping all that stuff, just choose Records → Duplicate (Figure 1-9). FileMaker displays a new record containing all the same information as the record you chose to duplicate. (FileMaker copied everything from the first record into a new one for you.) Now you can just edit the information that needs to be changed.
Tip
Be sure you don’t accidentally leave in the first person’s email address or phone number, lest a message or phone call get misdirected later.
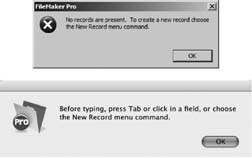
When you create a database, FileMaker is nice enough to create the first record for you, so you can start typing right away. But when you start a database using a template, you’re not so lucky. If you try clicking in a field, you’re met with the first error message shown at top. Luckily, that error message tells you exactly what you need to do: Choose File → New Record first.
This minor annoyance is forgivable, since it’s so easy to work around (and frankly, most databases don’t stay empty for long). Unfortunately, another common error message is twice as annoying. If you try typing something before you’ve clicked in a field, FileMaker decides it better warn you with the box shown here. Apparently, the folks at FileMaker are afraid you’ll type madly away before you figure out nothing’s showing up onscreen.
So instead, you’ll have to dismiss an error message every time you bump a key on your keyboard. This gets annoying quickly, but there’s no way to get rid of the error message for good. Just remember that you have to be in a field before you can start typing.
Deleting records
Last but not least, getting rid of a record you no longer need is a breeze. FileMaker Pro gives you three commands that let you delete one record, a group of records, or even all the records in your database.
Warning
Deleting records can’t be reversed. There’s no Undo option, since FileMaker saves changes automatically (Section 1.4). So when you delete a record (or all the records in a database), make sure you’re ready to part with the data.
One record. Just choose Records → Delete Record to delete the record you’re currently on. FileMaker asks if you’re sure you want to delete the record, lest you accidentally send, say, your aunt’s address to the trash bin. If you’ve indeed written her—or anyone else—out of your life, simply click Delete in the message box to complete the purge.
Multiple records. FileMaker has a neat command (Records → Delete Found Records) that trashes any group of records of your choosing. Before you can use this command, you have to tell FileMaker what those records are, which you do by using the Find command (Section 1.6.3.1). In your FileMaker career, you’ll often use the Find command to locate the records you want to act upon before you tell FileMaker what to do with them.
All records. In some cases, you may want to delete all the records in a database. Maybe your friend wants an empty copy of your database for his own use. Or perhaps your database holds data you just don’t need anymore, like test results you’re about to reproduce. Complete record elimination is easily accomplished by way of two menu commands: Just choose Records → Show All Records, then choose Records → Delete All Records.
Revert the record
Now that you know how to edit a record, and what it means to be in a record (see the box on Section 1.5.3), you can learn about one of FileMaker’s most overlooked features: the Revert Record command. Its purpose is simple: Choose Records → Revert Record and FileMaker throws away any changes you made since you first entered the record. This trick comes in handy when you accidentally modify a field by bumping into the keyboard, or realize you accidentally entered Uncle John’s address in Aunt Ethel’s record. Just revert the record and you can be confident that whatever you did has been forgotten.
But keep in mind that the Revert Record command is only available when you’re in a record, and you’ve made changes. If you don’t have the record open, or you haven’t made any changes since you last committed the record, the Revert Record command is grayed out.
Note
Committing a record isn’t exactly difficult: You just press Enter or click somewhere in the window and FileMaker dutifully saves the record without a peep. Once this happens, you can no longer choose the Revert Record command. (How’s that for commitment?) If you want a little more control, you can tell FileMaker to ask you for confirmation before a record is committed. You’ll learn how to do this on Section 4.4.3.1.
Using the tools described so far for adding, deleting, and editing records in your database, you can quickly amass a large number of records. The next section explains how to find your way around this vast body of information.
Navigating Your Database
As exciting as it is to enter data into a database—well, the first time anyway—chances are you’ll also want to look at those records again at some point. In fact, some might say that’s the whole point of building a database. But first, you need to learn how to navigate around the records in the database, which this section explains. Fortunately, moving around a database isn’t nearly as tough as following maps and highway signs in a foreign country. FileMaker makes it easy to skip from one record to the next, all the while keeping you abreast of where you are.
Tip
As you go through this section on navigating, it helps to have a database open in front of you so you can follow along and try some of these techniques. Since you probably don’t have many records in the Contact Management database you just created, there’s a sample one for you to download on the “Missing CD” page at www.missingmanuals.com (Section 3.4.5).
Navigating Record by Record
In the Contact Management database, you can add as many records as you want. But you can view only one at a time in the window FileMaker displays. To tell FileMaker which record you want to look at, you have three options:
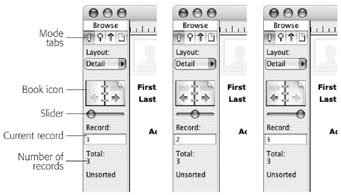
The book icon lets you flip from record to record one at a time. Pretend your database is a book, with each record on its own page. To get to the next record, click the right-hand page. To go back, click the left-hand page. If you can’t go any further in one direction, the appearance of the icon’s “page” changes, as shown in Figure 1-10.
Figure 1-10. The status area is the key to record navigation. In addition to displaying the controls for switching records, the status area indicates where you are in the database. This series of pictures, for example, shows the status area when you’re on the first record in the database (left), a record in the middle of the database (middle), and the last record (right). Notice how the appearance of the Book icon and slider changes in each picture.The slider is kind of a turbo-charged version of the Book icon. Instead of clicking once for each record, you can advance through a bunch of records by dragging. If you know approximately where you want to go (like “around half way” or “about one-third from the end”) then the slider is the quickest way to get there. The slider is most handy when you want to get to the beginning or the end of the database. In that case, just drag the slider as far as it will go in either direction.
The Current Record indicator serves two purposes. First, it shows you which record you’re on. Second, if you know which record you want to be on, you can simply type in the record number to jump to it. Below the Current Record, the status area also shows you how many records are in your database.
Keyboard Shortcuts
FileMaker also has a few keyboard shortcuts to make record navigation painless. If you haven’t used a database program before, you’ll notice that some keys act in ways you might not expect—like the Enter key, as described below. Still, spending a little time getting used to using these keystrokes will save you hours of time down the road.
To go to the next record, press Ctrl (Control)-Down Arrow.
To move to the previous record, press Ctrl (Control)-Up Arrow.
If you press Esc, you’ll jump immediately to the Current Record field, ready to type in a record number. (This shortcut only works when you’re not in the record; see Section 1.5.3.)
Pressing the Enter key commits the record (Section 1.5.3), rather than inserting a new line in a field, as you might expect based on what the Enter key does in other programs. To insert a new line in FileMaker, press the Return key.
Pressing the Tab key moves you from one field to another. (To indent a line you have to type a tab character into a field, by pressing Ctrl+Tab [Option-Tab].)
Finally, bear in mind that you can change these things on a field-by-field basis when you’re designing a database, as you’ll learn in Chapter 3. For instance, FileMaker lets you decide that Return—not Tab—should move you from field to field. If you make that choice, Tab types a tab into a field, and Return doesn’t insert a blank line. There’s unfortunately no way for you to tell which key does what by looking at a field—you just have to try some of these keys to find out.
Finding Records
When your database really gains some size, you’ll realize that even keyboard shortcuts aren’t the fastest way to get to the record you want. You need to tell FileMaker to pull up the record for you. For example, you have a season’s ticket holder whose last name is Spinnet and who just renewed her subscription for a year. You need to find her record and make the update, and you don’t have all day.
Suppose you have 126 records in your Contact Management database; it could take ages to find the one you want just by clicking the Book icon. Instead, switch to Find mode and tell FileMaker what you’re looking for, and the program finds it for you. This section explains how to use Find mode to search for a record or group of records, and how to edit your search if you don’t get the results you anticipated. (If you downloaded the example file discussed on Section 1.6.1, you can open it and try out Find mode now.)
You can get to Find mode in four ways:
The Mode pop-up menu, Mode tabs, and View menu all indicate what mode you’re currently in. Once you’re in Find mode, your window should look like Figure 1-11.
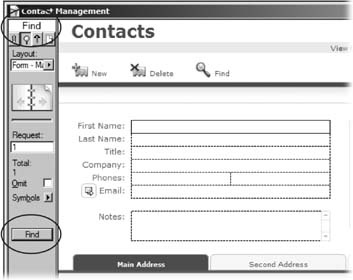
Find mode looks just like Browse mode (where you’ve spent all your time up until now). The best way to tell that you’re in Find mode is to look for clues in the Status area or Mode pop-up menu. Find mode also seems to work the same way—you can edit data in your fields and add, delete, or navigate through records. But don’t be deceived: Find mode is very different from Browse mode.
Note
Another subtle clue indicates you’re in Find mode: The borders around fields have a dashed-line appearance when the record is active. In Browse mode, active fields are bordered by a dotted line.
Even though it may seem like you’re editing records in Find mode, you’re actually not—you’re editing requests instead. Requests describe what certain records look like, so FileMaker can find them for you.
You just need to enter enough information to tell FileMaker what you want. It then looks for records that have the same information you entered, much like searches you conduct using other programs.
Performing a Find
Say you want to find every person in your Contact Managements database whose last name is Spinnet. Here’s what you would do:
Choose View → Find Mode (or use any of the other methods described above to get to Find mode).
The window is now in Find mode, as you can tell by a quick glance at the Mode pop-up menu.
Type Spinnet into the Last Name field.
This works just like Browse mode: Simply click to place your cursor in the field and then type. (Remember, you aren’t editing a record—you’re editing a request.)
Click the Find button in the Status area.
(You can also choose Requests → Perform Find or simply press Enter.)
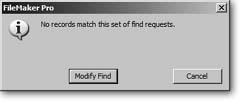
FileMaker then looks for any records that have “Spinnet” in the Last Name field. If the program doesn’t find any, you see the message pictured in Figure 1-12. On the other hand, if FileMaker did find some records, you wind up back in Browse mode, presented with the records FileMaker found. (Technically, these records are called a found set. You’ll learn much more about found sets in the next chapter.)
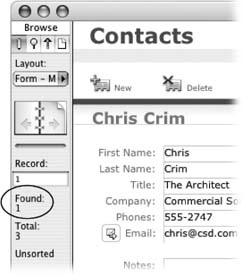
After you perform a find, FileMaker displays the set of records that matched your find request (in this case, all the records with the last name Spinnet). You can see how many records you found by looking at the count in the Status area, as shown in Figure 1-13.
Although you’re in Browse mode, you can’t look through every record in the database—just the ones FileMaker found.
Tip
If your find didn’t come out exactly the way you wanted, don’t just return to Find mode. If you do, you’ll have an empty request, and have to start all over again. Instead, choose Records → Modify Last Find, which takes you to Find mode and displays the request you used last. Now you can simply make any necessary modifications and perform the find again.
FastMatch
In the previous find examples, you had FileMaker search for records by telling it what to look for. But sometimes you’re already looking at a record that has the right information in it—you just want to find more that match.
Find mode looks so much like Browse mode that it’s easy to forget which mode you’re in. This may not seem like a big deal, but it can be a real drag if you think you’re in Browse mode and you start entering data. Since find requests look a lot like records, you can make quite a bit of progress entering records and never realize your mistake. When you finally do figure it out, it’s a rude awakening: None of the requests you’ve just entered can be turned into real records; you must re-enter them all in Browse mode.
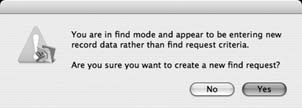
Luckily, FileMaker is nice enough to give you a warning if it thinks you might be confused. If you create more than ten find requests while in Find mode, FileMaker shows this message. If you were entering data in Find mode by mistake (at least you’re finding out now, not after you’ve typed for three hours), just click No, switch to Browse mode, and start over with your data entry. If you know you’re in Find mode, and you really want to add all these requests, just click Yes. FileMaker won’t bother you again.
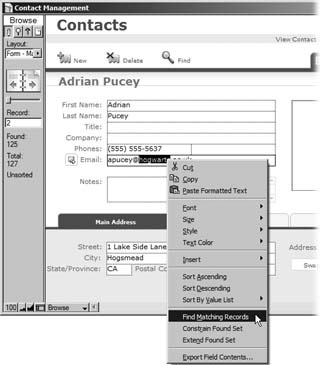
Say you need a list of everybody in the Contact Management file who has an email address from Hogwarts School. Flip to any record with a Hogwarts.ac.uk email address. Drag to select the word “hogwarts.” You can do the whole Hogwarts.ac.uk if you’re feeling vigorous, but “hogwarts” is enough to find the records you need. Right-click the highlighted text (Control-click on the Mac).
From the shortcut menu that pops up, select “Find Matching Records (Figure 1-14).” Bam! FileMaker shows you a found set of all your Hogwarts email contacts.
Same Database, Multiple Windows
So far, you’ve spent all your time in the same Contact Management window. If you’re feeling a little claustrophobic, fear not. At any time, you can get yourself another window by choosing Window → New Window. What you get is an exact copy of the window you were just looking at. What’s the big deal, you ask? The big deal is that you can switch to another record or do almost anything else in the new window, without affecting what’s displayed in the first one.
When you have multiple windows open, you can change most of the settings you’ve seen so far for each window. For example, if you want to compare two contacts side-by-side, you can show one contact in each window.
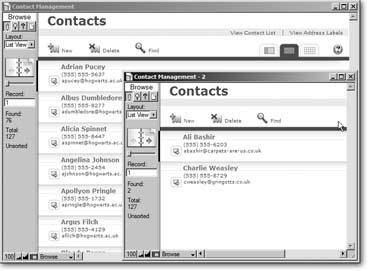
You can even zoom one window in and another one out, or show the status area in one window but not the other (if that’s your idea of fun). Another time multiple windows are useful is when you’re working with one set of found records (Section 1.6.3.2) but need to do another search. You can perform a find in a new window without disrupting your work in the original window. Say you’ve been fiddling with the Find command to come up with all your contacts who live in California, then suddenly need to find the phone number for a colleague in New York. Just create a new window and look up your East Coast colleague there (Figure 1-15). Your California group is safe and sound in the first window.
Note
If you have two windows open, both of them are connected in one way. If you edit the data in one window, the changes show up in the other window (or every window you have open, if you’re working with multiple windows). Since FileMaker’s windows just display the records in your database, a second window doesn’t mean you have a second database—instead, both windows share the same data.
Automatically Arranging Windows
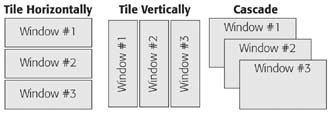
If you have a lot of windows on your screen and don’t feel like rearranging them yourself, you can use one of several commands that arrange the windows for you—or at least try to. Using FileMaker’s Window menu, you can choose one of three commands: Tile Vertically, Tile Horizontally, or Cascade. Each command rearranges the windows in a different manner, as shown in Figure 1-16.
The Window menu commands are a great place to start when you have so many windows open, you don’t even know which one you’re looking for! However, 99 times out of 100, these automatic rearrangements somehow seem to make every window the wrong size, and put each window in the wrong place. So use these commands with the understanding that you may still have to do some rearranging yourself.
Hiding Windows
If you have a window just the way you want it (for example, showing all the neighbors you need to hit up for Girl Scout Cookies), but it’s in your way onscreen, you can opt to hide it instead of closing it. (When you close a window after using the Find command, your results disappear.) Hiding a window makes it disappear from your screen completely, but keeps the information stashed in a handy place in your computer so you can get it back if you want it. It’s a neat timesaver when you’re screen is crowded—or when you want to keep prying eyes away from your information.
To hide the window displayed on the front of your screen, choose Window → Hide Window. To bring it back again, choose Window → Show Window, and pick the window you want back from the list. In order for this to work, you have to remember the name of the window you hid (its name appears in the title bar, across the top of the window).
Warning
You may be used to using your operating system’s built-in features for dealing with windows, like minimizing them to the Mac OS X Dock. These techniques work just fine in FileMaker, but they might play havoc when a FileMaker script needs to control the same window. If you’re using any of these little software robots to automate tasks, as you’ll learn in Chapter 13, it’s best to stick to FileMaker’s own window commands.
Closing hidden windows
On Section 1.3.1, you learned that the way to close a database is to simply close its windows. As with most rules, there’s an exception: Even if you close all visible windows, the database itself may still be open—in a hidden window.
The easiest way to close all FileMaker’s open windows, hidden ones included, is to press the Alt (Option) key and choose File → Close All. The ordinary Close command changes to Close All when you press that key.
If you try editing a record in one window while it’s showing in another window, you’ll notice that your changes don’t appear in the second window as you type. In order for the changes to appear, you must first commit the record (see the box on Section 1.5.3). Once you do, the changes appear everywhere else.
Here’s a hypothetical example. Suppose you start making changes to Auntie Marie’s contact info in one window, but you’re interrupted by a phone call before you finish. To help the caller, you need to look something up in the database. Since you’re a savvy FileMaker guru, you make a new window and look it up there so you don’t have to lose track of the changes you’re making to Auntie Marie.
Unfortunately, by the time you finish the phone call, you’ve forgotten that you already started editing Marie’s record. Now you go to Marie’s record in the new window to make the changes. Bear in mind the record is already half-changed but uncommitted in the first window.
What happens if you start making changes now? Which set of changes wins?
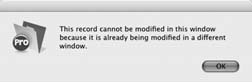
To avoid the problem of which changes “win,” FileMaker automatically performs record locking for you. If you try to edit a record that’s already being edited in another window, you see this error message. Yes, it’s frustrating to get this message, but just remember that automatic record locking really is your protection against major problems. (This is especially true when you have multiple users accessing your database at the same time—see Chapter 18.) This message is your friend.
Get FileMaker Pro 8: The Missing Manual now with the O’Reilly learning platform.
O’Reilly members experience books, live events, courses curated by job role, and more from O’Reilly and nearly 200 top publishers.

