Chapter 1. Getting Around the Fire
While the complete operation of every screen and action available on the Fire phone is beyond the scope of this small getting-started guide to device’s unique features, any discussion of the things it does cover wouldn’t be worth much if you didn’t at least know how to access them first. And, as a significant part of Amazon’s innovation is at the heart of navigation itself, it makes sense to start with a brief how-to on finding your way around the device.
Hardware Features
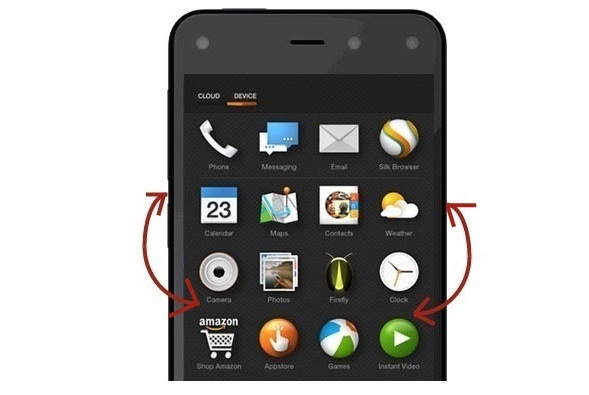
Figure 1-1 identifies the buttons used to access some of the new features we’ll cover throughout this book, along with the cameras that enable those features. For now, here’s a quick run-down on what these buttons and cameras do:
- Power button
- The power button turns the phone on, of course, but it also brings up the lock screen if the phone is asleep and puts the screen to sleep if you press it quickly when it’s on (or on the lock screen). Pressing and holding it down brings up a menu of options to power off the phone, restart it, or cancel.
- Home button
- If the phone is asleep, pressing the Home button brings up the lock screen. When the phone is in action, the Home button toggles the screen between Carousel view (discussed in Carousel) and a grid view of all the apps on your device (see the screen in Figure 1-1) or stored in the cloud but not downloaded (toggle between these views by tapping Device or Cloud at the top of the app screen shown in Figure 1-1).
- Volume up/down buttons
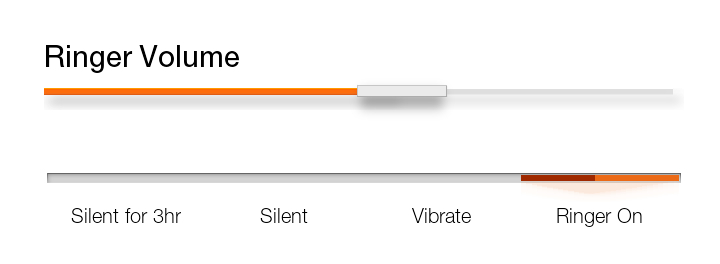
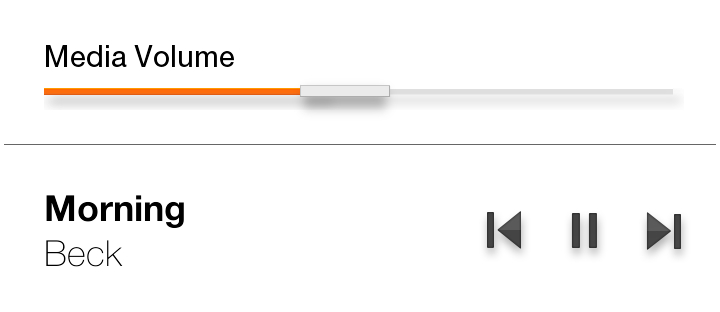
- From the Home screen, tapping these buttons brings up Ringer Volume options (louder, quieter, silent, vibrate, or silence for three hours), as shown in Figure 1-2. Within the Music app or other apps, they bring up Media Volume options, along with controls for advancing tracks, going back, or pausing the song, as shown in Figure 1-3.
- Camera/Firefly button
- Tapping this button and quickly releasing immediately opens the Camera app, whether your phone is already running an app, asleep, or displaying the lock screen. Pressing and holding it (within an app, while asleep, or from the lock screen) opens the Firefly app, which Chapter 3 covers in detail.
- Primary front-facing camera
- This is the lens used by the Camera app whenever the front-facing camera is being used.
- Dynamic Perspective cameras
- These four cameras work together as sensors to enable all features that rely on Amazon’s new Dynamic Perspective technology (covered in detail in Chapter 2).
Note
Generally, Dynamic Perspective depends on at least two of these cameras recognizing the user’s face, while the other two account for changes in the way the user holds the phone (only two are needed, so if the bottom two are covered in landscape or portait mode, the other two are sufficient). If you obscure more than two of these cameras (either as a rare accident or on purpose to test them), or move out of view of them, you’ll notice the features of Dynamic Perspective fail.
That’s about all you need to know about the hardware to get started (I’ll assume you can find and use the headphone jack, microphones, and receiver on your own), but the real magic happens when you take a look at the software they open up or make possible.
We’ll get to the new features in later chapters, while the rest of this chapter will focus on the new navigation paradigms and associated physical gestures used to get around the interface.
Three-Panel Navigation
If you’ve used an iPhone or Android phone, you’ll feel comfortable with most of the general navigation on the Fire phone (which we won’t cover here), but Amazon has introduced a helpful new three-panel system that you might miss if you’re just doing what you’re used to from your other smartphones.
Accessible from within both the Home screen and the apps written specifically for the Fire, you’ll find additional panels on the left and right sides of the screen. Just tap and swipe from the left side of the screen to bring up the left menu and do the same on the right side of the screen for the right menu (or use the one-handed gesture covered in One-Handed Gestures).
From the Home Screen
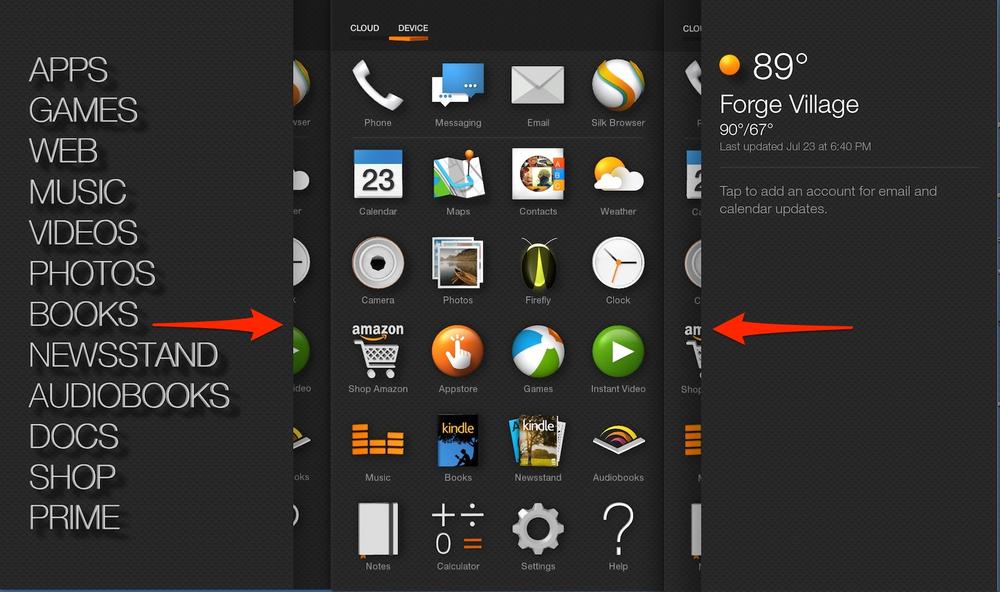
Figure 1-4 shows what these left and right panels look like from the Home screen.
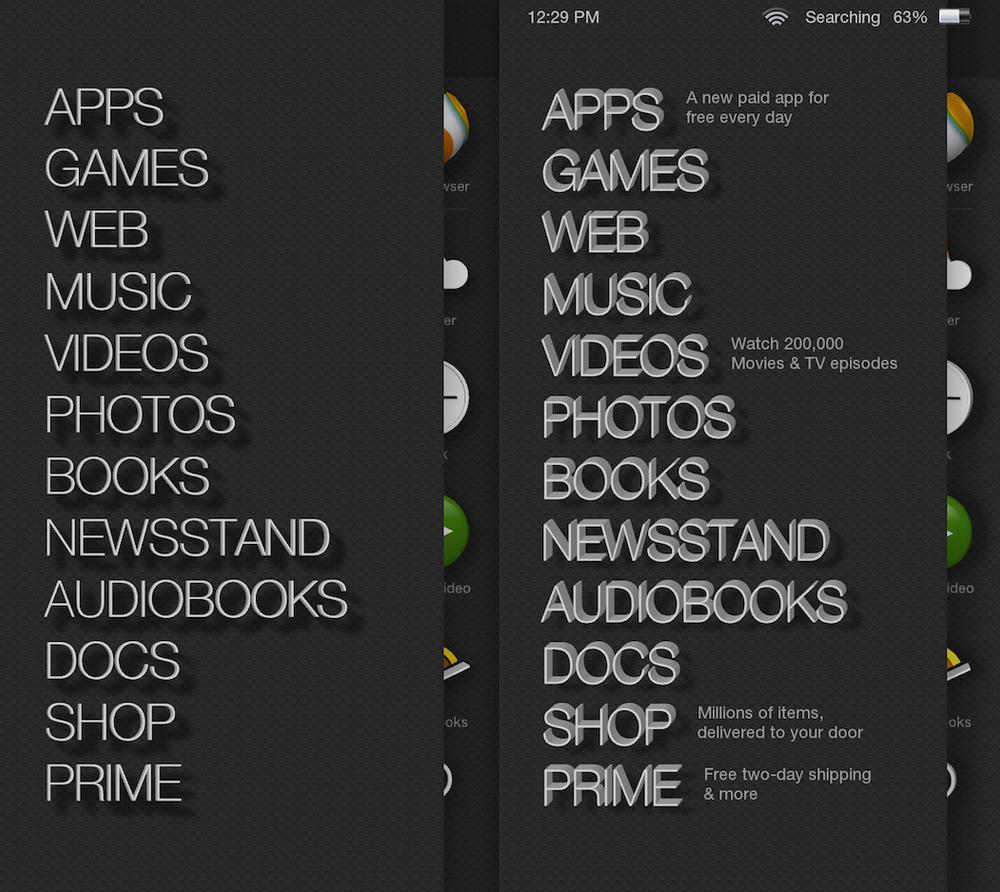
In this case, the left panel for the Home screen gives you quick access to all of your content libraries stored in Amazon’s cloud or on your device, including apps, books, photos, and videos. Similar to the Google Now cards on Android phones or the menu you get when you swipe down on from the top of an iPhone Home screen, the right panel brings in pieces of information from your apps that might be immediately useful, such as snippets from new emails, text messages, the weather, appointments in your calendar, etc.
Within an App
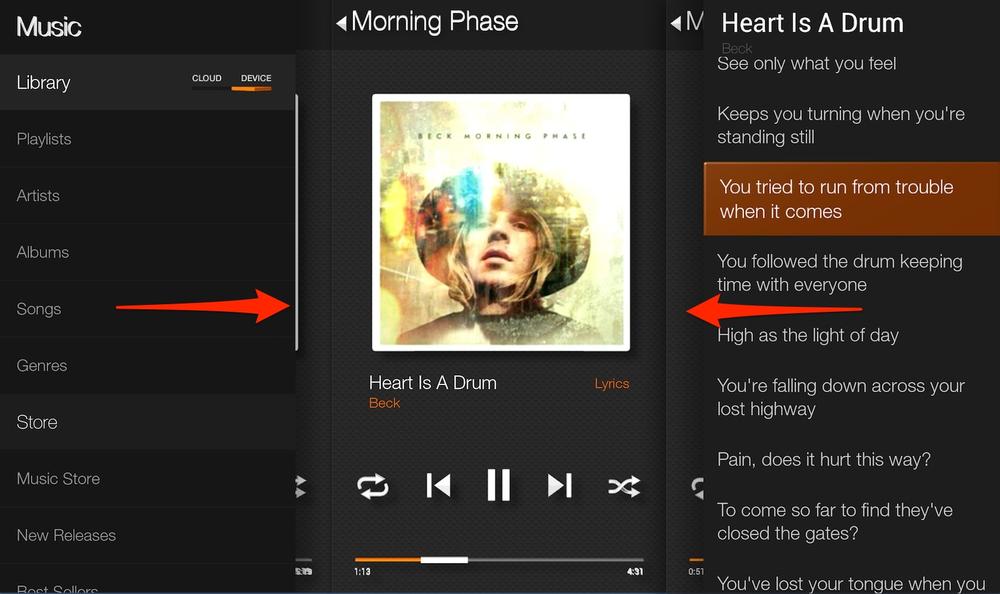
Generally, within an app, the left panel provides a quick menu of options and the right panel brings information that might be immediately useful, interesting, or even delightful. As just one example, check out the three panels of the Music app, shown in Figure 1-5.
Here, the left panel gives you access to your playlists, artists, songs, etc., as well as a direct link to Amazon’s Music store, while the right panel provides real-time lyrics as the song plays (when available). The highlighted text advances as the song plays, and you can even scroll down further in the lyrics, tap a line, and the song will jump forward to the part where the tapped lyric plays.
This is one of those features that is both useful and delightful. Be sure to test the left and right panes from within all of your apps to see what other things you might otherwise be missing.
Carousel
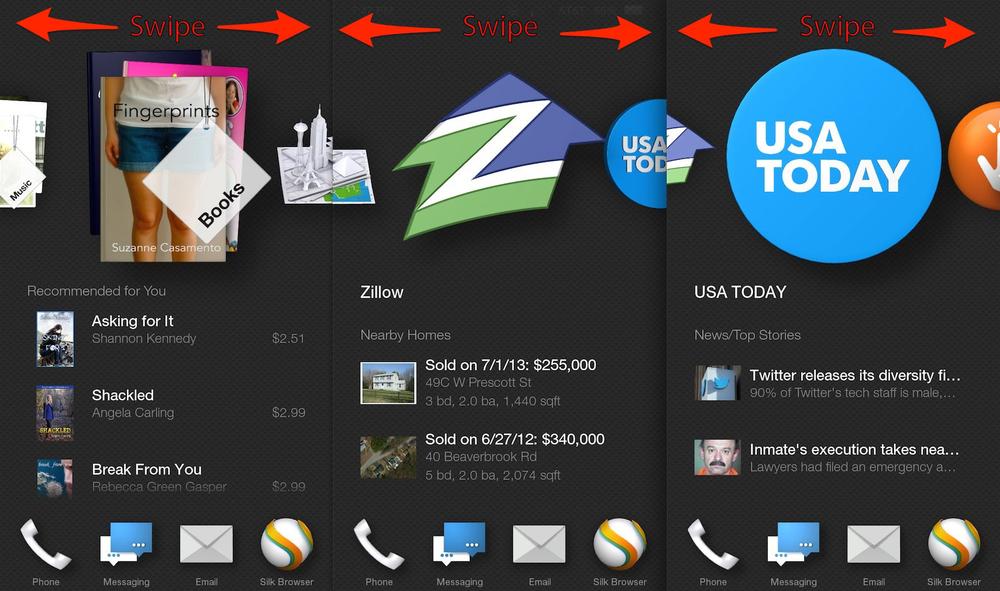
If you’ve used any Kindle Fire model, you’ll already be familiar with the Carousel, an area on the Home screen that highlights recently used apps, books, or other media in a rotating display you can navigate by tapping and sliding right (for more recently used items) or left (for older items). While the Kindle Fire places the Carousel directly above a grid of your regular content library on the same screen, the Fire phone gives the Carousel its own screen (toggle between the Carousel view and the library view by tapping the Home button, as discussed in Hardware Features).
Why give the Carousel its own screen? Well, beyond just not competing with the rest of your library and cluttering up the smaller real estate offered by a phone, Amazon also beefed up its Carousel for the Fire phone. With the enhanced features it now has, it really needs its own screen.
The newly enhanced Carousel view now includes not only the “hero” icon of the app, book, or item in your history, but also small bits of useful content updated in real time. As you can see in Figure 1-6, the Books app (not a lot changing in real time) shows only recommendations for purchases based on other books you’re reading. But Zillow has enhanced their app to include property information about homes for sale or recently sold in your area (you can specify what you’re looking for within the app), and USA Today shows headlines for top news stories. Just click on the snippet to open the app and go directly to that item.
Each app developed to work with the enhanced Carousel provides different information that is most likely to be useful to the user immediately. For example, the Email app shows incoming messages below the app icon in Carousel view, allowing you to take action on a message without even opening the app (if you want to delete it) or opening the app directly to that message for response.
As handy as it is, the Carousel is limited to recently used items, so older items might quite a bit of scrolling to find. To skip the Carousel and go right to the full app grid, just swipe up from the bottom of the screen (swipe down from the grid screen to get the Carousel) or tap the Home button (tapping the Home button from the grid view opens the Carousel view).
One-Handed Gestures
Beyond their new swiping navigational options introduced in Three-Panel Navigation, Amazon has invented brand-new one-handed gestures (in practice, swiping usually requires one hand to hold the phone and the other to swipe) that you might completely miss if you’re not looking for them but which could really help your productivity once you know about them.
Note
Knowing that these gestures are made possible by Amazon’s new Dynamic Perspective technology (see Chapter 2) might help you understand how to use them a little better or troubleshoot them when they occasionally require more effort. But for now, you don’t really need to know much about what goes on under the hood to use them.
These new navigational tools work without any need to touch the screen. You simply tilt, shift, or swivel in various directions.
Peek
Gently angling the phone to the left or the right, as shown in Figure 1-7, reveals extra, “layered” information about items shown on any given screen.
The extra information changes based on what’s currently displayed on the screen. Figure 1-8 shows the extra information that appears when you peek into the left panel on the Home screen.
Note
The menu items appear three-dimentional, because the tilting shows the “sides” of the letters when you angle the phone.
Even if it just presents a side view of the icons displayed, peeking has an effect on almost every screen with Fire phone. Go ahead and try it out wherever you are to see what extra information you might find.
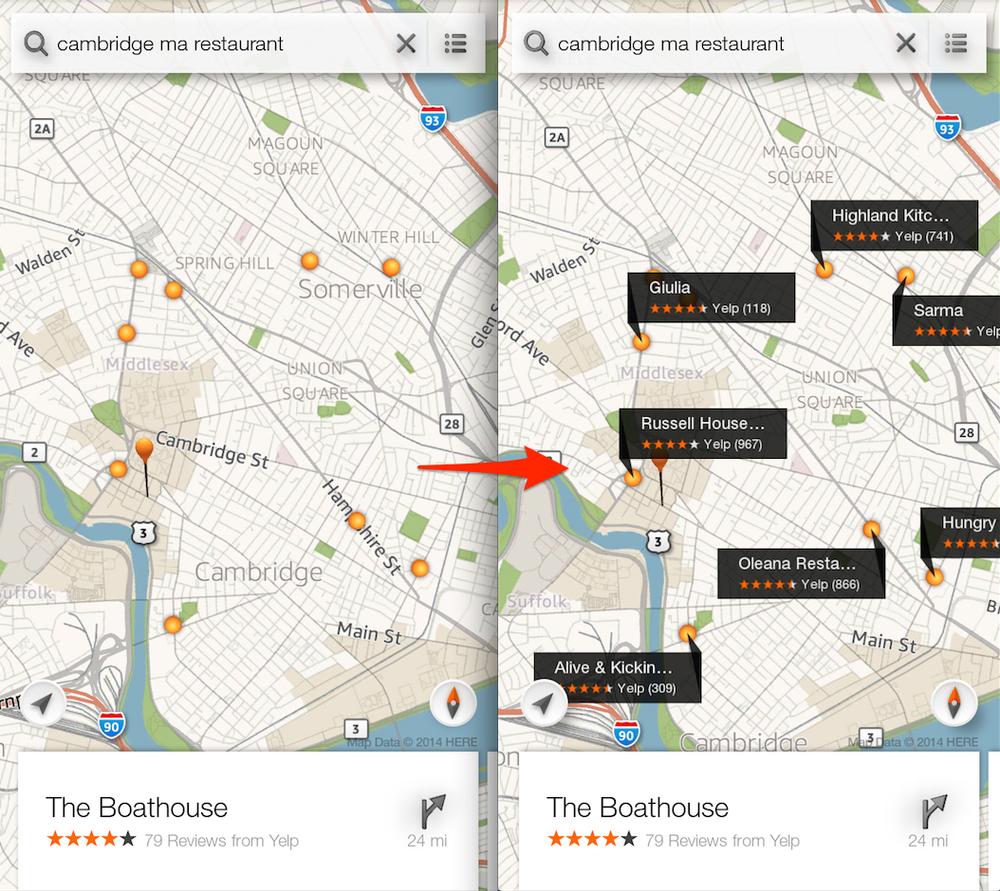
For example, if you’ve searched for restaurants using the Maps app, peeking reveals Yelp reviews for the locations plotted on the map, as shown in Figure 1-9.
In addition to adding information, peeking allows you to see under or around icons or titles that overlay and obscure the content (such as the search bar or the My Location icon in the lower-left corner of the Maps screen).
Tilt
Tilting is done using the same angling action as peeking (see Figure 1-7), but more quickly and with more force. Shifting the phone sharply in this way has the same effect as swiping from the edge of the phone, as discussed in Three-Panel Navigation.
Tilting the left side of the phone toward you displays the left panel of the Home page or apps (tilting the left side away from you again sharply dismisses it). Tilting the ride side toward you displays the right panel (and tilting the ride side away from you again dismisses it).
Auto-Scroll
A similar tilting gesture, but angling the phone base up and away from you, automatically scrolls down a web page. The steeper the angle, the faster the scroll. Pulling the top of the phone back toward you scrolls in the opposite direction.
Note
Though auto-scroll was featured in the Kindle app during Amazon’s press conference announcing the Fire phone, it was not included in the initial release. When it is added in a later software update, it will feature a lock icon that will keep the current pace of your scrolling without requiring continued tilting.
This gesture lets you read long web pages (and, eventually, Kindle books) without ever having to touch the screen, which is particularly useful if one of your hands is occupied doing something else.
Swivel
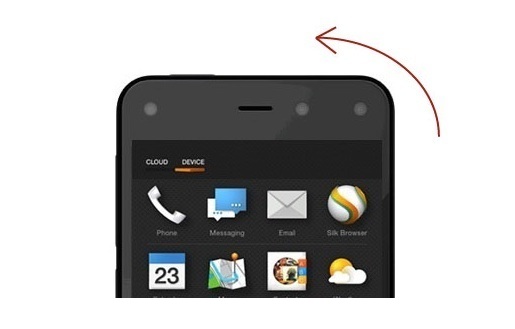
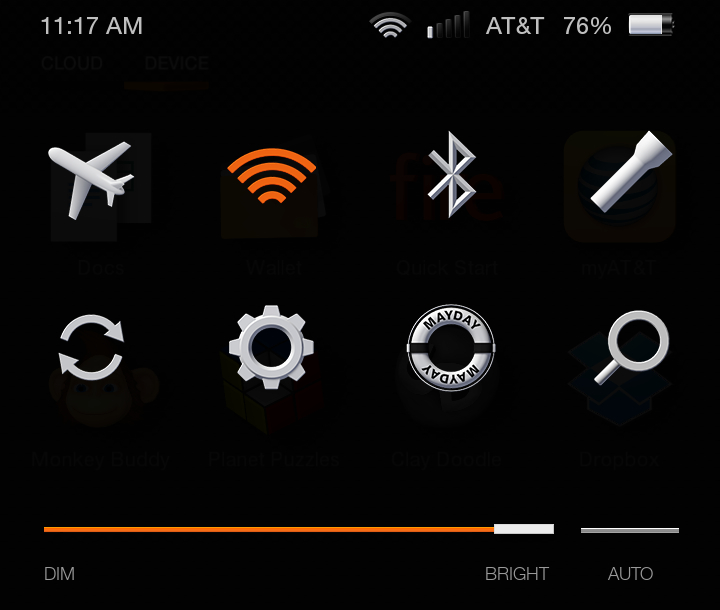
Sharply swiveling the top corner of the phone in a tight arc from right to left (as shown in Figure 1-10) or left to right reveals the Quick Actions bar shown in Figure 1-11.
From this menu, you can quickly put your phone in Airplane Mode, connect to a wireless hotspot, turn Bluetooth on or off, access the flashlight, sync your device, access the larger settings menu, search the device, adjust your screen’s brightness, or connect with Mayday for customer support (as discussed in Chapter 4).
Get Fire Phone: Out of the Box now with the O’Reilly learning platform.
O’Reilly members experience books, live events, courses curated by job role, and more from O’Reilly and nearly 200 top publishers.

