Chapter 1. Sharing Photos
Hacks 1-9
Sharing photos has been a popular activity since the invention of the portable camera. Most of us regularly pore over photos during gatherings with friends and family, whether flipping through a stack of photos, looking through albums, or enduring projected slideshows chronicling every detail of a recent vacation. Flickr helps you share photos in many similar ways [Hack #1] , and it gives you control over who sees which photos [Hack #2] .
Now, instead of waiting for a gathering to share your photos, you can make them available to your friends and family almost as soon as you take them [Hack #6] . You can even add the photos to your own web site [Hack #9] if you want. And in addition to friends and family, Flickr can connect your photos with a wider audience of people who might be interested in them. Sharing photos is nothing new, but Flickr gives you the opportunity to share your photos in new ways.
To get started sharing photos with Flickr, you just need a minute or two to create your account. Browse to Flickr (http://www.flickr.com), and click the “Sign up now!” button shown in Figure 1-1.
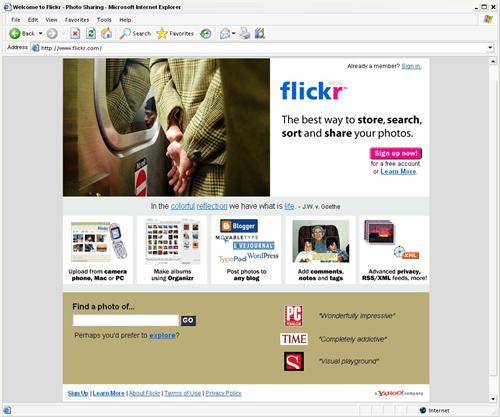
Flickr is owned by Yahoo!, and if you already have a Yahoo! account, you can use your Yahoo! ID and password to create a new Flickr account. If you don’t have a Yahoo! ID yet, clicking the “Sign up now!” link will walk you through the account creation process. The whole process takes less than a few minutes, and once your Flickr account is created, you can start sharing photos.
When you return to Flickr in the future, you can click the “Sign in” link at the top of the Flickr front page. From there, you’ll see the two sign-in options shown in Figure 1-2.
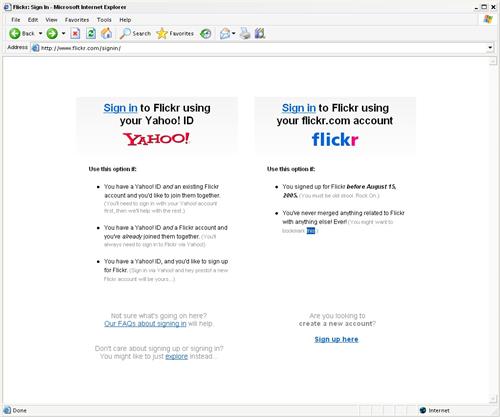
If you created your Flickr account after August 15, 2005, you’ll use the Yahoo! option for signing in. Otherwise, you can choose the Flickr option on the right. Most likely, Flickr accounts created before August 15, 2005 will eventually be moved to standard Yahoo! accounts, but at the time of this writing, the sign-in page is a visual reminder that Flickr is a new addition to the Yahoo! family of applications.
This chapter will show you the basics of using Flickr to share photos, and it will take you beyond the upload form [Hack #5] so you can be sharing photos like a Flickr power user in no time.
Store, Sort, and Share Your Photos
To get started with Flickr, you need to understand its basic features.
At its most basic, Flickr is a web application that helps you create a public journal of photos. You can upload your photos to Flickr and see them appear on a web page, with the most recently added photo on top. But once you start playing with Flickr, you’ll quickly find that it’s much more sophisticated. In fact, Flickr is an open platform for storing, arranging, sharing, discussing, and discovering photos with people across the globe.
What began as an independent project by a small company called Ludicorp was quickly snapped up by Yahoo! and is now reaching a much wider audience. If you don’t already have a Yahoo! account, you can sign up for one via the Flickr home page.
Tip
A basic Flickr account is free and lets you upload up to 20 MB of photos per month, show up to 200 of your photos, and create three individual galleries (which Flickr calls sets). You can also upgrade to a paid Flickr Pro account, which gives you much more storage and unlimited sets. At the time of this writing, a Flickr Pro account costs $24.95 per year.
Once you’ve created an account, you can add some information about yourself to your profile that will tell others a bit about you. Flickr is a social application, and unlike some sites where uploading photos feels like a lonely process, adding photos to Flickr feels like a group activity.
Store
The first step in getting to know Flickr is uploading some of your photos. The steps required to move photos from your camera to your computer vary widely, so that will have to be an exercise for the reader. But once the photos are on your computer, there are several ways to add them to Flickr.
From your browser
When you’re getting started, the simplest way to upload photos is via your web browser and the "Upload photos to Flickr” page (http://www.flickr.com/photos/upload/). Click Browse... next to one of the blank fields on the page, and a new window will let you choose an image file on your local computer. Figure 1-3 shows what choosing a file looks like on Windows XP.
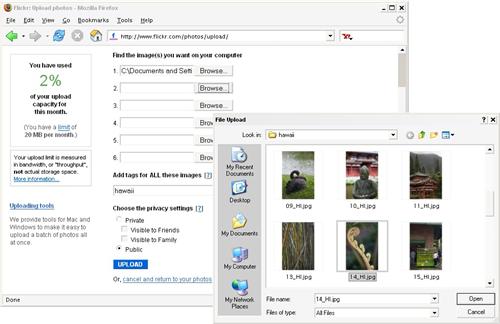
When you highlight a photo and click Open, the previously blank field will be filled with the local path to the image file. You can upload up to six photos at a time and set tags and privacy settings for each photo in the group. Clicking Upload sends your photos to Flickr, which might take some time, depending on the size of your photos and your connection speed. Once your photos have been uploaded, you’ll have the option to add titles and descriptions to each of them. It’s easy to add titles and descriptions later as well.
You can set default privacy options [Hack #2] for every photo you upload by clicking Your Account at the top of any Flickr page and choosing Default Photo Privacy from the menu. Or you can browse directly to http://www.flickr.com/profile_photoconf.gne to set options such as who can see your photos, who can comment, and who can add notes and tags.
From your desktop
Once you’re completely hooked on Flickr, you might want to upload entire sets of photographs at a time. You can find a number of ways to upload photos on the Tools page (http://www.flickr.com/tools/). The tools are programs you can download and install on Windows or Macintosh computers that allow you to upload a number of photos at once.
Figure 1-4 shows the Windows Flickr Uploadr in action; you can simply drag images from the file explorer and drop them onto the Flickr Uploadr window.
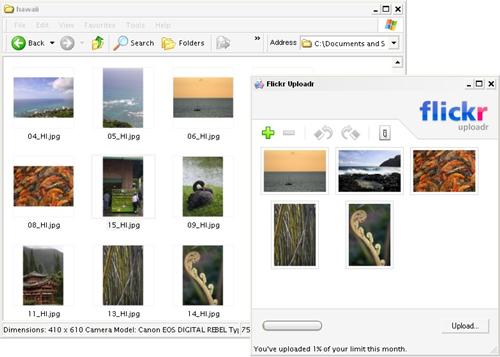
Once you’ve added all of the photos you want to send to Flickr into the Flickr Uploadr, click the Upload... button. You’ll also have the option to add tags to the photos or change the default privacy settings for those photos. There are many uploading tools available [Hack #5] , so be sure to take a look at your options to see which tool might work best with your system.
From an email address
In addition to uploading photos via the Web or a desktop application, you can send photos to Flickr by email. Click the Your Account link at the top of any Flickr page, and choose “Uploading by email” under the Photo Settings heading. You can also browse directly to http://www.flickr.com/profile_mailconf.gne .
Once there, you’ll find a randomly generated email address that’s unique to your Flickr account. You can use the address to send photos to Flickr as an email attachment. This option is particularly handy for cell phone cameras, because you can snap your photo on the go and post it directly to Flickr [Hack #6] , without making a trip to your home computer.
Sort
You’ll find every photo you upload in your Flickr photostream . A photostream is simply a list of every photo you’ve uploaded in reverse-chronological order, with the latest photo you’ve uploaded first. Once your photos are in your photostream, however, there are a number of ways you can organize them beyond the chronological listing.
Tagging
Tagging is a simple form of organization that lets you associate keywords with each of your photos. Unlike traditional categorization schemes, tags are freeform, and you can use any words, numbers, or phrases you like. Figure 1-5 shows a photo at Flickr, with its tags listed just to its right. The photo was taken in the town of Kaneohe, Hawaii, at a Buddhist temple, and the photographer has tagged the photo with the words temple, Kaneohe, and Hawaii.
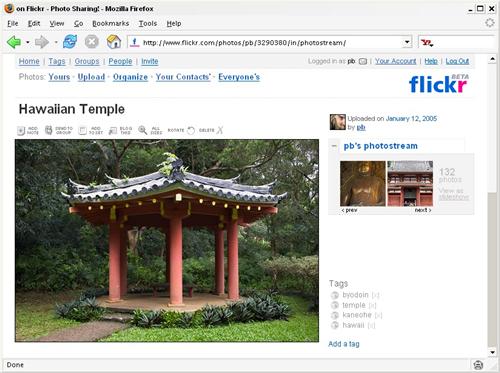
Clicking on any tag will show you all of the photos that you’ve tagged with that word. Clicking the globe icon next to any tag will show you photos by everyone at Flickr tagged with that word. Tagging photos is a fairly simple process, but learning a few tagging hints [Hack #10] can help you determine which keywords to use.
Organizing
The key to more complex organization is the Flickr tool called Organizr . Organizr runs in your browser, and you’ll need to have the free Macromedia Flash Player (http://www.macromedia.com/go/getflashplayer/) installed to use it. You can fire up Organizr by clicking the Organize link at the top of any Flickr page.
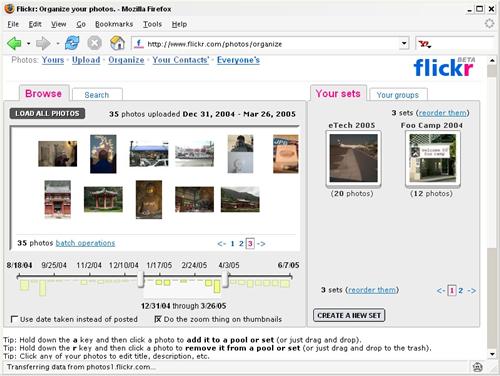
You’ll find your photos in Organizr’s main window. You can view all photos; limit your photos by date; or search your titles, descriptions, and tags. The sliders below the main window adjust the dates you’d like to view, as shown in Figure 1-6.
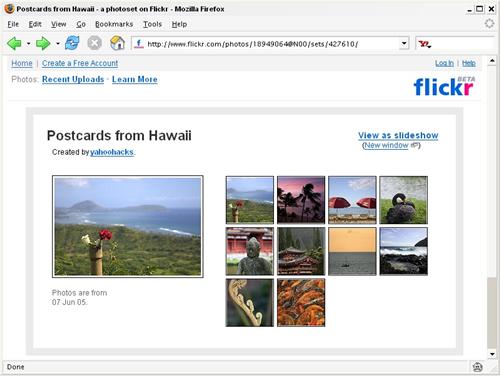
Inside Organizr, you can create and edit photo sets. A set is group of photos that you assemble into an individual gallery. Once you’ve created a set and given it a title, you can drag a photo from the main window and drop it into a set on the right to add the photo to that set. From there, you can arrange the photos in a set into a specific order. Figure 1-7 shows what the cover page of a set looks like to someone browsing the set for the first time.
Tip
Free Flickr accounts are limited to three sets, but you can create an unlimited number of sets with a Flickr Pro account.
The “View as slideshow” link on the front page of a set will let people see the group of photos as a Flash presentation. Viewers don’t even have to press keys or click mouse buttons; they can sit back and watch the photos dissolve in and out as the presentation automatically moves from one picture to the next.
Share
One of the primary benefits of using Flickr is that once your photos are uploaded, they are accessible to anyone with a web browser.
Free to the public
The easiest way to share all of your photos is to create a simple URL, called a Flickr address , that you can share with others. Browse to http://www.flickr.com/profile_url.gne, and choose a simple word as your address. The format of the URL will look like this:
http://www.flickr.com/photos/insert your word/It’s important to choose your Flickr address carefully, because your choice is permanent; you can’t edit your Flickr address once you’ve created it. The newly created URL will point directly to your photostream, and you can give the URL to your friends and family or link to your photostream from another web site using the URL.
Once your photos are on Flickr, you can also share them by automatically posting them to a weblog [Hack #9] , or by displaying your latest photos with a Flickr badge [Hack #7] . Flickr also provides RSS feeds for photostreams, groups, and tags, so once your photos are in the system, there are myriad ways for others to view them.
One benefit of these methods of sharing is that others viewing your photos don’t need to be members of Flickr to see them; they don’t have to go through the account creation process simply to look at your photos. However, if they do go the extra mile and become Flickr members themselves, you’ll have several more ways to connect and share photographs.
Flickr community
Flickr works best when your friends and family are also participating at the site. You can add anyone with a Flickr account as a friend, family member, or contact.
Tip
Keep in mind that the category another Flickr member is in will determine which photos of yours that person can see if you alter your photos’ default privacy settings.
As you build a group of contacts [Hack #24] at Flickr, you’ll be able to easily browse their photos, just as they can browse yours. Clicking the Your Contacts’ link at the top of any Flickr page will show the latest photos added by all of your contacts, and it’s a great way to keep up with your friends.
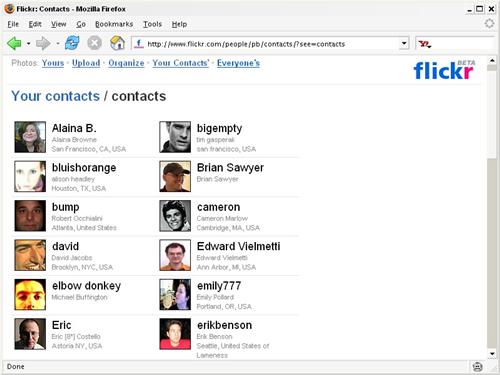
You can also browse a full list of your contacts by clicking the People link at the top of any page; clicking a name will take you to that person’s photostream. Figure 1-8 shows a contact list at Flickr.
The Groups feature lets anyone form a public discussion and photo sharing space at Flickr. In addition to sending photos to a group photo pool , you can post messages to the group and carry on conversations. For example, there’s a group called The Bookshelf Project, available at http://www.flickr.com/groups/bookshelf/, whose members share photos of their home bookshelves and discuss the topic of storing books.
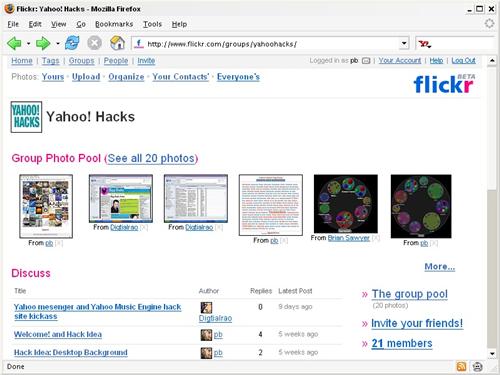
If you’re interested in a specific topic, chances are good that someone has created a specific Flickr group devoted to it. You can browse a full list of groups, organized by topic, at http://www.flickr.com/groups_browse.gne. Figure 1-9 shows the Flickr group for Yahoo! Hacks (my previous book for O’Reilly), which you’ll find online at http://www.flickr.com/groups/yahoohacks/.
Beyond contacts and groups, Flickr members can comment on each other’s photos, help out with tagging, and even add notes to specific areas of a photo. (As always, these features are contingent on the permissions you set for your photos [Hack #2] .)
Control Who Sees Your Photos
Flickr has a flexible privacy system that enables you to share photos with your friends, your family, or the world—or keep them to yourself.
Flickr exists so that you can share photos, but you might not want everyone in the world to see all of your photos. Your friends would love to see photos of you knocking back a few beers at your favorite bar, but your boss might frown on them. Your family would love to see photos of you dressed up for your cousin’s wedding, but your friends might not appreciate your powder-blue tuxedo. With a bit of planning, you can make sure that your Flickr photos are shared with only the people whom you want to see them (or not shared at all).
Every photo sent to Flickr has a privacy setting, and the default setting is Public. When a photo is Public, anyone visiting Flickr can see the photo. If you want to control access to your photos more closely, you can set them as Private. But the term “Private” is a bit misleading, because there are different levels of privacy. To understand how the levels of privacy work, you need to know a bit about how Flickr contacts work.
Flickr Contacts
When you mark a photo as Private, the ability to view the photo is limited to you (of course) and certain people among your Flickr contacts. Say you want to share a slightly embarrassing baby picture of yourself with members of your family, but not the rest of the world. First, you’ll need to add your family members to your contact list by inviting them to join Flickr (or, if they already have accounts, browsing to their photostream pages and adding them as contacts).
To invite people, browse to your Flickr home page and click the Invite link at the top of the page. Enter your family members’ email addresses and names, and designate their relation to you by checking the box next to “This person is family.” Click Send, and Flickr will send out invitations. Once a family member receives the invitation, she can register at Flickr, and she’ll be added to your contact list as a family member.
Flickr contacts can have three different statuses: Family, Friends, or Contact. Once someone on your contact list is designated as Family, he’ll have the ability to view photos that you’ve designated at Private, Visible to Family. You can also designate photos as Private, Visible to Friends or Private, Visible to Friends and Family to limit access to just friends, or just friends and family members. Contacts without a Friends or Family designation will be able to see your Public photos only.
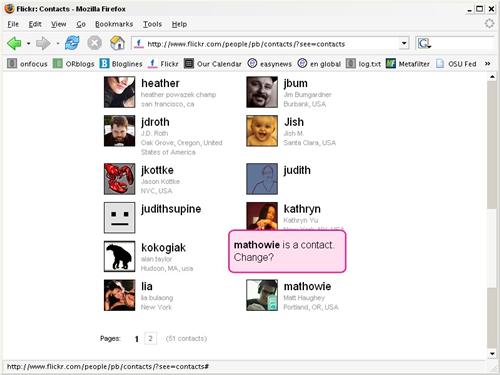
You can change a contact’s status at any time by clicking the People link at the top of any Flickr page. From there, navigate through your contacts and hover over the icon of the contact you’d like to change. A pink box like the one in Figure 1-10 will appear, asking if you’d like to change the status of your contact.
Click the box, and you’ll see a change contact status dialog like the one shown in Figure 1-11.
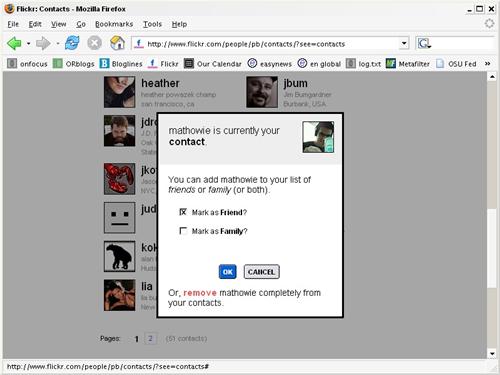
Adjust the settings and click OK, and the contact will have the ability to see photos (or not), depending on his status.
Setting Privacy
You can set the privacy settings for specific photos at any point, but it’s best to do so when you initially upload the photos to Flickr. Figure 1-12 shows the privacy settings on the basic upload form.

Even if you’re using a desktop uploading tool [Hack #5] , you’ll find that they all offer a way to set the privacy level for the batch of photos you’re uploading.
Tip
Be aware that if you add a photo to a Flickr group pool, any member of the group will be able to see that photo, regardless of its privacy setting.
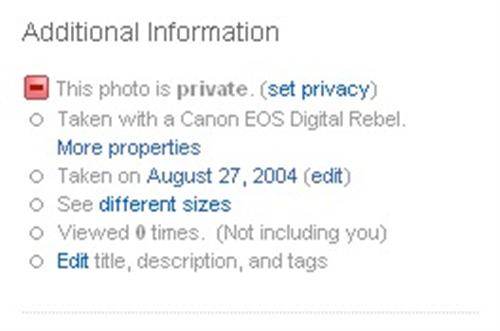
You can always see how a photo is marked in Flickr by checking the settings underneath the photo. Browse to your photostream and look for a square icon directly underneath the photo. The color of the icon indicates its privacy status. Green means the photo is Public, yellow means the photo is Private but friends or family members can view it, and red means you’re the only user that can view the photo. You’ll also find a phrase next to the icon that indicates who can see the photo, as shown in Figure 1-13.
You can click the “set privacy” link at any time to change the privacy of a photo.
Warning
To publish a photo to your weblog with the Blog This feature at Flickr, the photo will need to be marked as Public. If you publish a Public photo and then change its status later, the photo will still be visible on your weblog, but people clicking through to the photo at Flickr will not be able to see the photo detail page.
If you find that you’re marking every photo you upload to Flickr as Private, you can set this as the default privacy setting. At the bottom of any Flickr page, under the Your Account heading, click the Photo Privacy link to set your privacy preferences, as shown in Figure 1-14.
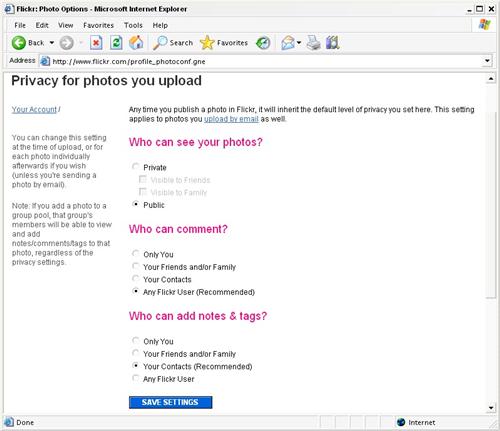
As you can see, you can set a default privacy value for your photos, and you can set the level of participation you’d like other Flickr users to have with your photos.
Manage Image Metadata
Flickr will display the information that most digital cameras embed inside a photo, and with the right tools, you can control this data.
If you take photos with a digital camera, chances are good that the original files that come from the camera contain information about the camera settings when you snapped the photos. This information can include the date and time, how long the shutter was open, the settings you chose for the shot, and whether your lens was zoomed in or out. This type of information is called metadata, which literally means data about data.
In the days before digital cameras, one of the best ways to store information about a photo was by flipping over a print and physically writing on it. In the digital world, information about a photo can be embedded within the image file itself. Viewing the info can help you remember how you got a great shot, or tell others how they can achieve a similar effect.
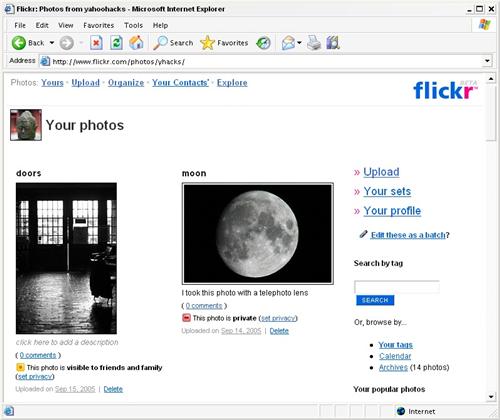
If metadata is present in your photo when you upload it to Flickr, you’ll find your camera make and model along with a “More properties” link on the photo detail page, as shown in Figure 1-15.
Clicking the “More properties” link takes you to a page like the one in Figure 1-16, with many more details about the photograph.
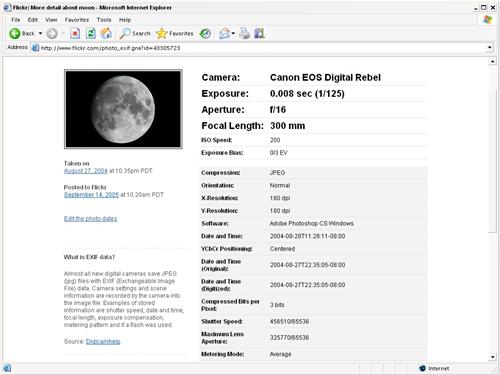
As you can see, Flickr has chosen to highlight certain properties and include others in a grey box. All of this data that Flickr can display comes from a few different sources, and it helps to be familiar with some of the terms before you start editing and refining your photo metadata. The exact metadata will differ by camera and software, but here’s a look at some common metadata properties you’ll find:
- Camera
This property shows the manufacturer and model of camera that was used to take the photograph.
- Exposure
This is the length of time in seconds that the shutter was open on the camera.
- Aperture
The aperture controls light coming into a camera, and this property shows the aperture setting in its standard f-stop measurement.
- Focal Length
This property shows the focal length (in millimeters) when the photo was taken. If the camera has a fixed lens, this will be a fixed value. A zoom lens will show differences between shots as the lens is zoomed in and out.
- ISO Speed
Many digital cameras allow adjustments for light sensitivity, and this property shows the ISO speed set on the camera when the photo was taken.
- Exposure Bias
If the photographer set the camera to under- or overexpose a photograph, this property will show how far the setting was pushed in either direction.
- Orientation
If available, this property shows how the camera was positioned when the photo was taken.
- Software
Image-production software such as Photoshop usually embeds its stamp on any metadata, letting others know the software used to produce the image.
- Dates and Times
Several dates and times can be embedded in a photo, including when the photo was taken, when the photo was opened in production software, and when the photo was last modified.
- Exposure Mode
This property can let you know what type of exposure mode the camera was in when the photo was taken, including automatic, manual, or aperture priority.
- Artist Name
This property can be set to the name of the photographer.
- Copyright
Photographers can add specific copyright information to a file, and that info is shown in this property.
- Keywords, Title, and Description
Much like titles, descriptions, and tags at Flickr, these properties, embedded as metadata by the photographer, can help identify the subject of the photo.
The most common metadata format is called EXchangeable Image File (EXIF) data, and it contains most of the camera settings. In addition, some cameras and programs embed metadata in the International Press Telecommunications Council (IPTC) format, which includes detailed artist information, and the more recent XML-based eXtensible Metadata Platform (XMP) format endorsed by Adobe. You’ll see these acronyms used quite a bit (and often interchangeably) in different image software programs; just be aware that when you see them, you’re dealing with image metadata.
You can use Flickr and your digital camera without ever knowing that image metadata exists, and you won’t be missing much. But if you’re interested in the craft of photography and want to see the technical details behind your favorite photos, this metadata can be a great learning tool. And, in turn, you can share your technical details with others so they can learn from your photos.
Viewing Metadata
The first step to understanding image metadata is simply to take a look at the data embedded in your photographs. Here are a few image tools that can both read and edit metadata in your images.
Photoshop CS
Open a photo in Photoshop and choose File → File Info... from the menu to display the metadata window shown in Figure 1-17.
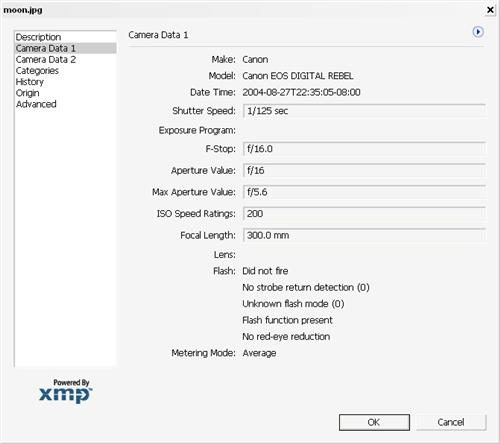
Choose a page of data on the left, and you’ll see the details on the right. The Camera Data 1 and 2 pages show the technical info about the photo embedded in the file. You can’t edit this information within Photoshop, but you can view the info so you’ll know what others will see once you’ve added the image to Flickr.
If you click the Description page, though, you have the option to add a title, author, description, keywords, and copyright information to the image metadata. Figure 1-18 shows the metadata entry form.
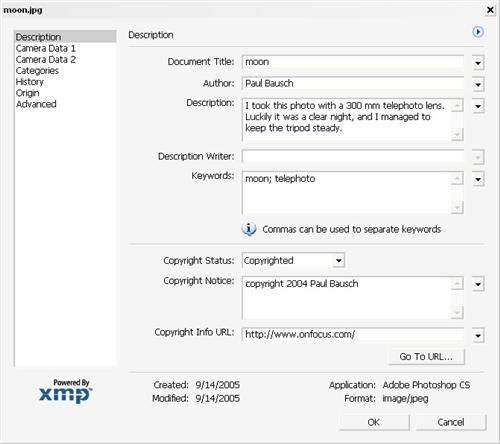
Once you’ve added the data, click OK. Back in the main Photoshop window, save the image to be sure the metadata is added. It’s always a good idea to use the File → Save As... feature to make a copy of the file; that way, no matter what changes you make to the image metadata, you’ll always have the original file with the original metadata intact.
In addition to the File Info metadata window, you can edit metadata within Photoshop from the File Browser. Choose File → Browse from the menu and navigate to a folder with images. Highlight an image on the right, and open the metadata palette in the lower-left corner of the browser. Fields that you can edit are noted with a pencil, as shown in Figure 1-19.
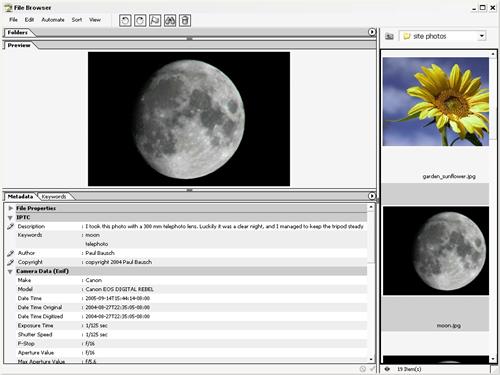
Using the File Browser is a quick way to add titles and descriptions to photos before you upload them to Flickr. Flickr will automatically extract the title, description, and keyword information from the image file if it exists in the image metadata.
Exifer
Exifer (http://www.friedemann-schmidt.com/software/exifer/index.htm) is a free program specifically designed to read and edit image metadata. Once you open Exifer, browse to a folder with images and highlight a specific image to see the metadata in the right pane, as shown in Figure 1-20.
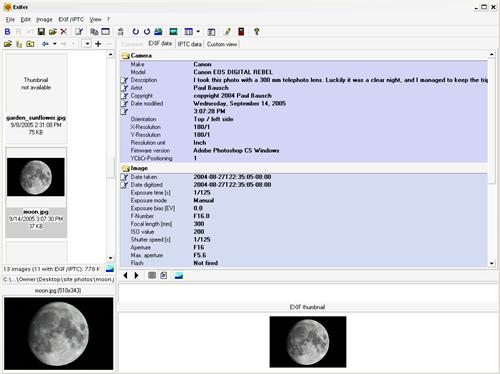
Data that you can edit in Exifer is noted with the paper-and-pencil icon. Double-click an editable field to change the value. Unlike Photoshop, Exifer will let you adjust the time an image was taken; this is especially handy for correcting the timestamp set by a camera with the wrong time setting, or if you took photos in a different time zone without adjusting the setting.
Tip
Flickr does not set the date and time the photo was taken based on the EXIF data. If you upload a photo that was taken years ago, you’ll have to update the “taken on” date by hand, even if the EXIF data is accurate.
Exifer will give you the option to save the original metadata in a separate file. You may want to do this, because there’s no Save As... option in Exifer, and any metadata changes are written into the file.
jhead
Another free program that can read and write some image
metadata is jhead (http://www.sentex.net/~mwandel/jhead/).
jhead is a command-line program,
so once you’ve downloaded the version for your operating system,
you’ll need to open up a command prompt to use it.
On Windows, you can find the command prompt at Start → Programs → Accessories → Command Prompt. Mac users can simply open the Terminal app.
From the command prompt, call the program and include an image file to analyze, like so:
jhead moon.jpgThe output will include common EXIF data, like this:
File name    : moon.jpg
File size    : 38366 bytes
File date    : 2005:09:14 15:07:28
Camera make  : Canon
Camera model : Canon EOS DIGITAL REBEL
Date/Time    : 2004-08-27T22:35:05
Resolution   : 510 x 343
Flash used   : No
Focal length : 300.0mm  (35mm equivalent: 2871mm)
CCD width    : 3.76mm
Exposure time: 0.0080 s  (1/125)
Aperture     : f/16.0
ISO equiv.   : 200
Jpeg process : Progressive
You have a number of options for changing the metadata with
jhead. You can adjust for
time-zone problems by moving the time forward or backward. Use the
-ts switch to change the date and
time of a photograph, like this:
jhead -ts2003:08:27-22:35:05 moon.jpgEven though the camera noted that the photo was taken in 2004,
editing the metadata will tell Flickr and the world that the photo
was really taken in 2003. To see all of the metadata editing options
in jhead, bring up the help
documentation, like this:
jhead -hWhile not as friendly as the other programs, you might find
jhead useful for editing the
image metadata of entire folders of photos at a time.
Hiding Metadata
If you’d rather not share your image metadata with the world, there are some steps you can take to keep the info to yourself. First, Flickr provides a way to turn of the “More properties” link on your photo detail pages.
To hide this link, browse to Flickr and choose the Profile Privacy link under Your Account at the bottom of the page. Check the box next to “Hide my EXIF data?” and click Save Changes. Keep in mind, though, that while the EXIF properties page will be hidden from other Flickr users, a determined user will still be able to download the original file and extract the metadata.
Tip
Removing metadata from image files will reduce the file size by 5 to 10 kilobytes, so if you’re really trying to squeeze every extra byte from your photos, removing EXIF data will help. You won’t notice a difference in upload times or Flickr bandwidth usage with a change that small, though many programs (including Photoshop) remove the data if you use the “Save for Web” option.
To remove image metadata completely, you can use any of the
programs mentioned for editing image metadata. In Photoshop, open the
File Info window and click Advanced on the left. Highlight EXIF
Properties on the right and click Delete. Do the same for any other
metadata you’d like to delete, and then be sure to save a copy of the
file. With Exifer, click EXIF/IPTC → Remove from the menu, and with
jhead, use the -de switch. For example, the following
command would remove all of the image metadata from a file called
moon.jpg:
jhead -de moon.jpgThe choice to use metadata and share it with others is up to you, but be aware that even if you do nothing, some of your data might be available inside your photographs.
Resize Photos for Flickr
Images coming directly from a digital camera or scanner are often quite large. Resizing them before sharing them can save your Flickr bandwidth.
Digital photos come in all shapes and sizes, because they’re taken by devices with varying capabilities and used for a number of different purposes. If you’re going to print a digital photo, you want the highest resolution possible—the more pixels there are in a photo, the better the print quality will be when translating that photo to paper. If you’re just going to display an image on a computer screen, on the other hand, you can use a smaller image, because the screen doesn’t need as many pixels to display a sharp image. Because Flickr images are primarily used for display on computer screens, you can take advantage of that fact and tailor your images just for Flickr by resizing them.
Why Size Matters
When you’re using Flickr, you don’t need to think about the size of an image. However, there are several reasons why you should keep image size in mind. Possibly the most important reason is conserving bandwidth. The free version of Flickr allows 20 megabytes of transfer each month, and larger image dimensions usually mean a larger file (in megabytes) to upload. It takes longer to upload larger photos, and you can upload fewer photos per month at the large size.
If you don’t pay attention to your bandwidth you might not ever know you’re uploading extremely large images, because Flickr automatically resizes them to a number of different standard sizes. For example, all photos in your photostream will be displayed at a maximum of 240 pixels wide (or high, depending on their orientation), allowing people to view many of your photos at once. Each image is displayed at a maximum of 500 pixels at the longest dimension on its detail page, so that viewers can see a bit more detail than was available in the photostream listing. In fact, if you upload a photo that’s 1,000 pixels wide, no viewers will see it at its full size unless they click the All Sizes button on the photo detail page.
This means that 500 pixels is as wide or tall as an image ever needs to be for normal browsing at Flickr. If you cut that 1,000-pixel image in half, you’ll save some time uploading, and you’ll save your Flickr bandwidth for more images.
Another reason for resizing your images is that you might not want other Flickr users to have access to larger versions of your photographs. Large (high-resolution) versions of photos not only show more detail on the screen, but are also better for printing. So, if you’d rather not give other Flickr members print-quality versions of your photos, resizing them before you upload will make sure that people have access only to versions that look good on a computer screen. This will allow you, for example, to give everyone access to screen-quality versions of your photos, but charge for print-quality versions at your own web site.
Programs to Resize Photos
To resize an image, you’ll need a program that can handle the task, and there are probably several hundred available. This hack shows how to resize images with five different programs. You might have one of these programs installed on your computer already; if not, you’ll probably want to acquire one of these or any of the numerous other offerings.
Photoshop CS
Adobe Photoshop (http://www.adobe.com/photoshop/) is the standard for image professionals, and it’s available for both Macs and PCs. At $599 (at the time of this writing) it’s not cheap, but Photoshop will give you a full-featured digital photo lab that lets you adjust images in many different ways, including resizing them. Adobe also offers a light, less-fully-featured version of Photoshop called Photoshop Elements for $99.
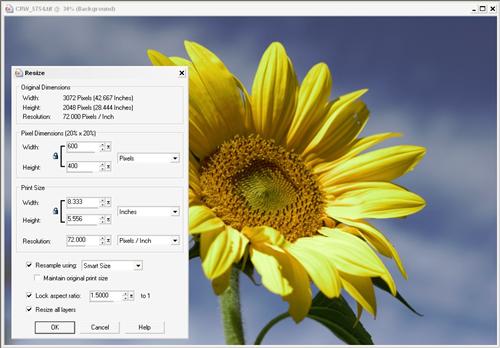
Open the image you want to resize in Photoshop and choose Image → Image Size from the top menu to bring up the Image Size dialog. (Or, in Photoshop Elements, choose Image → Resize → Image Size.) Change the units to pixels in the top drop-down menu, and enter your desired width, as shown in Figure 1-21.
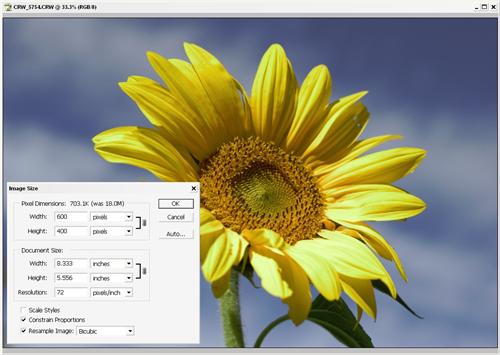
Photoshop will automatically calculate the proper height in pixels. (If your image is oriented vertically, change the height instead and Photoshop will calculate the proper width.) At the top of the Pixel Dimensions section of the Image Size dialog, you’ll see an estimate of the new file size. In Figure 1-21, resizing the image reduces the photo of a flower from 18 megabytes to less than 1 megabyte. Uploading this photo will now use up only a fraction of your bandwidth, instead of consuming practically your entire month’s allocation.
With the new width and height set, click OK to resize your image. Choose File → Save As... from the menu, and give your newly resized image a new name that you’ll recognize. (It’s always a good idea to keep a copy of your original photo, rather than overwriting it, so you can go back and print the file or use it for some other reason down the road.)
Paint Shop Pro X
Paint Shop Pro X (http://www.corel.com/paintshoppro/) is an alternative to Photoshop offered by Corel for $129. You can bring up the Resize dialog, shown in Figure 1-22, by choosing Image → Resize from the menu or using the keyboard shortcut Shift-S.
Enter a new width or height, and Paint Shop Pro will automatically calculate the other dimension. Click OK and save the new file under a new name, preserving the original.
IrfanView 3.97
IrfanView (http://www.irfanview.com) is a lightweight image-editing tool that’s free for noncommercial use. To bring up its “Resize/Resample image” dialog, press Ctrl-R or choose Image → Resize/Resample from the menu. Enter the new size, as shown in Figure 1-23.
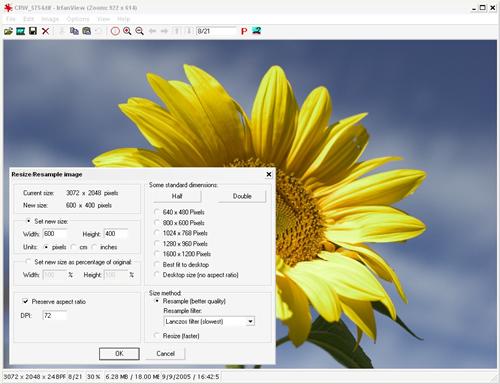
You can also choose an alternate size from the “standard dimensions” list on the right side of the window. Once you’ve entered the new size, click OK, and then save the file as a new image.
Windows XP Image Resizer PowerToy
Microsoft offers a series of small, free applications that you can add to Windows XP, called “PowerToys.” Each PowerToy performs some specific task that’s not included with the basic operating system installation, and the Image Resizer PowerToy does just what you’d expect. To get a copy, browse to http://www.microsoft.com/windowsxp/downloads/powertoys/xppowertoys.mspx and search for “image resizer” on the right side of the page.
Once the PowerToy is installed, you can resize any image by right-clicking the image file and choosing Resize Pictures from the menu. You can also resize a whole batch of images at once with this program, and it’s a quick way to resize an entire folder of images.
When you click Resize Pictures, you’ll see a window like the one shown in Figure 1-24.
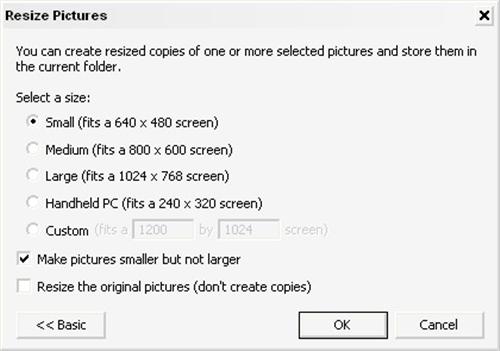
You can choose a size from the options available, or click Custom and enter your own size. Unfortunately, the Image Resizer won’t automatically calculate the corresponding height or width, so you’ll need to do some math on your own if you go with a custom size.
Once you’ve made your choice, be sure that the “Resize the original pictures” option is not checked, and click OK. The Image Resizer will create new images with the same names, but you’ll find the words Small, Medium, Large, WinCE, or Custom added to the new filenames. For example, a file called sunflower.jpg would be copied, resized, and saved as sunflower (small).jpg if you chose the small image size from the menu.
iPhoto
Mac OS X users can rely on iPhoto, an image-organizing program that is included with OS X by default. To resize photos in iPhoto, simply select the photos you’d like to resize and choose Share → Export... from the menu. Choose the File Export tab and set your maximum width or height in the “Scale images no larger than” boxes shown in Figure 1-25.
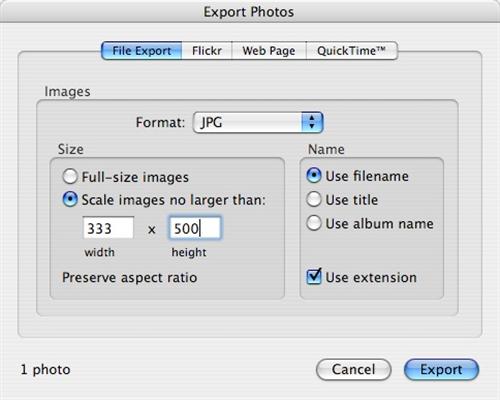
Be sure to change the format to JPG in the drop-down menu, and make sure the “Use extension” option is checked. Click Export and choose a memorable location for your resized photos.
Thinking Small
You can now upload your newly resized images to Flickr, using your favorite method [Hack #5] . You should notice that it takes less time to transfer the files, and you’ll have more room in your Flickr account to upload files.
Also note that many Flickr upload tools will automatically resize photos for you, so be sure to check the options available to you in your uploading tool of choice.
Add Photos Quickly
Flickr uploading tools can speed up the process of adding photos to Flickr.
Adding a photo to Flickr isn’t hard. If you browse to Flickr, log in, and choose Upload from the menu, you’ll find the upload page [Hack #1] , with six empty fields waiting for photos. Click the Browse... buttons next to the fields and choose some local files, and your photos will soon make their way from your desktop to Flickr.
If you want to add more than six photos at a time, though, the upload page begins to look like an awfully slow way of transferring files. You have to upload in batches of six, and wait for each group to transfer before starting the next group. Uploading 30 photos would require 5 trips to the upload page, and constant monitoring to find out when the last batch of photos was done transferring.
Tip
Another factor to consider when uploading photos is the size of the photos themselves. A larger image file will take longer to transfer, so you might want to resize your photos [Hack #4] before adding them to Flickr.
Luckily, Flickr has provided several tools to make uploading easier. An uploading tool is simply a program you can install on your computer that communicates with Flickr. You can find a list of uploading tools created by Flickr developers at http://www.flickr.com/tools/, along with some tools written by outside developers. This hack discusses how to use some of the available Flickr upload tools.
Granting Your Permission
Any tool that uses the Flickr API to add photos to your photostream needs your explicit permission. As you install software that communicates with Flickr, you’ll likely encounter a Flickr permissions page like the one shown in Figure 1-26.
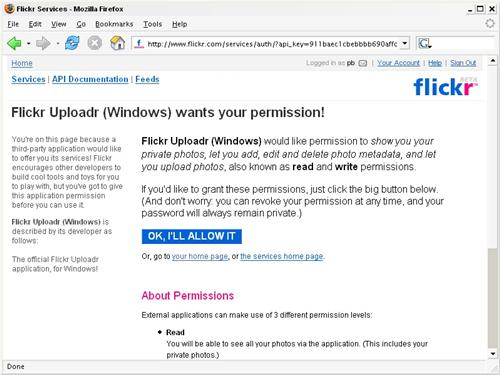
This process ensures that you give access only to programs that you’re aware of, and you can view a list of the applications you’ve approved at any time by logging into Flickr and browsing to the Authentication List page (http://www.flickr.com/services/auth/list.gne). If you see the permissions page while using an upload tool, you’ll need to click the OK, I’ll Allow It button; otherwise, the upload tool won’t be able to add your photos to Flickr.
Batch Uploading Tools
Batch uploading tools save you time by letting you upload entire groups of photos at once. Let’s take a look at some of the available options.
Uploadr for Mac
The official uploading tool for Mac OS X users is called Uploadr. Download the program from the Flickr Tools page (http://www.flickr.com/tools/), and double click the .dmg file to mount it. Drag the Flickr Uploadr application icon from the Flicker Uploadr window to your desktop or Applications folder to install it. Once it’s installed, double-click the Uploadr icon and grant your permission to the application. After you’re logged in, you can start dragging and dropping photos into the left pane of the Uploadr, as shown in Figure 1-27.
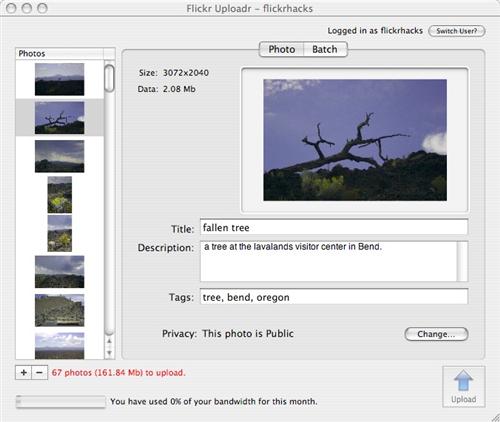
You can set titles, descriptions, and tags for each individual photo, or you can click the Batch tab to set global privacy attributes and tags for the entire group of photos. You can also set the Uploadr to automatically resize your photos before sending them to Flickr, saving transfer time and bandwidth. Choose Flickr Uploadr → Preferences from the menu to set your preferred maximum photo size.
Once your photo attributes are set, you can click Upload to send your photos to Flickr, and they’ll be transferred in the background.
FlickrExport for iPhoto
If you manage your photos with iPhoto on your Mac, you might want to try the FlickrExport plug-in written by Fraser Speirs (http://www.connectedflow.com/blog/). The plug-in lets you use the iPhoto interface to select photos to send to Flickr.
Download the plug-in from http://www.connectedflow.com/flickrexport/, and follow the installation instructions once it’s on your desktop. Once the plug-in is installed, open up iPhoto and select a batch of photos from your Library. Choose Share → Export from the iPhoto menu, and click the Flickr button at the top of the page. You’ll see the Flickr Export dialog shown in Figure 1-28.

As with Uploadr, you can set titles, captions, tags, and privacy settings for each photo, or you can use the “Apply to All” buttons to set attributes for the entire batch. Once your settings are in place, click Export to send the photos to Flickr.
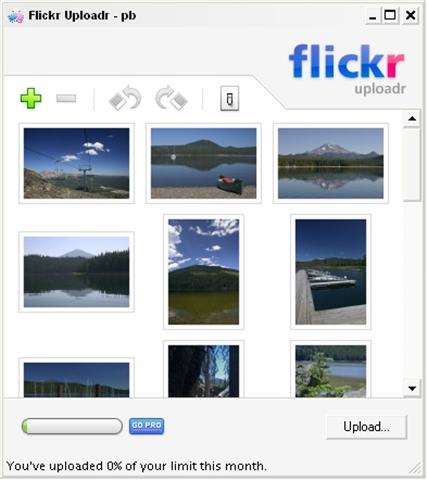
Uploadr for Windows
Mac users aren’t the only ones who can benefit from official Flickr tools, and there’s a version of Uploadr for Windows available at the Flickr Tools page (http://www.flickr.com/tools/). Be sure to choose the proper version of Uploadr for your version of Windows; download the program and double-click the icon to start the installation.
Uploadr for Windows is a bit more simplistic than its Mac cousin, and you won’t be able to add titles, captions, or tags until you’ve transferred the photos to Flickr. To transfer photos, simply drag the images to the Uploadr window, as shown in Figure 1-29, and click the Upload... button.
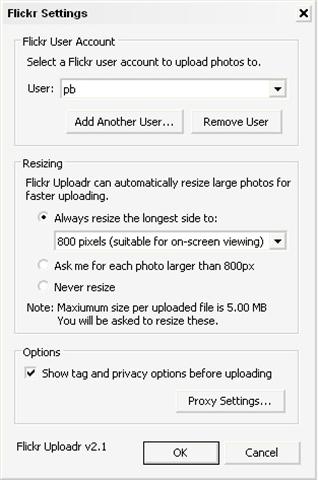
Uploadr will automatically resize your photos if you’d like, and you can set that preference by clicking the light switch icon in the main Uploadr window. Figure 1-30 shows the Flickr Settings window.
Windows XP Import Wizard
Windows XP has some nice built-in features for working with photos, and Flickr has a tool that extends the publishing features to send photos directly to Flickr. On the Tools page, look for a link titled Download “Send To Flickr” Windows XP Explorer Wizard, right-click the link, and choose Save As... to save the file wizard.reg to your computer. Double click wizard.reg, and approve the additions to your Registry. This will install the necessary settings to export images to Flickr.
To try out the wizard, browse to any folder that contains pictures with the Windows file explorer. Choose “Publish this folder to the Web” to start the wizard. If you don’t see the Publish option, choose Tools → Folder Options... from the menu and make sure the “Show common tasks in folders” option is selected.
After you click “Publish this folder to the Web,” you can select the photos from the folder that you want to add to Flickr. Figure 1-31 shows the selection process.

Once you’ve made your selections, click Next and choose Flickr from the list of options. The first time you run the wizard, you’ll need to grant permission to the program. Once you grant permission, you’ll get an authorization code to enter into the wizard. Enter the code into the application, click Next, and you’ll be set to send your photos.
You can’t add titles or captions to photos before sending them, but you can set tags and privacy options for the batch. You also have the option of resizing the photos automatically before they’re sent. Once your photos are available at Flickr, you’ll have the option to add titles and descriptions, and you can use batch editing [Hack #35] to speed things up.
Desktop Uploading Widgets
Desktop uploading widgets are small applications that run on your desktop and transfer images to Flickr. They won’t help you upload images in large batches, but you can drag and drop a single photo onto the widget to send it to Flickr. This can save you the steps of opening your browser, finding the upload page, and browsing around for the photo you’d like to send. Instead, you simply drag the photo onto the widget, drop it, specify your tags, and click Upload. (Unfortunately, you can’t specify a title and description while uploading—the widget is built for speed, so it’s tags only.)
Flidget
If you’re running Mac OS X Tiger (Version 10.4) with Dashboard, you can use Flidget (http://www.apple.com/downloads/dashboard/blogs_forums/flidget.html). Download the widget and double-click it to add it to your dashboard. Click the “i” icon in the lower-right corner to set your Flickr login and password.
You’ll need to be sure you have an Active Screen Corner set for Dashboard so that you can drag a file to the widget. To set an active corner, click and hold Dashboard in your Mac Dock and choose Dashboard Preferences... from the menu. Choose Dashboard from one of the Active Corners.
Once you’re set to go, grab a photo you’d like to send to Flickr and drag it to the active corner you set up. You should see Flidget appear on the screen. Drop the file onto Flidget. You’ll see a thumbnail of the image, and you can add tags to the photo, as shown in Figure 1-32.
Click Upload, and Flidget will send your photo to Flickr.
Konfabulator
If you don’t have the latest version of Mac OS X, or if you’re on a Windows machine, you can still play along by using widget engine Konfabulator (http://www.konfabulator.com). Once you have Konfabulator installed, you can grab the Flickr Upload Widget from http://flagrantdisregard.com/flickr/uploader.php.
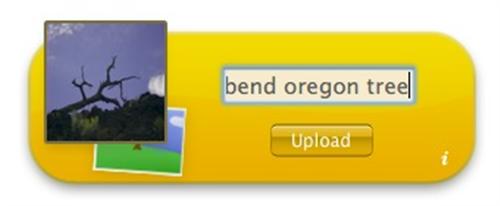
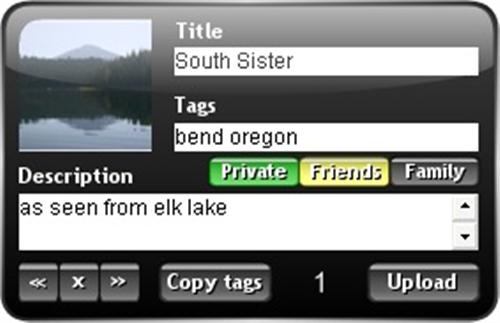
As with Flidget, you can simply drag and drop an image file onto the Flickr Upload Widget. In addition to tags, you can add a title and a description and set your privacy preferences before clicking Upload to transfer the file, as shown in Figure 1-33.
If you find yourself posting one or two photos at a time rather than large sets, these desktop widgets might speed up your routine.
Beyond the Tools
If the tools mentioned here aren’t quite right for your Flickr-flow, you might want to investigate rolling your own [Hack #42] . The Flickr API gives you programmatic access to all of Flickr’s features, including uploading photos, so with a bit of development you might be able to build your perfect uploading tool. Also, be sure to look at the official Tools page (http://www.flickr.com/tools/) at Flickr to find the latest available tools.
Post Pictures from Your Cell Phone
Using Flickr’s post via email feature, you can send photos directly from your cell phone while you’re out and about.
Imagine you’re out walking around your city, and you notice that the annual fair is setting up for its week-long extravaganza. You’d like to share the news with your friends and family. You could take a picture of the newly unloaded carousel with your digital camera, walk home, transfer the photo to your computer, and then upload it to Flickr. If you have a cell phone with a built-in camera, however, you can take the picture and post it to Flickr on the spot. Hooray for convergence!
To post from your cell phone, you’ll need a cellular plan that lets you send photos via email. The data-transfer plans are usually $5 to $10 more per month than standard plans, or you might have a pay-per-use option that lets you pay for the number of messages you send. Check with your cellular service provider to get details about sending email from your phone. Once your plan is in place, posting from your cell phone relies on Flickr’s “Upload-by-email” feature. Most camera phones can send any of their photos via email. With the proper phone and plan, you simply need a Flickr email address.
Uploading by Email
Every user at Flickr has a unique email address for uploading pictures. You can find out yours by looking under Your Account at the bottom of any Flickr page and clicking the appropriately titled “Upload-by-email” link. You’ll see a page like the one in Figure 1-34, which lets you in on your secret address.
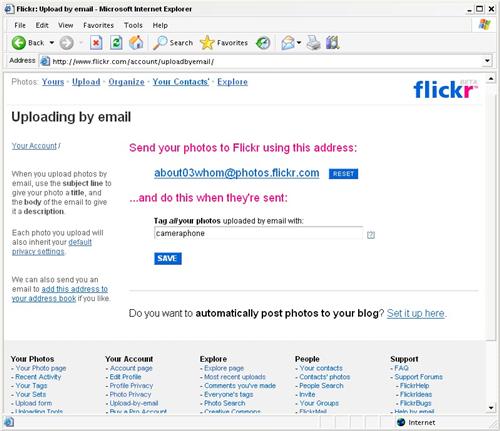
Notice that the email address is made up of random words and numbers before the @ symbol, followed by photos.flickr.com. Keep in mind that the domain is not simply flickr.com, because without the photos. prefix, your photos will be sent into the void.
The “Uploading by email” page also lets you specify any tags to automatically add to a photo when it’s uploaded via email. Popular tags for cell phone users include cameraphone, mobile, and moblog (short for mobile blog). If you’re going to be taking photos from a specific location with your mobile phone, you could include the location name as an auto-tag as well.
Tip
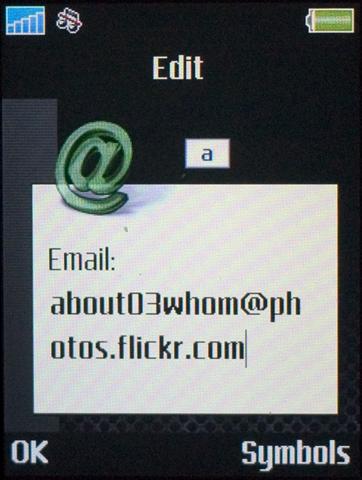
Every cell phone has a different way of taking pictures and entering contacts, so you might have to consult your cell phone manual for some of these procedures. The screenshots in this hack show a Sony Ericsson S710a—an excellent phone for mobile photos.
While the page is still up on your computer, grab your cell phone and start a new entry in your phone’s contacts list. If you enter your private Flickr address now, you won’t have to remember it while you’re out and about. Figure 1-35 shows how entering the address looks on a cell phone; be sure to add it to the email field of a contact.
Give the contact a name you’ll recognize, like Flickr, and you’ll be all set for easy uploading from the field. Be sure to click Save on the “Uploading by email” page at Flickr to associate your Flickr email address with your account.
Sending a Photo
So, you’re out about town, armed with a camera phone and a Flickr address stored as a contact. When you capture the perfect image, you’ll be set for sharing it with the world.
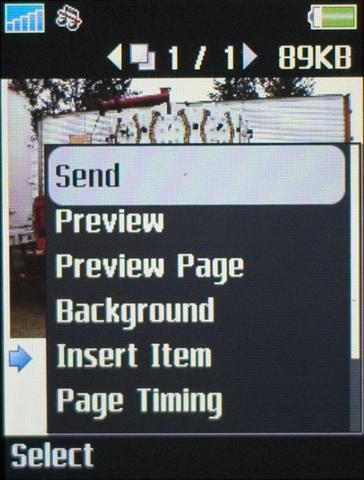
Every cell phone has a different method of sending a photo, but generally, the rule is to push buttons until you see an option called Send (see Figure 1-36).
Once you select Send, you’ll usually have the option to review the email before you send it. If you have great cell-phone-keypad dexterity, you can set a Subject line for your email like the one shown in Figure 1-37, and Flickr will use the subject as the title of the photo.
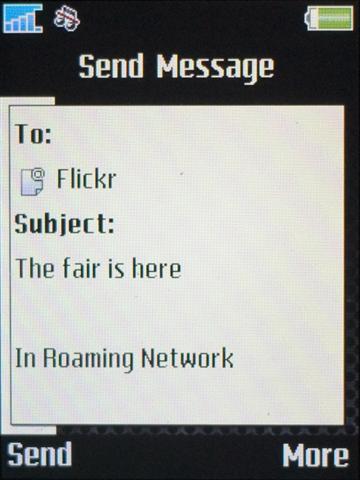
If you don’t set a subject, most cell phones use the internal filename of the photo as the subject of the message—something along the lines of DSC00025. Of course, you can always change the title of a Flickr image once you’re back at your home computer.
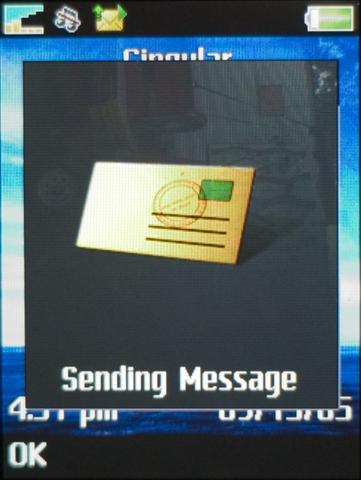
When the message is ready to go, click Send, and your phone will send the message through powerful cell networks directly to Flickr. Your phone might even provide a Sending Message graphic like the one shown in Figure 1-38 to let you know the message is on its way.
A minute or two later, your photo will appear on Flickr with your subject and preselected tags, as shown in Figure 1-39.
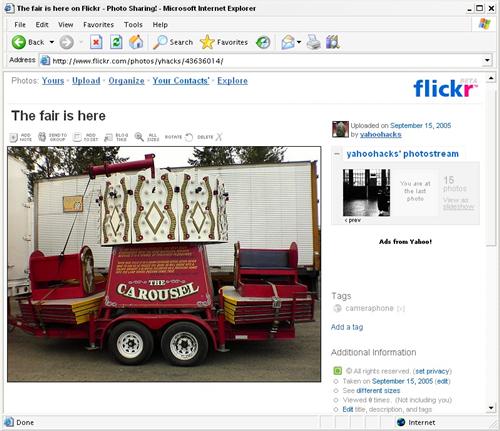
The entire process of sending a photo takes about a minute, and then you can slip the phone back into your pocket. Once you’re back at your computer, you can log into Flickr and add any additional information, such as a description or more detailed tags—the hurdle of transferring the photo will be a distant memory.
Feed Your Latest Photos to Your Web Site
Flickr provides a number of ways to syndicate your photos to another web site.
Adding photos to an existing web site can be a complex chore. You have to upload each photo to your site, write some HTML to display each photo on a page, and create duplicate, resized images if you want to show thumbnails of the photos. Fortunately, there are several tools at your disposal that simplify the process of sharing your photos on a remote web site.
Even though you upload your photographs to Flickr—and they’re stored on Flickr’s servers—your photos aren’t locked in at the site. Flickr is an open system that allows you to access your photos in a number of ways and display them anywhere you’d like. One of the easiest ways to show your photos on another site is with a Flickr badge.
Flickr Badges
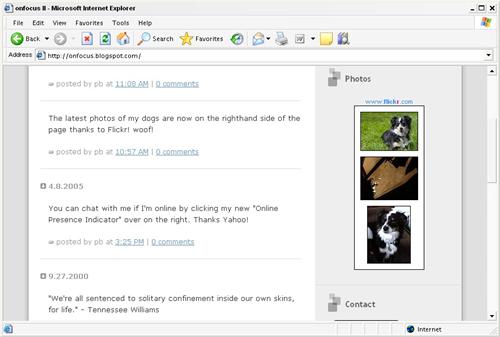
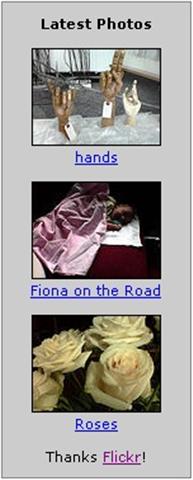
Though it sounds like something you might wear on your uniform, a Flickr badge is simply a bit of code that displays photos on a remote web site. Figure 1-40 shows a simple Flickr badge with three photos on a remote web site.
You can create your own Flickr badge in a simple five-step process. Browse to the “Create your own Flickr badge” page (http://www.flickr.com/badge_new.gne), and log in if you haven’t already. Creating a Flickr badge is the process of making a number of decisions about the badge. Here are the steps:
- Choose the type
You can decide between basic static HTML, or an animated Flash-based badge. The animated badge shows a bit of movement and fades thumbnails in and out. Choosing Flash will mean your visitors will need the Macromedia Flash plug-in installed for their browsers in order to see your photos.
- Choose the photos
You can choose to display your latest photos, or any of your photos that are tagged with a specific term. In addition, you can display photos from a group you’re a member of, all Public photos with a certain tag, or, if you’re feeling generous, all Public photos.
- Set the layout (HTML only)
When you’re building an HTML badge, you have a number of options for the layout. You can choose to show your personal buddy icon, which links to your Flickr profile page. You can choose the number of photos you’d like to show, the size of the thumbnails, and the orientation of the badge (horizontal or vertical). Finally, you can choose to show the latest photos or a random sampling.
- Choose colors
If you want the badge to fit in seamlessly with your remote site’s design, you can adjust the background, border, and link colors. The preview at the bottom of the page will show your changes in progress.
- Copy and paste code
On the last page, you can preview your badge, and copy the code for your unique badge by highlighting it and clicking Ctrl-C.
The code for a static HTML badge is a combination of CSS, HTML, and JavaScript. It should look something like this:
<!-- Start of Flickr Badge -->
<style type="text/css">
#flickr_badge_source_txt {padding:0; font: 11px Arial, Helvetica, Sans serif;
    color:#666666;}
#flickr_badge_icon {display:block !important; margin:0 !important;
    border: 1px solid rgb(0, 0, 0) !important;}
#flickr_icon_td {padding:0 5px 0 0 !important;}
.flickr_badge_image {text-align:center !important;}
.flickr_badge_image img {border: 1px solid black !important;}
#flickr_www {display:block; padding:0 10px 0 10px !important;
    font: 11px Arial, Helvetica, Sans serif !important; color:#3993ff !important;}
#flickr_badge_uber_wrapper a:hover,
#flickr_badge_uber_wrapper a:link,
#flickr_badge_uber_wrapper a:active,
#flickr_badge_uber_wrapper a:visited {text-decoration:none !important;
     background:inherit !important;color:#3993ff;}
#flickr_badge_wrapper {background-color:#ffffff;border: solid 1px #000000}
#flickr_badge_source {padding:0 !important;
    font: 11px Arial, Helvetica, Sans serif !important; color:#666666 !important;}
</style>
<table id="flickr_badge_uber_wrapper" cellpadding="0" cellspacing="10" border="0">
 <tr>
     <td>
     <a href="http://www.flickr.com" id="flickr_www">
     www.<strong style="color:#3993ff">flick
     <span style="color:#ff1c92">r</span></strong>
     .com</a>
     <table cellpadding="0" cellspacing="10" border="0" id="flickr_badge_wrapper">
       <script type="text/javascript"
src="http://www.flickr.com/badge_code_v2.gne?count=3&display=latest&size=t&layout=v&source=user&user=33853652177%40N01">
       </script>
     </table>
     </td>
 </tr>
</table>
<!-- End of Flickr Badge -->
The Cascading Style Sheet (CSS) style definitions at the top of
the code format how the badge looks. You can modify this CSS at any
point to change how the badge looks on your site. Immediately after
the <style> tags, the
standard HTML <table> holds
the photos.
The <script> tag does
the work of displaying the photos. As you can see in the src attribute, the JavaScript file resides
at http://www.flickr.com and displays photos
based on the parameters passed in the URL. Many of the decisions you
made while running through the badge-creation process are encapsulated
in this URL. For example, the count
variable will be set to the number of photos you told the badge to
display, and the layout variable
will be set to v or h, depending on your choice of vertical or
horizontal layout.
If you need to change your badge, try studying the fairly self-explanatory variables in the URL and changing their values. That way, you can make changes quickly without running through the whole badge-creation process again.
Flickr Feeds
Another way that Flickr makes photos available for use on other sites is through standard XML syndication formats [Hack #17] . You’ll find news feeds at the bottom of many Flickr pages that relate to the content you see on those pages.
Each Flickr feed contains the 10 most recently added photos for
a particular user, group, or tag. The item nodes in the feed contain
all of the details you need to display the photo on a remote site: the
title, a link to the photo on Flickr, and a bit of HTML for displaying
a thumbnail and caption. Here’s a look at an item in a Flickr RSS feed
(this example has been formatted for readability; the actual feed
includes escaped HTML, with tags such as <p> rendered as the escaped <p>):
<item>
    <title>Ultimate Championships</title>
    <link>http://www.flickr.com/photos/pb/16469233/</link>
    <description>
        <p><a href="http://www.flickr.com/people/pb/">pb</a> posted a photo:</p>
        <p><a href="http://www.flickr.com/photos/pb/16469233/"
            title="Ultimate Championships">
            <img src="http://photos10.flickr.com/16447365_40ac8021f5_m.jpg"
            width="240" height="161" alt="Ultimate Championships"
            style="border: 1px solid #000000;" /></a></p>
        <p>the women's championship game was washington vs. stanford</p>
    </description>
    <pubDate>Mon, 30 May 2005 11:01:15 -0700</pubDate>
    <author>nobody@flickr.com (pb)</author>
    <guid isPermaLink="false">tag:flickr.com,2004:/photo/16469233</guid>
</item>
The <title> and
<link> elements hold the
title of the photo and a link to the photo, as you’d expect. The
<description> element holds
the block of HTML that you can use on a remote site.
The most common use of RSS is viewing new items in a newsreader, but there’s no reason you can’t use this same feed to create a custom Flickr badge. Parsing XML is the perfect job for Perl, and with a few lines of code, you can build your own badge.
The code
This Perl script uses the LWP::Simple module to fetch a Flickr feed
and the XML::RSS module to parse
the feed and display its contents. Make sure you have these modules
on your server, and then add this code to a file called flickr_feed.pl. Be sure to include a
valid Flickr feed URL that contains the photos you want to
syndicate.
#!/usr/bin/perl
# flickr_feed.pl
# Transforms a Flickr Feed into HTML
# Usage: flickr_feed.pl

use strict;
use XML::RSS;
use LWP::Simple;

# Grab the feed.
my $flickr_feed = 'insert Flickr feed URL';
my $feed = get($flickr_feed);

# Start RSS Parser
my $rss = new XML::RSS;

# parse the feed
$rss->parse($feed);

# initialize item counter
my $i;

# print the title, link, and description of each RSS item
foreach my $item (@{$rss->{'items'}}) {
    $i++;
    my $desc = "$item->{'description'}\n";

    # remove the "posted by" text
    $desc =~ s!<p>.*?posted a photo:</p>!!;

    # use thumbnails instead of medium images
    $desc =~ s!_m!_t!;

    # remove the width and height attributes from image tags
    $desc =~ s!width=".*?" height=".*?"!!;

    # remove the paragraph tags
    $desc =~ s!</?p>!!g;

    # print the item
    print "$desc<br />";
    print "<a href=\"$item->{'link'}\">";
    print "$item->{'title'}</a><br /><br />";

    # set the number of photos
    last if ($i == 3);
}
This code downloads the Flickr feed and massages the HTML in
the <description> tag,
removing some text. It then prints each item in the feed, until it
hits the number specified in the last line of the script.
Running the hack
You can run this code from the command line by calling the script like this:
perl flickr_feed.plYou’ll probably want to set the script to run on a regular schedule with the Windows Task Scheduler, or cron on Unix-based systems.
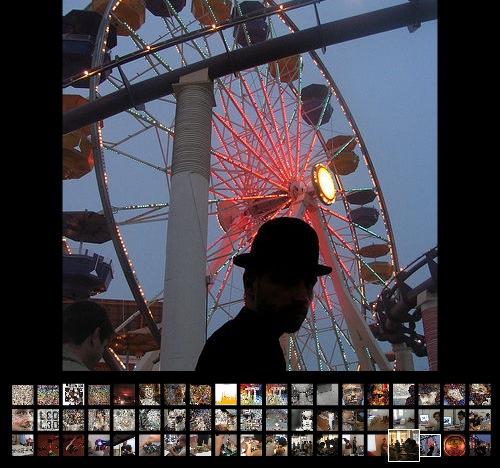
Using an XML feed instead of a preprogrammed Flickr badge requires a bit more work, but it gives you more control over the presentation. You can create your own CSS styles and classes to make the photos appear exactly as you want them to. Figure 1-41 shows a custom Flickr badge created with the script provided in this hack, viewed on a remote site.
Hacking the Hack
Even though the Flickr feeds contain most of the information associated with each photo, you can still do more with the Flickr API. The API provides programmatic access to anything at Flickr, not just photos. (You can read the full documentation at http://www.flickr.com/services/api/.)
In addition to titles and captions, you can get access to everything from the number of comments people have left about a photo to notes left by others to technical data (EXIF tags) from the camera that took the photo. Building a custom badge with the API will be more technically complex than parsing an RSS feed, but if you really want access to all of the data you have stored at Flickr, it’s available!
Make a Photo Gallery in 30 Seconds or Less
This online form will create ready-to-paste HTML code for your next photo gallery.
There are a number of tools available for building galleries or albums from your Flickr photos. One of my favorite free tools is CK’s Flickr Album Maker, which can be found at http://webdev.yuan.cc.
Tip
CK is a Taiwanese Flickr Hackr who has made an excellent collection of code generators, most of them driven by forms.
CK’s Flickr Album Maker presents an online form in which you’re requested to fill out a few fields. It then produces either a static gallery of your photos, or a slideshow. In both cases CK provides you with the HTML code, so you can copy it and paste it into your own web site.
Since CK’s code talks to the Flickr API to get information about your photos, you don’t need to actually know anything about the API yourself. All of that stuff happens under the hood.
Making an Album
To begin making an album, go to CK’s site at http://webdev.yuan.cc and click on the Flickr Album Maker navigation link. You’ll be presented with the form shown in Figure 1-42.
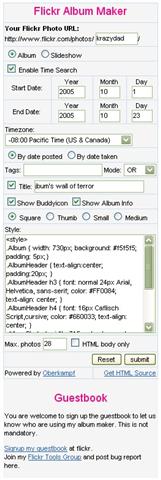
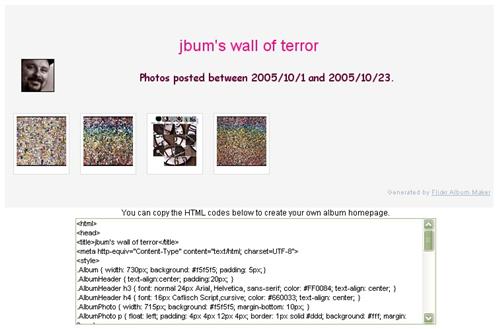
After filling out the form with the personal information needed to access your Flickr photos, press the submit button. CK’s Album Maker will then produce a sample album and provide you with the HTML source code for copying, as shown in Figure 1-43.
If you want to tweak the result, you can modify the embedded stylesheet.
Making a Slideshow
If you select the Slideshow option at the top of CK’s form, it will produce source code for a very spiffy interactive slideshow, instead of a static gallery. The slideshow will look something like Figure 1-44.
If the slideshow interface looks familiar, it’s because you’ve
probably seen it before. This is the same Flash-based slideshow used
on the Flickr web site. If you look at the source code that CK
produces, you’ll notice that it is merely summoning Flickr’s slideshow
and putting it into an iframe:
<iframe width="500" height="500" frameborder="0" scrolling="no" src = "http://www.flickr.com/slideShow/index.gne?nsid=&text=&tags=&tag_mode=any&user_id=94832693@N00&firstId=&v=1.6&codeV=1.26"></iframe>
Tip
Another nice tool for adding a Flash slideshow to your web site is the $20 Slideshow Pro, which can be found at http://www.slideshowpro.net.
Rolling Your Own
There are a few other web sites that work in a similar way. A lot of CK’s stuff either uses or is inspired by Oberkampf, a PHP library of useful routines for building slideshows and galleries. The Oberkampf web site (http://www.entrauge.com/tools/oberkampf/index.php) also employs an online form to collect your personal information, which it then embeds directly into a personalized copy of the Oberkampf source code.
Armed with Oberkampf, you can reduce the task of producing a strip of your thumbnail images to a single line of PHP code.
See Also
CK provides excellent support for the Album Maker and other tools he makes. He has created a Flickr group for this purpose at http://www.flickr.com/groups/flickr_tools/.
Post Photos to Your Blog
If you take a few minutes to enter some information about your weblog at Flickr, you can post photos directly to it with a single click.
Many weblog systems offer tools to help you upload and include images with your posts, bit you might find that Flickr is a nice alternative to the standard photo tools. Once you upload a photo to Flickr [Hack #1] , you have several options for including that photo in your weblog posts.
Blog This
The most direct way to send a photo from Flickr to your weblog is through the Blog This button that you’ll see above each of your photos, as shown in Figure 1-45.
To enable the Blog This button, you need to give Flickr some information about your weblog.
Configuring a weblog
Setting up Flickr to post to a weblog is a simple three-step process. Click Your Account at the top of any page at Flickr, and click Your Blogs under the section labeled Blogging. You’ll find a list of any weblogs you’ve set up; to add a weblog to your account, click “Set up a new blog.”
The first step to setting up a new weblog is telling Flickr which weblog tool you use. Flickr supports the following weblog systems:
- Blogger
- TypePad
- Movable Type
- LiveJournal
- WordPress
- Manila
If you use a weblog tool that’s not listed, check your tool’s documentation to see if it uses one of the supported weblog application programming interfaces (APIs). An API allows a third-party tool such as Flickr to add posts to your weblog. Flickr supports the following APIs:
- Atom
This API is an emerging independent standard for programmatic weblog access and is supported by many tools, including Blogger and the latest versions of Movable Type. You can see the details of the API at http://www.atomenabled.org.
- BloggerAPI
This was the first weblog API implemented by Blogger. It’s no longer actively developed, but some tools still support it.
- MetaWeblogAPI
This is another older API that some tools, including WordPress, support. You can read more about the API at http://www.xmlrpc.com/metaWeblogApi.
If your weblog tool supports one of these APIs, you just need to know the API Endpoint: a URL to which Flickr should send API requests. The documentation should give you the API Endpoint URL, and with that in hand, you can move on to the second step.
Once you’ve chosen your tool or supported API, you’ll need to enter the username and password you use for your weblog. Flickr will use this information to contact the weblog tool and fetch information about your weblog (or the multiple weblogs you maintain there).
Choose your weblog from the list, click Next, and verify the information on the following page. If you don’t feel comfortable storing your weblog tool’s password with Flickr, you can uncheck the box labeled “Store your password?” Click All Done, and you’ll be ready to start posting pictures!
Posting to your weblog
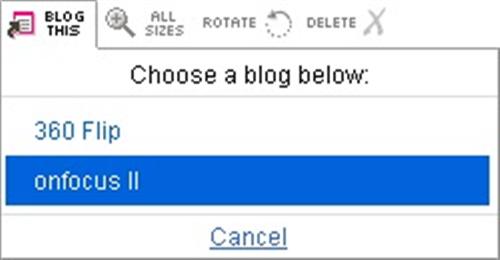
With your weblogs set to go at Flickr, browse to one of your photos that you’d like to post to a weblog. Click the Blog This button above the photo and choose one of your weblogs from the list, as shown in Figure 1-46.
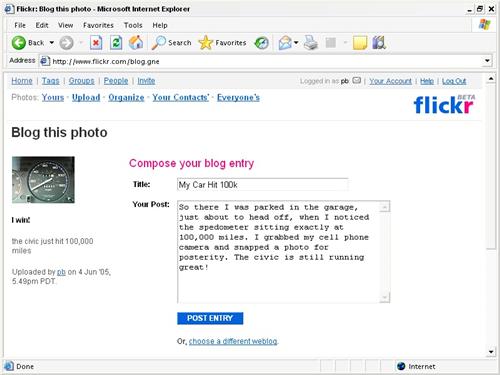
Once you choose your weblog, you’ll have the option to compose your post at Flickr (Figure 1-47).
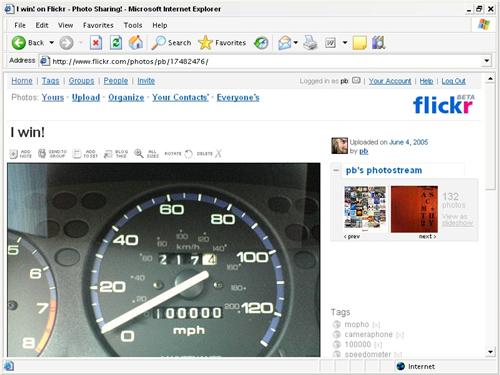
Click Post Entry, and Flickr will automatically send the text and photo to your weblog. Figure 1-48 shows the example post at a Blogger-powered weblog.
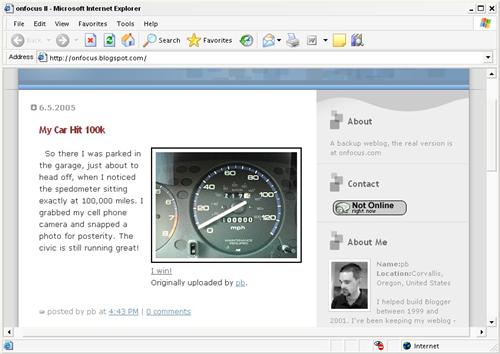
The nice thing about using Flickr’s Blog This feature is that you don’t have to write the HTML necessary to link to a photo—you can simply point and click to add a post with a photo to your weblog, and Flickr assembles the necessary HTML behind the scenes.
If you want to change the HTML that Flickr uses, you can alter the way Flickr lays out the photo and text for your weblog posts. To customize a post layout for one of your weblogs, browse to the Your Blogs page at Flickr and click Layout. You’ll see several options, as shown in Figure 1-49.
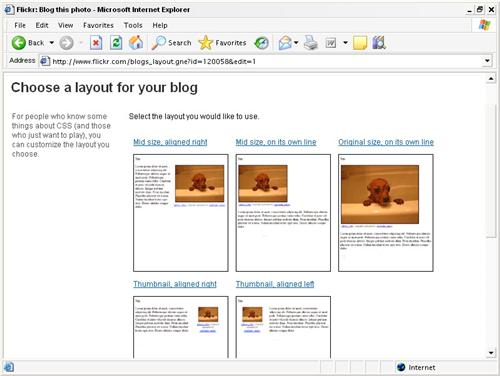
You can even create a custom post layout template, if you want to go beyond the existing options.
Roll Your Own Post
While the Blog This feature at Flickr works well for posting a single photo along with some text, it doesn’t work as well for posting multiple photos within a single post. And you might find that your post layouts are so unique that a single template won’t work. In either of these cases, you’ll need to write your own HTML to display images in your weblog posts. Even though you’ll be doing some of the work on your own, Flickr can still make your life easier by hosting and processing your images.
The key to writing your own HTML to display images is finding direct URLs for the images you upload. But each image has more than just one URL—for every image you upload to Flickr, there are five image sizes available, each with its own URL. This lets you choose the appropriate image size for the post, or use a thumbnail instead of a full image.
Tip
Keep in mind that the larger your photo is, the longer it will take your readers to download it. And large photos won’t always fit within the design constraints of a standard weblog. If your weblog text fits within a 400-pixel-wide column, posting an 800-pixel-wide photo will break the design.
To find URLs for each of the image sizes available, click the appropriately titled All Sizes button above any photo you’ve uploaded to Flickr. This will take you to the All Sizes page (Figure 1-50), which includes the size options listed across the top of the page, along with the dimensions of the photo in each size.
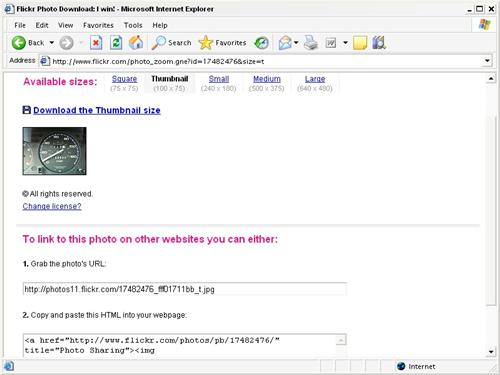
As you click each image size in the menu, you’ll find a unique URL listed underneath the photo. Each URL has a similar format that looks something like this:
http://photos11.flickr.com/17447365_fff01711bb_o.jpgNotice that the URL starts with a Flickr domain and that the
filename includes two alphanumeric IDs separated by an underscore,
followed by a final letter (again separated by an underscore) before
the .jpg extension. That final
letter is a URL code, which represents the size
of a Flickr photo; understanding the codes can help you create or
change links to different photo sizes on the fly. Here’s a quick look
at the different photo sizes available at Flickr:
- Large
This size is the original size of the photo before it was uploaded to Flickr. If you uploaded a photo that was 800 pixels wide by 600 pixels high, you can access the original by clicking the Large size. The URL code for this size is
o, which probably stands for original. If the original image you uploaded was extremely large (more than 1024 pixels at its longest dimension), an Original photo size will also be available at Flickr. In this case, the Large size will have the URL codeb, and the Original size will have the codeo.- Medium
The Medium size is what you see on a Flickr photo detail page. This size will be 500 pixels at its longest dimension, depending on the orientation of the photo. There is no URL code for Medium photos, because this is the default size.
- Small
Small photos are 240 pixels at the longest dimension and are used on photostream pages as thumbnails. The URL code for Small photos is
m.- Thumbnail
This size is 100 pixels at its longest dimension and can be used to link to a larger version of the photo. The URL code for Thumbnail-sized photos is
t.- Square
A Square photo is a version of the original cropped to a 75x75-pixel square. You’ll find this size photo in use on your Flickr homepage when you’re logged in. It’s a handy size to use if you need to know the exact width and height of a photo. The URL code for square photos is
s.
Once you’ve determined the size of the photo you’d like to display in your post, copy its URL. Then, you can use the URL in an HTML image tag to display the photo, like this:
<img src="http://photos11.flickr.com/17447365_fff01711bb_m.jpg" width="240" height="180" alt="speedometer" />
When you’re writing your own HTML, you can combine multiple images, link images to unique web pages, or create more complex layouts than are possible with Flickr’s Blog This feature. Figure 1-51 shows a single post at LiveJournal with several photos hosted at Flickr.
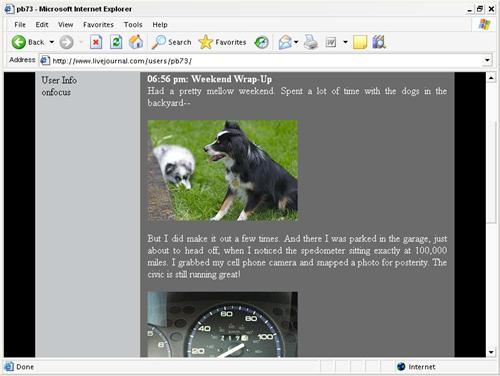
While you might not need this level of control for every post you make, knowing what’s available to you can give you the freedom to get creative with your weblog posts.
Get Flickr Hacks now with the O’Reilly learning platform.
O’Reilly members experience books, live events, courses curated by job role, and more from O’Reilly and nearly 200 top publishers.

