When you place one SketchUp object against another, they tend to glue themselves together. Sometimes this behavior is helpful, but other times it's annoying. (For complete details see Understanding SketchUp's Sticky Behavior.) Suppose you place a 2 x 4 on top of the bench seat. Later, if you move the 2 x 4 with an edge or surface glued to the bench seat, one of two things happens. Either both the seat and the 2 x 4 move, or moving the 2 x 4 distorts the lovely shape of your bench seat. The way to keep this from happening is to turn the bench seat into a component. Components have many advantages and you'll read all about them in Chapter 5. The immediate advantage for your bench seat is that a component keeps its shape; you can place it against another object without gluing its edges and surfaces to that object. Here are the steps to turn your bench seat into a component:
With the Select tool (space bar), triple-click the 2 x 12 x 72-inch bench seat to select all of its faces and edges.
The selected edges turn blue, and the selected faces are highlighted with dots.
Press G to open the Create Component box.
You could also click the Create Component button (it's next to the selection arrow) or choose Edit → Create Component.
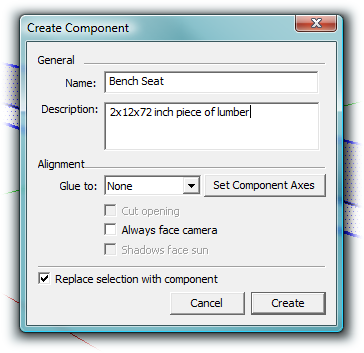
In the Name box, type Bench Seat, as shown in Figure 1-18.
Use a descriptive name that will mean something to you (and others) 12 months from now.
In the Description box, type 2x12x72 inch piece of lumber.
This description may come in handy later if you're looking through your components for a piece of lumber.
Leave the rest of the options as they are and click the Create button.
Your bench seat is still selected, and it's highlighted as a component with an envelope of blue lines.
Open the Components window (Window → Components) and click the Select tab.
The Components window has three tabs: Select, Edit, and Statistics. It shows different details for each.
Under the tabs, click the button that looks like a house.
The house button is named "In Model" because it's used to display the components that are in your model. You see this button in the Materials and Styles windows, too. At this point, Bench Seat should be the only component showing.
In the Components window, click the Bench Seat component to select it, and then click the Statistics tab.
Notice that the Statistics tab provides details about the selected component. In the case of your Bench Seat, it shows that there are 12 edges and 6 faces. How rectangular!
Click the close button to close the Create Component window.
If there's a bench seat attached to your mouse cursor, that's because SketchUp thought you wanted to add a component to your drawing. Press Esc to make it go away.
Use File → Save to save your project.
A standard file box appears, where you can navigate to a directory and type in a file name. Even though you're not finished with your bench, it never hurts to save early and save often.
So, you turned your bench seat into a component. Now it won't get confused when it comes up against other objects. If you want another, identical bench seat or a 2 x 12 x 72-inch board for any other purpose, all you have to do is drag it out of the Components window. Make sure you're on the Select tab and drag. In the drawing window you can select an entire component with a single click—no triple-clicking is needed for components. Notice that components are highlighted with extra blue lines like an envelope when you select them. That's a visual reminder that they're components and that you can't modify them like other objects. You'll learn some more details about components when you make the bench legs. The complete story on editing components is in Chapter 5. For now, if you've got an extra bench seat in your drawing, click it and press Delete. You'll only need one from here on out.
Figure 1-18. The Create Component box gives you a way to name and describe components, which is helpful when you reuse them later. The gluing options determine the way your component behaves when attached to other objects. Here it's set to None, because you don't want to glue it to anything.
The legs for this bench are also 2 x 12 pieces of lumber. The legs are 15 inches tall, which puts the top of the bench seat a comfortable 17 inches off the ground.
Here are the steps to create the first leg:
Click the Front view button or choose Camera → Standard Views → Front.
It's usually easier to draw your initial 2-D shape in Front view or Top view. That way it's easier to keep all the edges of your shape on a single axis.
Press R to choose the Rectangle tool.
The SketchUp cursor changes to a pencil, indicating that you're ready to draw something. A hint that says "Select first corner" appears in the status bar.
Below the bench seat, draw a small rectangle of any size and shape, but don't click anywhere or press any keys.
You don't need to worry about the exact placement of the leg in the drawing—you'll position it later.
Type the following: 2, 15.
Remember, you don't have to click first; the numbers automatically appear in the Measurements toolbar. These dimensions create a rectangle that's taller than it is wide—just the thing for your bench leg.
Click the Iso view button or choose Camera → Standard Views → Iso.
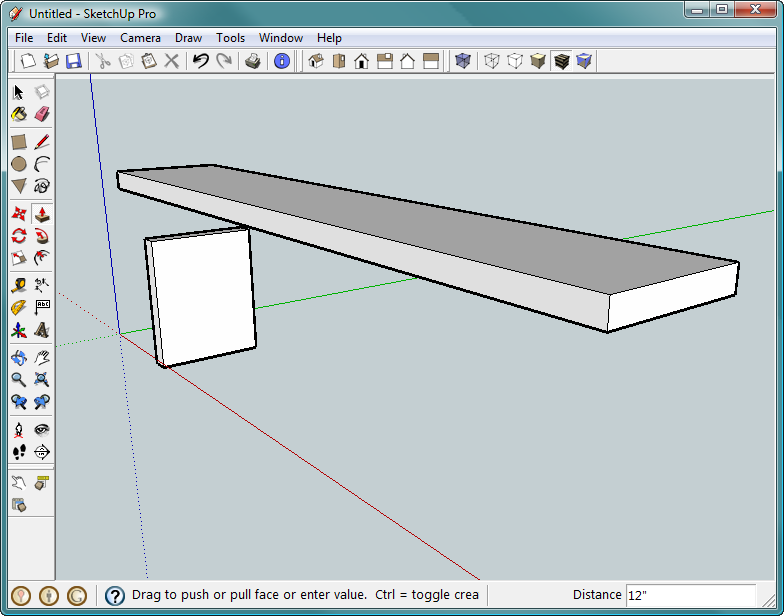
You see a 3-D view of the drawing area, which makes it easier to turn your rectangle into a board in the next few steps (Figure 1-19). If necessary, use the Zoom (Z) and Pan (H) tools to get a good view of your bench leg.
With the Push/Pull (P) tool, click and push the face toward the upper-left corner of the drawing area.
Stop as soon as you begin to see it change shape, and don't click anywhere or press any keys. You want to accurately enter a dimension for the bench leg.
Type 12 for the width of the bench leg.
As you type, the numbers appear in the Measurements toolbar. (It's not necessary to click in the Measurements toolbar before you type the dimension.) If you make a mistake, press Esc and enter the number again. When you're done, the bench leg is fully formed as a 2 x 12 that stands 15 inches tall.
Triple-click the leg and then press G to open the Create Component box.
Triple-clicking selects all the edges and faces of the bench leg. When you press G, the Create Component box appears.
In the Name box type Bench Leg, and in the Description box type 2x12x15 inch piece of lumber.
Click Create.
SketchUp saves the Bench Leg component. You now have two components in your model: Bench Seat and Bench Leg.
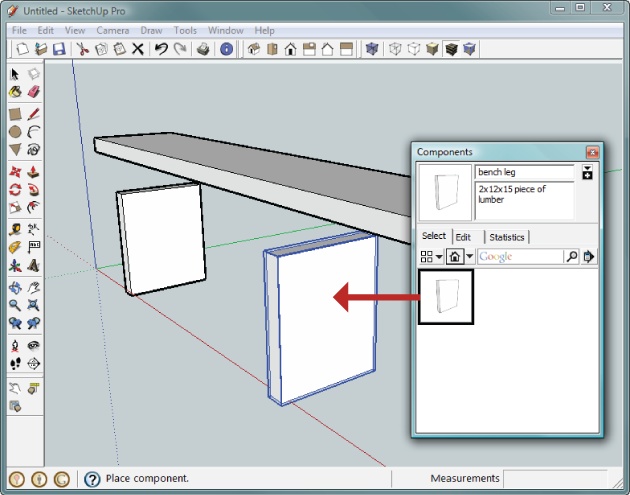
Unless you enjoy sitting at an angle, your bench needs two legs. You have two ways to create an identical second leg component. You can select the leg with the Selection arrow (space bar), and then copy (Ctrl+C) and paste (Ctrl+V) a new leg component into your document. Because your leg is a component, you can also open the Components window (Windows → Components), set the drop-down menu under the tabs to In Model, and then drag a second instance of the Bench Leg component into your document as shown in Figure 1-20. Either way, you have two instances of the Bench Leg component in your document. If you edit the component—add color to it, make the leg longer, and so on—the changes take place in both bench legs in your document.
At this point, you've milled three pieces of lumber: a bench seat and two legs. You have only one more piece to go. To make sure that your bench is sturdy, you need a support piece of lumber that connects and stabilizes the other three pieces. That'll cure the wobbles. The bench support is 2 x 8 x 52 inches. You're probably a pro at milling up lumber by now, but in any case, here's a short version of the steps again:
Click the Front view button or choose Camera → Standard Views → Front.
Front view makes it easier to draw a rectangle on the red axis.
Choose the Rectangle (R) tool, and then draw a small rectangle of any size and shape.
Don't worry about the size; you'll enter the dimensions in the Measurements toolbar.
Type 2, 8 for your dimensions, and then press Enter.
The numbers appear in the Measurements toolbar, creating a rectangle that's 2 inches wide and 8 inches tall.
Click the Iso view button or choose Camera → Standard Views → Iso.
Iso view provides a better angle for pushing the 2 x 8 rectangle into a three-dimensional piece of lumber.
Press P to select the Push/Pull tool, and then begin to push the face of the rectangle into a 3-D shape.
You don't have to be accurate as you're pushing, just get the motion started, and you can enter a precise dimension in the next step.
Type 52 and press Enter.
The numbers appear in the Measurements toolbar. The board becomes a 2 x 8 that is 52 inches long.
Triple-click the support board to select all its edges and faces.
All the edges and faces of the support board are highlighted.
Press G to open the Create Component box. Name the component Support, and for a description, type 2x8x52 inch piece of lumber.
SketchUp adds the Support board to your component library. You've created all the lumber you need to build your bench.
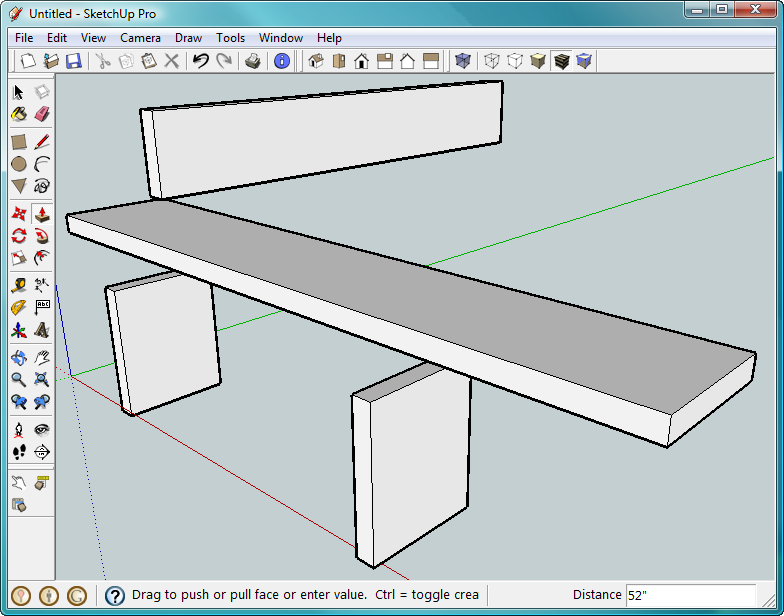
Okay, you've milled all the pieces of lumber you need for this bench (Figure 1-21). Grab your virtual nails. It's time to put this baby together. Along the way, you'll learn how to move and rotate objects and how to show and hide components in the drawing area.
You've got lumber scattered all over the SketchUp drawing window. You may have noticed that they're all kind of oriented in the proper direction to piece together into a bench except for that last piece, the support. You could have designed it to be properly oriented by simply changing the order of the numbers as you entered them into the Measurements toolbar (but then you wouldn't have had an opportunity to practice rotating objects).
Click the Top view button or choose Camera → Standard Views → Top.
You see one of the narrow faces of the 2 x 8, as well as your other bench parts.
If necessary, use the Zoom (Z) and Pan (H) tools to drag the support into view.
It's good to get used to positioning your work so you have just the right view of your model.
Press Q or choose Tools → Rotate.
The cursor changes to a protractor, and you're ready to apply the Rotate tool to objects in the drawing area.
Move the Protractor tool over the support component.
The protractor flips around depending on which face it hovers over. The dot in the middle, between the two curved arrows, snaps to endpoints, midpoints, and edges. This behavior is typical for SketchUp—it tries to anticipate what you want to do.
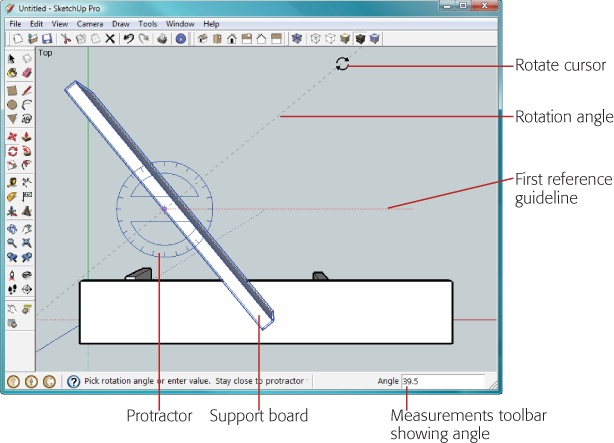
Position the center of the protractor over the midpoint of the left edge of the bench support, as shown in Figure 1-22.
Moving the cursor over the left edge of the support, you notice a snapping action when you reach the midpoint. Pause there, and a tooltip appears that reads "Midpoint in Component".
Click to select the midpoint, and then move the cursor a few inches off to the right.
A guideline appears between the midpoint and the cursor. The line snaps to a position that is perpendicular to the support.
Click to set this first reference guideline, and then begin to move the cursor in an arc.
When you click, the reference guideline appears on the screen. The support rotates as you move the cursor. A new guideline follows the cursor. Using this line, you can accurately select an angle with the protractor. The Measurements toolbar shows the value of the angle in degrees.
Move the cursor so the support board rotates 90 degrees.
There's a snapping action when you reach 90 degrees. The value of the angle appears in the Measurements toolbar.
Click to complete the rotation and 90 degrees.
When you complete the rotation, the Rotate tool's guidelines disappear.
Figure 1-22. As you rotate an object, the protractor shows you the angle, and the Measurements toolbar translates it into degrees.
Tip
Two tools change your cursor into a protractor—the Rotate tool and the Protractor tool (Using the Protractor Tool). If you ever find that the Rotate tool is behaving oddly, double-check to make sure you haven't chosen the Protractor tool instead, or vice versa if you intended to protract.
Up to this point you created individual components. Now it's time to build your bench by putting those components together. When you've done that, you can select everything and create a Bench component that's made up of the other components. The fact that you can have components inside of components comes in very handy as you build complex models. Assembling your bench requires some patience, because you have to successfully navigate SketchUp's 3-D space. The first few times you try to move your camera view around or to move objects in the drawing area can be a little disorienting. Here are some tips to help you build and navigate:
Save your work early and often. Don't wait until you're done and everything is perfect to save your document. Save frequently when you're at a comfortable spot. If you save your SketchUp drawing under different names, like Bench-1.skp, Bench-2.skp, Bench-3.skp, and so on, you can go back to a previous stage if something goes wrong.
Use the Esc key to undo when you're in the midst of an action. When you type numbers, they automatically appear in the Measurements toolbar, but they don't become permanent until you click a new tool or click in the drawing area. Up until that point you can start over by typing a new number or by pressing Esc.
Use Ctrl+Z (⌘-Z) to undo after you've completed an action. As with most programs, Ctrl+Z (⌘-Z) is SketchUp's undo keystroke. It undoes the last complete command. If you need to go back several steps, just keep pressing Ctrl+Z (⌘-Z).
Use Camera → Previous and Camera → Next to jump back and forth between camera views. It's often helpful to view your model from different angles as you position and tweak its elements. You'll find the Previous and Next views such valuable tools that you may want to assign them keyboard shortcuts as described in the box on Bench: Starting Your First Model.
In most programs from word processors to basic paint programs, you move objects by clicking anywhere on the object and dragging it to a new spot. You can do that in SketchUp, but you'll make your life easier if you retrain yourself to use SketchUp's best practices:
In SketchUp you often want to place objects with precision, because you're trying to align components like the parts of your bench perfectly. You don't want sloppy, overlapping, or misaligned edges. Chapter 2 gives a lot more detail about the intricacies of moving objects. For now, remember these basic steps when you move an object in SketchUp with the click-move-click method:
Click a specific point on the object you want to move. Often that's a corner or a midpoint.
In your drawing, click the specific point where you want to place that point of your object. By using specific reference points, you place objects with precision.
To practice, change to Iso view and then zoom in on one of the bench legs in your drawing. To start off, you can move it from place to place without worrying about lining it up with any other object.
Zoom in so one of the bench legs looms large in the drawing window.
Leave enough room so you can move the leg to a new location a couple inches away.
Press M to select the Move tool, or choose Tools → Move from the menu.
Your cursor changes to a cross with arrowheads.
Move the cursor over one of the broad faces of the Bench Leg component.
Highlights appear on the leg. Blue envelope lines highlight the object, indicating that it's a component. Red crosses appear on the face, indicating points you can use to rotate the component. These marks can also help you to find midpoints of the component. You'll have a chance to test these in later steps.
Hold the cursor over one of the corners of the bench leg.
A tooltip appears saying "Endpoint in Component". The tooltip lets you know that if you click now, you'll select the Endpoint as your reference point for the move. Don't click now though; you're not done yet.
Move the cursor along one of the edges.
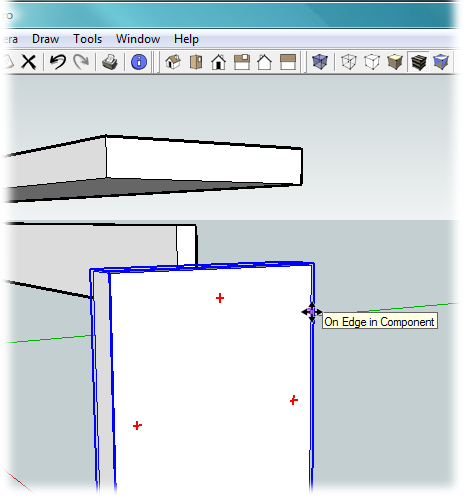
The tooltip changes to "On Edge in Component", as shown in Figure 1-23.
Keep moving the cursor down the edge until you find the midpoint.
When you near the midpoint, the cursor snaps slightly and the tooltip reads "Midpoint in Component".
Move the cursor over one of the red crosses on the face of the bench leg.
The cursor changes to the protractor, indicating that you can use this point to rotate the bench leg if necessary. For this model, the bench leg is probably already correctly oriented. If you spin the leg and realize you didn't need to, just press the undo keystroke when you're done (Ctrl+Z for Windows; ⌘-Z for Mac).
Click the lower corner of the Bench Leg closest to you.
Move the cursor over the corner. When the tooltip reads "Endpoint in Component", click.
Move the mouse to a new location in your drawing and click again.
As you move the cursor around the drawing window, the bench leg follows. When you click a spot, SketchUp places that lower corner of the bench leg exactly where you click.
Note
When working with components, one click with the Move tool selects the entire component, making it a cinch to move. Not so with non-component objects. If you click a non-component object with the Move tool, you select only the clicked edge or face. When you make the move, only that edge or face moves, changing the object's shape. To move a non-component, triple-click the object with the Select tool. When you see highlights on all the edges and faces of the object, you can use the Move tool to reposition it without changing its shape.
Figure 1-23. When you hover (that is, pause the cursor) over an object, a tooltip appears that names the type of object. Here the tooltip shows that the Move tool is over one of the component's edges—a perfect point to grab to move the bench leg precisely.
You may want to experiment some more with the Move tool before you begin to assemble your bench pieces. Get used to finding and selecting endpoints and midpoints on your bench leg. Notice how you can drag the bench leg completely through the other objects on the screen. (Can't do that with real lumber!) You can even place and leave a component so that it runs right through another component.
While you're in move mode, drag the bench leg all over the screen. Notice how sometimes it gets really big as if it's close to you, and other times it's really small as if it's far away. In fact it sort of jumps and changes size as you move it. That's because SketchUp is constantly guessing what type of a move you're trying to make. Are you trying to push the bench leg far into the distance? Or are you trying to move it up and down over the same spot? In Chapter 2 you'll learn how to tell SketchUp exactly which direction you intend to move an object.
Copying and deleting components in SketchUp is similar to just about any other program you've ever used. Press the space bar to choose the Select tool; the cursor looks like an arrow. Then click a component, like one of the bench legs. Choose Edit → Copy to copy the object. To paste it back into the drawing, choose Edit → Paste. At that point, you find that your cursor changes to the Move tool with the new bench leg attached. Click in your drawing to place the bench leg at that spot. Copying and pasting a component like this bench leg does the same thing as dragging a new Bench Leg out of the Components window. All of the Bench Leg components are identical, and in SketchUp-speak, they're considered instances of the Bench Leg component. If you edit the Bench Leg component, those changes appear in every bench leg instance in your model.
Deleting an object is even easier. You can practice on that third bench leg you just created: you only need two for this project. Again, use the Select tool (space bar, or Tools → Select). Click the doomed bench leg and then press Delete. Poof! It's gone.
SketchUp uses the standard shortcut keys for Copy (Ctrl+C for Windows; ⌘-C for Mac), Cut (Ctrl+X for Windows; ⌘-X for Mac), Paste (Ctrl+V for Windows, ⌘-V for Mac), and Delete (Delete).
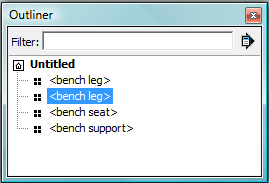
In the not too distant future, when you're a SketchUp wizard, you'll be building very complex models made up of dozens of components. At times you'll want to zero-in on one specific component amidst a vast confusion of others. That's when you'll turn to the Outliner. To open the Outliner, choose Window → Outliner. The Outliner window opens showing a list of the components in your drawing. Your bench is a simple four-component model, so you should see a list that looks like Figure 1-24.
Clicking a component in the Outliner is the same as selecting a component in the drawing area. Click the Bench Seat in the Outliner and you see highlights surrounding the seat in the drawing window. In the next section, you'll assemble the two legs and the bench support into a single component. Even though your bench is relatively simple, suppose you want to hide the bench seat while you work with the other three components. To hide the bench seat, right-click (or ⌘-click) its name in the Outliner, and then choose Hide from the shortcut menu. The name in the Outliner fades to gray. When you want to see the bench seat again, just right-click its name in the Outliner and then choose Unhide.
Figure 1-24. The Outliner window provides a list of the components in your drawing. When you select a component in the Outliner window, it's also selected in the drawing area, and vice versa. Even though they form one bench, the four parts are actually individual components. You'll combine them in the next section.
Get Google SketchUp: The Missing Manual now with the O’Reilly learning platform.
O’Reilly members experience books, live events, courses curated by job role, and more from O’Reilly and nearly 200 top publishers.
