If you're building a bench in the real world, you need to go to the lumberyard and buy some lumber. For this project, building a bench in SketchUp, you're going to mill up your own lumber. You'll create the four boards you need for your bench, making sure that their dimensions are just right. No sawdust or wasted short ends in SketchUp! Then you'll fit the pieces together.
Note
The exercises in the remainder of this chapter focus on building a simple bench. If you'd like to jump ahead to see the finished bench, you can download the file bench_finished.skp from the Missing CD for this book found at http://missingmanuals.com/cds.
The board that makes the seat for this bench is a 2 x 12 that's 72 inches long. These boards are kind of expensive at Home Depot, but with SketchUp, you've got your own lumber mill. All SketchUp objects start as 2-D drawings, which you'll learn all about in the next chapter (Drawing Lines with the Line Tool). They get their third dimension when you use the Push/Pull tool to give them shape. Follow these steps to get a feel for the full procedure:
Open a new SketchUp document with File → New.
A new SketchUp document opens in Iso view. You see colored lines that are guides for the three axes in your SketchUp world. In this view, the blue line runs somewhat vertically, representing up and down directions. The red line runs somewhat horizontally, representing left and right. The green line represents near (closer to the camera) and far (away from the camera).
Note
If your view is different from the one described in step 1, make sure you've chosen Inches ("Product Design and Woodworking – Feet and Inches")-3D as your Template preference as described in step 3 on Creating Your Own Templates.
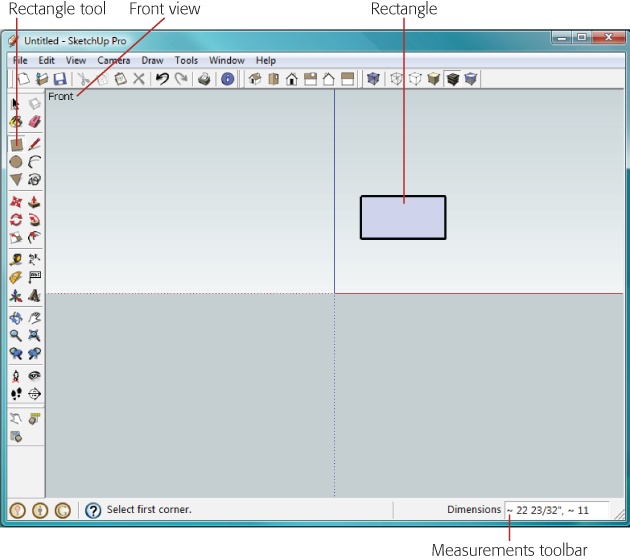
Change to a Front view either by clicking the Front button or by using the menu Camera → Standard Views → Front.
In Front view, the blue axis runs straight up and down the drawing area, and the red axis sits on the horizon running straight across the drawing area from left to right.
Choose the Rectangle tool from the toolbar or click Draw → Rectangle; then, to the right of the blue axis and above the red axis, drag to draw a small rectangle of any size and shape as shown in Figure 1-15.
When you're done, don't click anywhere else or press any keys. Drawing a precise rectangle in SketchUp is a two-step process. First you draw a basic shape, and then you enter the specific dimensions as described in the next step.
Using your keyboard, type the numbers separated by a comma: 72, 2. Don't worry about clicking anywhere; just press the keys.
As you type, the numbers appear in the Measurements toolbar in the lower-right corner. You never have to click the Measurements toolbar to enter dimensions—it knows what you're doing! When you type 72, the Measurements toolbar knows you're saying you want the rectangle you just drew to be 72 inches long—the width of your bench. The comma is a separator, telling SketchUp that the next number will be another dimension measurement. When you enter the 2, you're saying you want the rectangle to be 2 inches tall—the thickness of your bench seat. If you make a mistake while typing, press Esc and enter new dimensions. You can keep changing the dimensions until you choose another tool or menu command. To save the dimensions, press Enter.
Chances are your rectangle doesn't fit in your drawing area or it's not centered. You'll resolve that problem in the next step.
Click the Zoom Extents (Camera → Zoom Extents) button to get a complete view of your rectangle.
The Zoom Extents button zooms the drawing window so every object in your drawing is in the view. It's a handy button that you'll use frequently, so early on, it's worth noting its location in the toolbar and memorizing the shortcut key (Shift+Z for Windows and ⌘-[ for Mac).
Click the Iso view button, or use the menu command Camera → Standard Views → Iso.
The Iso button looks like a small house viewed at an angle. The Iso view gives you a better 3-D view of your rectangle as you turn it into a board in the next couple steps.
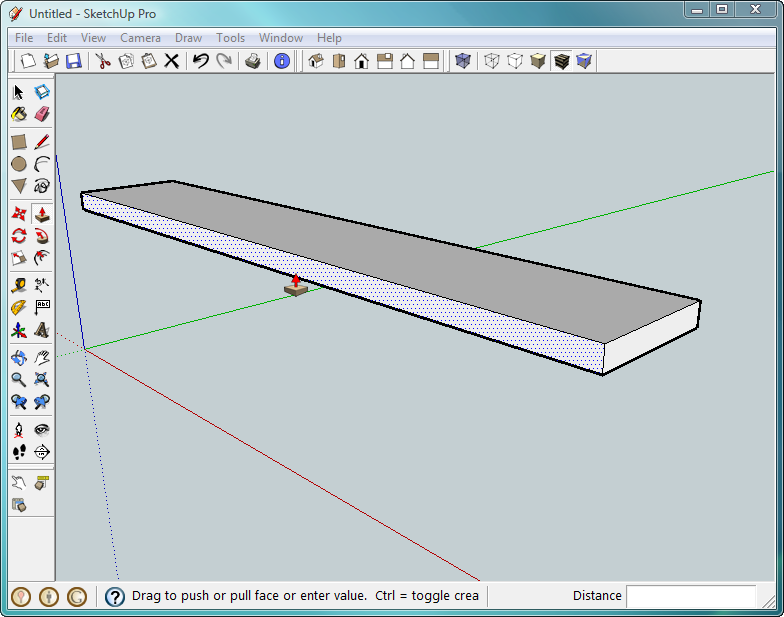
Choose the amazingly handy Push/Pull tool by clicking its toolbar button or by choosing Tools → Push/Pull (Figure 1-16).
The Push/Pull button looks like a box with an arrow sprouting from the top.
Click once on the rectangle's face (avoid clicking on one of the black edge lines). Then move your mouse around, but don't click anywhere else or press any keys.
As you move the mouse, your bench seat starts to change shape. In the next step, you specify the width of your bench seat.
Type 12 and the numbers appear in the Measurements toolbar.
Your bench seat becomes 12 inches wide.
Congratulations! You just finished your first model and created a bench seat that's 2 x 12 x 72 inches.
Figure 1-16. Pushing and pulling 2-D objects into 3-D shapes is one of the fun parts of SketchUp. Usually, you start pushing or pulling in a direction, and then you enter a specific dimension in the Measurements toolbar.
Tip
The Measurements toolbar makes SketchUp so easy to use. This magic box always seems to know what you want to do. You never have to click in the Measurements toolbar to enter numbers. Simply type numbers right after you use a tool. The Measurements toolbar knows what to expect based on your most recent action. If you change your mind or make a mistake entering numbers, you can press Esc to start over.
Get Google SketchUp: The Missing Manual now with the O’Reilly learning platform.
O’Reilly members experience books, live events, courses curated by job role, and more from O’Reilly and nearly 200 top publishers.


