Chapter 2. Drawing on the Canvas
Using HTML5 Canvas effectively requires a strong foundation in drawing, coloring, and transforming basic two-dimensional shapes. While the selection of built-in shapes is relatively limited, we can draw any shape we desire using a series of line segments called paths, which we will discuss in the upcoming section Using Paths to Create Lines.
Note
The HTML5 Canvas API is well covered in many online forms. The W3C site has an exhaustive and constantly updated reference that details the features of the Canvas 2D Drawing API. It can be viewed at http://dev.w3.org/2006/canvas-api/canvas-2d-api.html.
However, this online reference lacks concrete examples on using the API. Rather than simply reprinting this entire specification, we will spend our time creating examples to explain and explore as many features as we have space to cover.
The Basic File Setup for This Chapter
As we proceed through the Drawing API, all the examples in this
chapter will use the same basic file setup, shown below. Use this code as
the basis for all of the examples we create. You will only have to change
the contents of the drawScreen()
function:
<!doctype html>
<html lang="en">
<head>
<meta charset="UTF-8">
<title>Ch2BaseFile - Template For Chapter 2 Examples</title>
<script src="modernizr-1.6.min.js"></script>
<script type="text/javascript">
window.addEventListener('load', eventWindowLoaded, false);
function eventWindowLoaded() {

   canvasApp();

}

function canvasSupport () {
     return Modernizr.canvas;
}

function canvasApp(){

if (!canvasSupport()) {
          return;
     }else{
      var theCanvas = document.getElementById("canvas");
      var context = theCanvas.getContext("2d");
   }

   drawScreen();

   function drawScreen() {
      //make changes here.
      context.fillStyle = '#aaaaaa';
      context.fillRect(0, 0, 200, 200);
      context.fillStyle  = '#000000';
      context.font = '20px _sans';
      context.textBaseline = 'top';
      context.fillText  ("Canvas!", 0, 0);

   }
}

</script>
</head>
<body>
<div style="position: absolute; top: 50px; left: 50px;">
<canvas id="canvas" width="500" height="500">
 Your browser does not support HTML5 Canvas.
</canvas>
</div>
</body>
</html>
The Basic Rectangle Shape
Let’s get our feet wet by looking at the single primitive, built-in geometric shape on Canvas—the rectangle. On Canvas, basic rectangle shapes can be drawn in three different ways: filling, stroking, or clearing. We can also build rectangles (or any other shape) by using paths, which we will cover in the next section.
First, let’s look at the API functions used for these three operations:
fillRect(x,y,width,height)Draws a filled rectangle at position
x,yfor width and height.strokeRect(x,y,width,height)Draws a rectangular outline at position
x,yfor width and height. This makes use of the currentstrokeStyle,lineWidth,lineJoin, andmiterLimitsettings.clearRect(x,y,width,height)Clears the specified area and makes it fully transparent (using transparent black as the color) starting at position
x,yfor width and height.
Before we can use any of these functions, we will need to set up the fill or stroke style that will be used when drawing to the canvas.
The very basic way to set these styles is to use a color value represented by a 24-bit hex string. Here is an example from our first demonstration:
context.fillStyle = '#000000';
context.strokeStyle = '#ff00ff';
In Example 2-1, the fill style is simply set to be the RGB color black, while the stroke style is a classic purple color. The results are shown in Figure 2-1:

The Canvas State
When we draw on the Canvas context, we can make use of a stack of so-called drawing states. Each of these states stores data about the Canvas context at any one time. Here is a list of the data stored in the stack for each state:
Transformation matrix information such as rotations or translations using the
context.rotate()andcontext.setTransform()methodsThe current clipping region
The current values for canvas attributes, such as (but not limited to):
globalAlphaglobalCompositeOperationstrokeStyletextAlign,textBaselinelineCap,lineJoin,lineWidth,miterLimitfillStylefontshadowBlur,shadowColor,shadowOffsetX, andshadowOffsetY
We will cover these states later in this chapter.
What’s Not Part of the State?
The current path (which we will explore later in this chapter) and current bitmap (see Chapter 4) being manipulated on the Canvas context are not part of the saved state. This very important feature will allow us to draw and animate individual objects on the canvas. The section Simple Canvas Transformations utilizes the Canvas state to apply transformations to only the current shape being constructed and drawn, leaving the rest of the canvas not transformed.
Using Paths to Create Lines
Paths are a method we can use to draw any shape on the canvas. A
path is simply a list of points, and lines to be drawn between those
points. A Canvas context can only have a single “current” path, which is
not stored as part of the current drawing state when the context.save() method is called.
Context for paths is a critical concept to understand, because it will enable you to transform only the current path on the canvas.
Starting and Ending a Path
The beginPath() function call
starts a path, and the closePath()
function call ends the path. When you connect two points inside a path,
it is referred to as a subpath. A subpath is
considered “closed” if the final point connects to the first
point.
Note
The current transformation matrix will affect everything drawn in this path. As we will see when we explore the upcoming section on transformations, we will always want to set the transformation matrix to the identity (or reset) if we do not want any transformation applied to a path.
The Actual Drawing
The most basic path is controlled by a series of moveTo() and lineTo() commands, as shown in Example 2-2.
function drawScreen() {
   context.strokeStyle  = "black"; //need list of available colors
   context.lineWidth  = 10;
   context.lineCap  = 'square';
   context.beginPath();
   context.moveTo(20, 0);
   context.lineTo(100, 0);
   context.stroke();
   context.closePath();

}
Figure 2-2 shows an example of this output.
Example 2-2 simply draws a 10-pixel-wide horizontal line (or stroke) from position 20,0 to position 100,0.
We have also added the lineCap
and strokeStyle attributes. Let’s
take a brief look at the various attributes we can apply to a line
before we move on to some more advanced drawing.
lineCap attributes
context.lineCap
The lineCap is the end of a
line drawn on the context. It can be one of three values:
lineJoin attributes
context.lineJoin
The lineJoin is the
“corner” that is created when two lines meet. This is called a
join. A filled triangle is created at the join,
and we can set its basic properties with the lineJoin Canvas attribute.
miterThe default; an edge is drawn at the join. The
miterLimitis the maximum allowed ratio of miter length to line width (the default is 10).bevelA diagonal edge is drawn at the join.
roundA round edge is drawn at the join.
strokeStyle
The strokeStyle defines the
color or style that will be used for lines and around shapes (as we
saw with the simple rectangles in Example 2-2).
Examples of More Advanced Line Drawing
Example 2-3 shows these attributes in action; the results are depicted in Figure 2-3. There are a few oddities when drawing lines on the canvas, which we will point out along the way.
function drawScreen() {

      // Sample 1: round end, bevel join, at top left of canvas
      context.strokeStyle  = "black"; //need list of available colors
      context.lineWidth  = 10;
      context.lineJoin  = 'bevel';
      context.lineCap  = 'round';
      context.beginPath();
      context.moveTo(0, 0);
      context.lineTo(25, 0);
      context.lineTo(25,25);
      context.stroke();
      context.closePath();

      // Sample 2: round end, bevel join, not at top or left of canvas
      context.beginPath();
      context.moveTo(10, 50);
      context.lineTo(35, 50);
      context.lineTo(35,75);
      context.stroke();
      context.closePath();

      // Sample 3: flat end, round join, not at top or left of canvas
      context.lineJoin  = 'round';
      context.lineCap = 'butt';
      context.beginPath();
      context.moveTo(10, 100);
      context.lineTo(35, 100);
      context.lineTo(35,125);
      context.stroke();
      context.closePath();

}These three line and join samples should help illustrate some of the combinations of attributes we can use to draw paths on the canvas.
The first sample attempts to draw starting at the top left of the
canvas, resulting in a strange image. Canvas paths are drawn outward in
both the x and y directions
from the center of the pixel it begins on. For this reason, the top line
in Sample 1 seems to be thinner than the 10 pixels we specified. In
addition, the “round” end of the top-left horizontal line segment cannot
be seen because both of these were drawn off the screen in the
“negative” value areas of the screen coordinates. Furthermore, the
diagonal “bevel” at the lineJoin is
not drawn.
Sample 2 rectifies the problems in Sample 1 by offsetting the
beginning of the drawing away from the top left. This allows the entire
horizontal line to be drawn, as well as the “round” lineCap and the “bevel” lineJoin.
Sample 3 shows us eliminating the extra lineCap in favor of the default “butt,” and
changing the lineJoin to
“round.”
Advanced Path Methods
Let’s take a deeper look at some of the other methods we can use to draw paths on the canvas, including arcs and curves that can be combined to create complex images.
Arcs
There are four functions we can use to draw arcs and curves onto the canvas. An arc can be a complete circle or any part of a circle
context.arc()
context.arc(x, y, radius, startAngle, endAngle, anticlockwise)
The x and y values define the center of our circle,
and the radius will be the radius
of the circle upon which our arc will be drawn. startAngle and endAngle are in radians, not degrees.
anticlockwise is a true or false value that defines the direction of
the arc.
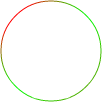
For example, if we want to draw a circle with a center point at
position 100,100 and with a radius of 20, as shown in Figure 2-4, we could use the code below for the
contents of drawScreen():
context.arc(100, 100, 20, (Math.PI/180)*0, (Math.PI/180)*360, false);
Example 2-4 illustrates the code necessary to create a simple circle.
function drawScreen() {

      context.beginPath();
      context.strokeStyle = "black";
      context.lineWidth = 5;
      context.arc(100, 100, 20, (Math.PI/180)*0, (Math.PI/180)*360, false);

      //full circle
      context.stroke();
      context.closePath();

}Notice that we have to convert our start angle (0) and our end angle (360) into radians by multiplying them by
(Math.PI/180). By using 0 as the start angle and 360 as the end, we create a full
circle.
We can also draw a segment of a circle by not specifying the
entire 0 to 360 start and stop angles. This code for drawScreen() will create one-quarter of a
circle drawn clockwise, as shown in Figure 2-5:
context.arc(100, 200, 20, (Math.PI/180)*0, (Math.PI/180)*90, false);
If we want to draw everything but the 0–90
angle, as shown in Figure 2-6, we
can employ the anticlockwise
argument and set it to true:
context.arc(100, 200, 20, (Math.PI/180)*0, (Math.PI/180)*90, true);
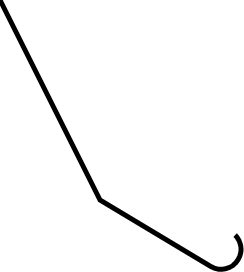
context.arcTo()
context.arcTo(x1, y1, x2, y2, radius)
The arcTo method has only
been implemented in the latest browsers—perhaps because its
capabilities can be replicated by the arc() function. It takes in a point
(x1,y1) and draws a straight line from the
current path position to this new position. Then it draws an arc from
that point to the y1,y2 point using the given radius.
The context.arcTo method will
work only if the current path has at least one subpath. So, let’s
start with a line from position 0,0 to position 100,200. Then we will
build our small arc. It will look a little like a bent wire coat
hanger (for lack of a better description), as shown in Figure 2-7:
context.moveTo(0,0);
context.lineTo(100, 200);
context.arcTo(350,350,100,100,20);
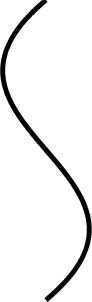
Bezier Curves
Bezier curves, which are far more flexible than arcs, come in both the cubic and quadratic types:
context.bezierCurveTo(cp1x, cp1y, cp2x, cp2y, x, y)context.quadraticCurveTo(cpx, cpy, x, y)
The Bezier curve is defined in 2D space by a “start point,” an “end point,” and one or two “control” points, which determine how the curve will be constructed on the canvas. A normal cubic Bezier curve uses two points, while a quadric version uses a single point.
The quadratic version, shown in Figure 2-8, is the simplest, only needing the end point (last) and a single point in space to use as a control point (first):
context.moveTo(0,0);
context.quadraticCurveTo(100,25,0,50);

This curve starts at 0,0 and
ends at 0,50. The point in space we
use to create our arc is 100,25. This
point is roughly the center of the arc vertically. The 100 value for the single control point pulls
the arc out to make an elongated curve.
The cubic Bezier curve offers more options because we have two control points to work with. The result is that curves—such as the classic “S” curve shown in Figure 2-9—are easier to make:
context.moveTo(150,0);
context.bezierCurveTo(0,125,300,175,150,300);
The Canvas Clipping Region
Combining the save() and
restore() functions with the Canvas
clip region limits the drawing area for a path and its subpaths. We do
this by first setting rect() to a
rectangle that encompasses the region we would like to draw in, and then
calling the clip() function. This
will set the clip region to be the rectangle we defined with the
rect() method call. Now, no matter
what we draw onto the current context, it will only display the portion
that is in this region. Think of this as a sort of mask that you can use
for your drawing operations. Example 2-5 shows how this works,
producing the clipped result shown in Figure 2-10.
function drawScreen() {

      //draw a big box on the screen
      context.fillStyle = "black";
      context.fillRect(10, 10, 200, 200);
      context.save();
      context.beginPath();

      //clip the canvas to a 50×50 square starting at 0,0
      context.rect(0, 0, 50, 50);
      context.clip();

      //red circle
      context.beginPath();
      context.strokeStyle = "red"; //need list of available colors
      context.lineWidth = 5;
      context.arc(100, 100, 100, (Math.PI/180)*0, (Math.PI/180)*360, false);
      //full circle
      context.stroke();
      context.closePath();

      context.restore();

      //reclip to the entire canvas
      context.beginPath();
      context.rect(0, 0, 500, 500);
      context.clip();

      //draw a blue line that is not clipped
      context.beginPath();
      context.strokeStyle = "blue"; //need list of available colors
      context.lineWidth = 5;
      context.arc(100, 100, 50, (Math.PI/180)*0, (Math.PI/180)*360, false);
      //full circle
      context.stroke();
      context.closePath();


}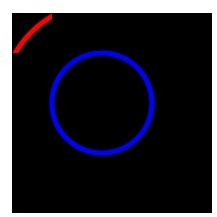
Example 2-5 first draws a
large 200×200 black rectangle onto the canvas. Next, we set our Canvas
clipping region to rect(0,0,50,50).
The clip() call then clips the canvas
to those specifications. When we draw our full red circle arc, we only
see the portion inside this rectangle. Finally, we set the clipping
region back to rect(0,0,500,500) and
draw a new blue circle. This time, we can see the entire circle on the
canvas.
Compositing on the Canvas
Compositing refers to how finely we can control the transparency and
layering effects of objects as we draw them to the canvas. There are two
attributes we can use to control Canvas compositing operations: globalAlpha and globalCompositeOperation.
globalAlphaThe
globalAlphaCanvas property defaults to1.0(completely opaque) and can be set from0.0(completely transparent) through1.0. This Canvas property must be set before a shape is drawn to the canvas.globalCompositeOperationThe
globalCompositeOperationvalue controls how shapes are drawn into the current Canvas bitmap after bothglobalAlphaand any transformations have been applied (see the next section, Simple Canvas Transformations, for more information).In the following list, the “source” is the shape we are about to draw to the canvas, and the “destination” refers to the current bitmap displayed on the canvas.
copyWhere they overlap, displays the source and not the destination.
destination-atopDestination atop the source. Where the source and destination overlap and both are opaque, displays the destination image. Displays the source image wherever the source image is opaque but the destination image is transparent. Displays transparency elsewhere.
destination-inDestination in the source. Displays the destination image wherever both the destination image and source image are opaque. Displays transparency elsewhere.
destination-outDestination out source. Displays the destination image wherever the destination image is opaque and the source image is transparent. Displays transparency elsewhere.
destination-overDestination over the source. Displays the destination image wherever the destination image is opaque. Displays the source image elsewhere.
lighterSource plus destination. Displays the sum of the source image and destination image, with color values approaching
1.0as a limit.source-atopSource atop the destination. Displays the source image wherever both images are opaque. Displays the destination image wherever the destination image is opaque but the source image is transparent. Displays transparency elsewhere.
source-inSource in the destination. Displays the source image wherever both the source image and destination image are opaque. Displays transparency elsewhere.
source-outSource out destination. Displays the source image wherever the source image is opaque and the destination image is transparent. Displays transparency elsewhere.
source-over(Default.) Source over destination. Displays the source image wherever the source image is opaque. Displays the destination image elsewhere.
xorSource
xordestination. Exclusive OR of the source image and destination image.
Example 2-6 shows how some of these values can affect how shapes are drawn to the canvas, producing Figure 2-11.
function drawScreen() {

      //draw a big box on the screen
      context.fillStyle = "black"; //
      context.fillRect(10, 10, 200, 200);

      //leave globalCompositeOperation as is
      //now draw a red square
      context.fillStyle = "red";
      context.fillRect(1, 1, 50, 50);

      //now set it to source-over
      context.globalCompositeOperation = "source-over";
      //draw a red square next to the other one
      context.fillRect(60, 1, 50, 50);

      //now set to destination-atop
      context.globalCompositeOperation = "destination-atop";
      context.fillRect(1, 60, 50, 50);

      //now set globalAlpha
      context.globalAlpha = .5;

      //now set to source-atop
      context.globalCompositeOperation = "source-atop";
      context.fillRect(60, 60, 50, 50);

   }
As you can see in this example, we have
toyed a little with both the globalCompositeOperation and the globalAlpha Canvas properties. When we assign
the string source-over, we are
essentially resetting the globalCompositeOperation back to the default. We
then create some red squares to demonstrate a few of the various
compositing options and combinations. Notice that destination-atop switches the newly drawn shapes
under the current Canvas bitmap, and that the globalAlpha property only affects shapes that
are drawn after it is set. This means we don’t have to save() and restore() the Canvas state to set the next drawn
shape to a new transparency value.
In the next section, we will look at some transformations that
affect the entire canvas. As a result, if we want to transform only the
newly drawn shape, we will have to use the save() and restore() functions.
Simple Canvas Transformations
Transformations on the canvas refer to the mathematical adjustment of physical properties of drawn shapes. The two most commonly used shape transformations are scale and rotate, which we will focus on in this section.
Under the hood, a mathematical matrix operation applies to all transformations. Luckily, you do not need to understand this to use simple Canvas transformations. We will discuss how to apply rotation, translation, and scale transformations by changing simple Canvas properties.
Rotation and Translation Transformations
An object on the canvas is said to be at the 0 angle rotation when it is facing to the left (this is important if an object has a facing; otherwise, we will use this as a guide). Consequently, if we draw an equilateral box (all four sides are the same length), it doesn’t have an initial facing other than one of the flat sides facing to the left. Let’s draw that box for reference:
//now draw a red square
context.fillStyle = "red";
context.fillRect(100,100,50,50);
Now, if we want to rotate the entire canvas 45 degrees, we need to do a couple simple steps. First, we always set the current Canvas transformation to the “identity” (or “reset”) matrix:
context.setTransform(1,0,0,1,0,0);
Because Canvas uses radians, not degrees, to specify its transformations, we need to convert our 45-degree angle into radians:
var angleInRadians = 45 * Math.PI / 180;
context.rotate(angleInRadians);
Lesson 1: Transformations are applied to shapes and paths drawn after the setTransform() or other transformation function is called
If you use this code verbatim, you will see a funny
result…nothing! This is because the setTransform() function call only affects
shapes drawn to the canvas after it is applied.
We drew our square first, then set the transformation properties. This
resulted in no change (or transform) to the drawn square. Example 2-7 gives the code in the
correct order to produce the expected result, as illustrated in Figure 2-12.
function drawScreen() {

      //now draw a red square
      context.setTransform(1,0,0,1,0,0);
      var angleInRadians = 45 * Math.PI / 180;
      context.rotate(angleInRadians);
      context.fillStyle = "red";
      context.fillRect(100,100,50,50);

}We get a result this time, but it will probably differ from what
you expect. The red box is rotated, but it looks like the canvas was
rotated with it. The entire canvas did not rotate, only the portion
drawn after the context.rotate()
function was called. So, why did our square both rotate and move off
to the left of the screen? The origin of the rotation was set at the
“nontranslated” 0,0 position,
resulting in the square rotating from the top left of the entire
canvas.
Example 2-8 offers a slightly different scenario: draw a black box first, then set the rotation transform, and finally draw the red box again. See the results in Figure 2-13.
function drawScreen() {

      //draw black square
      context.fillStyle = "black";
      context.fillRect(20,20,25,25);

      //now draw a red square
      context.setTransform(1,0,0,1,0,0);
      var angleInRadians = 45 * Math.PI / 180;
      context.rotate(angleInRadians);
      context.fillStyle = "red";
      context.fillRect(100,100,50,50);

}The small black square was unaffected by the rotation, so you
can see that only the shapes drawn after the context.rotate() function was called were
affected.
Again, the red box was moved far off to the left. To reiterate,
this occurred because the canvas did not know what origin to use for
the rotation. In the absence of an actual translated origin, the
0,0 position setting is applied,
resulting in the context.rotate()
function rotating “around” the 0,0
point, which brings us to our next lesson.
Lesson 2: We must “translate” the point of origin to the center of our shape to rotate it around its own center
Let’s change Example 2-8 to rotate the red square 45 degrees while keeping it in its current location.
First, we take the numbers we applied to the fillRect() function call to create a few
variables to hold the red square’s attributes. This is not necessary,
but it will make the code much easier to read and change later:
var x = 100;
var y = 100;
var width = 50;
var height = 50;
Next, using the context.translate() function call, we must
change the origin of the canvas to be the center of the red square we
want to rotate and draw. This function moves the origin of the canvas
to the accepted x and y locations. The center of our red square
will now be the desired top-left corner x location for our object (100), plus half the width of our object.
Using the variables we created to hold attributes of the red square,
this would look like:
x+0.5*width
Next, we must find the y
location for the origin translation. This time, we use the y value of the top-left corner of our shape
and the height of the shape:
y+.05*height
The translate() function call
looks like this:
context.translate(x+.05*width, y+.05*height)
Now that we have translated the canvas to the correct point, we can do our rotation. The code has not changed:
context.rotate(angleInRadians);
Finally, we need to draw our shape. We cannot simply reuse the
same values from Example 2-8
because the canvas origin point has moved to the center of the
location where we want to draw our object. You can now consider
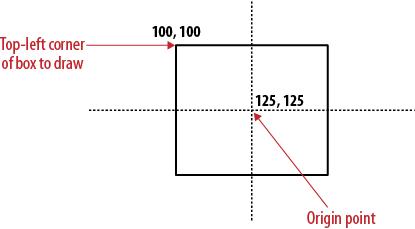
125,125 as the starting point for all draw operations. We get 125 for x
by taking the upper-left corner of the square (100) and adding half its width (25). We do the same for the y origin position. The translate() method call accomplishes
this.
We will need to draw the object starting with the correct
upper-left coordinates for x and
y. We do this by subtracting half
the width of our object from the origin x, and half the height of our object from
the origin y:
context.fillRect(-0.5*width,-0.5*height, width, height);
Why do we do this? Figure 2-14 illustrates the situation.
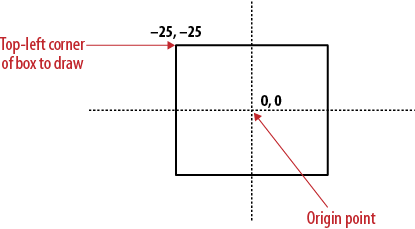
Consider that we want to draw our square starting at the top-left corner. If our origin point is at 125,125, the top left is actually 100,100. However, we have translated our origin so the canvas now considers 125,125 to be 0,0. To start our box drawing at the nontranslated canvas, we have to start at –25,–25 on the “translated” canvas.
This forces us to draw our box as though the origin is at 0,0, not 125,125. Therefore, when we do the actual drawing of the box, we must use these coordinates, as shown in Figure 2-15.
In summary, we needed to change the point of origin to the center of our square so it would rotate around that point. But when we draw the square, we need our code to act as though the (125,125) point is actually (0,0). If we had not translated the origin, we could have used the (125,125) point as the center of our square (as in Figure 2-14). Example 2-9 demonstrates how this works, creating the result shown in Figure 2-16.
function drawScreen() {

      //draw black square
      context.fillStyle = "black";
      context.fillRect(20,20 ,25,25);

      //now draw a red square
      context.setTransform(1,0,0,1,0,0);
      var angleInRadians = 45 * Math.PI / 180;
      var x = 100;
      var y = 100;
      var width = 50;
      var height = 50;
      context.translate(x+.5*width, y+.5*height);
      context.rotate(angleInRadians);
      context.fillStyle = "red";
      context.fillRect(-.5*width,-.5*height , width, height);

   }
Let’s look at one final rotation example. Example 2-10 takes Example 2-9 and simply adds four separate 40×40 squares to the canvas, rotating each one slightly. The result is shown in Figure 2-17.
function drawScreen() {

      //now draw a red square
      context.setTransform(1,0,0,1,0,0);
      var angleInRadians = 45 * Math.PI / 180;
      var x = 50;
      var y = 100;
      var width = 40;
      var height = 40;
      context.translate(x+.5*width, y+.5*height);
      context.rotate(angleInRadians);
      context.fillStyle = "red";
      context.fillRect(-.5*width,-.5*height , width, height);

      context.setTransform(1,0,0,1,0,0);
      var angleInRadians = 75 * Math.PI / 180;
      var x = 100;
      var y = 100;
      var width = 40;
      var height = 40;
      context.translate(x+.5*width, y+.5*height);
      context.rotate(angleInRadians);
      context.fillStyle = "red";
      context.fillRect(-.5*width,-.5*height , width, height);

      context.setTransform(1,0,0,1,0,0);
      var angleInRadians = 90 * Math.PI / 180;
      var x = 150;
      var y = 100;
      var width = 40;
      var height = 40;
      context.translate(x+.5*width, y+.5*height);
      context.rotate(angleInRadians);
      context.fillStyle = "red";
      context.fillRect(-.5*width,-.5*height , width, height);
      context.setTransform(1,0,0,1,0,0);
      var angleInRadians = 120 * Math.PI / 180;
      var x = 200;
      var y = 100;
      var width = 40;
      var height = 40;
      context.translate(x+.5*width, y+.5*height);
      context.rotate(angleInRadians);
      context.fillStyle = "red";
      context.fillRect(-.5*width,-.5*height , width, height);

}
Scale Transformations
The context.scale() function
takes in two parameters: the first is the scale attribute for the
x-axis, and the second is the scale attribute for the y-axis. The value
1 is the normal scale for an object.
Therefore, if we want to double an object’s size, we can set both values
to 2. Using the code below in
drawScreen() produces the red square
shown in Figure 2-18:
context.setTransform(1,0,0,1,0,0);
context.scale(2,2);
context.fillStyle = "red";
context.fillRect(100,100 ,50,50);

If you test this code, you will find that scale works in a similar manner as rotation. We did not translate the origin of the scale point to double the size of the square; rather, we used the top-left corner of the canvas as the origin point. The result is that the red square appears to move farther down and to the left. What we would like is for the red square to remain in place and to scale from its center. We do this by translating to the center of the square before we scale, and by drawing the square around this center point (just as we did in Example 2-9). Example 2-11 produces the result shown in Figure 2-19.
function drawScreen() {

      //now draw a red square
      context.setTransform(1,0,0,1,0,0);
      var x = 100;
      var y = 100;
      var width = 50;
      var height = 50;
      context.translate(x+.5*width, y+.5*height);
      context.scale(2,2);
      context.fillStyle = "red";
      context.fillRect(-.5*width,-.5*height , width, height);

   }
Combining Scale and Rotation Transformations
If we want to both scale and rotate an object, Canvas
transformations can easily be combined to achieve the desired results
(as shown in Figure 2-20). Let’s
look in Example 2-12 at how we might
combine them by using scale(2,2) and
rotate(angleInRadians) from our
previous examples.
function drawScreen() {
      context.setTransform(1,0,0,1,0,0);
      var angleInRadians = 45 * Math.PI / 180;
      var x = 100;
      var y = 100;
      var width = 50;
      var height = 50;
      context.translate(x+.5*width, y+.5*height);
      context.scale(2,2);
      context.rotate(angleInRadians);
      context.fillStyle = "red";
      context.fillRect(-.5*width,-.5*height , width, height);

   }
Example 2-13 also combines rotation and scale, this time using a rectangle. Figure 2-21 reveals what it creates.
function drawScreen() {

      //now draw a red rectangle
      context.setTransform(1,0,0,1,0,0);
      var angleInRadians = 90 * Math.PI / 180;
      var x = 100;
      var y = 100;
      var width = 100;
      var height = 50;
      context.translate(x+.5*width, y+.5*height);
      context.rotate(angleInRadians);
      context.scale(2,2);

      context.fillStyle = "red";
      context.fillRect(-.5*width,-.5*height , width, height);

   }
Filling Objects with Colors and Gradients
In this chapter, we have quickly looked at color and fill styles as we proceeded through the discussions of basic and complex shape construction. In this section, we will take a deeper look at coloring and filling shapes we draw on the canvas. In addition to these simple colors and fills, there are a number of different gradient styles that we can employ. Furthermore, Canvas also has a method to fill shapes with bitmap images (see Chapter 4).
Setting Basic Fill Colors
The Canvas fillStyle property
is used to set a basic color for filling shapes on the canvas. We saw
this earlier in the chapter when we used simple color names for our
fillStyle. An example is:
context.fillStyle = "red";
Below is a list of the usable color string values from the HTML4 specification. As of this writing, the HTML5 color specification has not been set. In the absence of any additional HTML5-specific colors, the HTML4 colors will work properly in HTML5:
Black = #000000 |
Green = #008000 |
Silver = #C0C0C0 |
Lime = #00FF00 |
Gray = #808080 |
Olive = #808000 |
White = #FFFFFF |
Yellow = #FFFF00 |
Maroon = #800000 |
Navy = #000080 |
Red = #FF0000 |
Blue = #0000FF |
Purple = #800080 |
Teal = #008080 |
Fuchsia = #FF00FF |
Aqua = #00FFFF |
Note
All these color values will work with the strokeStyle as well as the fillStyle.
Of course, using a string for the color name is not the only available method of specifying a solid color fill. The list below includes a few other methods:
- Setting the fill color with the
rgb()method The
rgb()method lets us use the 24-bit RGB value when specifying our fill colors:context.fillStyle = rgb(255,0,0);
This will result in the same
redcolor as the string value above.- Setting the fill color with a hex number string
We can also set the
fillStylecolor with a hex number in a string:context.fillStyle = "#ff0000";
- Setting the fill color with the
rgba()method The
rgba()method allows us to specify a 32-bit color value with the final 8 bits representing the alpha value of the fill color:context.fillStyle = rgba(255,0,0,1);
Filling Shapes with Gradients
There are two basic options for creating gradient fills on the canvas: linear and radial. A linear gradient creates a horizontal, vertical, or diagonal fill pattern; the radial variety creates a fill that “radiates” from a central point in a circular fashion. Let’s look at some examples of each.
Linear gradients
Linear gradients come in three basic styles: horizontal, vertical, and diagonal. We control where colors change in our gradient by setting color stops at points along the length of the object we wish to fill.
Linear horizontal gradients
Example 2-14 creates a simple horizontal gradient, as shown in Figure 2-23.
function drawScreen() {

      // horizontal gradient values must remain 0
      var gr = context.createLinearGradient(0, 0, 100, 0);

      // Add the color stops.
      gr.addColorStop(0,'rgb(255,0,0)');
      gr.addColorStop(.5,'rgb(0,255,0)');
      gr.addColorStop(1,'rgb(255,0,0)');

      // Use the gradient for the fillStyle.
      context.fillStyle = gr;
      context.fillRect(0, 0,100,100);

   }
To create the horizontal gradient, we must first create a
variable (gr) to reference the
new gradient. Here’s how we set it:
var gr = context.createLinearGradient(0,0,100,0);
The four parameter values in the createLinearGradient method call are the
top-left x and y
coordinates to start the gradient, as well as the two bottom-right
points to end the gradient. Our example starts at 0,0 and goes to 100,0. Notice that the
y values are both 0 when we create a horizontal
gradient; the opposite will be true when we create a vertical
gradient.
Once we have defined the size of our gradient, we then add in color stops that take two parameter values. The first is a relative position origin point along the gradient to start with color, and the second is the color to use. The relative position must be a value from 0.0 to 1.0:
gr.addColorStop(0,'rgb(255,0,0)');
gr.addColorStop(.5,'rgb(0,255,0)');
gr.addColorStop(1,'rgb(255,0,0)');
Therefore, in Example 2-14,
we have set a red color at 0, a
green color at .5 (the center),
and another red color at 1. This
will fill our shape with a relatively even red to green to red
gradient.
Next, we need to get the context.fillStyle to be the gradient we
just created:
context.fillStyle = gr;
Finally, we create a rectangle on the canvas:
context.fillRect(0, 0, 100, 100);
Notice that we created a rectangle that was the exact size of our gradient. We can change the size of the output rectangle like this:
context.fillRect(0, 100, 50, 100);
context.fillRect(0, 200, 200, 100);
Example 2-15 adds these two new filled rectangles to Example 2-14 to create Figure 2-24. Notice that the gradient fills up the available space, with the final color filling out the area larger than the defined gradient size.
function drawScreen() {

   var gr = context.createLinearGradient(0, 0, 100, 0);

   // Add the color stops.
   gr.addColorStop(0,'rgb(255,0,0)');
   gr.addColorStop(.5,'rgb(0,255,0)');
   gr.addColorStop(1,'rgb(255,0,0)');

   // Use the gradient for the fillStyle.
   context.fillStyle = gr;
   context.fillRect(0, 0, 100, 100);
   context.fillRect(0, 100, 50, 100);
   context.fillRect(0, 200, 200, 100);

    }
Applying a horizontal gradient to a stroke
Gradients can be applied to any shape—even the stroke around a
shape. Example 2-16 takes the
filled rectangles from Example 2-15 and creates a strokeRect shape instead of a filled
rectangle. Figure 2-25 shows the
very different result.
function drawScreen() {

      var gr = context.createLinearGradient(0, 0, 100, 0);

      // Add the color stops.
      gr.addColorStop(0,'rgb(255,0,0)');
      gr.addColorStop(.5,'rgb(0,255,0)');
      gr.addColorStop(1,'rgb(255,0,0)');

      // Use the gradient for the fillStyle.
      context.strokeStyle = gr;
      context.strokeRect(0, 0, 100, 100);
      context.strokeRect(0, 100, 50, 100);
      context.strokeRect(0, 200, 200, 100);

   }
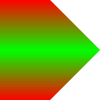
Applying a horizontal gradient to a complex shape
We can also apply a linear gradient to a “closed” shape made up of points, as shown in Example 2-17. A shape is considered closed when the final point is the same as the starting point.
function drawScreen() {

      var gr = context.createLinearGradient(0, 0, 100, 0);

      // Add the color stops.
      gr.addColorStop(0,'rgb(255,0,0)');
      gr.addColorStop(.5,'rgb(0,255,0)');
      gr.addColorStop(1,'rgb(255,0,0)');

      // Use the gradient for the fillStyle.
      context.fillStyle = gr;
      context.beginPath();
      context.moveTo(0,0);
      context.lineTo(50,0);
      context.lineTo(100,50);
      context.lineTo(50,100);
      context.lineTo(0,100);
      context.lineTo(0,0);
      context.stroke();
      context.fill();
      context.closePath();

   }
In this example, we use the context.fill() command to fill in our
shape with the current fillStyle,
creating the output shown in Figure 2-26.
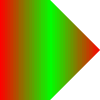
Figure 2-26 shows the new shape we have created with points. As long as the points are closed, the fill will work as we expect.
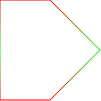
Vertical gradients
Vertical gradients are created in a very similar manner as the
horizontal variety. The difference is that we must specify a
y value that is not 0, and the x values must both be 0. Example 2-18 shows the shape from Example 2-17 created with a
vertical rather than a horizontal gradient to produce the output in
Figure 2-27.
function drawScreen() {

      var gr = context.createLinearGradient(0, 0, 0, 100);

      // Add the color stops.
      gr.addColorStop(0,'rgb(255,0,0)');
      gr.addColorStop(.5,'rgb(0,255,0)');
      gr.addColorStop(1,'rgb(255,0,0)');

      // Use the gradient for the fillStyle.
      context.fillStyle = gr;
      context.beginPath();
      context.moveTo(0,0);
      context.lineTo(50,0);
      context.lineTo(100,50);
      context.lineTo(50,100);
      context.lineTo(0,100);
      context.lineTo(0,0);
      //context.stroke();
      context.fill();
      context.closePath();

   }
The only difference between Example 2-18 and Example 2-17 is the line creating the linear gradient.
The horizontal version (Example 2-17):
var gr = context.createLinearGradient(0, 0, 100, 0);
The new vertical version (Example 2-18):
var gr = context.createLinearGradient(0, 0, 0, 100);
All of the same rules for strokes on horizontal gradients apply to vertical ones. Example 2-19 takes the shape from Example 2-18, stroking it with the gradient instead of filling it, producing the outline shown in Figure 2-28.
function drawScreen() {

      var gr = context.createLinearGradient(0, 0, 0, 100);

      // Add the color stops.
      gr.addColorStop(0,'rgb(255,0,0)');
      gr.addColorStop(.5,'rgb(0,255,0)');
      gr.addColorStop(1,'rgb(255,0,0)');

      // Use the gradient for the fillStyle.
      context.strokeStyle = gr;
      context.beginPath();
      context.moveTo(0,0);
      context.lineTo(50,0);
      context.lineTo(100,50);
      context.lineTo(50,100);
      context.lineTo(0,100);
      context.lineTo(0,0);
      context.stroke();
      context.closePath();

   }
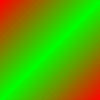
Diagonal gradients
You can easily create a diagonal gradient by varying both the
second x and second y parameters of the createLinearGradient() function:
var gr= context.createLinearGradient(0, 0, 100, 100);
To create a perfect diagonal gradient, as shown in Figure 2-29, fill a square that is the same size as the diagonal gradient. The code is provided in Example 2-20.
function drawScreen() {

      var gr = context.createLinearGradient(0, 0, 100, 100);

      // Add the color stops.
      gr.addColorStop(0,'rgb(255,0,0)');
      gr.addColorStop(.5,'rgb(0,255,0)');
      gr.addColorStop(1,'rgb(255,0,0)');

      // Use the gradient for the fillStyle.
      context.fillStyle = gr;
      context.beginPath();
      context.moveTo(0,0);
      context.fillRect(0,0,100,100)
      context.closePath();

   }
Radial gradients
The definition process for radial and linear gradients is very similar. Although a radial gradient takes six parameters to initialize rather than the four needed for a linear gradient, it uses the same color stop idea to create the color changes.
The six parameters are used to define the center point and the radii of two circles. The first circle is the “start” circle, and the second circle is the “end” circle. Let’s look at an example:
var gr = context.createRadialGradient(50,50,25,50,50,100);
The first circle has a center point of 50,50 and a radius of 25; the second has a center point of
50,50 and a radius of 100. This will effectively create two
concentric circles.
We set color stops the same way we did with the linear gradients:
gr.addColorStop(0,'rgb(255,0,0)');
gr.addColorStop(.5,'rgb(0,255,0)');
gr.addColorStop(1,'rgb(255,0,0)');
Example 2-21 puts this together to create the result shown in Figure 2-30.
function drawScreen() {

      var gr = context.createRadialGradient(50,50,25,50,50,100);

      // Add the color stops.
      gr.addColorStop(0,'rgb(255,0,0)');
      gr.addColorStop(.5,'rgb(0,255,0)');
      gr.addColorStop(1,'rgb(255,0,0)');

      // Use the gradient for the fillStyle.
      context.fillStyle = gr;
      context.fillRect(0, 0, 200, 200);

   }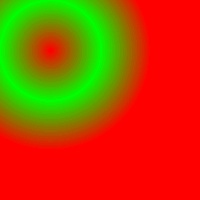
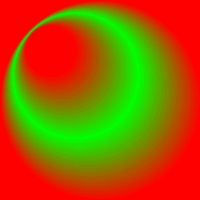
Example 2-22 offsets the second circle from the first to create the effects shown in Figure 2-31.
function drawScreen() {

      var gr = context.createRadialGradient(50,50,25,100,100,100);

      // Add the color stops.
      gr.addColorStop(0,'rgb(255,0,0)');
      gr.addColorStop(.5,'rgb(0,255,0)');
      gr.addColorStop(1,'rgb(255,0,0)');

      // Use the gradient for the fillStyle.
      context.fillStyle = gr;
      context.fillRect(0, 0, 200, 200);

}
As with the linear gradients, we can also apply the radial gradients to complex shapes. Example 2-23 takes an arc example from earlier in this chapter, but applies a radial gradient to create Figure 2-32.
function drawScreen() {

      var gr = context.createRadialGradient(50,50,25,100,100,100);

      // Add the color stops.
      gr.addColorStop(0,'rgb(255,0,0)');
      gr.addColorStop(.5,'rgb(0,255,0)');
      gr.addColorStop(1,'rgb(255,0,0)');

      // Use the gradient for the fillStyle.
      context.fillStyle = gr;
      context.arc(100, 100, 100, (Math.PI/180)*0, (Math.PI/180)*360, false);
      context.fill();

   }
Example 2-23 takes the radial gradient from Example 2-22 and applies it to a circle shape rather than a rectangle shape. This removes the red square from the background of the shape.
We can also apply our radial gradient to the stroke of our arc rather than the fill, as shown in Example 2-24 and Figure 2-33.
function drawScreen() {

      var gr = context.createRadialGradient(50,50,25,100,100,100);

      // Add the color stops.
      gr.addColorStop(0,'rgb(255,0,0)');
      gr.addColorStop(.5,'rgb(0,255,0)');
      gr.addColorStop(1,'rgb(255,0,0)');

      // Use the gradient for the fillStyle.
      context.strokeStyle = gr;
      context.arc(100, 100, 50, (Math.PI/180)*0, (Math.PI/180)*360, false)
      context.stroke();

   }
Example 2-24 created a circle that is smaller than the version in Example 2-23, so the radial gradient would show up on the stroke of the arc. If we left it the same size as Example 2-23, we would have a solid red fill because the radial gradient is solid red at the diameter edge of the circle.
Filling Shapes with Patterns
We will cover using bitmap images on the canvas in Chapter 4, but for now, let’s take a quick look at how images can be used as fill patterns for shapes we draw.
Fill patterns are initialized with the createPattern() function, which takes two
parameters. The first is an Image
object instance, and the second is a String representing how to display the repeat pattern inside the shape. We can use a
loaded image file or an entire other canvas as a fill pattern for a drawn
shape.
There are currently four types of image fills:
repeatrepeat-xrepeat-yno-repeat
Modern browsers have implemented these four types to various
degrees, but standard repeat seems to
be the most common. Let’s look at it now and then we will take a brief
look at the other three.
Figure 2-34 shows a simple bitmap fill pattern that we can use to test this functionality. It is a 20×20 green circle on a transparent background, saved as a .gif file named fill_20x20.gif.
Example 2-25 tests
this first with the repeat string to
create a box full of little green circles, as shown in Figure 2-35.
function drawScreen() {

      var fillImg = new Image();
      fillImg.src = 'fill_20x20.gif';
      fillImg.onload = function(){

         var fillPattern = context.createPattern(fillImg,'repeat');
         context.fillStyle = fillPattern;
         context.fillRect(0,0,200,200);

      }

   }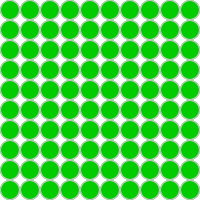
It is best not to use Image
instances until they have loaded completely. We will cover this in detail
in Chapter 4, but for now, we simply create
an inline onload event handler function
that will be called when Image is ready
to be used. The repeat pattern string
does a good job of completely filling the 200×200 square. Let’s see the
code for how the other repeat strings perform (in Example 2-26), and view the
results in Figures 2-36 through 2-38.
function drawScreen() {


      var fillImg = new Image();
      fillImg.src = 'fill_20x20.gif';

      fillImg.onload = function(){

         var fillPattern1 = context.createPattern(fillImg,'no-repeat');
         var fillPattern2 = context.createPattern(fillImg,'repeat-x');
         var fillPattern3 = context.createPattern(fillImg,'repeat-y');

         context.fillStyle = fillPattern1;
         context.fillRect(0,0,100,100);

         context.fillStyle = fillPattern2;
         context.fillRect(0,110,100,100);

         context.fillStyle = fillPattern3;
         context.fillRect(0,220,100,100);

      }

   }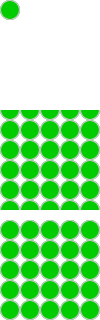
Only Firefox seems to show anything of significance when the
repeat-x and repeat-y strings are used in the repeat parameter. We will cover more examples of
filling, as well as many other uses for bitmap images, in Chapter 4.
Creating Shadows on Canvas Shapes
We can add shadows to shapes we draw on the canvas using four parameters. As with the tiled fill patterns in the previous section, this feature has not been fully implemented on all HTML5-compliant browsers.
We add a shadow by setting four Canvas properties:
shadowOffsetXshadowOffsetYshadowBlurshadowColor
The shadowOffsetX and shadowOffsetY values can be positive or
negative. Negative values will create shadows to the left and top rather
than to the bottom and right. The shadowBlur property sets the size of the
blurring effect on the shadow. None of these three parameters is affected
by the current Canvas transformation matrix. The shadowColor can be any color set via HTML4 color
constant string—rgb() or rgba()—or with a string containing a hex
value.
Example 2-27 and Figure 2-39 show a few different boxes drawn with various shadow settings.
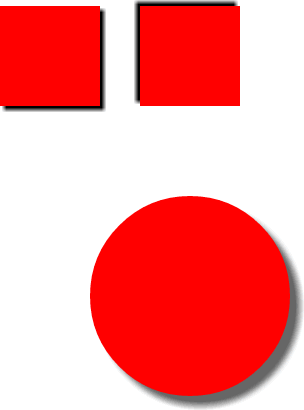
function drawScreen() {

     context.fillStyle = 'red';

     context.shadowOffsetX = 4;
     context.shadowOffsetY = 4;
     context.shadowColor = 'black';
     context.shadowBlur = 4;
     context.fillRect(10,10,100,100);

     context.shadowOffsetX = -4;
     context.shadowOffsetY = -4;
     context.shadowColor = 'black';
     context.shadowBlur = 4;
     context.fillRect(150,10,100,100);

     context.shadowOffsetX = 10;
     context.shadowOffsetY = 10;
     context.shadowColor = 'rgb(100,100,100)';
     context.shadowBlur = 8;
     context.arc(200, 300, 100, (Math.PI/180)*0, (Math.PI/180)*360, false)
     context.fill();
}
As you can see, if we adjust the shadowOffset values along with the shadowBlur value, we create various shadows. We
can also create shadows for complex shapes drawn with paths and
arcs.
What’s Next
We covered a lot of ground in this chapter, introducing the ways to construct primitive and complex shapes, and how we can draw and transform them on the canvas. We also discussed how to composite, rotate, scale, translate, fill, and create shadows on these shapes. But we’ve only just begun exploring HTML5 Canvas. In the next chapter, we will look at how to create and manipulate text objects on the canvas.
Get HTML5 Canvas now with the O’Reilly learning platform.
O’Reilly members experience books, live events, courses curated by job role, and more from O’Reilly and nearly 200 top publishers.

