After you’ve connected and turned on your camcorder, open iMovie by double-clicking its icon, or single-clicking it in the Dock. But before you’re treated to the main iMovie screen (shown in Figure 4-4), iMovie may ask you to take care of a few housekeeping details.
All modern Mac
monitors let you adjust the resolution, which is a measurement of how much it can show as measured in pixels (the tiny dots that make up the screen picture). If you choose ![]() → System Preferences → Displays, you’ll see the available choices.
→ System Preferences → Displays, you’ll see the available choices.
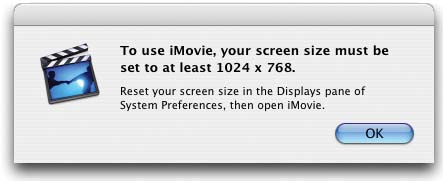
iMovie likes a very big screen—a high-resolution monitor. If your monitor is set to one of the lower resolution settings when you launch iMovie, you’ll get an error message like the one shown in Figure 4-2. The bottom line: Choose a setting that’s 1024 x 768 or larger. Poor iMovie can’t even run at a lower setting.
Caution
If you switch your resolution to a resolution lower than 1024 x 768 while iMovie is open, the program has no choice but to quit. (At least it does you the courtesy of offering to save the changes to the project file you’ve been working on.) The program is more graceful when you switch between two higher resolutions; it instantly adjusts its various windows and controls to fit the resized screen. In other words, whenever you switch resolutions while the program is open, be extra careful not to choose, for example, 800 x 600 by mistake.
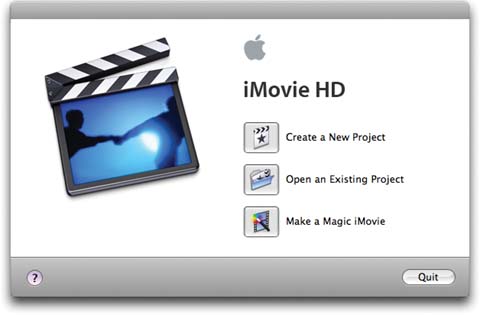
If everything has gone well, and iMovie approves of your monitor setting, your next stop is the window shown in Figure 4-3.
You’ve reached a decision point: You must now tell the program whether you want to begin a new movie (called a project in iMovie lingo), open one you’ve already started, use the Magic iMovie feature (Section 4.8), or quit the program.
After the first time you run iMovie, you may not see the dialog box shown in Figure 4-3 very often. After that, each time you launch iMovie, it automatically opens up the movie you were working on most recently. If you ever want to see the Project dialog box again, in fact, you’ll have to do one of the following:
Instead of quitting iMovie when you’re finished working, just close all of its windows, so that the Create Project screen reappears. If you quit iMovie at this point, it will also show the Create Project dialog box the next time you open the program.
Discard the last movie you were working on (by trashing it from your hard drive), or move it to a different folder.
Throw away the iMovie Preferences file (which is where iMovie records which movie you were editing most recently). It bears the uncatchy name com.apple.iMovie.plist, and it’s inside your Home → Library → Preferences folder.
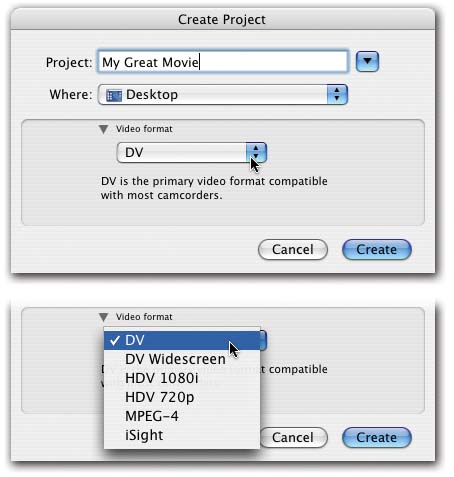
If you click Create a New Project (Figure 4-3), you’re now asked to select a name and location for the movie you’re about to make—or, as iMovie would say, the project you’re about to make (Figure 4-4).
Figure 4-4. Top: In the Create Project dialog box, you name your new movie and specify where you want to save it. Bottom: You can also tell iMovie what format to expect for the incoming video. In most cases, though, you don’t need to bother; iMovie automatically accommodates whatever camera you attach.
This is a critical moment. Starting a new iMovie project isn’t as casual an affair as starting a new word processing file. For one thing, iMovie requires that you save and name your file before you’ve actually done any work. For another, you can’t bring in footage from your camcorder without first naming and saving a project file.
Above all, the location of your saved project file—your choice of hard drive to save it on—is important. Digital video files are enormous. Standard DV footage consumes about 3.6 MB of your hard drive per second. Therefore:
Table 4-1.
|
This much video |
Needs about this much disk space |
|---|---|
|
1 minute |
228 MB |
|
15 minutes |
3.5 GB |
|
30 minutes |
7 GB |
|
60 minutes |
13 GB |
|
2 hours |
28 GB |
|
4 hours |
53 GB |
As you could probably guess, high-definition footage is even more massive; each minute of it takes between three and four times as much disk space as standard DV footage.
Note
That’s “between three and four,” because there are two primary HDTV standards, known as 720p and 1080i (see Section 4.3.4). Video shot in 720p consumes slightly under three times the amount of disk space as standard DV (about 9 MB per second, or 34 gigabytes per hour), and 1080i takes up four times as much (14 MB per second, or 52 gigs per hour).
When you save and name your project, you’re also telling iMovie where to put these enormous, disk-guzzling files. If, like most people, you have only one hard drive, the one built into your Mac, fine. Make as much empty room as you can, and proceed with your video-editing career.
But many iMovie fans have more than one hard drive. They may have decided to invest in a larger hard drive, as described in the box in Section 4.4, so that they can make longer movies. If you’re among them, save your new project onto the larger hard drive if you want to take advantage of its extra space.
Tip
People who have used other space-intensive software, such as Photoshop and Final Cut Pro, are frequently confused by iMovie. They expect the program to have a Scratch Disk command that lets them specify where (on which hard drive) they want their work files stored while they’re working.
As you now know, iMovie has no such command. You choose your scratch disk (the hard drive onto which you save your project) on a movie-by-movie basis.
Note, by the way, that digital video requires a fast hard drive. Therefore, make no attempt to save your project file onto a CD, DVD, iDisk, or another disk on the network. It won’t be fast enough, and you’ll get nothing but error messages.
As shown in Figure 4-4, iMovie offers a pop-up menu in the Create Project dialog box called “Video format.” (You may have to click the little flippy-triangle button to see it.) The most important lesson to learn about this pop-up menu is that, in general, you should ignore it.
Here, you can specify what kind of incoming video iMovie should expect, but you don’t have to. iMovie detects what kind of camcorder you’ve attached automatically, and it creates the right kind of project no matter what this pop-up menu says.
Note
iMovie can even change the project’s format after you’ve created it, but only if the project is completely empty. Once you’ve created a clip—even an empty black clip or a Ken Burns photo clip—the format is locked down. Of course, even then, you can delete all the clips and empty the iMovie Trash; at that point, iMovie will once again resize its own window according to the kind of camcorder you plug into it.
So why did Apple provide this pop-up menu? Primarily for situations in which you’re not going to use a video camera to provide the footage. For example, you might want to use iMovie HD to create a spectacular slideshow from your digital photos in high-definition, or at least in widescreen. (As of mid-2006, there’s no such thing as a Mac that burns high-definition DVDs. But there will be soon. If you create your slideshows in high-def format today, you’ll be ready.)
In such cases, you’ll be happy to have this pop-up menu so that you can choose a format manually.
Your choices are:
DV stands for digital video—the usual signal from standard MiniDV camcorders.
DV Widescreen is also for MiniDV camcorders, but specifically the ones that offer a so-called 16:9 shooting mode. That is, these camcorders can film a widescreen, rectangular image, shaped like an HDTV picture but without the high resolution. You’d choose this option when importing footage filmed in 16:9 mode. (For your reference, the traditional, squarish video picture is known as 4:3. Both ratios refer to the width:height proportions of the picture.)
HDV 1080i, HDV 720p refer to the new, high-definition camcorders that inspired the creation of iMovie HD. 1080i and 720p are two different flavors of high-def TV; Sony’s high-def camcorders use 1080i, and JVC’s HD1 records in 720p. Both of them are HDV camcorders, a reference to the format they use to store a high-definition picture on ordinary MiniDV cassettes.
Note
If you’re scoring at home: 1080i creates the picture on your screen by blasting 1,080 fine horizontal lines onto the screen in two alternating, interlaced sets of 540. A 720p picture is painted progressively down the screen in a single pass, but using “only” 720 lines of resolution.
Online, people argue about which format is superior until they’re blue in the keyboard, but let’s just put it this way: Both pictures look absolutely spectacular compared with 480i (the interlaced picture of regular TV) or even 480p (what you get from standard DVDs).
Still to come: the dawn of commonplace 1080p, the ultimate format, which is still rare among TV sets, broadcasts, and cameras.
MPEG-4 is the video format used by many “flash-based” video devices, extremely compact handheld camcorders that store video on a memory card instead of tape. (See Section 4.6.)
iSight is Apple’s video-chat camera. It’s built right into iMacs and MacBook Pro laptops, just above the screen, or you can buy one as an external, cylindrical camera/microphone for about $100. For instructions on capturing video from an iSight, see Section 4.4.3
Once you’ve set up your Create Project dialog box, click the Create button.
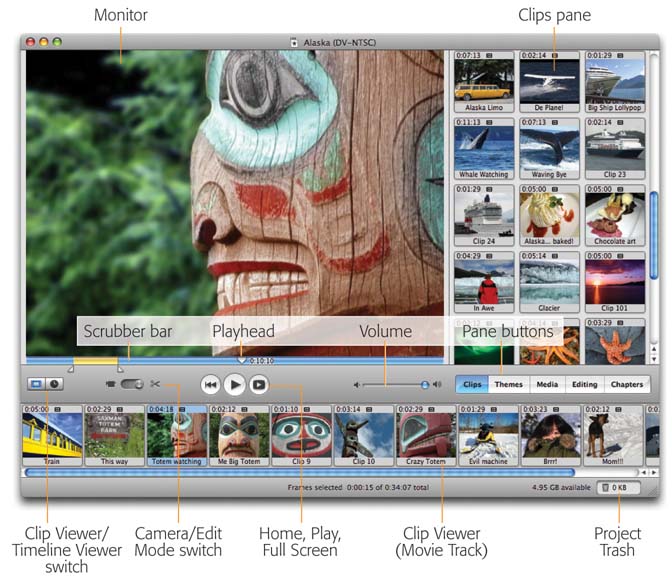
Once you’ve saved your file, you finally arrive at the main iMovie window. Figure 4-5 is a cheat sheet for iMovie’s various screen elements. Spend no time memorizing their functions now; the rest of this book covers each of these tools in context and in depth.
Clips pane. These little cubbyholes store the clips—pieces of footage, individual shots—that you’ll rearrange into a masterpiece of modern storytelling.
This pane won’t always be the Clips pane, incidentally. It becomes the Themes pane, the Media pane, and so on, when you click one of the buttons beneath it. The one thing all of these incarnations have in common is that they offer you lists of materials you can incorporate into your movie.
Pane buttons. Each of these buttons—Clips, Themes, Media, Editing, Chapters—fills the Clips pane area with tools that add professional touches to your movie, like crossfade styles, credit sequences, footage effects (like brightness and color shifting), still photos, sound effects, and music. Chapters 6, 7, 8, and 16 cover these video flourishes in detail.
Figure 4-5. iMovie d oesn’t look much like any program you’ve used before—except perhaps earlier versions of iMovie. iMovie appears in its own window, which you can resize, send to the background, drag to a second monitor, and otherwise manipulate like any other program’s window. Scrubber bar Playhead Volume Pane buttons
For now, iMovie veterans should just note that these buttons have been clumped up to save space. The old Photos and Audio buttons, for example, now hide inside the new version’s Media button. And the old Titles, Transitions, and Effects panes have been collected into a single Editing button. Expect to have to make an extra click here and there.
Clip Viewer/Timeline Viewer. You’ll spend most of your editing time down here. Each of these tools offers a master map that shows which scenes will play in which order, but there’s a crucial difference in the way they do it.
When you click the Clip Viewer button (marked by a piece of filmstrip), you see your movie represented as slides. Each clip appears to be the same size, even if some are long and some are short. The Clip Viewer offers no clue as to what’s going on with the audio, but it’s a supremely efficient overview of your clips’ sequence.
When you click the Timeline Viewer button (marked by the clock), on the other hand, you can see the relative lengths of your clips, because each shows up as a colored band of the appropriate length. Parallel bands (complete with visual “sound waves,” if you like), underneath indicate blocks of sound that play simultaneously.
Camera Mode/ Edit Mode switch. In Camera Mode, the playback controls operate your camcorder, rather than the iMovie film you’re editing. In Camera Mode, the Monitor window shows you what’s on the tape, not what’s in iMovie, so that you can choose which shots you want to transfer to iMovie for editing.
In Edit Mode, however, iMovie ignores your camcorder. Now the playback controls govern your captured clips instead of the camcorder. Edit Mode is where you start piecing your movie together.
Tip
You can drag the blue dot between the Camera Mode and Edit Mode positions, if you like, but doing so requires sharp hand-eye coordination and an unnecessary mouse drag. It’s much faster to click inside the track next to the icons, ignoring the little switch entirely. (You can also click on the scissors icon itself for Edit Mode; you can’t click directly on the camera icon, however, without triggering its pop-up menu.)
Home. Means “rewind to the beginning.” Keyboard equivalent: the Home key on your keyboard. (On laptops, you must hold down both the Fn key and the leftarrow key to trigger the Home function.)
Play/Stop. Plays the tape, movie, or clip. When the playback is going on, the button turns blue; that’s your cue that clicking it again stops the playback.
Play Full Screen. Clicking this button makes the movie you’re editing fill the entire Mac screen as it plays back, instead of playing just in the small Monitor window.
Tip
The Full Screen button doesn’t play your movie back from the beginning. Instead, it plays back from the location of the Playhead. If you do want to play in full-screen mode from the beginning, press the Home key (or click the Home button just to the left of the Play button) before clicking the Play Full Screen button.
Scrubber bar. This special scroll bar lets you jump anywhere in one piece of footage, or the entire movie.
Playhead. The Playhead is like the little handle of a normal scroll bar. It shows exactly where you are in the footage.
Volume slider. To adjust your speaker volume as you work, click anywhere in the slider’s “track” to make the knob jump there. (Keep in mind that you can also boost the Mac’s overall speaker volume by pressing the volume keys on the keyboard, using the
 control in your menu bar, or using the Sound pane in System Preferences.)
Project Trash. You can drag any clip onto this icon to get rid of it. (Or just highlight a clip and press the Delete key.)
Free space. This indicator lets you know how full your hard drive is. In the world of video editing, that’s a very important statistic, as described in Section 4.4.2.3.
Get iMovie 6 & iDVD: The Missing Manual now with the O’Reilly learning platform.
O’Reilly members experience books, live events, courses curated by job role, and more from O’Reilly and nearly 200 top publishers.
