Chapter 4. Diving Deeper
In this chapter, you will dive deeper into Swift. Apple provides developers with a toolset of classes and methods. This toolset, also known as a framework, is called Foundation. You can learn more about Apple’s frameworks at developer.apple.com. However, the provided toolset is not always enough. Sometimes it is necessary to create your own class or methods. In this chapter, you will learn how to create your own classes and objects. You will also learn how to create your own methods. These skills will allow you to build a wider range of apps.
Methods
In Chapter 2, you learned about a morning routine and the list of steps you go through to get ready in the morning. Methods are a group of steps that work together to accomplish a specific task. Methods are very similar to functions. Methods are a set of steps to complete a task inside a class or object. A function is a set of steps to complete a task that stands alone. These two items are so similar, they have become synonyms. It is common to hear people use the words “method” and “function” interchangeably, even though they are usually referring to a method.
Writing your own method can be convenient for repeated work. If you were to write a method that greets you in the morning, it might look like this:
funcgoodMorning(){println("Good Morning")}
Creating your own method starts with the func keyword. This keyword is used to declare the beginning of a new method. The next item is the method’s name. Method names also use camel-casing. For example:
goodMorning()
After the method name comes a set of parentheses. Next, an open brace is used to begin the method, and a closed brace is used to end it.
Methods can take input in order to provide a more detailed decision process. For example, if you are the coach of a track and field team, it might be helpful to tell your runners how far they need to go running (i.e., “Go for a run” or “Go for a seven-mile run”).
This additional input will change the final product. Input variables like these are called parameters. Parameters are outside values that are passed into a method. The name and type of the parameter are defined inside the parentheses. The parameters passed in will be referred to as the variable name inside the parentheses. For example:
funcgoodMorning(name:String){println("Good Morning \(name)")}//Good Morning NAME
Parameters are defined by first stating the variable name and then a colon followed by the type of variable. Multiple parameters can be accepted and are separated by a comma. The previous method takes a variable called name and uses it inside the welcome message:
funcgoodMorning(name:String,day:String){println("Good Morning \(name), Happy \(day)")}//Good Morning NAME-VARIABLE-HERE, happy DAY-VARIABLE-HERE
You can put as many lines of code inside your method as you like, but it is usually best practice to group similar lines of code into their own method and then call that method. Separating your code into small reusable methods is a great habit and will make updating your code much easier.
You created this great goodMorning method, but how do you use it? Calling a method is a term used to describe a line of code that triggers a method to execute. Calling a method is as simple as writing the method name followed by a set of parentheses. These empty parentheses are required, even if your method does not have any parameters. For example, consider a method named goodNight:
funcgoodNight(){println("Good Night")}
You would execute the code inside goodNight by writing:
goodNight()//"Good Night"
This will call the goodNight() method and execute the steps inside the goodNight method. But what if your method takes input like goodMorning? Consider a method that takes input parameters like this:
funcgoodMorning(name:String,day:String){println("Good Morning \(name), Happy \(day)")}//Good Morning NAME-VARIABLE-HERE, Happy DAY-VARIABLE-HERE
You could call the goodMorning method like this:
goodMorning("Steve",day:"Saturday")//Good Morning Steve, Happy Saturday
Finally, if your method requires input and the caller forgets to provide it, you can set a default value for your parameters. If a value is not provided, the default will take its place. To set a default value to your parameter, add an equals sign next to the type and provide the default value. For example, the following code sets "World" and "Day" as the default values for the name and day parameters:
funcgoodMorning(name:String="World",day:String="Day"){println("Good Morning \(name), Happy \(day)")}
Now, if a caller forgets to provide the parameters, the message is still readable:
goodMorning()//Good Morning World, Happy Day
Return Values
Methods can do more than accept input and execute steps; they can generate output as well. When a method provides an output value, it is called a return value. The return value is the final product of the method, and it is sent back to the caller. A return value can be any type, but the return type must be declared by the method:
funcsum(a:Int,b:Int)->Int{returna+b}
If a method provides a return value, the return type must be defined after the parameters. The return type is the type of variable that will be returned. To define the return type, add a dash and a greater-than sign following the parameters. The arrow, →, signifies a return value will be provided, and the type of value is stated to the right of the arrow. Finally, the return keyword must be used inside the method next to the variable to be returned.
No matter how many lines of code there are inside a method, the return keyword ends the method when it is executed. When the return keyword is executed, any code below the return keyword within the method will be skipped:
funccalculateTip(bill:Float,percentage:Float)->Float{vartip=bill*percentagereturntip}
Classes
Imagine you are a home builder, and you just signed a contract to build 20 similar homes in a brand new neighborhood. Before you send out the construction crew, you must first create a blueprint. A blueprint is a document that shows exactly how the house will look and behave. This single document is used as the template to create each of the 20 houses.
Using a blueprint or template to create objects saves time and makes maintenance much easier. This principle applies to creating virtual objects, too. The blueprints in Swift are called a class. A class is a blueprint or template for an object. This template can be used over and over like a printing press to create virtual objects.
A class defines the attributes and behaviors of the object. The attributes are the characteristics of the object. These attributes are defined by properties. Properties are variables included in each object. The properties of a house would be the exterior color, street number, and number of bathrooms.
The behaviors are the methods the object provides. For example, a method could set the air temperature to 68 degrees, or open the garage, or enable the alarm system.
Creating your own class in Swift is simple. If you wanted to create a house class for your new home building project, it would look like this:
classHouse{}
The name of a class always starts with a capital letter. This allows other developers to distinguish between a class and an object. Objects and methods always start with a lowercase letter.
Properties
Adding properties to your custom class is very similar to declaring a variable. You can add some properties to your house class like this:
classHouse{varexteriorColor="Brown"varcurrentAirTemp=70varisGarageOpen=truevarisAlarmEnabled=false}
The class you created has four properties, each with a default value already set. This means if a new value is not provided, each house created from this house class will have a brown exterior, the garage will be open, the alarm system will be disabled, and the air temperature will be 70 degrees.
Methods
You could add some methods to the house class as well:
classHouse{varexteriorColor="Brown"varcurrentAirTemp=70varisGarageOpen=falsevarisAlarmEnabled=falsefuncprepareForNighttime(){isGarageOpen=falseisAlarmEnabled=truecurrentAirTemp=65}funcprepareForDaytime(){isGarageOpen=trueisAlarmEnabled=falsecurrentAirTemp=70}}
Notice these methods are defined just like a method. They use the same func keyword followed by the method name, parameters, and return value. Each house created with the house class will have the ability to prepare for daytime or prepare for nighttime. These methods will do things like shut the garage, enable the alarm, and adjust the air temperature.
Creating an Object
Now that you have defined the properties and methods for the house class, it is time to build your first house. To create an object from a class, you call the initializer method. The initializer method is a method designed specifically for setting up new objects. The initializer method is similar to walking through the setup wizard on your Mac the first time it starts up.
If you provided default values for your properties, there is no need to write an initializer method. Xcode will create one for you. The initializer method is typically accessed by writing the name of the class followed by two parentheses. For example:
varmyHouse:House=House()
or:
varmyHouse=House()
Either line creates a new house called myHouse.
Accessing Properties
You can access the value of a property by using dot syntax. Dot syntax is a format used to access and assign values to properties. Dot syntax begins with an object:
varmyHouse=House()
To access the exteriorColor, write the variable name followed by a dot and then exteriorColor:
myHouse.exteriorColor//Brown
The exeriorColor returns the string "Brown" because the property’s default value is "Brown".
This simple format can be used for assigning values to properties as well. To assign a value, add an equals sign with the new value next to it:
myHouse.exteriorColor="Blue"
This will change the exteriorColor property to "Blue":
myHouse.exteriorColor="Blue"println(myHouse.exteriorColor)//"Blue"
After the code changes the exteriorColor to "Blue", the next line prints the exteriorColor of the house.
Calling Methods
You can use the methods from the house class by calling the method’s name:
myHouse.prepareForNighttime()
Calling a method uses the same dot syntax you saw with properties. First, you write the name of the object and then a dot, followed by the name of the method you would like to call. Finally, the line is ended with a set of parentheses. These parentheses should include any required parameters; otherwise, they must be written and left empty.
Subclasses
When creating something, it’s helpful to reuse a template instead of starting from scratch. Imagine you want to build a cabin. A cabin has many similar features to a house, but it also has a few different attributes and behaviors. Instead of drawing a completely new blueprint, you could start with the house class and then make changes from there. This process of reusing is called subclassing.
Subclassing provides a convenient way to share attributes and behaviors between a parent and child class. In this case, the parent class is House and the child class is Cabin. Writing a subclass is just like creating a custom class. However, the parent class name is placed after the class name and separated by a colon. For example:
classCabin:House{}
Inheritance
Inheritance is the ability to pass down attributes and behaviors from a parent class to a child class. All of the parent class’s properties and methods will automatically be shared with the child class. For example, the cabin class inherits the properties and default values of exteriorColor, currentAirTemp, isGarageOpen, and isAlarmEnabled. The cabin class also inherits the prepareForNighttime() and prepareForDaytime() methods. However, the cabin class can add or change these if needed. For example, the cabin class may want to have "Red" as its default exteriorColor.
Overriding
But what if you don’t want a brown cabin? No problem—with overriding, you can change it. Changing the inherited properties or methods in a child class is called overriding. Overriding allows the child class to define its own version of a particular property or method. To override a method, add the override keyword.
Overriding initializers
You can override the default value of a property using the initializer method. The initializer method is called whenever a new object is created. This means you can write your own initializer and set your own default values:
classHouse{varexteriorColor="Brown"varcurrentAirTemp=70varisGarageOpen=falsevarisAlarmEnabled=falsefuncprepareForNighttime(){isGarageOpen=falseisAlarmEnabled=truecurrentAirTemp=65}funcprepareForDaytime(){isGarageOpen=trueisAlarmEnabled=falsecurrentAirTemp=70}}classCabin:House{overrideinit(){super.init()exteriorColor="Red"}}
The cabin class defines its own initializer method by using the init keyword. Since the cabin class overrides the initializer method from the House class, the override keyword is added to the beginning of the method name. Remember, the initializer method is automatically created for the House class. The init keyword is followed by a set of empty parentheses, and an open brace will begin the initialize method.
In the case of a subclass, the parent class’s initializer should first be called before the child class overrides or makes changes. To refer to the parent class, use the super keyword. Inside the child class’s init method, write super.init(). This will call the parent class’s initializer method. Once this is complete, the child class is free to override and make changes. In this case, the cabin class sets the exteriorColor to "Red".
Overriding methods
In addition to overriding a subclass’s properties, you can also override a subclass’s methods. For example, when you prepare a cabin for nighttime, there are different steps required than when you prepare a house. In a house, you might shut the garage, change the central air, and arm the alarm. However, with a cabin, there is no alarm system to enable or garage to shut; you will likely just start a fire in the fireplace. To override a method, you use the override keyword:
classCabin:House{overrideinit(){super.init()exteriorColor="Red"}overridefuncprepareForNighttime(){startFire()}}
In this chapter, you dove deeper into Swift. You learned how to create your own classes and methods. You also learned how to subclass and override. With these skills, you are now ready to create any class you could need to build an app. Your knowledge base is growing; now it is time to put that knowledge to work. Continue on to the Race Car exercise.
Exercise: Race Car
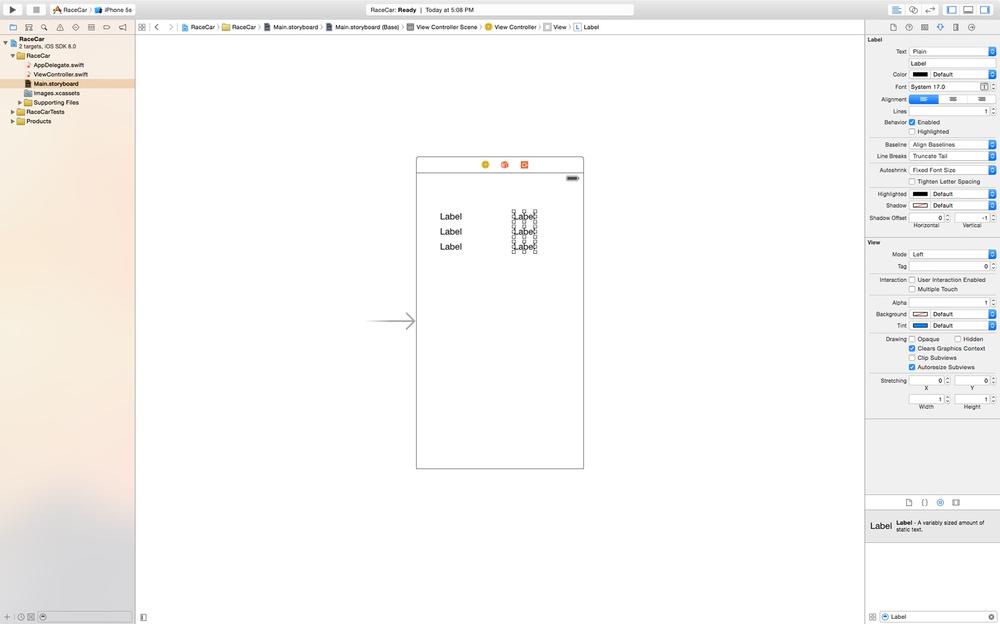
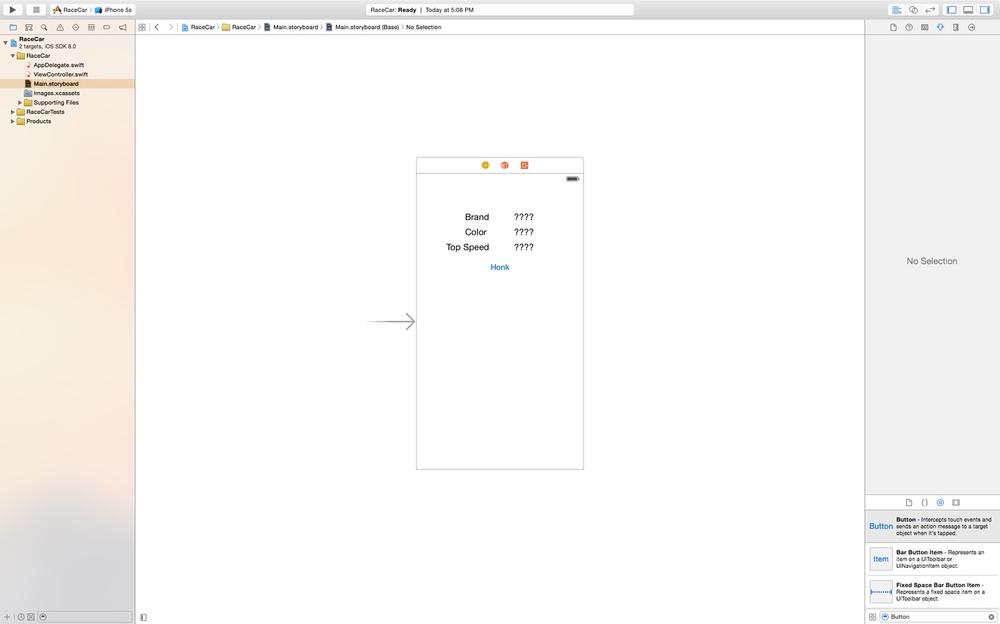
In this next exercise, you will create your own race car class. Your application will create a race car, tell it to honk, and then display the race car to the user. The app’s user interface will look like Figure 4-1.
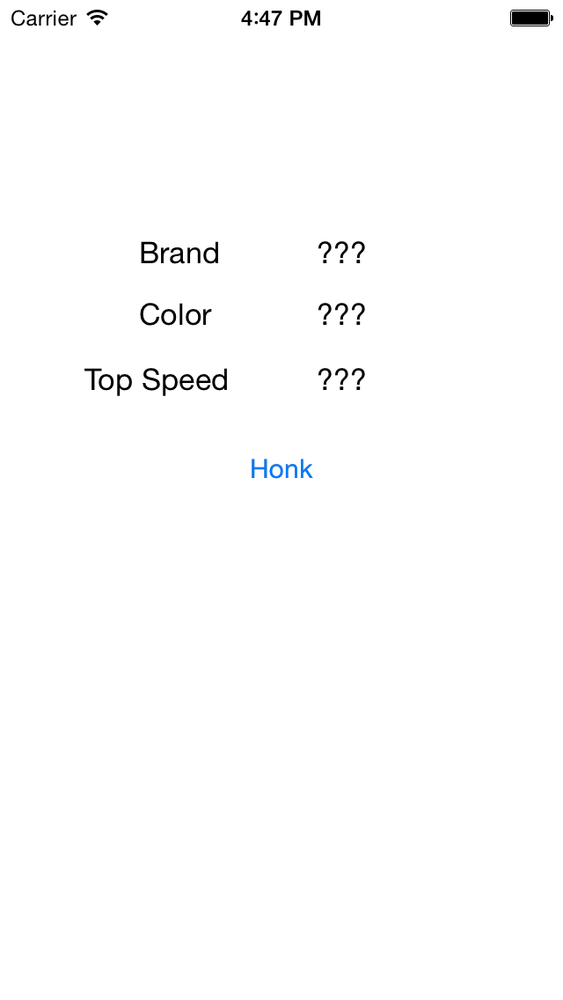
Notice the interface is made up of six Labels and a Button. The application will display the properties of your new race car. The user will have the ability to honk the car as well. But, when the race car honks, no noise will be made; instead, it will write a message to the developer log.
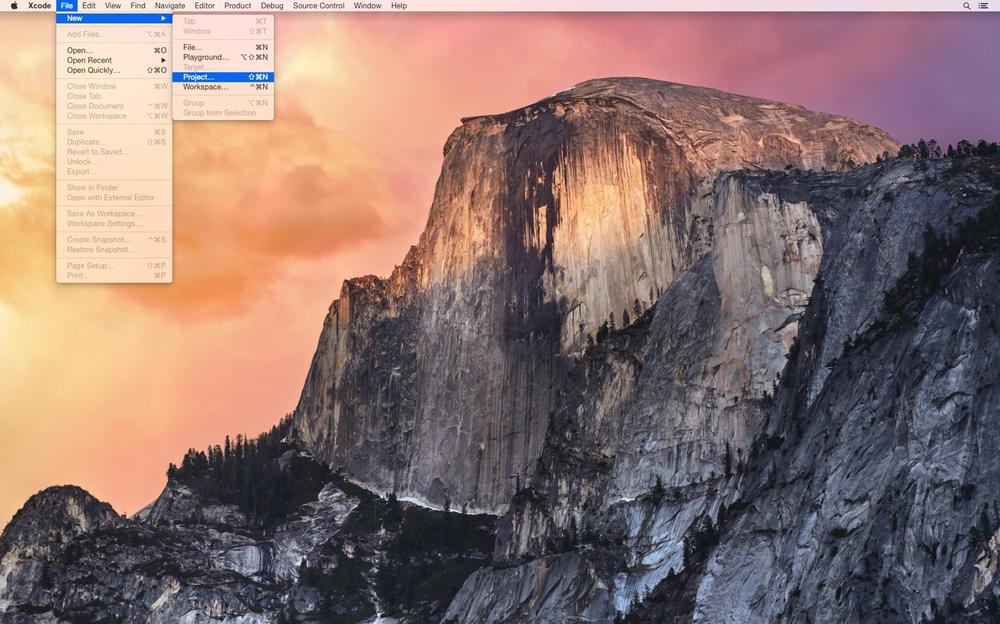
Now that you have a set of features and a user interface, it’s time to start developing the app. Open Xcode and select File→New→Project from the menu bar (Figure 4-2).
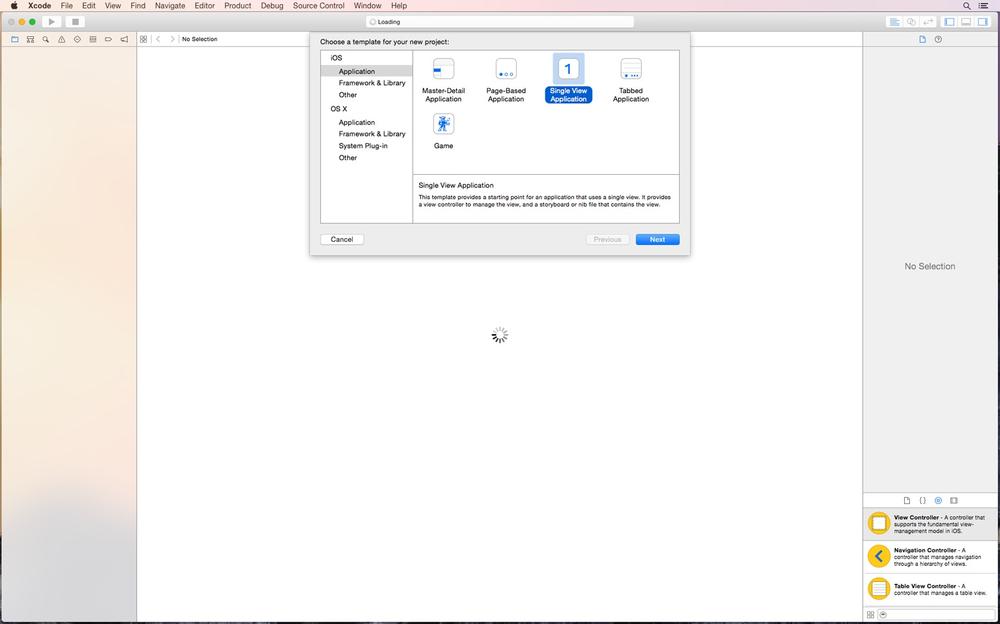
Select the Single View Application template for your project (Figure 4-3).
Click Next and enter RaceCar as the Product Name (Figure 4-4).
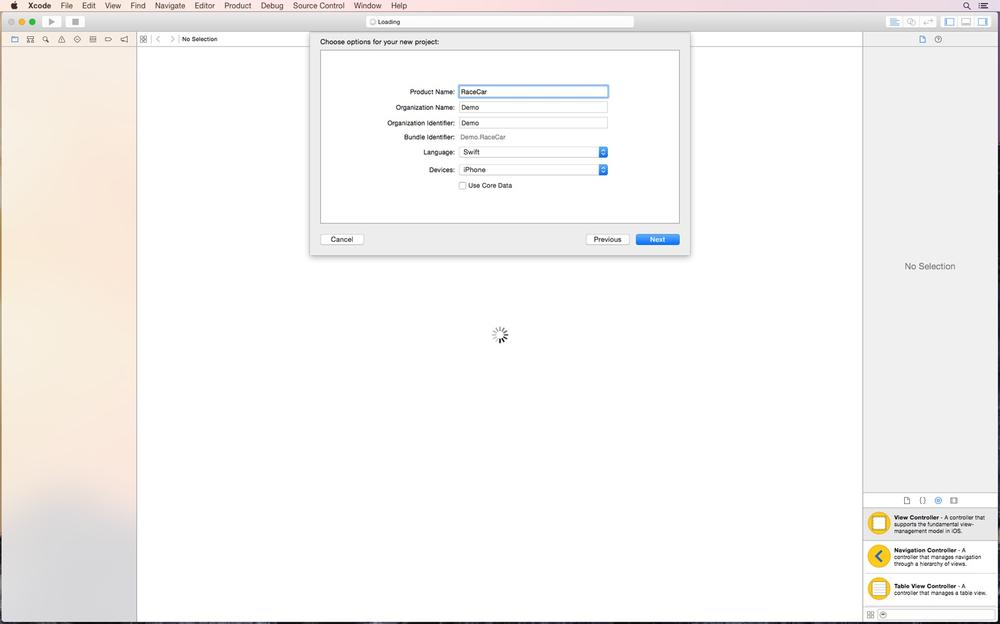
Your Organization Name and Organization Identifier should already be completed. If they are not, enter your first and last name with no spaces. Verify the Language is set to Swift and the Devices option is set to iPhone. Leave Use Core Data unselected and then click Next.
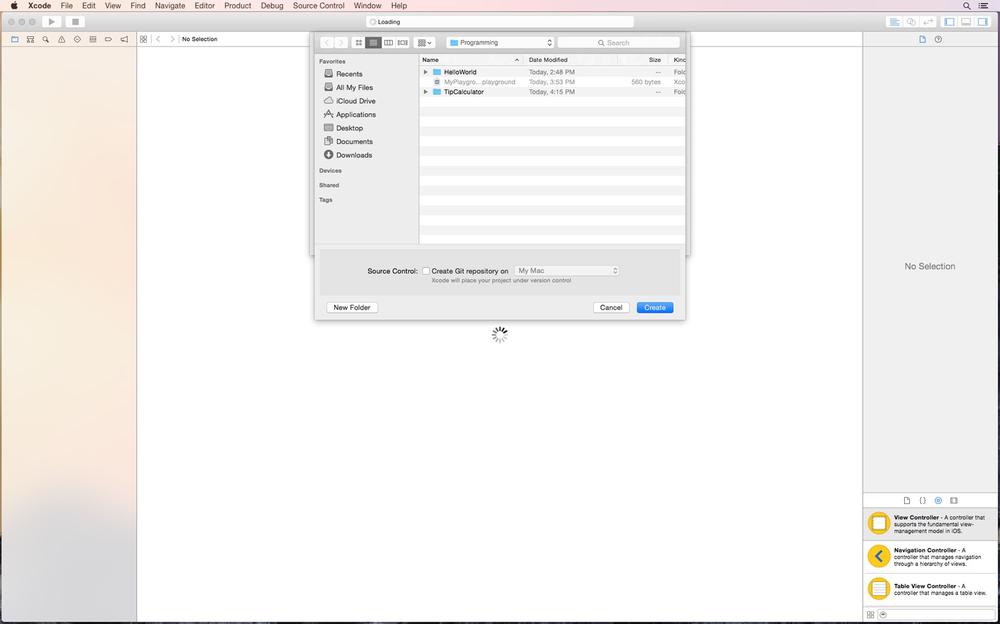
The project directory dialog box will appear (Figure 4-5). Select your Documents folder and then select the Programming folder. Leave “Create Git Repository on My Mac” unselected and click Create.
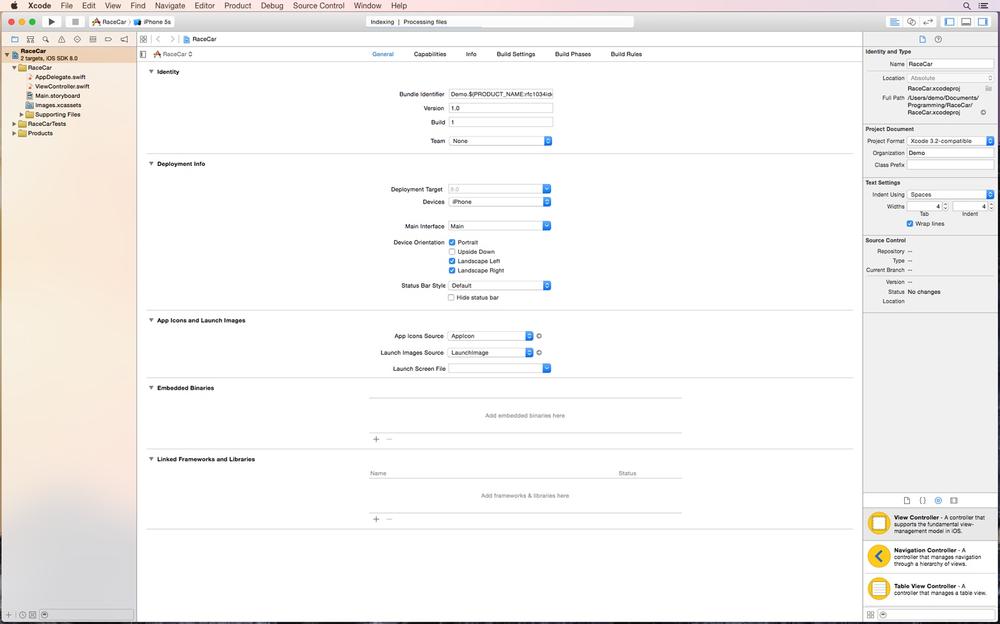
The project details screen should start to feel familiar by now (Figure 4-6). We have the Project Navigator on the left side, the Standard Editor in the middle, and the Inspector on the right side.
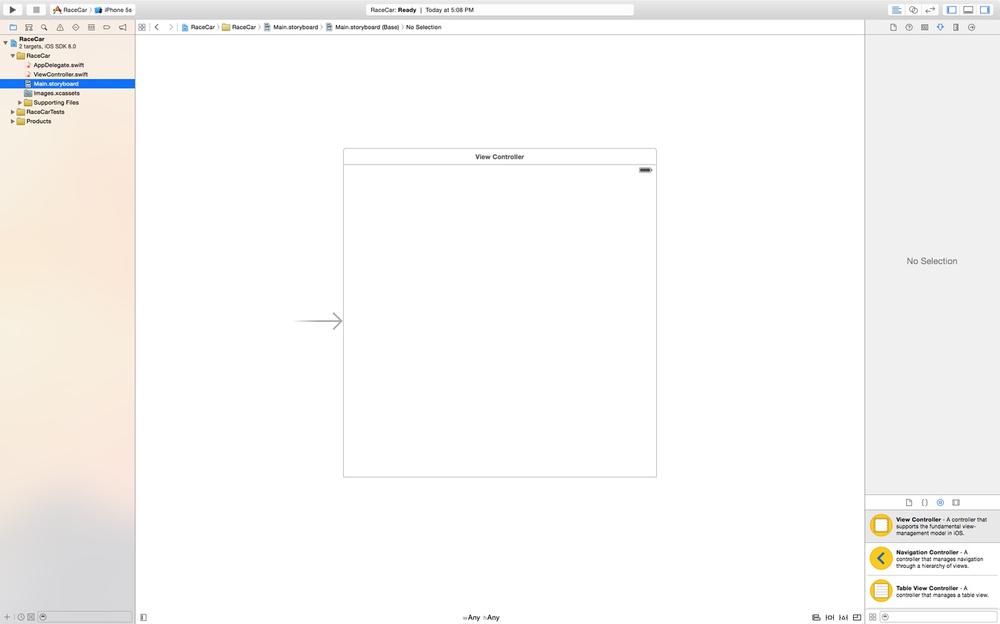
Select the Main.storyboard file from the Project Navigator. A blank interface will appear (Figure 4-7).
This app will run only on iPhone. Click the first tab at the top of the Inspector. The tab looks like a piece of paper with a folded corner. About halfway down, deselect the Use Auto Layout checkbox (Figure 4-8). A dialog box will appear, select iPhone, and then Disable Size Classes. The shape of the user interface will change. Auto Layout is used for multiple screen sizes and will be covered in Chapter 7 of this book.
Check and make sure the Inspector is visible. If it is not, click the Inspector View button in the upper-right corner of your screen. The button will turn blue with a blue stripe on the right side when it is enabled (Figure 4-9).
Click the Attributes Inspector icon at the top of the Inspector. The Attributes Inspector icon is the fourth from the left and looks like a downward arrow. Finally, select the Object Library icon on the lower Inspector toolbar. The Object Library icon is the third from the left and looks like a small circle.
Once you have the Object Library open, type Label into the Object Library search box at the bottom of the Inspector (Figure 4-10). Click and drag three Labels onto the interface. Position the three Labels vertically on the left side of the interface (Figure 4-11).
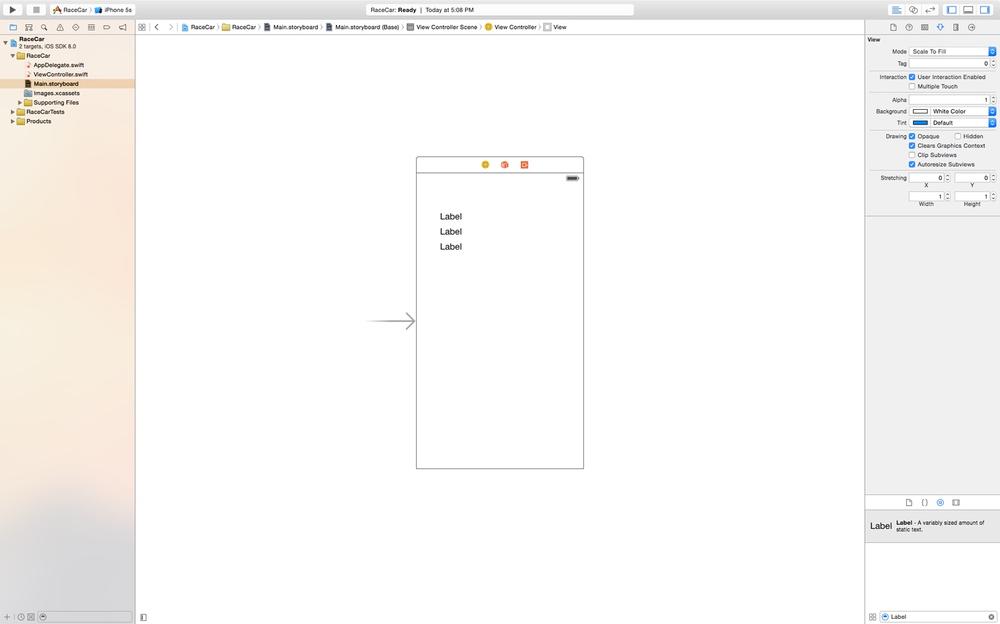
Once you have the three Labels aligned, click and draw a box around the Labels with your mouse.
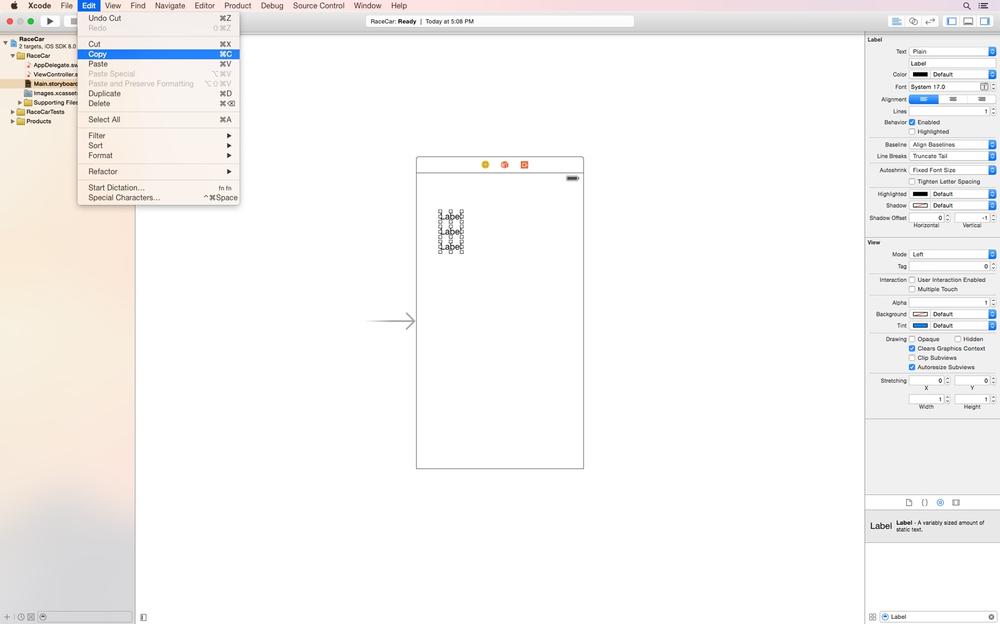
The three Labels should now all be selected (Figure 4-12). You can tell that the Labels are selected because each Label will have small white boxes surrounding it. Next, go to the top menu bar and select Edit→Copy or press Command+C (Figure 4-13).

Then go to the top menu bar and select Edit→Paste or press Command+V (Figure 4-14).
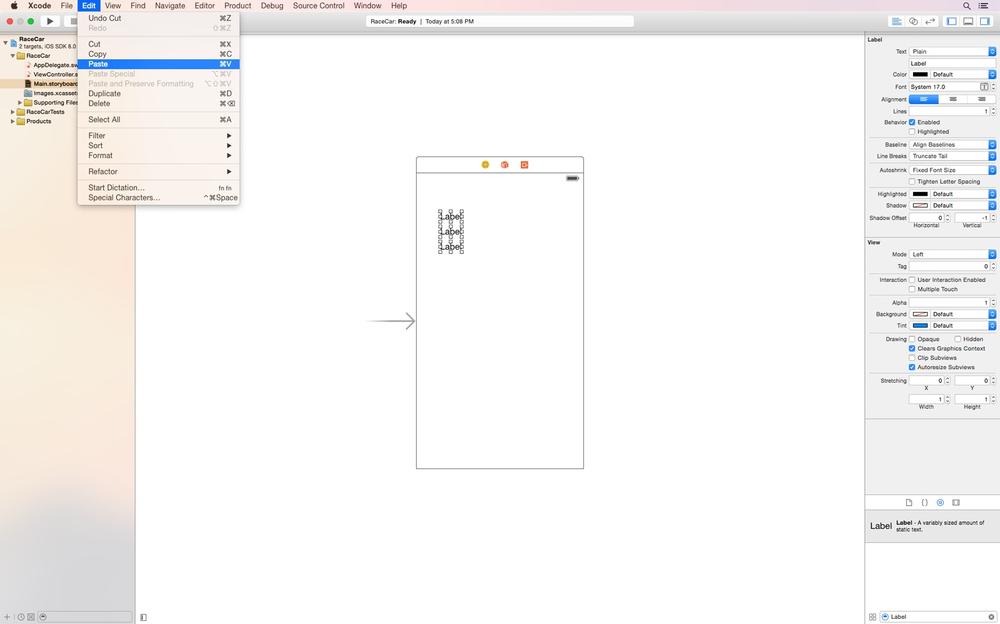
The three new Labels will be added to the interface. These new Labels will all be selected. Click the topmost new Label and drag it to the right side of the interface. The other two new Labels will follow the Label you dragged across. Ensure that each Label is lined up with a Label on the other side (Figure 4-15).
Copy and pasting elements on the interface is sometimes more convenient than dragging six Labels from the Object Library. Finally, erase the Label text inside the Object Library search box and type Button (Figure 4-16).
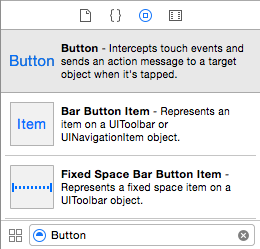
Drag a Button from the Object Library and position it in the center just below the Labels (Figure 4-17).
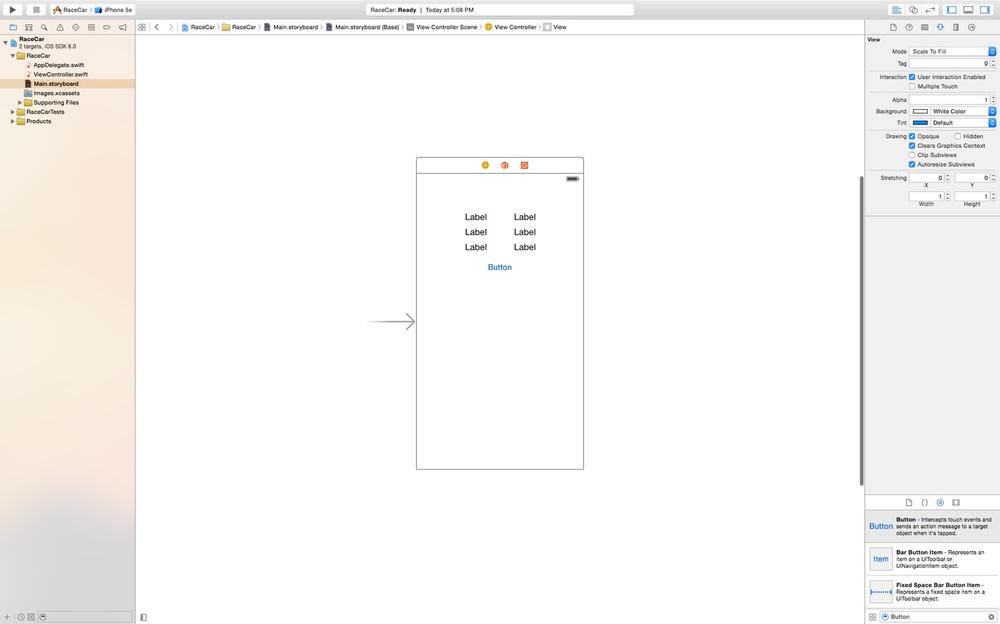
Double-click the Label in the upper-left corner of the interface. Replace the text with Brand (Figure 4-18). Double-click and change the middle Label on the left side to Color. Finally, double-click and change the bottom left Label to Top Speed. Realign the Labels as needed.
The Labels on the left will serve as descriptors for the Labels on the right. The value for each attribute of your race car will be displayed in the Labels on the right, as in Table 4-1.
Double-click each Label on the right side and set the text to ???? (Figure 4-19). Then drag the upper-right corner of each right-side label until the width is at least 60 pts.

Finally, double-click the Button and set the text to Honk. Then drag the upper-right corner of the Button until the width is at least 60 pts (Figure 4-20).
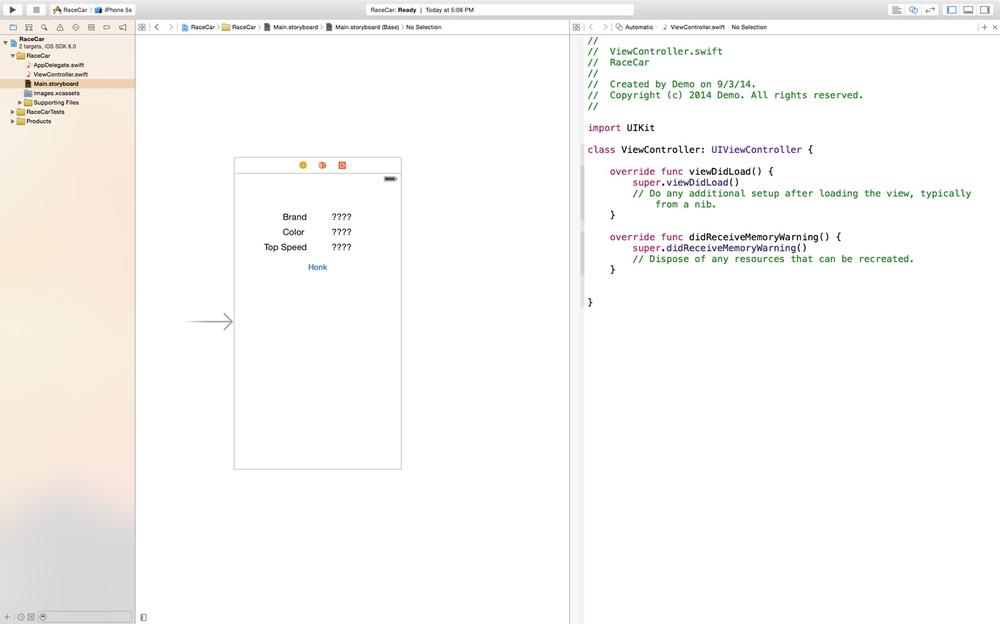
Now that your interface is complete, it is time to connect the view to the controller. In this case, the controller is ViewController.swift file. In the upper-right corner of the screen, click the Assistant Editor button. This will open the Assistant Editor on the right side of your screen (Figure 4-21).
To clean up more space, hide the Inspector by clicking the Inspector View button in the upper-right corner of your screen.
The Assistant Editor will open the ViewController.swift file automatically. You can verify this by checking the current file shown at the top of the Assistant Editor, right next to the word “Automatic.”
Not all of the elements on the interface need to be connected to the controller. There is no reason to connect an element that is static or will not change. The three Labels on the left side of the interface will not change throughout the lifetime of this app. This means you can safely leave these Labels disconnected from the controller.
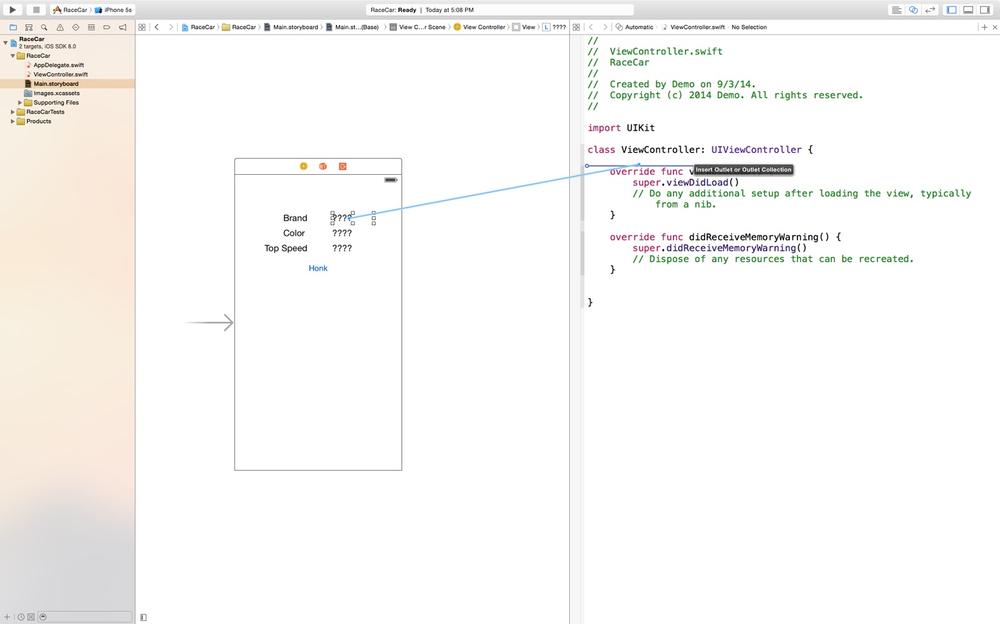
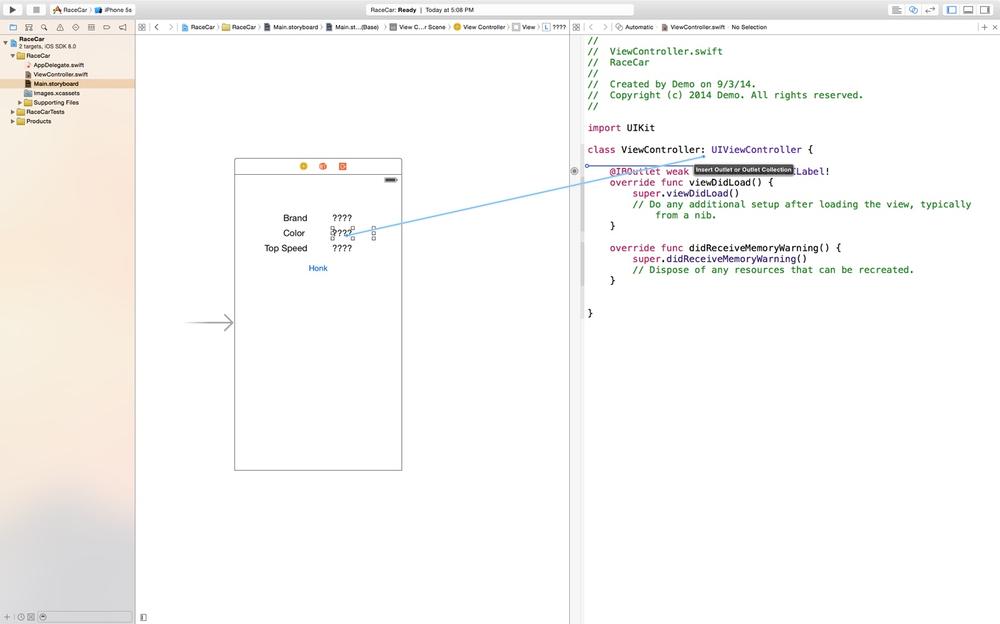
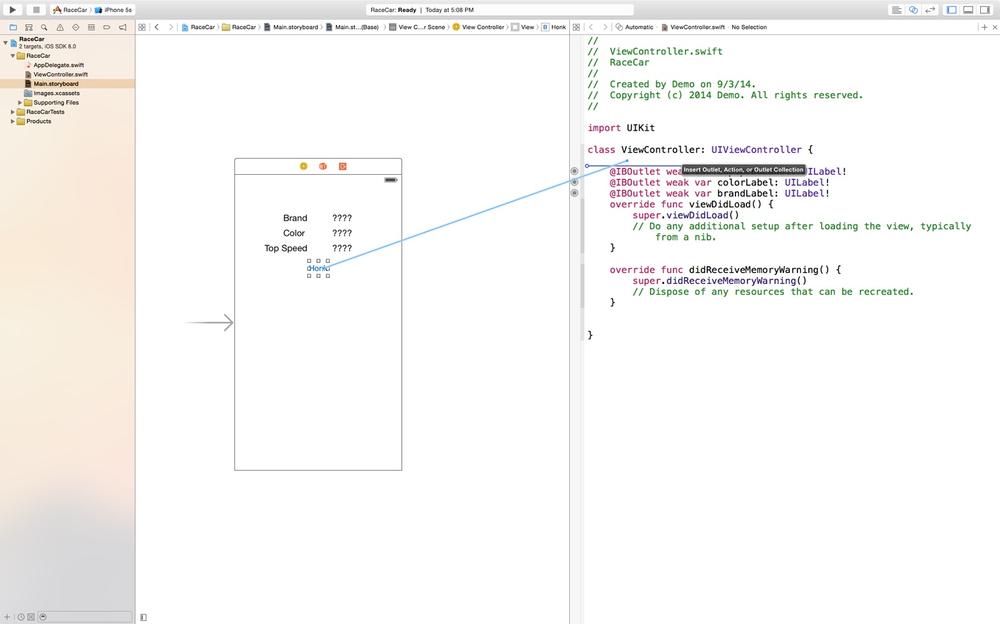
Select the upper-right Label on the interface. While holding the Control key, click and drag from the Label to just below the following words:
classViewController:UIViewController{
Release your mouse when you see a blue horizontal line (Figure 4-22); the connection dialog will be shown (Figure 4-23).
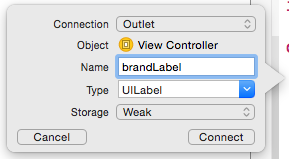
Since the element is a Label, the connection is automatically set to Outlet. Enter brandLabel for the name. Click Connect when finished.
Code was generated for you when you clicked the Connect button. Take a look at the code written by Xcode:
@IBOutletvarbrandLabel:UILabel!
The first keyword @IBOutlet is used to declare an outlet connection between the views. You know the var keyword is used to declare a variable. brandLabel is the name of your new variable, the colon is used to designate the type of variable, and the UILabel is the type. The new brandLabel variable will be used to reference the upper-right Label on the interface.
Select the middle Label on the right side of the interface. While holding the Control key, click and drag from the Label to just below the following words:
classViewController:UIViewController{
Be careful not to release your mouse while hovering over the generated code from the brandLabel. A light blue box will appear if you incorrectly hover over another Label’s code. This can cause confusing issues. Be sure to only release your mouse when you see a dark blue horizontal line (Figure 4-24). If done correctly, the connection dialog will be shown (Figure 4-25).
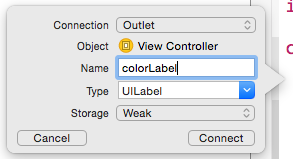
Since the element is a Label, the connection is automatically set to Outlet. Enter colorLabel for the name. Click Connect when finished.
More code was generated for you when you clicked the Connect button.
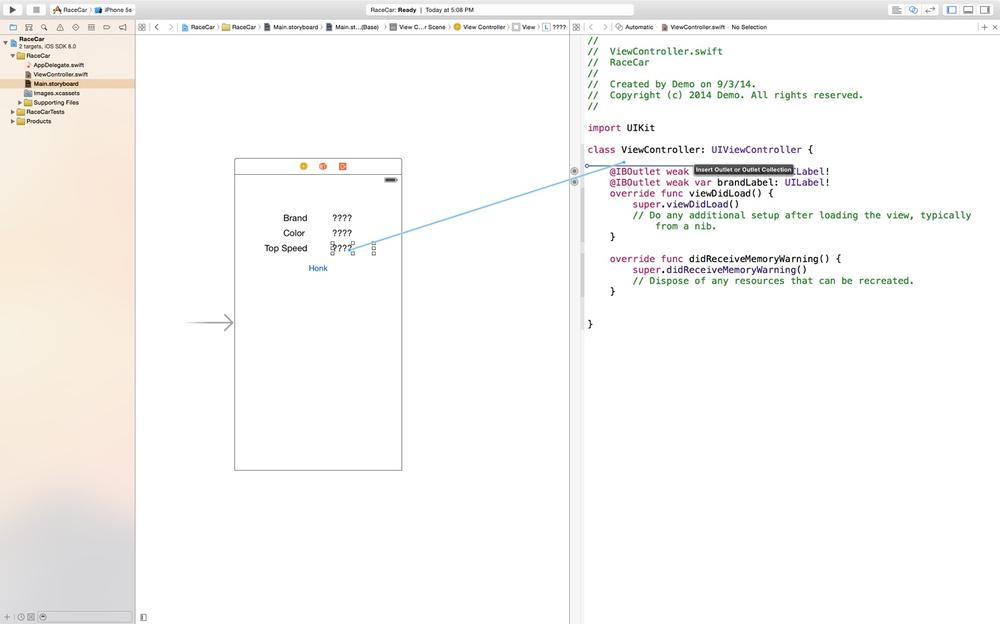
Select the bottom-right Label on the right side of the interface. While holding the Control key, click and drag from the Label to just below the following words:
classViewController:UIViewController{
Be sure to only release your mouse when you see a dark blue horizontal line (Figure 4-26); the connection dialog will be shown (Figure 4-27).
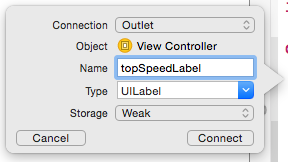
Since the element is a Label, the connection is automatically set to Outlet. Enter topSpeedLabel for the variable name. Notice the use of camel-casing. Click Connect when finished.
More code was generated for you when you clicked the Connect button.
Finally, you must connect the Button to the controller. A Button triggers an event inside the controller when the user taps it. This view to the controller connection pattern is called an action.
Select the Button in the middle of the interface. While holding the Control key, click and drag from the Label to just below the following words:
classViewController:UIViewController{
Be sure to only release your mouse when you see a blue horizontal line (Figure 4-28); the connection dialog will be shown (Figure 4-29).
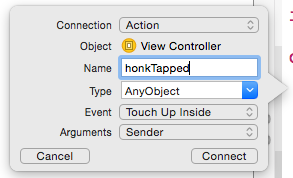
Since the element is a Button, the connection must be set to action. Click the drop-down box next to Connection and select Action. Enter honkTapped for the action name. Leave the rest of the options alone and click Connect.
Look at the generated code created for the honkTapped action. Actions generate methods, while outlets generate variables. The method honkTapped will be called each time the Button is tapped. Take a look at the code generated by Xcode:
@IBActionfunchonkTapped(sender:AnyObject){}
The @IBAction keyword is used to declare the connection as an action. The func keyword is used to declare a method. The honkTapped portion will be used to call or execute the method. The parentheses declare the parameter or input. Inside the parentheses is the variable name for the parameter followed by a colon and the type of variable. In this case, you see the type AnyObject. AnyObject is used as a placeholder for any type of object. The sender parameter created by Xcode will provide a variable pointing to the element that triggered the action. This sender parameter could be a variety of different types like a Button, a Slider, or a Segmented Control.
The user interface has been fully connected to the controller. It’s now time to turn your attention to building your very own race car. However, Apple does not provide a race car class. No problem, you can build your own custom classes with just a few clicks.
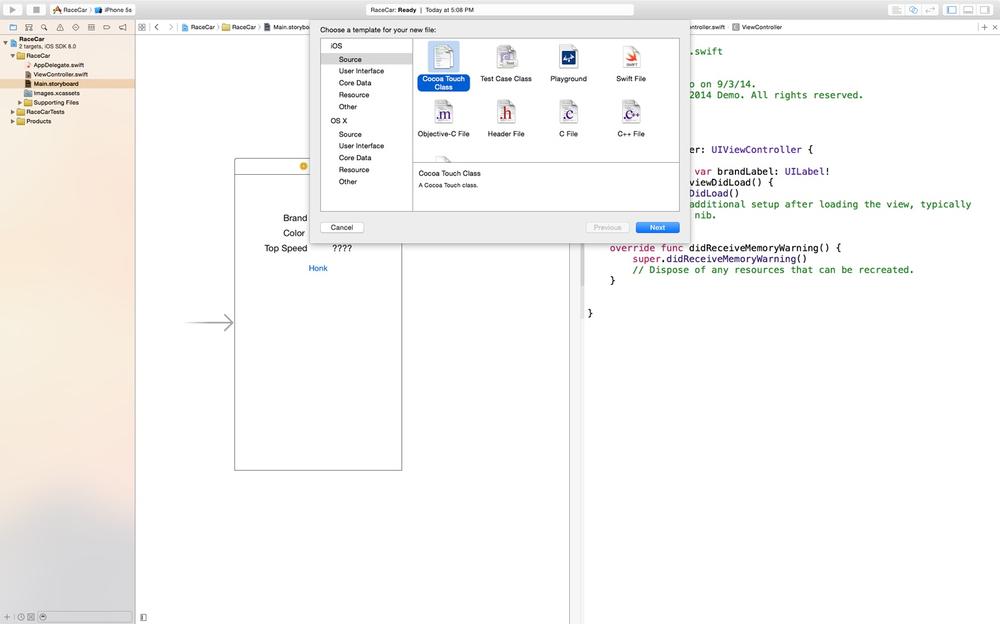
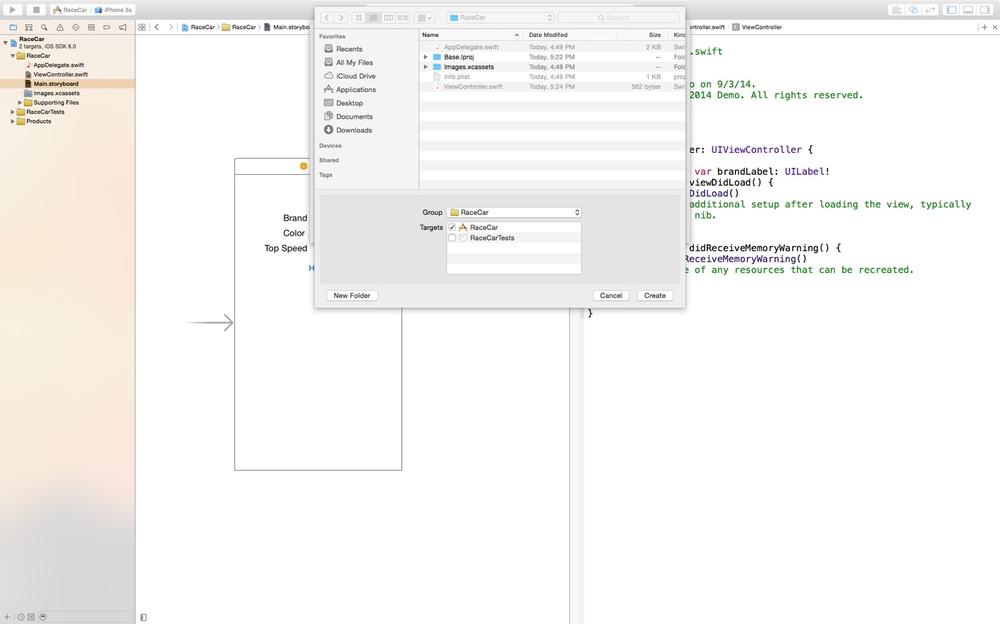
Select File→New→File (Figure 4-30).

Then select Cocoa Touch Class (Figure 4-31).
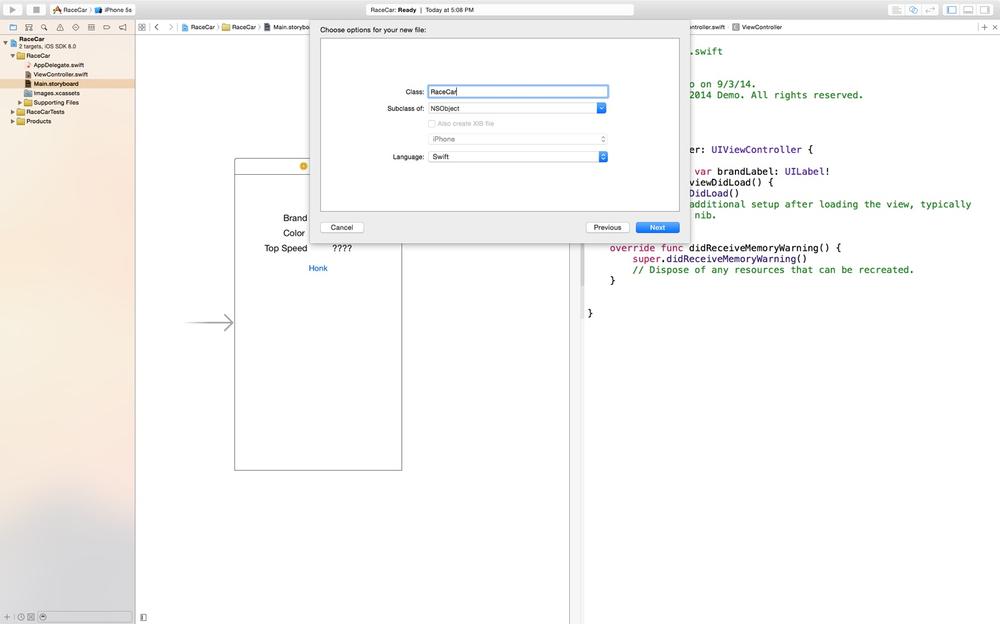
Enter RaceCar in the Class field (Figure 4-32). Set the “Subclass of:” field to NSObject. Finally, make sure Language is set to Swift. Click Next.
Xcode will now ask you where you would like to save your files. The RaceCar project directory should already be selected. If not, select the RaceCar directory inside of /Documents/Programming/RaceCar and then click Create (Figure 4-33).
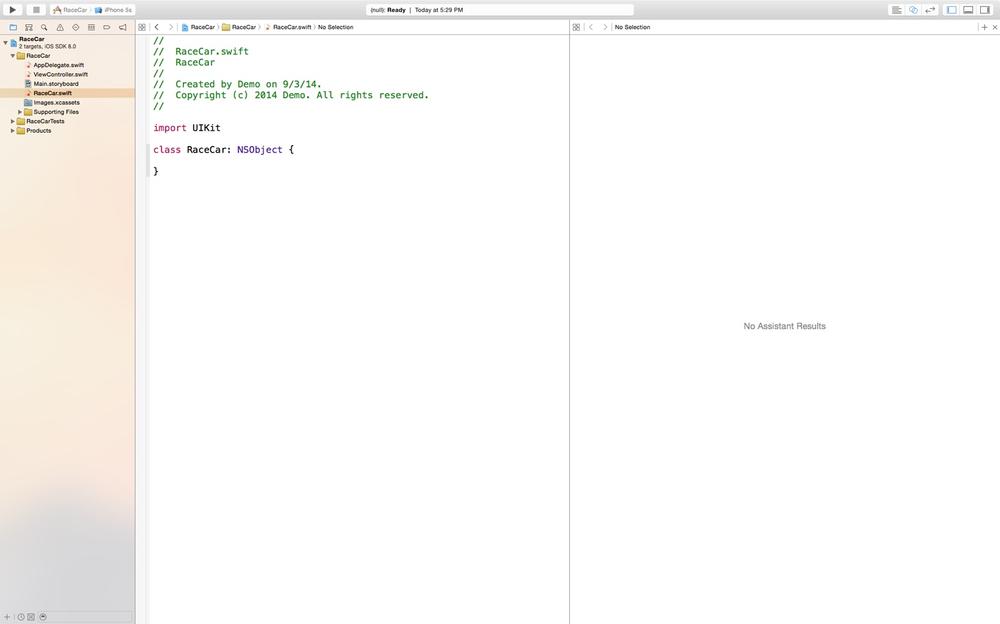
You will notice a new file selected, RaceCar.swift, in the Project Navigator. The new RaceCar class file will also be open inside the Editor (Figure 4-34).
Your RaceCar will have three properties and one method. Each RaceCar will have the following properties: brand, color, and top speed. Moreover, your RaceCar will be able to honk. When your RaceCar honks, the app will not make a noise, but instead write a message to the developer log. The developer log is a great tool to keep track of variables and events while an app is running. Users cannot see the developer log. The developer log is also a great tool to triage issues or crashes.
Create your first property for the RaceCar class:
classRaceCar:NSObject{varbrand:String="Ferrari"}
Adding a property is very similar to creating a variable. However, a property can be accessed by other objects. The var keyword is used to create the property. The property name comes after the var keyword. Next, there is a colon followed by the variable type. Finally, you set the variable equal to a default value with an equals sign and a string inside double quotes.
Add the next property to the RaceCar class:
classRaceCar:NSObject{varbrand:String="Ferrari"varcolor:String="Red"}
Add the color property with the same syntax and format used for the brand property. The property name is color, and the default value will be "Red". The name of the color will be stored using a String variable.
Finally, add the topSpeed property to the RaceCar class:
classRaceCar:NSObject{varbrand:String="Ferrari"varcolor:String="Red"vartopSpeed:Int=200}
The topSpeed property uses the same syntax but has a few different values. The type is set to Int, because it will store the top speed of the car as a whole number. Also, set the default value to 200; quotes are not used with integer values.
The properties of the RaceCar class are now complete. This means each RaceCar created will have a brand, color, and top speed. The default values for each will be set to "Ferrari", "Red", and 200.
The RaceCar objects should also honk. This behavior will be defined as a method. Add the honk method to the RaceCar class:
classRaceCar:NSObject{varbrand:String="Ferrari"varcolor:String="Red"vartopSpeed:Int=200funchonk(){println("Honk! Honk!")}}
The func keyword is used to declare the method. The honk keyword is used as the method’s name. Finally, the empty parentheses state there will not be any input or parameters for the method.
Inside the method, between the open and closed braces, is only one line of code. The println keyword will take a String parameter and write the string to the developer log. Parentheses surround the String parameter, in this case, "Honk! Honk!". When this line of code is executed, Xcode will present the message in the Debug Console.
The Debug Console, or Debugger, is typically hidden while writing code and shown when the app is running (Figure 4-35). To show the Debugger, look at the view buttons in the upper-right corner of the screen. The middle button with the dark stripe across the bottom will show and hide the Debugger.

The RaceCar class is complete. It’s now time to create a race car using the RaceCar class. Save the RaceCar class by pressing Command+S on your keyboard.
Open the ViewController.swift file by clicking on it in the Project Navigator. Hide the Assistant Editor by clicking the Standard Editor button in the upper-right corner. The Standard Editor button has a few lines and is the first from the left.
Place your cursor inside the honkTapped method and add the following code:
@IBActionfunchonkTapped(sender:AnyObject){//Create Car//Display Car//Honk Car}
Place the cursor under the //Create Car line and type the following:
varmyCar=RaceCar()
The var keyword is used to create a variable; myCar is the variable name of your new RaceCar. The equals sign is used to set the variable to the value on the right. Finally, a new RaceCar is created with RaceCar().
RaceCar() calls the RaceCar initialize method and returns a new RaceCar with default values. The initialize method was generated by Xcode. To create an object from a class, write the class name followed by a set of parentheses. In this case, there are no required parameters, so the parentheses are empty.
Now there is a new RaceCar set to the myCar variable. Place your cursor under the //Display Car comment and write the following:
brandLabel.text=myCar.brand
This line sets the brand label on the interface to the car’s brand; in this case, "Ferrari". brandLabel is the variable that represents the brand label on the interface. The dot provides access to the properties and methods of the Label. In this case, the dot is followed by the text property. The equals sign assigns myCar’s brand to brandLabel’s text property.
The myCar variable represents the new RaceCar you created. The dot provides access to the properties and methods of the RaceCar. The brand property is accessed by writing the word brand. This returns a string and the brandLabel’s text property takes a string as input.
Add the following code to the //Display Car section:
colorLabel.text=myCar.colortopSpeedLabel.text="\(myCar.topSpeed)"
You will notice the colorLabel line is very similar to the brandLabel line. The colorLabel line takes the color of the RaceCar and assigns it to the color label on the interface. In this case, the color assigned is the default value, "Red".
The topSpeedLabel line is a little different from the first two. The topSpeedLabel should be set to the RaceCar’s topSpeed value. Labels require a String variable for their text property. However, a RaceCar’s topSpeed is stored as an integer, not a string. This problem is easily solved with string interpolation.
Place the cursor under the //Honk Car line and add the following:
myCar.honk()
This line will trigger the honk method for the RaceCar. The honk method will write a message to the Debugger. myCar is the RaceCar object. The dot provides access to the properties and methods. Finally, the honk method is called with honk(). The empty parentheses are added because there are no parameters for this method.
Now it is time to see the app in action. Click the Play button in the upper-left corner of the screen. Xcode will build the code into an app and launch the iOS Simulator (Figure 4-36).
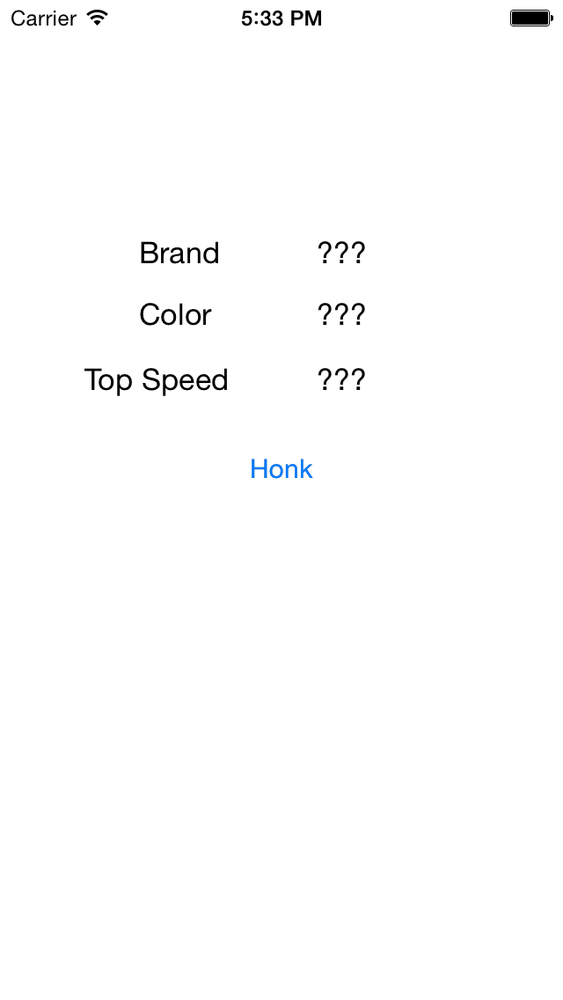
Once the app has launched, click the Honk button (Figure 4-37).
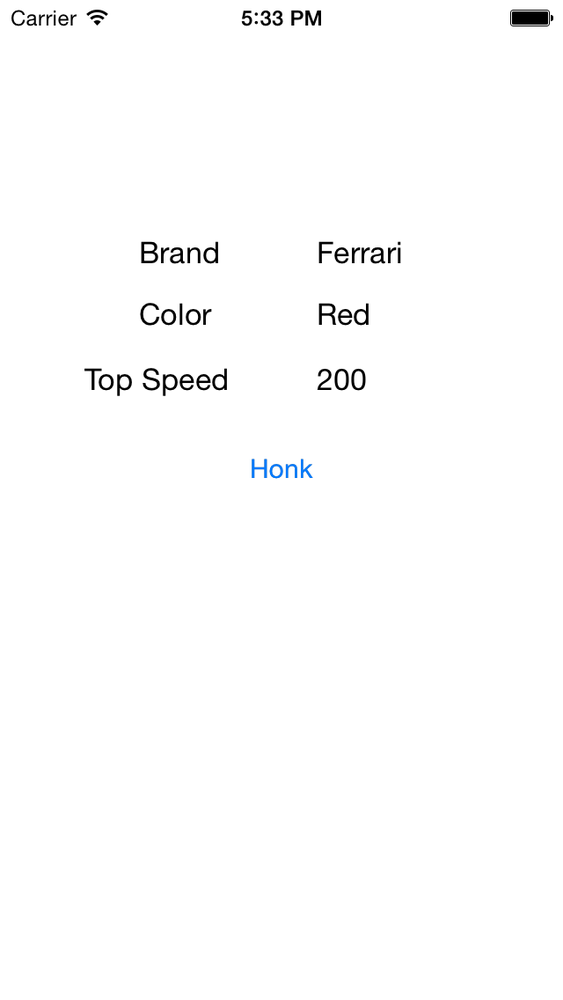
The app creates a RaceCar and displays the RaceCar’s properties in the Labels. The app also calls the RaceCar’s honk() method and writes a message to the Debugger. Look toward the bottom-right corner of your screen, and you should see the Debugger. If not, click the middle view button in the upper-right corner of the screen. The Debugger will show the message "Honk! Honk!".
Don’t worry if you received an error, a warning, or your app did not run as expected. The best way to learn is to make mistakes. Practice makes perfect. A sample version of the project is available on AppSchool.com/book. Download it, compare it, and try, try again. Don’t be afraid to start the exercise over and walk through it until you get it right.
Get Introducing iOS 8 now with the O’Reilly learning platform.
O’Reilly members experience books, live events, courses curated by job role, and more from O’Reilly and nearly 200 top publishers.

