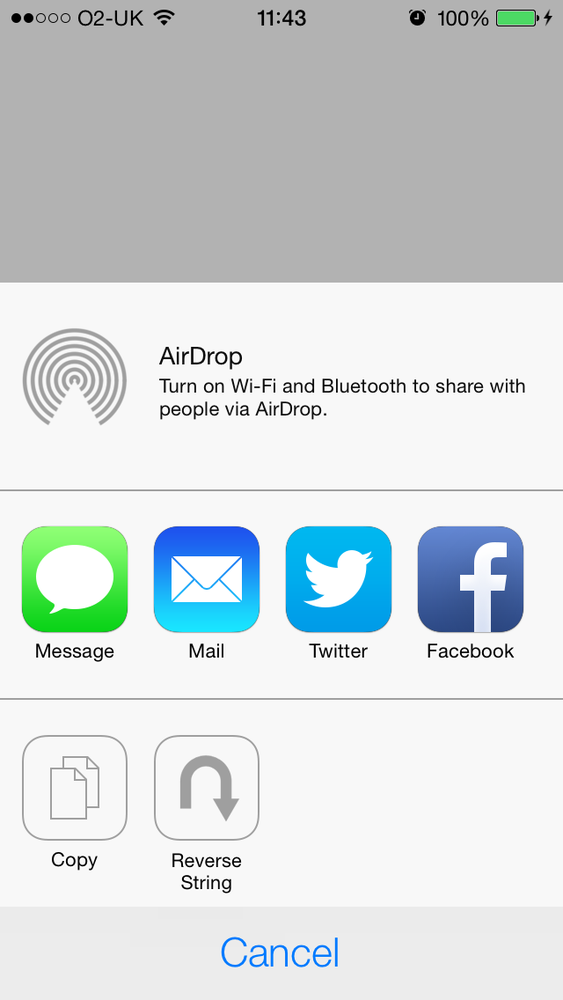
You want your app to participate in the list of apps that can handle sharing in iOS and appear in the list of available activities displayed in the activity view controller (see Figure 1-27).
You may need something like this, for example, when you have a text-editing app and when the user presses the Share button, you want a custom item that says “Archive” to appear in the activity view controller. When the user presses the Archive button, the text inside your app’s editing area will get passed to your custom activity, and your activity can then archive that text into the filesystem on the iOS device.
Create a class of type UIActivity. In other words, subclass the
aforementioned class and give a name (whatever you like) to your new
class. Instances of the subclasses of this class can be passed to the
initWithActivityItems:applicationActivities:
initializer of the UIActivityViewController class, and if they
implement all the required methods of the UIActivity class, iOS will display them in the
activity view controller.
The initWithActivityItems:applicationActivities:
method’s first parameter accepts values of different types. These values
can be strings, numbers, images, etc.—any object, really. When you
present an activity controller with an array of arbitrary objects passed
to the initWithActivityItems
parameter, iOS will go through all the available system activities, like
Facebook and Twitter, and will ask the user to pick an activity that
suits her needs best. After the user picks an activity, iOS will pass
the type of the objects in your array to the
registered system activity that the user picked. Those activities can
then check the type of the objects you are trying to share and decide
whether they can handle those objects or not. They communicate this to
iOS through a specific method that they will implement in their
classes.
So let’s say that we want to create an activity that can reverse
any number of strings that are handed to it. Remember that when your app
initializes the activity view controller through the initWithActivityItems:applicationActivities:
method, it can pass an array of arbitrary objects to the first parameter
of this method. So our activity is going to peek at all these objects in
this arbitrary array, and if they are all strings, it is going to
reverse them and then display all the reversed strings in an alert
view.
Subclass
UIActivityas shown here:
#import <UIKit/UIKit.h>@interfaceStringReverserActivity:UIActivity@end
#import "StringReverserActivity.h"@interfaceStringReverserActivity()<UIAlertViewDelegate>@property(nonatomic,strong)NSArray*activityItems;@end@implementationStringReverserActivity-(void)alertView:(UIAlertView*)alertViewdidDismissWithButtonIndex:(NSInteger)buttonIndex{[selfactivityDidFinish:YES];}
Next, override the
activityTypemethod of your activity. The return value of this method is an object of typeNSStringthat is a unique identifier of your activity. This value will not be displayed to the user and is just for iOS to keep track of your activity’s identifier. There are no specific values that you are asked to return from this method and no guidelines available from Apple, but we will follow the reverse-domain string format and use our app’s bundle identifier and append the name of our class to the end of it. So if our bundle identifier is equal tocom.pixolity.ios.cookbook.myappand our class name isStringReverserActivity, we will returncom.pixolity.ios.cookbook.myapp.StringReverserActivityfrom this method, like so:
-(NSString*)activityType{return[[NSBundlemainBundle].bundleIdentifierstringByAppendingFormat:@".%@",NSStringFromClass([selfclass])];}
The next method to override is the
activityTitlemethod, which should return a string to be displayed to the user in the activity view controller. Make sure this string is short enough to fit into the activity view controller:
-(NSString*)activityTitle{return@"Reverse String";}
The next method is
activityImage, which has to return an instance ofUIImagethat gets displayed in the activity view controller. Make sure that you provide both Retina and non-Retina versions of the image for both iPad and iPhone/iPod. The iPad Retina image has to be 110×110 pixels and the iPhone Retina image has to be 86×86 pixels. Obviously, divide these dimensions by 2 to get the width and the height of the non-Retina images. iOS uses only the alpha channel in this image, so make sure your image’s background is transparent and that you illustrate your image with the color white or the color black. I have already created an image in my app’s image assets section, and I’ve named the image “Reverse,” as you can see in Figure 1-29. Here is our code, then:
-(UIImage*)activityImage{return[UIImageimageNamed:@"Reverse"];}
Implement the
canPerformWithActivityItems:method of your activity. This method’s parameter is an array that will be set when an array of activity items is passed to the initializer of the activity view controller. Remember, these are objects of arbitrary type. The return value of your method will be a Boolean indicating whether you can perform your actions on any of the given items or not. For instance, our activity can reverse any number of strings that it is given. So if we find one string in the array, that is good enough for us because we know we will later be able to reverse that string. If we are given an array of 1,000 objects that contains only 2 strings, we will still accept it. But if we are given an array of 1,000 objects, none of which are of our acceptable type, we will reject this request by returningNOfrom this method:
-(BOOL)canPerformWithActivityItems:(NSArray*)activityItems{for(idobjectinactivityItems){if([objectisKindOfClass:[NSStringclass]]){returnYES;}}returnNO;}
Now implement the
prepareWithActivityItems:method of your activity, whose parameter is of typeNSArray. This method gets called if you returnedYESfrom thecanPerformWithActivityItems:method. You have to retain the given array for later use. You don’t really actually have to retain the whole array. You may choose to retain only the objects that you need in this array, such as the string objects.
-(void)prepareWithActivityItems:(NSArray*)activityItems{NSMutableArray*stringObjects=[[NSMutableArrayalloc]init];for(idobjectinactivityItems){if([objectisKindOfClass:[NSStringclass]]){[stringObjectsaddObject:object];}}self.activityItems=[stringObjectscopy];}
Last but not least, you need to implement the
performActivitymethod of your activity, which gets called when iOS wants you to actually perform your actions on the list of previously-provided arbitrary objects. In this method, basically, you have to perform your work. In our activity, we are going to go through the array of string objects that we extracted from this arbitrary array, reverse all of them, and display them to the user using an alert view:
-(NSString*)reverseOfString:(NSString*)paramString{NSMutableString*reversed=[[NSMutableStringalloc]initWithCapacity:paramString.length];for(NSIntegercounter=paramString.length-1;counter>=0;counter--){[reversedappendFormat:@"%c",[paramStringcharacterAtIndex:counter]];}return[reversedcopy];}-(void)performActivity{NSMutableString*reversedStrings=[[NSMutableStringalloc]init];for(NSString*stringinself.activityItems){[reversedStringsappendString:[selfreverseOfString:string]];[reversedStringsappendString:@"\n"];}UIAlertView*alertView=[[UIAlertViewalloc]initWithTitle:@"Reversed"message:reversedStringsdelegate:selfcancelButtonTitle:@"OK"otherButtonTitles:nil];[alertViewshow];}
We are done with the implementation of our activity class. Now let’s go to our view controller’s implementation file and display the activity view controller with our custom activity in the list:
#import "ViewController.h"#import "StringReverserActivity.h"@implementationViewController-(void)viewDidAppear:(BOOL)animated{[superviewDidAppear:animated];NSArray*itemsToShare=@[@"Item 1",@"Item 2",@"Item 3",];UIActivityViewController*activity=[[UIActivityViewControlleralloc]initWithActivityItems:itemsToShareapplicationActivities:@[[StringReverserActivitynew]]];[selfpresentViewController:activityanimated:YEScompletion:nil];}@end
When the app runs for the first time, you will see something similar to Figure 1-30 on the screen.
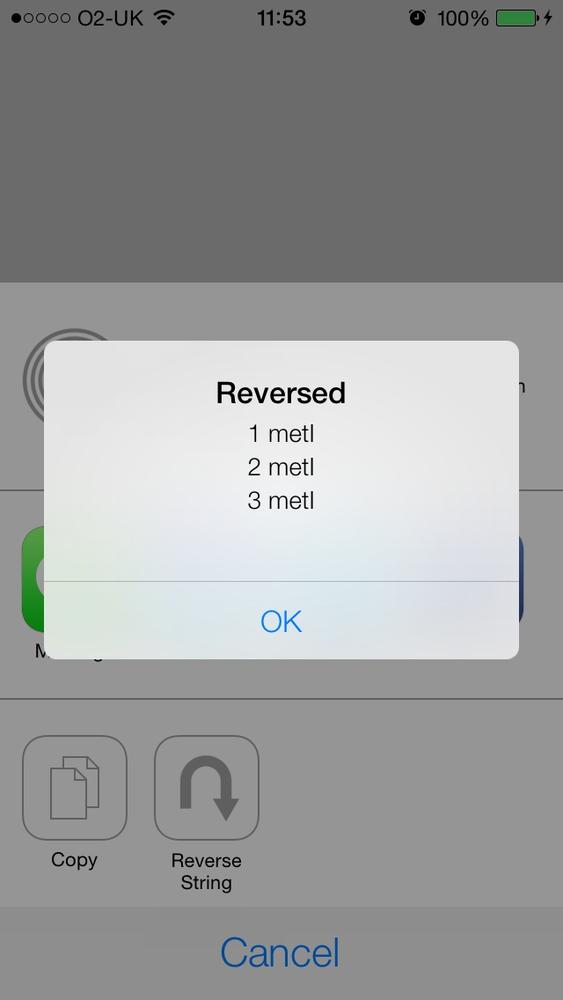
If you now tap on the Reverse String item in the list, you should see something similar to that shown in Figure 1-31.
Get iOS 7 Programming Cookbook now with the O’Reilly learning platform.
O’Reilly members experience books, live events, courses curated by job role, and more from O’Reilly and nearly 200 top publishers.


