Your Mac is now set up to create iPhone applications, so you're ready to start making your first one. The best part is that you're not going to write any code. How can you develop without writing code? It's possible with the timesaving power of Xcode templates and Interface Builder.
If you're an experienced developer, this way of working can present a challenge. If you're used to working in Visual Studio, Eclipse, or some other environment, your first encounter with Xcode can be a bit daunting. Besides working on a new operating system, you're also going to be dealing with new project layouts, keyboard shortcuts, and preferences. Don't worry, all of the tools you're used to having are still there, it's just a matter of time before you become comfortable using Xcode's version of them.
In this section, you'll go through all of the phases of creating an iPhone app, from creating a project file with Xcode to running it in the iPhone Simulator. You'll also take a peek at the Interface Builder application that lets you modify the user interface.
The first phase of creating an iPhone app is setting up a Project file. This file keeps track of the information Xcode uses to build your application. It's where you manage your source code, user interfaces, frameworks, and libraries. Think of it as a parts list for your application.
In your Hard Drive→Developer→Applications folder, double-click the Xcode icon to start the application. (It's at the bottom of the list.)
The tricky part is that Xcode isn't in your normal Applications folder. The installer puts it in the Developer→Applications folder. To make it easier to return to Xcode later, store its icon in your Dock.
In the Dock, Control-click the icon and choose Options→Keep in Dock.
From then on, you can launch Xcode by simply clicking the Dock icon.
Once Xcode is running, you'll see its Welcome window, as shown in Figure 1-6.
Tip
If you close the Welcome window by accident, you can reopen it by choosing Help→Welcome to Xcode.
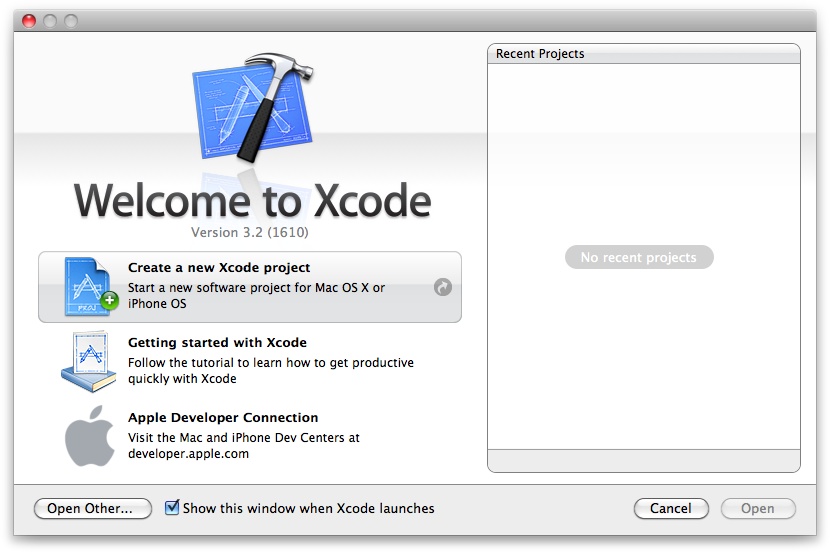
Figure 1-6. The Xcode launch window. As you create new projects with Xcode, you see them listed on the right. Click the "Create a new Xcode project" button to start your first iPhone application. The "Getting started with Xcode" button opens the documentation viewer and displays a helpful overview of Xcode. The last button is a convenient link to the Dev Centers for the Mac and iPhone.
Click the big "Create a new Xcode project" button.
The New Project window opens (Figure 1-7), showing you a choice of template categories. In Xcode, a template is a predefined set of source code files, libraries, frameworks, and user interface elements that you use to create different styles of applications.
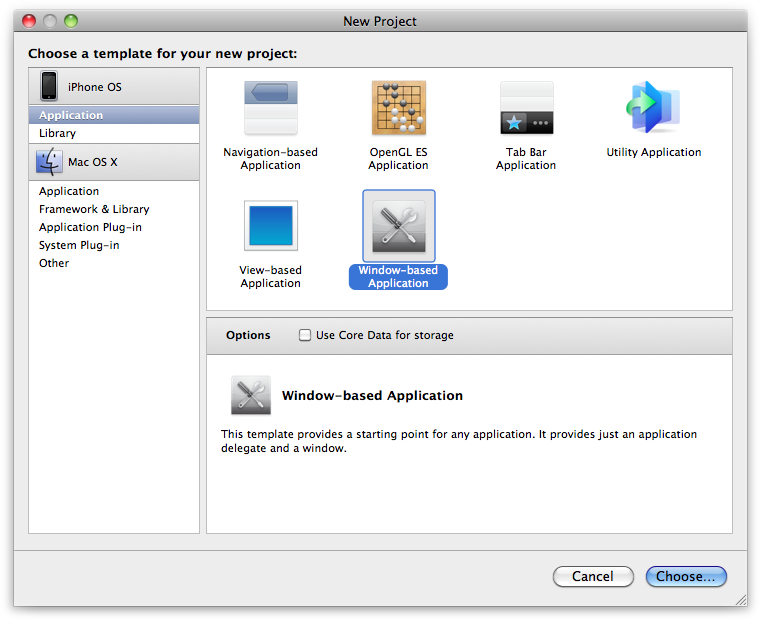
Figure 1-7. The Xcode New Project window lists all of the templates you can use to get a quick start. When you're starting out with a new application, select the template that best describes the style of user interface you want. When selected, each template displays a short description. Some templates even include options, like the one shown here to "Use Core Data for database storage".
Since you're creating an iPhone application, under the iPhone OS group in the upper-left corner, choose Application and take a look at the available templates.
Your choices come in the following categories:
Navigation-based Application. These applications have a "drill-down" style interface, like the iPhone Mail application.
OpenGL ES Application. Games that draw objects in a 3-D space use this template.
Tab Bar Application. This style of application uses a tab bar at the bottom of the screen to switch views. Apple's iPod application is a great example of this user interface style.
Utility Application. These applications generally present a simple interface, with a front view containing information and a back view for configuring the information. The built-in Weather app uses this metaphor.
View- and Window-based Applications. Turn to these templates when your application combines elements of the previous four styles. Think of them as bare-bones templates that you can customize to your own needs.
For your Flashlight app, you're going to use the Window-based Application template. Since the application only uses a single window, this basic template is all you need. A nice side effect of using this customizable template is that it creates fewer files for the project. In effect, you have a shorter, simpler parts list.
Click Window-based Application and then click Choose. Leave the Use Core Data checkbox unchecked since a flashlight doesn't need a database.
A save file dialog box appears so you can indicate a name and location for your project's folder (Figure 1-8).
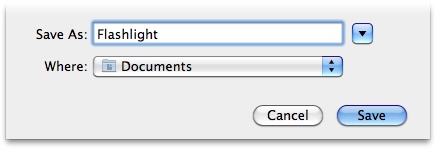
Type Flashlight for the project name, and choose the Documents folder from the bottom pop-up menu.
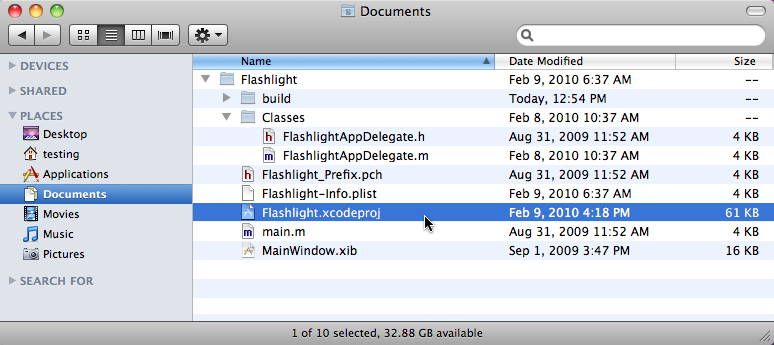
As shown in Figure 1-9 the folder you've just created in the Finder contains everything you need to build your application, including the main project file Flashlight.xcodeproj.
Figure 1-9. When you create a project with Xcode, it creates a folder of files used to build your application. The most important one is the .xcodeproj file—you can double-click this file to open the project in Xcode. Also, since you're creating a window-based app, Xcode starts you out with a file called MainWindow.xib. You'll learn more about the other files and folders in upcoming chapters.
Xcode creates this project folder behind the scenes. You may never in your Xcode career interact directly with files or folders. Instead, you can rely on Xcode to manage everything for you. But you still need to know where the folder is so you can back up your work.
Tip
As you get more advanced with Xcode, you may want to put your projects in folders of their own within your Home folder. Many developers create a Projects folder that contains nothing but their Xcode folders. Just as the Pictures, Movies, and Music folders make it easier to manage your media, a Projects folder makes it easier to manage your software.
After Xcode finishes creating the new project, it displays the files in a project window, as shown in Figure 1-10.
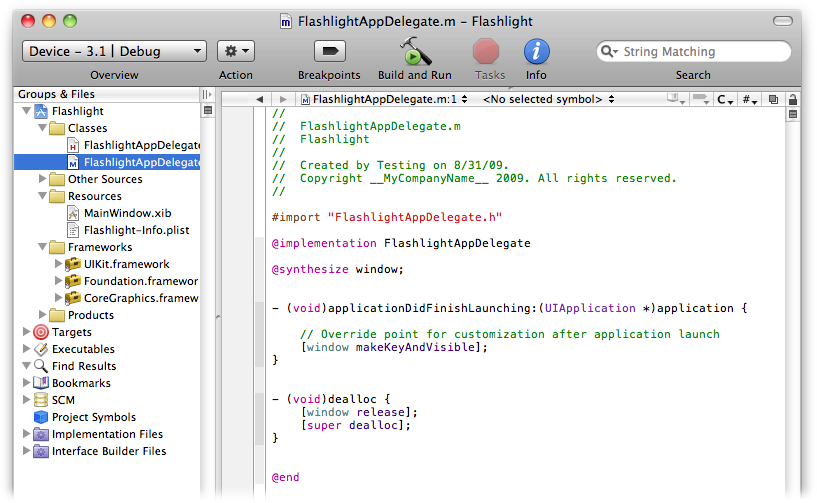
Figure 1-10. The Xcode project window. On the left are the project's groups and files, and on the right is the source code editor. Although the yellow group icons look like folders, they're not the same as the blue ones you see in the Finder. You can rename the Classes group and not affect the folders on disk. Likewise, you won't find a Resources folder in the Finder, but the group is a great way to organize files that aren't source code.
The Groups & Files panel on the left side of the project window lists the individual files that make up your application. To go back to the parts list metaphor, each group contains parts of a similar type. Here are a few of the most important groups:
The editor part of the window (the big white area in the lower right) shows the code that runs when the application finishes launching. In this simple example, the code makes a window object visible and able to respond to taps.
You'll learn more about these important groups and the source code in the next chapter. Remember: Your goal in this chapter is to build an app without writing any code!
You've gathered all the parts, and now it's time to assemble them. Unlike toys on Christmas Eve, Xcode projects are easy to put together. Thanks to the template, all you have to do is initiate the Build command, and Xcode takes all of the source code, resources, and frameworks and combines them into an executable file that can run on the iPhone.
Make sure that the pop-up menu in the upper-left corner of your project window is set to Simulator and Debug (the exact wording on the menu will change depending on which version of the iPhone SDK you're using). Then choose Build→Build, as shown in Figure 1-11.
After a short wait, you should see "Build succeeded" in the status bar, at lower left.
Note
Xcode's status bar, which runs along the bottom of the window, is an important information source. As you perform various tasks, this area keeps you posted on their progress. It's the first place you should look when you're wondering what's going on.
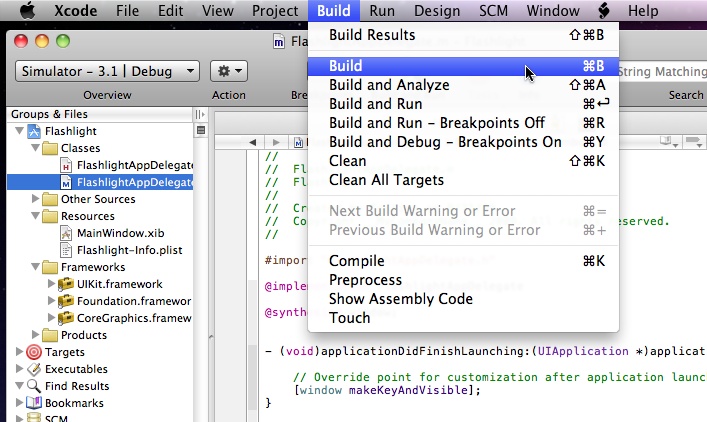
Figure 1-11. Building your iPhone application. Note that the Overview menu is set to the Simulator and Debug. The keyboard combination ⌘-B is a handy shortcut to build the project after you've made a change to the source code.
Once you've built your app, you can run it on your iPhone. Or better yet, run it on your Mac. That's right. If you're like most developers, you'll run your iPhone apps on the Mac about 90 percent of the time. Apps launch faster on the Mac than on the iPhone, and they're easier to debug on the Mac when problems occur.
Note
Don't discount that last 10 percent. Running your app on an actual device is extremely important: You'll learn why when design issues are discussed in Chapter 4.
When you develop an iPhone app, you'll probably run it on your Mac to test and debug it before it ever gets near an iPhone.
So how do you get an iPhone onto your Mac? It's easy: Make sure Simulator is selected in the Overview menu, and choose Run→Run. Since you have Simulator selected, Xcode uses a simulation of the iPhone to run your app.
Keep an eye down on the status bar. You'll see "Installing Flashlight in Simulator" displayed, and eventually, "Flashlight launched". Soon after, a giant iPhone appears on your desktop, and it's running your Flashlight application (Figure 1-12). Congratulations!
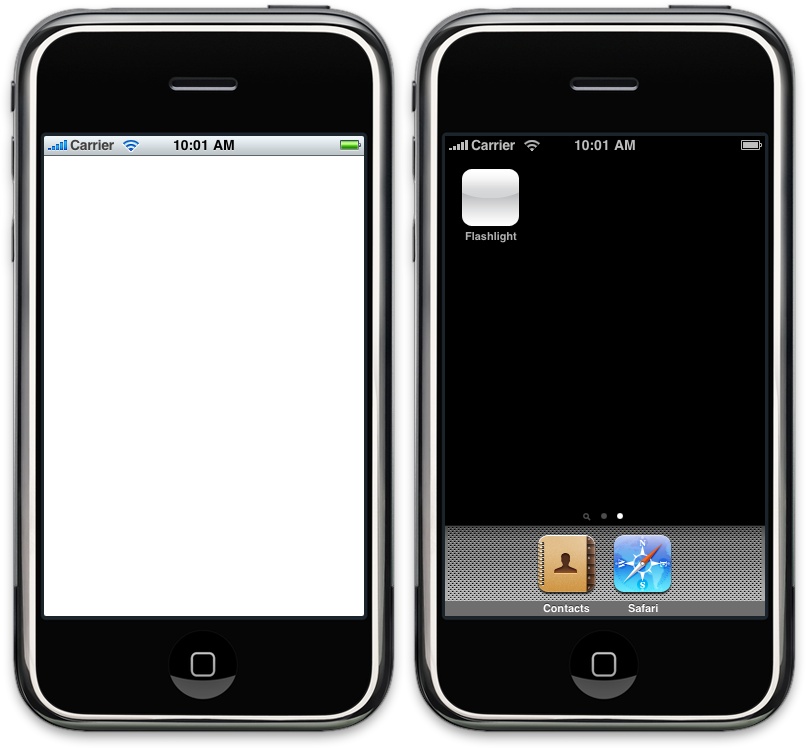
Figure 1-12. In the iPhone Simulator, the image on the left shows the application running, and the one on the right shows the application's icon on the home screen. It won't fit in your pocket, but the simulator acts just like a real, live iPhone.
Tip
You can do everything you've done in this section and the previous one with a single keystroke. Pressing ⌘-Enter builds and runs your application (in the simulator) in one step. When you get into the thick of iPhone app development, you'll be pressing these keys in your sleep.
So what does this giant iPhone do? It's called the iPhone Simulator, and it behaves like the device in your pocket, except:
It's hundreds of times faster.
It has as much memory as your Mac.
The network is much more reliable.
It has a larger display.
It doesn't sync with iTunes over a USB cable.
Touching the simulator screen has no effect.
In reality, this big phone sitting on your desktop has very different hardware specifications than the one you're used to. But once you get used to keeping your fingers off the screen, you'll end up loving the simulator. It makes your life as a developer so much easier because it does one important thing: it lets you test your code without having an iPhone plugged into your Mac. The box on Simulating Reality shows you how to get the most out of this important tool.
When you click the Home button, you see a screen with the applications installed by Xcode. Since you only have one at this point, all you'll see is the Flashlight app. Drag your mouse to swipe between the pages of applications. Many of the applications you're used to seeing on your iPhone have gone missing, but you'll still be able to use Photos, Contacts, Settings, and Safari while testing. Clicking an app's icon launches it in the Simulator just as it would on a real device.
So now that you have a running application, you notice that the white light makes it look like every other flashlight app in iTunes. You need a better color for the light—a way to stand out in the crowd. How are you going to do that without breaking the "no code" rule? The answer is simple: Interface Builder.
Xcode works hand-in-hand with Interface Builder to create your app's user interface (UI). You create objects like windows and buttons with this tool and then drop them into your code. When you created the project from a template, Xcode created a file containing these objects automatically.
To get an idea of how easy this method is, open your Flashlight app's UI. From the main project window, open the Resources group by clicking the disclosure triangle, and double-click the MainWindow.xib file. Interface Builder opens (you'll see it bouncing in the Dock). Once it's open, you're ready to start working on your UI (Figure 1-13).
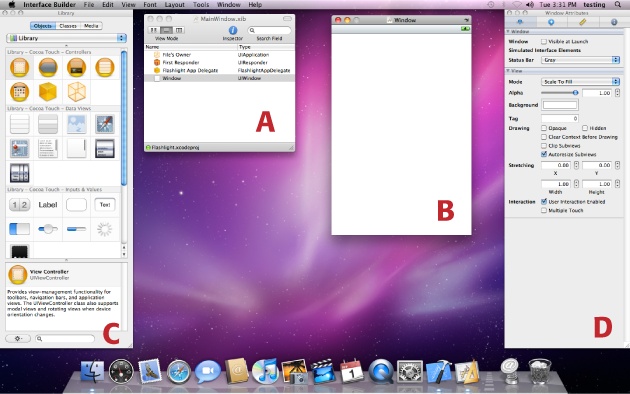
Figure 1-13. Interface Builder and its many windows take up much of your display. In the middle are the .xib document (A) and the window displayed in the iPhone app (B). To the left is the library of user interface elements where buttons, windows, and other user interface components can be accessed (C). A property inspector for the objects in the interface is displayed on the right (D).
The main document window is MainWindow.xib. To change the View Mode, use the three buttons in the upper-left corner. The buttons work much like they do in the Finder: the leftmost displays icons, the center a list, and the right one shows columns. The list view (which you can see in Figure 1-13), is more compact and easier to read (especially with longer names).
The Library window, at far left, contains a list of all the interface objects you can use in your design. You'll learn about these objects in detail in Chapter 3.
To start modifying the Flashlight's UI, double-click the Window item in the list in MainWindow.xib. The app's window opens to the right of the main document window and gives you the opportunity to modify the color. Start thinking about your favorite color!
At the far right is the Property Inspector. You'll use this window often as you refine your UI. Currently, it's showing Window Attributes because you're working with a window. The inspector is split into four main sections, which you choose from the tabs at the top. Each section lets you adjust various aspects of each object:
Attributes. The object's particular settings. Behind the scenes, these items set properties and attributes for the object to save you from writing code (although you can still write the code manually if necessary).
Connections. The connections define how your source code accesses the UI objects. For the Flashlight app, you'll see that "window" is connected to "Flashlight App Delegate".
Size. This panel lets you define the selected object's geometry. For example, the window's width and height is 320 x 480 (the size of the iPhone's screen).
Identity. This view shows what kind of object is defined. The app's window has a class of UIWindow.
Tip
To manage Interface Builder's many windows, you'll find that keyboard shortcuts make short work of finding the information you need. You can access the main document window by pressing ⌘-0, and you can switch to each section of the inspector with ⌘-1 through ⌘-4. Use Shift-⌘-L to bring up the Library window.
If you don't fully understand what's going on here, don't worry. You'll learn everything there is to know about classes, objects, and instances in the next chapter.
Note
If you've used other development environments, leave your preconceptions about how Interface Builder works at the door. Instead of automatically generating code to display the UI from resources, the .xib file contains an XML representation of the actual object instances and hierarchy. When you load a file, Interface Builder creates an object graph in memory and connects it to the instance variables that you've chosen. We'll go into greater detail about how this works in Chapter 3.
Now that you've had a little tour of Interface Builder, you can modify your flashlight's UI. Make sure that Window is selected in the MainWindow.xib document and that the Property Inspector is on the first panel (for modifying attributes).
Have you picked your favorite color yet? Time to change the background color of the window by clicking the Background color picker. Then click a nice color for the light in the color wheel (Figure 1-14). A soothing shade of yellow, for example.
The window preview updates immediately as you select colors. As your UI develops, you'll really appreciate this quick feedback: you don't have to build your app to see how a change will look, and that saves a lot of time.
Choose File→Save to update your MainWindow.xib file. Get in the habit of saving after tweaking your UI, and remember to check for the "modified" dot in the document's close box if your changes aren't working right. The last thing you want is to waste time debugging a user interface bug because you forgot to save the file.
Now switch back to the Xcode project window for the Flashlight, and select Build→Build and Run.
Note
If you see a window pop up with a warning to Stop Executable, just click OK. Xcode is just reminding you that you already have an application running in the simulator.
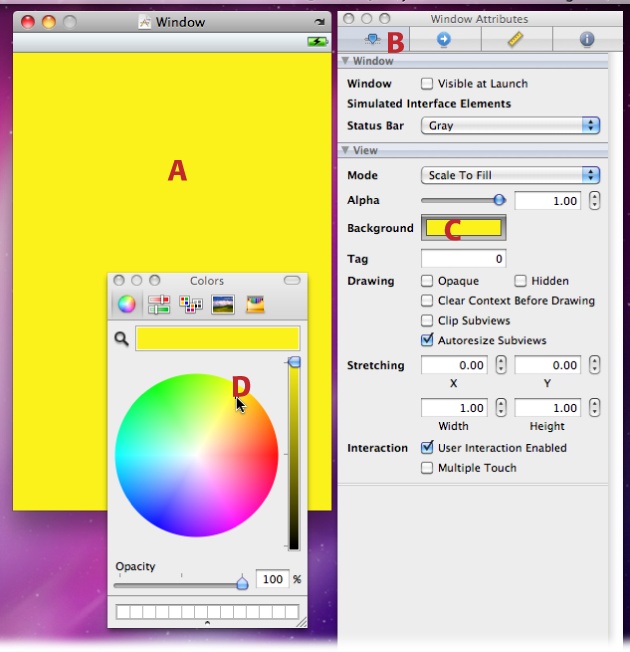
Figure 1-14. Changing your application window's background color involves clicking a color wheel. After selecting the Window in the MainWindow.xib document (A), you view the attributes (B), which include a background color. Clicking in the well (C) brings up a color wheel (D) where you can select a new color with your mouse. As you select new colors, you get immediate feedback.
You've just made your first iPhone application and customized it to fit your own tastes. Well done!
Now that the journey is complete, read on to look at some details for things you saw along the way.
Get iPhone App Development: The Missing Manual now with the O’Reilly learning platform.
O’Reilly members experience books, live events, courses curated by job role, and more from O’Reilly and nearly 200 top publishers.

