Now that you're up to speed with the language and frameworks used to create applications on the iPhone, you're ready to start coding, right? Wrong!
You may have years of experience developing applications for the desktop or Web, but the iPhone is a radical new platform running on a mobile device. Understanding how one or more fingers work with your user interface takes time. Assumptions based on how applications work in a controlled work environment change when you move into a chaotic mobile environment. These big differences also mean that the tools you'll use to design your app will change.
This chapter will introduce you to some of the unique elements of iPhone design. You'll also learn about a decision process that helps you come to terms with this new platform. And once you've gone through that process, you'll see how to start thinking about the code that will implement your ideas.
You'll find a lot more to developing iPhone applications than just writing code. In this section, you'll learn what's different about designing iPhone software, how to create effective user experiences, how to start visualizing your ideas, and what tools will help during the design process.
If you made it through the last two chapters unscathed, you're probably not someone who does design for a living. And that's just fine, because this section isn't about drawing things that are pretty. It's about making things that work pretty.
Many developers think a designer is someone who comes in at the end of a project and cleans up graphicsâsomeone who can take all of those ugly images you created as placeholders and update them before you ship the product.
Designers can certainly do these things, but you're selling them short if that's all you ask them to do. Great designers will help you determine what the product should do by providing the perspective of someone who's not intimately involved with the technology.
As a developer, you tend to look at problems from the implementation outward. A designer thinks about the final product and works inward toward how it's constructed. When the logical left side of your brain encounters the designer's artistic right side, great things can happen.
Designers provide a point of view that you don't have. Don't be afraid to get this valuable input early in your product's lifecycle.
Here are some of the general things you and your designer should focus on:
Focus on the user and her task. Your primary goal is to always think about use cases before forging ahead with a design solution. Some developers like to write user stories to formalize the kinds of tasks their customers will perform.
Follow established conventions. Apple has done an excellent job developing actions, behaviors, gestures, and metaphors with the built-in applications. You'd be wise to follow their lead whenever possible.
Maintain consistency. People intuitively learn the patterns in your application. Make sure that the look and feel for these patterns remains the same throughout your design. This is especially important when you need to deviate from the established conventions mentioned above.
Reduce complexity. Designing a complex interface is easy. The most difficult job of a designer is distilling the elements down to their most basic level. Always question the need to add "just another control." Removing parts of your interface should give you more satisfaction than adding them.
Make the application's state clear. If a background task like refresh is occurring, you need to convey that information to the user. When a user performs an action, visual feedback in the form of a highlight or an animation lets her know what's going on internally. Assume that people will make mistakes, so provide well-written feedback, and give them a way to undo the action.
A good design isn't static. Don't be afraid to iterate! Your customers' needs will change over time. Leave room for growthâeven when you have no idea how the product will evolve.
Even if you've had years of application design experience and the list in the previous section is second nature to you, you're still going to face many new challenges in your design. If you're wondering what's so different about designing for the iPhone, there's a simple answer: lots!
The first thing you notice about the iPhone is how you interact with it physically. The contact is direct, not through an intermediate device like a mouse.
Input by human finger has some immediate implications that you need to consider in your design:
Finger size and reach. A fingertip, like the one shown in Figure 4-1 is much larger than a mouse pointer. The length of the finger can also be a limiting factor when trying to reach different areas of the screen at the same time. Hands also come in a wide variety of sizes.
Weight distribution. Control placement can affect the balance of the device in your hand.
Motion of the device. Movement can act as an output such as vibration or as input with the accelerometer.
One or two hands in use. Interaction patterns change dramatically depending on whether the user is using your application with one hand or two.
Left- or right-handed users. Control placements for right-handed users may not be appropriate for left-handed users.
Display rotation. The layout of your design can change when a user switches between portrait and landscape orientations.

Note that these issues are often interrelated. Designing for a left-hander using two hands in landscape can be just as important as for a right-hander using one hand in portrait orientation.
You also need to take into account environmental factors. A low-contrast design may look great in controlled lighting conditions, but when a user takes his phone out of his pocket on a bright and sunny day, he'll have trouble viewing the information you're presenting. Similarly, your design may be easy to read while stationary, but many people will use your app while jostled around in a bus or train.
It's important to take your creation outside the office and to see the effects of the real world on its usability. Do this early and often throughout the development process.
The iPhone has two types of users. As you design your application, you need to keep the radically different needs of these two groups in mind.
Some people use the iPhone as a satellite device. These folks have a desktop computer in their home or office. The iPhone acts as a way for them to take their information on the go. Some aspects of app design for this group are:
The Mail application is useful for notification and triage. Composition of long messages isn't comfortable.
Capture and display of photos is easy, but extensive processing of the image is beyond the capabilities of the CPU.
It's easy to add information to the Contacts app, especially with new people you meet. But the real value is syncing this information back to the desktop.
Applications that don't sync important data back to the desktop are frustrating to use. Apple's built-in Notes application is an example.
The other group of iPhone users is the one that doesn't have another computer. For many people, their new smart phone is the first time they've had a personal computing device. These users don't expect the kind of features available on a real computer, but they'll still need flexibility while using your application.
For all kinds of users, the value of the iPhone isn't so much the function that it performs, but rather where it performs that function. Succinctly, it's the Internet in your pants.
There's one other major area where the iPhone differs from the desktop: The resources available are much more limited. Table 4-1 compares the device sitting on your desk with the one in your pocket.
Table 4-1. When it comes to resources, your desktop computer is much more powerful than your iPhone.
Resource | Desktop | iPhone |
|---|---|---|
Several GHz with multiple cores | ||
Memory | Several GB | Several hundred MB |
Wired connection with several Mbits of bandwidth | Wireless connection that can run as slow as dialup speeds | |
Display | Thousands of pixels in each dimension | Hundreds of pixels in each dimension |
As you can see, in most cases the resources are an order of magnitude smaller than you're used to. Many of these limitations will come into play when you're implementing your design; others will have an immediate impact.
For example, the small display obviously limits the amount of information you can present on a single screen. Likewise, the limited amount of memory and processing power prevents you from putting thousands of items in your app's lists. Displaying hundreds of items is less taxing on the system and on the user who has to interpret the information. Less is more, both for the device hardware and the person using it.
You have a lot of new things to come to terms with in your first iPhone application. Don't be afraid to avoid some of them initially.
Many successful designs on the iPhone started out simple. The developers focused on solving the problem at hand and kept the implementation as basic as possible. As their knowledge and experience about the platform grew, so did their product.
Your application will certainly evolve over time. Remember that it's much easier to add a feature in a future release than it is to remove one once it's in a customer's hand. Don't try to guess what people want from your application. Let them tell you and guide your education in this new and exciting platform!
Whether you're a designer or developer, you can use some simple steps and tools to get your application idea off the ground.
Even if you don't have the skills to make nice-looking icons and images, you can still draw rough prototypes of your design. Your paper drawings may not be pretty, but they're just fine for getting the initial feel of the app.
This low-tech design technique is surprisingly effective. The key is that the piece of paper and the iPhone share something in common: You can interact with both by using your sense of touch.
You'll find yourself imagining what it's like to touch the controls drawn on the paper. It's also easy to move pieces of paper around as you envision the transitions between one screen and another. The fact that it's hard to write down lot of information in a constrained space naturally forces you to simplify ideas.
And unlike with code, if you find something that doesn't make sense, it's just a matter of pulling out the eraser and modifying the interface. Tools like Xcode and Interface Builder make your life much easier when you're implementing designs, but they can be a huge waste of time when you're in the discovery phase of development.
Paper also has another nice quality: It lets the designer and developer work together at the same time. It's difficult for a group to work on a Photoshop composition or on an Interface Builder document simultaneously. With paper, everyone can have a pencil and contribute. See Figure 4-2 for an example of a paper prototype.
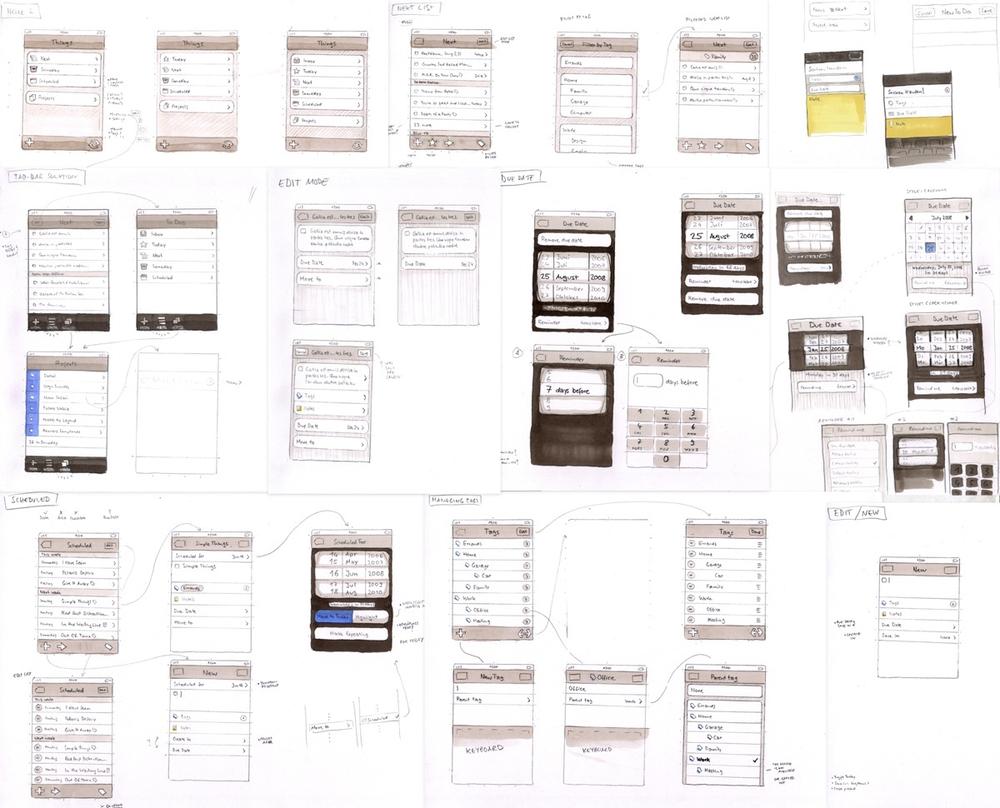
Figure 4-2. This is a great example of paper prototyping done by Christian Krämer at Cultured Code. This illustration shows many of the screens they designed for their award-winning Things application. Some of these initial screens changed over the life of the project, but the basic flow of the application, represented by arrows, did not.
So what tools do you need to create these paper prototypes? Obviously, you need paper and a pencil, along with a couple of less obvious things. Take a look in Figure 4-3 at the tools that Cultured Code used to create the diagram in Figure 4-2.
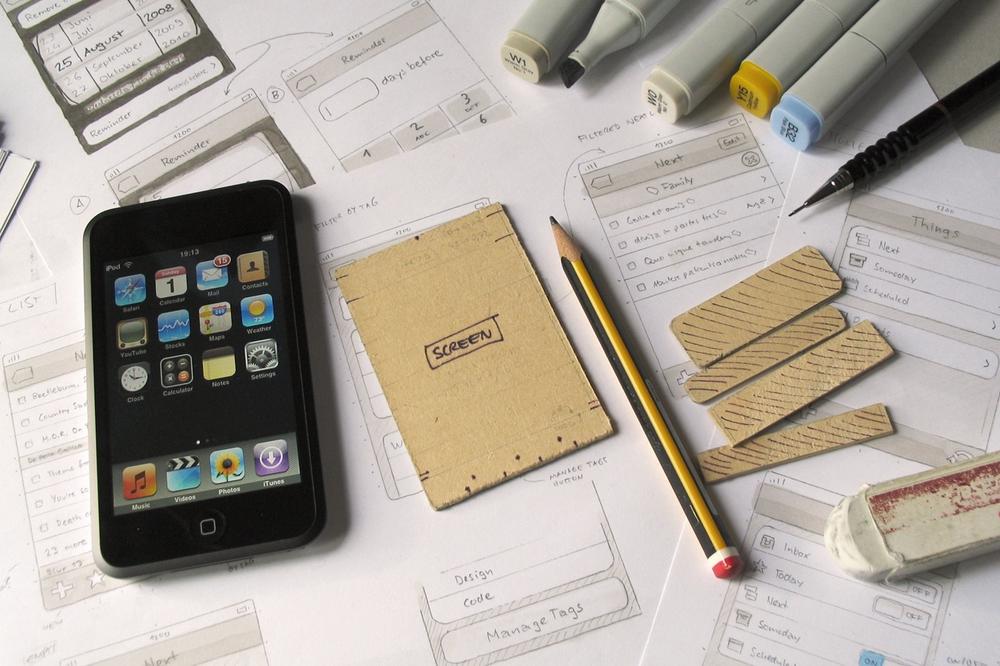
Figure 4-3. The tools used to create the paper prototype shown in Figure 4-2. Everything in this image is important, especially the templates for standard user interface elements.
Why the eraser? You shouldn't be afraid to make mistakes at this point in your design. Also, if you're working with a group, the eraser is an important tool to help refine someone else's idea. Highlighting pens are also helpful for visually breaking up the interface's components.
You'll also want to have an iPhone handy, with the latest version of the iPhone OS. You'll frequently want to refer to Apple's apps as examples of how to do things "the iPhone way." iPhone users are most familiar with the device's built-in software: If you mimic those designs and interactions, you'll be creating something that's easy for folks to learn.
The most important thing in this photo is the screen template with the iPhone's standard UI dimensions. You'll be drawing a lot of these boxes as you work through your design.
Christian's template was created by hand out of necessity. Luckily, entrepreneurs have realized that there's a strong demand for these types of products, and now several paper prototyping solutions are on the market:
http://uistencils.com. This user interface stencil by Design Commission makes it a snap to draw the standard symbols and controls used on the iPhone. They also sell a sketchpad that works beautifully with the stencil. You spend your time thinking about the design rather than how to draw it. Both Figures Figure 4-4 and Figure 4-5 were created using this stencil and sketchpad.
http://appsketchbook.com. Stephen Martin came up with this sketchbook after being asked to design several iPhone user interfaces. The result is a high-quality spiral-bound notebook with a wireframe template printed on each page. Perfect for the designer who wants to capture an idea.
Once you have a feel for the overall design of the application, you'll want to start formalizing how it's going to look onscreen. This is the point where you start thinking about branding and adding unique elements to your app.
Note
For many companies, this is a really important part of the process. A firm like UPS doesn't want their app to be the standard shades of blue with black and white text. They're going to rely on their corporate color scheme of brown and gold. You can also bet their logo will be featured prominently.
This work is best left to a designer who's an expert with Photoshop and other illustration tools. If you're a developer, people will notice that you can't draw, and that distracts them from the awesome code that's behind the images. If you haven't gotten a designer involved during the paper prototyping stage, you'll need to spend time explaining your design. Which is another reason to get one involved early in the process.
Not all designs will go through this step. If you're going to use the standard UI controls and layouts, there won't be much for a designer to do.
As your designer is working on mockups, you'll want to make sure that they know that the standard UI widgets are available in several document formats. If your designer is working with Illustrator, they'll want to know about Mercury Interactive's vector UI elements (http://www.mercuryintermedia.com/blog/index.php/2009/03/iphone-ui-vector-elements). For designers who prefer to work in Photoshop, Teehan+Lax (http://www.teehanlax.com/blog/2009/06/18/iphone-gui-psd-30/) and Smashing Magazine (http://www.smashingmagazine.com/2008/11/26/iphone-psd-vector-kit/) both provide PSD files with elements arranged in layers. Another option is to use Patrick Crowley's stencil kit for OmniGraffle (http://graffletopia.com/stencils/413).
Tip
Working in Illustrator provides the most flexibility. Editing vector objects is generally easier than moving bitmap layers around. You'll also future-proof your work by producing it in a format that's readily scalable, and that's handy when a print publication asks for some screenshots that are larger than 320 x 480 pixels!
You're also at a point where you can start thinking about the most important graphic in your application: the icon that appears on the home screen. This graphic is the first thing potential customers will see in iTunes, whether it's in search results or being listed as one of the top-selling apps. Think of it like a business card: You want to make a good impression, so let a professional handle this illustration!
The human brain processes shapes and colors much more quickly than words. As you work through the design of your application icon, focus on a distinctive color palette with clearly defined shapes. Avoid complicated and cluttered designs.
Remember how your first app seemed huge when you ran it in the iPhone Simulator? The same effect occurs when you're working in Photoshop: The iPhone's 320 x 480 display looks bigger than it really is. If you're customizing user interface components, remember that your designer is working in an environment where the light is carefully controlled.
Both these factors tend to skew the design toward something that's appropriate for the desktop and not for a mobile device. That's why it's so important to expose your design to the real world.
The easiest way to get a feel for the Photoshop mockups is to save the 320 x 480 images and sync them to the built-in Photos app. Once you have the designs on the device and are carrying them around, it's easy to open the app and look at them in different conditions like bright sunlight and fluorescent lighting.
It's also possible to verify control sizes and placement by placing your finger over the simulated interface elements. Watch out for content that gets obscured by your hand as you move your finger around. It's also a good time to see how things feel for left-handed users and whether the design works well for one- or two-handed use.
Designers and developers have decidedly different mindsets and ways of working. The last step of the design process for you, the developer, is thinking about how you're going to work with the designer to get the assets from their design tools into your development environment.
It's likely that your designer lives and breathes in Photoshop. Take a look at Figure 4-4. Designers know every nook and cranny of this madly complicated program and can do amazing stuff with it. Fortunately, you don't need to go out and buy a copy of Photoshop to use their work. All you need to do is ask the designer to supply your graphics in the PNG file format. This standard format is easy to export from a layered Photoshop document, and you can use it directly in your Xcode project.
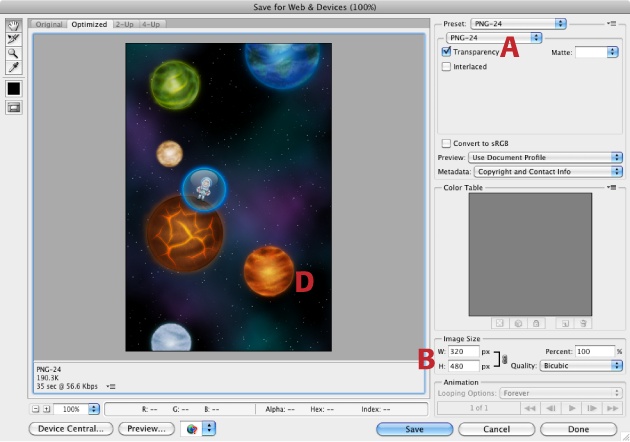
Figure 4-4. A graphic from the Iconfactory game AstroNut being created with Photoshop. To open this dialog box, use the FileâSave for Web & Devices menu. Make sure you're using PNG-24 (PNG file with 24-bit color) and Transparency (A). The screen size on the iPhone is 320 x 480 pixels, but you can set the image size to whatever is needed by the code (B).
If you need to edit the designer's work after delivery, it's usually just a matter of cropping or making other minor adjustments to the image. Many developers use a tool called Acorn (http://flyingmeat.com/acorn/) to do this simple cleanup.
When you're working with a designer's mockup, it's often necessary to measure various parts of the image to get the specified alignment right in Interface Builder or code. Is that button spacing 10 pixels or 11 pixels? What's the background color for this view? For these types of measurements, the Iconfactory's xScope tool is invaluable (http://iconfactory.com/software/xscope). This application provides a loupe, rulers, guides, and other tools that let you inspect and align screen graphics.
For maximum efficiency, give designers direct access to your version control repository. A lot of tweaking tends to be involved with graphics built into a typical iPhone app. These constant changes can result in a lot of file transfers, test builds, emails, and other communication between the developer and designer.
You can save yourself a lot of time if you teach the designer how to build your app and how to replace images using the version control system. As you both feel more comfortable with the arrangement, you might find the designer making changes to your NIBs. And after you've adjusted a UIColor definition for the hundredth time, you might even suggest that the designer modify your source code!
Tip
Keep in mind that designers are typically visual thinkers. Their talents usually don't include working directly at the command line for extended periods. If you're going to provide the designer with access to your repository, you'll want to use a tool like Versions (http://versionsapp.com/) that provides a graphical interface.
Get iPhone App Development: The Missing Manual now with the O’Reilly learning platform.
O’Reilly members experience books, live events, courses curated by job role, and more from O’Reilly and nearly 200 top publishers.

