Modify iTunes to match your décor by changing the graphics that render iTunes on your desktop.
Skinning—changing the look and feel of an application by overlaying different skins—is something you either take to or find utterly pointless. Some (okay, many) skins are rather tacky, but others provide a welcome alternative to the standard look of an application. iTunes, being a typical Apple application, doesn’t support skinning by default. Thanks, though, to a little third-party shape shifting, this doesn’t mean it can’t be done.
Unsanity’s ShapeShifter (http://www.unsanity.com/haxies/shapeshifter; $20; 15-day free trial available) allows you to change the overall appearance of your Mac using themes. Using Shapeshifter, you can change practically any aspect of your computer’s user interface (UI), including the look of windows, menus, applications, and buttons. The application comes with preset themes and the tools to create your own. And if you are happy with the look of the Finder but want to change iTunes, you can create application-specific themes. You can download a myriad of themes for ShapeShifter from Maxthemes (http://www.maxthemes.com/themes.htm), Macthemes (http://www.macthemes.net), and MacUpdate (http://www.macupdate.com).
But what if you don’t like anyone else’s themes, or what if you just want to make some minor adjustments to iTunes? Well, if you are willing to get your hands a little pixel-dirty, you can change iTunes to your heart’s content using the all-powerful Adobe Photoshop as your editing tool.
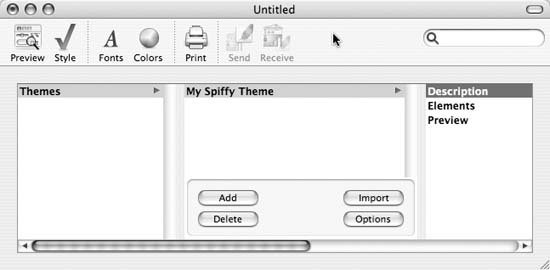
To create themes for ShapeShifter, you need ThemePark (http://www.geekspiff.com/software/themepark/; $20.00; limited trial version available). Start a new project by going to File → New → New GuiKit. ThemePark will create a default new window showing just a Themes column.
Tip
You don’t absolutely need Photoshop to create your own artwork for this hack. While you won’t have the integration that ThemePark provides with Photoshop, you will still be able to open up graphics and edit them. Check out the more affordable Adobe Photoshop Elements (http://www.adobe.com/products/photoshopel/main.html; $99.00) or, if you are feeling open-sourcy, give MacGimp (https://www.archei.com/ macgimp/; $29.00 for download version; $49.95 for package version) a try.
Select Theme, and a menu pops up in the next column (ThemePark works in a similar fashion to Mac OS X’s column view).
Click Add, and a new Theme called My Spiffy Theme appears in the second column, as shown in Figure 4-49.
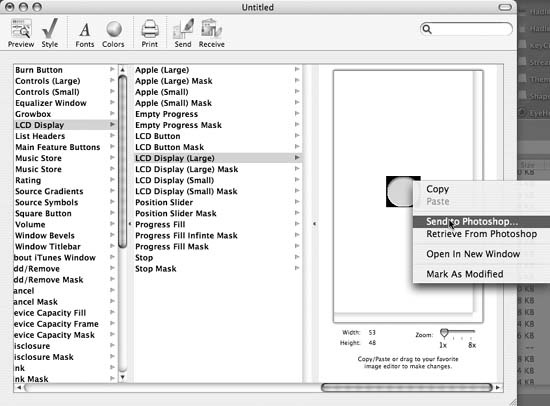
Navigate to Elements → Application Skins, select iTunes from the drop-down menu, and click Add. You now have access to all the graphic files that make iTunes look the way it does! For example, scroll down the list of graphic files in the iTunes column and select Play. As in Mac OS X’s column view, ThemePark will load the graphic that iTunes uses for the Play button.
To edit the Play button with Photoshop, just Control-click on it and select Send to Photoshop from the drop-down menu, as shown in Figure 4-50. The graphic will now open up in Photoshop, where you can make any number of changes (such as adjusting the hue and saturation, adding elements, or starting from scratch and building your own arrow). Once you have made your edits in Photoshop, go back to ThemePark. Control-click on the graphic, and this time select Retrieve from Photoshop. ThemePark will now update the iTunes element.
UsingThemePark you can change every aspect of iTunes, including arrows, buttons, window chrome, and more. You might want to customize only a few elements, but the choice is yours.
Once you are finished with the design phase, you need to export the file as a ShapeShifter theme. First, save your ThemePark file (in case you want to make edits or additions in the future) by selecting File → Save. You have now saved the source ThemePark file. Much like Photoshop has a native .psd file format that you use to create your web artwork and then export to .gif, ThemePark has its own file format. Now that you have saved your ThemePark file, you need to export a file that can work with ShapeShifter. Select File → Export Theme → For ShapeShifter and select your Documents folder as the destination.
Launch System Preferences, select the ShapeShifter panel under the Other grouping, and select the Theme tab. Click the + icon in the lower-left corner of the window, navigate to the theme file you just exported, and click the Open button, as shown in Figure 4-51.
The next time you open up iTunes, the interface changes you made in your theme will appear.
There are some aspects of iTunes that ShapeShifter can’t get to, such as the scroll bars and the background color of the tables. That doesn’t mean, though, that they’re completely out of reach; take a gander at “Alter the iTunes Look and Feel by Resource Hacking” [Hack #66] for even more iTunes UI hacking tips.
Get iPod and iTunes Hacks now with the O’Reilly learning platform.
O’Reilly members experience books, live events, courses curated by job role, and more from O’Reilly and nearly 200 top publishers.


