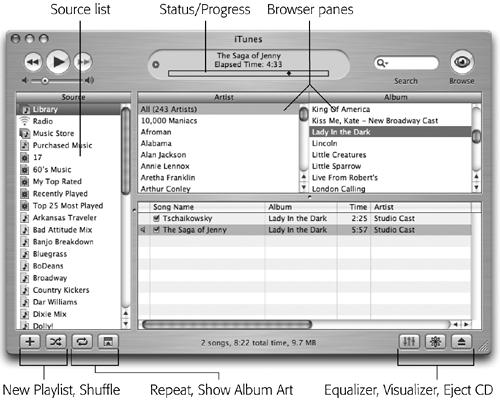
The area at the center top of the iTunes window—the status area—tells you what song is playing, who’s playing it, which album it came from, and how much playing time remains. To the left are volume and song navigation controls; to the right is a search box for hunting down or looking up specific singers or songs. Figure 4-1 presents a guided tour of the controls and functions on the iTunes screen.
Figure 4-1. The iTunes window shows all of the current playlists, the various places to find music in the Source list, and even album art on the left side. The main area of the window displays all of the songs on the chosen source. Depending on what you click in the Source list, iTunes displays all of the songs you’re currently hearing. In this case, you can see the entire contents of the iTunes library.
The Source panel at the left of the iTunes window displays all of the audio sources you can tap into at the moment. If you have a CD in the computer’s drive, for example, it shows up in the Source list, as will a currently connected iPod.
Clicking a name in the Source column makes the main song-list area change accordingly, like this:
Click the icon of a CD you’ve inserted; the disc’s track list appears.
Click a playlist (Section 4.9.1); the contents of that music mix appear in the window.
Click the Radio icon; a list of Internet radio stations shows up.
Click the Music Store icon; you jump to Apple’s online music emporium where you can browse, preview, and buy songs (Chapter 6).
As shown in Figure 4-1, the iTunes window is brimming with tools for managing your music, all of which are described in detail starting on Section 4.7. But first you’ll need some music to work with. The next section explores one of the most popular uses for iTunes—ripping digital audio files from compact discs.
Don’t be misled by the brushed-aluminum look of the iTunes window. In fact, you can push and pull the various parts of the window like taffy.
You can resize the panes within the iTunes window. Look for a shallow dot between panes; it denotes strips that you can drag to resize adjacent panes.
The main song list is separated into several columns, which you can sort and rearrange. Click a column title (like Artist or Album) to sort the song list alphabetically by that criterion. Click the little black triangle next to the column title to reverse the sorting order.
Change the order of the columns by dragging them. For example, if you want to have Album right next to the Song Name, drag the word Album horizontally until it’s next to Song Name.
To adjust the width of a column, drag the vertical divider line on its right side.
To resize all the columns so that they precisely fit the information in them, right-click (or Control-click if you have a Mac) any column title and choose, from the contextual menu, Auto Size All Columns. Double-clicking on the vertical column lines automatically resizes them to fit the text as well.
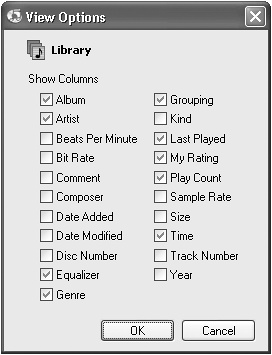
To add more kinds of information to your list of columns (or less), right-click (or Control-click) any column title. From the pop-up list of column categories (Bit Rate, Date Added, and so on), choose the name of the column you want to add or remove. Column names with checkmarks are the ones that are currently visible.
Tip
Want to track your own listening habits? Turn on the Play Count in iTunes Options. Now you can see just how many times you have played “I Want You Back” by the Jackson 5 since you ripped that CD of old Motown gems to your hard drive. Checking out the Top 25 Most Played playlist in the Source window (Section 4.2) can also let you know where your ears have been lately.
If you intend to make a lot of adjustments to your list of columns, though, it’s much faster to make the changes all at once. Choose Edit→View Options to produce the dialog box shown in Figure 4-2, where you can turn columns on and off en masse.
Lovely as the iTunes window may be, it can take up a heck of a lot of screen real estate. When you’re just playing music while you work on other things, you can shrink iTunes down to a svelte display panel that takes up a fraction of the size of the full window.
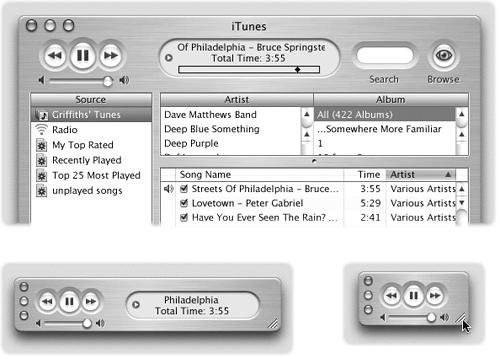
In fact, iTunes can run in three size modes: small, medium, or large. Here’s how you pull this off:
Large. This is what you get the first time you open iTunes.
Medium. You can switch back and forth between large and medium by clicking the green zoom button at the top- or middle-left corner (or choosing Window→Zoom). If you use iTunes for Windows, press Ctrl+M or choose Advanced→Switch to Mini Player to get the medium-sized window.
Small. If your desktop isn’t big enough for even the small iTunes window in Figure 4-3 at lower left, try taking it down a notch. To create the mini bar shown at lower right in Figure 4-3, start with the medium-size window. Then drag the resize handle (the diagonal lines in the lower-right corner) leftward. To expand it, just reverse the process.
Figure 4-3. And what size music would you like today? In both the Mac and the Windows versions of iTunes, you can choose large, medium, or small. (Press Ctrl+M in Windows to get the medium size, which you can then scrunch up into the small player by dragging the resize handle.) Only the large version has the space to serve as command central for MP3s, Internet radio, visual effects, and the kitchen sink.
Get iPod & iTunes: The Missing Manual, Second Edition now with the O’Reilly learning platform.
O’Reilly members experience books, live events, courses curated by job role, and more from O’Reilly and nearly 200 top publishers.


