Chapter 4. iTunes Basics
If you read Chapter 1 to find a speedy way to get your iPod set up and ready to play, you’ve already dipped a toe into the iTunes waters. But as you may have guessed, beneath its pretty surface, iTunes is a deep well of media-management wonders.
Even without buying music from the online iTunes store, you can use the program to import music from your CD collection and add personal ratings, lyrics, and artwork to your song files. once you check everything into your iTunes library, the program makes it easy to browse and search through all your treasures—and automatically mix your music.
Yes, iTunes is a powerful program. so powerful, in fact, that this chapter will focus on its most basic and useful functions—like what the controls do and how to import music from CDs. if you want to learn more about fine-tuning your library, Chapter 5 covers more advanced iTunes features. Chapter 6 tells you how to create customized song playlists, Chapter 7 is all about blowing your bucks in the iTunes store, and Chapter 8 spotlights the video side of iTunes.
But enough of the introductory blah-blah. Turn the page if you want to get to know iTunes better.
The iTunes Window: An Introduction
iTunes is your iPod’s best friend. You can do just about everything with your digital music here—convert songs on a CD into iPod-ready music files, buy music, listen to Internet radio stations, watch video—and more.
Here’s a quick tour of the main iTunes window and what all the buttons, controls, and sliders do.
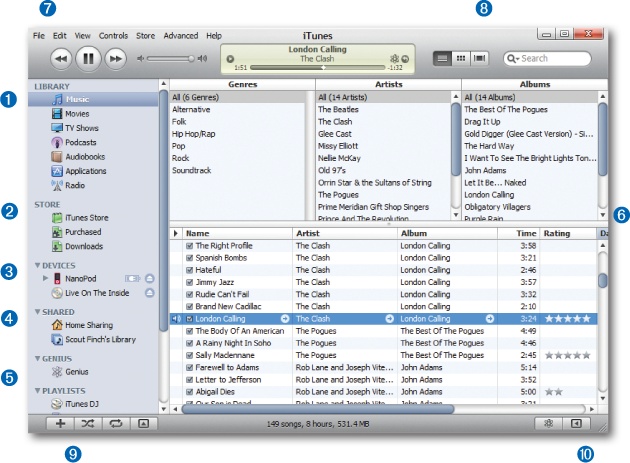
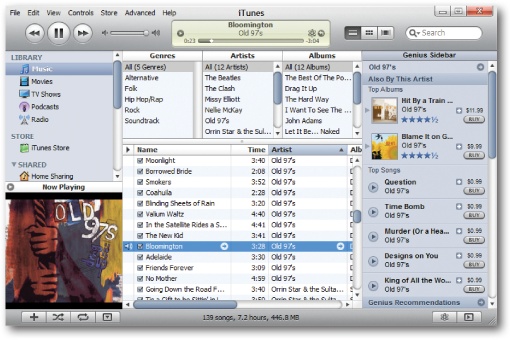
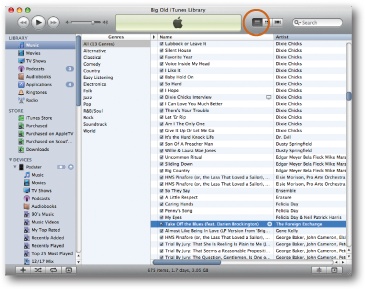
The Source panel on the left side of iTunes displays all the audio and video you can tap into at the moment. Click any item listed in the Source column to display its contents in the main window, like so:
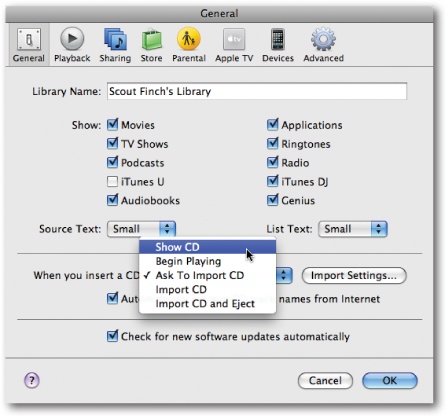
Click any icon in the Library group to see what’s in your different media libraries. As you add movies, music, and other stuff to iTunes, click the appropriate icon to find what you’re looking for—a song, a TV show, and so on. Programs you buy for the iPod Touch land here under Applications. Want to change the items you see listed? Press Ctrl+comma (⌘-comma) to call up iTunes Preferences menu and then click the General tab. In the “Show:"area, turn on (or off) the checkboxes for, say, Ringtones or iTunes U, as you see fit.
In the Store area, click the shopping-bag icon to shop for new stuff in the iTunes Store or the green curled-page icon to see the list of things you already bought. The Downloads icon (a green down-arrow) shows items you’re downloading from the store, or files ready for you to snag.
If you have a music CD in your computer’s drive, it shows up in the Devices area, as will a connected iPod. Click the gray Eject icon next to the name to safely pop out a disc or disconnect an iPod.
In the Shared area, browse the media libraries of other iTunes fans on your network. You can stream music if you see a blue stacked playlist, or copy music and videos between machines with the Home Sharing feature turned on.
iTunes keeps all your custom song lists—whether the iTunes Genius automatically generated them or you lovingly handcrafted them—in the Genius and Playlists sections. The iTunes DJ feature, which quickly whips up party mixes, lives here too.
When you click an item in the Source list—Music, in this case—iTunes’ main window displays all the things in that category. Three columns above the main song list let you browse through the genres, artists, and albums in your collection. Naturally, this part of the window is called the Column Browser. It’s shown here in the top position, but you can display your chosen browser categories as a series of vertical columns on the left side of the iTunes window by choosing View→Column Browser→On Left.
The outer edges of the iTunes window are full of buttons and controls:
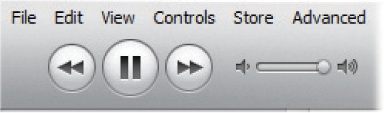
Play and pause your current song or video—or jump to the next or previous track. The volume slider adjusts the sound.
The center of the upper pane shows you what song’s playing. To the right of that you have handy buttons to change views within the main part of the window and a search box for finding songs fast.
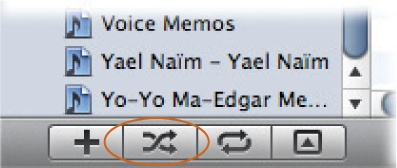
At the bottom-left corner are shortcut buttons for (from left to right) making a new playlist, shuffling or repeating your playlists, and displaying album artwork or videos.
The lower-right corner of iTunes is where the Genius controls hang out. When you have a song selected, click the whizzy electron-shaped icon to create a Genius playlist (Chapter 6) based on that song. The boxed-arrow icon toggles the Genius Sidebar panel on (it’s stocked with “Buy these songs” suggestions to help round out your library), and off (to leave you in peace).

Change the Look of the iTunes Window
Don’t be misled by the brushed-aluminum look of iTunes: You can push and pull various window parts like salt-water taffy.
Adjust how much of the iTunes Browser—the three-pane quick-browse area that opens and closes when you press Ctrl+B (⌘-B)—by dragging the tiny dot at the top of the song list window up or down. The same keyboard shortcut toggles the browser off and on. (You can also put the browser on the left; see Change the Look of the iTunes Window.)
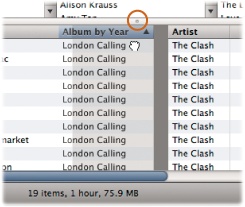
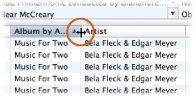
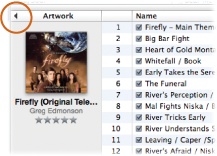
iTunes divides the main song list into columns that you can sort or re-arrange. Click a column title (like Name or Album) to sort the list alphabetically. Click the column title again to reverse the sort order. Change the order of the columns themselves by dragging them, as shown above.
To adjust a column’s width, drag the right-hand vertical divider line. (You may need to grab the line in the column title bar.)
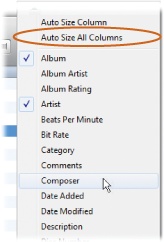
To resize all the columns so their contents fit precisely, right-click (Control-click) any column title and choose Auto Size All Columns.
To add (or delete) columns, right-click (Control-click) any column title. From the pop-up list of column categories (Bit Rate, Date Added, and so on), choose the column name you want to add or remove. Checkmarks indicate currently visible columns.
Click the black triangle in the first column to display or hide album covers alongside song titles. If you don’t have any artwork for the song, iTunes displays the generic Gray Musical Note icon. If you find life has too many gray areas already, the next chapter tells you how to add album artwork to your files.
Change the Size of the iTunes Window
Lovely as iTunes is, it takes up a heck of a lot of screen real estate. When you’re working on other things, you can shrink it down. In fact, iTunes can run in three size modes: small, medium, or large:
Large. This is what you get the first time you open iTunes. (Hate the music hard-sell from the Genius Sidebar on the right? Close the panel by clicking the square button in the lower-right corner.)
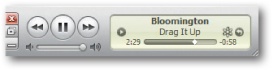
Medium. Windows folks: Switch back and forth between large and medium by pressing Ctrl+M (Shift-⌘-M) or choosing View→Switch to Mini Player.
Small. To really scrunch things down, start with the medium-size window. Then drag the resize handle (the diagonal lines in the lower-right corner) leftward. To expand it, just reverse the process.

Tired of losing your mini-iTunes window among the vast stack of open windows on your screen? You can make the iTunes mini-player always visible on top of other open documents, windows, and assorted screen detritus. Open iTunes Preferences (Ctrl+comma [⌘-comma]), click the Advanced tab, and turn on the checkbox next to “Keep Mini Player on top of all other windows.” Now you won’t have to click frantically around the screen trying to find iTunes if you get caught listening to your bubblegum-pop playlist.
Import Specific Songs From Your CDs
In Chapter 1 you learned how iTunes simplifies converting (also called ripping) songs from your compact discs into small iPod-ready digital files: You basically just pop a CD into your computer’s disc drive and iTunes walks you through the process. If you’re connected to the Internet, iTunes downloads song titles and other album info. A few minutes later, you’ve got copies of those tunes in iTunes.
If you want time to think about which songs you want from each CD, no problem. Simply summon the Preferences box (Ctrl+comma [⌘-comma]), click the General tab, and then change the menu next to “When you insert a CD:” to “Show CD.”
Tip
If you know you want all the songs on that stack of CDs next to your computer, just change the iTunes CD import preferences to “import CD and Eject” to save yourself some clicking.
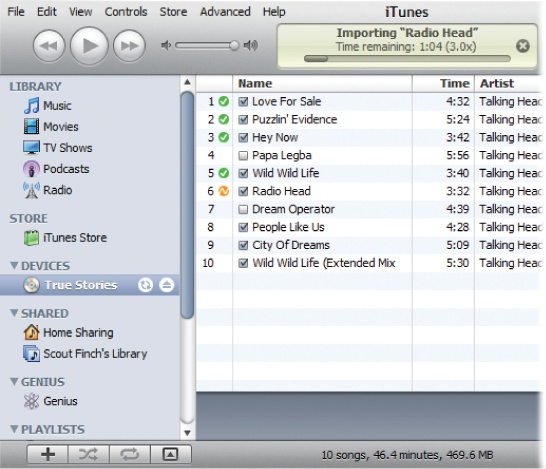
So now, if you don’t want to rip an entire album—who wants anything from Don McLean’s American Pie besides the title track?—you can exclude the songs you don’t want by removing the checkmarks next to their names. Once you pick your songs, in the bottom-right corner of the screen, click the Import CD button.
You can Ctrl+click (⌘-click) any box to deselect all the checkboxes at once. To turn them all on again, Ctrl+click (⌘-click) a box next to an unchecked song. This is a great technique when you want only one or two songs in the list; turn off all the checkboxes, and then turn on only those two tracks.
As the import process starts, iTunes moves down the list of checked songs, converting each one to a file in your Music→iTunes→iTunes Media→Music folder for Windows 7 or Home→Music→iTunes→iTunes Music on a Mac OS X system. An orange squiggle next to a song name means that iTunes is currently converting the track. Feel free to switch to other programs, answer email, surf the Web, or do any other work as iTunes rips away.
Once iTunes finishes up, each imported song bears a green checkmark, and the program signals its success with a melodious little flourish. Now you have some brand-new songs in your iTunes music library.
Change Import Settings for Better Audio Quality
iPods can play several different digital audio formats: AAC, MP3, WAV, AIFF, and a format called Apple Lossless. Feel free to safely ignore that last sentence, as well as the rest of this page, if you’re happy with the way your music sounds on your iPod or a pair of external speakers.
If you find the audio quality lacking, you can change the way iTunes encodes, or converts, songs during the CD conversion process. iTunes gives you two main options in its import settings box (Edit [iTunes for Macs]→Preferences→General, and then click the Import Settings button to get there): They are:
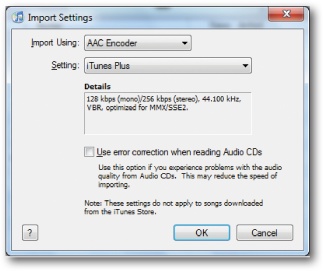
Audio format (use the drop-down menu beside “Import Using”). Some formats tightly compress audio data to save space. The tradeoff: lost sound quality. Highly compressed formats include AAC (iTunes’ default setting) and MP3. Formats that use little or no compression include WAV and AIFF, sound better, but take up more space. Apple Lossless splits the difference: Better sound quality than AAC and MP3, but not as hefty as WAV or AIFF.
Bit rate (beside “Setting”). The higher the number of bits listed, the greater the amount of data contained in the file (in other words, your files take up more storage space). The advantage? Better sound quality.
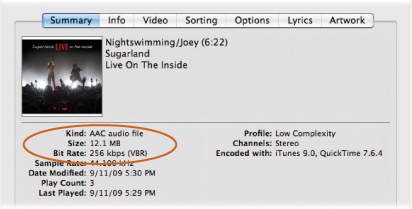
To see a song’s format and other technical information, click its title in iTunes, press Ctrl+I (⌘-I), and then click the Summary tab in the Get Info box.
Three Ways to Browse Your Collection
Instead of just presenting you with boring lists of songs and albums, iTunes gives you three options for browsing your media collection—some of them more visual than others. Click the View button at the top of iTunes to switch among views.
List View presents the traditional way of displaying song titles. Press Ctrl+B (⌘-B) on the keyboard to toggle on and off the browser that shows vertical (or horizontal) panes grouping your music by genre, artist, and album. Press Ctrl+Alt+3 (Option-⌘-3) to jump back to List View from another view.
Grid View presents your collection in a nifty array of album covers and other artwork. You can sort the grid by album, artist, genre, or composer. There’s a lot you can do in Grid View, so flip the page for more. Press Ctrl+Alt+4 (Option-⌘-4) to switch to the Grid.
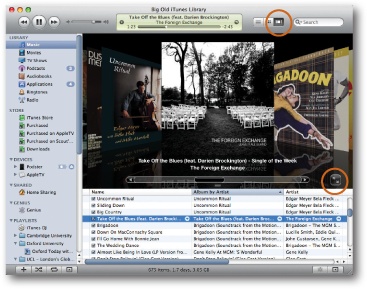
Cover Flow. If you really like album art, this view’s for you. Ctrl+Alt+5 (Option-⌘-5) is the shortcut. In the top part of iTunes, your collection appears as a stream of album covers. To browse them, press the left- and right-arrow keys on the keyboard or drag the scroll bar underneath the albums to see them whiz by. If that’s not enough visual stimulation for you, click the little Full Screen button by the slider bar to turn your whole screen into Cover View, complete with playback controls.
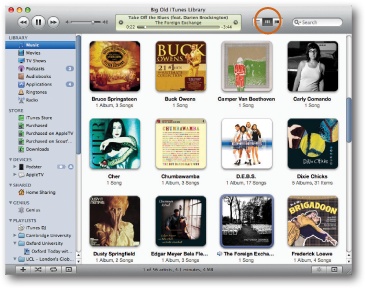
Get a Birds-Eye Look at Your Collection with Grid View
Although it’s been around since iTunes 8, Grid View is still probably the most eye-catching way to see your media library. It’s like laying out all your albums on the living room floor—great for seeing everything you’ve got, without the hassle of having to pick it all back up. More picturesque than List View and not quite as moving as Cover Flow, Grid View is the middle road to discovering (or rediscovering) what’s in your iTunes library.
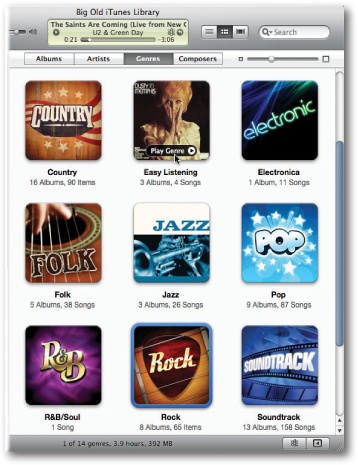
iTunes offers four ways to see your collection: grouped by album, artist, genre, or composer. Click each named tab to see the music sorted by that category. (If you don’t see the tabs, choose View→Grid View→Show Header.) Here’s how to work the Grid:
Hover your mouse over any tile on the grid to get a clickable Play icon that lets you start listening to the music.
Double-click a cover in Albums view to display both the cover and song titles in List View.
If you have mutliple albums under the Artists, Genres, or Composers tabs, hover your mouse over each tile to rotate through the album covers. If you want to represent the group using a particular album cover or piece of art, right-click it and choose Set Default Grid Artwork. You can do the opposite for art you don’t want to see: right-click it and choose Clear Deafult Grid Artwork.
Adjust the size of the covers and art by dragging the slider at the top of the window.
One thing about Grid View, though: It’s pretty darn depressing unless you have artwork on just about everything in your collection. (If you don’t, and you see far too many generic musical-note icons there, Chapter 5 shows you how to art things up.) And if you hate Grid View, don’t use it—iTunes just defaults to whatever view you were using the last time you quit the program.
Search for Songs in iTunes
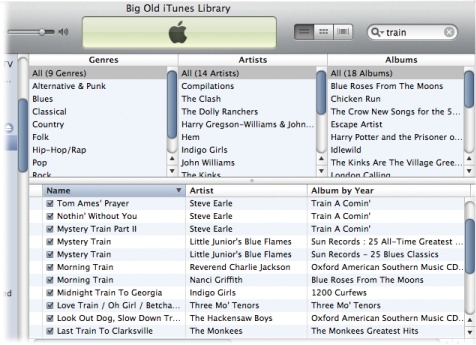
You can call up a list of all the songs with a specific word in their title, album name, or artist attribution just by clicking the Source pane’s Music icon (under Library) and typing a few letters into the Search box in iTunes’ upper-right corner. With each letter you type, iTunes shortens the list of songs it displays, showing you only tracks that match what you type.
For example, typing train brings up a list of everything in your music collection that has the word “train” somewhere in the song’s information—maybe the song’s title (“Mystery Train”), the band name (Wire Train), or the Steve Earle album (Train A Comin’). Click the other Library icons, like Movies or Audiobooks, to comb those collections for titles that match a search term.
Another way to search for specific titles is to use the iTunes Browser mentioned earlier in this chapter. If you can’t see the browser pane, press Ctrl+B (⌘-B) to summon it. Depending on how you configured it in View→Column Browser, the browser reveals your music collection grouped by genre, artist, and album. Hit the same keys again (Ctrl+B [⌘-B]) to close the browser.
Shuffle Your Music in Many Ways
With its sometimes uncanny ability to randomly pluck and play songs that seem perfect together, iTunes’ Shuffle feature has won over a huge number of fans, especially those who don’t want to think about what to listen to as they noodle around the Internet. To start shuffling, click the twisty-arrows icon down on the bottom-left corner of the iTunes window.
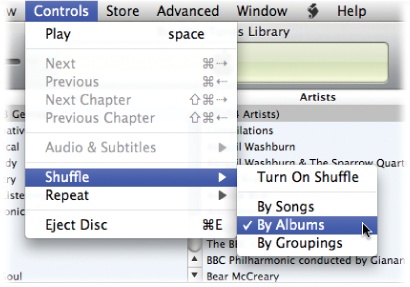
You’re not stuck with a single shuffling method, either. Some days you may feel like mixing up your music song by song, and other days you may be more in the mood to change things up by album.
You can control just what you shuffle by choosing Controls→Shuffle and selecting Songs, Albums, or Groupings from the submenu. (As explained in the next chapter, Grouping is a way to keep cetain tracks together in your iTunes library, like separate classical-music movements that are part of a larger work in the Classical music category.)
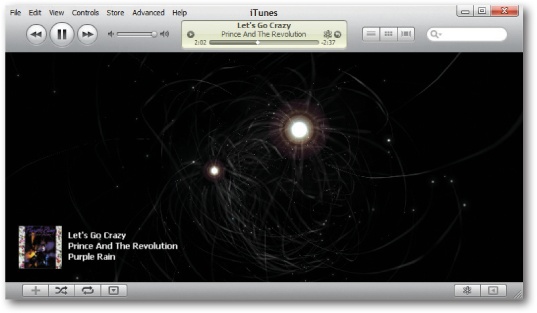
Animate Your Songs: iTunes Visualizer
Visualizer is the iTunes term for an onscreen laser-light show that pulses, beats, and dances in perfect sync to your music. The effect is hypnotic and wild, especially when summoned midway through a sluggish day in the office.
Choose View→Visualizer to select from iTunes Visualizer (lots of Disco in Space moments) or iTunes Classic Visualizer(trippy psychedelic patterns a-go-go). Mac users running OS X 10.5 or later even get three more colorful themes to choose from: Lathe, Jelly, and Stix.
To summon the scenery, choose View→Show Visualizer. The show begins immediately. To see a tiny onscreen menu of even more controls for Visualizer or Classic Visualizer, press the / key and then the letter of the desired command listed on screen. It’s a great way to fiddle.
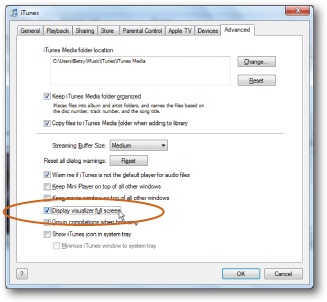
If you find the iTunes window too constraining for all this eye candy, you can play it full screen by going to the Preferences box (Ctrl+comma [⌘-comma]) and clicking the Advanced tab. Put a check in the box next to “Display visualizer full screen.”
True, you won’t get a lot of work done, but when it comes to stress relief, visuals are a lot cheaper than a hot tub.
Get iPod: The Missing Manual, 8th Edition now with the O’Reilly learning platform.
O’Reilly members experience books, live events, courses curated by job role, and more from O’Reilly and nearly 200 top publishers.

