Chapter 2 focused on drawing vector graphics within Flash, a common skill you will need for many projects. In many cases, you may also require bitmap graphics, such as those created in Adobe Photoshop, or you may need to import vector graphics that originated in Adobe Illustrator or another drawing application. This chapter describes how you can use these assets, and provides a few related workflow tips. You’ll also learn a few techniques for creating animations from imported assets.
As the chapter progresses, you’ll see that Flash supports the importing of a wide variety of graphic file formats. For simplicity, however, the import process is initiated the same way for all formats. Regardless of file format, you need only invoke a menu command and choose one or more files from a standard operating system file browser. Flash then presents the appropriate import dialog based on the chosen file type.
You will most likely want to import the file directly to the Stage (File→Import→Import to Stage). With an unlocked layer selected in the Timeline, importing a standard graphic file places the imported asset on the Stage, adds it to the active layer and frame, and places it in the Library. Flash support for native file formats, such as Adobe Photoshop PSD files, includes additional import options that allow the creation of layers and frames based on the structure of the imported file.
If you don’t plan to use the asset immediately, you can import it to your file’s Library (File→Import→Import to Library). This can be very helpful if you intend to batch-import several assets at a time.
Flash supports most standard graphics file formats, as well as several formats typically associated with specific operating systems. Table 4-1 shows the most common file formats available for import into Flash on both Mac and Windows operating systems. Table 4-2 shows additional file formats that are supported when QuickTime 4.0 or later is installed on your Mac or PC.
Table 4-1. Graphics file formats supported for import into Flash
Format | Extension | Additional notes |
|---|---|---|
JPEG | .jpg, .jpeg | |
PNG | .png | If the file includes transparent areas, transparency is preserved; see the Importing from Other Native Formats section later in this chapter. |
GIF | .gif | If the file includes transparent areas, transparency is preserved; static and animated GIFs are supported; animated GIFs are converted to keyframes. |
AutoCAD DXF | .dxf | 3D is not supported and fills are not maintained; best for 2D line drawing, such as floorplans. |
Bitmap | .bmp | |
.wmf | Grouped when imported to the Stage. | |
.emf | Grouped when imported to the Stage. | |
Flash SWF | .swf | SWF must not be protected; flattened and grouped when imported to the Stage; supported animation is converted to keyframe sequence. See the Importing from SWF section, later in this chapter. |
Table 4-2. Graphics file formats supported when QuickTime 4.0 or later is installed
Format | Extension | Additional notes |
|---|---|---|
TIFF | .tif, .tif | Flattened when imported. |
Targa | .tga | Embedded alpha channels are supported. |
PICT | .pct, .pic, .pict | Imports as a flattened bitmap on Windows. |
Silicon Graphics Image | .sgi | |
QuickTime Image | .qti | |
MacPaint | .pntg |
The SWF (“swiff”) file Flash creates when you test or publish a FLA is in a compiled proprietary format. Nevertheless, you can import graphics—and, to some degree, animations—from a SWF as if they were self-contained graphics files. When you import to the Stage, Flash adds graphical assets to the Library and approximates animations in the main Timeline as a sequence of keyframes. When you import to the Library, Flash imports graphical assets, but ignores animations and does not add keyframes to the Timeline.
Note
When you import a SWF, Flash does not import the file as a whole. That is, you cannot embed a SWF inside another SWF. You will learn how to load an external SWF at runtime when reading about components in Chapter 9. For now it’s enough to know that you cannot import a functional SWF during authoring.
Importing from a SWF is possible only if the file was not protected when compiled. Protecting your assets from importing is an optional feature that prevents others from appropriating your content. This feature is found in the file-specific Publish Settings (File→Publish Settings) in the Flash section under Advanced→Trace and debug (Figure 4-1). You will learn more about publishing your files for distribution in later chapters, but this feature, off by default, can be enabled to prevent an FLA from importing SWF content.
Figure 4-1. The Protect from import feature is disabled in Publish Settings to allow import from a SWF
Note
You can experiment with SWF imports by using the companion source code, which includes example SWFs with and without animation.
For Photoshop and Flash users, design productivity dramatically improved with the introduction of Flash’s PSD importer, which can import multilayered PSD files in seconds. Flash not only understands the PSD file architecture, but can also convert select elements of a PSD to Flash assets (like movie clips) during the import process.
An average application or website interface created in Photoshop used to take hours to bring into Flash. You had to save every layer to individual JPEG or PNG files, import them all, reassemble everything on stage, create any necessary movie clips, reapply filter effects, and so on. Using the PSD importer, the same process is nearly automatic and can be completed in seconds. In addition, a useful preferences setting can preconfigure the importer to use your most commonly requested options, speeding up the process even more.
Flash supports many of Photoshop’s layer features when importing a PSD. Table 4-3 shows a concise rundown of supported features, including known limitations.
Table 4-3. PSD features supported during Flash import
Feature | Notes |
|---|---|
Color Mode | Only RGB is supported. CMYK will be converted to RGB. |
Image Layers | Rasterized (converted to bitmap) to Flash bitmaps, transparency is preserved when converted to Bitmap image with editable layer style; when imported as a flattened bitmap, underlying layers seen through the transparency will be merged with the image layer. |
Text Layers | Can be rasterized, converted to vector outlines, or left as an editable text element; text on a path must be rasterized to preserve the appearance. |
Shape Layers | Can be rasterized or left as editable paths. |
Merged Layers | Can be separated or converted to movie clips; adjacent layers can also be merged during import. |
Layer Groups | Converted to Flash layer folders. |
Smart Objects | Editability is not supported; the objects will be rasterized. |
Layer Styles | Are rasterized. |
Blend Modes | Compatible blend modes such as Normal, Darken, Multiply, Lighten, Screen, Hard Light, Difference, and Overlay, for example, are converted to Flash blend modes when Bitmap image with editable layer style is selected; incompatible blend modes are not applied, but their appearance can be preserved if rasterizing the layer to bitmap. |
Adjustment Layers | Not supported; will be applied if the PSD is imported as a flattened bitmap. |
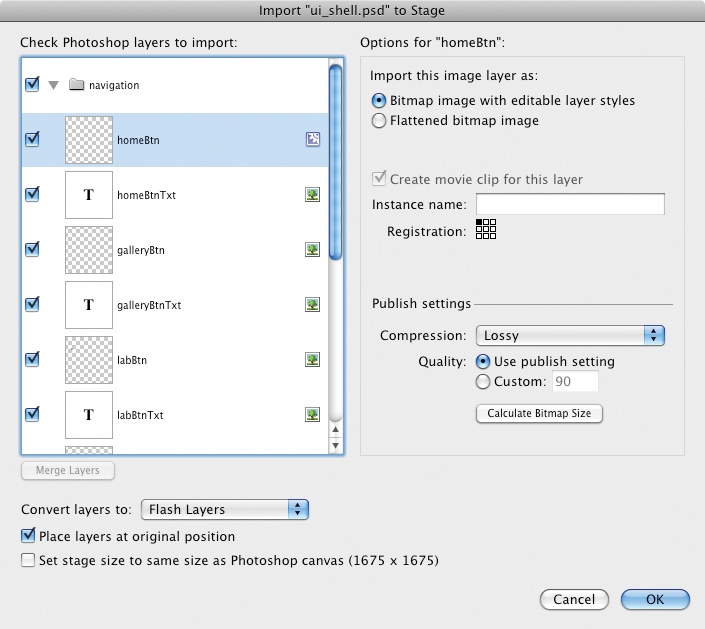
Initiating the import process for PSD files is no different than when importing a standard JPG. You can import to the Stage (File→Import→Import to Stage) or to the Library (File→Import→Import to Library). When you select a PSD file, however, Flash displays a special dialog for accessing the PSD layers (Figure 4-2).
When configuring the Import dialog, the first thing to decide is how you want the assets to flow into Flash. In the lower-left corner of Figure 4-2, the Convert layers to option specifies that PSD layers are converted to Flash layers or keyframes. Typically, you will convert to layers, but the keyframe option makes it possible to create an animation sequence in PSD layers and automatically import that sequence to a frame-by-frame animation. Place layers at original position preserves the location of layer elements during the import. Set stage size to same size as Photoshop canvas adjusts the Flash Stage size to match the dimensions of the PSD. This is handy when creating a Flash file from a PSD interface mockup.
After you determine the destination of your assets, it’s time to configure each layer’s import settings. You can configure each layer type according to the supported features described in Table 4-3. When either configuring image layers or rasterizing another layer type (converting to a bitmap image), you can set compression settings on a layer-by-layer basis. Compression is discussed in greater detail in the Working with Bitmaps section, later in this chapter.
In addition to choosing whether to maintain editability for each layer type or to rasterize to a bitmap, you will need to choose whether or not to create a movie clip symbol for the layer during the import process. A movie clip is necessary if you want to exert ActionScript control, animate the object using tweens (described in the next chapter), apply color effects, and more. In addition, the Flash importer automatically creates movie clips if you choose to preserve layer styles. When in doubt, encapsulate the layer in a movie clip, but you need to supply an instance name only if ActionScript control is required. Finally, you can choose a registration point for each movie clip.
Note
As an added convenience, dragging and dropping a PSD file from your operating system onto the Flash Stage invokes the PSD importer. This is not recommended for other file formats, as it may affect how transparency is rendered. In these cases, it is wisest to import the asset.
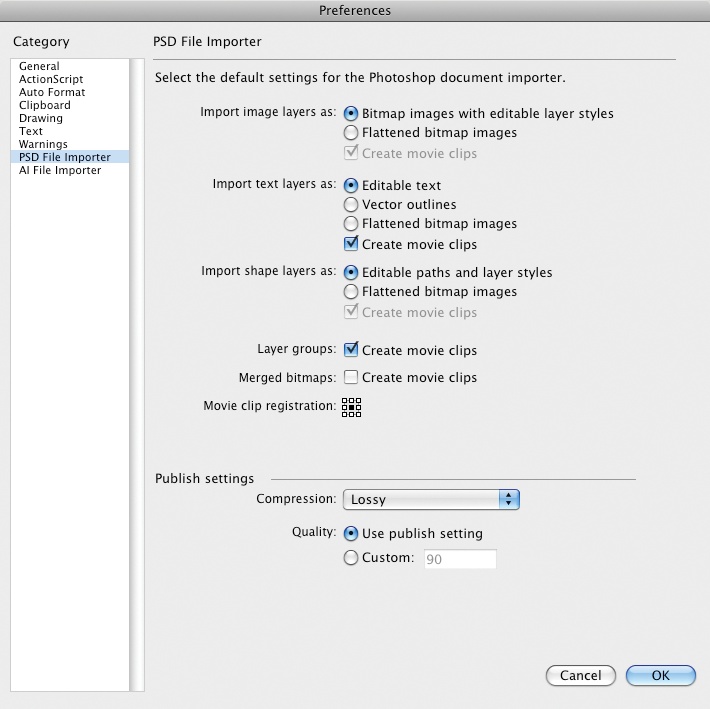
If you find yourself configuring PSD layers for import in a similar manner over and over again, you can save yourself a lot of time by setting these values in the PSD Importer Preferences dialog (on a Mac, Flash→Preferences→PSD File Importer, on a PC, Edit→Preferences→PSD File Importer). In fact, even if you end up having to import an asset more than a time or two (perhaps because you notice mistakes in your PSD file after importing it), it will probably be worthwhile to adjust the preferences for your immediate needs.
Figure 4-3 shows the Preferences dialog. As you can see, the settings mirror those that have already been described. Changing these settingss will only take a few seconds to do each time. However, doing so will save you the time of adjusting each layer repeatedly during the import process.
Importing Adobe Illustrator AI files is very similar to importing PSD files. It is, in fact, easier for two reasons. First, Flash and Illustrator have more in common from a vector-editing standpoint, so many of the features are more compatible from the outset. Second, Flash-specific features have been added to Illustrator that make it possible to create Flash symbols and text elements in Illustrator documents.
Translating Illustrator assets to the Flash world is relatively straightforward. Table 4-4 lists the most common Illustrator features you may wish to preserve and how Flash handles them.
Table 4-4. AI features supported during Flash import
Feature | Notes |
|---|---|
Color Mode | Only RGB is supported. CMYK will be converted to RGB. |
Transparency | Editability is preserved. |
Clip Masks | Editability is preserved. |
Gradient Fills | Editability is preserved. |
Pattern Strokes and Fills | Editability is preserved. |
Effects | Compatible effects such as Drop Shadow, Blur, Glow, and Bevel, for example, are converted to Flash filter effects; incompatible styles are not applied. |
Blend Modes | Compatible blend modes such as Normal, Darken, Multiply, Lighten, Screen, Hard Light, Difference, and Overlay, for example, are converted to Flash blend modes; incompatible blend modes are not applied. |
The real workflow enhancement, however, comes from the ability of any Illustrator user to originate select Flash assets right within Illustrator. Illustrator can create Flash movie clip and graphic symbols, as well as Flash static, dynamic, and input text fields. For more information, see the sidebar Creating Flash Symbols and Text in Adobe Illustrator, next.
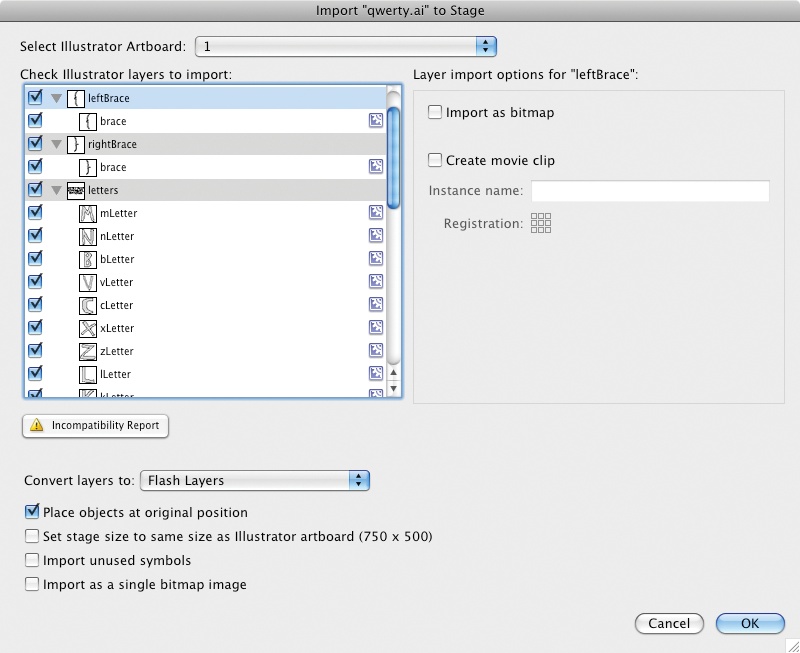
Flash’s AI Importer dialog (Figure 4-7) is nearly identical to its PSD Importer dialog. The only appreciable differences are the fact that you can import unused symbols (symbols in the AI file’s symbol library but not used on the artboard), and the fact that all Flash symbols and text elements created in Illustrator will be preconfigured when the import process begins. In addition, the importer can alert you to incompatibility issues, such as when an asset with a print color mode (CMYK) is imported into the web color (RGB) world of Flash. The Incompatibility Report button immediately below the list of Illustrator layers will generate a report describing any known issues.
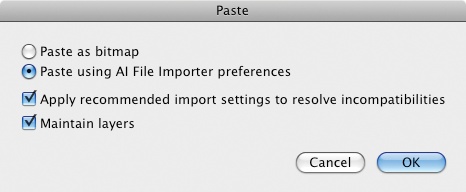
A nice, loosely related difference in the two workflows is that Flash has an improved copy and paste process for assets originating in Illustrator. Copying and pasting assets from Illustrator triggers a dialog (Figure 4-8) that prompts you for a method for handling the clipboard data. You can paste as bitmap or use the AI import preferences, and you can allow Flash to resolve conflicts and maintain layers.
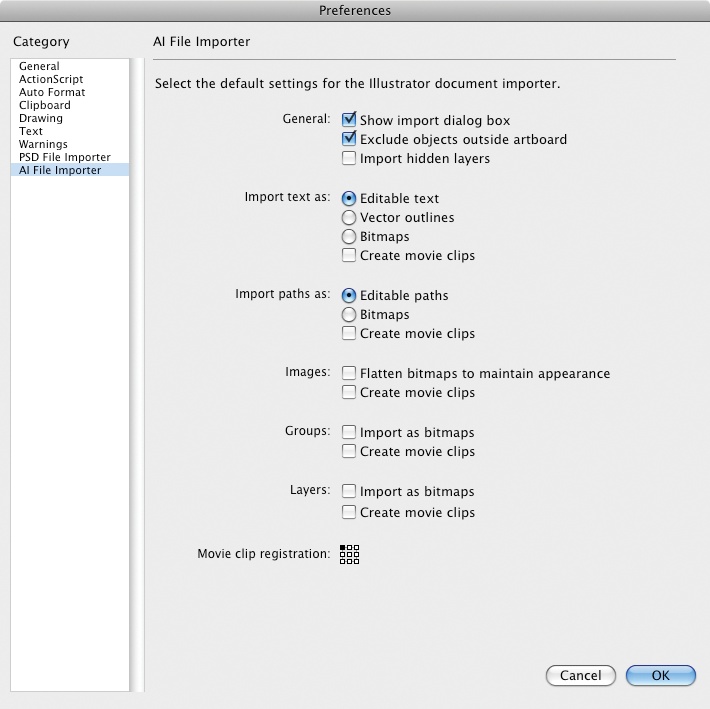
As with the PSD Importer, you can save a lot of time by configuring the preferences option for the AI Importer (Figure 4-9). Its Preferences dialog is nearly identical to the PSD Importer’s, with one notable exception: you can exclude any objects outside the Illustrator artboard. This is convenient for quickly excluding assets during the import into Flash without deleting them in Illustrator.
Flash supports enhanced import options for two more native formats:
- Fireworks
Importing Fireworks files preserves relative asset locations, editable paths and text, compatible blend modes and effects, and more. It will even convert multiple Fireworks pages into their own Flash scenes, if desired. If preferred, you can import a Fireworks asset as a flattened PNG and use Flash’s round-trip editing features to edit changes in Fireworks. You can Control+click (Mac) or right-click (Windows) on the asset in the Library and choose the Edit in Fireworks option to open the file in Fireworks. After effecting the changes, the Flash file will be updated. Note that this only works on files that originated as Fireworks native files and were imported. It will not work on a flattened PNGs or files that were pasted into Flash.
- Freehand
Although the application isn’t still commercially available, legacy Freehand users will appreciate the fact that Freehand import support continues in Flash CS4 Professional. Freehand pages can be converted to Flash scenes or keyframes, and Freehand layers can be converted to Flash layers or keyframes, both of which make it possible to create animations from Freehand assets and to simply import artwork.
Note
The companion website has additional information and sample files for importing assets from Fireworks and Freehand. Even if you don’t have Fireworks or Freehand, you can experiment with these features by importing files provided with the companion source files.
Most of the animations you will create in Flash will originate in the Timeline, as discussed in the next chapter. However, it’s also possible to create animations simply by importing external assets. For example, you can import an image sequence by filling a folder with several sequentially numbered graphics (image_01.jpg, image02.jpg, and so on). Importing the first one prompts Flash to ask if you want to import a sequence; if you consent, Flash automatically imports all the images and creates sequential keyframes for each. Instant animation!
You can even reverse the sequence automatically by selecting all of the frames (select the first frame of the sequence, hold down the Shift key, and select the last frame) and using the Modify→Timeline→Reverse Frames menu command. This is great for creating animation cycles. For example, you could import an image sequence of a squirrel peeking out of a hollow tree. You could then copy and paste the frames, reverse the sequence, and see the squirrel retreat back into its den.
Another nice feature helps when you want to animate more than one discrete element from a single layer. You will learn in the next chapter that timeline animations require that only one element be in each layer, so you must distribute each element to a layer of its own. Select the entire frame in which your multiple objects reside, and use the Modify→Timeline→Distribute to Layers feature. You can then apply the animation techniques that you’ll learn in the next chapter to animate each layer.
Care for bitmaps doesn’t end at the import stage. Flash includes a few features designed to help you work with pixel-based artwork in authoring mode. Options like manipulating compression settings, converting an image to vectors, and using a bitmap as a fill allow you to do more than just display static bitmaps.
Publish Settings (File→Publish Settings) is a file-wide set of preferences that allows you to control many ways in which your SWF will behave. One such feature is the JPEG compression quality applied to certain embedded bitmaps (Figure 4-10). You can set the quality of the image and enable JPEG deblocking to help smooth out some of the visual artifacts caused by compression. This global setting applies to images pasted into Flash or imported as part of a larger file by way of one of the native file-format importers (such as the PSD Importer). It doesn’t apply to individually imported bitmaps. To specify settings for the latter, use the Bitmap Properties feature described in the next section.
Note
To learn more about Publish Settings, see Chapter 14.
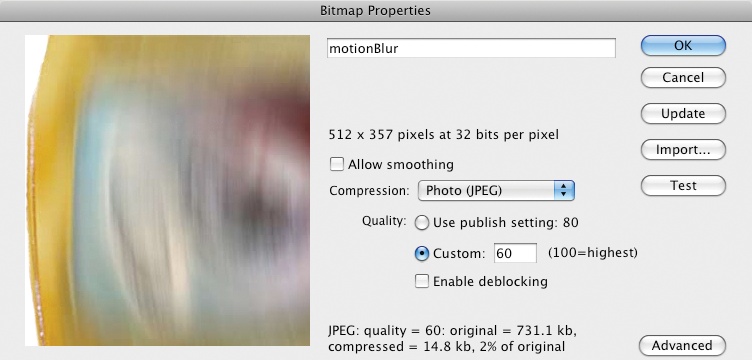
You can also vary compression settings on an asset-by-asset basis. If you select a bitmap in the Library and click the Properties button in the lower-left corner of the panel, you will open the Bitmap Properties dialog. Shown in Figure 4-11, the available options follow.
- Update and Import
When a bitmap is imported, clicking Update replaces the internal asset with the external source. This is a simple way to update a bitmap with a more current version without having to import a new file and replace all instances derived from it. If the bitmap was pasted into Flash or imported as part of a larger file by one of the native file-format import assistants, Update serves the same purpose as Import. Clicking Import opens a file browser dialog and allows you to import a replacement asset. All instances created from the prior bitmap are updated automatically.
- Compression
This setting lets you choose between a lossy compression algorithm, called Photo (JPEG), and a lossless option, called Lossless (PNG/GIF). You need not select an algorithm based on the file type. For example, you can choose the lossless compression option for a bitmap imported from a JPEG.
Note
Historically, JPEG compression is best for continuous-tone images (such as photos and gradients), PNG compression is best for transparency, and GIF compression is best for large areas of solid colors. However, because Flash allows you to switch algorithms after an image has been imported, the choice of lossy versus lossless compression ultimately comes down to a balance of visual quality and file size.
- Quality
If the Lossless (PNG/GIF) compression option is selected, no quality options are available. If the Photo (JPEG) option is selected, you can dictate whether Flash uses a preset quality value or a custom setting. The custom setting allows you to specify any quality value and enable deblocking. There are two types of preset settings. If the bitmap was imported directly, you can use the imported JPEG data (not pictured in Figure 4-11). That is, if you customize the compression values in Photoshop, this setting will use that data. If the file was pasted in or imported by a native file importer, you can tell Flash to use the file-wide publish settings quality value.
- Test
Clicking this button test-compresses the bitmap using the compression option you specify. It also displays text at the bottom of the dialog showing the before and after size of the file and the percent of file size saved. This is handy for experimenting with quality sizes to see how much it will affect the size of the final SWF.
- Allow Smoothing
This option smoothes the edges of images and is helpful when scaling bitmaps, particularly during animation.
Note
The advanced bitmap properties options not pictured in Figure 4-11 are related to ActionScript and will be discussed in Chapter 6.
Occasionally, you may have a need or desire to convert a bitmap to a collection of vectors. The most compelling reason to do this is to edit or animate the graphic. Another useful reason to trace a bitmap is to scale the image to a much larger size. Enlarging a bitmap can cause blurriness and make the individual pixels too pronounced—an effect called pixelation. When you enlarge a vector, however, it remains crisp at any size because it is composed of lines and points that are redrawn each time the vector is scaled.
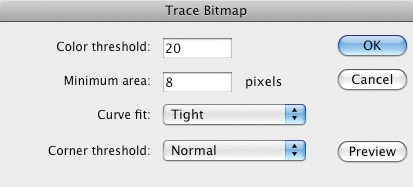
To trace a bitmap, select the bitmap and use the Modify→Bitmap→Trace Bitmap menu command. Use the dialog that appears (Figure 4-12) to set tolerances used when tracing. Color threshold determines when a new color in the bitmap is identified for tracing. The lower the threshold, the more colors will be seen as unique, and the more vectors will be created. Minimum area sets a minimum limit for the number of adjacent pixels within the same color threshold that must be found to create a new vector. The Curve fit menu contains six presets that prompt the trace routine to fit curves tighter or looser to the original image color areas. Tighter curves are more accurate and looser curves “round out” the color areas. Finally, the Corner threshold works much the same way, allowing you to choose more or fewer corners in the final trace. More corners make the trace closer to the original.
Note
Look to the companion website for an interesting example of tracing bitmaps that includes ActionScript animation and a round-trip editing workflow from Flash to Illustrator and back again.
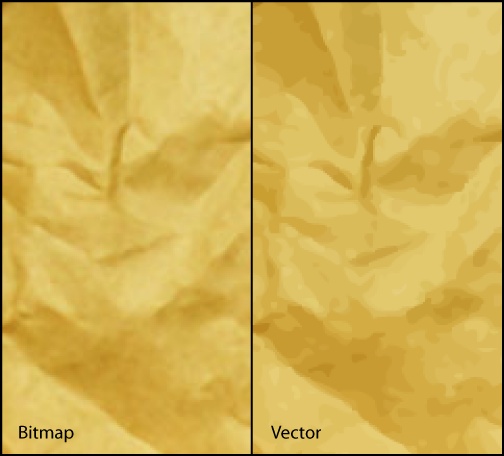
As the trace’s visual fidelity improves, the resulting vectors become more complex. Smaller Color Threshold and Minimum Area settings, tighter curves, and more corners create many more vectors that must be drawn by the viewer’s computer at runtime. The respective default values of 100, 8, Normal, and Normal produce a coarser tracing with fewer vectors. Figure 4-13 shows before and after trace images of a crumpled piece of paper, which appears as a background in the portfolio project. To achieve this level of accuracy, the values in Figure 4-12 were used, increasing the number of curves used in the trace.
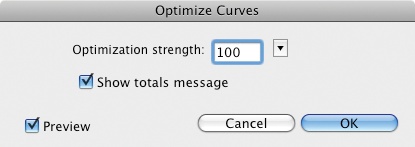
Flash provides an Optimize Curves feature (Modify→Shape→Optimize) for reducing the complexity of a vector shape and, thus, the file size (Figure 4-14). You can vary the optimization strength from 0 to 100, preview the effect of the setting, and receive an optimization report. The vector image in Figure 4-13 was optimized with a setting of 100 and resulted in a 17% reduction in curves, but still maintained acceptable visual fidelity.
Another bitmap manipulation technique is to use the bitmap as a tiled fill. This is most common when using photographic textures as fills or when filling large shapes where an equivalent bitmap would increase file size too significantly. Often, seamless tiles are used for fills, which are rectangles optimized to hide any seams when the tiles are joined. Figure 4-15 shows a seamless tile and a bitmap fill created from that tile.
To use a bitmap fill, open the Color panel, select the fill chip, and set the Type menu to Bitmap. This will show a series of thumbnails of all the bitmaps in the current file’s Library panel. Select the bitmap you prefer and then apply the fill with the Paint Bucket just as you would apply solid or gradient color fills. Any new shape that you draw while the bitmap fill is active will also use that tile, and you can even apply tiles to strokes.
So far, you’ve created component parts of your portfolio. While that will continue, it’s now time to create the master file into which all other assets will be placed. This file will contain the user interface elements common to all screens, including navigation buttons, logo, and so on.
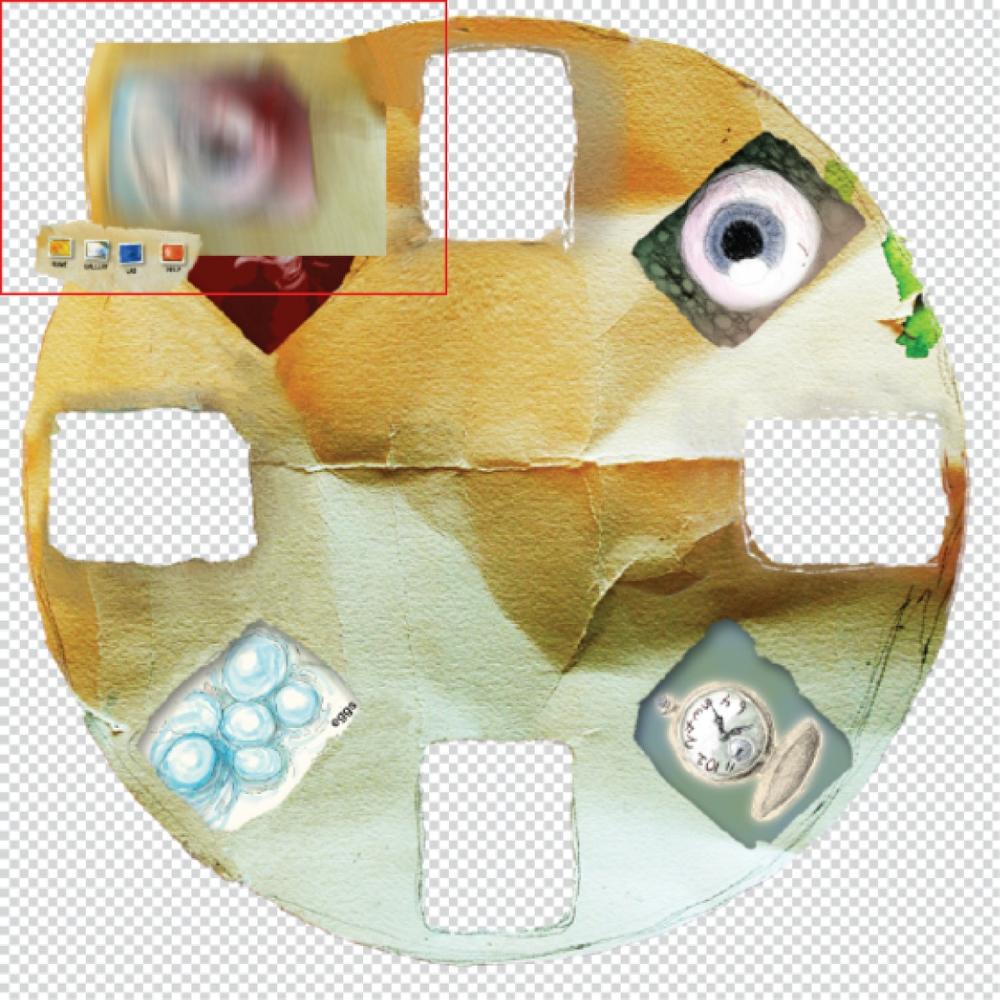
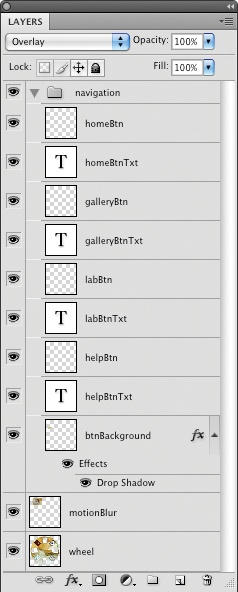
Before you import the native Photoshop document (PSD), it helps to understand how the file is constructed and what the portfolio will look like. In particular, the PSD uses an optimization technique that improves working with large bitmaps, and warrants scrutiny. Figure 4-16 shows the artwork in the PSD, and Figure 4-17 shows its layer configuration.
The design for the portfolio is based on a large viewing wheel that reveals each screen as it rotates. Figure 4-16 shows the wheel in the center of the document and the remainder of the interface in the upper-left corner. This arrangement allows you to import the entire interface in one process. The PSD is actually 1,675×1,675 pixels. The upper-left corner (outlined by a red reference outline that doesn’t appear in the artwork) is 750×500 pixels, the size of the Flash document.
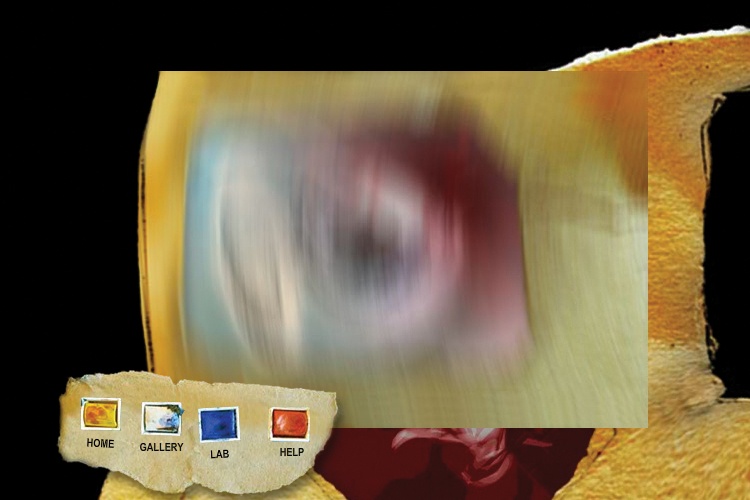
The portfolio’s four navigation buttons are in the lower-left corner of the highlighted area. In Chapter 7, you will add filter effects to the Up, Over, and Down states of these buttons to give them their final appearances. The upper-right corner of this area will contain a logo you will import from Adobe Illustrator later in this chapter. The lower-right corner of the region is the eventual location of the sound controller you created in Chapter 3. Finally, the center of the highlighted area contains a graphic used to improve the experience of switching screens.
Figure 4-16. The project user interface PSD; the red outline, for reference only, indicates Flash file dimensions
When navigating to a new screen, the wheel rotates a few times and then slows down and stops at the chosen screen. To make the rotation time fast and consistent, the portfolio uses a motion blur illusion. Motion blur is a directional blur that fools the eye into thinking an object is in motion—a trick that has served animators for decades. When the wheel is rotating fast enough, the project fades in a graphic on top of the wheel. The graphic is a composite of the art in the wheel and is blurred to simulate circular motion. This reinforces the movement of the wheel in the viewer’s mind. When the wheel begins to slow down, the motion blur fades away. This trick lets you move from any frame to any other frame in the same amount of time without appearing clunky or reducing the impact of the rotating wheel.
Figure 4-17 shows the layers in the PSD. The top nine rows of the document comprise the navigation system. Four pairs of button art and text sit atop a background, and all of these layers are contained in a layer group called navigation. Each button text layer is editable text, and a drop shadow layer style is applied to the background behind the buttons.
The motion blur and wheel reside in their own layers. Both are reduced to approximately 70% of their eventual size. This is a trick to reduce the file size of the final project SWF. Bitmaps can add a lot to file size, so it’s sometimes helpful to reduce them prior to importing. However, if you reduce them too much, they will appear blurry when enlarged to full size. By reducing the images to this degree in the PSD, you will only need to enlarge them 140% in the FLA to reach their desired sizes.
Create a new FLA using the File→New menu command. This file will serve as the master project file into which all other assets will be placed, so you don’t need to use the content template you created in Chapter 1. Save your file as portfolio.fla.
Change the document settings (Modify→Document) to apply the correct dimensions and Stage color. Set the size of the file to
750×500pixels. Uncheck the Adjust 3D Perspective Angle to preserve current stage projection checkbox (you’ll learn more about this and other 3D properties in Chapter 8). Set the Stage color toblack.Use the Import to Stage menu item (File→Import→Import to Stage) and, in the file browser dialog, select the provided source file, ui_shell.psd.
In the lower-left corner of the dialog that appears, set the Convert layers to option to
Flash Layers, and enable the Place layers at original position option. Be sure the Set stage size to same size as Photoshop canvas option is not enabled. You want to preserve your file size, rather than match the much larger size of the interface’s wheel asset.
If you set your PSD import preferences as described earlier in the Configuring the PSD Importer preferences section of this chapter, most of your work will be done for you. This is because Flash will automatically preconfigure each layer according to your preferences, based on the layer type.
If all of the layers in the Import dialog are already set to import as movie clips, your preferences match the options discussed herein. Skip to step 10. If you’ve chosen to configure each layer, continue with step 6.
Select all layers (click the navigation layer group at the top of the scrolling list, hold down the Shift key, scroll down to the bottom of the list, and click the wheel image layer). Enable the Create movie clips for these layers option and choose a center registration point.
Select each image layer and set it to Bitmap image with editable layer styles. While doing this, set the Publish Settings of each image layer to
Lossycompression and choose theUse publish settingquality.Select each text layer and set its import option to
Editable text.One by one, select the navigation layer group, and the motionBlur and wheel image layers, and give each movie clip an instance name that matches its layer name.
All that remains is to give the navigation buttons instance names. Select the homeBtn layer and name its movie clip
home. Follow suit so galleryBtn becomesgallery, labBtn becomeslab, and helpBtn becomeshelp.Click OK to complete the import process. Save your work. Your file should look like Figure 4-18. Compare it in greater detail to the furnished source file portfolio_01.fla. If your file doesn’t closely resemble the furnished source, reconfirm your steps or continue with the provided file.
Note
As a typical project progresses, you will usually add several assets to your library. In addition to creating symbols as you work, you will likely import, copy and paste, or drag and drop symbols, bitmaps, sounds, and more, from external sources.
In doing so, your library will become cluttered, so you may want to organize it now and then by grouping assets into folders. How you arrange your files is often a matter of preference, but the companion source FLAs will periodically organize the Library to show you different ways of managing your assets.
For more information on using the Library, see the companion website.
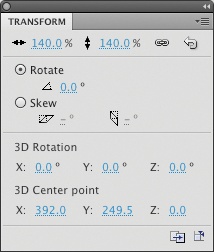
Using the Transform panel (Figure 4-19), lock the link to the right of the scale properties and scale the motionBlur movie clip proportionally to
140%. Wait to scale the wheel until the next chapter.Save your work.
When a page of the portfolio is displayed, its content will appear in one of the square holes punched into the viewing wheel. As such, you must use a contrasting background image so your assets don’t disappear into the black Stage color. It would be trivial to change the Stage color, but that option is unappealing for two reasons. First, a flat-colored stage won’t match the portfolio design and, second, the black stage color supports the illusion that the interface elements are free-floating and the wheel is spinning in place.
Another solution is to import a background graphic of crumpled paper to sit behind the wheel. This matches the design of the portfolio and, as the wheel spins, the empty frames reveal the background. When the wheel stops, your screen content animates in front of the texture.
In your portfolio.fla file, add a new layer at the top of the Timeline and name it
background.Select the frame in that layer and import (File→Import→Import to Stage) the provided source file paper_background_small.jpg. The smaller dimensions of this graphic will save on SWF file size later on, but the image must be scaled up to fill the area visible through the wheel frames. Select the bitmap and, using the Properties panel, set its width and height to
625and500, respectively.Create a movie clip from the bitmap. With the bitmap still selected, use Modify→Convert to Symbol. Name the movie clip
paperand choose a center registration point from the nine-point grid.Using the Properties panel, set the x and y of the movie clip to
395and250, respectively.Click on the layer and drag it to the bottom of all other layers to make sure the background is below the wheel.
Note
Optionally, experiment with tracing bitmaps by tracing the crumpled background paper. Use an efficient setting, as described earlier in this chapter in the Tracing a Bitmap section, and compare the bitmap and vector versions of the asset. Determine which is more satisfactory: a bitmap scaled to 200% (with possible blurriness) or a traced bitmap (with a possibly coarser blending of colors).
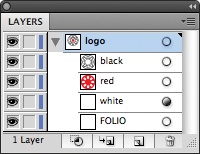
Having imported the main interface assets from Adobe Photoshop, you’ll now import two assets from Adobe Illustrator. The first is the portfolio logo, which you’ll configure during the import process. The second is for the Lab screen you’ll program later on, and that asset was preconfigured in Illustrator to smooth the import process. Before you get to that point, take a look at the logo (Figure 4-20) and the Illustrator file’s layers (Figure 4-21).
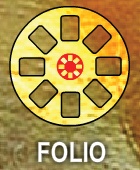
Figure 4-20 shows a sneak peek at the logo after importing because its background and text appear white in Illustrator and are difficult to see. This is reflected in the layer thumbnails in Figure 4-21, in the white and FOLIO layers. The logo consists of four discrete elements: the word “Folio” in white text, a white background, a red center icon, and black outlines. All four parts are named appropriately and reside in a single layer named logo. The white logo background does not appear white in Figure 4-20 because a blend mode has been applied in Illustrator. You’ll learn more about blend modes in Chapter 7 but, for now, you’ll see that the blend mode is preserved during the AI import process and remains editable in Flash.
In your portfolio.fla file, click the motionBlur layer in the Timeline panel and then add a new layer. Don’t worry about its name, as you’ll change it later.
Select a frame in the new layer and import (File→Import→Import to Stage) the provided source file logo.ai.
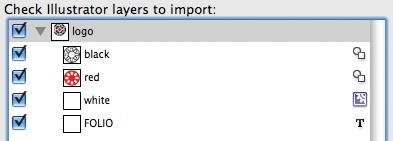
The AI File Importer appears, and the layer structure of the file will be reflected in the dialog (Figure 4-22). The icons to the right of the element names indicate that the black and red elements are set to import as editable shapes, the text is set to import as editable text, and the white background element is set to import as a movie clip. If your icons don’t match these options, revisit the Configuring the AI Importer preferences section earlier in the chapter.
Even though the AI File Importer preferences discussed earlier in the chapter do not automatically create movie clips, the logo’s white background element is set to import as a movie clip before configuring any further options. This is necessary to preserve the blend mode applied in Illustrator. If you alter this import option, the dialog will display a warning that an incompatibility exists, and the blend mode will not be translated into Flash.
Hold down your Shift key and click on the logo, black, red, and white elements and check the Create movie clip checkbox. Give the movie clips a center registration point by clicking the center box in the 9-box grid marked Registration. These options are shown in Figure 4-23.
Individually select the logo, black, red, and white elements and give them movie clip instance names that match their names in the dialog.
At the bottom of the dialog, choose to Convert layers to a Single Flash Layer, and to Place objects at original position. The Illustrator document is the same size as your portfolio FLA’s stage, so the logo will appear in the correct position after import.
Click the OK button to import. You will notice that the layer name has assumed the name of the AI file. Rename it to logo.
Double-click on the movie clip on the stage, and you will see everything in a single layer. In Chapter 7, it will be easier to work with the logo as separate parts, so you a nice productivity tip to move each element to its own layer. Select everything by clicking once in the frame in the Timeline panel, and use the Modify→Timeline→Distribute to Layers menu command. A layer for each logo part will be created, along with the original, now empty default layer. Delete the latter, as you will no longer need it.
Return to the stage using Edit→Edit Document and save your file. You are now finished with the logo until you revisit it later in Chapter 7 to put blend modes to work.
Lab, short for laboratory, is a name often given to an experimental section of a project. In the portfolio project, the Lab screen is a place to show design and coding experiments, and focuses on a text animation tool. In the finished project, the user types into a text field and triggers an animation in the corresponding on-screen letters.
Because the Flash assets for the Lab screen were prepared for you in Adobe Illustrator, the import process is nearly effortless. There is only one thing you need to do to compensate for a feature of the AI importer.
As you saw when importing the logo, when importing directly to the Stage, two options help control placement of assets. You can change the size of the Stage to match the dimensions of the Illustrator document, and you can place the imported assets at their original positions in the Illustrator document, relative to the upper-left corner of the Stage.
However, when importing into a movie clip, these options are not available. This behavior mimics the process of importing to the Library instead of the Stage, where position is not relevant. Unfortunately, you want to automatically position the elements in your movie clip, too. You’re importing into a movie clip because you’ve prepared your workflow to ease asset integration in the future. When the time comes, you will transfer the Lab movie clip to the main project FLA, and your prep work will really pay off.
There are a few ways to work around the issue. First, you can import directly to the Stage and then create a new movie clip once the import is complete. In this case, you will need to manually adjust the location of the assets after the movie clip is created because the movie clip registration point will not be (0, 0). This will make transferring the movie clip to your main file more troublesome later on, so it is not ideal.
A better approach is to continue to use the content movie clip in your template. Import to the Stage, copy the newly imported assets to the clipboard, open the content movie clip, and then Paste in Place (Edit→Paste in Place) to preserve their prior locations. Because the registration point of your content movie clip is also (0, 0), the assets will be right where you want them. This is the approach you should use when confronted with a similar situation without control over your imported assets.
However, there’s another trick that continues your workflow optimization by preparing for this issue while still in Illustrator. By simply adding a placeholder asset in the upper-left corner of your matching-size Illustrator document, the placeholder will correspond to point (0, 0) after import and all the assets will be correctly positioned. This trick has been used in the furnished source files, and all you need to do is remove the placeholder asset:
Create a new file using your Content template and double-click the content movie clip to prepare for importing.
Create a new layer and delete the placeholder layer. Your movie clip should now have only one layer with nothing in it.
Select the frame in that layer and import (File→Import→Import to Stage) the provided source file qwerty.ai.
All the work you would have put into the Import dialog has been done for you in Illustrator, so just click OK to continue with the import.
Note
Remember, importing AI files is nearly identical to importing PSD files, so you can easily experiment with the process using your own files. Rather than focusing on that process again, this portion of the exercise focuses on workflow and collaboration between Illustrator and Flash users.
Once the import is complete, the assets will be correctly positioned and you will see a small pink square in the upper-left corner. Look at the Timeline panel and you will see a layer at the top of the Timeline called placeholder. Delete this layer, and you’re done.
Save your file as lab_page.fla and compare it to the provided source file, lab_page_final.fla.
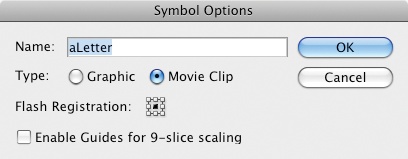
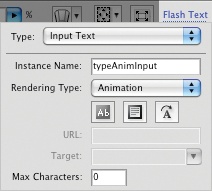
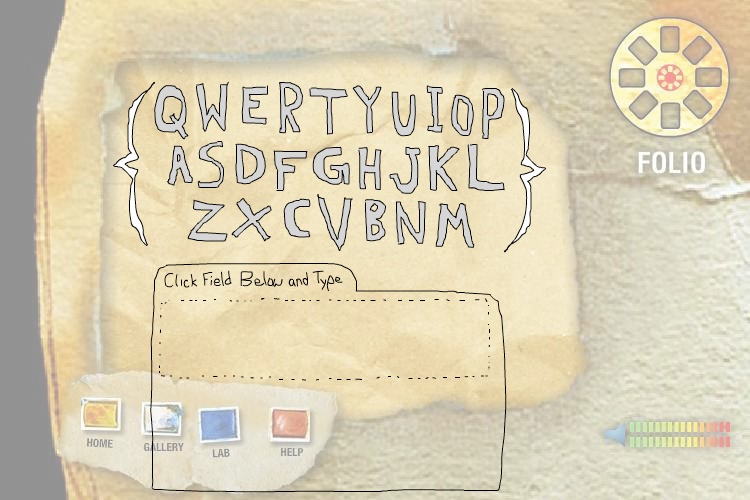
Figure 4-24 shows the finished movie clip after removing the placeholder layer. Poke around and see that the braces, letters, and the tabbed card at the bottom of the screen are all movie clips. Double-click the tabbed card and look inside to find a group. Grouping elements in Illustrator helps preserve their relative locations during the import process. Break this group apart (Edit→Break Apart), and you’ll find that the text field already has an instance name. This is ready to program with ActionScript, which you’ll do in Chapter 6.
Get Learning Flash CS4 Professional now with the O’Reilly learning platform.
O’Reilly members experience books, live events, courses curated by job role, and more from O’Reilly and nearly 200 top publishers.

