It’s time to meet the key player in Rails applications. Controllers are the components that determine how to respond to user requests and coordinate responses. They’re at the heart of what many people think of as “the program” in your Rails applications, though in many ways they’re more of a switchboard. They connect the different pieces that do the heavy lifting, providing a focal point for application development. The model is the foundation of your application’s data structures, which will let you get information into and out of your databases.
Warning
Controllers are important, certainly a “key player,” but don’t get too caught up in them. When coming from other development environments, it’s easy to think that controllers are the main place you should put application logic. As you get deeper into Rails, you’ll likely learn the hard way that a lot of code you thought belonged in the controller really belonged in the model, or sometimes in the view.
Controllers are Ruby objects. They’re stored in the app/controllers directory of your application.
Each controller has a name, and the object inside of the controller file
is called nameController.
Demonstrating controllers without getting tangled in all of Rails’ other components is difficult, so for an initial tour, the application will be incredibly simple. (You can see the first version of it in ch04/guestbook01.) Guestbooks were a common (if kind of annoying) feature on early websites, letting visitors “post messages” so that the site’s owner could tell who’d been there. (The idea has since evolved into more sophisticated messaging, like Facebook’s Timeline.)
Note
If you’ve left any Rails applications from earlier chapters
running under rails server, it would
be wise to turn them off before starting a new application.
To get started, create a new Rails application, as we did in Chapter 1. If you’re working from the command line, type:
rails new guestbook
Rails will create the usual pile of files and folders. Next, you’ll want to change to the guestbook directory and create a controller:
cd guestbook
rails generate controller entries
    create  app/controllers/entries_controller.rb
    invoke  erb
    create    app/views/entries
    invoke  test_unit
    create    test/functional/entries_controller_test.rb
    invoke  helper
    create    app/helpers/entries_helper.rb
    invoke    test_unit
    create      test/unit/helpers/entries_helper_test.rb
    invoke  assets
    invoke    coffee
    create      app/assets/javascripts/entries.js.coffee
    invoke    scss
    create      app/assets/stylesheets/entries.css.scss
If you then look at app/controllers/entries_controller.rb, which is the main file we’ll work with here, you’ll find:
class EntriesController < ApplicationController
end
This doesn’t do very much. However, there’s an important
relationship in that first line. Your EntriesController inherits from ApplicationController. The ApplicationController object lives in app/controllers/application_controller.rb,
and it also doesn’t do very much initially, but if you ever
need to add functionality that is shared by all of the controllers in your
application, you can put it into the ApplicationController object.
To make this controller actually do something, we’ll add a method.
For right now, we’ll call it sign_in,
creating the very simple object in Example 4-1.
Example 4-1. Adding an initial method to an empty controller
class EntriesController < ApplicationController

  def sign_in

  end

end
We’ll also need a view, so that Rails has something it can present to visitors. You can create a sign_in.html.erb file in the app/views/entries/ directory, and then edit it, as shown in Example 4-2.
Note
You can also have Rails create a method in the controller, as well as a basic view at the same time that it created the controller, by typing:
rails generate controller entries sign_in
You can work either way, letting Rails generate as much (or as little) code as you like.
Example 4-2. A view that lets users see a message and enter their name
<h1>Hello <%= @name %></h1>

<%= form_tag :action => 'sign_in' do %>
   <p>Enter your name:
   <%= text_field_tag 'visitor_name', @name %></p>

   <%= submit_tag 'Sign in' %>

<% end %>
Example 4-2 has a lot of new pieces to it because it’s using helper methods to create a basic form. Helper methods take arguments and return text, which in this case is HTML that helps build your form. The following particular helpers are built into Rails, but you can also create your own:
The
form_tagmethod takes the name of our controller method,sign_in, as its:actionparameter.The
text_field_tagmethod takes two parameters and uses them to create a form field on the page. The first,visitor_name, is the identifier that the form will use to describe the field data it sends back to the controller, while the second is default text that the field will contain. If the user has filled out this form previously, and our controller populates the@namevariable, it will list the user’s name. Otherwise, it will be blank.The last helper method,
submit_tag, provides the button that will send the data from the form back to the controller when the user clicks it.
Once again, you’ll need to enable routing for your controller. You’ll need to edit the config/routes.rb file. Remove the # that has been bolded below:
# match ':controller(/:action(/:id))(.:format)'
    end
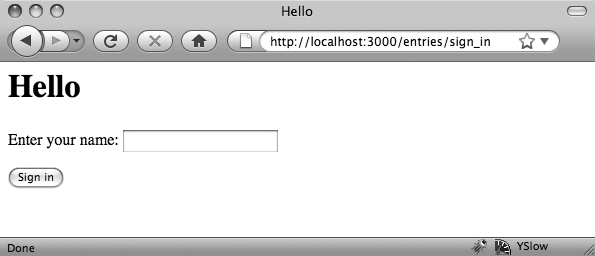
If you start up the server and visit http://localhost:3000/entries/sign_in, you’ll see a simple form like Figure 4-1.
Now that we have a way to send data to our controller, it’s time to update the controller so that it does something with that information. In this very simple case, it just means adding a line, as shown in Example 4-3.
Example 4-3. Making the sign_in method do something
class EntriesController < ApplicationController

  def sign_in
    @name = params[:visitor_name]
  end

end
The extra line gets the visitor_name parameter from the request header
sent back by the client and puts it into @name. (If there wasn’t a visitor_name parameter, as would be normal the
first time this page is loaded, @name
will just be blank.)
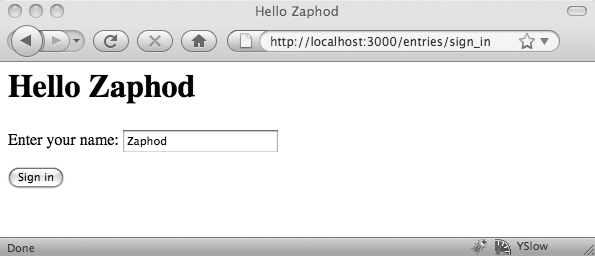
If you enter a name into the form, you’ll now get a pretty basic hello message in return, as shown in Figure 4-2. The name will also be sitting in the form field for another round of greetings.
Warning
If, instead of Figure 4-2, you get a strange
error message about “wrong number of arguments (1 for 0),” check your
code carefully. You’ve probably added a space between params and [, which produces a syntax error whose
description isn’t exactly clear. (This seems to have gone away in Ruby
1.9.2.)
The controller is now receiving information from the user and passing it to a view, which can then pass more information.
There is one other minor point worth examining before we move on,
though: how did Rails convert the http://localhost:3000/entries/sign_in URL into a call to
the sign_in method of the entries controller? If you look in the config directory of your application, you’ll
find the routes.rb file, which
contains the rule we enabled for choosing what gets called when a request
comes in:
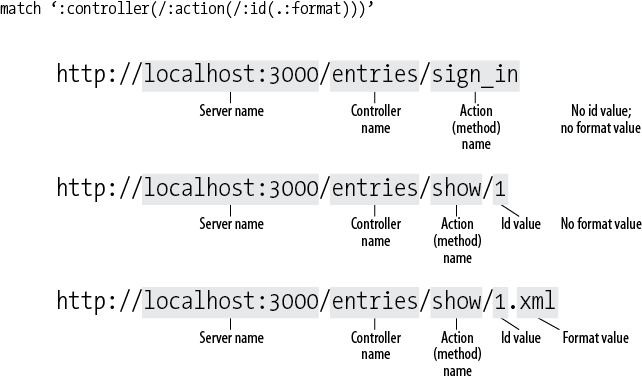
match ':controller(/:action(/:id(.:format)))'
In this case, entries mapped to
:controller, and sign_in mapped to :action. Rails used this simple mapping to
decide what to call. We don’t have an :id or a :format—yet. (And as Chapter 2 demonstrated, if there hadn’t been an
:action, Rails would have defaulted to
an :action named index.) Figure 4-3 shows how Rails
breaks down a URL to decide where to go.
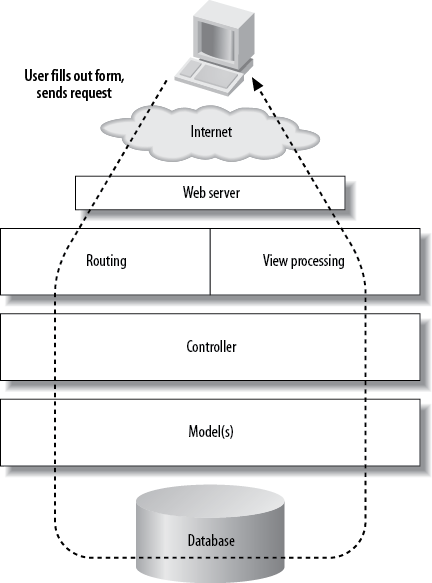
The Rails approach to handling requests, shown in Figure 4-4, has a lot of moving parts between users and data.
Rails handles URL processing instead of letting the web server pick which file to execute in response to the request. This allows Rails to use its own conventions for deciding how a request gets handled, called routing, and it allows developers to create their own routing conventions to meet their applications’ needs.
The router sends the request information to a controller. The controller decides how to handle the request, centralizing the logic for responding to different kinds of requests. The controller may interact with a data model (or several), and those models will interact with the database if necessary. The person writing the controller never has to touch SQL, though, and even the person writing the model should be able to stay away from it.
Once the controller has gathered and processed the information it needs, it sends that data to a view for rendering. The controller can pick and choose among different views if it needs to, making it easy to throw an XML rendering on a controller that was originally expecting to be part of an HTML-generating process. You could offer a variety of different kinds of HTML—basic, Ajax, or meant for mobile—from your applications if necessary. Rails can even, at the developer’s discretion, generate basic views automatically, a feature called scaffolding. Scaffolding makes it extremely easy to get started on the data management side of an application without getting too hung up on its presentation.
The final result comes from the view, and Rails sends it along to the user. The user, of course, doesn’t need to know how all of this came to pass—the user just gets the final view of the information, which hopefully is what they wanted.
Now that you’ve seen how this works in the big picture, it’s time to return to the details of making it happen.
Most applications will need to do more with data—typically, at least, they’ll store the data and present it back as appropriate. It’s time to extend this simple application so that it keeps track of who has stopped by, as well as greeting them. This requires using models. (The complete application is available in ch04/guestbook02.)
Warning
As Chapter 5 will make clear, in most application development, you will likely want to create your models by letting Rails create a scaffold, since Rails won’t let you create a scaffold after a model with the same name already exists. Nonetheless, understanding the more manual approach will make it much easier to work on your applications in the long run.
Keeping track of visitors will mean setting up and using a database. This should be
easy when you’re in development mode, as Rails now defaults to
SQLite, which doesn’t require explicit configuration.
(When you deploy, you’ll still want to set up a database, typically
MySQL, as discussed in Chapter 20.) To test whether SQLite is installed on your system, try
issuing the command sqlite3 -help
from the command line. If it’s there, you’ll get a help message. If not,
you’ll get an error, and you’ll need to install SQLite.
Once the database engine is functioning, it’s time to create a
model. Once again, it’s easiest to use generate to lay a foundation, and then add
details to that foundation. This time, we’ll create a simple model
instead of a controller and call the model entry:
rails generate model entry
              invoke  active_record
              create    db/migrate/20110221152951_create_entries.rb
              create    app/models/entry.rb
              invoke    test_unit
              create      test/unit/entry_test.rb
              create      test/fixtures/entries.yml
For our immediate purposes, two of these files are critical. The first is app/models/entry.rb, which is where all of the Ruby logic for handling a person will go. The second, which defines the database structures and thus needs to be modified first, is in the db/migrate/ directory. It will have a name like [timestamp]_create_entries.rb, where [timestamp] is the date and time when it was created. It initially contains what’s shown in Example 4-4.
Example 4-4. The default migration for the entry model
1  class CreateEntries < ActiveRecord::Migration
2    def change
3      create_table :entries do |t|
4
5        t.timestamps
6      end
7    end
8  end
There’s a lot to examine here before we start making changes.
First, note on line 1 that the class is called CreateEntries. The model may be for an entry,
but the migration will create a table for more than one entry. Rails
names tables (and migrations) for the plural, and can handle most common
English irregular pluralizations. (In cases where the singular and
plural would be the same, you end up with an s
added for the plural, so deer become deers and sheep become sheeps.)
Many people find this natural, but other people hate it. For now, just
go with it—fighting Rails won’t make life any easier.
Also on line 1, you can see that this class inherits most of its
functionality from the Migration
class of ActiveRecord. ActiveRecord
is the Rails library that handles all the database
interactions. (You can even use it separately from Rails, if you want
to.)
The action begins on line 2 with the change method. Rails used to have separate self.up and
self.down methods, one to build
tables and one to take them down, but Rails 3.1 got smarter. It’s smart
enough to understand how to run change backwards to
roll back the migration—effectively it provides you with “undo”
functionality automatically.
Note
This example takes the slow route through creating a model so you can see what happens. In the future, if you’d prefer to move more quickly, you can also add the names and types of data on the command line, as you will do when generating scaffolding in Chapter 5.
The change method operated on a table called
Entries. Note that the migration is not concerned with what kind of
database it works on. That’s all handled by the configuration
information. You’ll also see that migrations, despite working pretty
close to the database, don’t need to use SQL—though if you really want
to use SQL, it’s available.
Storing the names people enter into this very simple application requires adding a single column:
create_table :entries do |t|
  t.string :name
  t.timestamps
end
The new line refers to the table (t) and creates a column of type string, which will be accessible as :name.
Note
In older versions of Rails, that new line would have been written:
t.column :name, string
The old version still works, and you’ll definitely see migrations written this way in older applications and documents. The new form is a lot easier to read at a glance, though.
The t.timestamps line is there
for housekeeping, tracking “created at” and “updated at” information.
Rails also will automatically create a primary key, :id, for the table. Once you’ve entered the
new line (at line 4 of Example 4-4), you can run the
migration with the Rake tool:
$ rake db:migrate
(in /Users/simonstl/rails/guestbook)
==  CreateEntries: migrating ==================================================
-- create_table(:entries)
   -> 0.0021s
==  CreateEntries: migrated (0.0022s) =========================================
Rake is Ruby’s own version of the classic command-line Unix
make tool, and Rails uses it for a
wide variety of tasks. (For a full list, try rake
--tasks.)
Note
If you want to run precisely the version of rake that was
installed with your application, run bundle exec rake
db:migrate instead. It may or may not matter, depending on
the details of your Rails installation. See Chapter 17 for more information on
bundle. Also, in some Rails installations, you may
receive a message after attempting to run rake
db:migrate that the command won’t run due to version
incompatibilities and, in that case, using run bundle
exec may be your only option.
In this case, the db:migrate task runs
all of the previously unapplied change (or self.up) migrations in your application’s
db/migrate/ folder. db:rollback gives you an undo option for the previous by running the
change methods backwards (or the
self.down methods if present).
Now that the application has a table with a column for holding names, it’s time to turn to the app/models/entry.rb file. Its initial contents are very simple:
class Entry < ActiveRecord::Base
  # attr_accessible :title, :body
end
The Entry class inherits from
the ActiveRecord library’s Base
class, but has no functionality of its own. It used to be
able to stay that way—Rails provides enough capability that nothing more
was needed. Unfortunately, Rails’ superpowers turned out to create some
security leaks, in particular problems with mass assignment letting
attackers set values they shouldn’t. To avoid mysterious errors from
Rails, and to permit your code to assign values to the
:name property, you need to explicitly specify that
it’s OK with attr_accessible, as the comment suggests. Change the model to look
like:
class Entry < ActiveRecord::Base
  attr_accessible :name
end
This tells Rails that it’s allowed to set values for :name, and only for
:name.
Warning
Remember that the names in your models also need to stay away from the list of reserved words presented at http://oldwiki.rubyonrails.org/rails/pages/ReservedWords/.
As you may have guessed, the controller is going to be the key component transferring data that comes in from the form to the model, and then it will be the key component transferring that data back out to the view for presentation to the user.
To get started, the controller will just blindly save new names to the model, using the code highlighted in Example 4-5.
Example 4-5. Using ActiveRecord to save a name
class EntriesController < ApplicationController

  def sign_in
       @name = params[:visitor_name]
       @entry = Entry.create({:name => @name})

  end

end
The highlighted line combines three separate operations into a single line of code, which might look like:
       @myEntry = Entry.new
       @myEntry.name = @name
       @myEntry.save
The first step creates a new variable, @myEntry, and declares it to be a new
Entry object. The next line sets
the name property of @myEntry—effectively setting the future
value of the column named “name” in the Entries table—to the @name value that came in through the form.
The third line saves the @myEntry
object to the table.
The Entry.create approach
assumes you’re making a new object, takes the values to be stored as
named parameters, and then saves the object to the database.
Note
Both the create and the
save method return a boolean
value indicating whether or not saving the value to the database was
successful. For most applications, you’ll want to test this, and
return an error if there was a failure.
These are the basic methods you’ll need to put information into
your databases with ActiveRecord. (There are many shortcuts and more
elegant syntax, as Chapter 5 will
demonstrate.) This approach is also a bit too simple. If you visit
http://localhost:3000/entries/sign_in/, you’ll
see the same empty form that was shown in Figure 4-1. However, because
@entry.create was called, an empty
name will have been written to the table. The log data that appears in
the server’s terminal window shows:
 (0.1ms)  begin transaction
          SQL (87.3ms)  INSERT INTO "entries" ("created_at", "name",
 "updated_at") VALUES (?, ?, ?)  [["created_at", Mon, 20 Feb 2012 16:18:14
UTC +00:00], ["name", nil], ["updated_at", Mon, 20
Feb 2012 16:18:14 UTC +00:00]]
           (7.1ms)  commit transaction
The nil is the problem here because it really
doesn’t make sense to add a blank name every time someone loads the
form without sending a value. On the bright side, we have evidence
that Rails is putting information into the Entries table, and if we
enter a name, say “Zaphod,” we can see the name being entered
into
the table:
    (0.1ms)  begin transaction
              SQL (0.6ms)  INSERT INTO "entries" ("created_at", "name", "updated_at")
              VALUES (?, ?, ?)  [["created_at", Mon, 20 Feb 2012 16:18:48 UTC +00:00],
              ["name", "Zaphod"], ["updated_at", Mon, 20 Feb 2012 16:18:48 UTC +00:00]]
It’s easy to fix the controller so that NULLs aren’t stored—though as we’ll see in Chapter 7, this kind of validation code really belongs in the model. Two lines, highlighted in Example 4-6, will keep Rails from entering a lot of blank names.
Example 4-6. Keeping blanks from turning into permanent objects
class EntriesController < ApplicationController

  def sign_in
       @name = params[:visitor_name]
     unless @name.blank?
       @entry = Entry.create({:name => @name})
     end
  end

end
Now Rails will check the @name variable to make sure that it has a
value before putting it into the database. unless @name.blank? will test for both nil
values and blank entries. (blank?
is a Rails method extending Ruby’s String objects.)
If you want to get rid of the NULLs you put into the database, you can run
rake
db:rollback and rake
db:migrate (or rake
db:migrate:redo to combine them) to drop and rebuild
the table with a clean copy. In this case, you should stop the server before running
rake and restart it when you’re done.
==  CreateEntries: reverting ==================================================
 -- drop_table(:entries)
    -> 0.0012s
==  CreateEntries: reverted (0.0013s) =========================================

==  CreateEntries: migrating ==================================================
 -- create_table(:entries)
    -> 0.0015s
==  CreateEntries: migrated (0.0016s) =========================================
If you want to enter a few names to put some data into the new table, go ahead. The next example will show how to get them out.
Storing data is a good thing, but only if you can get it out again. Fortunately, it’s not difficult for the controller to tell the model that it wants all the data, or for the view to render it. For a guestbook, it’s especially simple, as we just want all of the data every time.
Getting the data out of the model requires one line of additional code in the controller, highlighted in Example 4-7.
Example 4-7. A controller that also retrieves data from a model
class EntriesController < ApplicationController

  def sign_in
       @name = params[:visitor_name]
     if !@name.blank? then
       @entry = Entry.create({:name => @name})
     end

     @entries = Entry.all

  end

end
The Entry object includes a
find method—like new and save, inherited from its parent ActiveRecord::Base class without any
additional programming. If you run this and look in the logs, you’ll
see that Rails is actually making a SQL call to populate the @entry array:
Entry Load (0.4ms) SELECT "entries".* FROM "entries"
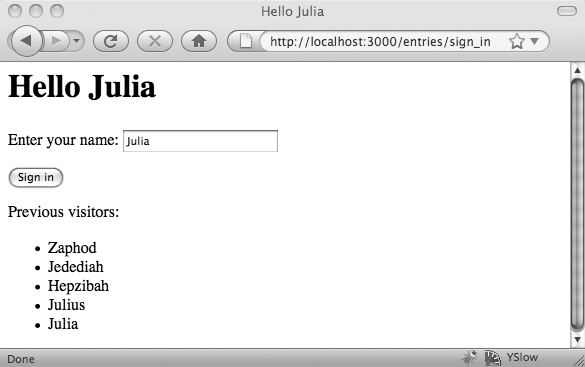
Next, the view, still in views/entries/sign_in.html.erb, can show the contents of that array, to the site’s visitors see who’s come by before, using the added lines shown in Example 4-8.
Example 4-8. Displaying existing users with a loop
<h1>Hello <%= @name %></h1>

<%= form_tag :action => 'sign_in' do %>
   <p>Enter your name:
   <%= text_field_tag 'visitor_name', @name %></p>

   <%= submit_tag 'Sign in' %>

<% end %>
<p>Previous visitors:</p>
<ul>
<% @entries.each do |entry| %>
  <li><%= entry.name %></li>
<% end %>

</ul>
The loop here iterates over the @entries array, running as many times as
there are entries in @entries.
@entries, of course, holds the list
of names previously entered, pulled from the database by the model
that was called by the controller in Example 4-7. For each entry,
the view adds a list item containing the name value, referenced here as entry.name. The result, depending on exactly
what names you entered, will look something like Figure 4-5.
It’s a lot of steps, yes, but fortunately you’ll be able to skip a lot of those steps as you move deeper into Rails. Building this guestbook didn’t look very much like the “complex-application-in-five-minutes” demonstrations that Rails’ promoters like to show off, but now you should understand what’s going on underneath the magic. After the apprenticeship, the next chapter will get into some journeyman fun.
The find method and its relatives are common in Rails, usually in
controllers. It’s constantly used as find(id) to retrieve
a single record with a given id, while
the similar all method retrieves an entire set of
records. There are four basic ways to call find, and then a set of options that can apply
to all of those uses:
- find by
id The
findmethod is frequently called with a singleid, as infind(id), but it can also be called with an array ofids, likefind(id1, id2, id3, ...) in which casefindwill return an array of values. Finally, you can callfind([id1, id2])and retrieve everything withidvalues betweenid1andid2.- find all
Calling the
allmethod—User.all, for example—will return all the matching values as an array.- find first
Calling
first—User.first, for example—will return the first matching value only. If you want this to raise an error if no matching record is found, add an exclamation point, asfirst!.- find last
Calling
last—User.last, for example— will return the last matching value only. Just as withfirst, if you want this to raise an error if no matching record is found, add an exclamation point, aslast!.
The options, which have evolved into chainable methods, give you much more control over what is queried and which values are returned. All of them actually modify the SQL statements used to query the database and can accept SQL syntax, but you don’t need to know SQL to use most of them. This list of options is sorted by your likely order of needing them:
-
where The
wheremethod lets you limit which records are returned. If, for example, you set:Users.where("registered = true")then you would only see records with a
registeredvalue oftrue.:conditionsalso has another form. You could instead write:Users.where(:registered => true)
This will produce the same query and makes it a little more readable to list multiple conditions. Also, if conditions are coming in from a parameter or some other data source you don’t entirely trust, you may want to use the array form of
:conditions:Users.where("email = ?", params[:email])Rails will replace the
?with the value of the:emailparameter that came from the user, after sanitizing it.-
order The
ordermethod lets you choose the order in which records are returned, though if you’re usingfirstorlastit will also determine which record you’ll see as first or last. The simplest way to use this is with a field name or comma-separated list of field names:Users.order("family_name, given_name")By default, the
orderwill sort in ascending order, so the option just shown would sortfamily_namevalues in ascending order, usinggiven_nameas a second sort field whenfamily_namevalues are the same. If you want to sort a field in descending order, just put DESC after the field name:Users.order("family_name DESC, given_name DESC")This will return the names sorted in descending order.
-
limit The
limitoption lets you specify how many records are returned. If you wrote:Users.limit(10)
you would receive only the first 10 records back. (You’ll probably want to specify
orderto ensure that they’re the ones you want.)-
offset The
offsetoption lets you specify a starting point from which records should be returned. If, for instance, you wanted to retrieve the next 10 records after a set you’d retrieved withlimit, you could specify:Users.limit(10).offset(10)
-
readonly Retrieves records so that you can read them, but cannot make any changes.
-
group The
groupoption lets you specify a field that the results should group on, like the SQL GROUP BY clause.-
lock joins,include,select, andfromThese let you specify components of the SQL query more precisely. You may need them as you delve into complex data structures, but you can ignore them at first.
Rails also offers dynamic finders, which are methods it automatically supports based on the
names of the fields in the database. If you have a given_name field, for
example, you can call find_by_given_name(name)
to get the first record with the specified
name, or find_all_by_given_name(name)
to get all records with the specified name.
These are a little slower than the regular find method, but may be more readable.
Note
Rails also offers an elegant way to create more readable queries with scopes, which you should explore after you’ve found your way around.
Where would you put code to which you want all of your controllers to have access?
How do the default routes decide which requests to send to your controller?
What does the
changemethod do in a migration?What three steps does the
createmethod combine?How do you test to find out whether a submitted field is blank?
How can you retrieve all of the values for a given object?
How can you find a set of values that match a certain condition?
How can you retrieve just the first item of a set?
Code in the
ApplicationControllerclass, stored at app/controllers/application_controller.rb, is available to all of the controllers in the project.The default routes assume that the controller name follows the first slash within the URL, that the controller action follows the second slash, and that the ID value follows the third slash. If there’s a dot (
.) after the ID, then what follows the dot is considered the format requested.The
changemethod is called when Rake runs a migration. The code explains what to create moving forward, but Rails can also run it backwards. It usually creates tables and fields.The
createmethod creates a new object, sets its properties to those specified in the parameters, and saves it to the database.You can test to see whether something is blank using an
ifstatement and theblank?method, as in:if @name.blank? then something to do if blank end
To retrieve all values for a given object, use
.all.To retrieve a set of values, use
.where(.conditions)To get the first of a set, use
.first. You may need to set an:orderparameter to make sure that your understanding of “first” and Rails’ understanding of “first” are the same.
Get Learning Rails 3 now with the O’Reilly learning platform.
O’Reilly members experience books, live events, courses curated by job role, and more from O’Reilly and nearly 200 top publishers.
