One of the stated goals for the 2.5 development cycle was the creation of a unified device model for the kernel. Previous kernels had no single data structure to which they could turn to obtain information about how the system is put together. Despite this lack of information, things worked well for some time. The demands of newer systems, with their more complicated topologies and need to support features such as power management, made it clear, however, that a general abstraction describing the structure of the system was needed.
The 2.6 device model provides that abstraction. It is now used within the kernel to support a wide variety of tasks, including:
- Power management and system shutdown
These require an understanding of the systemâs structure. For example, a USB host adaptor cannot be shut down before dealing with all of the devices connected to that adaptor. The device model enables a traversal of the systemâs hardware in the right order.
- Communications with user space
The implementation of the sysfs virtual filesystem is tightly tied into the device model and exposes the structure represented by it. The provision of information about the system to user space and knobs for changing operating parameters is increasingly done through sysfs and, therefore, through the device model.
- Hotpluggable devices
Computer hardware is increasingly dynamic; peripherals can come and go at the whim of the user. The hotplug mechanism used within the kernel to handle and (especially) communicate with user space about the plugging and unplugging of devices is managed through the device model.
- Device classes
Many parts of the system have little interest in how devices are connected, but they need to know what kinds of devices are available. The device model includes a mechanism for assigning devices to classes, which describe those devices at a higher, functional level and allow them to be discovered from user space.
- Object lifecycles
Many of the functions described above, including hotplug support and sysfs, complicate the creation and manipulation of objects created within the kernel. The implementation of the device model required the creation of a set of mechanisms for dealing with object lifecycles, their relationships to each other, and their representation in user space.
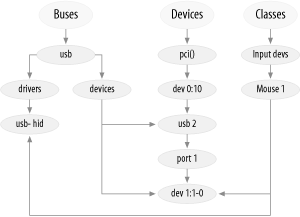
The Linux device model is a complex data structure. For example, consider Chapter 14, which shows (in simplified form) a tiny piece of the device model structure associated with a USB mouse. Down the center of the diagram, we see the part of the core âdevicesâ tree that shows how the mouse is connected to the system. The âbusâ tree tracks what is connected to each bus, while the subtree under âclassesâ concerns itself with the functions provided by the devices, regardless of how they are connected. The device model tree on even a simple system contains hundreds of nodes like those shown in the diagram; it is a difficult data structure to visualize as a whole.
For the most part, the Linux device model code takes care of all these considerations without imposing itself upon driver authors. It sits mostly in the background; direct interaction with the device model is generally handled by bus-level logic and various other kernel subsystems. As a result, many driver authors can ignore the device model entirely, and trust it to take care of itself.
There are times, however, when an understanding of the device model is a good thing to
have. There are times when the device model âleaks outâ from behind the other layers; for
example, the generic DMA code (which we encounter in Chapter 15) works with struct device. You may
want to use some of the capabilities provided by the device model, such as the reference
counting and related features provided by kobjects. Communication with user space via sysfs is
also a device model function; this chapter explains how that communication works.
We start, however, with a bottom-up presentation of the device model. The complexity of the device model makes it hard to understand by starting with a high-level view. Our hope is that, by showing how the low-level device components work, we can prepare you for the challenge of grasping how those components are used to build the larger structure.
For many readers, this chapter can be treated as advanced material that need not be read the first time through. Those who are interested in how the Linux device model works are encouraged to press ahead, however, as we get into the low-level details.
The kobject is the
fundamental
structure that
holds the device model together. It was initially conceived as a simple reference counter,
but its responsibilities have grown over time, and so have its fields. The tasks handled by
struct
kobject and its supporting code now include:
- Reference counting of objects
Often, when a kernel object is created, there is no way to know just how long it will exist. One way of tracking the lifecycle of such objects is through reference counting. When no code in the kernel holds a reference to a given object, that object has finished its useful life and can be deleted.
- Sysfs representation
Every object that shows up in sysfs has, underneath it, a kobject that interacts with the kernel to create its visible representation.
- Data structure glue
The device model is, in its entirety, a fiendishly complicated data structure made up of multiple hierarchies with numerous links between them. The kobject implements this structure and holds it together.
- Hotplug event handling
The kobject subsystem handles the generation of events that notify user space about the comings and goings of hardware on the system.
One might conclude from the preceding list that the kobject is a complicated structure. One would be right. By looking at one piece at a time, however, it is possible to understand this structure and how it works.
A kobject has the type struct kobject; it is
defined in <linux/kobject.h>. That file also
includes declarations for a number of other structures related to kobjects and, of course,
a long list of functions for manipulating them.
Before we get into the details, it is worth taking a moment to understand how kobjects are used. If you look back at the list of functions handled by kobjects, you see that they are all services performed on behalf of other objects. A kobject, in other words, is of little interest on its own; it exists only to tie a higher-level object into the device model.
Thus, it is rare (even unknown) for kernel code to create a standalone kobject; instead, kobjects are used to control access to a larger, domain-specific object. To this end, kobjects are found embedded in other structures. If you are used to thinking of things in object-oriented terms, kobjects can be seen as a top-level, abstract class from which other classes are derived. A kobject implements a set of capabilities that are not particularly useful by themselves but that are nice to have in other objects. The C language does not allow for the direct expression of inheritance, so other techniquesâsuch as embedding one structure in anotherâmust be used.
As an example, letâs look back at struct
cdev, which we encountered in Chapter 3. That structure, as found in the 2.6.10
kernel, looks like this:
struct cdev {
    struct kobject kobj;
    struct module *owner;
    struct file_operations *ops;
    struct list_head list;
    dev_t dev;
    unsigned int count;
};
As we can see, the cdev structure has a kobject
embedded within it. If you have one of these structures, finding its embedded kobject is
just a matter of using the kobj field. Code that
works with kobjects often has the opposite problem, however: given a struct kobject pointer, what is the pointer to the
containing structure? You should avoid tricks (such as assuming that the kobject is at
the beginning of the structure), and, instead, use the container_of
macro (introduced in Section 3.5.1. So
the way to convert a pointer to a struct
kobject called kp
embedded within a struct cdev would be:
struct cdev *device = container_of(kp, struct cdev, kobj);
Programmers often define a simple macro for "back-castingâ kobject pointers to the containing type.
This book has presented a number of types with simple mechanisms for initialization at compile or runtime. The initialization of a kobject is a bit more complicated, especially when all of its functions are used. Regardless of how a kobject is used, however, a few steps must be performed.
The first of those is to simply set the entire kobject to 0, usually with a call to memset. Often this
initialization happens as part of the zeroing of the structure into which the kobject is
embedded. Failure to zero out a kobject often leads to very strange crashes further down
the line; it is not a step you want to skip.
The next step is to set up some of the internal fields with a call to kobject_init( ):
void kobject_init(struct kobject *kobj);
Among other things, kobject_init sets the kobjectâs reference
count to one. Calling kobject_init is not sufficient, however.
Kobject users must, at a minimum, set the name of the kobject; this is the name that is
used in sysfs entries. If you dig through the kernel source, you can find the code that
copies a string directly into the kobjectâs name
field, but that approach should be avoided. Instead, use:
int kobject_set_name(struct kobject *kobj, const char *format, ...);
This function takes a printk-style variable argument list. Believe it or not, it is actually possible for this operation to fail (it may try to allocate memory); conscientious code should check the return value and react accordingly.
The other kobject fields that should be set, directly or indirectly, by the creator
are ktype, kset,
and parent. We will get to these later in this
chapter.
One of the key functions of a kobject is to serve as a reference counter for the object in which it is embedded. As long as references to the object exist, the object (and the code that supports it) must continue to exist. The low-level functions for manipulating a kobjectâs reference counts are:
struct kobject *kobject_get(struct kobject *kobj);
void kobject_put(struct kobject *kobj);
A successful call to kobject_get increments the kobjectâs
reference counter and returns a pointer to the kobject. If, however, the kobject is
already in the process of being destroyed, the operation fails, and
kobject_get returns NULL. This
return value must always be tested, or no end of unpleasant race conditions could
result.
When a reference is released, the call to kobject_put decrements the reference count and, possibly, frees the object. Remember that kobject_init sets the reference count to one; so when you create a kobject, you should make sure that the corresponding kobject_put call is made when that initial reference is no longer needed.
Note that, in many cases, the reference count in the kobject itself may not be
sufficient to prevent race conditions. The existence of a kobject (and its containing
structure) may well, for example, require the continued existence of the module that
created that kobject. It would not do to unload that module while the kobject is still
being passed around. That is why the cdev structure
we saw above contains a struct
module pointer. Reference counting for struct cdev is implemented as follows:
struct kobject *cdev_get(struct cdev *p)
{
    struct module *owner = p->owner;
    struct kobject *kobj;

    if (owner && !try_module_get(owner))
        return NULL;
    kobj = kobject_get(&p->kobj);
    if (!kobj)
        module_put(owner);
    return kobj;
}
Creating a reference to a cdev structure requires
creating a reference also to the module that owns it. So cdev_get
uses try_module_get to attempt to increment that moduleâs usage
count. If that operation succeeds, kobject_get is used to increment
the kobjectâs reference count as well. That operation could fail, of course, so the code
checks the return value from kobject_get and releases its reference
to the module if things donât work out.
One important thing
still missing from the discussion is what happens to a
kobject when its reference count reaches 0. The code
that created the kobject generally does not know when that will happen; if it did, there
would be little point in using a reference count in the first place. Even predictable
object life cycles become more complicated when sysfs is brought in; user-space programs
can keep a reference to a kobject (by keeping one of its associated sysfs files open)
for an arbitrary period of time.
The end result is that a structure protected by a kobject cannot be freed at any
single, predictable point in the driverâs lifecycle, but in code that must be prepared
to run at whatever moment the kobjectâs reference count goes to 0. The reference count is not under the direct control of the code that
created the kobject. So that code must be notified asynchronously whenever the last
reference to one of its kobjects goes away.
This notification is done through a kobjectâs release method. Usually, this method has a form such as:
void my_object_release(struct kobject *kobj)
{
    struct my_object *mine = container_of(kobj, struct my_object, kobj);

    /* Perform any additional cleanup on this object, then... */
    kfree(mine);
}
One important point cannot be overstated: every kobject must have a release method, and the kobject must persist (in a consistent state) until that method is called. If these constraints are not met, the code is flawed. It risks freeing the object when it is still in use, or it fails to release the object after the last reference is returned.
Interestingly, the release method is not stored in the kobject
itself; instead, it is associated with the type of the structure that contains the
kobject. This type is tracked with a structure of type struct
kobj_type, often simply called a âktype.â This structure looks like the
following:
struct kobj_type {
void (*release)(struct kobject *);
struct sysfs_ops *sysfs_ops;
struct attribute **default_attrs;
};The release field in struct kobj_type is, of course, a pointer to the
release method for this type of kobject. We will come back to the
other two fields (sysfs_ops and default_attrs) later in this chapter.
Every kobject needs to have an associated kobj_type structure. Confusingly, the pointer to this structure can be
found in two different places. The kobject structure itself contains a field (called
ktype) that can contain this pointer. If, however,
this kobject is a member of a kset, the kobj_type
pointer is provided by that kset instead. (We will look at ksets in the next section.)
Meanwhile, the macro:
struct kobj_type *get_ktype(struct kobject *kobj);
finds the kobj_type pointer for a given
kobject.
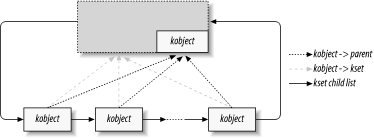
The kobject structure is often
used to link together objects into a
hierarchical structure that matches the structure of the subsystem being modeled. There
are two separate mechanisms for this linking: the parent pointer and ksets.
The parent field in struct
kobject is a pointer to another kobjectâthe one representing the next level up
in the hierarchy. If, for example, a kobject represents a USB device, its parent pointer may indicate the object representing the hub
into which the device is plugged.
The main use for the parent pointer is to position
the object in the sysfs hierarchy. Weâll see how this works in Section 14.2.
In many ways, a kset looks like an extension of the kobj_type structure; a kset is a collection of kobjects embedded within
structures of the same type. However, while struct
kobj_type concerns itself with the type of an object,
struct
kset is concerned with aggregation and collection.
The two concepts have been separated so that objects of identical type can appear in
distinct sets.
Therefore, the main function of a kset is containment; it can be thought of as the top-level container class for kobjects. In fact, each kset contains its own kobject internally, and it can, in many ways, be treated the same way as a kobject. It is worth noting that ksets are always represented in sysfs; once a kset has been set up and added to the system, there will be a sysfs directory for it. Kobjects do not necessarily show up in sysfs, but every kobject that is a member of a kset is represented there.
Adding a kobject to a kset is usually done when the object is created; it is a
two-step process. The kobjectâs kset field must be
pointed at the kset of interest; then the kobject should be passed to:
int kobject_add(struct kobject *kobj);
As always, programmers should be aware that this function can fail (in which case it returns a negative error code) and respond accordingly. There is a convenience function provided by the kernel:
extern int kobject_register(struct kobject *kobj);
This function is simply a combination of kobject_init and kobject_add.
When a kobject is passed to kobject_add, its reference count is incremented. Containment within the kset is, after all, a reference to the object. At some point, the kobject will probably have to be removed from the kset to clear that reference; that is done with:
void kobject_del(struct kobject *kobj);
There is also a kobject_unregister function, which is a combination of kobject_del and kobject_put.
A kset keeps its children in a standard kernel linked list. In almost all cases, the contained kobjects also have pointers to the kset (or, strictly, its embedded kobject) in their parentâs fields. So, typically, a kset and its kobjects look something like what you see in Figure 14-1. Bear in mind that:
All of the contained kobjects in the diagram are actually embedded within some other type, possibly even other ksets.
It is not required that a kobjectâs parent be the containing kset (although any other organization would be strange and rare).
For initialization and setup, ksets have an interface very similar to that of kobjects. The following functions exist:
void kset_init(struct kset *kset); int kset_add(struct kset *kset); int kset_register(struct kset *kset); void kset_unregister(struct kset *kset);
For the most part, these functions just call the analogous kobject_ function on the ksetâs embedded kobject.
To manage the reference counts of ksets, the situation is about the same:
struct kset *kset_get(struct kset *kset); void kset_put(struct kset *kset);
A kset also has a name, which is stored in the embedded kobject. So, if you have a
kset called my_set, you would set its name
with:
kobject_set_name(&my_set->kobj, "The name");
Ksets also have a pointer (in the ktype field) to
the kobj_type structure describing the kobjects it
contains. This type is used in preference to the ktype field in a kobject itself. As a result, in typical usage, the
ktype field in struct
kobject is left NULL, because the same field within the kset is the one actually
used.
Finally, a kset contains a subsystem pointer (called subsys). So itâs time to talk about subsystems.
A subsystem is a
representation for a high-level portion of the kernel as a whole. Subsystems usually
(but not always) show up at the top of the sysfs hierarchy. Some example subsystems in
the kernel include block_subsys (/sys/block, for block devices), devices_subsys (/sys/devices, the core
device hierarchy), and a specific subsystem for every bus type known to the kernel. A
driver author almost never needs to create a new subsystem; if you feel tempted to do
so, think again. What you probably want, in the end, is to add a new class, as discussed
in Section 14.5.
A subsystem is represented by a simple structure:
struct subsystem {
struct kset kset;
struct rw_semaphore rwsem;
};A subsystem, thus, is really just a wrapper around a kset, with a semaphore thrown in.
Every kset must belong to a subsystem. The subsystem membership helps establish the
ksetâs position in the hierarchy, but, more importantly, the subsystemâs rwsem semaphore is used to serialize access to a ksetâs
internal-linked list. This membership is represented by the subsys pointer in struct kset. Thus, one
can find each ksetâs containing subsystem from the ksetâs structure, but one cannot find
the multiple ksets contained in a subsystem directly from the subsystem
structure.
Subsystems are often declared with a special macro:
decl_subsys(name, struct kobj_type *type,
struct kset_hotplug_ops *hotplug_ops);This macro creates a struct subsystem with a name
formed by taking the name given to the macro and
appending _subsys to it. The macro also initializes
the internal kset with the given type and hotplug_ops. (We discuss hotplug operations later in this
chapter.)
Subsystems have the usual list of setup and teardown functions:
void subsystem_init(struct subsystem *subsys); int subsystem_register(struct subsystem *subsys); void subsystem_unregister(struct subsystem *subsys); struct subsystem *subsys_get(struct subsystem *subsys) void subsys_put(struct subsystem *subsys);
Most of these operations just act upon the subsystemâs kset.
Kobjects are the mechanism behind the sysfs virtual filesystem. For every directory found in sysfs, there is a kobject lurking somewhere within the kernel. Every kobject of interest also exports one or more attributes, which appear in that kobjectâs sysfs directory as files containing kernel-generated information. This section examines how kobjects and sysfs interact at a low level.
Code that works with sysfs should include <linux/sysfs.h>.
Getting a kobject to show up in sysfs is simply a matter of calling kobject_add. We have already seen that function as the way to add a kobject to a kset; creating entries in sysfs is also part of its job. There are a couple of things worth knowing about how the sysfs entry is created:
Sysfs entries for kobjects are always directories, so a call to kobject_add results in the creation of a directory in sysfs. Usually that directory contains one or more attributes; we see how attributes are specified shortly.
The name assigned to the kobject (with kobject_set_name) is the name used for the sysfs directory. Thus, kobjects that appear in the same part of the sysfs hierarchy must have unique names. Names assigned to kobjects should also be reasonable file names: they cannot contain the slash character, and the use of white space is strongly discouraged.
The sysfs entry is located in the directory corresponding to the kobjectâs
parentpointer. IfparentisNULLwhen kobject_add is called, it is set to the kobject embedded in the new kobjectâs kset; thus, the sysfs hierarchy usually matches the internal hierarchy created with ksets. If bothparentandksetareNULL, the sysfs directory is created at the top level, which is almost certainly not what you want.
Using the mechanisms we have described so far, we can use a kobject to create an empty directory in sysfs. Usually, you want to do something a little more interesting than that, so it is time to look at the implementation of attributes.
When created, every kobject is given a set of
default attributes. These attributes are specified by way of the kobj_type structure. That structure, remember, looks like this:
struct kobj_type {
    void (*release)(struct kobject *);
    struct sysfs_ops *sysfs_ops;
    struct attribute **default_attrs;
};
The
default_attrs field lists the attributes to be created
for every kobject of this type, and sysfs_ops provides
the methods to implement those attributes. We start with default_attrs, which points to an array of pointers to attribute structures:
struct attribute {
char *name;
struct module *owner;
mode_t mode;
};In this structure, name is the name of the
attribute (as it appears within the kobjectâs sysfs directory), owner is a pointer to the module (if any) that is responsible for the
implementation of this attribute, and mode is the
protection bits that are to be applied to this attribute. The mode is usually S_IRUGO for read-only attributes; if the attribute is
writable, you can toss in S_IWUSR to give write access
to root only (the macros for modes are defined in <linux/stat.h>). The last entry in the default_attrs list must be zero-filled.
The default_attrs array says what the attributes
are but does not tell sysfs how to actually implement those attributes. That task falls to
the kobj_type->sysfs_ops field, which points to a
structure defined as:
struct sysfs_ops {
ssize_t (*show)(struct kobject *kobj, struct attribute *attr,
char *buffer);
ssize_t (*store)(struct kobject *kobj, struct attribute *attr,
const char *buffer, size_t size);
};Whenever an attribute is read from user space, the show
method is called with a pointer to the kobject and the appropriate attribute structure. That method should encode the value of
the given attribute into buffer, being sure not to
overrun it (it is PAGE_SIZE bytes), and return the
actual length of the returned data. The conventions for sysfs state that each attribute
should contain a single, human-readable value; if you have a lot of information to return,
you may want to consider splitting it into multiple attributes.
The same show method is used for all attributes associated with a
given kobject. The attr pointer passed into the
function can be used to determine which attribute is being requested. Some
show methods include a series of tests on the attribute name. Other
implementations embed the attribute structure within
another structure that contains the information needed to return the attributeâs value; in
this case, container_of may be used within the
show method to obtain a pointer to the embedding structure.
The store
method is
similar; it should decode the data stored in buffer
(size contains the length of that data, which does
not exceed PAGE_SIZE), store and respond to the new
value in whatever way makes sense, and return the number of bytes actually decoded. The
store method can be called only if the attributeâs permissions
allow writes. When writing a store method, never forget that you are
receiving arbitrary information from user space; you should validate it very carefully
before taking any action in response. If the incoming data does not match expectations,
return a negative error value rather than possibly doing something unwanted and
unrecoverable. If your device exports a self_destruct
attribute, you should require that a specific string be written there to invoke that
functionality; an accidental, random write should yield only an error.
In many cases, the
kobject typeâs default_attrs field describes all the attributes that kobject will ever have.
But thatâs not a restriction in the design; attributes can be added and removed to
kobjects at will. If you wish to add a new attribute to a kobjectâs sysfs directory,
simply fill in an attribute structure and pass it
to:
int sysfs_create_file(struct kobject *kobj, struct attribute *attr);
If all goes well, the file is created with the name given in the attribute structure, and the return value is 0; otherwise, the usual negative error code is
returned.
Note that the same show( ) and store( ) functions are called to implement operations on the new attribute. Before you add a new, nondefault attribute to a kobject, you should take whatever steps are necessary to ensure that those functions know how to implement that attribute.
int sysfs_remove_file(struct kobject *kobj, struct attribute *attr);
After the call, the attribute no longer appears in the kobjectâs sysfs entry. Do be aware, however, that a user-space process could have an open file descriptor for that attribute and that show and store calls are still possible after the attribute has been removed.
The sysfs conventions call for all attributes to contain a single value in a human-readable text format. That said, there is an occasional, rare need for the creation of attributes that can handle larger chunks of binary data. That need really only comes about when data must be passed, untouched, between user space and the device. For example, uploading firmware to devices requires this feature. When such a device is encountered in the system, a user-space program can be started (via the hotplug mechanism); that program then passes the firmware code to the kernel via a binary sysfs attribute, as is shown in Section 14.8.1.
Binary attributes are described with a bin_attribute
structure:
struct bin_attribute {
struct attribute attr;
size_t size;
ssize_t (*read)(struct kobject *kobj, char *buffer,
loff_t pos, size_t size);
ssize_t (*write)(struct kobject *kobj, char *buffer,
loff_t pos, size_t size);
};Here, attr is an attribute structure giving the name, owner, and permissions for the binary
attribute, and size is the maximum size of the binary
attribute (or 0 if there is no maximum). The
read and write methods work similarly to the
normal char driver equivalents; they can be called multiple times for a single load with a
maximum of one page worth of data in each call. There is no way for sysfs to signal the
last of a set of write operations, so code implementing a binary attribute must be able to
determine the end of the data some other way.
Binary attributes must be created explicitly; they cannot be set up as default attributes. To create a binary attribute, call:
int sysfs_create_bin_file(struct kobject *kobj,
struct bin_attribute *attr);Binary attributes can be removed with:
int sysfs_remove_bin_file(struct kobject *kobj,
struct bin_attribute *attr);The sysfs filesystem has the usual tree structure, reflecting the hierarchical organization of the kobjects it represents. The relationships between objects in the kernel are often more complicated than that, however. For example, one sysfs subtree (/sys/devices) represents all of the devices known to the system, while other subtrees (under /sys/bus) represent the device drivers. These trees do not, however, represent the relationships between the drivers and the devices they manage. Showing these additional relationships requires extra pointers which, in sysfs, are implemented through symbolic links.
Creating a symbolic link within sysfs is easy:
int sysfs_create_link(struct kobject *kobj, struct kobject *target,
char *name);This function creates a link (called name) pointing
to targetâs sysfs entry as an attribute of kobj. It is a relative link, so it works regardless of where
sysfs is mounted on any particular system.
The link persists even if target is removed from
the system. If you are creating symbolic links to other kobjects, you should probably have
a way of knowing about changes to those kobjects, or some sort of assurance that the
target kobjects will not disappear. The consequences (dead symbolic links within sysfs)
are not particularly grave, but they are not representative of the best
programming style and
can cause confusion in user space.
Symbolic links can be removed with:
void sysfs_remove_link(struct kobject *kobj, char *name);
A hotplug event is a notification to user space from the kernel that something has changed in the systemâs configuration. They are generated whenever a kobject is created or destroyed. Such events are generated, for example, when a digital camera is plugged in with a USB cable, when a user switches console modes, or when a disk is repartitioned. Hotplug events turn into an invocation of /sbin/hotplug, which can respond to each event by loading drivers, creating device nodes, mounting partitions, or taking any other action that is appropriate.
The last major kobject function we look at is the generation of these events. The actual event generation takes place when a kobject is passed to kobject_add or kobject_del. Before the event is handed to user space, code associated with the kobject (or, more specifically, the kset to which it belongs) has the opportunity to add information for user space or to disable event generation entirely.
Actual control of hotplug events is
exercised by way of a set of methods stored in the kset_hotplug_ops
structure:
struct kset_hotplug_ops {
int (*filter)(struct kset *kset, struct kobject *kobj);
char *(*name)(struct kset *kset, struct kobject *kobj);
int (*hotplug)(struct kset *kset, struct kobject *kobj,
char **envp, int num_envp, char *buffer,
int buffer_size);
};A pointer to this structure is found in the hotplug_ops field of the kset structure. If a given kobject is not contained
within a kset, the kernel searchs up through the hierarchy (via the parent pointer) until it finds a kobject that
does have a kset; that ksetâs hotplug operations are then
used.
The filter
hotplug operation is called whenever the kernel is
considering generating an event for a given kobject. If filter
returns 0, the event is not created. This method,
therefore, gives the kset code an opportunity to decide which events should be passed on
to user space and which should not.
As an example of how this method might be used, consider the block subsystem. There are at least three types of kobjects used there, representing disks, partitions, and request queues. User space may want to react to the addition of a disk or a partition, but it does not normally care about request queues. So the filter method allows event generation only for kobjects representing disks and partitions. It looks like this:
static int block_hotplug_filter(struct kset *kset, struct kobject *kobj)
{
struct kobj_type *ktype = get_ktype(kobj);
return ((ktype = = &ktype_block) || (ktype = = &ktype_part));
}Here, a quick test on the type of kobject is sufficient to decide whether the event should be generated or not.
When the user-space hotplug program is invoked, it is passed to the name of the relevant subsystem as its one and only parameter. The name hotplug method is charged with providing that name. It should return a simple string suitable for passing to user space.
Everything else that the hotplug script might want to know is passed in the environment. The final hotplug method (hotplug) gives an opportunity to add useful environment variables prior to the invocation of that script. Again, this methodâs prototype is:
int (*hotplug)(struct kset *kset, struct kobject *kobj,
char **envp, int num_envp, char *buffer,
int buffer_size);As usual, kset and kobject describe the object for which the event is being generated. The
envp array is a place to store additional environment
variable definitions (in the usual NAME=value format);
it has num_envp entries available. The variables
themselves should be encoded into buffer, which is
buffer_size bytes long. If you add any variables to
envp, be sure to add a NULL entry after your last addition so that the kernel knows where the end
is. The return value should normally be 0; any nonzero
return aborts the generation of the hotplug event.
The generation of hotplug events (like much of the work in the device model) is usually handled by logic at the bus driver level.
So far, we have seen a great deal of low-level infrastructures and a relative shortage of examples. We try to make up for that in the rest of this chapter as we get into the higher levels of the Linux device model. To that end, we introduce a new virtual bus, which we call lddbus,[1] and modify the scullp driver to âconnectâ to that bus.
Once again, much of the material covered here will never be needed by many driver authors. Details at this level are generally handled at the bus level, and few authors need to add a new bus type. This information is useful, however, for anybody wondering what is happening inside the PCI, USB, etc. layers or who needs to make changes at that level.
A bus is a channel between the processor and one or more devices. For the purposes of the device model, all devices are connected via a bus, even if it is an internal, virtual, âplatformâ bus. Buses can plug into each otherâa USB controller is usually a PCI device, for example. The device model represents the actual connections between buses and the devices they control.
In the Linux device model, a bus is represented by the bus_type
structure,
defined in <linux/device.h>. This structure
looks like:
struct bus_type {
char *name;
struct subsystem subsys;
struct kset drivers;
struct kset devices;
int (*match)(struct device *dev, struct device_driver *drv);
struct device *(*add)(struct device * parent, char * bus_id);
int (*hotplug) (struct device *dev, char **envp,
int num_envp, char *buffer, int buffer_size);
/* Some fields omitted */
};The name
field is the name of the bus, something such as pci. You can see from the structure that each bus is its own
subsystem; these subsystems do not live at the top level in sysfs, however. Instead, they
are found underneath the bus subsystem. A bus contains
two ksets, representing the known drivers for that bus and all devices plugged into the
bus. Then, there is a set of methods that we will get to shortly.
As we mentioned, the
example
source includes a virtual bus implementation called lddbus. This
bus sets up its bus_type structure as follows:
struct bus_type ldd_bus_type = {
.name = "ldd",
.match = ldd_match,
.hotplug = ldd_hotplug,
};Note that very few of the bus_type fields require
initialization; most of that is handled by the device model core. We do have to specify
the name of the bus, however, and any methods that go along with it.
Inevitably, a new bus must be registered with the system via a call to bus_register . The lddbus code does so in this way:
ret = bus_register(&ldd_bus_type);
if (ret)
return ret;This call can fail, of course, so the return value must always be checked. If it succeeds, the new bus subsystem has been added to the system; it is visible in sysfs under /sys/bus, and it is possible to start adding devices.
Should it be necessary to remove a bus from the system (when the associated module is removed, for example), bus_unregister should be called:
void bus_unregister(struct bus_type *bus);
There are several methods
defined
for the bus_type structure; they allow the bus code
to serve as an intermediary between the device core and individual drivers. The methods
defined in the 2.6.10 kernel are:
int (*match)(struct device *device, struct device_driver *driver);This method is called, perhaps multiple times, whenever a new device or driver is added for this bus. It should return a nonzero value if the given
devicecan be handled by the givendriver. (We get to the details of thedeviceanddevice_driverstructures shortly). This function must be handled at the bus level, because that is where the proper logic exists; the core kernel cannot know how to match devices and drivers for every possible bus type.int (*hotplug) (struct device *device, char **envp, int num_envp, char*buffer, int buffer_size);This method allows the bus to add variables to the environment prior to the generation of a hotplug event in user space. The parameters are the same as for the kset hotplug method (described in the earlier Section 14.3).
The lddbus driver has a very simple match function, which simply compares the driver and device names:
static int ldd_match(struct device *dev, struct device_driver *driver)
{
return !strncmp(dev->bus_id, driver->name, strlen(driver->name));
}When real hardware is involved, the match function usually makes some sort of comparison between the hardware ID provided by the device itself and the IDs supported by the driver.
The lddbus hotplug method looks like this:
static int ldd_hotplug(struct device *dev, char **envp, int num_envp,
char *buffer, int buffer_size)
{
envp[0] = buffer;
if (snprintf(buffer, buffer_size, "LDDBUS_VERSION=%s",
Version) >= buffer_size)
return -ENOMEM;
envp[1] = NULL;
return 0;
}Here, we add in the current revision number of the lddbus source, just in case anybody is curious.
If you are writing bus-level code,
you may find
yourself having to perform some operation on all devices or drivers that have been
registered with your bus. It may be tempting to dig directly into the structures in the
bus_type structure, but it is better to use the
helper functions that have been provided.
To operate on every device known to the bus, use:
int bus_for_each_dev(struct bus_type *bus, struct device *start,
void *data, int (*fn)(struct device *, void *));This function iterates over every device on bus,
passing the associated device structure to fn, along with the value passed in as data. If start is
NULL, the iteration begins with the first device on
the bus; otherwise iteration starts with the first device after start. If fn returns a nonzero value,
iteration stops and that value is returned from bus_for_each_dev
.
There is a similar function for iterating over drivers:
int bus_for_each_drv(struct bus_type *bus, struct device_driver *start,
void *data, int (*fn)(struct device_driver *, void *));This function works just like bus_for_each_dev, except, of course, that it works with drivers instead.
It should be noted that both of these functions hold the bus subsystemâs reader/writer semaphore for the duration of the work. So an attempt to use the two of them together will deadlockâeach will be trying to obtain the same semaphore. Operations that modify the bus (such as unregistering devices) will also lock up. So, use the bus_for_each functions with some care.
Almost every layer in the Linux
device model
provides an interface for the addition of attributes, and the bus layer is no exception.
The bus_attribute
type is
defined in <linux/device.h> as
follows:
struct bus_attribute {
struct attribute attr;
ssize_t (*show)(struct bus_type *bus, char *buf);
ssize_t (*store)(struct bus_type *bus, const char *buf,
size_t count);
};We
have already seen struct
attribute in Section 14.2.1. The bus_attribute type also includes two methods for displaying
and setting the value of the attribute. Most device model layers above the kobject level
work this way.
A convenience macro has been provided for the compile-time
creation and initialization of bus_attribute
structures:
BUS_ATTR(name, mode, show, store);
This
macro declares a structure, generating its name by prepending the string bus_attr_ to the given name.
Any attributes belonging to a bus should be created explicitly with bus_create_file:
int bus_create_file(struct bus_type *bus, struct bus_attribute *attr);
Attributes can also be removed with:
void bus_remove_file(struct bus_type *bus, struct bus_attribute *attr);
The
lddbus driver creates a simple attribute file containing, once
again, the source version number. The show method and bus_attribute structure are set up as
follows:
static ssize_t show_bus_version(struct bus_type *bus, char *buf)
{
return snprintf(buf, PAGE_SIZE, "%s\n", Version);
}
static BUS_ATTR(version, S_IRUGO, show_bus_version, NULL);Creating the attribute file is done at module load time:
if (bus_create_file(&ldd_bus_type, &bus_attr_version))
printk(KERN_NOTICE "Unable to create version attribute\n");This call creates an attribute file (/sys/bus/ldd/version) containing the revision number for the lddbus code.
At the lowest level, every device
in a Linux system is
represented by an instance of struct device:
struct device {
struct device *parent;
struct kobject kobj;
char bus_id[BUS_ID_SIZE];
struct bus_type *bus;
struct device_driver *driver;
void *driver_data;
void (*release)(struct device *dev);
/* Several fields omitted */
};There are many other struct device
fields that are of interest only to the device core code.
These fields, however, are worth knowing about:
struct device *parentThe deviceâs âparentâ deviceâthe device to which it is attached. In most cases, a parent device is some sort of bus or host controller. If
parentisNULL, the device is a top-level device, which is not usually what you want.struct kobject kobj;The kobject that represents this device and links it into the hierarchy. Note that, as a general rule,
device->kobj->parentis equal to&device->parent->kobj.char bus_id[BUS_ID_SIZE];A string that uniquely identifies this device on the bus. PCI devices, for example, use the standard PCI ID format containing the domain, bus, device, and function numbers.
struct bus_type *bus;Identifies which kind of bus the device sits on.
struct device_driver *driver;The driver that manages this device; we examine
structdevice_driverin the next section.void *driver_data;A private data field that may be used by the device driver.
void (*release)(struct device *dev);The method is called when the last reference to the device is removed; it is called from the embedded kobjectâs release method. All
devicestructures registered with the core must have a release method, or the kernel prints out scary complaints.
At a minimum, the parent, bus_id, bus, and release fields must be set before the device structure can be
registered.
The usual set of registration and unregistration functions exists:
int device_register(struct device *dev);
void device_unregister(struct device *dev);
We have seen how the lddbus code registers its bus type. However, an actual bus is a device and must be registered separately. For simplicity, the lddbus module supports only a single virtual bus, so the driver sets up its device at compile time:
static void ldd_bus_release(struct device *dev)
{
    printk(KERN_DEBUG "lddbus release\n");
}

struct device ldd_bus = {
    .bus_id   = "ldd0",
    .release  = ldd_bus_release
};
This is a top-level bus, so the parent and
bus fields are left NULL. We have a simple, no-op release method, and, as
the first (and only) bus, its name is ldd0. This bus
device is registered with:
ret = device_register(&ldd_bus);
if (ret)
    printk(KERN_NOTICE "Unable to register ldd0\n");
Once that call is complete, the new bus can be seen under /sys/devices in sysfs. Any devices added to this bus then shows up under /sys/devices/ldd0/.
Device entries in sysfs can have attributes. The relevant structure is:
struct device_attribute {
    struct attribute attr;
    ssize_t (*show)(struct device *dev, char *buf);
    ssize_t (*store)(struct device *dev, const char *buf,
                     size_t count);
};
These attribute structures can be set up at compile time with this macro:
DEVICE_ATTR(name, mode, show, store);
The resulting structure is named by prepending dev_attr_ to the given name. The actual
management of attribute files is handled with the usual pair of functions:
int device_create_file(struct device *device,
                       struct device_attribute *entry);
void device_remove_file(struct device *dev,
                        struct device_attribute *attr);
The dev_attrs field of struct bus_type points to a list of default attributes created for every
device added to that bus.
The device structure
contains the information that the device model core
needs to model the system. Most subsystems, however, track additional information about
the devices they host. As a result, it is rare for devices to be represented by bare
device structures; instead, that structure, like
kobject structures, is usually embedded within a higher-level representation of the
device. If you look at the definitions of struct
pci_dev or struct
usb_device, you will find a struct
device buried inside. Usually, low-level drivers are
not even aware of that struct
device, but there can be exceptions.
The lddbus driver creates its own device type (struct
ldd_device) and expects individual device drivers to
register their devices using that type. It is a simple structure:
struct ldd_device {
    char *name;
    struct ldd_driver *driver;
    struct device dev;
};

#define to_ldd_device(dev) container_of(dev, struct ldd_device, dev);
This structure allows the driver to provide an actual name for the device (which can
be distinct from its bus ID, stored in the device
structure) and a pointer to driver information. Structures for real devices usually also
contain information about the vendor, device model, device configuration, resources
used, and so on. Good examples can be found in struct
pci_dev (<linux/pci.h>) or struct
usb_device (<linux/usb.h>). A convenience macro
(to_ldd_device) is also defined for struct
ldd_device to make it easy to turn pointers to the
embedded device structure into ldd_device pointers.
The registration interface exported by lddbus looks like this:
int register_ldd_device(struct ldd_device *ldddev)
{
    ldddev->dev.bus = &ldd_bus_type;
    ldddev->dev.parent = &ldd_bus;
    ldddev->dev.release = ldd_dev_release;
    strncpy(ldddev->dev.bus_id, ldddev->name, BUS_ID_SIZE);
    return device_register(&ldddev->dev);
}
EXPORT_SYMBOL(register_ldd_device);
Here, we simply fill in some of the embedded device structure fields (which individual drivers should not need to know
about), and register the device with the driver core. If we wanted to add bus-specific
attributes to the device, we could do so here.
To show how this interface is used, let us introduce another sample driver, which we have called sculld. It is yet another variant on the scullp driver first introduced in Chapter 8. It implements the usual memory area device, but sculld also works with the Linux device model by way of the lddbus interface.
The sculld driver adds an attribute of its own to its device
entry; this attribute, called dev, simply contains
the associated device number. This attribute could be used by a module loading the
script or the hotplug subsystem to automatically create device nodes when the device is
added to the system. The setup for this attribute follows the usual patterns:
static ssize_t sculld_show_dev(struct device *ddev, char *buf)
{
    struct sculld_dev *dev = ddev->driver_data;

    return print_dev_t(buf, dev->cdev.dev);
}

static DEVICE_ATTR(dev, S_IRUGO, sculld_show_dev, NULL);
Then, at initialization time, the device is registered, and the dev attribute is created through the following
function:
static void sculld_register_dev(struct sculld_dev *dev, int index)
{
    sprintf(dev->devname, "sculld%d", index);
    dev->ldev.name = dev->devname;
    dev->ldev.driver = &sculld_driver;
    dev->ldev.dev.driver_data = dev;
    register_ldd_device(&dev->ldev);
    device_create_file(&dev->ldev.dev, &dev_attr_dev);
}
Note that we make use of the driver_data field to
store the pointer to our own, internal device structure.
The device model tracks all of the drivers known to the system. The main reason for this tracking is to enable the driver core to match up drivers with new devices. Once drivers are known objects within the system, however, a number of other things become possible. Device drivers can export information and configuration variables that are independent of any specific device, for example.
Drivers are defined by the following structure:
struct device_driver {
    char *name;
    struct bus_type *bus;
    struct kobject kobj;
    struct list_head devices;
    int (*probe)(struct device *dev);
    int (*remove)(struct device *dev);
    void (*shutdown) (struct device *dev);
};
Once again, several of the structureâs fields have been omitted (see <linux/device.h> for the full story). Here, name is the name of the driver (it shows up in sysfs),
bus is the type of bus this driver works with,
kobj is the inevitable kobject, devices is a list of all devices currently bound to this
driver, probe is a function called to query the existence of a
specific device (and whether this driver can work with it), remove is called when the device is removed from the system, and shutdown is called at shutdown time to quiesce the
device.
The form of the functions for working with device_driver structures should be looking familiar by now (so we cover them
very quickly). The registration functions are:
int driver_register(struct device_driver *drv);
void driver_unregister(struct device_driver *drv);
The usual attribute structure exists:
struct driver_attribute {
    struct attribute attr;
    ssize_t (*show)(struct device_driver *drv, char *buf);
    ssize_t (*store)(struct device_driver *drv, const char *buf,
                     size_t count);
};
DRIVER_ATTR(name, mode, show, store);
And attribute files are created in the usual way:
int driver_create_file(struct device_driver *drv,
                       struct driver_attribute *attr);
void driver_remove_file(struct device_driver *drv,
                        struct driver_attribute *attr);
The bus_type structure contains a field (drv_attrs) that points to a set of default attributes, which
are created for all drivers associated with that bus.
As is the case with mos
t
driver core structures, the device_driver structure
is usually found embedded within a higher-level, bus-specific structure. The
lddbus subsystem would never go against such a trend, so it has
defined its own ldd_driver
structure:
struct ldd_driver {
    char *version;
    struct module *module;
    struct device_driver driver;
    struct driver_attribute version_attr;
};

#define to_ldd_driver(drv) container_of(drv, struct ldd_driver, driver);
Here, we require each driver to provide its current software version, and lddbus exports that version string for every driver it knows about. The bus-specific driver registration function is:
int register_ldd_driver(struct ldd_driver *driver)
{
    int ret;

    driver->driver.bus = &ldd_bus_type;
    ret = driver_register(&driver->driver);
    if (ret)
        return ret;
    driver->version_attr.attr.name = "version";
    driver->version_attr.attr.owner = driver->module;
    driver->version_attr.attr.mode = S_IRUGO;
    driver->version_attr.show = show_version;
    driver->version_attr.store = NULL;
    return driver_create_file(&driver->driver, &driver->version_attr);
}
The first half of the function simply registers the low-level device_driver structure with the core; the rest sets up the
version attribute. Since this attribute is created
at runtime, we canât use the DRIVER_ATTR
macro;
instead, the driver_attribute structure must be
filled in by hand. Note that we set the owner of the attribute to the driver module,
rather than the lddbus module; the reason for this can be seen in
the implementation of the show
function for
this attribute:
static ssize_t show_version(struct device_driver *driver, char *buf)
{
    struct ldd_driver *ldriver = to_ldd_driver(driver);

    sprintf(buf, "%s\n", ldriver->version);
    return strlen(buf);
}
One might think that the attribute owner should be the lddbus
module, since the function that implements the attribute is defined there. This
function, however, is working with the ldd_driver
structure created (and owned) by the driver itself. If that structure were to go away
while a user-space process tried to read the version number, things could get messy.
Designating the driver module as the owner of the attribute prevents the module from
being unloaded, while user-space holds the attribute file open. Since each driver module
creates a reference to the lddbus module, we can be sure that
lddbus will not be unloaded at an inopportune time.
For completeness, sculld creates its ldd_driver structure as follows:
static struct ldd_driver sculld_driver = {
    .version = "$Revision: 1.1 $",
    .module = THIS_MODULE,
    .driver = {
        .name = "sculld",
    },
};
A simple call to register_ldd_driver adds it to the system. Once initialization is complete, the driver information can be seen in sysfs:
$ tree /sys/bus/ldd/drivers
/sys/bus/ldd/drivers
`-- sculld
    |-- sculld0 -> ../../../../devices/ldd0/sculld0
    |-- sculld1 -> ../../../../devices/ldd0/sculld1
    |-- sculld2 -> ../../../../devices/ldd0/sculld2
    |-- sculld3 -> ../../../../devices/ldd0/sculld3
`-- versionThe final device model concept we examine in this chapter is the class. A class is a higher-level view of a device that abstracts out low-level implementation details. Drivers may see a SCSI disk or an ATA disk, but, at the class level, they are all simply disks. Classes allow user space to work with devices based on what they do, rather than how they are connected or how they work.
Almost all classes show up in sysfs under /sys/class. Thus, for example, all network interfaces can be found under /sys/class/net, regardless of the type of interface. Input devices can be found in /sys/class/input, and serial devices are in /sys/class/tty. The one exception is block devices, which can be found under /sys/block for historical reasons.
Class membership is usually handled by high-level code without the need for explicit support from drivers. When the sbull driver (see Chapter 16) creates a virtual disk device, it automatically appears in /sys/block. The snull network driver (see Chapter 17) does not have to do anything special for its interfaces to be represented in /sys/class/net. There will be times, however, when drivers end up dealing with classes directly.
In many cases, the class subsystem is the best way of exporting information to user space. When a subsystem creates a class, it owns the class entirely, so there is no need to worry about which module owns the attributes found there. It also takes very little time wandering around in the more hardware-oriented parts of sysfs to realize that it can be an unfriendly place for direct browsing. Users more happily find information in /sys/class/some-widget than under, say, /sys/devices/pci0000:00/0000:00:10.0/usb2/2-0:1.0.
The driver core exports two distinct interfaces for managing classes. The class_simple routines are designed to make it as easy as possible to add new classes to the system; their main purpose, usually, is to expose attributes containing device numbers to enable the automatic creation of device nodes. The regular class interface is more complex but offers more features as well. We start with the simple version.
The class_simple interface was intended to be so easy to use that nobody would have any excuse for not exporting, at a minimum, an attribute containing a deviceâs assigned number. Using this interface is simply a matter of a couple of function calls, with little of the usual boilerplate associated with the Linux device model.
The first step is to create the class itself. That is accomplished with a call to class_simple_create:
struct class_simple *class_simple_create(struct module *owner, char *name);
This function creates a class with the given name.
The operation can fail, of course, so the return value should always be checked (using
IS_ERR, described in the Section 1.8 in Chapter 11) before
continuing.
A simple class can be destroyed with:
void class_simple_destroy(struct class_simple *cs);
The real purpose of creating a simple class is to add devices to it; that task is achieved with:
struct class_device *class_simple_device_add(struct class_simple *cs,
                                             dev_t devnum,
                                             struct device *device,
                                             const char *fmt, ...);
Here, cs is the previously created simple class,
devnum is the assigned device number, device is the struct
device representing this device, and the remaining
parameters are a printk-style format string and arguments to create
the device name. This call adds an entry to the class containing one attribute, dev, which holds the device number. If the device parameter is not NULL, a symbolic link (called device)
points to the deviceâs entry under /sys/devices.
It is possible to add other attributes to a device entry. It is just a matter of using class_device_create_file, which we discuss in the next section with the rest of the full class subsystem.
Classes generate hotplug events when devices come and go. If your driver needs to add variables to the environment for the user-space event handler, it can set up a hotplug callback with:
int class_simple_set_hotplug(struct class_simple *cs,
                             int (*hotplug)(struct class_device *dev,
                                            char **envp, int num_envp,
                                            char *buffer, int buffer_size));
When your device goes away, the class entry should be removed with:
void class_simple_device_remove(dev_t dev);
Note that the class_device structure returned by
class_simple_device_add is not needed here; the device number
(which should certainly be unique) is sufficient.
The class_simple interface suffices for many needs, but sometimes more flexibility is required. The following discussion describes how to use the full class mechanism, upon which class_simple is based. It is brief: the class functions and structures follow the same patterns as the rest of the device model, so there is little that is truly new here.
A class is defined by an
instance of
struct class:
struct class {
    char *name;
    struct class_attribute *class_attrs;
    struct class_device_attribute *class_dev_attrs;
    int (*hotplug)(struct class_device *dev, char **envp,
                   int num_envp, char *buffer, int buffer_size);
    void (*release)(struct class_device *dev);
    void (*class_release)(struct class *class);
    /* Some fields omitted */
};
Each class needs a unique name, which is how this
class appears under /sys/class. When the class is
registered, all of the attributes listed in the (NULL-terminated) array pointed to by class_attrs is created. There is also a set of default attributes for every
device added to the class; class_dev_attrs points to
those. There is the usual hotplug function for adding variables to
the environment when events are generated. There are also two
release methods: release is called whenever
a device is removed from the class, while class_release is called
when the class itself is released.
The registration functions are:
int class_register(struct class *cls);
void class_unregister(struct class *cls);
The interface for working with attributes should not surprise anybody at this point:
struct class_attribute {
    struct attribute attr;
    ssize_t (*show)(struct class *cls, char *buf);
    ssize_t (*store)(struct class *cls, const char *buf, size_t count);
};

CLASS_ATTR(name, mode, show, store);

int class_create_file(struct class *cls,
                      const struct class_attribute *attr);
void class_remove_file(struct class *cls,
const struct class_attribute *attr);The real purpose of a
class is to
serve as a container for the devices that are members of that class. A member is
represented by struct class_device:
struct class_device {
    struct kobject kobj;
    struct class *class;
    struct device *dev;
    void *class_data;
    char class_id[BUS_ID_SIZE];
};
The
class_id field holds the name of this device as it
appears in sysfs. The class pointer should point to
the class holding this device, and dev should point
to the associated device structure. Setting dev is optional; if it is non-NULL, it is used to create a symbolic link from the class entry to the
corresponding entry under /sys/devices, making it
easy to find the device entry in user space. The class can use class_data to hold a private pointer.
The usual registration functions have been provided:
int class_device_register(struct class_device *cd);
void class_device_unregister(struct class_device *cd);
The class device interface also allows the renaming of an already registered entry:
int class_device_rename(struct class_device *cd, char *new_name);
Class device entries have attributes:
struct class_device_attribute {
   struct attribute attr;
   ssize_t (*show)(struct class_device *cls, char *buf);
   ssize_t (*store)(struct class_device *cls, const char *buf,
                    size_t count);
};

CLASS_DEVICE_ATTR(name, mode, show, store);

int class_device_create_file(struct class_device *cls,
                             const struct class_device_attribute *attr);
void class_device_remove_file(struct class_device *cls,
                              const struct class_device_attribute *attr);
A default set of attributes, in the classâs class_dev_attrs field, is created when the class device is registered;
class_device_create_file may be used to create additional
attributes. Attributes may also be added to class devices created with the
class_simple interface.
The class subsystem has an additional concept not found in other parts of the Linux device model. This mechanism is called an interface, but it is, perhaps, best thought of as a sort of trigger mechanism that can be used to get notification when devices enter or leave the class.
An interface is represented by:
struct class_interface {
    struct class *class;
    int (*add) (struct class_device *cd);
    void (*remove) (struct class_device *cd);
};
Interfaces can be registered and unregistered with:
int class_interface_register(struct class_interface *intf);
void class_interface_unregister(struct class_interface *intf);
The functioning of an interface is straightforward. Whenever a class device is added
to the class specified in the class_interface structure, the interfaceâs
add function is called. That function can perform any additional
setup required for that device; this setup often takes the form of adding more
attributes, but other applications are possible. When the device is removed from the
class, the remove method is called to perform any required
cleanup.
To better understand what the driver model does, let us walk through the steps of a deviceâs lifecycle within the kernel. We describe how the PCI subsystem interacts with the driver model, the basic concepts of how a driver is added and removed, and how a device is added and removed from the system. These details, while describing the PCI kernel code specifically, apply to all other subsystems that use the driver core to manage their drivers and devices.
The interaction between the PCI core, driver core, and the individual PCI drivers is quite complex, as Figure 14-2 shows.

The PCI subsystem
declares
a single struct
bus_type called pci_bus_type, which is initialized with the following values:
struct bus_type pci_bus_type = {
    .name      = "pci",
    .match     = pci_bus_match,
    .hotplug   = pci_hotplug,
    .suspend   = pci_device_suspend,
    .resume    = pci_device_resume,
    .dev_attrs = pci_dev_attrs,
};
This pci_bus_type
variable
is registered with the driver core when the PCI subsystem is loaded in the kernel with a
call to bus_register. When that happens, the driver core creates a
sysfs directory in /sys/bus/pci that consists of two
directories: devices and drivers.
All PCI drivers must define a struct pci_driver
variable that defines the different functions that this PCI driver can do (for more
information about the PCI subsystem and how to write a PCI driver, see Chapter 12). That structure contains a struct device_driver that is then initialized by the PCI core
when the PCI driver is registered:
/* initialize common driver fields */
drv->driver.name = drv->name;
drv->driver.bus = &pci_bus_type;
drv->driver.probe = pci_device_probe;
drv->driver.remove = pci_device_remove;
drv->driver.kobj.ktype = &pci_driver_kobj_type;
This code sets up the bus for the driver to point to the pci_bus_type and points the probe and
remove functions to point to functions within the PCI core. The
ktype for the driverâs kobject is set to the variable pci_driver_kobj_type, in order for the PCI driverâs attribute files to work
properly. Then the PCI core registers the PCI driver with the driver core:
/* register with core */
error = driver_register(&drv->driver);
The driver is now ready to be bound to any PCI devices it supports.
The PCI core, with help from the architecture-specific code that actually talks to the
PCI bus, starts probing the PCI address space, looking for all PCI devices. When a PCI
device is found, the PCI core creates a new variable in memory of type struct
pci_dev. A portion of the struct pci_dev structure looks like the following:
struct pci_dev {
    /* ... */
    unsigned int   devfn;
    unsigned short vendor;
    unsigned short device;
    unsigned short subsystem_vendor;
    unsigned short subsystem_device;
    unsigned int   class;
    /* ... */
    struct pci_driver *driver;
    /* ... */
    struct device dev;
    /* ... */
};
The bus-specific fields of this PCI device are initialized by the PCI core (the
devfn, vendor,
device, and other fields), and the struct
device variableâs parent variable is set to the PCI bus device that this PCI device lives on.
The bus variable is set to point at the pci_bus_type structure. Then the name and bus_id variables are set,
depending on the name and ID that is read from the PCI device.
After the PCI device structure is initialized, the device is registered with the driver core with a call to:
device_register(&dev->dev);
Within the device_register function, the driver core initializes a number of the deviceâs fields, registers the deviceâs kobject with the kobject core (which causes a hotplug event to be generated, but we discuss that later in this chapter), and then adds the device to the list of devices that are held by the deviceâs parent. This is done so that all devices can be walked in the proper order, always knowing where in the hierarchy of devices each one lives.
The device is then added to the bus-specific list of all devices, in this example, the
pci_bus_type list. Then the list of all drivers that
are registered with the bus is walked, and the match function of the
bus is called for every driver, specifying this device. For the pci_bus_type bus, the match function was set to point to
the pci_bus_match function by the PCI core before the device was
submitted to the driver core.
The pci_bus_match function casts the struct
device that was passed to it by the driver core, back
into a struct
pci_dev. It also casts the struct
device_driver back into a struct
pci_driver and then looks at the PCI device-specific
information of the device and driver to see if the driver states that it can support this
kind of device. If the match is not successful, the function returns 0 back to the driver core, and the driver core moves on to the
next driver in its list.
If the match is successful, the function returns 1
back to the driver core. This causes the driver core to set the driver pointer in the struct
device to point to this driver, and then it calls the
probe function that is specified in the struct device_driver.
Earlier, before the PCI driver was registered with the driver core, the probe variable was set to point at the
pci_device_probe function. This function casts (yet again) the
struct
device back into a struct
pci_dev and the struct
driver that is set in the device back into a struct
pci_driver. It again verifies that this driver states
that it can support this device (which seems to be a redundant extra check for some
unknown reason), increments the reference count of the device, and then calls the PCI
driverâs probe function with a pointer to the struct
pci_dev structure it should bind to.
If the PCI driverâs probe function determines that it can not
handle this device for some reason, it returns a negative error value, which is propagated
back to the driver core and causes it to continue looking through the list of drivers to
match one up with this device. If the probe function can claim the
device, it does all the initialization that it needs to do to handle the device properly,
and then it returns 0 back up to the driver core. This
causes the driver core to add the device to the list of all devices currently bound by
this specific driver and creates a symlink within the driverâs directory in sysfs to the
device that it is now controlling. This symlink allows users to see exactly which devices
are bound to which devices. This can be seen as:
$ tree /sys/bus/pci
/sys/bus/pci/
|-- devices
|   |-- 0000:00:00.0 -> ../../../devices/pci0000:00/0000:00:00.0
|   |-- 0000:00:00.1 -> ../../../devices/pci0000:00/0000:00:00.1
|   |-- 0000:00:00.2 -> ../../../devices/pci0000:00/0000:00:00.2
|   |-- 0000:00:02.0 -> ../../../devices/pci0000:00/0000:00:02.0
|   |-- 0000:00:04.0 -> ../../../devices/pci0000:00/0000:00:04.0
|   |-- 0000:00:06.0 -> ../../../devices/pci0000:00/0000:00:06.0
|   |-- 0000:00:07.0 -> ../../../devices/pci0000:00/0000:00:07.0
|   |-- 0000:00:09.0 -> ../../../devices/pci0000:00/0000:00:09.0
|   |-- 0000:00:09.1 -> ../../../devices/pci0000:00/0000:00:09.1
|   |-- 0000:00:09.2 -> ../../../devices/pci0000:00/0000:00:09.2
|   |-- 0000:00:0c.0 -> ../../../devices/pci0000:00/0000:00:0c.0
|   |-- 0000:00:0f.0 -> ../../../devices/pci0000:00/0000:00:0f.0
|   |-- 0000:00:10.0 -> ../../../devices/pci0000:00/0000:00:10.0
|   |-- 0000:00:12.0 -> ../../../devices/pci0000:00/0000:00:12.0
|   |-- 0000:00:13.0 -> ../../../devices/pci0000:00/0000:00:13.0
|   `-- 0000:00:14.0 -> ../../../devices/pci0000:00/0000:00:14.0
`-- drivers
    |-- ALI15x3_IDE
    |   `-- 0000:00:0f.0 -> ../../../../devices/pci0000:00/0000:00:0f.0
    |-- ehci_hcd
    |   `-- 0000:00:09.2 -> ../../../../devices/pci0000:00/0000:00:09.2
    |-- ohci_hcd
    |   |-- 0000:00:02.0 -> ../../../../devices/pci0000:00/0000:00:02.0
    |   |-- 0000:00:09.0 -> ../../../../devices/pci0000:00/0000:00:09.0
    |   `-- 0000:00:09.1 -> ../../../../devices/pci0000:00/0000:00:09.1
    |-- orinoco_pci
    |   `-- 0000:00:12.0 -> ../../../../devices/pci0000:00/0000:00:12.0
    |-- radeonfb
    |   `-- 0000:00:14.0 -> ../../../../devices/pci0000:00/0000:00:14.0
    |-- serial
    `-- trident
        `-- 0000:00:04.0 -> ../../../../devices/pci0000:00/0000:00:04

.0A PCI device can
be removed from a system in a number of different ways. All CardBus devices are really PCI
devices in a different physical form factor, and the kernel PCI core does not
differenciate between them. Systems that allow the removal or addition of PCI devices
while the machine is still running are becoming more popular, and Linux supports them.
There is also a fake PCI Hotplug driver that allows developers to test to see if their PCI
driver properly handles the removal of a device while the system is running. This module
is called fakephp and causes the kernel to think the
PCI device is gone, but it does not allow users to physically remove a PCI device from a
system that does not have the proper hardware to do so. See the documentation with this
driver for more information on how to use it to test your PCI drivers.
The PCI core exerts a lot less effort to remove a device than it does to add it. When
a PCI device is to be removed, the
pci_remove_bus_device function is called. This function does some
PCI-specific cleanups and housekeeping, and then calls the
device_unregister function with a pointer to the struct
pci_devâs struct
device member.
In the device_unregister function, the driver core merely unlinks
the sysfs files from the driver bound to the device (if there was one), removes the device
from its internal list of devices, and calls kobject_del with a
pointer to the struct kobject that is contained in the
struct device structure. That function makes a
hotplug call to user space stating that the kobject is now removed from the system, and
then it deletes all sysfs files associated with the kobject and the sysfs directory itself
that the kobject had originally created.
The kobject_del function also removes the kobject reference of
the device itself. If that reference was the last one (meaning no user-space files were
open for the sysfs entry of the device), then the release function
for the PCI device itself, pci_release_dev, is called. That function
merely frees up the memory that the struct pci_dev took
up.
After this, all sysfs entries associated with the device are removed, and the memory associated with the device is released. The PCI device is now totally removed from the system.
A PCI driver is added
to
the PCI core when it calls the pci_register_driver function. This
function merely initializes the struct
device_driver structure that is contained within the
struct
pci_driver structure, as previously mentioned in the
section about adding a device. Then the PCI core calls the
driver_register function in the driver core with a pointer to the
structdevice_driver structure contained in the
struct
pci_driver structure.
The driver_register function initializes a few locks in the
struct
device_driver structure, and then calls the
bus_add_driver function. This function does the following
steps:
Looks up the bus that the driver is to be associated with. If this bus is not found, the function instantly returns.
The driverâs sysfs directory is created based on the name of the driver and the bus that it is associated with.
The busâs internal lock is grabbed, and then all devices that have been registered with the bus are walked, and the match function is called for them, just like when a new device is added. If that match function succeeds, then the rest of the binding process occurs, as described in the previous section.
Removing a driver is
a
very simple action. For a PCI driver, the driver calls the
pci_unregister_driver function. This function merely calls the
driver core function driver_unregister, with a pointer to the
struct
device_driver portion of the struct
pci_driver structure passed to it.
The
driver_unregister function handles some basic housekeeping by
cleaning up some sysfs attributes that were attached to the driverâs entry in the sysfs
tree. It then iterates over all devices that were attached to this driver and calls the
release function for it. This happens exactly like the previously
mentioned release function for when a device is removed from the
system.
After all devices are unbound from the driver, the driver code does this unique bit of logic:
down(&drv->unload_sem);
up(&drv->unload_sem);
This is done right before returning to the caller of the function. This lock is
grabbed because the code needs to wait for all reference counts on this driver to be
dropped to 0 before it is safe to return. This is
needed because the driver_unregister function is most commonly called
as the exit path of a module that is being unloaded. The module needs to remain in memory
for as long as the driver is being referenced by devices and by waiting for this lock to
be freed, this allows the kernel to know when it is safe to remove the driver
from
memory.
There are two different ways to view hotplugging. The kernel views hotplugging as an interaction between the hardware, the kernel, and the kernel driver. Users view hotplugging as the interaction between the kernel and user space through the program called /sbin/hotplug. This program is called by the kernel when it wants to notify user space that some type of hotplug event has just happened within the kernel.
The most commonly used meaning of the term âhotplugâ happens when discussing the fact that most all computer systems can now handle devices appearing or disappearing while the system is powered on. This is very different from the computer systems of only a few years ago, where the programmers knew that they needed to scan for all devices only at boot time, and they never had to worry about their devices disappearing until the power was turned off to the whole machine. Now, with the advent of USB, CardBus, PCMCIA, IEEE1394, and PCI Hotplug controllers, the Linux kernel needs to be able to reliably run no matter what hardware is added or removed from the system. This places an added burden on the device driver author, as they must now always handle a device being suddenly ripped out from underneath them without any notice.
Each different bus type handles the loss of a device in a different way. For example,
when a PCI, CardBus, or PCMCIA device is removed from the system, it is usually a while
before the driver is notified of this action through its remove
function. Before that happens, all reads from the PCI bus return all bits set. This means
that drivers need to always check the value of the data they read from the PCI bus and
properly be able to handle a 0xff value.
An example of this can be seen in the drivers/usb/host/ehci-hcd.c driver, which is a PCI driver for a USB 2.0 (high-speed) controller card. It has the following code in its main handshake loop to detect if the controller card has been removed from the system:
result = readl(ptr);
if (result =  = ~(u32)0)    /* card removed */
    return -ENODEV;
For USB drivers, when the device that a USB driver is bound to is removed from the
system, any pending urbs that were submitted to the device start failing with the error
-ENODEV. The driver needs to recognize this error and
properly clean up any pending I/O if it occurs.
Hotpluggable devices are not limited only to traditional devices such as mice, keyboards, and network cards. There are numerous systems that now support removal and addition of entire CPUs and memory sticks. Fortunately the Linux kernel properly handles the addition and removal of such core âsystemâ devices so that individual device drivers do not need to pay attention to these things.
As alluded to earlier in this chapter, whenever a device is added or removed from the system, a âhotplug eventâ is generated. This means that the kernel calls the user-space program /sbin/hotplug. This program is typically a very small bash script that merely passes execution on to a list of other programs that are placed in the /etc/hotplug.d/ directory tree. For most Linux distributions, this script looks like the following:
DIR="/etc/hotplug.d"
for I in "${DIR}/$1/"*.hotplug "${DIR}/"default/*.hotplug ; do
    if [ -f $I ]; then
        test -x $I && $I $1 ;
    fi
done
exit 1
In other words, the script searches for all programs bearing a .hotplug suffix that might be interested in this event and invokes them, passing to them a number of different environment variables that have been set by the kernel. More details about how the /sbin/hotplug script works can be found in the comments in the program and in the hotplug(8) manpage.
As mentioned previously, /sbin/hotplug is called whenever a kobject is created or destroyed. The hotplug program is called with a single command-line argument providing a name for the event. The core kernel and specific subsystem involved also set a series of environment variables (described below) with information on what has just occurred. These variables are used by the hotplug programs to determine what has just happened in the kernel, and if there is any specific action that should take place.
The command-line argument passed to /sbin/hotplug is the name
associated with this hotplug event, as determined by the kset assigned to the kobject.
This name can be set by a call to the name function that is part of
the ksetâs hotplug_ops structure described earlier in
this chapter; if that function is not present or never called, the name is that of the
kset itself.
The default environment variables that are always set for the /sbin/hotplug program are:
ACTIONThe string
addorremove, depending on whether the object in question was just created or destroyed.DEVPATHA directory path, within the sysfs filesystem, that points to the kobject that is being either created or destroyed. Note that the mount point of the sysfs filesystem is not added to this path, so it is up to the user-space program to determine that.
SEQNUMThe sequence number for this hotplug event. The sequence number is a 64-bit number that is incremented for every hotplug event that is generated. This allows user space to sort the hotplug events in the order in which the kernel generates them, as it is possible for a user-space program to be run out of order.
SUBSYSTEMThe same string passed as the command-line argument as described above.
A number of the different bus subsystems all add their own environment variables to
the /sbin/hotplug call, when devices associated with the bus are
added or removed from the system. They do this in their hotplug
callback that is specified in the struct
kset_hotplug_ops assigned to their bus (as described in
Section 14.3.1). This allows user
space to be able to automatically load any necessary module that might be needed to
control the device that has been found by the bus. Here is a list of the different bus
types and what environment variables they add to the /sbin/hotplug
call.
Any devices on the
IEEE1394 bus, also known as Firewire, have the
/sbin/hotplug parameter name and the SUBSYSTEM environment variable set to the value ieee1394. The ieee1394 subsystem also
always adds the following four environment variables:
VENDOR_IDThe 24-bit vendor ID for the IEEE1394 device
MODEL_IDThe 24-bit model ID for the IEEE1394 device
GUIDThe 64-bit GUID for the device
SPECIFIER_IDThe 24-bit value specifying the owner of the protocol spec for this device
VERSIONThe value that specifies the version of the protocol spec for this device
All
network devices
create a hotplug event when the device is registered or unregistered in the kernel. The
/sbin/hotplug call has the parameter name and the SUBSYSTEM environment variable set to the value net, and just adds the following environment
variable:
INTERFACEThe name of the interface that has been registered or unregistered from the kernel. Examples of this are
loandeth0.
Any devices on the PCI bus have the parameter name and the SUBSYSTEM environment variable set to the value pci. The PCI subsystem also always adds the following four environment
variables:
PCI_CLASSThe PCI class number for the device, in hex.
PCI_IDThe PCI vendor and device IDs for the device, in hex, combined in the format
vendor:device.PCI_SUBSYS_IDThe PCI subsystem vendor and subsystem device IDs, combined in the format
subsys_vendor:subsys_device.PCI_SLOT_NAMEThe PCI slot ânameâ that is given to the device by the kernel. It is in the format
domain:bus:slot:function. An example might be0000:00:0d.0.
For all
input devices (mice, keyboards, joysticks, etc.),
a hotplug event is generated when the device is added and removed from the kernel. The
/sbin/hotplug parameter and the SUBSYSTEM environment variable are set to the value input. The input subsystem also always adds the following
environment variable:
The following environment variables may be present, if the device supports it:
NAMEThe name of the input device as given by the device.
PHYSThe deviceâs physical address that the input subsystem gave to this device. It is supposed to be stable, depending on the bus position into which the device was plugged.
EVKEYRELABSMSCLEDSNDFFThese all come from the input device descriptor and are set to the appropriate values if the specific input device supports it.
Any devices on the USB bus have the parameter
name and the SUBSYSTEM environment variable set to
the value usb. The USB subsystem also always adds the
following environment variables:
If the bDeviceClass field is set to 0, the following environment variable is also set:
If the kernel build option, CONFIG_USB_DEVICEFS,
which selects the usbfs filesystem to be built in the
kernel, is selected, the following environment variable is also set:
DEVICEA string that shows where in the
usbfsfilesystem the device is located. This string is in the format/proc/bus/usb/USB_BUS_NUMBER/USB_DEVICE_NUMBER, in whichUSB_BUS_NUMBERis the three-digit number of the USB bus that the device is on, andUSB_DEVICE_NUMBERis the three-digit number that has been assigned by the kernel to that USB device.
All SCSI devices create a hotplug event when the
SCSI device is
created or removed from the kernel. The /sbin/hotplug call has the
parameter name and the SUBSYSTEM environment variable
set to the value scsi for every SCSI device that is
added or removed from the system. There are no additional environment variables added by
the SCSI system, but it is mentioned here because there is a SCSI-specific user-space
script that can determine what SCSI drivers (disk, tape, generic, etc.) should be loaded
for the specified SCSI device.
If a Plug-and-Play-supported laptop
docking station is added or removed from the running Linux system (by inserting the
laptop into the station, or removing it), a hotplug event is created. The
/sbin/hotplug call has the parameter name and the SUBSYSTEM environment variable set to the value dock. No other environment variables are set.
On the
S/390
architecture, the channel bus architecture supports a wide range of hardware, all of
which generate /sbin/hotplug events when they are added or removed
from the Linux virtual system. These devices all have the
/sbin/hotplug parameter name and the SUBSYSTEM environment variable set to the value dasd. No other environment variables are set.
Now that the Linux kernel is calling /sbin/hotplug for every device added and removed from the kernel, a number of very useful tools have been created in user space that take advantage of this. Two of the most popular tools are the Linux Hotplug scripts and udev.
The Linux hotplug scripts started out as the very first user of the /sbin/hotplug call. These scripts look at the different environment variables that the kernel sets to describe the device that was just discovered and then tries to find a kernel module that matches up with that device.
As has been described before, when a driver uses the MODULE_DEVICE_TABLE macro, the program, depmod, takes that information and creates the files located in
/lib/module/KERNEL_VERSION/modules.*map. The * is different, depending on the bus type that the driver
supports. Currently, the module map files are generated for drivers that work for
devices that support the PCI, USB, IEEE1394, INPUT, ISAPNP, and CCW subsystems.
The hotplug scripts use these module map text files to determine what module to try to load to support the device that was recently discovered by the kernel. They load all modules and do not stop at the first match, in order to let the kernel work out what module works best. These scripts do not unload any modules when devices are removed. If they were to try to do that, they could accidentally shut down devices that were also controlled by the same driver of the device that was removed.
Note, now that the modprobe program can read the
MODULE_DEVICE_TABLE information directly from the
modules without the need of the module map files, the hotplug scripts might be reduced
to a small wrapper around the modprobe
program.
One of the main reasons for creating the unified driver model in the kernel was to allow user space to manage the /dev tree in a dynamic fashion. This had previously been done in user space with the implementation of devfs, but that code base has slowly rotted away, due to a lack of an active maintainer and some unfixable core bugs. A number of kernel developers realized that if all device information was exported to user space, it could perform all the necessary management of the /dev tree.
devfs has some very fundamental flaws in its design. It requires every device driver to be modified to support it, and it requires that device driver to specify the name and location within the /dev tree where it is placed. It also does not properly handle dynamic major and minor numbers, and it does not allow user space to override the naming of a device in a simple manner, forcing the device naming policy to reside within the kernel and not in user space. Linux kernel developers really hate having policy within the kernel, and since the devfs naming policy does not follow the Linux Standard Base specification, it really bothers them.
As the Linux kernel started to be installed on huge servers, a lot of users ran into the problem of how to manage very large numbers of devices. Disk drive arrays of over 10,000 unique devices presented the very difficult task of ensuring that a specific disk was always named with the same exact name, no matter where it was placed in the disk array or when it was discovered by the kernel. This same problem also plagued desktop users who tried to plug two USB printers into their system and then realized that they had no way of ensuring that the printer known as /dev/lpt0 would not change and be assigned to the other printer if the system was rebooted.
So, udev was created. It relies on all device information being exported to user space through sysfs and on being notified by /sbin/hotplug that a device was added or removed. Policy decisions, such as what name to give a device, can be specified in user space, outside of the kernel. This ensures that the naming policy is removed from the kernel and allows a large amount of flexibility about the name of each device.
For more information on how to use udev and how to configure it, please see the documentation that comes included with the udev package in your distribution.
All that a device driver needs to do, for udev to work properly with it, is ensure that any major and minor numbers assigned to a device controlled by the driver are exported to user space through sysfs. For any driver that uses a subsystem to assign it a major and minor number, this is already done by the subsystem, and the driver doesnât have to do any work. Examples of subsystems that do this are the tty, misc, usb, input, scsi, block, i2c, network, and frame buffer subsystems. If your driver handles getting a major and minor number on its own, through a call to the cdev_init function or the older register_chrdev function, the driver needs to be modified in order for udev to work properly with it.
udev looks for a file called dev in the /class/ tree of sysfs, in order to
determine what major and minor number is assigned to a specific device when it is called
by the kernel through the /sbin/hotplug interface. A device driver
merely needs to create that file for every device it controls. The class_simple interface is usually the easiest way to do
this.
As mentioned in Section 14.5.1
the first step in using the class_simple interface is
to create a struct
class_simple with a call to the
class_simple_create function:
static struct class_simple *foo_class;
...
foo_class = class_simple_create(THIS_MODULE, "foo");
if (IS_ERR(foo_class)) {
    printk(KERN_ERR "Error creating foo class.\n");
    goto error;
}
This code creates a directory in sysfs in /sys/class/foo.
Whenever a new device is found by your driver, and you assign it a minor number as described in Chapter 3, the driver should call the class_simple_device_add function:
class_simple_device_add(foo_class, MKDEV(FOO_MAJOR, minor), NULL, "foo%d", minor);
This code causes a subdirectory under /sys/class/foo to be created called fooN, where N is the minor number for this device. There is one file created in this directory, dev, which is exactly what udev needs in order to create a device node for your device.
When your driver is unbound from a device, and you give up the minor number that it was attached to, a call to class_simple_device_remove is needed to remove the sysfs entries for this device:
class_simple_device_remove(MKDEV(FOO_MAJOR, minor));
Later, when your entire driver is being shut down, a call to class_simple_destroy is needed to remove the class that you created originally with the call to class_simple_create:
class_simple_destroy(foo_class);
The dev file that is created by the call to
class_simple_device_add consists of the major and minor numbers,
separated by a : character. If your driver does not want to use the class_simple interface because you want to provide other
files within the class directory for the subsystem, use the
print_dev_t function to properly format the major and minor
number for the
specific device.
As a driver author, you may find yourself confronted with a device that must have firmware downloaded into it before it functions properly. The competition in many parts of the hardware market is so intense that even the cost of a bit of EEPROM for the deviceâs controlling firmware is more than the manufacturer is willing to spend. So the firmware is distributed on a CD with the hardware, and the operating system is charged with conveying the firmware to the device itself.
You may be tempted to solve the firmware problem with a declaration like this:
static char my_firmware[ ] = { 0x34, 0x78, 0xa4, ... };That approach is almost certainly a mistake, however. Coding firmware into a driver bloats the driver code, makes upgrading the firmware hard, and is very likely to run into licensing problems. It is highly unlikely that the vendor has released the firmware image under the GPL, so mixing it with GPL-licensed code is usually a mistake. For this reason, drivers containing wired-in firmware are unlikely to be accepted into the mainline kernel or included by Linux distributors.
The proper solution is to obtain the firmware from user space when you need it. Please resist the temptation to try to open a file containing firmware directly from kernel space, however; that is an error-prone operation, and it puts policy (in the form of a file name) into the kernel. Instead, the correct approach is to use the firmware interface, which was created just for this purpose:
#include <linux/firmware.h>
int request_firmware(const struct firmware **fw, char *name,
                     struct device *device);
A call to request_firmware requests that user space locate and
provide a firmware image to the kernel; we look at the details of how it works in a
moment. The name should identify the firmware that is
desired; the normal usage is the name of the firmware file as provided by the vendor.
Something like my_firmware.bin is typical. If the
firmware is successfully loaded, the return value is 0
(otherwise the usual error code is returned), and the fw argument is pointed to one of these structures:
struct firmware {
        size_t size;
        u8 *data;
};
That structure contains the actual firmware, which can now be downloaded to the device. Be aware that this firmware is unchecked data from user space; you should apply any and all tests you can think of to convince yourself that it is a proper firmware image before sending it to the hardware. Device firmware usually contains identification strings, checksums, and so on; check them all before trusting the data.
After you have sent the firmware to the device, you should release the in-kernel structure with:
void release_firmware(struct firmware *fw);
Since request_firmware asks user space to help, it is guaranteed to sleep before returning. If your driver is not in a position to sleep when it must ask for firmware, the asynchronous alternative may be used:
int request_firmware_nowait(struct module *module,
                            char *name, struct device *device, void *context,
                            void (*cont)(const struct firmware *fw, void *context));
The additional arguments here are module (which
will almost always be THIS_MODULE), context (a private data pointer that is not used by the
firmware subsystem), and cont. If all goes well,
request_firmware_nowait begins the firmware load process and
returns 0. At some future time, cont will be called with the result of the load. If the
firmware load fails for some reason, fw is NULL.
The firmware subsystem works with sysfs and the hotplug mechanism. When a call is made to request_firmware, a new directory is created under /sys/class/firmware using your deviceâs name. That directory contains three attributes:
loadingThis attribute should be set to one by the user-space process that is loading the firmware. When the load process is complete, it should be set to
0. Writing a value of-1toloadingaborts the firmware loading process.datadatais a binary attribute that receives the firmware data itself. After settingloading, the user-space process should write the firmware to this attribute.deviceThis attribute is a symbolic link to the associated entry under /sys/devices.
Once the sysfs entries have been created, the kernel generates a hotplug event for
your device. The environment passed to the hotplug handler includes a variable FIRMWARE, which is set to the name provided to
request_firmware. The handler should locate the firmware file, and
copy it into the kernel using the attributes provided. If the file cannot be found, the
handler should set the loading attribute to -1.
If a firmware request is not serviced within 10 seconds, the kernel gives up and returns a failure status to the driver. That time-out period can be changed via the sysfs attribute /sys/class/firmware/timeout.
Using the request_firmware interface allows you to distribute the device firmware with your driver. When properly integrated into the hotplug mechanism, the firmware loading subsystem allows devices to simply work âout of the box.â It is clearly the best way of handling the problem.
Please indulge us as we pass on one more warning, however: device firmware should not be distributed without the permission of the manufacturer. Many manufacturers will agree to license their firmware under reasonable terms when asked politely; some others can be less cooperative. Either way, copying and distributing their firmware without permission is a violation of copyright law and an invitation for trouble.
Many functions have been introduced in this chapter; here is a quick summary of them all.
#include <linux/kobject.h>The include file containing definitions for kobjects, related structures, and functions.
void kobject_init(struct kobject *kobj);int kobject_set_name(struct kobject *kobj, const char *format, ...);Functions for kobject initialization.
struct kobject *kobject_get(struct kobject
                *kobj);
void kobject_put(struct kobject *kobj);Functions that manage reference counts for kobjects.
struct kobj_type;struct kobj_type *get_ktype(struct kobject *kobj);Represents the type of structure within which a kobject is embedded. Use get_ktype to get the
kobj_typeassociated with a given kobject.int kobject_add(struct kobject *kobj);extern int kobject_register(struct kobject *kobj);void kobject_del(struct kobject *kobj);void kobject_unregister(struct kobject *kobj);kobject_add adds a kobject to the system, handling kset membership, sysfs representation, and hotplug event generation. kobject_register is a convenience function that combines kobject_init and kobject_add. Use kobject_del to remove a kobject or kobject_unregister, which combines kobject_del and kobject_put.
void kset_init(struct kset *kset);int kset_add(struct kset *kset);int kset_register(struct kset *kset);void kset_unregister(struct kset *kset);Initialization and registration functions for ksets.
decl_subsys(name, type, hotplug_ops);A macro that makes it easier to declare subsystems.
void subsystem_init(struct subsystem
              *subsys);
int subsystem_register(struct subsystem *subsys);void subsystem_unregister(struct subsystem *subsys);struct subsystem *subsys_get(struct subsystem *subsys)void subsys_put(struct subsystem *subsys);Operations on subsystems.
#include <linux/sysfs.h>int sysfs_create_file(struct kobject *kobj, struct attribute *attr);int sysfs_remove_file(struct kobject *kobj, struct attribute *attr);int sysfs_create_bin_file(struct kobject *kobj, struct bin_attribute *attr);int sysfs_remove_bin_file(struct kobject *kobj, struct bin_attribute *attr);int sysfs_create_link(struct kobject *kobj, struct kobject *target, char*name);void sysfs_remove_link(struct kobject *kobj, char *name);Functions for creating and removing attribute files associated with a kobject.
int bus_register(struct bus_type *bus);void bus_unregister(struct bus_type *bus);Functions that perform registration and unregistration of buses in the device model.
int bus_for_each_dev(struct bus_type *bus, struct device *start, void *data,int (*fn)(struct device *, void *));int bus_for_each_drv(struct bus_type *bus, struct device_driver *start, void*data, int (*fn)(struct device_driver *, void *));Functions that iterate over each of the devices and drivers, respectively, that are attached to the given bus.
BUS_ATTR(name, mode, show, store);int bus_create_file(struct bus_type *bus, struct bus_attribute *attr);void bus_remove_file(struct bus_type *bus, struct bus_attribute *attr);The BUS_ATTR macro may be used to declare a
bus_attributestructure, which may then be added and removed with the above two functions.int device_register(struct device *dev);void device_unregister(struct device *dev);Functions that handle device registration.
DEVICE_ATTR(name, mode, show, store);int device_create_file(struct device *device, struct device_attribute *entry);void device_remove_file(struct device *dev, struct device_attribute *attr);Macros and functions that deal with device attributes.
int driver_register(struct device_driver
              *drv);
void driver_unregister(struct device_driver *drv);Functions that register and unregister a device driver.
DRIVER_ATTR(name, mode, show, store);int driver_create_file(struct device_driver *drv, struct driver_attribute*attr);void driver_remove_file(struct device_driver *drv, struct driver_attribute*attr);Macros and functions that manage driver attributes.
struct class_simple *class_simple_create(struct module
                *owner, char *name);
void class_simple_destroy(struct class_simple *cs);struct class_device *class_simple_device_add(struct class_simple *cs, dev_tdevnum, struct device *device, const char *fmt, ...);void class_simple_device_remove(dev_t dev);int class_simple_set_hotplug(struct class_simple *cs, int (*hotplug)(structclass_device *dev, char **envp, int num_envp, char *buffer, intbuffer_size));Functions that implement the
class_simpleinterface; they manage simple class entries containing adevattribute and little else.int class_register(struct class *cls);void class_unregister(struct class *cls);Registration and unregistration of classes.
CLASS_ATTR(name, mode, show, store);int class_create_file(struct class *cls, const struct class_attribute *attr);void class_remove_file(struct class *cls, const struct class_attribute *attr);The usual macros and functions for dealing with class attributes.
int class_device_register(struct class_device
                *cd);
void class_device_unregister(struct class_device *cd);int class_device_rename(struct class_device *cd, char *new_name);CLASS_DEVICE_ATTR(name, mode, show, store);int class_device_create_file(struct class_device *cls, const structclass_device_attribute *attr);void class_device_remove_file(struct class_device *cls, const structclass_device_attribute *attr);Functions and macros that implement the class device interface.
int class_interface_register(struct class_interface
                *intf);
void class_interface_unregister(struct class_interface *intf);Functions that add an interface to a class (or remove it).
#include <linux/firmware.h>int request_firmware(const struct firmware **fw, char *name, struct device*device);int request_firmware_nowait(struct module *module, char *name, struct device*device, void *context, void (*cont)(const struct firmware *fw, void*context));void release_firmware(struct firmware *fw);Functions that implement the kernel firmware-loading interface.
[1] The logical name for this bus, of course, would have been âsbus,â but that name was already taken by a real, physical bus.
Get Linux Device Drivers, 3rd Edition now with the O’Reilly learning platform.
O’Reilly members experience books, live events, courses curated by job role, and more from O’Reilly and nearly 200 top publishers.

