In general, new programs arrive on your Mac via one of two avenues: on a CD, or via an Internet download. The CD method is slightly simpler; see “Performing the Installation” later in this section.
For help installing downloaded programs, on the other hand, read on.
Programs you download from the Internet generally arrive in a specially encoded, compressed form. The downloaded file’s name usually has one of these file name extensions:
.sit indicates a StuffIt file, the standard Macintosh file-compression format.
.zip is the standard Windows compression file format—and, because Panther has a built-in Create [.zip] Archive command right in the File menu, it may become the new standard Macintosh compression format. (That would certainly make life easier for people who have to exchange files with the Windows crowd.)
.tar is short for tape archive, an ancient Unix utility that combines (but doesn’t compress) several files into a single icon, for simplicity in sending.
.gz is short for gzip, a standard Unix compression format.
.tar.gz or .tgz represents one compressed archive containing several files.
.dmg is a disk image, described below.
Fortunately, if you use Safari (Chapter 20) as your Web browser, you don’t have to worry about all this, because it automatically unzips and unstuffs them. If you use some other browser, StuffIt Expander can turn all of them back into usable form. In fact, StuffIt Expander, a program in your Applications→Utilities folder, generally kicks in automatically when you download a file. (If it doesn’t, double-click a downloaded compressed file to spur Expander into action.)
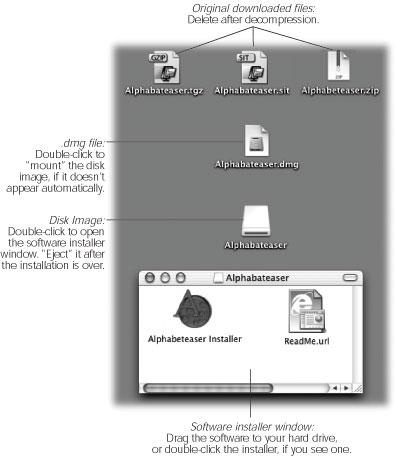
Once you’ve unstuffed (or untarred) a downloaded program, it often takes the form of a disk image file, whose name ends with the letters .dmg (second from top in Figure 4.19). (Some files arrive as disk images straight from the Web, too, without having been compressed first.)
Disk images have been around for years on the Mac, but they’re extremely common in Mac OS X. All you have to do is double-click the .dmg icon. After a moment, it magically turns into a disk icon on your desktop, which you can work with just as though it’s a real disk (third from top in Figure 4.19). For example:
Double-click it to open it. The software you downloaded is right inside.
Remove it from your desktop by dragging it to the Trash (whose icon turns into a big silver Eject key as you drag), highlighting it and pressing
 -E (the shortcut for
File→Eject), or Control-clicking it and choosing Eject from the contextual menu.
(You’ve still got the original .dmg file you downloaded, so you’re not really saying
goodbye to the disk image forever.)
Figure 4-19. Downloading a new program from the Internet may strew your desktop with icons. After the installation is complete, you can delete all of them. (But keep the .dmg file if you think you might want to install the software again later.)
Note
In 2003, Apple introduced a new kind of disk images called Internet-enabled disk images. When you download one, the .dmg file automatically copies its contents onto your desktop and then auto-Trashes itself. You might never know that you downloaded a disk image; it’s as though you just downloaded a bunch of files.
If you don’t see all of the left-over detritus illustrated in Figure 4-19 after downloading a disk image, now you’ll know why; you just got lucky.
When the StuffIt Expander progress-bar dialog box disappears, you may have several icons on your desktop. Some are useful; some you’re free to trash.
The original compressed file. It’s safe to throw away the .sit, .tar, .gz, or .tgz file you originally downloaded (after it’s decompressed, of course).
Tip
If you get tired of cleaning up after your downloads this way, you can tell StuffIt Expander to delete the pieces automatically. To do so, double-click the StuffIt Expander icon (in Applications→Utilities). From the StuffIt Expander menu, choose Preferences. Turn on both “Delete after expanding” checkboxes, and then click OK.
The .dmg file. Once you’ve turned it into an actual disk-drive icon, installed the software from it, and “ejected” the disk-drive icon, you can delete the .dmg file. Keep it only if you think you might need to reinstall the software someday.
Note
If you try to trash the .dmg file before removing the disk-drive icon from the screen, you’ll get a “file in use” error message when you try to empty the Trash.
The disk image itself. This final icon, the one that contains the actual software or its installer (third from top in Figure 4-19), doesn’t exist as a file on your hard drive. It’s a phantom drive, held in memory, that will go away by itself when you log out. So after installing its software, feel free to drag it to the Trash (or highlight it and press
 -E to “eject” it).
Working with .tar, .gz, and .dmg files are all skills unique to downloading Mac OS X programs from the Internet. Installing software from a CD is much more straight-forward.
In either case, once you’ve got a disk icon on your desktop (either a pseudo-disk from a disk image or a CD you’ve inserted), you’re ready to install the software. You can install many Mac OS X programs just by dragging their icons or folders to your hard drive. Others offer a traditional installer program that requires you to double-click, read, and accept a license agreement, and so on.
In both cases, where you decide to install the new program is suddenly a big issue. You have the following two alternatives:
In the Applications folder. Most programs, of course, sit in your Applications folder. Most of the time, this is where you’ll want to install new programs. Putting them in the Applications folder makes it available to anyone who uses the Mac.
Note
You can’t put anything in your Applications folder unless you have an Administrator account, as described in Section 11.2.
In your Home folder. Suppose you share your Mac with other people, as described in Chapter 11. If that’s your situation, you may occasionally want to install aprogram privately, reserving it for your own use only. In that case, just install or drag it into your Home folder, or a folder inside it. When other people log onto the machine, they won’t even know that you’ve installed that new program, since it doesn’t show up in the Applications folder.
If you don’t have an Administrator account, in fact, this is your only option for installing new programs.
In Mac OS X, there’s no Add/Remove Programs window. If the program you want to trash came with an Uninstall program, by all means use it. If not, to uninstall a program, just drag it (or its folder) from the Applications folder (or wherever it is), to the Trash.
Some programs also leave harmless scraps of themselves behind; to check for them, look for preference files or folders bearing the dearly departed program’s name in your Library folders and your Home→Library→Preferences folder.
Get Mac OS X: The Missing Manual, Panther Edition now with the O’Reilly learning platform.
O’Reilly members experience books, live events, courses curated by job role, and more from O’Reilly and nearly 200 top publishers.


