As we
mentioned earlier, the XML Structure task pane, though not terribly
useful to end users, is an important tool for developers of Word XML
templates. By using it to apply XML elements to different parts of a
regular Word document, you can create a merged document that contains
both WordprocessingML and custom XML elements from your schema. After
saving it as XML (WordprocessingML and all), you suddenly have an
example of what your onload stylesheet needs to
generate as a result document. Adapting this document to an XSLT
stylesheet is often as simple as slapping
xsl:stylesheet and xsl:template
elements around the document and replacing text inside leaf-node
custom elements with xsl:value-of instructions.
With this end in view, let’s take a look at the necessary steps to preparing the press release template within Word.
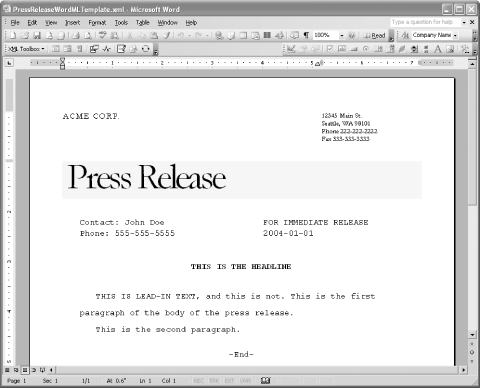
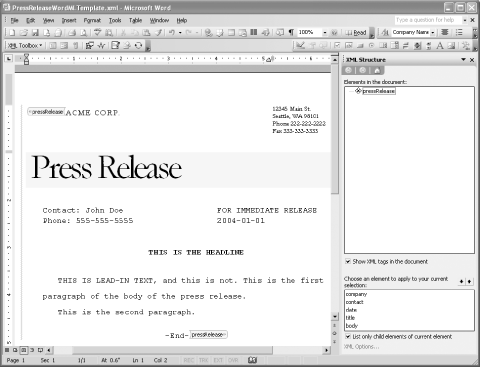
First, create a regular Word document that contains all of the formatting and boilerplate text you want to include in your template. Our imaginary IT department’s press release template began its life as a regular Word document, adapted from a template available on Office Online. After simplifying it a bit to meet their requirements, they were ready to begin. Figure 4-23 shows the pristine Word document before it was introduced to XML.
Once you have your regular Word
document ready, the next thing to do is to attach your schema to it.
We saw the schema document for press releases,
pressRelease.xsd, way back in Example 4-1. Select Tools → Templates and Add-Ins, and click
the XML Schema tab to open the dialog shown in Figure 4-24.
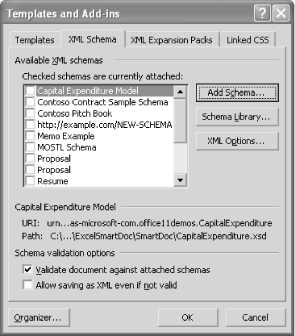
This dialog should look familiar, as we introduced it earlier in
“Attaching Schemas to a Document.”
Click the Add Schema . . . button and browse to find the file named
pressRelease.xsd. After you select the schema
file, you’ll get the Schema Settings dialog, shown in
Figure 4-25.
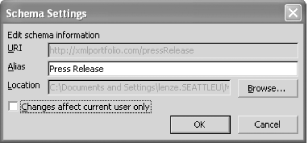
Enter a friendly name for this schema, such as “Press Release.” Uncheck the “Changes affect current user only” checkbox if you want this entry in the schema library to be available to all users on your machine. (Since this schema library entry is initially for development purposes only, on the developer’s machine, it probably doesn’t matter what you choose.)
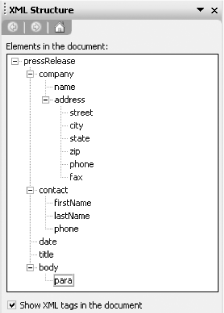
After hitting the OK button, you will see that the newly created “Press Release” checkbox has been checked for you in the XML Schema dialog. After clicking OK once more, the XML Structure task pane will appear, as shown in Figure 4-26.
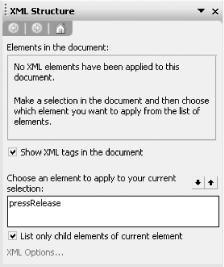
Click “pressRelease” at the bottom
of the task pane to apply your schema’s
pressRelease element to the entire document. You
will see the dialog shown in Figure 4-27.

Select “Apply to Entire Document.” The result is shown in Figure 4-28.
At this point, you are ready to begin applying individual elements to
their corresponding selections of text in the press release document.
To do this, select the text to be contained within the element, and
then click the corresponding element name at the bottom of the XML
Structure task pane. Since the XML Structure task pane, by default,
displays only the elements that are legal in the current context, it
works best to apply elements in a top-down order, e.g.,
company before name and
address. Once you have applied all the elements of
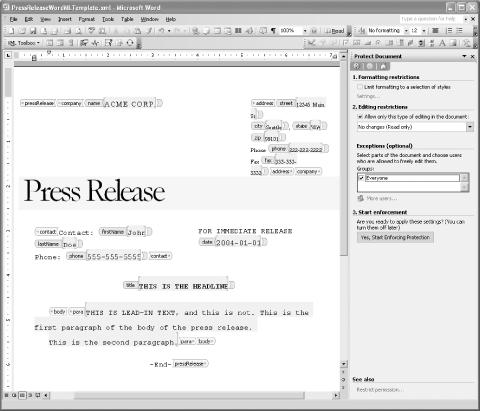
the document, your document should look something like that in Figure 4-29.
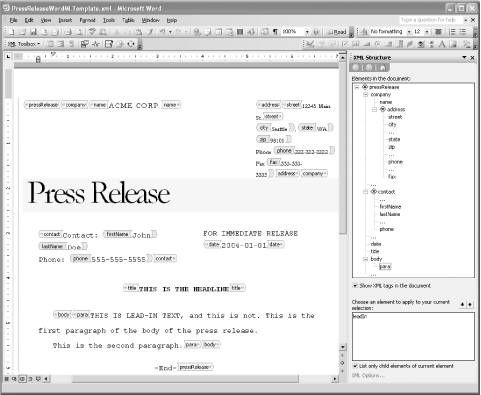
In Figure 4-29, most of the elements have been
applied to places where you would expect, e.g.,
firstName to
“John,” lastName
to “Doe.” The one exception is the
para element, which has not been applied to each
of the two paragraphs in the body of the press release but rather to
all of the text within the body. Without
utilizing Smart Document technology, Word
does not provide an easy way for end users to create repeating
elements (except with table rows, which aren’t used
here). Since the para element nevertheless needs
to be repeating, we use regular Word paragraphs
(w:p elements instead of literal
para elements) and convert back and forth between
real para elements through the
onload and onsave
stylesheets. The only reason we include a literal
para element in the template is to enable the
document to be valid. The schema requires at least one
para element to be present. Rather than creating a
temporary, special-purpose schema in which para
elements are optional, we make the document valid by letting a
single, fixed para element contain the Word
paragraphs. The onload and
onsave stylesheets translate back and forth
between this intermediate representation (one para
element containing multiple w:p elements) and the
true, desired representation (a sequence of one or more
para elements). We’ll see both
sides of this translation shortly.
When you
apply XML tags to a document through the XML Structure task pane,
Word automatically decides at what level of the WordprocessingML
hierarchy to insert the tags, based on the current selection. In
Figure 4-29, the street element,
for example, got inserted as a block-level tag (inside a table cell),
while the city and state
elements got inserted as run-level tags. This was necessary because
city and state were applied to
text within the same paragraph. Oftentimes, you do not want to just
stick with what Word chooses. While you can’t always
turn a run-level tag into a block-level tag, you can certainly turn a
block-level leaf tag (i.e., that contains no
more custom elements) into a run-level tag. And, as it turns out,
there is a very good reason for doing so.
Block-level tags allow users to insert multiple Word paragraphs
(w:p elements) inside them. Unless you have an
onsave stylesheet that specifically handles this
case, the text from the multiple paragraphs will get merged together
when the WordprocessingML is stripped from the document. This
inevitably causes whitespace formatting problems, e.g., the absence
of a space between the last sentence of one paragraph and the first
sentence of the next. As it happens, our press release
template’s onsave stylesheet
does expect there to be multiple Word paragraphs
(w:p elements) inside the para
element (from which it will derive corresponding
para elements in the final result). But it does
not expect multiple paragraphs anywhere else in
the template. Thus, it behooves us to change other block-level leaf
tags to run-level tags instead. In fact, we can generalize the
advice: whenever possible, use run-level tags for leaf
elements when all you want is a single line of text. In
the press release template, there are four such candidates for
change: the name, street,
date, and title elements.
The easiest way to change a block-level tag into a run-level tag from within the Word UI is to place the cursor just to the right of the end tag and hit the spacebar. Since there can’t be text outside the block-level tag yet on the same line, Word automatically converts the block-level tag to a run-level tag. Then, you can just hit Backspace to remove the space character if you want. The tag will continue to be a run-level tag.
Figure 4-30 shows a close-up of the
name and street elements in
their default block-level state, before any changes are made.
And Figure 4-31 shows the name
and street elements after we have changed them to
run-level tags using the space/Backspace technique described above.
Provided that we also convert the date and
title elements, our new
template—supplemented with editing restrictions—will now
be more robust. It will prevent users from hitting Enter to create
new paragraphs inside fields that are designed to contain only one
line of text.
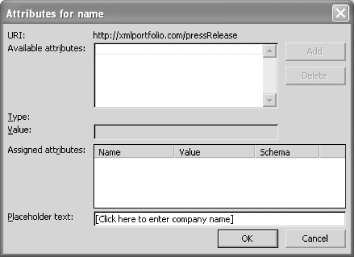
Once all of the custom tags are in place, you can assign placeholder text to each custom leaf element by right-clicking the element in the main pane or in the XML Structure task pane and selecting Attributes . . . . In the Attributes dialog, enter the placeholder text for the element in the “Placeholder text” text box, as shown in Figure 4-32.
One thing to note about our template so far is that the document is still flagged as invalid, even though all of the elements in the document have been applied to valid values. The XML Structure task pane alerts us to the problem, shown up close in Figure 4-33.
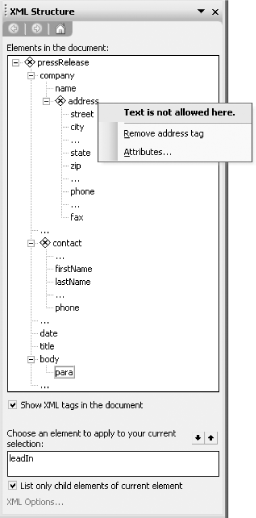
Right-clicking the address element in the tree
shows that the problem is that text is contained directly inside the
address element, which the schema disallows. Each
mixed content text node is represented in the XML Structure task pane
as an ellipsis (...). For the
address element, the culprits are the comma
(,) between the city and
state elements, and the words
Phone and Fax. These text nodes
are not part of our data; instead, they are part of our
template’s boilerplate text. To ignore mixed content
for purposes of validation, we will need to turn on the
“Ignore mixed
content” document option.
To view and modify the current document’s XML options, click the “XML Options . . . " link at the bottom of the XML Structure task pane. (This dialog is also accessible through a button on the Tools → Templates and Add-Ins . . . → XML Schema dialog.) Here is where we can check the “Ignore mixed content” checkbox so that the boilerplate text in our template gets stripped out for validation purposes. If we check this checkbox and click OK, then the XML Structure task pane no longer complains that our document is invalid, as shown in Figure 4-34.
Note that the ellipses are now gone. Since “Ignore mixed content” is turned on, all mixed content text nodes are ignored for validation purposes and no longer appear in the XML Structure task pane’s tree view of the document. For that reason, the validation errors are gone now too.
For now, we’ll leave the XML save options alone. It
is true that our ultimate onload stylesheet will
need to turn the “Apply custom
transform” option on, pointing to the
onsave stylesheet for our press release
template, harvestPressRelease.xsl. However, we
are not there yet. For development purposes, we still need to save
the template we are currently preparing in Word as WordprocessingML,
so that we can adapt it into an onload
stylesheet. If we try to prematurely set our ultimately desired save
options, we’ll be faced with the Catch-22 of not
being able to save the underlying WordprocessingML, because
we’ve asked Word to apply our
onsave stylesheet to it. Instead, the ultimately
desired save options will have to be set
manually inside the w:docPr
element in the onload stylesheet once
we’ve created it.
Now that you have assigned all of the XML elements in your document, along with placeholder text, it’s time to turn on editing restrictions, so that users don’t inadvertently delete boilerplate text or custom XML elements. To do this, open the Protect Document task pane, click the box next to “Allow only this type of editing in the document,” and leave the default type of restriction in the drop-down box—“No changes (Read only).” Figure 4-35 shows the Protect Document task pane.
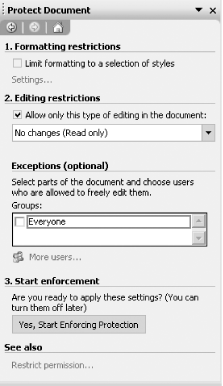
At this point, if you start enforcing the protection, no one will be able to edit any part of the document. That’s obviously not what you want. To designate a particular area within your document to be editable, you need to select the area and then click the Everyone checkbox under “Exceptions” to indicate that the designated area can be edited by anyone. With the “Show XML tags” option turned on, you can proceed throughout your document, selecting the text inside each leaf custom XML tag and then clicking “Everyone.”
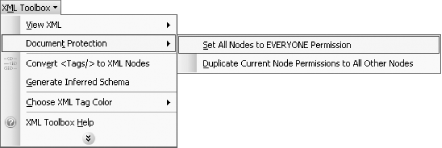
Better yet, you can skip this tedious process by using a feature of the XML Toolbox plug-in (which we introduced in Chapter 2). If you select XML Toolbox → Document Protection → Set All Nodes to EVERYONE Permission, as shown in Figure 4-36, all of the text inside leaf node XML elements will be selected and delineated as editable by “everyone.”
The result of applying editing permissions either manually or through the XML Toolbox plug-in is shown in Figure 4-37.
You’re almost done setting the editing restrictions.
We just have one more recommendation. For the remaining block-level
leaf element (para), it helps to avoid certain
usability problems if you include
para’s end tag inside the
editable region. Don’t worry, the user
won’t be able to delete the tag. This just ensures
that they will be able to hit Enter and create a new paragraph as
expected and that all paragraphs they do create stay within the
editing region. To do this, highlight the para end
tag and click the “Everyone”
checkbox in the Protect Document task pane. The result should look
like the close-up of the paragraph tags shown in Figure 4-38.

Note that the editing region includes the end tag but not the start
tag. If you included the start tag too, then the user would be
allowed to delete the para element, which is
definitely not what you want.
Before we start enforcing protection, we first need to configure our formatting restrictions.
To enable formatting restrictions, check the box next to “Limit formatting to a selection of styles” in the Protect Document task pane. Then click the “Settings . . . " link. You will see the dialog shown in Figure 4-39.
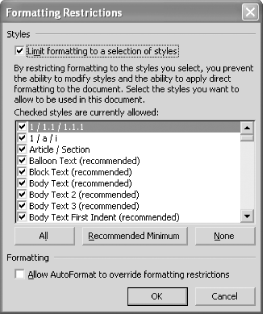
In the press release template, there are only three styles we want to let users have access to. Start by clicking the “None” button to uncheck all of the styles. Then, scroll down the list and check the boxes next to “Body Text,” “Lead-in Emphasis,” and “No formatting.” Finally, click OK. The dialog box in Figure 4-40 asks you whether you want to remove existing styles in the document that aren’t in your allowed list of styles.
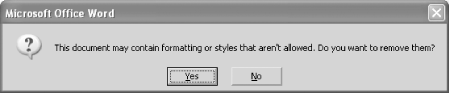
At this point, it is important that you click the No button. Otherwise, the other styles in the document that control how the template looks and feels will get stripped out. Thus, there is a distinction between styles that the user is allowed to apply and styles that are already present in the document.
After specifying the formatting and editing restrictions, you can put those restrictions into effect by clicking the “Yes, Start Enforcing Protection” button in the Protect Document task pane. You will then be prompted with the dialog shown in Figure 4-41.
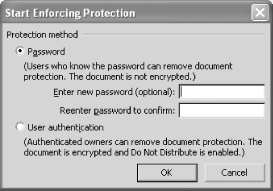
Here, you can enter an optional password that users need to enter to turn document protection off. If you don’t want to specify a password, just click OK.
We are finally ready to adapt
the document’s underlying WordprocessingML into an
onload XSLT stylesheet. As we already mentioned,
converting the document to a stylesheet is often as simple as
inserting xsl:value-of instructions into key
places in the document. While this is usually a straightforward task,
it can also be somewhat tedious, depending on how many elements are
in your template.
Unfortunately (and strangely), Word
does not provide a mechanism for generating
onload XSLT stylesheets for you. To address this
deficiency, we’ve developed a fairly simple
stylesheet that can be applied as an onsave
stylesheet to the template you prepared in Word using the XML
Structure task pane. The stylesheet is called
create-onload-stylesheet.xsl,
and, as the name suggests, it creates an example
onload stylesheet. (Yes, that’s
using XSLT to create XSLT.) Chances are, you will need to manually
tweak the resulting stylesheet, but for templates like our press
release example, it gets you about 90% of the way there. It does this
simply by replacing text inside leaf-node custom elements with
xsl:value-of instructions.
Tip
Even though the press release template makes use of some heavy XSLT,
it is quite possible to build XML templates for Word without doing
any XSLT coding at all. If your template doesn’t
require an onsave stylesheet or any custom
logic, then the create-onload-stylesheet.xsl
utility could be all that you need to generate your
onload stylesheet.
To use this utility, check the “Apply
transform” checkbox in the “Save
As” dialog once you’ve finished
preparing your template in Word. Then click the Transform... button
to browse for the file named
create-onload-stylesheet.xsl. Lastly, click
Save. Just like that, you have transformed your static template
prepared in Word to a dynamic template that can be used as an
onload stylesheet.
Example 4-11 shows the
create-onload-stylesheet.xsl in its entirety.
We’ll take a closer look at certain parts of the
stylesheet to explain what they do. This stylesheet substantially
emulates what you as a developer would otherwise have to do manually
to get from the merged XML template prepared in Word to a functioning
onload stylesheet.
Example 4-11. create-onload-stylesheet.xsl, a utility for creating onload stylesheets
<xsl:stylesheet version="1.0"
xmlns:xsl="http://www.w3.org/1999/XSL/Transform"
xmlns:out="dummy"
xmlns:w="http://schemas.microsoft.com/office/word/2003/wordml"
xmlns:sl="http://schemas.microsoft.com/schemaLibrary/2003/core"
xmlns:aml="http://schemas.microsoft.com/aml/2001/core"
xmlns:wx="http://schemas.microsoft.com/office/word/2003/auxHint"
xmlns:w10="urn:schemas-microsoft-com:office:word"
xmlns:v="urn:schemas-microsoft-com:office:vml"
xmlns:o="urn:schemas-microsoft-com:office:office"
xmlns:dt="uuid:C2F41010-65B3-11d1-A29F-00AA00C14882"
xmlns:st="urn:schemas-microsoft-com:office:smarttags"
exclude-result-prefixes="v st">
<xsl:output indent="yes" encoding="utf-8"/>
<!-- Use the "out" prefix for XSLT instructions in the result stylesheet -->
<xsl:namespace-alias stylesheet-prefix="out" result-prefix="xsl"/>
<!-- Create stylesheet root element and root template rule -->
<xsl:template match="/">
<out:stylesheet version="1.0">
<out:template match="/">
<xsl:apply-templates/>
</out:template>
</out:stylesheet>
</xsl:template>
<!-- By default, copy all elements, attributes, and text straight through
so they will function as literal result elements, etc. -->
<xsl:template match="@* | * | text( )">
<xsl:copy>
<xsl:apply-templates select="@*|node( )"/>
</xsl:copy>
</xsl:template>
<!-- Selectively copy attributes and top-level children of w:wordDocument -->
<xsl:template match="w:wordDocument">
<xsl:copy>
<!-- Create xml:space attribute only in the final result
of the onload transformation -->
<out:attribute name="xml:space">preserve</out:attribute>
<!-- Copy the rest of w:wordDocument's attributes -->
<xsl:apply-templates select="@*[not(name( )='xml:space')]"/>
<!-- Copy any top-level elements that come before o:DocumentProperties -->
<xsl:apply-templates select="o:DocumentProperties/preceding-sibling::*"/>
<!-- Preserve only the o:Title property; leave out all private info -->
<o:DocumentProperties>
<xsl:copy-of select="o:DocumentProperties/o:Title"/>
</o:DocumentProperties>
<!-- Preserve processing instructions inside o:CustomDocumentProperties
(in the same way that XML2WORD.XSL does) -->
<o:CustomDocumentProperties>
<out:if test="processing-instruction( )">
<o:processingInstructions dt:dt="string">
<out:for-each select="processing-instruction( )">
<out:text><?</out:text>
<out:value-of select="name( )"/>
<out:text> </out:text>
<out:value-of select="."/>
<out:text>?></out:text>
</out:for-each>
</o:processingInstructions>
<!-- Copy any other custom document properties -->
<xsl:apply-templates select="o:CustomDocumentProperties/*"/>
</out:if>
</o:CustomDocumentProperties>
<!-- Process the rest of the top-level children of w:wordDocument -->
<xsl:apply-templates select="o:DocumentProperties/following-sibling::*
[not(self::o:CustomDocumentProperties)]"/>
</xsl:copy>
</xsl:template>
<!-- Set some XML-specific document options -->
<xsl:template match="w:docPr">
<xsl:copy>
<!-- Process all other document options -->
<xsl:apply-templates select="*[not(self::w:removeWordSchemaOnSave or
self::w:showXMLTags)]"/>
<!-- Turn "Save data only" back on (as it was likely only off in the
first place so that this stylesheet could be applied) -->
<w:removeWordSchemaOnSave/>
<!-- Force "Show XML tags" to "off", as opposed to application state -->
<w:showXMLTags w:val="off"/>
<!-- Insert some commented-out XML document options that you may want
to manually turn on -->
<xsl:comment><![CDATA[
These are some XML save options you may want to set:
<w:ignoreMixedContent/>
<w:useXSLTWhenSaving/>
<w:saveThroughXSLT w:xslt=""/>
<w:saveInvalidXML/>
]]></xsl:comment>
</xsl:copy>
</xsl:template>
<!-- Remove these settings, because they were probably only set
to enable this transformation in the first place -->
<xsl:template match="w:useXSLTWhenSaving | w:saveThroughXSLT |
w:saveInvalidXML"/>
<!— Insert xsl:value-of instructions into custom run-level leaf tags
(identified by the presence of placeholder text) —>
<xsl:template match="*[@w:placeholder][ancestor::w:p]">
    <xsl:copy>
      <xsl:copy-of select="@*"/>
<xsl:copy-of select="w:permStart"/>
      <w:r>
        <xsl:copy-of select="(w:r/w:rPr)[1]"/>
        <w:t>
          <out:value-of>
            <xsl:attribute name="select">
              <xsl:call-template name="xpath-expression"/>
            </xsl:attribute>
          </out:value-of>
        </w:t>
      </w:r>
      <xsl:copy-of select="w:permEnd"/>
    </xsl:copy>
  </xsl:template>
<!-- Wrap whitespace-only text in w:t elements with xsl:text to ensure
that it doesn't get stripped when Word loads the onload stylesheet -->
<xsl:template match="w:t[not(normalize-space(.))]">
<xsl:copy>
<out:text>
<xsl:value-of select="."/>
</out:text>
</xsl:copy>
</xsl:template>
<!-- Generate XPath expressions for the select attributes of
xsl:value-of instructions that we create -->
<xsl:template name="xpath-expression">
<xsl:variable name="ancestor-elements"
select="ancestor-or-self::*[not(self::w:* or self::sl:* or self::aml:* or
self::wx:* or self::w10:* or self::v:* or
self::o:* or self::dt:* or self::st:*)]"/>
<xsl:for-each select="$ancestor-elements">
<xsl:text>/</xsl:text>
<xsl:value-of select="name( )"/>
</xsl:for-each>
</xsl:template>
</xsl:stylesheet>The highlighted template rule in Example 4-11 is the most important template rule of this stylesheet. Let’s step through it to see precisely what it does. Whereas the default behavior of the stylesheet is to copy all elements, attributes, and text straight through, this template rule makes an exception for custom run-level leaf tags. It matches them using this pattern:
<xsl:template match="*[@w:placeholder][ancestor::w:p]">
This pattern matches elements that have both a
w:placeholder attribute and an ancestor
w:p element. The presence of the
w:placeholder attribute indicates that this is a
leaf node (i.e., a custom tag that contains text only), and the
presence of an ancestor w:p element indicates that
this must be a run-level tag (as opposed to a block-level, row-level,
or cell-level tag). The pattern assumes that you have explicitly
specified placeholder text for all of your leaf elements, which is
true for the press release template and also a good practice in
general.
Instead of just copying the element through as-is, the template rule
creates a shallow copy of the element along with its attributes
(including the w:placeholder attribute):
<xsl:copy>
<xsl:copy-of select="@*"/>Then, it copies the w:permStart element if present:
<xsl:copy-of select="w:permStart"/>
Next, instead of copying all the runs and text straight through, it
creates a single w:r element, preserving any run
properties that you defined when preparing the template in Word:
<w:r>
<xsl:copy-of select="(w:r/w:rPr)[1]"/>Then, it creates a single w:t element that,
instead of text, contains an xsl:value-of
instruction:[4]
<w:t>
<out:value-of>To generate the value of the select attribute, a
template named xpath-expression is invoked,
generating an XPath expression that represents the precise path to
the current custom element:
<xsl:attribute name="select">
<xsl:call-template name="xpath-expression"/>
</xsl:attribute>Finally, the open elements are closed and the
w:permEnd element is copied through, if present:
</out:value-of>
</w:t>
</w:r>
<xsl:copy-of select="w:permEnd"/>
</xsl:copy>
</xsl:template>The reason this is the most important template rule is that it
inserts xsl:value-of instructions into the
resulting stylesheet, thereby making your Word template dynamic. When
Word opens a press release XML document, for example, the
xsl:value-of instructions in the
onload stylesheet dynamically populate the
fields in the press release template with values from the source XML
document.
Whether you manually insert xsl:value-of
instructions into the XML template you prepare in Word or you use a
utility like create-onload-stylesheet.xsl, your
ultimate onload stylesheet should contain
excerpts that look like this:
<ns1:street w:placeholder="12345 Main Street">
  <w:permStart w:id="1" w:edGrp="everyone"/>
  <w:r>
    <w:t>
      <xsl:value-of select="/ns1:pressRelease/ns1:company/ns1:address/ns1:street"/>
    </w:t>
  </w:r>
  <w:permEnd w:id="1"/>
</ns1:street>
The above is excerpted from pr2word.xsl, the
onload stylesheet for our press release
template. Again, ns1 is an auto-generated
namespace prefix mapped to the namespace for press release
documents.
Although the XSLT stylesheet created by
create-onload-stylesheet.xsl may perfectly
suffice for some templates, the press release template needs some
further customizations. In particular, it needs to handle the body
text of press release documents. As such, a stylesheet created by
create-onload-stylesheet.xsl will not
dynamically populate any block-level elements, since the utility only
supports run-level leaf elements. You will need to make some
modifications to the resulting stylesheet, because the body text is
contained (necessarily) within a block-level element.
After finding the relevant spot in the resulting stylesheet, remove
the hard-coded w:p elements inside the
ns1:para element. You want the contents of
ns1:para to be dynamically populated based on the
presence of para elements in the source document
being opened, so begin processing those:
    <ns1:body>
      <ns1:para w:placeholder="[Click here to enter body text]">
        <w:permStart w:id="12" w:edGrp="everyone" w:displacedBySDT="prev"/>
        <!-- ************* MANUAL CUSTOMIZATIONS *************** -->
        <xsl:apply-templates select="/ns1:pressRelease/ns1:body/ns1:para"/>
        <!-- *************************************************** -->
      </ns1:para>
      <w:permEnd w:id="12" w:displacedBySDT="next"/>
    </ns1:body>
Next, define some template rules that convert para
elements in the source document to w:p elements,
and leadIn elements to runs having the
“Lead-in Emphasis” style. All of
the needed custom template rules are shown below:
  <!-- ************* MANUAL CUSTOMIZATIONS *************** -->
  <xsl:template match="ns1:para">
    <w:p>
      <w:pPr>
        <w:pStyle w:val="BodyText"/>
        <xsl:if test="not(node( ))">
          <w:rPr>
            <w:rStyle w:val="Lead-inEmphasis"/>
          </w:rPr>
        </xsl:if>
      </w:pPr>
      <xsl:apply-templates/>
    </w:p>
  </xsl:template>

  <xsl:template match="ns1:leadIn">
    <w:r>
      <w:rPr>
        <w:rStyle w:val="Lead-inEmphasis"/>
      </w:rPr>
      <xsl:apply-templates/>
    </w:r>
  </xsl:template>

  <xsl:template match="ns1:para/text( )">
    <w:r>
      <w:t>
        <xsl:copy/>
      </w:t>
    </w:r>
  </xsl:template>

  <xsl:template match="ns1:leadIn/text( )">
    <w:t>
      <xsl:copy/>
    </w:t>
  </xsl:template>
  <!-- *************************************************** -->
These are all very straightforward. There is just one twist. In the
template rule for para elements, there is a test
to see if the current element is empty:
        <xsl:if test="not(node( ))">
          <w:rPr>
            <w:rStyle w:val="Lead-inEmphasis"/>
          </w:rPr>
        </xsl:if>
If you recall from Chapter 2, the
w:rPr element, when inside the
w:pPr element, signifies the run properties of the
paragraph mark. By assigning the “Lead-in
Emphasis” style to the paragraph mark, you dictate
the character style that text will be in when the user begins typing.
This is exactly the sort of behavior you want for lead-in text when a
user is first filling out the template. One way
you’ll know whether the user is filling out the
template for the first time is if the source document contains no
data yet, i.e., if it contains a single empty
para element—hence the test to see if the
current element is empty.
There is one more place where you need to make some manual
modifications to the onload stylesheet. At this
point, you have finished defining the mappings between
para elements in the source document and styled
paragraphs in the WordprocessingML document. However, you still
haven’t shown Word how to do the reverse—how
to translate styled paragraphs back to your custom XML. You do have
the onsave stylesheet,
harvestPressRelease.xsl, up and ready to go; you
just need to point Word to it. Edit the literal result elements
inside w:docPr so that “Save data
only” will be turned off, “Apply
custom transform” will be turned on, and the
onsave stylesheet will be correctly referenced.
Your changes should look something like this:
       <!-- ************* MANUAL CUSTOMIZATIONS *************** -->
        <w:removeWordSchemaOnSave w:val="off"/>
        <w:useXSLTWhenSaving/>
        <w:saveThroughXSLT w:xslt="\\intra\pr\harvestPressRelease.xsl"/>
       <!-- *************************************************** -->
Finally, your final onload stylesheet,
pr2word.xsl, is ready
to
deploy.
[4] The out prefix is
used (in conjunction with the top-level
xsl:namespace-alias instruction) to disambiguate
between XSLT instructions that are a part of this stylesheet and XSLT
instructions that are part of the result stylesheet. The XSLT
processor treats out:value-of as a literal result
element that will effectively output an
xsl:value-of instruction in the final
result.
Get Office 2003 XML now with the O’Reilly learning platform.
O’Reilly members experience books, live events, courses curated by job role, and more from O’Reilly and nearly 200 top publishers.

