Printers give you a sense of physical accomplishment—something otherwise lacking in your interactions with your PC. You can hold printed sheets in your hands or pass them out with a flourish at a meeting. To help with this transformation from digital to physical, this chapter guides you through the following tasks:
Selecting the right printer for your needs.
Connecting and setting up a printer (or several) to your PC or laptop.
Printing on the correct side of the paper, including printing long documents on both sides of the paper.
Printing envelopes, including return addresses.
Printing digital photos on your printer or at one of several professional developers.
Distinguishing between paper types, so you choose the right one for whatever you’re printing.
Replacing ink and toner cartridges, fixing paper jams, and buying replacement parts.
You’ll find three main kinds of printers on the market today: inkjets, laser printers, and all-in-one devices. Consumers gravitate toward inkjet and all-in-one printers; businesses lean toward laser printers. The following pages explain how these printers work, which tasks they perform best, and which one you need for your work.
Inkjet printers (sometimes called “bubblejet” printers) bring quick and easy color printing to the masses. They’re versatile as well, printing everything from perforated business cards to glossy photos to novels. Figure 4-1 shows one inkjet printer, which, like most of its brethren nowadays, is compact, quiet, and easy to use. The real deal-clincher? Inkjets are cheap—$50 for a mediocre model; $200 for good one.
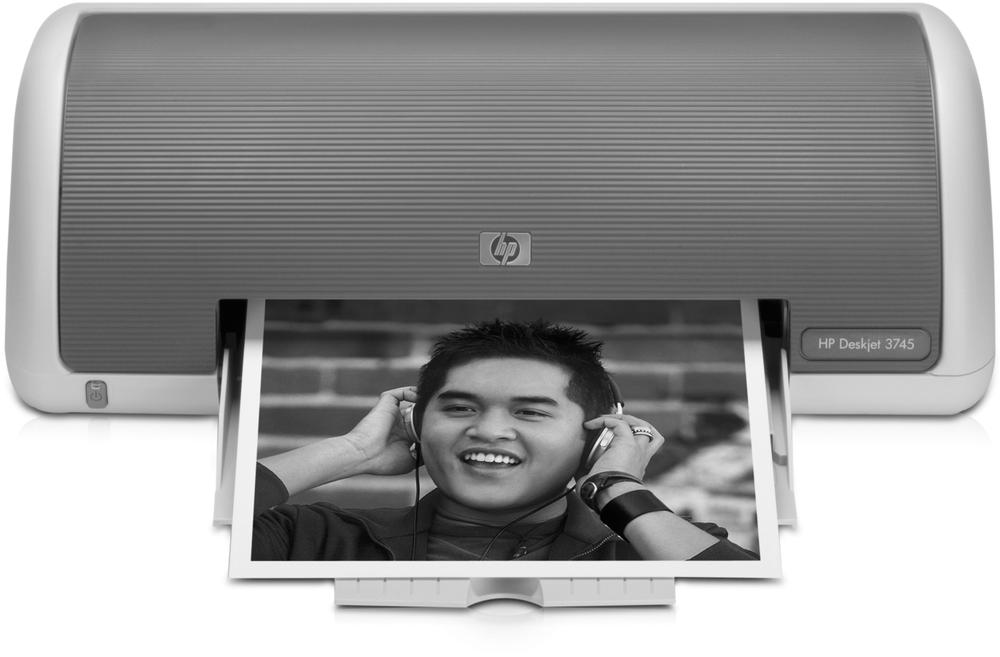
Figure 4-1. Expensive replaceable cartridges inside inkjet printers spray ink onto paper to create photos, letters, or even iron-on T-shirt transfers. The printers come cheap—usually between $50 and $200—but their cartridges don’t; they usually cost between $10 and $30 apiece. Inkjet printers prove cost effective for people printing casually—say, a few times a week.
But although inkjet printers sell for a song, their ink cartridges don’t, much to the glee of manufacturers. Taking a tip from razor vendors, printer manufacturers sell printers at little or no profit, making up the difference by repeatedly selling you replacement ink cartridges.
Inkjet printers work much like robotic airbrush artists. Tiny nozzles in the printer spray ink onto the paper, creating images in an elaborate game of point, switch colors, and spray. Surprisingly enough, the process works. Those crisp letters look haphazard only when examined under a magnifying glass.
Most inkjet printers work their wonders with one black ink cartridge, and one filled with a handful of colors. Monitors can display 16.7 million colors—far too many to fit in a shopping cart, much less a printer cartridge. So printer manufacturers took a lesson from low-budget street painters—they fill the color cartridge with separate tubes of color: red (magenta), blue (cyan), and yellow. By mixing those three shades in different proportions (and sprinkling in a little black to darken the shade), the printer mixes custom colors on the fly.
Color cartridges also contain an unfortunate side effect, noticeable after printing lots of one color—a Web site with lots of blue ads, for instance. When the cartridge runs out of blue, it’s worthless for creating other colors—even though it may be two-thirds full of red and yellow. The manufacturer’s solution? Buy a new cartridge, of course. Alternatively, some more expensive printers let you install separate cartridges for the three main colors, reducing the waste somewhat.
Photo printers add three more colors to the mix: light red, light blue, or some light gray or green. The extra colors help recreate the natural colors and skin tones shown in most photographs.
Laser printers (Figure 4-2) cost much more than inkjet printers, with prices starting around $150 for a low-end model. Double or triple that price for color laser printers. So why bother at all? Because when you figure in the extra costs of inkjet paper and cartridges, lasers cost much less per page to print, which can be a deal clincher for people who print on a daily basis. Laser-printed pages also stand up better to water; inkjet-printed papers smudge when pelted by rain, while your laser-printed pages escape without a blemish.
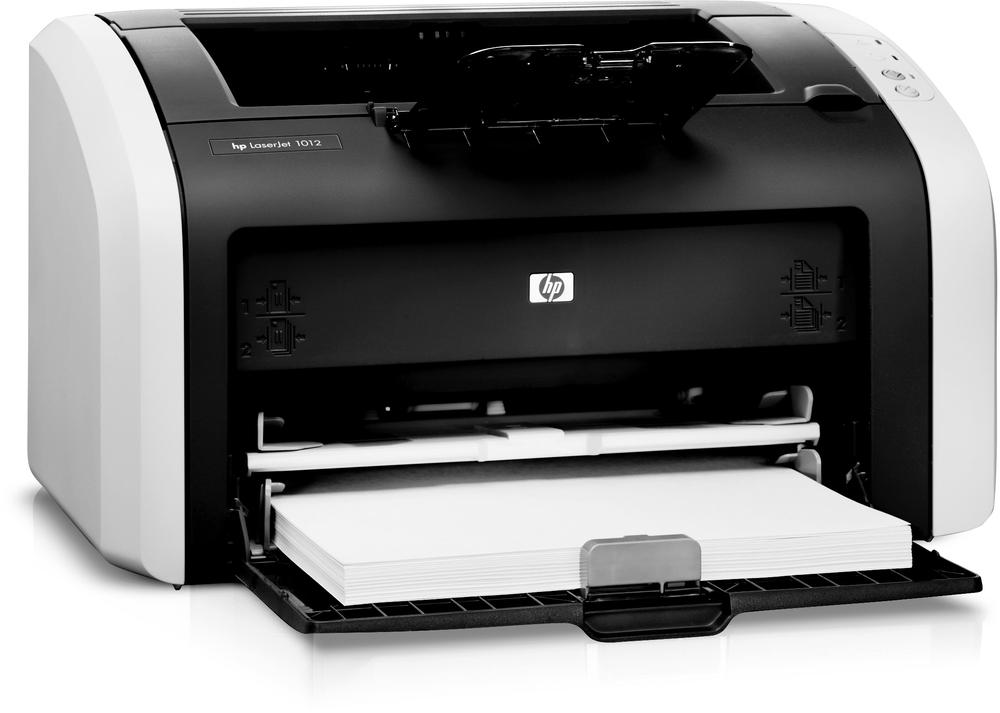
Figure 4-2. Laser printers toss their dots onto a page with a complex combination of laser beams, electric charges, heat, drums, and black plastic powder known as toner. Laser printers pack 600 dots per inch, and create very clear, detailed printouts. With laser printers, it costs much less to print per page than with inkjet printers, but only the most expensive models print color. Laser printers’ low per-page cost makes them attractive to people who print on a daily basis.
To decide between inkjet or laser, think how often you need to print in color. Most laser printers print only black—which is fine for letters, but dreary for photos. The newest color laser printers boost the starting price to around $500—10 times more than a low-end color inkjet, and way past most budgets. And if you want to print occasional photos, forget it. Color laser technology hasn’t yet reached the level of inkjets.
Laser printers take their technology from the age-old copying machine. A printer’s laser projects the page’s image onto a revolving drum using a dotted pattern of electric charges. The drum passes over very fine plastic powder known as toner. Just as static electricity sometimes attracts bits of dust, the powder sticks to the charged electrical pattern on the drum. The revolving drum then drops the toner onto the paper, and the printer seals it in place with pressure and heat. (That’s why newly printed pages feel warm and cuddly right out of the laser printer.)
The latest “laser” printers dump the laser in favor of LEDs (Light-Emitting Diodes), albeit much higher-powered LEDs than the red ones found in ugly clock radios. Instead of waving a laser at the drum, these printers send high-intensity light through a stationary row of LEDs, thus reducing mechanical breakdowns and requiring less maintenance than their old-school laser predecessors.
Many well-equipped modern desks resemble an island of beached electronics with one LCD monitor protruding from the pile. All-in-one (also called multifunction) printers (Figure 4-3) reclaim your lost elbow room by squeezing your desktop printer, scanner, and fax machine into one small unit. Combining the printer and scanner turns the unit into an on-the-fly copying machine, as well.
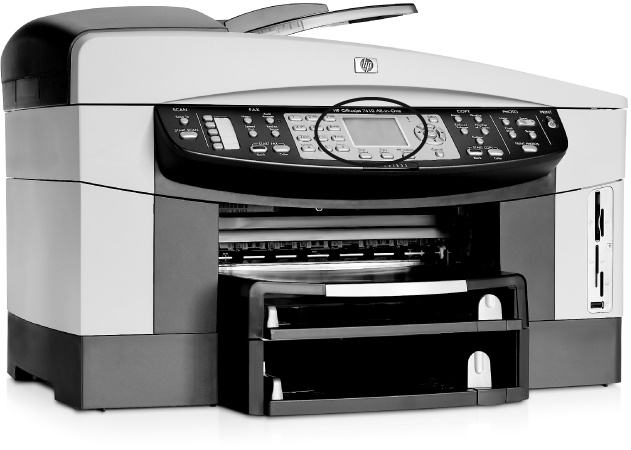
Figure 4-3. All-in-one printers combine a desktop printer, scanner, and fax machine into one bulky but convenient package. When shopping, look for one with an ample-sized color screen (circled). You’ll be working on that screen when making minor, on-the-fly edits to remove red-eye or adjust the color values in your pictures.
Most all-in-one printers also offer media card readers to print photos on the fly. Remove your camera’s memory card, push it into the printer’s ever-so-convenient memory card slot, and select the pictures to print—all without firing up your computer. Of course, that also removes your chance to crop out those strangers standing by the fountain, tweak the orange in the sunset, or airbrush out an ex.
All-in-one printers sell well for several reasons:
Size. Squeezing four machines into one attracts computer owners who work in small spaces.
Cheap. The components work together, so they’re cheaper than buying a separate printer, scanner, fax machine, and copying machine. The fax machine borrows the scanner and printer, for instance, reducing the fax machine’s components to one tiny chip.
Simplicity. One company built all the components, eliminating any compatibility problems. One menu guides you through controlling each part, saving you from learning four menus on four machines.
Standalone. With most all-in-one printers, you don’t even have to attach your computer to the printer. To print out your digital camera’s photos, just insert the camera’s flash card into the printer and push some buttons on the menu. Your computer can sleep while you and the printer are busy.
Critics point out their flaws, as well:
Vulnerability. The interwoven parts rely on each other, so a drowning scanner also takes down the copy machine and the fax machine. A dead printer kills both the fax and copy machine.
Lower quality. All-in-one units work adequately, but never extraordinarily. Don’t count on advanced features like quick printing, high-resolutions prints or scans, or the ability to handle different-sized paper.
Limited upgrades. The intertwined components limit your upgrade ability. You can buy a higher resolution scanner to digitize your old family photos, for instance, but it won’t work well (possibly not at all) with the all-in-one’s printer, copying machine, or fax machine.
Limited functions. Manufacturers cut corners to reduce costs. Some models lack print trays for instance, chaining you to the computer to feed it, sheet-by-sheet.
Older technology printers turn up for tempting prices at garage sales, estate sales, swap meets, and on eBay. Many still work well, and BuyPrinters (http://www.buyprinters.com) stocks thousands of printer ribbons and other supplies for niche models. These printers turn up most often in the bottom-feeder market:
Dot matrix. Largely forgotten in the consumer rush to color inkjet printers, dot matrix printers work much like a lowly typewriter. But instead of creating an imprint by pushing a single character against a ribbon, they push a grid of metal pins. The printer quickly changes the grid into different shapes to form different characters. The finer grid of a 24-pin dot matrix printer produces more refined characters than the coarse grids of the cheaper 9-pin models.
Dot matrix printers can’t handle color or fine graphics, but they’re extremely economical. They cost only a penny or two per printed page, and some frugal owners even go so far as to dip an aging ribbon in ink, rewind it, and pop it back into the printer to double or triple the ribbon’s life. Dot matrix printers work great for printing receipts, invoices, and creating other paper trails. Unlike most printers, dot matrix printers can print through carbon copies, which is helpful for filling out duplicate forms in offices. Used models sometimes cost less than a single inkjet cartridge—a bargain if you print lots of drafts.
Thermal. You see thermal printers in action every day: Receipts from your ATM, gas pump, and grocery store all crept out of them. Thermal printers pass heat over specially treated paper, darkening it into characters. Small and lightweight, they forged the way for the portable printer market. Thermal printers print only one shade, so forget about colors or letter quality.
If that garage sale thermal printer uses fax machine paper, you may be in luck; POSPaper (http://www.pospaper.com) sells a wide variety of rolls. Otherwise, pass this one by.
Daisy wheel. Daisy wheel printers contain a revolving wheel; each spoke of the wheel contains a different keyboard character. The printer slaps characters against the ribbon, leaving imprints indistinguishable from a hand-typed manuscript.
They’re loud, slow, and limited to the characters on their currently installed wheel—no graphics, unless you count the underline key. They’re fantastic for people wanting that vintage “hand-typed” look, but before tossing it in your trunk, search on Google for that particular model to see if anybody still sells ribbons or wheels. Some models remain compatible with electric typewriters, which means a ready supply of available parts is out there. Try Daisy (http://www.itsdaisy.com) for parts and supplies. (Log onto the site as Guest for a look-see.)
Most printers today connect to a computer’s USB port (Section 1.8.1) using a rectangular-shaped plug that pushes into a similarly rectangular-shaped hole. USB printers and their cousins, FireWire (Section 1.8.2.1) printers, both embrace Windows’ “Plug and Play” technology. When you first plug in and turn on the printers, Windows morphs into a friendly receptionist, greeting your newly plugged-in printer by name. After the small talk, Windows looks up the printer’s model in its database, installs the appropriate driver from its built-in stash of more than 900 models, and leaves you ready to print.
Windows XP’s built-in printer drivers work like a jack of all trades, but, as the saying goes, they’re master of none. They let your printer handle basic printing tasks, but leave out support for your printer’s fanciest features: shrinking documents to fit on a page, for example, or adding special colors to enhance photos, or advanced page previews.
That’s why it’s often better to install the printer manufacturer’s own driver, found on the CD that’s usually packaged with the printer. Built specifically for your particular printer model, this driver lets you take advantage of features Windows XP doesn’t know about. You can install the manufacturer’s driver after seeing how you like Windows XP’s built-in driver, or you can install it before plugging in your printer.
Tip
Instead of installing the manufacturer’s driver with its own installation software, install it through Windows XP’s Add Printer Wizard (see Section 4.2.3), instead. The wizard plucks the driver neatly from the installation CD and installs it, leaving out all the extra trial software and other unnecessary software packaged with printers these days.
Figure 4-4 compares Microsoft’s built-in driver with the one installed by the printer’s manufacturer.
To make sure you’re using the newest printer driver—one that fixes any bugs belatedly discovered on the version shipped with your printer, download the latest driver available: visit the manufacturer’s Web site and drop by the Downloads section, which you can usually find in the Technical Support area. Then download the newest driver listed, run its installation program, and Windows XP switches to it.
Note
Windows XP may bug you when you plug a USB printer into your PC, saying “This USB device can perform faster if you connect it to a Hi-Speed USB 2.0 port.” That’s Windows XP’s way of saying your printer still works through your PC’s old USB 1.1 port, but sending it large files is like pouring a bucket of water through a straw. To send files more quickly, upgrade to a USB 2.0 port (Section 1.8.1) and plug your printer into one of those newer ports.
Most people can plug their printer into their PC’s USB port, let Windows handle the messy installation chores, and consider the job done. But if your printer connects to your PC in a different way—through a network, Bluetooth, or a serial, parallel, or infrared port—the next two sections explain the process.
When you bring that second computer (or third, or fourth) into the house, you needn’t buy a new printer for each one. Instead, install one printer, and network the computers—connect them using one of several inexpensive methods covered in Chapter 14. Networking lets every computer to print to the same printer, as well as share the same Internet connection, and even share the same files.
Network. If you or somebody else has installed and “shared” a printer on your network (described on Section 14.7), Windows can automatically locate the printer’s name and location. Unfortunately, Windows can’t tell you whether a networked printer’s turned on, out of paper, broken, or currently being used by Jerry to print 300 sheets for his origami society meeting that night, so you still may need to get out of your chair and ogle the printer’s status.
Bluetooth. The same holds true for printers using Bluetooth, a wireless technology that spans about 30 feet. After installing a Bluetooth adapter to your PC (see Section 14.10.5), you can print to any Bluetooth printer within that range.
To install either a networked printer or Bluetooth printer, head for the Add Printer Wizard (see Section 4.2.3).
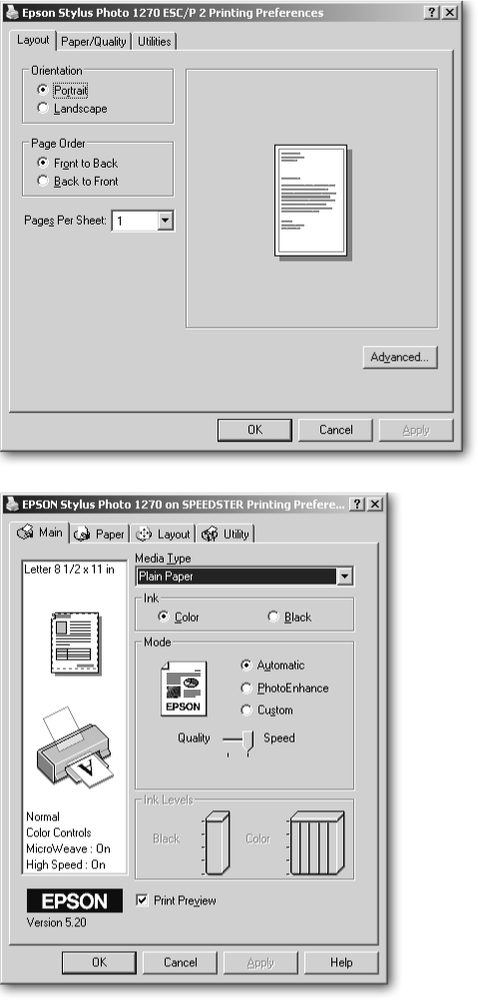
Figure 4-4. Top: When you install a printer, Windows XP usually installs a driver that lets you print immediately—without installing any software that came with your printer. Windows XP’s driver, shown here, lets you access the printer’s most basic functions. Bottom: Printer manufacturers constantly update their drivers, so if you download your printer model’s latest driver from the manufacturer’s Web site, Windows XP lets you access more features.
Some older printers cling to their old-school connectors. These three turn up most often.
Parallel. The oldest printing technology, parallel printers plug into the biggest port on your PC: A long, thin, 25-pin parallel port (Section 1.8.8), usually with a printer icon stamped into the metal nearby. The gaping connector on the end of your printer’s cable pushes into the port (the connector only fits facing one direction). Once it’s inserted, push the two little clasper rings shut to hold it in place.
Serial. An oddball even in their time, serial printers plug into the smaller serial port (Section 1.8.8).
Infrared. Yesterday’s vision of what Bluetooth’s now become, infrared devices talk by flashing beams of invisible light at each other, like a TV remote control. Many laptops come with infrared ports, usually resembling little translucent plastic ovals or rectangles on the laptop’s front or side. To connect with the printer, face the laptop’s infrared port toward the printer’s. Since infrared works only on clean desks, the ports need an uninterrupted line of sight to work.
The line-of-sight problem and the lack of infrared ports on desktop PCs killed the development of infrared printers fairly quickly.
Windows sometimes recognizes these types of printers automatically when they’re installed and turned on. If not, you’ll need to fire up Windows XP’s built-in Add Printer Wizard, described in the next section.
Windows XP’s built-in Add Printer Wizard comes in handy on three occasions:
You plug a printer directly into your PC, but Windows XP says it can’t find a driver.
You want to add a printer connected through a network.
You want to add a printer connected via Bluetooth.
The wizard automatically appears if Windows XP can’t find a driver for your newly plugged-in USB printer. But if Windows XP doesn’t automatically fetch the wizard, wake the wizard yourself: choose Start → Control Panel → Printers and Faxes → File → Add Printer.
When the wizard arrives onscreen, click Next to put it to work and then follow these steps:
Tell the wizard what type of printer to set up, and then click Next.
To connect to a printer connected to your PC with a cable, choose "Local printer attached to this computer,” and then turn on “Automatically Detect and Install my Plug and Play Printer.”
To connect to a Bluetooth printer, choose “A Bluetooth printer.” The wizard probes any nearby radio waves for a nearby Bluetooth printer. (Make sure your Bluetooth printer’s turned on.) This option appears only if Windows XP recognizes your PC’s Bluetooth adapter. If you don’t see the option, add a Bluetooth adapter (see Section 14.10.5.1) to your PC.
To connect to a network printer, choose “A network printer, or a printer attached to another computer.” When you click next, choose “Browse for a printer,” and then select your network printer from the list. You may need to double-click Microsoft Windows Network to see the printer.
If the wizard’s magic works, Windows XP discovers your newly installed local or nearby Bluetooth printer and installs a driver (or asks you to insert the installation CD so it can grab a driver there). The wizard finishes by offering to print a test page to make sure everything’s kosher. Click Yes, especially if it’s the first time you’ve tried printing to the printer, just to make sure the printed page looks okay.
If your printer somehow eludes the wizard’s grasp, head for the next step.
Select the port your printer uses to connect to your PC, and then click Next.
Windows XP lists a handful of ports; choose the first one, dubbed "LPT1.” On the rare chance you plugged in a serial printer, choose "COM1” instead.
Choose your printer’s manufacturer and model, and then choose Next.
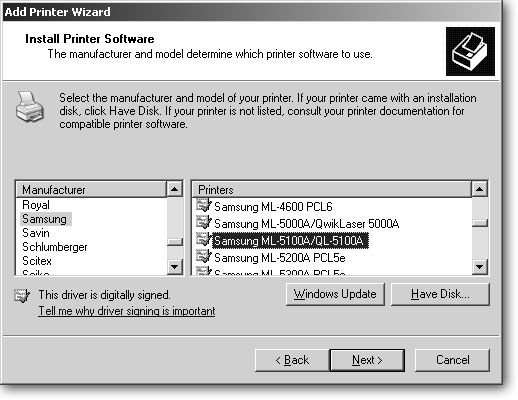
Windows lists printer manufacturers from Agfa to Xerox. Choose your printer’s manufacturer from the left column, as shown in Figure 4-5, and then select the model from the right. Windows should automatically install the driver. If it doesn’t, Windows offers you these two suspender straps:
Have Disk. Have the installation software that came with the printer, or a driver you’ve downloaded from the Web site? Then insert the floppy or CD into your PC (or browse to the folder containing your downloaded driver), click the Have Disk button, and then let Windows install that driver.
Windows Update. Don’t have the software that came with the printer? Click the Windows Update button; now that you told Windows your printer’s manufacturer and model, Microsoft may be able to find the right driver online.
Name your printer and select it as the Default Printer, if desired.
Choose a simple name for your printer. For instance, choose “Photo Printer” instead of “EpsonSty” or the awful name Windows XP suggests. An easily identifiable name not only helps any networked PCs find that printer, but lets you easily locate the printer on any software’s Print menu.
The Default designation applies to only one of your printers, should you own several. Windows XP automatically routes all printing jobs to that printer, unless you tell it otherwise just before printing.
Figure 4-5. Click your printer’s manufacturer from the left column, and the printer’s model name from the right column. Or, if you have the printer’s installation CD or a newly downloaded driver, click Have Disk, instead. Then browse to the inserted CD or the folder containing the download. Windows displays only names of drivers in the Browse window, making it easy to spot a driver among a sea of file names. Click Next, and Windows installs your printer’s driver.
Printing a test page—a single sheet of paper with brief text and graphics—lets you prove that your printer works and Windows XP knows how to talk to it. Yes, it wastes ink and a sheet of paper, but you get the peace of mind knowing that your installation efforts succeeded.
Tip
When Windows XP’s Test Page tests your printer’s capabilities, it doesn’t print meaningless Latin phrases. Instead, it prints your printer’s name, its connected port, and all its driver files, complete with their version numbers. This kind of stuff excites the printer manufacturer’s tech support staff, should you find yourself on the phone with them during installation.
If the printer still has trouble talking to your printer, the wizard doesn’t leave you stranded. It summons the Printer Troubleshooter program—a sort of high-school test where you select answers from a list while Windows XP runs tests and asks you if anything happened.
Although it’s only a robot, like the wizard, the Printer Troubleshooter checks your settings, and then leads you through a thorough checklist of the most obvious fixes—an unplugged cord, for instance, or a missing driver. That bit of knowledge helps you nod your head more confidently when answering those same questions from the manufacturer’s tech support people over the phone. And sometimes the Troubleshooter unveils a simple yet overlooked fix—the printer’s out of paper, for instance, or has a paper jam or loose cable.
When you click the Print button to send your work to the printer, Windows XP makes basic assumptions about how you want the job to look. Since most people print on cheap paper, for instance, Windows XP always assumes you want a single copy of your work printed on plain paper. If you always print duplicates, though, or always print on higher-quality paper, you can let Windows know. Doing so spares you valuable time changing your printer’s options whenever you print.
To change your printer’s default preferences, choose Start → Control Panel → Printers and Faxes. Right-click your particular printer, choose Preferences, and then set it up exactly the way you want: change the paper quality, print quality, number of copies—anything that suits the way you work. When you choose OK, Windows XP remembers those preferences and chooses them automatically whenever you print something. That turns printing into a one-click operation rather than a three-, four-, or five-click chore.
Tip
Having to change printer settings wastes time as well as paper—say, for example, when you accidentally print photos in “draft” mode. If you find that you’ve got more than one set of printer settings that you frequently use, you can create multiple printer icons—Photo Printer, Draft Printer, and so on. To do so, install your printer again, letting Windows create a second icon for it. Then set one printer’s options for photos, and name it “Photo Printer.” Change the other printer’s options and name it “Draft Printer.” Create others to match different needs. When it’s time to print, just select the printer with the appropriate settings, and spare yourself the trouble of changing settings yet again.
Laser printers aren’t very picky about their paper. Buy plain old copy machine paper, available at office supply and drug stores worldwide, and your printouts will look just fine. (If you’re one of the lucky few who own a color laser printer, buy paper specifically designed for color laser printers; the regular stuff won’t hold the color well, and inkjet paper won’t work.)
Inkjet printers, on the other hand, are very picky about paper. They can’t use laser printer paper, as it lacks a polymer coating—a special chemical that lets the ink bind with the paper. Without the polymer, the ink smears, leading to blurring, dirty nozzles, and ink smears.
Although they’re picky, inkjet printers still give you plenty of different paper types to choose from. In fact, manufacturers have flooded the market with different paper varieties. To help confused customers choose the right inkjet paper for their printer, Epson even offers the fairly useful Epson Paper Finder, which you can visit at http://www.epson.com (see Figure 4-6).
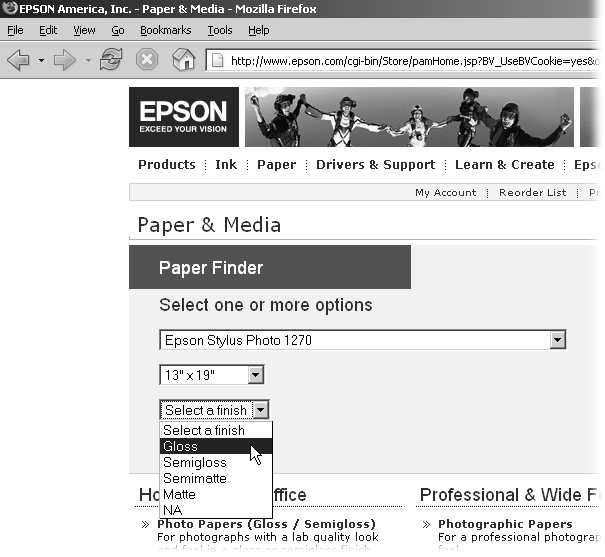
Figure 4-6. Epson sells inkjet paper in hundreds of sizes and styles to please professionals as well as consumers. To find the right paper for your printer, select your printer model, desired paper size, and the paper’s finish. Epson quickly whittles its whopping list down to a handful of suitable choices.
When choosing paper for your inkjet printer, narrow down the pack by following these steps.
Choose paper that fits in your printer’s tray.
Paper comes in a wide variety of sizes, so measuring the size of your printer’s paper tray rules out many contenders. Most inexpensive printers can’t handle paper wider than the standard eight and a half inches, although they still work with longer, legal sized (8.5 x 14 inch) paper. If the paper tray has a “slider” for adjusting its width, measure the tray with the slider at full width.
Many printers choke on thick "heavy weight” papers, often used to print cards or special photos. To find out your printer’s paper-size and weight limitations, visit its manufacturer’s Web site. Head for the Customer Service area, and look up your printer model to see any limitations on paper size and weight.
Choose the paper listed on your printer’s Preferences menu.
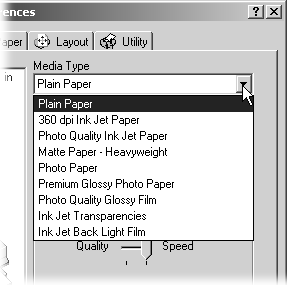
Your printer needs to know what type of paper you inserted in order to spray the right amount of ink. To see what paper your printer understands, visit the printer’s Preferences menu. Choose Start → Control Panel → Printers and Faxes. Right-click your printer, and choose Printing Preferences to see its favorite papers, as shown in Figure 4-7. Most office supply stores carry those particular paper types—either as created by your printer’s manufacturer or available in a generic brand.
Choose the paper that matches what you’re printing.
Don’t be surprised to see stores listing a paper’s "weight” on the package; to find standard copy machine paper, look for “20 pound” weight paper. A “24 pound” weight works better for formal letters, as it’s slightly heavier. (The heavier the weight, the thicker the paper.)
Most office supply stores carry these types of paper for a variety of jobs.
Drafts. Quality doesn’t matter when printing the evening’s spaghetti sauce recipe or tomorrow’s shopping list. Although generic “plain” inkjet paper works fine for these sorts of tasks, remember to save your botched printouts, too; the reverse side works fine for printing drafts, maps, and test runs to make sure you correctly set the margins and alignment.
Office. For printouts you show to others, look for paper designated specifically as “inkjet paper.” If it doesn’t say inkjet, it lacks the coating that prevents blurring.
Photos. When printing photos, nothing beats glossy photo paper (Section 4.8); plain paper looks lousy and won’t last long.
Matte. Thicker than standard paper, matte paper uses texture to keep the shine down, making it both durable and non-glare. Some people like the textured look for photographs, since this type of paper doesn’t reflect the sun as much as other paper types.
Specialty. Some inkjet paper isn’t really paper at all. Specialty paper (Section 4.6) lets you print on iron-on transfers, labels, transparencies, and other plastic-based fibers.
Tip
Many digital cameras can shoot in "panoramic” mode, great for squeezing in an entire horizon during sunsets. To print these kinds of pictures out, order the longest photo paper that fits in your paper tray. Even if the paper’s too wide, you can cut it to the correct width and save the leftovers for printing smaller photos.
Virtually every program ever created by computerkind lets you print out documents by choosing File → Print. Instead of whisking your work straight to the printer, Windows responds by summoning the famous Print dialog box (Figure 4-8).
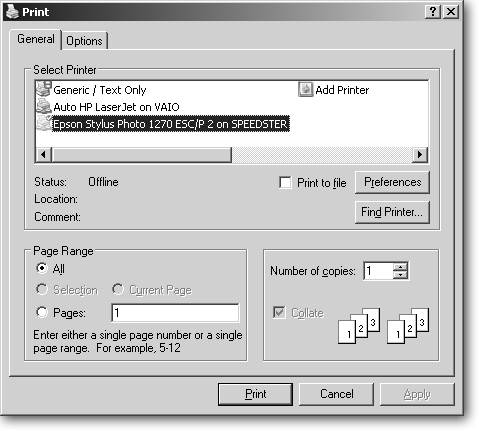
Figure 4-8. Choose Print from any program’s File menu to see this window. The layout varies subtly in some programs, but these basic elements always appear. Click OK to simply send your work to the highlighted printer. The window preselects the most common choices: one copy and all of the pages. But feel free to change the options to meet your needs. Click Preferences to change specific aspects of your print job—choose black and white instead of color, for instance, or let the printer know you’re going to feed it higher-quality paper.
To send your work to the printer without further ado, just click OK. But when you want to tailor your printout, these options appear in the print dialog box of almost every program.
Select Printer. Windows XP lists every printer connected to your PC—whether physically attached or networked. Choose the printer for your job—perhaps Martin’s printer down the hall that’s so much nicer than yours—and Windows sends your work to it. PCs with fax modems also show the fax as an available printer; choose it to start the process of sending a fax, described in the online appendix, “Other Cool Things You Can Do Online,” available on the "Missing CD” page at http://www.missingmanuals.com.
Tip
Want the Print dialog box to open with your favorite printer already highlighted for one-click printing? Then click Start → Control Panel → Printers and Faxes. Right-click your preferred printer from the list and then choose Set as Default Printer.
Preferences or Properties. Although this button’s name varies in different programs, it always lets you change how your printer handles its incoming print job. (To change your printer’s settings permanently, flip to Section 4.3.) Different printers offer different options; some let you print on both sides of the paper automatically, for instance, or switch to a different feeder tray for super-sized paper (handy for printing year-end spreadsheets). One neat trick among most Epson inkjet printers: they work like old-time gas station attendants, offering to check your ink levels to make sure the cartridge has enough juice left to handle the job.
Page Range. Most people leave this set to All, which tells the program to print every page of the document. To print only a certain section of your report—the 53rd page of your 103-page document, say—choose Pages and enter “53” into the surprisingly versatile Pages dialog box. For instance, enter “1–53” to print the first 53 pages, ignoring the rest. Or enter “1,5,7–10” to print pages 1 and 5, as well as pages 7, 8, 9, and 10.
Choose Selection to print only the area you’ve highlighted—the “toppings” options from a Web site’s pizza menu, for instance.
Copies. Leave this set to “1” to print a single a copy. But if you need a copy for everybody at the meeting, increase the number accordingly. To save a little time when printing copies of multipage documents, turn on the adjacent Collate checkbox. That prints your pages in order—pages 1–6, then another set of 1–6—but it does take the computer a little longer to spit them all out. But rejoice: at least you’re wasting the computer’s time for change, and not the other way around.
Some programs add other options to the Print window. Microsoft Word, for instance, offers a Zoom area, letting you squeeze 2, 4, 6, 8, or 16 pages onto a single sheet of paper. The print’s still legible when two pages squeeze onto a single sheet of paper; the other settings are useful mostly for graphics departments looking at a report’s overall design, making sure the charts and reports carry a similar look and feel throughout a document.
Tip
You needn’t open a file to print it. If you’re comfortable with your default printer settings (Section 4.3), try this for a timesaver: from any folder, select the file or files you want to print, right-click them, and then choose Print. Windows opens each file in the program that created it, prints the file, and then closes the program.
An envelope can slide into a printer in way-too-many ways, but only one way works. Naturally, everybody wastes a few envelopes when printing addresses. To waste the least amount, try these hints:
Some printers offer a special tray just for envelopes—look for an icon of an envelope on the tray, conveniently showing which way to insert the envelope. Match the icon’s fold with the one on your envelope.
Some courteous printer software shows you a helpful image demonstrating the proper way to insert an envelope into the feeder tray. To check your printer software’s courtesy level, choose Start → Control Panel → Printers and Faxes. Right-click your printer, and then choose Printing Preferences. Head for the Paper Size area, and then choose Envelope from the drop-down menu.
As a last resort, cut a piece of paper to the same size as your envelope, and then draw a flap on it. Run it through your printer to see whether it prints on the top or bottom side, and whether the flap should face to the right or left. When you find the direction that works, draw an arrow onto an envelope and tape it to your printer facing the correct direction.
Figuring out the right way to insert an envelope is the hardest part. Once you’ve figured it out, you can do things like quickly print up a bunch of preaddressed envelopes for monthly bills that don’t include their own return envelopes.
Microsoft Word offers a built-in envelope printer, shown in Figure 4-9. To print envelopes in Word 2003, choose Tools → Letters and Mailings → Envelopes and Labels. In Word 2000, choose Tools → Envelopes and Labels.
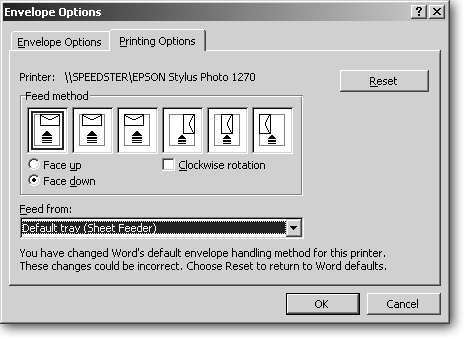
Figure 4-9. With its Face Up, Face Down, and Clockwise Rotation options, Microsoft Word shows an astonishing 18 different ways to feed an envelope into a printer. Only one method works, giving you a 94.5 percent chance of failure. When you figure out the correct way to feed an envelope into your particular printer with your particular software, draw a large arrow onto an envelope and tape it to your printer for future reference.
Some printers print only on standard “letter-sized” #10 envelopes designed for standard 8.5 x 11 inch paper. Smaller envelopes, like those made for greeting cards and invitations, may never come out of your printer without a pair of tweezers and a few expletives.
Large envelopes with metal clasps, like those made by Kraft, won’t roll through a printer. Instead, print mailing labels and stick them on those envelopes. In fact, some people find it easier to simply print out mailing labels for all their envelopes, neatly bypassing the problem of lining up envelopes in the printer.
Today’s printers handle more surfaces than just paper. Most office supply stores carry these types of inkjet paper in addition to office paper.
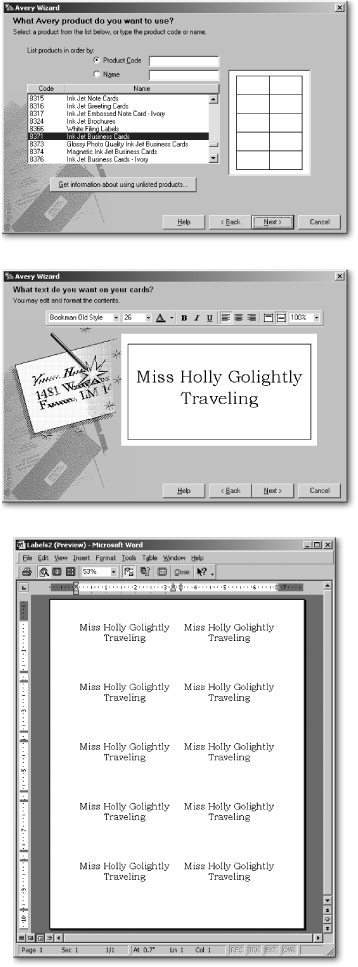
Stick-on labels. The premiere label maker, Avery, sells hundreds of different-sized labels and perforated cards, all on inkjet-printable sheets. Realizing the difficulty of aligning words with the varying size of the labels and cards, Avery created the free Avery Wizard software, shown in Figure 4-10, for Microsoft Word. Download the wizard from Avery’s Web site (http://www.avery.com) and run the software; when you’re done, an Avery icon appears in Microsoft Word’s toolbar. To print on a label, click the Avery icon, and the wizard guides you through choosing your particular type of Avery label—name tags, for instance. Type the names into the wizard’s onscreen blanks, and the Wizard shows you a print preview of your words, neatly lined up to print on the sheet of labels. Press Print, and the printer places your words inside each label.
Already used a few labels from a sheet? Click Cancel during the Print Preview (Figure 4-10, bottom), and Word displays an editable version of the Print Preview window. Delete the words from the cards that line up with your sheet’s missing labels, and then click Print. When the wizard prints your labels, it skips the empties.
CD labels. Most inkjet printers print directly onto round “peel-and-stick” CD labels, which look much nicer than scrawling on your CDs with a felt-tip pen. Unfortunately, the heat inside some CD and DVD players warps the labels, gumming up the drive. To avoid that problem, the latest printers from Epson (http://www.epson.com), Primera (http://www.primera.com), and Casio (http://www.casio.com) print directly onto the CD or DVD. Cheaper models costing less than $100 often print only text and simple graphics; professional quality models capable of full-color artwork cost more than $1,000, but they make your CDs look just as nice as the ones sold outside of subway stations.
Note
If you’re in the market for a new CD drive, Hewlett Packard’s latest CD drives employ LightScribe technology (see Section 10.7) to etch an image onto a CD while it’s still inside the drive.
Transparencies. Transparencies—transparent plastic sheets that rest on an overhead projector for presentations—thrived at conferences for several decades. Today’s spiffy digital projectors keep pushing overhead projectors further back into the closets, but many people still use them, especially in schools. Inkjet printers easily print text and graphics on the transparent plastic sheets, making them a cheap alternative until your company finally puts that digital projector in the budget.
Greeting cards. Many people now send greeting cards through the Internet, but nothing beats the personal touch of a custom-made, hand-signed greeting card. Greeting card paper comes specially sized on colored paper, complete with fold lines and perforations. Embellish it with your message, add some artwork, and skip that last-minute trip to the greeting card aisle.
Iron-on paper. These let you print your image (a picture of your kid, clever slogans, or team numbers) onto the paper, and then iron it onto fabric or clothing. Peel off the cooled paper to leave a machine-washable image. Be sure to iron it on backwards, though. Applying it wrong side-up gives you a mirror image and a mucked-up iron.
Figure 4-10. Top: Avery’s free Avery Wizard software makes quick work of printing labels and cards from within Microsoft Word. Choose the product number of your particular Avery labels from the first menu. Middle: Type the words that you want to appear into the template—perforated business cards, in this case. Bottom: The wizard shows a print preview of your neatly aligned work before sending it to the printer, which prints it onto the cards or labels.
iPod tattoos. The latest craze, this thin film wraps around your iPod, giving it a new look—faux ostrich skin perhaps—that also protects it from scratches. (Download templates on the Activity Center of Hewlett Packard’s Web site [http://www.hp.com]).
Those old photos in the shoebox usually look pretty darn good fifty years later, letting you chuckle over your grandparent’s funny clothes. So consider this sobering fact before investing lots of money in photo paper and ink cartridges for your inkjet printer: the vast majority of pictures printed by today’s photo printers fade in less than a decade. If they’re exposed to direct sunlight, these photos may not last more than a few months. Some inkjets use water-soluble ink, which means that handling a photo with wet fingers does it in.
The newest generation of inkjet printers, inks, and paper extends a printed photo’s life, but at a cost: these archival printers cost several hundred dollars extra, and require more expensive paper and ink. And the manufacturer’s longevity ratings for those prints applies only to photos kept under glass (or sealed in a protective sleeve), away from sunlight.
That’s why more people now turn to professional photo developers, since they accept digital photos as easily as they do traditional film. Better yet, they’ve priced their services so low that, picture for picture, they’re often less expensive than printing at home.
Professional photo developers accept digital photos in two ways, described in the next two sections.
Much to the chagrin of the photo-developing industry, the vast majority of digital photos remain unprinted. To recapture that lost market, the big players want to make photo developing as easy as possible—and just as quick as using an inkjet printer. Their solution? The photo kiosks shown in Figure 4-11. Waiting for you in stores nationwide, kiosks print your digital files any way you bring them in, whether on a floppy disk, a CD, or still inside your camera.
Although Kodak (http://www.kodak.com) and Sony (http://www.sony.com/picturestation) manufacture and sell the kiosks, each kiosk’s owner sets their own costs for printing; prices average from 30 to 60 cents for a 4 x 6 print.
Tip
For extra savings, visit the Kodak or Sony Web site before visiting their kiosks. As of this writing, both companies offer print-out discount coupons to present when paying for the photos.
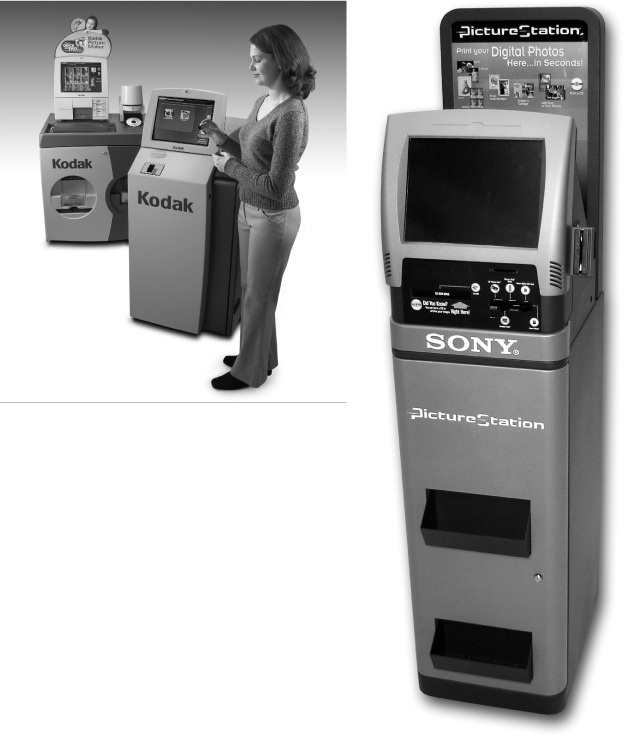
Figure 4-11. Left: Kodak (http://www.kodak.com) sprinkled more than 30,000 Picture Maker kiosks across the country in camera stores, drug stores, and shopping malls, making them the nation’s biggest player in the digital photo kiosk department. Kodak’s kiosks let you create prints from photos stored on digital camera memory cards, CDs, or floppy disks. The kiosks also accept photos beamed wirelessly from camera phones and PDAs, and they can even scan in existing photos and slides. The touch-sensitive screen lets you zoom, crop, remove “redeye,” adjust colors, and add borders before printing. Right: Found in thousands of FedEx Kinko’s locations, Sony’s PictureStation kiosks (http://www.sony.com/picturestation) accept digital camera memory cards, CDs, and floppy disks. Their kiosks offer the same zoom, crop, and red-eye repair tools as Kodak.
Your grandparents mailed their film rolls to the developer, and then waited for the prints to arrive in the mail. Digital photography resurrected that old business model, but with a twist: you can upload your photos to the developer, either from your PC or camera phone. A few days later, your prints arrive in the mail. (Some sites even let you choose a particular frame; the photo arrives in the frame you chose online.) Some online developers also let you pick up your photos in person within a few hours. Online developers don’t offer a kiosk’s immediate gratification, but they’re usually less expensive.
Also, uploading from home or work lets you spend more time editing your photos. Cropping a photo may be easier when you use your favorite, familiar image editing program, rather than fiddling with a kiosk’s built-in editing tools while the line behind you grows.
Windows XP lets you print photos directly from your My Pictures folder (Figure 4-12) to Web sites offered by Fujifilm, Shutterfly, and Kodak for about 25 cents per 4 x 6 print.
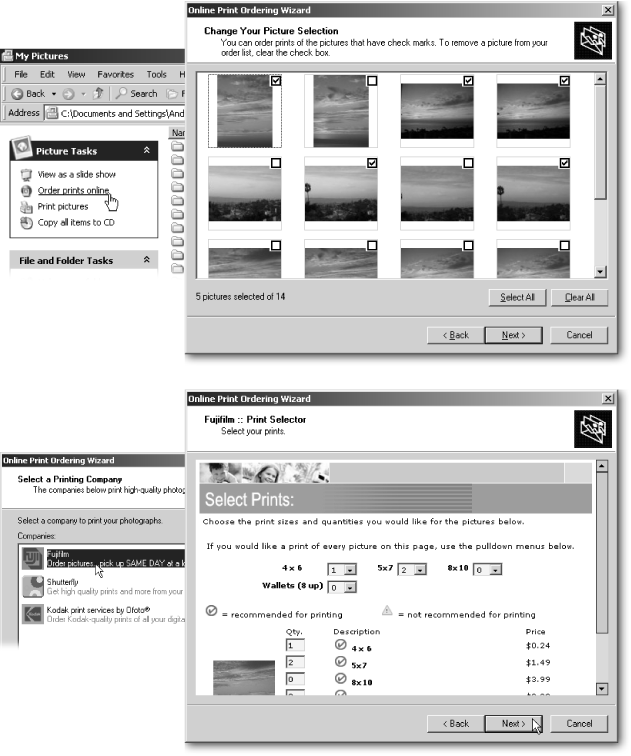
Figure 4-12. Top left: To order professional quality prints directly from Windows XP, open your My Pictures folder and then choose “Order prints online.” Top right: Turn on the checkboxes of the pictures you want to print, or choose Select All. Bottom left: Windows XP connects to the Internet and lists available printing companies; select the one you want. Bottom right: Choose the number of prints you want for each size listed. (To compare prices, click the Back button and try the different companies.) To complete your order, choose a pickup location (or enter your address to receive the prints by mail), and then enter your credit card number.
Although ordering directly from Windows XP’s My Picture folder may be handy, you can do the same thing from any developer’s Web site, often for a better price. Here are a few major photo developers and their Web sites:
Snapfish (http://www.snapfish.com)
Wal-Mart (http://www.walmart.com)
Ritz/Wolf Camera & Image (http://www.ritzpix.com)
Of course, an alternative to printing photos is sharing them online with friends (Section 5.5).
Printing decent photos on an inkjet printer boils down to three things:selecting the right paper type, choosing your photo’s resolution and size, and adjusting your printer’s settings. Make a mistake on any one of these three tasks, and it’s easy to muck up your photo. Here’s how to make the right choices when it’s time to print out your masterpieces.
When you want the best photos, buy paper from the same company that made your printer. Manufacturers create their printers, paper, and ink to work as a team. The coating on the paper binds with the ink to keep the colors from blurring. If quality really doesn’t matter—for children’s daily art projects, greeting cards, or refrigerator prints—buy the cheapest stuff you can get (and cheap ink, as well). But if you care about how your photos look, read on.
Tip
Don’t leave photo paper sitting in the printer’s tray; the light and temperature fluctuations dull its look. Instead, store the paper in a cool, dark place and feed it to your printer, sheet by sheet, when needed.
Manufacturers describe their photo paper using a wide variety of terms.
Premium. The most expensive option. This paper looks the best, feels the thickest, and lasts the longest. It’s for photos you really care about. To keep fading to a minimum, keep the picture framed under glass.
Glossy. Less expensive than premium paper, glossy photo paper shines like a “real” photograph, making the colors stand out. And, just like real photos, it magnifies fingerprints and reflects sunlight.
Semigloss. Semigloss isn’t quite as heavy or glossy as glossy paper, but it cuts down on the shiny colors for reduced price and better handling.
Matte. Matte paper adds texture to lessen the shine, making it both durable and non-glare. Some people prefer the textured look for portraits.
Plain. Don’t confuse this option with plain paper, which won’t work for photos. Plain photo paper works best for photos that aren’t priceless—when you want to let the kids play with the printer, for instance.
Tip
Don’t print on the back of botched photo paper. The paper prints well on one side only—the shiny side. Printing on the other side bleeds the ink together into arty smears. To determine which side is the rear, look for writing on the backside; alternatively, some paper manufacturers put notches on one corner and direct you to insert the paper with the notch facing a certain direction.
The concept can be a bit tricky to understand at first, but the size of your photo onscreen doesn’t translate into its printed size. That’s because your monitor and printer work at different levels of resolution—the number of dots needed to create the image.
Since people sit a foot or two from their screens, monitors create images by stringing together about 100 dots per inch—a fairly low resolution. Your eyes blur the dots together to create an even image. Printers require more dots than monitors because people (especially nearsighted ones) hold the paper much closer to their eyes. To fool the eye into seeing smooth, clean prints, most printers need to pack in at least 300 dots per inch—considerably higher resolution. That means your digital photo must be about three times the size of your monitor to print out at your monitor’s size.
This isn’t a big problem for digital cameras that use three or more megapixels. Those photos can easily fill a full sheet of paper at full resolution. But smaller photos—or portions of photos—may lack the resolution needed to print at certain sizes. When printed too large, photos look grainy. Sometimes you can see bunches of dots instead of a smooth image.
How do you know what size to choose? Some photo-editing programs (Section 5.4.2) let you know when you’re trying to print a photo at too large a size. (Some even help you crop photos to a standard photo size.) As a rule of thumb, the more megapixels your digital camera shoots with, the larger sized prints you can make.
Table 4-1 offers some guidelines as to how large a print you can make from your particular digital camera.
As shown above, cameras with three or more megapixels can fill a standard-sized piece of paper without much problem. Cameras with four or more megapixels give you the luxury of cropping (Section 5.5)—trimming out all but a photo’s best portion—while still creating a decent-sized print.
You’ll see similar charts elsewhere with slightly different numbers. That’s because a lot depends on the quality of your printer and your own definition of quality. The same photo can make professionals shudder and amateurs smile.
Once you decide on your photo’s size and paper type, be sure to tell your printer about your choices. If you skip this vital step, the printer chooses its default settings, which usually means printing your stunning photo onto plain paper at low quality.
To see how your photo will appear on paper, choose File → Print Preview, and then adjust the printer’s settings (Section 4.4) to match your chosen paper selection and photo size. When both the preview and settings look correct, click Print to send your photo to the printer.
Remember that sunlight, particularly ultraviolet rays within sunlight, fades photos quickly. For best preservation, request UV protected glass or plexiglass when framing your picture. That filters out the most harmful rays, giving your photos the best chance at long-term survival.
Some Web pages look awful when printed. The page’s entire right side disappears beyond the edge, for instance, or the bottom half prints on a second page. Or you may just want to print a few paragraphs, but all the graphics, ads, and borders that come along for the ride drain your inkjet’s nozzles dry. Sometimes a simple border fits the entire first page, leaving the text to run down the second page.
These Web pages don’t print well because the Web site’s creators don’t really care about your printing problem. They have enough trouble making sure the page looks good on different-sized monitors and different types of computers using different operating systems and different Web browsers.
To see how a page will look when liberated from the screen, choose File → Print Preview from your browser. If you’re lucky, and it looks perfect, click the Print button to send the page or pages to the printer. If the Web site doesn’t cooperate, try these tricks.
Printer format. A few Web designers feel your pain, so they design special versions of their Web pages that look nice on standard-sized sheets of paper. Look for the words “Text Only” or “Print Format”—usually near the page’s top, right corner.
Print only the part you want. Highlight the section you’re after—the text of a news article without all the surrounding ads, for example—and then choose File → Print. When the Print dialog box appears, choose Selection from the Page Range section.
Print only the page you want. Some long Web pages extend six printed pages or more, but in many cases you want only one page—page three, for instance. To print only that page, choose File → Print Preview. When your browser shows you how the site looks on paper, click the Page arrows along the top until you find the page with your coveted information. Then print only that page using your printer’s Page Range setting (Section 4.4).
Print in Landscape format. When printed, the right edge of some Web pages disappears off the paper’s edge. To give the page more space, tell your printer to print in Landscape (horizontal) mode rather than in the vertical-oriented Portrait mode.
Don’t print the background. Some Web sites spruce up their pages with a patterned background. That golf course’s Web site may look nice in Burberry, but printing those colors sucks your ink cartridges dry. Turn off backgrounds in Internet Explorer by choosing Tools → Options → Advanced. Scroll down to the Printing section, and turn off the “Print Background Colors and Images” checkbox. (In Firefox, choose File → Page Setup → Print backgrounds.)
Reformat in a word processor. From your browser, choose Edit → Select All → Edit → Copy to copy the entire Web page to Windows’ clipboard. Open a full-featured word processor like Microsoft Word and then choose Edit → Paste. The Web page turns into a convoluted jumble of tables, ready for you to pick apart. Use this labor-intensive procedure as a last resort.
Internet Explorer’s Print menu (File → Print) offers an Options tab, letting you print frames—large banners of stationary menus or ads that cling to the site’s top or side as you move between pages. Few sites use frames these days, so this option doesn’t mean much. To select a particular frame for printing, hold down Ctrl and press Tab. When you’re inside the desired frame, choose File → Print → Options tab to send the page to the printer. If Ctrl+Tab merely jumps between the Web site’s address and the page itself, the site doesn’t use frames.
When something’s wrong with your printer, start running down the following list of fixes.
Most paper jams start right in the printer’s paper tray, so start your examination there.
Are you feeding the printer thicker paper than normal? If you recently switched to new paper, check your printer’s manual or drop by its manufacturer’s Web site to see if it can handle this new stock—some printers choke on anything thicker than office paper.
Feel the adjustable paper tray levers to make sure they’re not holding the paper too tightly—or not tightly enough. The paper should pull through easily, but not so easily that it slides in at an angle.
Grab the paper stack with both hands and flex it up and down before placing it in the tray. That loosens the sheets, letting air move between them, and releases any static electricity that could cause pages to cling.
Don’t fill the tray with more paper than the printer can handle. Try about 20 sheets, decreasing or increasing the number until you’re sure your printer handles the stack well.
If the paper’s still jamming, try feeding the paper one sheet at a time—the problem may be with the rollers, the rubbery “rolling pins” that push your paper through the printer. Remove the printer’s lid and use a credit card or cotton ball soaked in alcohol to scrape off any gunk from the rollers.
Is the paper slightly damp or moist? Be sure to seal unused paper in an airtight bag if you live in a damp environment.
When your inkjet printer’s cartridges begin to run low, your printer always tells you about it. Some flash lights, others send an alert to your screen, and others simply refuse to work until you fork out the money for the replacement. Since printer companies make so much money from cartridges, they go out of their way to make them as easy as possible to buy and replace.
Don’t bother searching for a manual for instructions, just lift the lid of your printer; many printers include a well-placed sticker pointing out the cartridges’ location, model numbers, and step-by-step instructions for inserting the replacements.
Although instructions vary between printer manufacturers and models, here’s the basic procedure.
Find some plastic baggies in which to dispose the old cartridges.
Sometimes old cartridges leak ink. Keep a plastic sandwich bag or two on hand for quick disposal.
Lift the printer’s lid.
Most lift along the front, like the hood of a car.
If necessary, push a button to slide the cartridges into view.
Sometimes lifting the lid exposes the cartridges; if not, push the button revealed by the lid. The cartridges slide out of their hiding place and into view. (You may need to turn on your printer before the button works.) You should spot two or more cartridges: a small black one, and a thicker color one, and sometimes separate cartridges for each color.
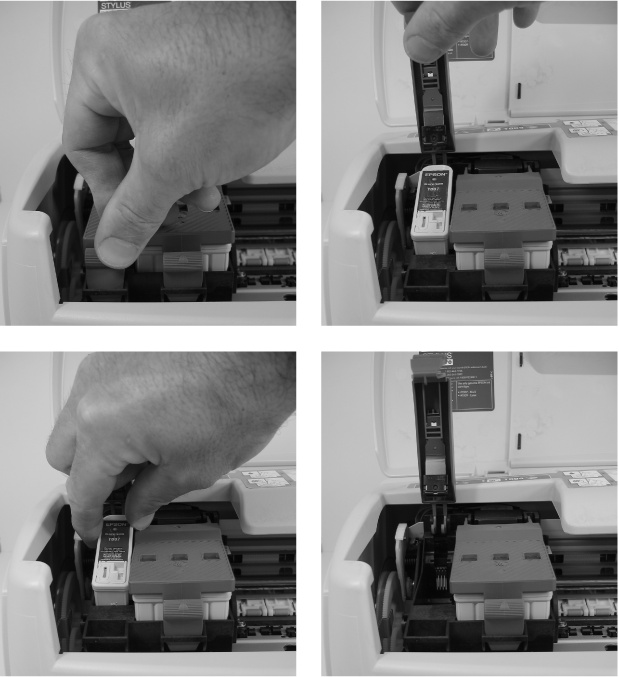
Remove the old cartridges from the printer.
Look for a little latch holding each cartridges in place, as shown in Figure 4-13. Release the latch, and the cartridge should pop up a bit. Grab the cartridge and lift it up and out of its chamber; then drop each one into the plastic bag.
Remove the new ink cartridges from their wrappers.
You may need to pull a little tape seal off the cartridges’ nozzles.
Figure 4-13. Inkjet cartridges are easy to replace. Top left: Lift the lid to your printer and then unclasp the lever holding your cartridge in place. Top right: Lift the cartridge’s lever. Bottom left: After lifting the lever, grasp the cartridge and pull it up and out. Bottom right: Insert the new cartridge in the empty space; be sure to push down the lever to lock the new cartridge in place.
Install the cartridges into the printer.
The black cartridge fits into a smaller chamber than the color one, keeping you from mixing them up. Once they’re in their chambers, fasten their latches to hold them in place.
Push the same button that exposed the cartridges or close the lid to make the cartridges retreat to their hiding place. The printer grunts and groans a bit as it tests the nozzles. After a minute or two, the printer should be ready to begin printing again.
A laser printer’s toner cartridge lasts a long time, often printing more than a thousand pages before starting to lose steam. When they begin to fade, the results are quickly visible: the pages become lighter and lighter, giving you a heads up that it’s time to replace the cartridge. It’s an easy task that works something like this.
Turn on the printer.
Open the printer.
If you don’t spot the toner cartridge, look for a button to push to bring it into view.
Pull out the existing toner cartridge.
Most pull straight out.
Take a new cartridge out of its box, read its instructions, and insert it into the printer.
Most toner cartridges come wrapped in an airtight package. Remove the packaging and pull out a plastic tab that seals the toner in place. Gently shake the toner cartridge to distribute its toner evenly, and then slide it into the printer. Don’t force it; it should slide evenly with a small push to lock it in place.
Tip
Some new laser printer models count the number of pages they’ve printed; when they reach a preset limit, they flash a light saying the cartridge needs replacing. If the printed pages still look good, you can squeeze more life out of the cartridge by removing it and then sliding it right back in. When the cartridge is really dead, replace it with a new one.
Streak marks on your pages mean your printer’s nozzles need cleaning of the goo that’s rubbing against the page. Remove one or both of the cartridges and wipe their nozzles (found on the bottom) with a soft, lint-free cloth (a word translating to “tissue” in most households).
Some printers offer a special “nozzle cleaning” procedure in their Properties menu (Start → Control Panel → Printers and Faxes; right-click your printer’s icon and then choose Properties). The cartridge blasts ink through the nozzle in an attempt to free the streaking culprit. Unfortunately, nozzle cleaning uses up lots of ink in the process.
If none of the previous tactics solve your problems, you have three options: take your printer in for repair, buy a new one, or fix it yourself.
Repair. Your printer’s work environment consists of paper, ink, and dust, leading to constant problems with dirt. Many shops can fix a problem by simply cleaning the printer. Ask for an estimate first, and compare it with the cost of a new printer.
Buy new. Since manufacturers make money from cartridges, and not printers, most new printers sell very inexpensively. The technology improves rapidly; color laser printers will soon sell for as much as inkjet printers. Depending on the cost of repair, it may be time for an upgrade.
Fix it yourself. Since most problems are caused by cleaning issues, you can try cleaning your printer yourself. When looking for tips on repairing your particular printer model—physically taking it apart—check out Sam’s Laser FAQ (http://www.repairfaq.org/sam). Samuel M. Goldwasser compiled a list of Frequently Asked Questions, organized by specific printer models, for repair technicians to share. Although laser printer repair consumes the bulk of Mr. Goldwasser’s site, inkjet printers receive plenty of coverage, as well.
The Fix Your Own Printers Web site (http://www.fixyourownprinter.com) offers downloadable manuals and guides for most printers, as well as error code charts, cleaning products, and a forum for owners to share problems.
Finally, Compass Micro, Inc. (http://www.compassmicro.com) sells parts online for Epson and Canon printers. Once you buy a part, the site also grants you access to its extensive library of closeup diagrams for Epson and Canon printers, helping you figure out where that leftover part really belongs.
Get PCs: The Missing Manual now with the O’Reilly learning platform.
O’Reilly members experience books, live events, courses curated by job role, and more from O’Reilly and nearly 200 top publishers.

