Introduction
When Photoshop Elements was first released back in 2001, it became a runaway success. It’s easy to see why: Elements gives people all the tools they need to get the very best from their photographs. It lets you take a ho-hum shot and give it some wow.
If you run a graphics studio or a large professional photography business, then you need the full version of Photoshop. But for most people who aren’t creating images for commercial printing, Elements offers a very useful toolkit at an appealing price. Even if you already have a photo-management program like Adobe’s Lightroom or Apple’s Aperture, you’ll find that Elements offers tools for certain tasks that you can’t perform with those programs.
Since Adobe introduced their new Creative Cloud monthly subscription plan for Photoshop, a lot of people are looking for an alternative that doesn’t require paying every month forever. If you’re one of them, Elements may be a good fit for you, but you need to be aware that a lot of features and controls are pretty well hidden in Elements. It’s a capable, midlevel image-editing program, but you need to know where to find things, since Elements is laid out quite differently from Photoshop and some features have different names. (For instance, if you’ve used Photoshop, what you know as Smart Sharpen is called Adjust Sharpness in Elements.) Happily, you have this book to guide you.
Why Photoshop Elements?
Adobe Photoshop is the granddaddy of all image-editing programs. It’s the Big Cheese, the industry standard against which everything else is measured. Every photo you’ve seen in a book or magazine in the past 15 years or so has almost certainly passed through Photoshop on its way to being printed. You just can’t buy anything that gives you more control over pictures than Photoshop does.
But Photoshop has some big drawbacks: It’s darned hard to learn, it’s expensive (and now a lot of people are turned off by Adobe’s new subscription-only Creative Cloud plan), and many of its features are just plain overkill if you don’t work on pictures for a living.
For several years, Adobe tried to find a way to cram many of Photoshop’s marvelous powers into a package that normal people could use. Finding the right formula was a slow process. First came PhotoDeluxe, a program that was lots of fun but came up short when you wanted to fine-tune how the program worked. Adobe tried again with Photoshop LE, which many people felt included all the difficulty of full Photoshop, but still gave too little of what you needed to do top-notch work.
Finally—sort of like Goldilocks—Adobe got it just right with Photoshop Elements, which took off like crazy because it offers so much of Photoshop’s power in a program that almost anyone can learn. With Elements, you, too, can work with the same wonderful tools that the pros use. Elements has been around for quite a while now and, in each new version, Adobe has added lots of push-button-easy ways to correct and improve your photos.
What You Can Do with Elements 13
Elements not only lets you make photos look great, but it also helps you organize them and gives you some pretty neat projects in which to use them. The program even comes loaded with lots of easy ways to share photos. The list of what Elements can do is pretty impressive. You can use it to:
Enhance photos by editing, cropping, and color-correcting them, including fixing exposure and color problems.
Add all kinds of special effects to images, like turning a garden-variety photo into a drawing, painting, or even a tile mosaic.
Combine photos into a panorama or montage.
Move someone from one photo to another, and even remove people (your ex, perhaps) from last year’s holiday photos.
Repair and restore old and damaged photos.
Organize photos and assign keywords to them so you can search by subject or name.
Add text to images and turn them into things like greeting cards and flyers.
Create slideshows to share with friends, regardless of whether they use Windows, a Mac, or even just a cellphone.
Automatically resize photos so they’re ready to send either as regular email attachments or in specially designed emails.
Create digital artwork from scratch, even without a photo to work from.
Create and edit graphics for websites.
Create wonderful projects like collages and calendars that you can print or digitally share with friends. Scrapbookers, get ready to be wowed.
It’s worth noting, though, that there are still a few things Elements can’t do. While the program handles text quite competently, at least as photo-editing programs go, it’s still no substitute for QuarkXPress, InDesign, or any other desktop-publishing program. And Elements can do an amazing job of fixing problems in photos, but only if you give it something to work with. If your photo is totally overexposed, blurry, and the top of everyone’s head is cut off, there’s a limit to what even Elements can do to salvage it. (C’mon, be fair.) But you’re more likely to be surprised by what Elements can fix than by what it can’t.
What’s New in Elements 13
The most important changes in Elements 13 are under the hood. For example, for the first time, Elements is now a 64-bit program for both Macs and Windows computers. What does that mean and why is it important?
For many years, the great majority of computer programs were 32 bit, including all versions of Elements prior to version 12 (where only the Mac version was 64-bit). The most important disadvantage of 32-bit programs is that, no matter how much RAM your computer has, a 32-bit program can only see and take advantage of about 3 GB of RAM. So even if you had, say, 16 GB of RAM, older versions of Elements might still stutter at times, because they couldn’t use that extra 13 GB. 64-bit programs don’t have this limitation. (There’s still a limit to how much RAM 64-bit programs can use, but the formula is complex and depends on other variables besides how much RAM is in a computer. All you need to know is that it’s much, much higher.) If you have a Windows computer that’s still running a 32-bit operating system, no problem. When you buy Elements, you get both 32- and 64-bit versions included. (All Macs have been 64-bits for some time now.)
Tip
To find out which version of Windows your computer is running, go to http://support.microsoft.com/kb/827218 and look under the “Automatic version detection results” heading.
Also, Elements 13 is designed to display properly on ultra-high resolution screens, like Apple’s Retina Display and Windows equivalents. If you have one of these screens, you know that looking at previous versions of Elements was like watching regular-definition TV on an HDTV screen–everything looked a little soft. Now everything should be just as sharply focused for you as it is for people using lower-resolution displays, and the menus should be large enough to read easily.
But that’s not all. Adobe has also found time to add a number of new features, including a couple that people have been requesting for years. Here’s a brief rundown of the main changes in Elements 13:
64-bits for all 64-bit operating systems. As explained above, this should make Elements perform significantly better.
Content-Aware Fill. People have been begging Adobe for years to include this popular Photoshop feature in Elements. It’s available in Elements 13, but it’s pretty well hidden; Content-Aware Fill explains where to find it.
Elements Live (eLive). If you look at the top of the Editor or the Organizer, you’ll see a tab labeled eLive. This is a new section devoted to useful tutorials, both basic and advanced, that also gives you a look at some fine photography for inspiration.
Effects and frames in Quick Fix. Elements 12 brought the ability to apply special effects and frames to your photos in the Quick Fix window. Elements 13 adds several new effects that let you easily create popular photo styles.
New slideshows (Organizer Slideshows) and emailing (Emailing Photos) in the Organizer. Elements’ slideshow and email features got a total makeover in this version. Now both the Mac and Windows versions have the same slideshow feature, which is much simpler to use than the old Slide Show Editor. And you can now email files from Elements using any email program without having to hassle with aggravating Adobe Mail verification codes.
Facebook Cover Photo (CD/DVD Labels). If you use Facebook, (and who doesn’t?), you know how it’s become quite the thing to create clever or amusing profile and cover images (the ones you see at the top of your personal page). Elements 13 includes a new Create project that lets you choose and customize a theme for these photos and then upload them directly to Facebook.
Refine Selection Brush tool (Reshaping Selections). Elements 13 includes this brand-new brush, which helps you tweak difficult selections.
Photomerge Compose (Combining Photos with Photomerge Compose). One of the most popular uses for Elements is to move people or objects from one photo to another one. Elements 13 brings a new kind of Photomerge that walks you through this process and helps adjust the lighting in the two images for a more realistic result.
Updated Crop tool (The Crop Tool). This Elements stalwart got a significant makeover in Elements 13. Now it can suggest various possible crops for those who aren’t sure just how they’d like to trim their photos.
Organizer updates. Adobe has refined some of the Organizer features introduced in Elements 12. For instance, albums and folders aren’t jumbled up together anymore—each has its own tab. The Tags section is now easier to use, and you get more suggestions about using Adobe’s online sharing service, Revel.
New Organizer view. Elements 13 brings a new way to view your photos in the Organizer: Adaptive Grid (Organizing Your Photos). This view lets you see all your photos edge to edge, without the gray background and all the distracting details like the image’s name and date below the photo.
New guided edits. Guided Edit mode—where Elements walks you through various photo projects and editing tasks—includes three great new edits for creating atmospheric black-and-white images, producing stylish effects with only a single color, or keeping a single object in color.
A few deletions. A lot of traditional Elements features disappeared in Elements 12 (like Color Variations and the Magic Extractor). There aren’t so many new missing features this time, but there are a few: You can no longer scan directly into Elements using TWAIN if you have a 64-bit version of Windows, or use Photo Mail in any version of Windows. The Slide Show Editor is also gone (the new slideshow feature is much easier to use, but it doesn’t give you as much control over the final product).
Elements vs. Photoshop
You could easily get confused about the differences between Elements and the full version of Adobe Photoshop. Because Elements is so much less expensive, and because many of its more advanced controls are tucked away, a lot of Photoshop aficionados tend to view Elements as some kind of toy version of their program. They couldn’t be more wrong: Elements is Photoshop, it’s just Photoshop adapted for use with a home printer and the Web.
The most important difference between Elements and Photoshop is that Elements doesn’t let you work or save files in CMYK mode, which is the format used for commercial color printing. (CMYK stands for Cyan, Magenta, Yellow, and blacK.) Your inkjet printer also uses those ink colors to print, but it expects you to give it an RGB file, which is what Elements creates. Don’t worry—this is all explained in Chapter 7.
Elements also lacks several tools that are basic staples in any commercial art department, like the extra color control you can get from Selective Color Adjustment layers and the Pen tool’s special talent for creating vector paths. Also, layer styles (the feature you use to create some special effects, like drop shadows and bevels) don’t have as many settings in Elements as they do in Photoshop. (In Elements, you start with a given preset style and make changes to it; in Photoshop, you can create a style from scratch.) The same holds true for a handful of other Elements tools.
And although Elements is all most people need to create graphics for the Web, it doesn’t come with the advanced Photoshop tools that let you do things like automatically slice images into smaller pieces so they display faster online. If you use Elements, then you’ll have to look for another program to help with that.
If you’re experienced with Photoshop and looking for an alternative that doesn’t require a subscription, it’s a good idea to download the trial version of Elements first, just to be sure it can do everything you want. If you want to be able to work with layers in 16-bit files, for example, Elements probably isn’t for you. On the other hand, you won’t find many alternatives that offer that capability, either, and you may need to decide how much you’re willing to give up in exchange for getting away from Adobe’s Creative Cloud.
The Key to Learning Elements
Elements may not be quite as powerful as Photoshop, but it’s still a complex program, filled with more features than most people ever use. The good news is that the Quick Fix window (Chapter 4) lets you get started right away, even if you don’t understand every last option Quick Fix presents you with. You also get Guided Edit mode (Guided Edit), which provides step-by-step walkthroughs of popular editing tasks, like sharpening a photo or cropping it to fit on standard photo paper.
As for the program’s more complex features, the key to learning how to use Elements—or any other program, for that matter—is to focus only on what you need to know for the task you’re currently trying to accomplish.
For example, if you’re trying to use Quick Fix to adjust the color of your photo and crop it, don’t worry that you don’t get the concept of layers yet. You won’t learn to do everything in Elements in a day or even a week. The rest will wait until you need it, so take your time and don’t fret about what’s not important to you right now. You’ll find it much easier to master Elements if you go slowly and concentrate on one thing at a time.
If you’re totally new to the program, then you’ll find only three or four big concepts in this book that you really need to understand if you want to get the most out of Elements. It may take a little time for some of them to sink in—resolution and layers, for instance, aren’t the most intuitive concepts in the world—but once they click, they’ll seem so obvious that you’ll wonder why they were confusing at first. That’s perfectly normal, so persevere. You can do this, and there’s nothing in this book that you can’t understand with a little bit of careful reading.
The very best way to learn Elements is just to dive right in and play with it. Try all the different filters to see what they do. Add a filter on top of another filter. Click all the different tools and try them. You don’t even need to have a photo open to do this. See Creating a New File to learn how to make an image from scratch in Elements, and keep an eye out for the many downloadable practice images you’ll find on this book’s companion website at www.missingmanuals.com/cds. Go crazy—you can stack up as many filters, effects, and layer styles as you want without crashing the program.
About This Book
Elements is a cool program that’s lots of fun to use, but figuring out how to make it do what you want is another matter. Elements’ Help files are pretty good, but of course you need to know what you’re looking for to use them to your best advantage. (Elements’ Help files are online; you can download a PDF of them from Adobe’s Elements support pages at www.adobe.com/support/photoshopelements.)
You’ll find a slew of Elements titles at your local bookstore, but most of them assume that you know quite a bit about the basics of photography and/or digital imaging. It’s much easier to find good intermediate books about Elements than books designed to get you going with the program.
That’s where this book comes in. It’s intended to make learning Elements easier by avoiding technical jargon as much as possible, and explaining why and when you’ll want to use (or avoid) certain features of the program. This approach is as useful to people who are advanced photographers as it is to those who are just getting started with their first digital cameras.
Note
This book periodically recommends other books, covering topics too specialized or tangential for a manual about Elements. Careful readers may notice that not all of these titles are published by Missing Manual parent O’Reilly Media. While we’re happy to mention other Missing Manuals and books in the O’Reilly family, if there’s a great book out there that doesn’t happen to be published by O’Reilly, we’ll still let you know about it.
You’ll also find instructions throughout this book that refer to files you can download from the Missing Manual website (www.missingmanuals.com) so you can practice the techniques you’re reading about. And in various spots, you’ll find several different kinds of short articles (a.k.a. boxes). The ones labeled “Up to Speed” are designed to help newcomers to Elements, or they explain concepts with which veterans are probably already familiar. Those labeled “Power Users’ Clinic” cover more advanced topics that won’t be of much interest to casual photographers.
A Note About Operating Systems
This book covers using Elements with both Windows computers and Macs, and you’ll see both platforms represented in the illustrations. (Frankly, you’ll see more Mac screenshots here, simply because some things are easier to read in the Mac version of the program. For example, pop-out menus are more likely to have a white background on a Mac instead of a dark one.) The Editor (the part of Elements where you tweak photos) works exactly the same way regardless of what kind of computer you’re using, but there are some differences in the Organizer and the projects available to you, and those are noted as necessary. Also, most of the keyboard shortcuts you use to run commands are different in Windows and on Macs; The Very Basics explains how those shortcuts are notated in this book.
So remember: It doesn’t matter which version of the program is shown in the illustrations; unless this book says otherwise, the differences are just slight cosmetic ones, like the fact that you close Mac program windows by clicking a button on their left, whereas in Windows the button is on the right.
Note
Adobe’s video-editing program, Premiere Elements, also uses the Elements Organizer, and if you install both programs, your Photoshop Elements menus will show a lot of Premiere Elements choices, too. These are normally turned off when you install only Photoshop Elements, but if they get turned on by mistake and you don’t care to see them, you can turn most of them off by launching the Organizer and going to Edit→Preferences→Editing on a PC or Elements Organizer→Preferences→Editing on a Mac. (Appendix B, available at www.missingmanuals.com/cds, explains all the Organizer’s menus. Appendix C, also online, covers the Editor’s menus.)
About the Outline
This book is divided into seven parts, each focusing on a different kind of task:
Part 1. The first part of this book helps you get started with the program. Chapter 1 shows how to navigate Elements’ slightly confusing layout and mish-mash of programs within programs. You’ll learn how to decide where to start and how to customize Elements so it best suits your working style. You’ll also read about some important keyboard shortcuts and where to look for help when you get stuck. Chapter 2 covers how to get photos into Elements, the basics of organizing them, and how to open files and create new images from scratch. You’ll also find out how to save and back up images. Chapter 3 explains how to rotate and crop photos, and includes a primer on that most important digital imaging concept—resolution.
Part 2. Chapter 4 shows how to use the Quick Fix window to dramatically improve your photos. Chapter 5 and Chapter 6 cover two key concepts that you’ll use throughout this book: making selections and working with layers.
Part 3. Having Elements is like having a darkroom on your computer. In Chapter 7, you’ll learn how to make basic corrections, such as fixing exposure, adjusting color, sharpening images, and removing dust and scratches. Chapter 8 covers topics unique to people who use digital cameras, like converting raw files and batch-processing photos. In Chapter 9, you’ll move on to more sophisticated fixes, like using the Clone Stamp tool to make repairs, making photos livelier by adjusting their color intensity, and adjusting light and shadows in images. Chapter 10 shows you how to convert color images to black and white, and how to tint and colorize black-and-white photos. Chapter 11 explains how to use Elements’ Photomerge feature to create a panorama from several photos, and how to correct perspective problems in images.
Part 4. This part covers the fun stuff: painting on photos and drawing shapes (Chapter 12), using filters and effects to create artistic looks (Chapter 13), and adding text to images (Chapter 14).
Part 5. Once you’ve created a great image in Elements, you’ll want to share it, so this part is about how to create fun projects like collages (Chapter 15), how to get the most out of your printer (Chapter 16), how to create files for emailing and posting online (Chapter 17), and how to make and share slideshows (Chapter 18).
Part 6. You can get hundreds of plug-ins and additional styles, brushes, and other nifty tools to customize your copy of Elements and increase its abilities; the Internet and your local bookstore are chock-full of additional info. Chapter 19 offers a look at some of these resources, as well as information about using a graphics tablet with Elements, and suggests some places to turn after you finish this book.
Part 7. Appendix A helps you get your copy of Elements up and running, and suggests what to do if it starts misbehaving. Appendixes B and C—which you can download from this book’s Missing CD web page (see Missing CD web page)—cover all the menu items in the Organizer and Editor, respectively.
For Newcomers to Elements
This book contains lots of information, and if you’re new to Elements, it can be a little overwhelming. But you don’t need to digest it all at once, especially if you’ve never used any kind of photo-editing program before. So what do you need to read first? Here’s a simple five-step way to use this book if you’re brand new to photo editing:
Read all of Chapter 1.
That’s important for understanding how to get around in Elements.
If your photos aren’t on your computer already, then read about the Photo Downloader in Chapter 2 (The Photo Downloader).
The Downloader gets photos from your camera’s memory card into Elements.
If you want to organize your photos, then read about the Organizer (also in Chapter 2, starting on Using the Organizer).
It doesn’t matter where your photos are right now. If you want to use Elements to label and keep track of them, then read Chapter 2.
When you’re ready to edit your photos, read Chapters Chapter 3 and Chapter 4.
Chapter 3 explains how to adjust your view of photos in the Editor. Chapter 4 shows you how to use the Quick Fix window to easily edit and correct photos. Guided Edit (Guided Edit) can also be very helpful when you’re just getting started. If you skipped Chapter 2 because you’re not using the Organizer, then go back there and read the part about saving photos (Saving Your Work) so you don’t lose your work.
When you’re ready to print or share your photos, flip to the chapters on sharing images.
Chapter 16 covers printing, both at home and from online services. Chapter 17 explains how to email photos, and Chapter 18 teaches you how to create slideshows.
That’s all you need to get started. You can come back and pick up the rest of the info in the book as you get comfortable with Elements and want to explore more of the wonderful things you can do with it.
The Very Basics
This book assumes that you know how to perform basic activities on your computer like clicking and double-clicking your mouse buttons and dragging objects onscreen. Here’s a quick refresher:
To click means to move the pointer of your mouse or trackpad cursor over an object on your screen, and then press the left mouse or trackpad button once. To right-click means to press the right mouse button once, which calls up a menu of special features. To double-click means to press the left button twice, quickly, without moving the mouse between clicks. To drag means to click an object and then to hold down the left button while you use the mouse to move the object.
Most onscreen selection buttons are pretty obvious, but you may not be familiar with radio buttons: To choose an option, click the little empty circle next to it.
In Elements, you’ll often want to use keyboard shortcuts to save time, and this book tells you about these shortcuts when they exist (and Elements has a lot). In this book, unless otherwise specified, keyboard shortcuts are always presented as Windows keystroke/Mac keystroke. So if you see a sentence like, “Press Ctrl+S/⌘-S to save your file,” that means that if you use Windows, you should hold down the Ctrl key while pressing the S key, and if you have a Mac, you should hold down the ⌘ key while pressing the S key. There’s one slight exception to this: When you see “right-click/Control-click,” if you have a Mac and a two-button mouse, you can right-click. But if you have a one-button mouse, you can Control-click instead—that means to press the Control key on your keyboard and then press your mouse button once.
If you’re comfortable with basic concepts like these, then you’re ready to get started with this book.
About→These→Arrows
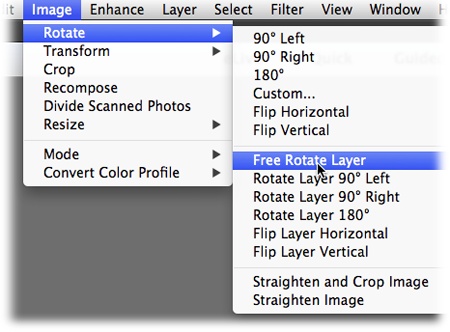
Throughout this book (and the Missing Manual series) you’ll see sentences like this: “In the Editor, select Filter→Artistic→Paint Daubs.” This is a shorthand way of helping you find files, folders, and menu items without having to read through excruciatingly long, bureaucratic-style instructions. So the sample sentence above is a short way of saying this: “In the Editor component of Elements, in the menu bar at the top of the screen, click the word ‘Filter.’ In the menu that appears, choose the Artistic menu item, and then go to Paint Daubs in the pop-out menu.” Figure I-1 shows you an example in action.
Mac file paths are shown using the same arrows. Windows file paths, on the other hand, are shown in the conventional Windows style, so if you see, “Go to C:\Documents and Settings\[your user name]\My Documents\My Pictures,” that means you should go to your C drive, open the Documents and Settings folder, look for your user account folder, and then find the My Documents folder. In that folder, open the My Pictures folder that’s inside it.
When there are different file paths for Windows 7 and 8, you’ll find them all listed in this book. Like keyboard shortcuts, file paths are shown as Windows file path/Mac file path when all versions of Windows use the same file path. Otherwise, all the different versions are specified.
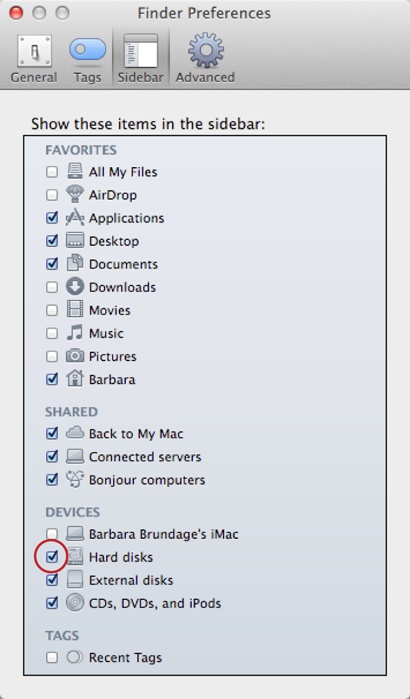
If you’re using a Mac, there’s one special challenge to finding some of the files mentioned in this book—specifically, the ones located in the Library folders. (Figure I-2 explains.) Also, if you buy Elements from the Mac App Store, all the files are actually inside the application itself, which means your file paths will be different. (This book covers the version of Elements that was released in September 2014, so you won’t see so much information about App Store version’s file paths, since that information wasn’t available when this book was written. Check this book’s Missing CD page at www.missingmanuals.com/cds for updated information after the App Store version is released.)
Note
The keyboard shortcuts listed in this book are the official Adobe shortcuts. However, if you have a Mac with an abbreviated keyboard (without a 10-key section on the right), like a laptop keyboard or the smaller Bluetooth keyboards, you need to add the fn key to shortcuts that use the F-keys on the top row of your keyboard. So, for instance, while the shortcut for Full Screen View in the Organizer is ⌘-F11, on a MacBook Pro, you would press fn-⌘-F11 instead.
About the Online Resources
As the owner of a Missing Manual, you’ve got more than just a book to read. Online, you’ll find example files so you can get some hands-on experience. You can also communicate with the Missing Manual team and tell us what you love (or hate) about this book. Head over to www.missingmanuals.com, or go directly to one of the following sections.
Missing CD web page
This book doesn’t have a CD pasted inside the back cover, but you’re not missing out on anything. Go to www.missingmanuals.com/cds to download sample files mentioned in this book, as well as a few tutorials and two additional appendixes. And so you don’t wear down your fingers typing long web addresses, this book’s Missing CD page also offers a list of clickable links to the websites mentioned in this book.
Registration
If you register this book at oreilly.com, you’ll be eligible for special offers—like discounts on future editions of Photoshop Elements: The Missing Manual. Registering takes only a few clicks. To get started, go to http://oreilly.com/register.
Feedback
Got questions? Need more information? Fancy yourself a book reviewer? On our Feedback page, you can get expert answers to questions that come to you while reading, share your thoughts on this book, and find groups for folks who share your interest in Elements. To have your say, go to www.missingmanuals.com/feedback.
Errata
In an effort to keep this book as up to date and accurate as possible, each time we print more copies, we’ll make any confirmed corrections readers have suggested. We also note such changes on the book’s website, so you can mark important corrections in your copy of the book. To report an error or view existing corrections, go to http://missingmanuals.com/library.html, click the title of this book, and then click the View/Submit Errata link on the right side of the page that appears.
Safari® Books Online
Safari Books Online is an on-demand digital library that lets you easily search over 7,500 technology and creative reference books and videos to find the answers you need quickly.
With a subscription, you can read any page and watch any video from our library online. Read books on your cellphone and mobile devices. Access new titles before they’re available for print and get exclusive access to manuscripts in development, and post feedback for the authors. Copy and paste code samples, organize your favorites, download chapters, bookmark key sections, create notes, print out pages, and benefit from tons of other time-saving features.
Get Photoshop Elements 13: The Missing Manual now with the O’Reilly learning platform.
O’Reilly members experience books, live events, courses curated by job role, and more from O’Reilly and nearly 200 top publishers.

