Photoshop Elements lets you do practically anything you want to your digital images. You can colorize black-and-white photos, remove demonic red-eye stares, or distort the facial features of people who have been mean to you. The downside is that finding your way around the program became harder in Elements 3 than it was in the first two versions of Elements. Luckily, Elements 4 has smoothed things out a little bit.
This chapter helps get you oriented in Elements. You'll learn about what to expect when you start up the program and how to use Elements to fix your photos with just a couple of keystrokes.
Along the way, you'll find out about some of Elements' basic controls and how to get hold of the program's Help files if you need them. Elements is absolutely crammed with help at every turn. Adobe did their best to make it as easy for you as possible.
Tip
On the Elements installation disc, Adobe gives you a 15-minute video introduction to Ele ments 4. Put the disc in your computer, choose a language, accept the software agreement, and click "Get a Quick Overview" to take a tour of what Elements can do.
When you launch Elements for the first time, you get a veritable smorgasbord of options, all neatly laid out for you in the Welcome screen (shown in Figure 1-1).
Interestingly, the Welcome screen isn't actually Elements. It's a launching pad that, depending on the button you click, will start up one of two different programs:
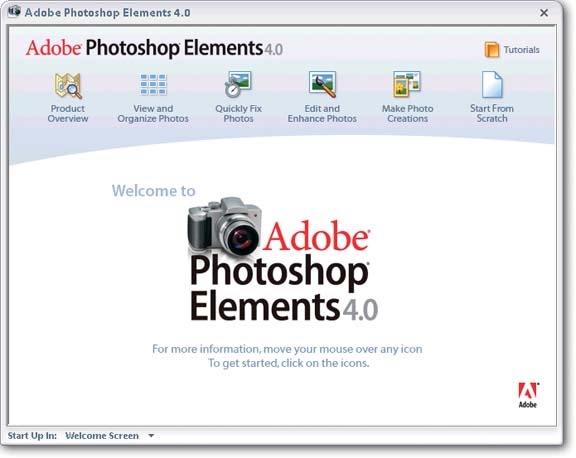
Figure 1-1. The Elements Welcome screen gives you six main activities to choose from (there's also a Tutorials link in the upper-right corner). Hold your cursor over any of these options for more details about each choice. You can't bypass the Welcome screen just by clicking the Close button. If you do, the screen goes away—but so does Elements. Fortunately, you've got options: the box on Section 1.2.1 tells you how to permanently get rid of the Welcome screen.
It's quite easy to get back and forth between the Editor and the Organizer—which you might call the two different faces of Elements—and you probably won't do much in one without eventually needing to get into the other. But in some ways, they still function as two separate programs. In any case, the Welcome screen offers you no less than six choices for how to get into Elements:
Product Overview offers a round-up of all the features inside Elements.
View and Organize Photos takes you to the Organizer, where you can store and sort all your images.
Quickly Fix Photos brings you to the wonderful Quick Fix window (which is actually part of the Editor) where you can perform amazing color corrections with just a click.
Edit and Enhance Photos takes you to the Editor, which is the digital darkroom/ art studio where you can perform your most extensive edits.
Make Photo Creations lets you use your photos in a wide variety of projects like greeting cards and slideshows. You perform all these tasks in the Organizer.
Start From Scratch provides you a new blank document in the Editor to noodle away on.
If you start in the Organizer, once you've located a photo to edit, you have to wait while the Editor loads. And if you have both the Editor and the Organizer running, quitting the Editor doesn't close the Organizer. You have to close both programs independently.
Adobe has built Elements around the assumption that most people will work on their photos in the following way: first, you'll bring your photos into the Organizer to sort and keep track of them. Then you'll open your photos in the Editor to work on them, and save them back to the Organizer when you're finished making changes. You can work differently, of course, like opening photos directly in the Editor and bypassing the Organizer altogether, but you may find you feel like you're always swimming against the current if you choose a different way of working. The next chapter has a few hints for disabling some Elements features if you really find they're getting in your way.
Get Photoshop Elements 4: The Missing Manual now with the O’Reilly learning platform.
O’Reilly members experience books, live events, courses curated by job role, and more from O’Reilly and nearly 200 top publishers.

