Chapter 1. Finding Your Way Around Elements

Photoshop Elements lets you do practically anything you want to your digital images. You can colorize black-and-white photos, remove demonic red-eye stares, or distort the facial features of people who’ve been mean to you. The downside is that all those options can make it tough to find your way around Elements, especially when you’re new to the program.

This chapter helps get you oriented in Elements. You’ll learn what to expect when you launch the program, how to use Elements to fix photos with just a couple of keystrokes, and how to sign up for and connect to all the goodies that await you on Photoshop. You’ll also learn how to use Guided Edit mode to get started editing your photos. Along the way, you’ll find out about some of Elements’ basic controls, and how to get to the program’s Help files.

The Welcome Screen

When you launch Elements for the first time, you’re greeted by the Welcome screen (Figure 1-1). This is where you register Elements and sign up for your free Photoshop.com account (U.S. only). Activation explains how.

Note

If you aren’t in the U.S., the whole process of registering Elements works a bit differently—see Activation.

Interestingly, the Welcome screen isn’t actually Elements. It’s just a launching pad that starts up one of two different programs, depending on the button you click:

  • Organize button. This starts the Organizer, which lets you store and organize your image files.

  • Edit button. Click this for the Editor, which lets you modify your images.

You can easily hop back and forth between the Editor and the Organizer—which you might call the two halves of Elements—and you probably won’t do much in one without eventually needing to get into the other. But in some ways, they function as two separate programs.
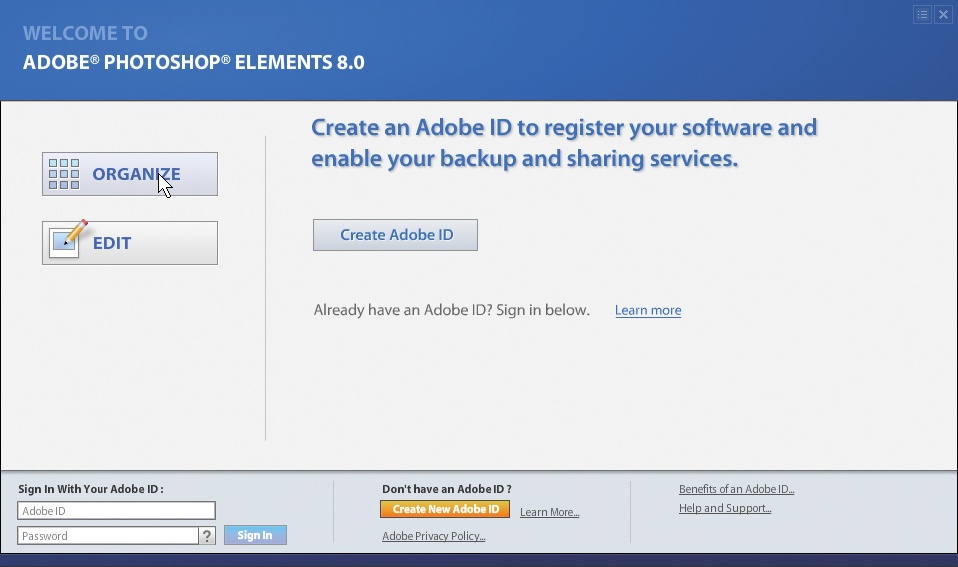
Elements’ Welcome screen. What you see in the right part of the window changes occasionally, so it may not be exactly the same as this illustration. The left part of the window always stays the same, though. There you can choose to start organizing or editing photos. The bottom of the screen always has links for signing onto Photoshop.com and displays info about your Photoshop.com account, if you have one. You can’t bypass the Welcome screen just by clicking the upper-right Close (X) button. When you do, the screen goes away—but so does Elements. Fortunately, you’ve got options: The box on tells you how to permanently say goodbye to this screen.
Figure 1-1. Elements’ Welcome screen. What you see in the right part of the window changes occasionally, so it may not be exactly the same as this illustration. The left part of the window always stays the same, though. There you can choose to start organizing or editing photos. The bottom of the screen always has links for signing onto Photoshop.com and displays info about your Photoshop.com account, if you have one. You can’t bypass the Welcome screen just by clicking the upper-right Close (X) button. When you do, the screen goes away—but so does Elements. Fortunately, you’ve got options: The box on Organizing Your Photos tells you how to permanently say goodbye to this screen.

If you start in the Organizer, then once you’ve picked a photo to edit, you have to wait a few seconds while the Editor loads. And when you have both the Editor and the Organizer running, just quitting the Editor doesn’t close the Organizer—you have to close both programs independently. When both programs are running, you can switch back and forth between them by clicking the button at the upper right of the screen; the button reads Organizer when you’re in the Editor and “Editor” when you’re in the Organizer. (The Organizer button just takes a click, but the Editor button includes a drop-down menu where you choose the editing mode you want.) You can also just click the Editor or the Organizer icon in the Windows taskbar to switch from one to the other.

Adobe built Elements around the assumption that most people work on their photos in the following way: First, you bring photos into the Organizer to sort and keep track of them. Then, you open photos in the Editor to work on them and save them back to the Organizer when you’ve finished making changes. You can work differently, of course—like opening photos directly in the Editor and bypassing the Organizer altogether—but you may feel like you’re always swimming against the current if you choose a different workflow. The next chapter has a few hints for disabling some of Elements’ features if you find they’re getting in your way.

The Welcome screen can also serve as your connecting point for signing onto www.photoshop.com. Photoshop.com has more about Photoshop.com, but for now you just need to know that a basic account is free if you’re in the United States (it’s not available yet in other countries), and it gives you access to all the interesting features in Elements 8 that require an Internet connection. If you’re signed into Photoshop.com already, you can see how much of your online storage you’ve already used in the graph at the bottom of the Welcome screen. There’s also a reminder of your personal URL at Photoshop.com and links to online help and to tips and tricks for using Elements. However, you can also get to all these things from within the Editor or the Organizer, so there’s no need to keep the Welcome screen around for that.

Tip

After you create your Photoshop.com account, you may find you have trouble with the Welcome screen if your Internet connection isn’t active when you start Elements. If the Welcome screen hangs while trying to gather your account info, just quit it (you may need to do this in Windows’ Task Manager—press Ctrl+Alt+Del in XP or Ctrl+Shift+Esc in Vista to call it up), then follow the directions in the box below for starting the Editor or the Organizer directly from the program file.

Organizing Your Photos

The Organizer is where your photos come into Elements and go out again (when it’s time to print or email them). The Organizer stores and catalogs your photos, and you automatically come back to it for any activities that involve sharing your photos, like printing a photo package (Picture Package) or making a slideshow (Slideshows). The Organizer’s main window (Figure 1-2), which is sometimes called the Media Browser, lets you view your photos, sort them into albums, and assign keyword labels to them. (In previous versions of Elements it was called the Photo Browser, so you may hear that term, too.)

The Organizer has lots of really cool features you’ll learn about throughout this book when they’re relevant to the task at hand. The next chapter shows you how to use the Organizer to import and organize your photos, and Appendix A covers all the Organizer’s different menu options. What’s more, if you sign up for a Photoshop.com account (Photoshop.com), then you can access and organize your photos from any computer, not just at home.

The Media Browser is your main Organizer workspace. Click the Create tab and you can choose to start all kinds of new projects with your photos, or click the Share tab for ways to let other people view your images. Click the arrow at the right of the Fix tab (circled) for a menu that gives you a choice of going to Quick Fix, Guided Edit, or Full Edit. The Fix tab gives you access to some quick fixes right in the Organizer, too. The Organizer also gives you another way to look at your photos, Date view, which is explained in .
Figure 1-2. The Media Browser is your main Organizer workspace. Click the Create tab and you can choose to start all kinds of new projects with your photos, or click the Share tab for ways to let other people view your images. Click the arrow at the right of the Fix tab (circled) for a menu that gives you a choice of going to Quick Fix, Guided Edit, or Full Edit. The Fix tab gives you access to some quick fixes right in the Organizer, too. The Organizer also gives you another way to look at your photos, Date view, which is explained in Chapter 2.

Photo Downloader

Elements has yet another component, which you may have seen already if you’ve plugged a camera into your computer after installing Elements: the Photo Downloader (Figure 1-3), which helps get photos straight into the Organizer directly from your camera’s memory card.

If you’ve used older versions of Elements, then you’ll be pleased to know that the Downloader is more polite than it used to be. In early versions of Elements, the Downloader ran constantly as a separate program (whether Elements was running or not), racing to be first on the scene whenever it detected any newly connected device that might have photos on it, and popping up its own window before the standard Windows dialog box could appear. For a few people, this was mighty convenient. But for the majority of folks (who didn’t want to use the Downloader every time they plugged some photo-bearing device into their computers), it was a big nuisance. If you have an iPod, for instance, then you know how aggravating this was.

Now the Downloader appears as only one of your options in the regular Windows dialog box that you see when you connect a device. If you want to use the Downloader, then just choose it from the list. No more interfering with your iPod, and no extra dialog box to close every time you don’t want to use the Downloader. It’s a major improvement.

Adobe’s Photo Downloader is yet another program you get when you install Elements. Its job is to pull photos from your camera (or other storage device) into the Organizer. To use the Downloader, just click “Organize and Edit using Adobe Elements Organizer 8.0” (circled) in Windows Vista’s AutoPlay dialog box. (If you use Windows XP, you’ll see a dialog box with similar options.) After the Downloader does its thing, you end up in the Organizer.
Figure 1-3. Adobe’s Photo Downloader is yet another program you get when you install Elements. Its job is to pull photos from your camera (or other storage device) into the Organizer. To use the Downloader, just click “Organize and Edit using Adobe Elements Organizer 8.0” (circled) in Windows Vista’s AutoPlay dialog box. (If you use Windows XP, you’ll see a dialog box with similar options.) After the Downloader does its thing, you end up in the Organizer.

You can read more about the Downloader in Chapter 2. If you plan to use the Organizer to catalog photos and assign keywords to them, then reading the section on the Downloader can help you avoid hair-pulling moments.

Photoshop.com

Adobe also gives you easy access to its Photoshop.com service as part of Elements. A basic account is free, and it’s nicely integrated into Elements, making it very easy to use. With a Photoshop.com account, you can:

  • Create your own website. You can make beautiful online albums that display your photos in elaborate slideshows—all accessible via your own Photoshop.com URL (web address). Great for dazzling friends and family. They can even download your photos or order prints, if you choose to let them (see Online Albums).

  • Automatically back up and sync your photos. Frequent worriers and travelers, prepare to be amazed. You can set Elements to sync your PC-based photos to storage space on Photoshop.com, providing you with a backup, just in case. What’s more, you can upload photos to your albums from other computers, and they automatically appear in the Organizer the next time you start Elements. See Backing Up Your Files for more about how to use this nifty feature.

  • Access your photos from other computers. When you’re not at home, pop over to your Photoshop.com account to see and even organize your photos. That way, when you visit friends, you don’t need to lug your computer along—just log into your account from their computers.

  • Download lots of extra goodies. The Content panel (The Content Panel) displays thumbnails for additional backgrounds, frames, graphics, and so on, that you can download right from Photoshop.com.

  • Get lots of great free advice. Call up the Photoshop Inspiration Browser (The Inspiration Browser), and you can choose from a whole range of helpful tutorials for all sorts of Elements tasks and projects.

The bad news is that these Photoshop.com features are available only in the United States—for now. Adobe says it plans to expand this offering worldwide. As of this writing, folks outside the United States can get some of the same features, like the ability to create online albums and galleries, at Adobe’s Photoshop Showcase site http://photoshopshowcase.com. (See Activation for more about the regional differences.)

To sign up for a free account:

  1. Tell Adobe you want an account.

    Just click the Create New Adobe ID button on the Welcome screen (The Welcome Screen) or at the top of either the Organizer or the Editor’s main window. This also registers Elements. If you’ve already got an Adobe ID (if you registered a previous version of Elements, for example), just sign in instead.

  2. In the window that opens, fill in your information to create your Adobe ID.

    You need to fill in the usual address, phone, email, and so on, and pick what you’d like as your unique Adobe web address. (Hint: something like http://johnspictures.photoshop.com is probably already taken, so you may need to try a few alternatives. When you click Create Account, you get a message if the web address you chose is already in use.) Turn on the checkbox that says you agree to Adobe’s terms and conditions. Finally, for security purposes, you need to enter the text you see in a box on the sign-up screen.

  3. Create your account.

    Click the Create Account button. Adobe tells you if it finds any errors in what you submitted and gives you a chance to go back and fix them.

  4. Confirm your account.

    You’ll get an email from Adobe that contains a link. Just click the link to confirm that you want to create an account, and you’re all set. (You need to click the link within 24 hours of creating your account, or you may have to start the whole process again.)

Once you have an account, you can get to it by clicking Sign In at the top of the Editor or Organizer. After you sign in, you see “Welcome <your name>” instead of “Sign In”, and you can click that to go to your account settings. (You can also look at the bottom of the Welcome screen to see how much free space you have left, as shown in Figure 1-4.)

Once you sign into your Photoshop.com account, the bottom of the Welcome screen tells you how much of your online storage space you’re currently using and includes a link for managing backups and syncing. You also see a link to your personalized web address (a helpful reminder).
Figure 1-4. Once you sign into your Photoshop.com account, the bottom of the Welcome screen tells you how much of your online storage space you’re currently using and includes a link for managing backups and syncing. You also see a link to your personalized web address (a helpful reminder).

A free Photoshop.com account is a pretty nice deal. It even includes 2 GB of space on Adobe’s servers for backing up and storing your photos. You can also upgrade to a paid account (called Plus), which gives you more of everything: more template designs for Online Albums, more downloads from the Content panel, more tutorials, and more storage space: 20–100 GB (depending on what level membership you choose). However, the Plus account costs $49.99 for 20 GB, and more as your storage amount increases, so you might want to try the free account first to see whether you’ll really use it enough to justify the expense. Because this service has been available since Elements 7, you can also investigate Adobe’s Photoshop.com support forum (http://forums.adobe.com/community/photoshopdotcom), as well as the independent forum sites (Beyond This Book) to see what people think about it.

Note

If you haven’t bought Elements yet, Adobe tends to promote the combination of Elements and a Plus account on their website. You have to hunt around a bit to find where to purchase Elements with just the free account, so look carefully before you buy if you don’t want to start off with the paid version.

Once you sign into your account, Elements logs you in automatically every time you launch the program. If you don’t want that to happen, just click your name at the top of the Elements window (in either the Organizer or Editor), and then, in the window that opens, choose Sign Out.

Editing Your Photos

The Editor is the other main component of Elements (Figure 1-5). This is the fun part of the program, where you get to edit, adjust, transform, and generally glamorize your photos, and where you can create original artwork from scratch with the drawing tools and shapes.

The main Elements editing window, which Adobe calls Full Edit. In some previous versions of Elements it was known as the Standard Editor, something to keep in mind in case you ever try any tutorials written for Elements 3 or 4.
Figure 1-5. The main Elements editing window, which Adobe calls Full Edit. In some previous versions of Elements it was known as the Standard Editor, something to keep in mind in case you ever try any tutorials written for Elements 3 or 4.

You can operate the Editor in any of three different modes:

  • Full Edit. The Full Edit window gives you access to Elements’ most sophisticated tools. You have far more ways to work on your photo in Full Edit than in Quick Fix, and if you’re fussy, it’s where you’ll do most of your retouching work. Most of the Quick Fix commands are also available via menus in the Full Edit window.

  • Quick Fix. For many beginners, Quick Fix (Figure 1-6) ends up being their main workspace. It’s where Adobe has gathered together the basic tools you need to improve most photos. It’s also one of the two places in Elements where you can choose to have a before-and-after view while you work. (Guided Edit, described below, is the other.) Chapter 4 gives you all the details on using Quick Fix.

  • Guided Edit. This window can be a big help if you’re a newcomer to Elements. It provides step-by-step walkthroughs for popular projects such as cropping your photos and removing blemishes from them. Like Quick Fix, Guided Edit offers a before-and-after view of your photo as you work on it (see Getting Help) and also offers some advanced features, like the Actions Player (Using Actions).

The Quick Fix window. Use the drop-down menus in the tab at the top of the screen (circled, right) to navigate from Full Edit to the Quick Fix window (and to Guided Edit, if you like) and back again. To compare your fixes with the original photo, fire up Before & After view, which you get by clicking the View menu (circled, left).
Figure 1-6. The Quick Fix window. Use the drop-down menus in the tab at the top of the screen (circled, right) to navigate from Full Edit to the Quick Fix window (and to Guided Edit, if you like) and back again. To compare your fixes with the original photo, fire up Before & After view, which you get by clicking the View menu (circled, left).

The rest of this chapter covers some of the Editor’s basic concepts and key tools.

Note

If you leave a photo open in the Editor, then when you switch back to the Organizer, you see a red band with a padlock across the photo’s Organizer thumbnail as a reminder. To get rid of the lock and free up your image for Organizer projects, go back to the Editor and close the photo there.

Panels, Bins, and Tabs

When you first open the Editor, you may be dismayed at how cluttered it looks. There’s stuff everywhere, and maybe not a lot of room left for the photos you’re editing, especially if you have a small screen. Don’t fret: One of Elements 8’s best features is the way you can customize the Editor’s workspace. There’s practically no limit to how you can rearrange the Editor. You can leave everything the way it is if you like a cozy area with everything at hand. Or if you want a Zen-like empty workspace with nothing visible but your photo, you can move, hide, and turn off almost everything. Figure 1-7 shows two different views of the same workspace.

What’s more, in Elements 8 you can hide everything in your workspace except for your images and the menu bar: no tools, panels, or Options bar. This is handy when you want a good, undistracted look at what you’ve just done to your photo. To do that, just press the Tab key; to bring everything back into view, press Tab again.

Two different ways of working with the same images, panels, and tools. You can use any arrangement that suits you.Top: The panels in the basic Elements arrangement, with the images in the new tabbed view ().Bottom: This image shows how you can customize your panels. Here the Project bin has been moved into the Panel bin, and the whole thing is collapsed to icons (they’re to the right of the image being worked on). Click an icon and that panel pops out so you can work with it. The images here are in floating windows.
Figure 1-7. Two different ways of working with the same images, panels, and tools. You can use any arrangement that suits you. Top: The panels in the basic Elements arrangement, with the images in the new tabbed view (Image windows). Bottom: This image shows how you can customize your panels. Here the Project bin has been moved into the Panel bin, and the whole thing is collapsed to icons (they’re to the right of the image being worked on). Click an icon and that panel pops out so you can work with it. The images here are in floating windows.

Note

You may notice that Elements’ menu bar at the very top of the program’s window changes a little depending on the size of your monitor and whether you’ve got the Elements window maximized to fill your screen. You’ll either see a single row above the Options bar (Elements’ Tools) with the PSE logo at the left and the Arrange menu (Image Views) and the Photoshop.com login area at the middle of the screen (as in Figure 1-7), or these items may be in a separate row above the menus that say File, Edit, Image, and so on (as in Figure 1-5). Both are perfectly normal, and you’ll see both arrangements in this book’s illustrations.

The Panel bin

When you’re in Full Edit, the right side of the Elements window displays the Panel bin. Panels let you do things like keep track of what you’ve done to your photo (Undo History panel) and apply special effects to your images (Effects panel and Content panel). You’ll learn about the various panels in detail throughout this book.

Note

In previous versions of Elements and in older versions of Photoshop, panels were called “palettes.” If you run across a tutorial that talks about the “Content palette” for example, that’s exactly the same thing as the The Content Panel.

You might like the Panel bin, but many people don’t. If you don’t have a large monitor, you may find it wastes too much desktop acreage, and in Elements, you need all the working room you can get. Fortunately, you don’t have to keep your panels in the bin; you can close the bin and just keep your panels floating around on your desktop, or you can minimize them.

You can’t close the bin completely when it has panels in it, but you can minimize it to just a narrow strip of icons by clicking the bin’s very top bar, the one with the double arrows on it. To expand it again, click the top bar once more. (If you pull all the panels out of the bin so that it’s empty, it disappears. To bring it back, click Reset Panels at the top of your screen, which resets all your panels, not just the bin.) You pull a panel out of the bin by dragging the panel’s top tab; you’ve now got yourself a floating panel. Figure 1-8 shows how to make panels even smaller once they’re out of the bin by collapsing them in one of two ways. You can also combine panels with each other, as shown in Figure 1-9; this works with both panels in the bin and freestanding panels.

You can free up even more space by collapsing your panels, accordion-style, once they’re out of the bin.Top: A full-sized panel.Bottom left: A panel collapsed by double-clicking where the cursor is.Bottom right: The same panel collapsed to an icon by clicking the very top of it (where the cursor is here) once. Click the top bar again to expand it.
Figure 1-8. You can free up even more space by collapsing your panels, accordion-style, once they’re out of the bin. Top: A full-sized panel. Bottom left: A panel collapsed by double-clicking where the cursor is. Bottom right: The same panel collapsed to an icon by clicking the very top of it (where the cursor is here) once. Click the top bar again to expand it.

When you launch Elements for the first time, the Panel bin contains only two panels: Layers and Effects. To see how many more panels Elements actually gives you, check out the Editor’s main Window menu (the one at the top of your screen): Everything listed in the menu’s middle section—from Adjustments to Undo History—is a panel you can put in the Panel bin.

When you select a new panel from the Window menu, it appears in the bin if you’re using the bin, floating on the desktop if you don’t have any panels in the bin, or right where it was when you closed it last time. In addition to combining panels as shown in Figure 1-9 you can also collapse the Panel bin or any group of panels into icons. Then, to use a panel, click its icon and it jumps out to the side of the group, full size. To shrink it back to an icon, click its icon again. To expand or shrink the Panel bin, click the double arrows at the panel’s upper right. You can combine panels here by dragging their icons onto each other. Then those panels open as a combined group, like the panels in Figure 1-9. Clicking one of the icons in the group collapses the opened, grouped panel back to icons. (Combined panel icons don’t show a dark gray line between them in the group the way separate icons do.) You can also separate combined panels in icon view by dragging the icons away from each other.

Adobe sometimes refers to floating panels as “tabs” in Elements’ menus. To close a floating tab, click the Close button (the X) at its upper right, or below the X click the barely visible square (it’s made up of four horizontal lines), and choose Close from the menu that appears. If you want to put a panel back in the bin, drag it over the bin and let go when you see a blue line, or drag onto the tab of a panel that’s already in the bin to create a combined panel within the bin.

Note

If you lose panels or you move stuff around so much that you can’t remember where you put things, you can always go home again by clicking the Reset Panels button at the top of your screen, which puts all your panels back in their original spots.

You can combine two or more panels once you’ve dragged them out of the bin.Top: The Histogram panel is being pulled into, and combined with, the Layers panel. To combine panels, drag one of them (by clicking on the panel’s name tab) and drop it onto the other panel.Bottom: To switch from one panel to another after they’re grouped, just click the tab of the one you want to use. To remove a panel from a group, simply drag it out of the group. If you want to return everything to how it looked when you first launched Elements, click Reset Panels (not visible here) at the top of your screen.
Figure 1-9. You can combine two or more panels once you’ve dragged them out of the bin. Top: The Histogram panel is being pulled into, and combined with, the Layers panel. To combine panels, drag one of them (by clicking on the panel’s name tab) and drop it onto the other panel. Bottom: To switch from one panel to another after they’re grouped, just click the tab of the one you want to use. To remove a panel from a group, simply drag it out of the group. If you want to return everything to how it looked when you first launched Elements, click Reset Panels (not visible here) at the top of your screen.

The Project bin

In the Editor, the long narrow photo tray at the bottom of your screen is called the Project bin. It shows you what photos you have open, as explained in Figure 1-10, but it does a lot more than that. At the bin’s upper left are two pull-down menus:

  • Show Open Files. This menu lets you determine what the Project bin displays: the photos currently open in the Editor, selected photos from the Organizer, or any of the albums (Albums and Smart Albums) you’ve made. If you send a bunch of photos over from the Organizer at once, you may think something went awry because no photo appears on your desktop or in the Project bin. If you switch this menu over to “Show Files from Elements Organizer”, then you see the photos waiting for you in the bin.

    The Project bin runs across the bottom of the Editor’s screen. It holds a thumbnail of every photo you have open, as well as photos you sent over from the Organizer that are waiting to be opened. Here you see the bin three ways: as it normally appears (top), as a floating panel (bottom left), and collapsed to an icon (bottom right). You can also click the Close button (the X) at the bin’s upper right, or right-click its tab and choose Close to hide it completely. To bring it back, go to Window → Project bin.
    Figure 1-10. The Project bin runs across the bottom of the Editor’s screen. It holds a thumbnail of every photo you have open, as well as photos you sent over from the Organizer that are waiting to be opened. Here you see the bin three ways: as it normally appears (top), as a floating panel (bottom left), and collapsed to an icon (bottom right). You can also click the Close button (the X) at the bin’s upper right, or right-click its tab and choose Close to hide it completely. To bring it back, go to Window → Project bin.
  • Bin Actions. This is where the Project bin gets really useful. You can choose to use the photos in the bin in a project (via the Create tab), share them by any of the means listed under the Task panel’s Share tab, print them, or make an album right there in the bin without ever going to the Organizer.

Tip

If you don’t use the Organizer, then the Project bin is a particularly great feature, because it lets you create groups of photos you can call up all together. Just put them in an album (Albums and Smart Albums), and then, from the bin’s Show Open Files menu, select the album’s name to see that group again.

You can drag your photos’ thumbnails in the bin to rearrange them if you want to use the images in a project.

The Project bin is useful, but if you have a small monitor, you may prefer to have the space it takes up for your editing work. In Elements 8, the Project bin behaves just like any of the other panels: you can rip it loose from the bottom of the screen and combine it with the other panels. You can even collapse it to an icon, like the other panels, or drag it into the Panel bin. (If you combine it with your other panels, the combined panel may be a little wider than it would be without the Project bin, although you can still collapse the combined group to icons.) If you’ve used the past couple of versions of Elements, you know this is a great improvement over the old, fixed Project bin.

Image windows

In Elements 8, you can choose how you want to see the images you’re working on. Older versions of Elements have used floating windows, where each image appears in a separate window that you can drag around. Elements 8 starts you out with floating windows, but you can also put your images into a new, tabbed view, which is something like the tabs in a web browser, or the tabs you’d find on paper file folders. The advantage of tabbed view is that you have plenty of workspace around the image, which is handy when you’re working near the edges of an image, or using a tool that requires you to be able to get outside the image’s boundaries. All the things you can do with image windows are explained on Image Views.

Incidentally, Clicking Reset Panels doesn’t do anything to your image windows or tabs; it just resets your panels.

Note

Because your view may vary, most of the illustrations in this book show only the image itself and the tool in use, without a window frame or tab boundary around it.

Elements’ Tools

Elements gives you an amazing array of tools to use when working on your photos. You get almost two dozen primary tools to help select, paint on, and otherwise manipulate images, and many of the tools have as many as six subtools hiding beneath them (see Figure 1-11). Bob Vila’s workshop probably isn’t any better stocked than Elements’ virtual toolbox.

Like any good toolbox, Elements’ Tools panel has lots of hidden drawers tucked away in it. Many Elements tools are actually groups of tools, which are represented by tiny black triangles on the lower-right side of the tool’s icon (you can see several of these triangles here). Right-clicking or holding the mouse button down when you click the icon brings out the hidden subtools. The little black square next to the regular Eraser tool means it’s the active tool right now.
Figure 1-11. Like any good toolbox, Elements’ Tools panel has lots of hidden drawers tucked away in it. Many Elements tools are actually groups of tools, which are represented by tiny black triangles on the lower-right side of the tool’s icon (you can see several of these triangles here). Right-clicking or holding the mouse button down when you click the icon brings out the hidden subtools. The little black square next to the regular Eraser tool means it’s the active tool right now.

Note

To explore every cranny of Elements, you need to open a photo (in the Editor, choose File → Open). Lots of the menus are grayed out if you don’t have a file open.

The long, skinny strip on the left side of the Full Edit window (shown back in Figure 1-5Editing Your Photos) is the Tools panel. It stays perfectly organized so you can always find what you want without ever having to lift a finger to tidy it up. If you forget what a particular tool does, just hover your cursor over the tool’s icon, and a label (called a tooltip) appears telling you the tool’s name. To activate a tool, click its icon. Any tool that you select comes with its own collection of options, as shown in Figure 1-12.

When a tool is active, the Options bar changes to show settings specific to that tool. Elements’ tools are highly customizable, letting you do things like adjust a brush’s size and shape. Here you see the Brush tool’s options. (The caterpillar-like thingy at the left is a sample of the brushstroke you’d get using the tool’s current settings.)
Figure 1-12. When a tool is active, the Options bar changes to show settings specific to that tool. Elements’ tools are highly customizable, letting you do things like adjust a brush’s size and shape. Here you see the Brush tool’s options. (The caterpillar-like thingy at the left is a sample of the brushstroke you’d get using the tool’s current settings.)

As the box below explains, you can have either a single- or double-columned Tools panel.

Other windows in Elements, like Quick Fix and the Raw Converter (see Using the Raw Converter), also have toolboxes, but none is as complete as the one in Full Edit.

Note

If you’ve used Elements 5 or earlier, you’ll notice an important difference in getting to subtools in Elements 8: You can’t switch from one tool in a subgroup to another by using the Options bar anymore. Now you can choose a tool from a group only by using the tool’s pop-out menu in the Tools panel, or by pressing its shortcut key repeatedly to cycle through the tool’s subgroup. Stop tapping the key when you see the icon for the tool you want.

Don’t worry about learning the names of every tool right now, but if you want to see them all, they’re all on display in Figure 1-13. It’s easier to remember what a tool is once you’ve used it. And don’t be overwhelmed by all of Elements’ tools. You probably have a bunch of Allen wrenches in your garage that you only use every year or so. Likewise, you’ll find that you tend to use certain Elements tools more than others.

The mighty Tools panel. Because some tools are grouped together in the same slot (indicated by the little black triangles next to the tool icons), you can’t ever see all the tools at once. (This Tools panel has two columns; the box on explains how to switch from one to two columns.) For grouped tools, the icon you see is the icon for the last tool in the group you used.
Figure 1-13. The mighty Tools panel. Because some tools are grouped together in the same slot (indicated by the little black triangles next to the tool icons), you can’t ever see all the tools at once. (This Tools panel has two columns; the box on Elements’ Tools explains how to switch from one to two columns.) For grouped tools, the icon you see is the icon for the last tool in the group you used.

Tip

You can save a ton of time by activating tools with their keyboard shortcuts, since you don’t have to interrupt what you’re doing to trek over to the Tools panel. To see a tool’s shortcut key, hover your cursor over its icon. A label pops up indicating the shortcut key (it’s the letter to the right of the tool’s name). To activate the tool, just press the appropriate key. If the tool you want is part of a group, all the tools in that group have the same keyboard shortcut, so just keep pressing that key to cycle through the group until you get to the tool you want.

Getting Help

Wherever Adobe found a stray corner in Elements, they stuck some help into it. You can’t move anywhere in this program without being offered some kind of guidance. Here are a few of the ways you can summon assistance if you need it:

  • Help menu. Choose Help → Photoshop Elements Help, or press F1. Elements launches your web browser, which displays Elements’ Help files, where you can search or browse a topic list and glossary. The Help menu also contains links to online video tutorials and Adobe’s support forum for Elements.

  • Tooltips. When you see a tooltip (Elements’ Tools) pop up under your cursor as you move around Elements, if the tooltip’s text is blue, that means it’s linked to the appropriate section in Elements; Help. You can click blue-text tooltips for more information about whatever your cursor is hovering over.

  • Dialog box links. Most dialog boxes have a few words of bright blue text somewhere in them. That text is actually a link to Elements Help. If you get confused about what Remove Color Cast does, for instance, then, in the Remove Color Cast dialog box, click the blue “color cast” text for a reminder.

Guided Edit

If you’re a beginner, Guided Edit, shown in Figure 1-14, can be a big help. It walks you through a variety of popular editing tasks, like cropping, sharpening, correcting colors, and removing blemishes. It also includes some features that are useful even if you’re an old Elements hand, like the Actions Player (Using Actions) and the new Exposure Merge (Blending Exposures).

Guided edit is really easy to use:

  1. Go to Guided Edit.

    In the Editor, click the Edit tab → EDIT Guided.

  2. Open a photo.

    Press Ctrl+O, and then, from the window that appears, choose your photo. If you already have a photo open, it appears in the Guided Edit window automatically. If you have several photos in the Project bin, then you can switch images by double-clicking the thumbnail of the one you want to work on.

    Guided Edit gives you step-by-step help with basic photo editing. Just use the tools that appear in this panel once you choose an activity. After you’ve selected a task, you can change the view to Before & After. Keep clicking the little blue button (circled) at the bottom of the window to toggle views between After Only, Before & After—Horizontal, and Before & After—Vertical.
    Figure 1-14. Guided Edit gives you step-by-step help with basic photo editing. Just use the tools that appear in this panel once you choose an activity. After you’ve selected a task, you can change the view to Before & After. Keep clicking the little blue button (circled) at the bottom of the window to toggle views between After Only, Before & After—Horizontal, and Before & After—Vertical.
  3. Choose what you want to do.

    Your options are grouped into major categories like Basic Photo Edits and Color Correction, with a variety of specific projects under each heading. Just click the task you want in the list on the right side of the window. The panel displays the relevant buttons and/or sliders for the task you selected.

  4. Make your adjustments.

    Just move the sliders and click the buttons till you like what you see. If you want to start over, click Reset. If you change your mind about the whole project, click Cancel.

    If several steps are involved, then Elements shows you just the buttons and slider you need to use for the current step, and then switches to a new set of choices for the next step as you go along.

    If you need to adjust your view of your photo while you work on it, Guided Edit has a little toolbox with the Hand (The Hand Tool) and Zoom (The Zoom Tool) tools to help you out.

  5. Click Done to finish.

    If there are more steps, then you may see another set of instructions. If you see the main list of topics again, you’re all through. Don’t forget to save your changes (Saving Your Work). To close your photo, press Ctrl+W, or leave it open and switch to another tab to share it or use it in a project.

Note

Guided Edit shows you quick and easy ways to change your image, but you don’t always get the best possible results. It’s a great tool for starting out; just remember that what you see here isn’t necessarily the best you can possibly make your images look. Once you’re more comfortable in Elements, Quick Fix (Chapter 4) is a good next step.

The Inspiration Browser

You’ve probably noticed the little text alerts that zip in and out at the bottom of both the Editor and the Organizer windows, as shown in Figure 1-15. If you click one, then you get a pop-up window that suggests a tutorial explaining how to do whatever the text alert mentioned. Click the arrow where it says “Learn how”, and up pops the Adobe Elements Inspiration Browser, a mini-program that lets you watch tutorials. You need a Photoshop.com account (available only for U.S. residents; see Photoshop.com) to use the Browser. (If you call up the Browser and you change your mind about using it, or if you don’t have an account, press the Esc key to close it.) It’s well worth checking out, because the Browser is a direct connection to a slew of tutorials for things you might want to do with Photoshop Elements or Premiere Elements (Adobe’s movie-editing program).

The first time you start the Inspiration Browser, you see a license agreement for yet another program: Adobe AIR, which lets other programs show you content stored online; no need to get out a web browser and navigate to a website. (Adobe AIR got installed automatically along with Elements.)

This process may seem like a lot of work, but it’s well worth the effort, since you can find tutorials on everything from beginner topics like creating albums to advanced subjects like working with Displacement Maps (a sophisticated technique used for things like making your photo look like it’s painted on a brick wall, or making a page of text look like a crumpled newspaper). The tutorials are all in either PDF or video format. You’ll see tutorials from well-known Elements gurus here, but anyone can submit a tutorial for the Inspiration Browser. So if you figure out how to do a project you think might be useful to others, you can create a tutorial and send it in for approval by clicking the “Submit a Tutorial” button and entering the requested information in the window that appears. (You need to create your tutorial as either a PDF or, for a video, in the Flash FLV format.)

Top: Click these little text banners for more information about the topic.Bottom: In these pop-up windows you can either click “Learn how” to go directly to that particular tutorial, or click the faintly ghosted left and right arrows (circled; they get brighter when you mouse over them) in the pop-up window to read about other available tutorials. You can also get to the Inspiration Browser by going to Help → Photoshop Inspiration Browser. (Not all the pop-ups have these navigation arrows. Some have a single arrow that only takes you to the linked tutorial without letting you browse for others.)
Figure 1-15. Top: Click these little text banners for more information about the topic. Bottom: In these pop-up windows you can either click “Learn how” to go directly to that particular tutorial, or click the faintly ghosted left and right arrows (circled; they get brighter when you mouse over them) in the pop-up window to read about other available tutorials. You can also get to the Inspiration Browser by going to Help → Photoshop Inspiration Browser. (Not all the pop-ups have these navigation arrows. Some have a single arrow that only takes you to the linked tutorial without letting you browse for others.)

You can search for tutorials using the box on the Browser’s left, or click All Tutorials and then filter them by category or product (so you don’t have to see Premiere Elements topics if you have only Photoshop Elements, for example). You can also click on one of the column headings to see the available tutorials arranged by Title, Author, Difficulty, Date Posted, Category, Type (video or PDF), or the average star rating people have given it. Use the buttons at the window’s upper right to change the view from a list to thumbnails (info about each tutorial appears below its thumbnail).

The Inspiration Browser is a wonderful resource and may well give you most of the help you need with Elements beyond this book.

Tip

If the author of a tutorial has a website, then the tutorial’s page has a link to it. Exploring these links can help you find lots of useful Elements-related resources, as well as useful add-on tools that extend Elements’ capabilities (see Chapter 19).

Escape Routes

Elements has a couple of really wonderful features to help you avoid making permanent mistakes: the Undo command and the Undo History panel. After you’ve gotten used to them, you’ll probably wish it were possible to use these tools in all aspects of your life, not just Elements.

Undo

No matter where you are in Elements, you can almost always change your mind about what you just did. Press Ctrl+Z, and the last change you made goes away. Pressing Ctrl+Z works even if you’ve just saved your photo, but only while it’s still open—if you close the file, your changes are permanent. Keep pressing Ctrl+Z and you keep undoing your work, step by step.

If you want to redo what you just undid, press Ctrl+Y. These keyboard shortcuts are great for toggling changes on and off while you decide whether you really want to keep them. The Undo/Redo keystroke combinations work in the Organizer and the Editor.

Tip

You have a bit of control over the key combination you use for Undo/Redo, if you don’t like Ctrl+Z/Ctrl+Y. Go to Edit → Preferences → General, where Elements gives you two other choices, both of which involve pressing the Z key in combination with the Control, Alt, and Shift keys.

Undo History panel

In the Full Edit window, you get even more control over the actions you can undo, thanks to the Undo History panel (Figure 1-16), which you open by choosing Window → Undo History.

For a little time travel, just slide the pointer (on the left, just above the cursor here) up and watch your changes disappear. You can go back only sequentially. Here, for instance, you can’t go back to the Crop tool without first undoing what you did with the Paint Bucket and the Eraser. Slide the pointer down to redo your work. You can also hop to a given spot in the list by clicking the place where you want to go instead of using the slider.
Figure 1-16. For a little time travel, just slide the pointer (on the left, just above the cursor here) up and watch your changes disappear. You can go back only sequentially. Here, for instance, you can’t go back to the Crop tool without first undoing what you did with the Paint Bucket and the Eraser. Slide the pointer down to redo your work. You can also hop to a given spot in the list by clicking the place where you want to go instead of using the slider.

This panel holds a list of the changes you’ve made since you opened your image. Just push the slider up and watch your changes disappear one by one as you go. Like the Undo command, Undo History even works if you’ve saved your file: As long as you haven’t closed the file, the panel tracks every action you take. You can also slide the other way to redo changes that you’ve undone.

Be careful, though: You can back up only as many steps as Elements is set to remember. The program is initially set up to record 50 steps, but you can change that number by going to Edit → Preferences → Performance → History & Cache and adjusting the History States setting. You can set it as high as 1,000, but remembering even 100 steps may slow your system to a crawl if you don’t have a superpowered processor, plenty of memory, and loads of disk space. If Elements runs slowly on your machine, then reducing the number of history states it remembers (try 20) may speed things up a bit.

The one rule of Elements

As you’re beginning to see, Elements lets you work in lots of different ways. What’s more, most people who use Elements approach projects in different ways. What works for your neighbor with her pictures may be quite different from how you’d work on the very same shots.

But you’ll hear one suggestion from almost every Elements veteran, and it’s an important one: Never, ever work on your original. Always, always, always make a copy of your image and work on that instead.

The good news is that if you store your photos in the Organizer, you don’t need to worry about accidentally trashing your original. If you save your files as version sets (Saving Your Work), Elements automatically creates a copy when you edit a photo that’s cataloged in the Organizer, so that you can always revert to your original.

If you’re determined not to use the Organizer or version sets, then follow these steps to make a copy of your image in the Editor:

  1. Go to File → Duplicate.

    The Duplicate Image dialog box appears.

  2. Name the duplicate and then click OK in the dialog box.

    Elements opens the new, duplicate image in the main image window.

  3. Find the original image and click its Close button (the X).

    If you have floating windows, the Close button is the standard Windows Close button you’d see at the upper right of any window. If you have tabs, the close X is on the right side of the image’s tab. Now the original is safely tucked out of harm’s way.

  4. Save the duplicate by pressing Ctrl+S.

    Choose Photoshop (.psd) as the file format when you save it. (You may want to choose another format after you’ve read Chapter 3 and understand more about your different format options.)

Now you don’t have to worry about making a mistake or changing your mind, because you can always start over.

Note

Elements doesn’t have an autosave feature, so you should get into the habit of saving frequently as you work. Saving Your Work has more about saving.

Getting Started in a Hurry

If you’re the impatient type and you’re starting to squirm because you want to be up and doing something to your photos, here’s the quickest way to get started in Elements: Adjust an image’s brightness and color balance all in one step.

  1. In the Editor, open a photo.

    Press Ctrl+O and navigate to the image you want, and then click Open.

  2. Press Alt+Ctrl+M.

    You’ve just applied Elements’ Auto Smart Fix tool (Figure 1-17).

Voilà! You should see quite a difference in your photo, unless the exposure, lighting, and contrast were almost perfect before. The Auto Smart Fix tool is one of Elements’ many easy-to-use features. (Of course, if you don’t like what just happened to your photo, no problem—simply press Ctrl+Z to undo it.)

If you’re really raring to go, jump ahead to Chapter 4 to learn about using the Quick Fix commands. But it’s worth taking the time to read the next two chapters so you understand which file formats to choose and how to make some basic adjustments to your images, like rotating and cropping them.

Don’t forget to give Guided Edit a try if you see what you want to do in the list of topics. Guided Edit can be a big help while you’re learning your way around.

Auto Smart Fix is the easiest, quickest way to improve the quality of your photos.Top left: The original, unedited picture.Top right: Auto Smart Fix makes quite a difference, but the colors are still slightly off.Bottom: By using some of the other tools you’ll learn about in this book (like Auto Contrast and Adjust Sharpness), you can make things look even better.
Figure 1-17. Auto Smart Fix is the easiest, quickest way to improve the quality of your photos. Top left: The original, unedited picture. Top right: Auto Smart Fix makes quite a difference, but the colors are still slightly off. Bottom: By using some of the other tools you’ll learn about in this book (like Auto Contrast and Adjust Sharpness), you can make things look even better.

Get Photoshop Elements 8 for Windows: The Missing Manual now with the O’Reilly learning platform.

O’Reilly members experience books, live events, courses curated by job role, and more from O’Reilly and nearly 200 top publishers.