Chapter 1. Finding Your Way Around Elements
Photoshop Elements lets you do practically anything you want to your digital images. You can colorize black-and-white photos, remove demonic red-eye stares, or distort the faces of people who’ve been mean to you. The downside is that all those options can make it tough to find your way around Elements, especially when you’re new to the program.
This chapter helps get you oriented in Elements. You’ll learn what to expect when you launch the program, how to use Elements to fix photos with just a couple of keystrokes, and how to sign up for and connect to all the goodies that await you on Photoshop.com. You’ll also learn how to use Guided Edit mode to get started editing your photos. Along the way, you’ll find out about some of Elements’ basic controls, and how to get to the program’s Help files.
The Welcome Screen
If you’re lucky, all you need to do to launch Elements for the first time is click the Elements icon (the blue square with Elements’ initials—pse—on it) in the Dock. If Elements didn’t automatically create a Dock icon when you installed it, go to your hard drive’s Applications folder and open the Adobe Photoshop Elements 8.0 folder. Double-click the Photoshop Elements icon (the bright blue square with “pse” on it) to start the program. When you do, the same icon appears in your Dock. To keep Elements in your Dock even after you quit the program, right-click (Control-click) the icon and choose “Keep in Dock”.
Note
Elements will take a while to start up the first time you launch it, because it’s building a database for the Content and Effects panels, which you’ll learn about later. So don’t be concerned if the program seems to hang—just give it a minute to finish. Once Elements creates the database, future launches go quicker.
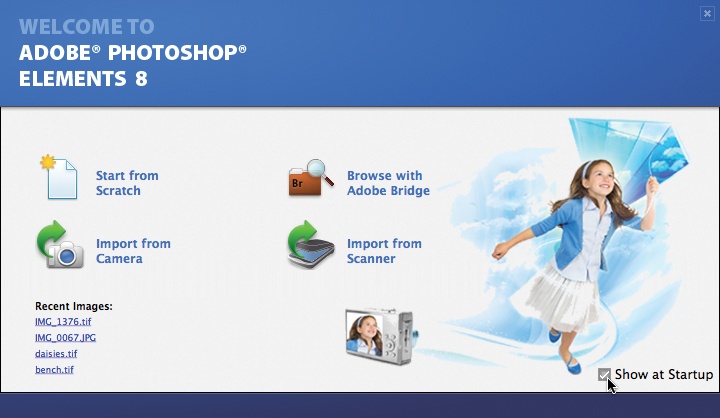
When you first launch Elements, you get a veritable smorgasbord of options, neatly laid out for you in the Welcome screen (Figure 1-1). It offers you no less than four options for where to start:
Start from Scratch. Clicking this button brings up the New File dialog box, where you set your options for a new, blank file. You can read more about your choices in this dialog box on Picking a File Size.
Browse with Adobe Bridge. Choose this option and Elements launches Adobe Bridge, a second program that comes with Elements. Bridge lets you—among other things—look through your photos and choose one to work on. There’s more about Bridge on Opening Photos in Elements.
Import from Camera. You got yet another extra program with Elements: the Adobe Photo Downloader. If you click this button, Elements sends you over to Bridge and launches the Photo Downloader. However, you may not want to do this, especially if you use another program like iPhoto to organize your photos, or if you use another download program like Canon’s ImageBrowser. There’s more about the Downloader on The Photo Downloader.
Import from Scanner. If your scanner driver lets you scan directly into Elements, click this button and, in the window that appears, select your scanner from the pull-down menu. Of course, you need to have your scanner driver and any necessary Photoshop plug-ins (Working with PDF Files) for your scanner installed or this won’t get you anywhere. (Many scanners come with software that lets you scan and save your image. You can then open the resulting file in Elements like any other image, as long as you saved it in a format that Elements understands—see Saving Your Work.) If you have a Mac with an Intel processor and your scanner plug-in is old, when you launch Elements, you see a message about plug-ins not loading. See Scanning Photos for more about that.
Figure 1-1. The Elements Welcome screen gives you four icons to pick from for different starting points. If you’ve opened Elements before, the Welcome screen remembers the images you’ve opened most recently. To work on one of them, click its name in the list in the lower-left part of the screen; Elements opens your file and closes the Welcome screen.
Tip
If Elements doesn’t recognize your scanner but you know you should be able to scan into Elements, try reinstalling your scanner driver and any scanner plug-ins.
If this isn’t the first time you’ve launched Elements, you’ll also see a list of recently opened files in the lower-left part of the window. Click a photo’s file name to open it.
You don’t have to choose any of these options if you don’t want to. Just click the Close button (the X) in the screen’s upper right and you’ll find yourself in Elements, free to do whatever you want. You can even turn off the Welcome screen altogether, as explained in the box on below.
Adobe Bridge—Decisions, Decisions
When you first start using Elements 8, you have a decision to make: How do you want to organize and search for your photos?
Of course, you can decide not to organize your photos, but that sure can make them hard to find. These days, everyone has lots of photos to deal with, whether you take them with your camera or cellphone or you’re busy scanning in old prints. Most people want to organize photos so they can easily find particular photos when they need ‘em.
With that in mind, Adobe gives you Adobe Bridge CS4 (Figure 1-2), the image browser that comes with full Photoshop and the other Creative Suite programs. In some ways, Bridge is a big step up from the file browser in early editions of Elements or the Organizer that comes with the Windows version, especially if you shoot Raw images (Chapter 8 has info about Raw formats). You can use Bridge to search for, move, and assign keywords and ratings to your photos, and to get detailed information about them.
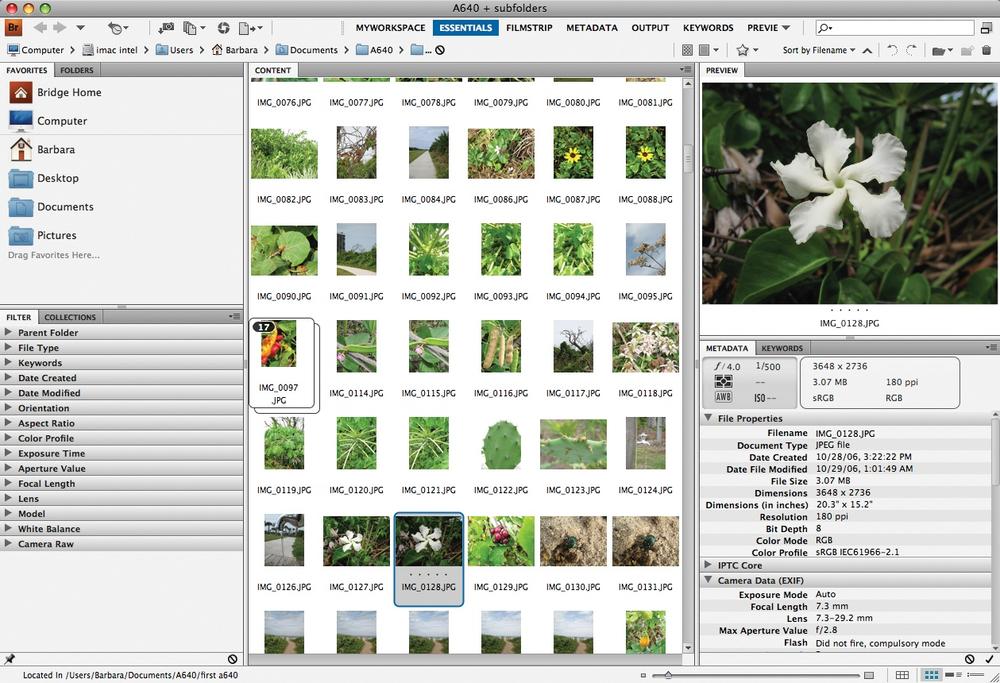
But if you’re like a lot of Mac folks, you already use some kind of photo organizer. iPhoto, which comes with all new Macs, is by far the most popular, but Apple’s Aperture and Adobe’s Lightroom also have big followings. If you use one of these programs, you probably don’t want to use Bridge most of the time. For one thing, bad things can happen when you try to get into your photo database (like the iPhoto library file, for example) from Bridge or any application other than the program that created it. The iPhoto library file, in particular, is prone to getting corrupted if you mess with it from outside iPhoto.
The good news is that you can send your photos directly to Elements from any of these organizer programs (Sending Images from Other Programs has the details). So for most photo-organizing tasks, it’s best to avoid Bridge entirely if you use one of these programs.
But if you want to create some of the projects that are built into Elements, like a web gallery (see Creating a Web Photo Gallery), you’ll get bounced over to Bridge in the process, so you’ll need to deal with Bridge a little bit, even if it’s not your main way of organizing photos. Opening Photos in Elements gives you a rundown of the Bridge basics you need to know.
If you’re not already locked into another photo organizer, Bridge lets you do a lot of useful things with your photos, like rate them, move and rearrange them, and assign keywords to them that lots of programs can understand. You can even group your photos into collections so you can work with them more easily. For many people, Bridge can be a valuable tool, especially if you prefer creating your own folder structure rather than letting a photo management program like iPhoto decide where to put your photos. You may find that Bridge is all you need for organizing your photos. There’s a lot more about it on The Many Uses for Bridge.
The Photo Downloader
Along with Bridge, you get the Adobe Photo Downloader. You can use the Downloader to get photos from your camera, but in OS X, you already have Image Capture to handle that part for you, and it does a fine job. For most people, the Downloader isn’t terribly useful, and Adobe makes it easy to forget it even exists, since you can only launch it from Bridge or Elements. (It’s not a standalone program like the Downloader that comes with the Windows version of Elements, although you can set it to launch automatically any time you connect a camera or card reader, even if Bridge and Elements aren’t running; the Missing CD page at www.missingmanuals.com has more info about the Downloader.)
Note
Although both the Mac and Windows versions of Elements include a Photo Downloader, there are a number of differences between the two. The Mac version doesn’t let you choose among different types of media to view and import, or let you correct red eye or create automatic stacks as you download your photos.
Few Mac people use the Downloader at all, but it can be useful in a couple of situations:
Convert to DNG. If you shoot Raw files (Using the Raw Converter) and you want to convert them to DNG files as you import them, the Downloader can do this automatically. (Converting to DNG has info about the DNG format.) You can convert to DNG in a couple of other ways in Elements, though, as Chapter 8 explains.
Add metadata. This is the Downloader’s most important feature. As you import your photos, you can tell the Downloader to add an author or copyright holder to the photo’s file info. Or you can create your own custom metadata template (a list of info about the picture that gets stored as part of the file, like who took it or a keyword to help you find the photo by searching) and apply it to every photo you import. (Keywords has lots more about metadata.) You can also use Bridge to add or edit metadata (even for batches of pictures) if you prefer—see Keywords.
To launch the Downloader so you can check it out, in Elements go to File → Adobe Photo Downloader; in Bridge, it’s File → Get Photos from Camera. (Since most people with Macs aren’t too interested in the Downloader, it’s not covered in depth in this book. If you want to know more about how to use it, you’ll find detailed Downloader instructions on this book’s Missing CD page at www.missingmanuals.com.)
Opening Photos in Elements talks more about getting photos into Elements, including some of the nifty ways of browsing through your pictures right in the Finder.
Editing Your Photos
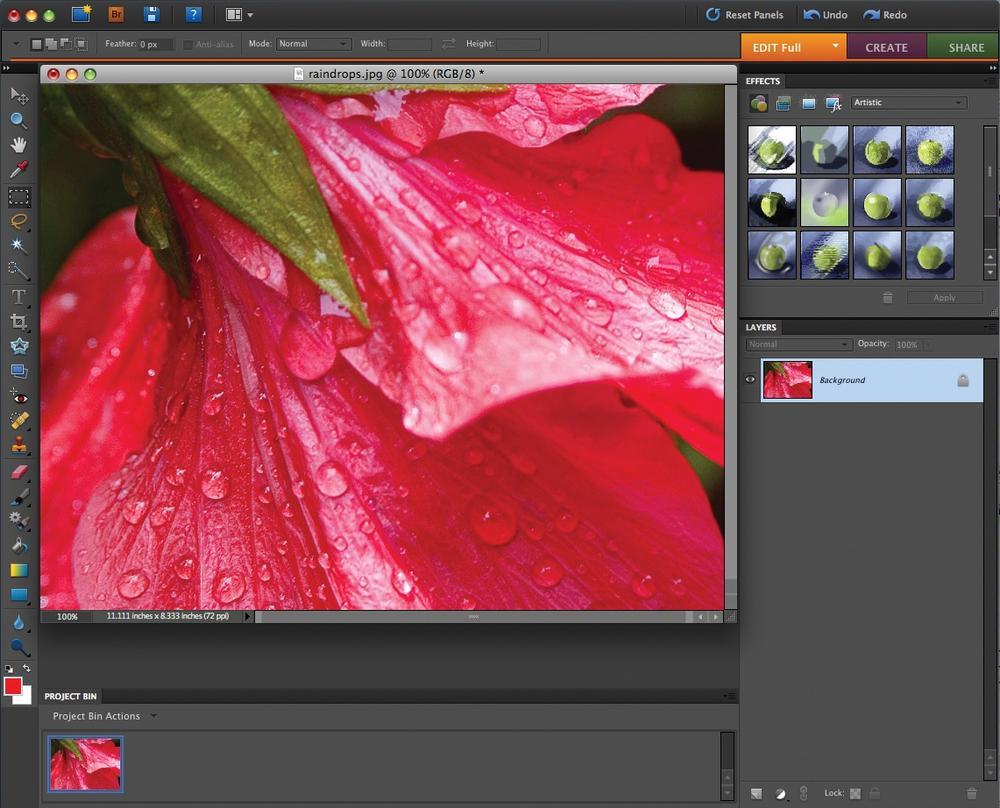
The Editor is the main component of Elements (Figure 1-3). This is the fun part of the program, where you get to edit, adjust, transform, and generally glamorize your photos, and where you can create original artwork from scratch with the drawing tools and shapes. The Editor has three different modes:
Full Edit. The Full Edit window gives you access to Elements’ most sophisticated tools. You have far more ways to work on your photo in Full Edit than in the other modes, and if you’re fussy, it’s where you’ll do most of your retouching work.
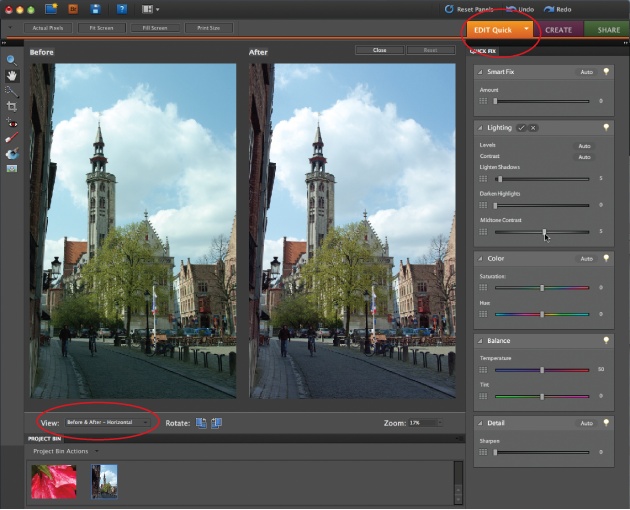
Quick Fix. For many beginners, Quick Fix (Figure 1-4) ends up being their main workspace. It’s where Adobe has gathered the basic tools you need to improve most photos. It’s also one of the two places in Elements where you can choose to have a before-and-after view while you work. (Guided Edit, described below, is the other.) Chapter 4 gives you all the details on using Quick Fix.
Figure 1-4. The Quick Fix window. Use the pull-down menus in the Edit tab at the top of the screen (circled, right) to hop from Full Edit to the Quick Fix window (and to Guided Edit, if you like) and back again. To compare your fixes with the original photo, fire up Before & After view, which you get by clicking the View menu (circled, left).Guided Edit. This window can be a big help if you’re new to Elements. It provides step-by-step walkthroughs for popular projects such as cropping photos and removing blemishes from them. Like Quick Fix, Guided Edit offers a before-and-after view of your photo as you work on it (see Guided Edit) and also has some advanced features, like the new Action Player (Using Actions).
The rest of this chapter covers some of the Editor’s basic concepts and key tools.
Panels, Bins, and Tabs
When you first open Elements, you may be dismayed at how cluttered it looks. There’s stuff everywhere, and maybe not a lot of room left for the photos you’re editing, especially if you have a small screen. Don’t fret: One of Elements 8’s best features is the way you can customize your workspace. There’s practically no limit to how you can rearrange things. You can leave everything the way it is if you like a cozy area with everything at hand. Or if you want a Zen-like, empty workspace with nothing visible but your photo, you can move, hide, and turn off almost everything. Figure 1-5 shows two different views of the same workspace.
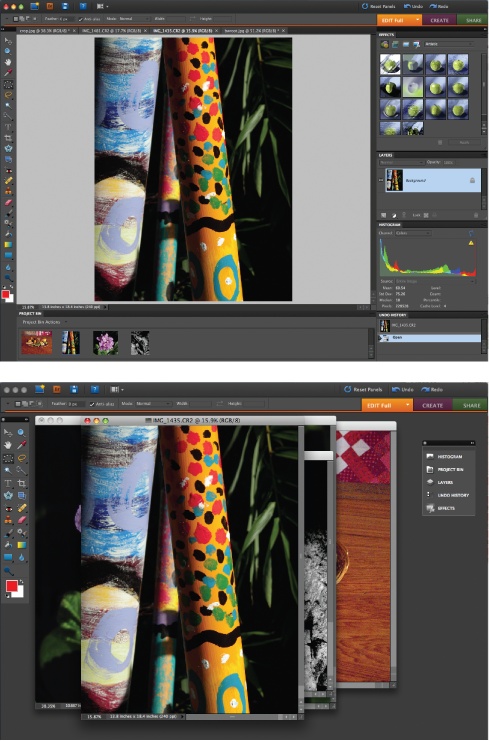
What’s more, in Elements 8 you can hide everything in your workspace except for your images and the menu bar: no tools, panels, or Options bar. This is handy when you want a good, undistracted look at what you’ve just done to your photo. To use that view, just press the Tab key; to bring everything back, press Tab again.
Note
If you used Elements 6, you’ll be pleased to know that you can resize the Elements 8 window by dragging its lower-right corner. If you were one of the few people who loved the giant Elements 6 window that clung to the edges of your screen so the only way to reach your other programs was through the empty area in the center of the workspace, you can have that in Elements 8, too: Just go to the Window menu and turn off Application Frame for a view just like how Elements 6 looked with “Show workspace background” turned off.
The Panel bin
When you’re in Full Edit, the right side of the Elements window displays the Panel bin. Panels let you do things like keep track of what you’ve done to your photo (Undo History panel) and apply special effects to your images (the Effects and Content panels). You’ll learn about the various panels in detail throughout this book.
Note
In previous versions of Elements and in older versions of Photoshop, panels were called “palettes.” If you run across a tutorial that talks about the “Content palette” for example, that’s exactly the same thing as the “Content panel.”
You might like the Panel bin, but many people don’t. If you don’t have a large monitor, you may find it wastes too much desktop acreage, and in Elements, you need all the working room you can get. Fortunately, you don’t have to keep your panels in the bin; you can close the bin and just keep your panels floating around on your desktop, or you can minimize them.
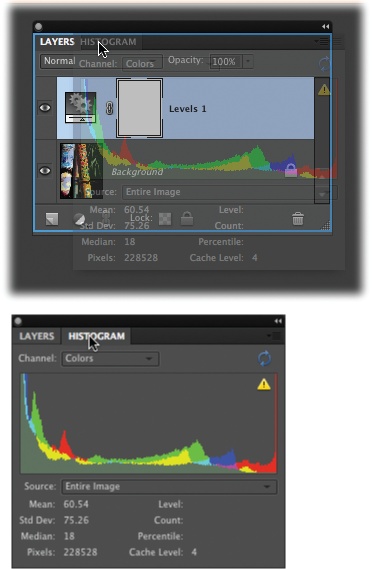
You can’t close the bin completely when it has panels in it, but you can minimize it to just a narrow strip of icons by clicking the bin’s topmost bar (the one with the double arrows on it). To expand it again, click the top bar once more. (If you pull all the panels out of the bin so that it’s empty, it disappears. To bring it back, click Reset Panels at the top of the Elements window, which resets all your panels, not just the bin.) You can pull a panel out of the bin by dragging the panel’s top tab; you now have a floating panel. Figure 1-6 shows how to make panels even smaller once they’re out of the bin by collapsing them in one of two ways. You can also combine panels, as shown in Figure 1-7; this works with both panels in the bin and freestanding panels.
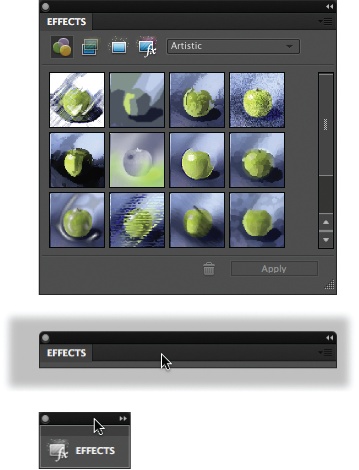
When you launch Elements for the first time, the Panel bin contains only two panels: Layers and Effects. To see how many more panels Elements has, check out the main Window menu (the one at the top of your screen). Everything listed in the menu’s middle section—from Adjustments to Undo History—is a panel you can put in the Panel bin.
When you select a new panel from the Window menu, it appears in the bin if you’re using the bin, floating on the desktop if you don’t have any panels in the bin, or right where it was when you closed it last time. In addition to combining panels as shown in Figure 1-7 you can also collapse the Panel bin or any group of panels to icons. Then, to use a panel, click its icon and it jumps out to the side of the group, full size. To shrink it back to an icon, click the double arrows at the panel’s upper right. You can combine panels in icon view by dragging their icons onto each other. Then those panels open as a combined group, like the panels in Figure 1-7. Clicking one of the icons in the group collapses the opened, grouped panels back to icons. (Combined panel icons don’t show a dark gray line between them in the group the way separate icons do.) To separate combined panels in icon view, drag a panel’s icon away from the other icon(s).
Adobe sometimes refers to floating panels as “tabs” in Elements’ menus. To close a floating tab, click the Close button (the dot) at its upper left, or click the barely visible square (made up of four horizontal lines) in the panel’s upper right, and choose Close from the menu that appears. If you want to put a panel back in the bin, drag it over the bin and let go when you see a blue line, or drag it onto the tab of a panel that’s already in the bin to create a combined panel within the bin.
The Project bin
The long, narrow section at the bottom of your screen is called the Project bin. It shows you what photos you have open, as explained in Figure 1-8. It also includes a pull-down menu labeled “Project Bin Actions”, which gives you shortcuts to the Create or Share tabs and their projects.
You can drag your photos’ thumbnails in the bin to rearrange them if you want to use the images in a project, and you can drag photos into your projects by dragging their thumbnails out of the bin into images or Create projects (Photo Collages).
The Project bin is useful, but if you have a small monitor, you may prefer to use the space it takes up for your editing work. In Elements 8, the Project bin behaves like any of the other panels: You can drag it from the bottom of the screen and combine it with other panels, collapse it to an icon, or drag it into the Panel bin. (If you combine it with other panels, the combined panel may be a little wider than it would be without the Project bin, although you can still collapse the combined group to icons.) If you’ve used the past couple of versions of Elements, you know this is a great improvement over the old, fixed Project bin.
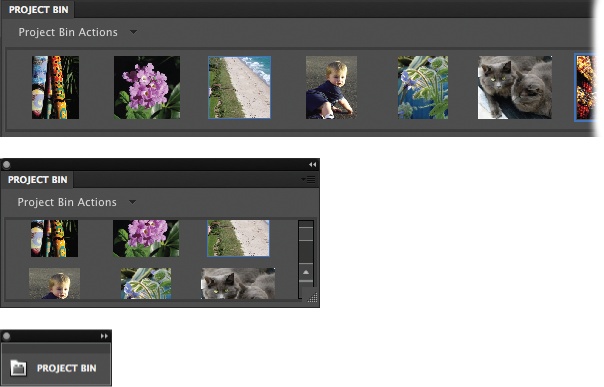
Image windows
In Elements 8, you can choose how you want to see the images you’re working on. Older versions of Elements used floating windows, where each image appears in a separate window that you can drag around. Elements 8 starts you out with floating windows, but you can also put your images into a new, tabbed view, which is something like the tabs in a web browser or the tabs on paper file folders. The advantage of tabbed view is that you have plenty of workspace around the image, which is handy when you’re editing near the edges of an image, or using a tool that requires you to be able to get outside the image’s boundaries. All the things you can do with image windows are explained on Image Views. Incidentally, clicking Reset Panels doesn’t do anything to your image windows or tabs; it just resets the panels.
Elements’ Tools
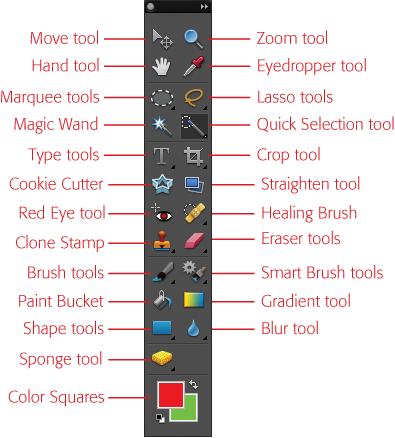
Elements gives you an amazing array of tools to use when working on your photos. You get almost two dozen primary tools to help select, paint on, and otherwise manipulate images, and many of the tools have as many as six subtools hiding beneath them (see Figure 1-9). Bob Vila’s workshop probably isn’t any better stocked than Elements’ virtual toolbox.
Note
To explore every cranny of Elements, you need to open a photo (File → Open). Lots of the menus are grayed out if you don’t have a file open.
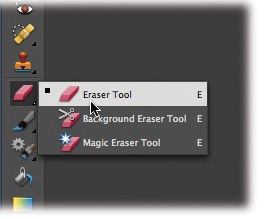
The long, skinny strip on the left side of the Full Edit window (shown back in Figure 1-3—Editing Your Photos) is the Tools panel. It stays perfectly organized so you can always find what you want without ever having to lift a finger to tidy it up. If you forget what a particular tool does, just hover your cursor over the tool’s icon, and a label (called a tooltip) appears telling you the tool’s name. To activate a tool, click its icon. Each tool comes with its own collection of options, as shown in Figure 1-10.

Elements starts you out with a single-column Tools panel, but if you if want, you can have a double-columned one. If you prefer a more compact Tools panel, see the box on Elements’ Tools.
Other windows in Elements, like Quick Fix and the Raw Converter (see Using the Raw Converter), also have toolboxes, but none is as complete as the one in Full Edit.
Note
If you’ve used Elements 4 or earlier, you’ll notice an important difference in getting to subtools in Elements 8: You can’t switch from one tool in a subgroup to another by using the Options bar anymore. Now you can choose a tool from a group only by using the tool’s pop-out menu in the Tools panel, or by pressing its shortcut key repeatedly to cycle through the tool’s subgroup. Stop tapping the key when you see the icon for the tool you want.
Don’t worry about learning the names of every tool right now, but if you want to see them all, they’re on display in Figure 1-11. (It’s easier to remember what a tool is once you’ve used it.) And don’t be overwhelmed by all of Elements’ tools. You probably have a bunch of Allen wrenches in your garage that you only use every year or so. Likewise, you’ll find that you tend to use certain Elements tools more than others.
Tip
You can save a ton of time by activating tools with their keyboard shortcuts, since you don’t have to interrupt what you’re doing to trek over to the Tools panel. To find out a tool’s shortcut key, hover your cursor over its icon. A label pops up indicating the shortcut key (it’s the letter to the right of the tool’s name). To activate the tool, just press the appropriate key. If the tool you want is part of a group, all the tools in that group have the same keyboard shortcut, so just keep pressing that key to cycle through the group until you get to the tool you want.
Getting Help
Wherever Adobe found a stray corner in Elements, they stuck some help into it. You can’t move anywhere in the program without being offered some kind of guidance. Here are a few of the ways you can summon assistance if you need it:
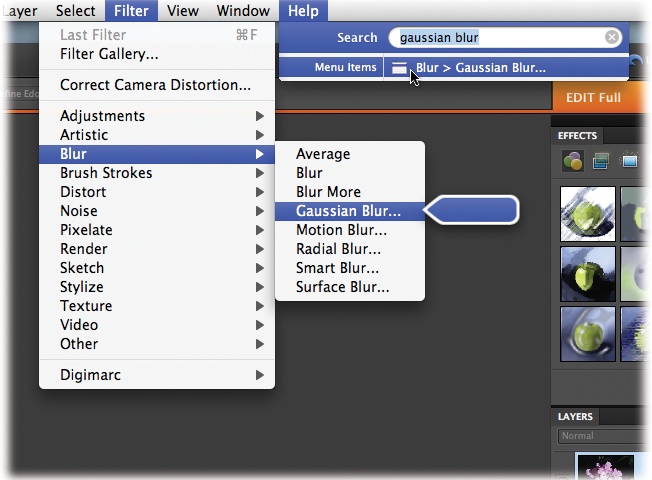
Help menu. Choose Help → Photoshop Elements Help. Elements launches your web browser, which displays Elements’ Help files, where you can search or browse a topic list and glossary. You’ll also see a blue Search box where you can type in a search term. This doesn’t search the Elements Help files, but rather lets you search the Elements menus, a cool feature, as explained in Figure 1-12.
Tooltips. When you see a tooltip (Elements’ Tools) pop up under your cursor as you move around Elements, check whether the tooltip’s text is blue; if it is, that means it’s linked to the appropriate section in Elements’ Help. You can click blue-text tooltips for more info about whatever your cursor is hovering over.
Dialog box links. Most Elements dialog boxes have a few words of bright blue text somewhere in them. That text is actually a link to Elements’ Help. If you get confused about what Remove Color Cast does, for instance, then, in the Remove Color Cast dialog box, click the blue “color cast” text for a reminder.
Guided Edit
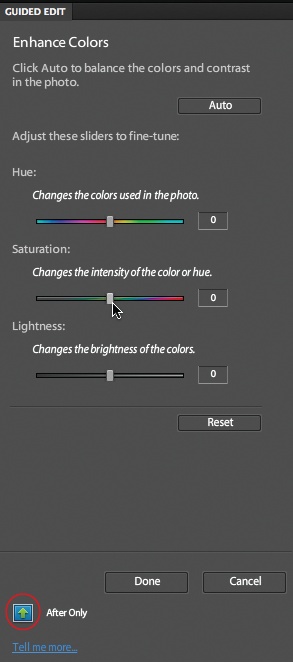
If you’re a beginner, Guided Edit, shown in Figure 1-13, can be a big help. It walks you through a variety of popular editing tasks, like cropping, sharpening, correcting colors, and removing blemishes. It also includes some features that are useful even if you’re an old Elements hand, like the Action Player (Using Actions) and the new Exposure Merge (Blending Exposures).
Guided edit is really easy to use:
Go to Guided Edit.
Click the Edit tab → EDIT Guided.
Open a photo.
Press ⌘-O, and then from the window that appears, choose your photo. If you already have a photo open, it appears in the Guided Edit window automatically. If you have several photos in the Project bin, you can switch between images by double-clicking the thumbnail of the one you want to work on.
Choose what you want to do.
Your options in the Guided Edit panel are grouped into major categories like Basic Photo Edits and Color Correction, with a variety of specific projects under each heading. Click a task in the list, and the panel displays the relevant buttons and/or sliders for that task.
Figure 1-13. Guided Edit gives you step-by-step help with basic photo editing. Just use the tools that appear in this panel once you choose a task. After you select a task, you can change the view to Before & After. Keep clicking the little blue button (circled) at the bottom of the window to toggle views between After Only, Before & After - Horizontal, and Before & After - Vertical.Make your adjustments.
Just move the sliders and click the buttons till you like what you see. If you want to start over, click Reset. If you change your mind about the whole project, click Cancel.
If several steps are involved, Elements shows you only the buttons and/or sliders you need for the current step, and then switches to a new set of choices for the next step as you go along.
If you need to adjust your view of your photo while you work on it, Guided Edit has a toolbox that includes the Hand (The Hand Tool) and Zoom (The Zoom Tool) tools to help you out.
Click Done to finish.
If there are more steps to your task, you may see another set of instructions. If you see the main list of topics again, you’re all through. Don’t forget to save your changes (Saving Your Work). To close your photo, press ⌘-W, or leave it open and switch to another tab to share it or use it in a project.
Note
Guided Edit is a great tool for starting out; it shows you quick and easy ways to change your image. But remember that what you see here isn’t necessarily the best you can possibly make your images look. Once you’re more comfortable in Elements, Quick Fix (Chapter 4) is a good next step.
Escape Routes
Elements has a couple of wonderful features to help you avoid making permanent mistakes: the Undo command and the Undo History panel. After you’ve gotten used to them, you’ll probably wish it were possible to use these tools in all aspects of your life, not just Elements.
Undo
No matter where you are in Elements, you can almost always change your mind about what you just did. Press ⌘-Z, and the last change you made goes away. Pressing ⌘-Z works even if you’ve just saved your photo, but only while it’s still open—if you close the file, your changes are permanent. Keep pressing ⌘-Z and you keep undoing your work, step by step.
If you want to redo what you just undid, press ⌘-Y. These keyboard shortcuts are great for toggling changes on and off while you decide whether you really want to keep them.
Undo History panel
In the Full Edit window, you have even more control over the actions you can undo, thanks to the Undo History panel (Figure 1-14), which you open by choosing Window → Undo History.
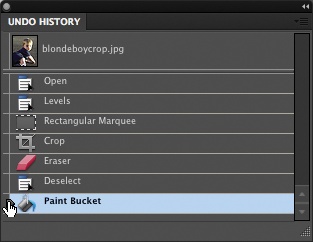
This panel holds a list of the changes you’ve made since you opened your image. Just drag the slider up and watch your changes disappear one by one as you go. Like the Undo command, Undo History even works if you’ve saved your file: As long as you haven’t closed the file, the panel tracks every action you take. You can also slide the other way to redo changes that you’ve undone.
Be careful, though: You can back up only as many steps as Elements is set to remember. The program is initially set up to record 50 steps, but you can change that number by going to Photoshop Elements → Preferences → Performance and, in the History & Cache section of the dialog box, adjusting the History States setting. You can set it as high as 1,000, but remembering even 100 steps may slow your system to a crawl if you don’t have a superpowered processor, plenty of memory, and loads of disk space. If Elements runs slowly on your machine, reducing the number of history states it remembers may speed things up a bit (try 20).
The one rule of Elements
As you’re beginning to see, Elements lets you work in lots of different ways. What’s more, people tend to approach projects in different ways. What works for your neighbor with her pictures may be quite different from how you’d work on the same shots.
But you’ll hear one suggestion from almost every Elements veteran, and it’s an important one: Never, ever work on your original. Always, always, always make a copy of your image and work on that instead. (If you use a program like iPhoto, it can make version sets for you. In other words, you can tell it to remember one edited version plus your original. See Sending Images from Other Programs for more about version sets.)
Tip
You can easily make a copy of a file in the Finder before you even launch Elements. Click the file once to select it, and then press ⌘-D, or Option-drag it away from the original and then let go of the mouse button. Either way, the new file automatically gets a name that lets you know it’s not the original, one ending in “copy” or “2,” for example.
Follow these steps to make a copy of your image in Elements:
Go to File → Duplicate.
You can also right-click (Control-click) the photo’s Project bin thumbnail and choose Duplicate there.
Name the duplicate, and click the Close button on the original.
Now the original is safely tucked out of harm’s way.
Save the duplicate using ⌘-S.
Choose Photoshop (.psd) as the file format when you save it. (You may want to choose another format after you’ve read Chapter 3 and understand more about your different format options.)
Now you don’t have to worry about making a mistake or changing your mind, because you can always start over.
Note
Elements doesn’t have an autosave feature, so you should get into the habit of saving frequently as you work. Saving Your Work has more about saving.
Getting Started in a Hurry
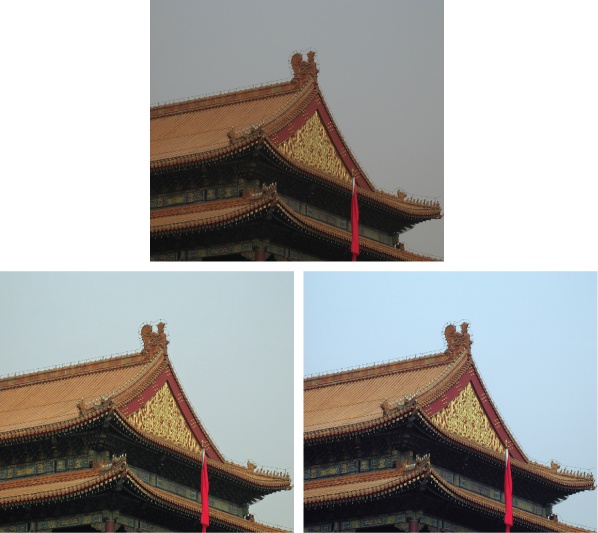
If you’re the impatient type and you’re starting to squirm because you want to be up and doing something to your photos, here’s the quickest way to get started in Elements: Adjust an image’s brightness and color balance, all in one step.
Open a photo.
Press ⌘-O and navigate to the image you want, and then click Open.
Press Option-⌘-M.
You’ve just applied Elements’ Auto Smart Fix tool (Figure 1-15).
Voilà! You should see quite a difference in your photo, unless the exposure, lighting, and contrast were almost perfect before. The Auto Smart Fix tool is one of the many easy-to-use features in Elements. (Of course, if you don’t like what just happened to your photo, no problem—simply press ⌘-Z to undo it.)
If you’re really raring to go, jump ahead to Chapter 4 to learn about the Quick Fix commands. But it’s worth taking the time to read the next two chapters so you understand which file formats to choose and how to make some basic adjustments to your images, like rotating and cropping them.
Don’t forget to give Guided Edit a try if you see what you want to do in the list of topics. Guided Edit can be a big help while you’re learning your way around.
Get Photoshop Elements 8 for Mac: The Missing Manual now with the O’Reilly learning platform.
O’Reilly members experience books, live events, courses curated by job role, and more from O’Reilly and nearly 200 top publishers.

