Chapter 4. Graphics
Hacks 27–33: Introduction
It’s easy to think of PHP as nothing more than a scripting language for HTML. But PHP is far more than that, with support for databases, graphing, image manipulation, and a lot more. This chapter details hacks for building beautiful graphics with bitmaps, vector graphics, and even Dynamic HTML (DHTML). You’ll even see how you can take photos from your iPhoto library and export them into HTML—all with that “HTML scripting language,” PHP.
Create Thumbnail Images
Use the GD graphics API in PHP to create thumbnails of your images.
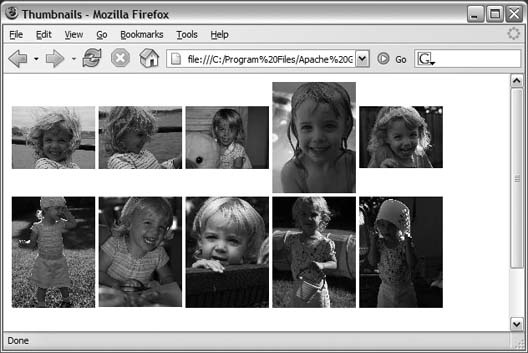
This simple hack takes a set of JPEG images in a directory named pics and creates thumbnails of them in a directory named thumbs. It also creates a file in the same directory as the script called index.html, which contains all of the thumbnails, as well as links to the original images.
The Code
Save the code in Example 4-1 as mkthumbs.php.
	<?php
	$dir = opendir( "pics" );
	$pics = array();
	while( $fname = readdir( $dir ) )
	{
		if ( preg_match( "/[.]jpg$/", $fname ) )
			$pics []= $fname;
	}
	closedir( $dir );
	foreach( $pics as $fname )
	{
	  $im = imagecreatefromjpeg( "pics/$fname" );
	  $ox = imagesx( $im );
	  $oy = imagesy( $im );

	  $nx = 100;
	  $ny = floor( $oy * ( 100 / $ox ) );

	  $nm = imagecreatetruecolor( $nx, $ny );

	  imagecopyresampled( $nm, $im, 0, 0, 0, 0, $nx, $ny, $ox, $oy );

	  print "Creating thumb for $fname\n";

	  imagejpeg( $nm, "thumbs/$fname" );
	 }

	 print "Creating index.html\n";

	 ob_start();
	 ?>
	 <html>
	 <head><title>Thumbnails</title></head>
	 <body>
	 <table cellspacing="0" cellpadding="2" width="500">
	 <tr>
	 <?php
	 $index = 0;
	 foreach( $pics as $fname ) {
	 ?>
	 <td valign="middle" align="center">
	 <a href="pics/<?php echo( $fname ); ?>"><img src="thumbs/<?php echo( $fname );
		?>" border="0" /></a>
	 </td>
	 <?php
	 $index += 1;
	 if ( $index % 5 == 0 ) { echo( "</tr><tr>" ); }
	 }
	 ?>
	 </tr>
	 </table>
	 </body>
	 </html>
	 <?php
	 $html = ob_get_clean();
	 $fh = fopen( "index.html", "w" );
	 fwrite( $fh, $html );
	 fclose( $fh );
	?>
The script starts by iterating through the pictures in the
pics directory. It then creates a thumbnail for
each image in the thumbs directory using the
GD imagint functions.
To create a thumbnail, the file first has to be read in and
handled by the imagecreatefromjpeg() function. After that,
the new (thumbnail) size is calculated, and a new image is created
(using imagecreatetruecolor()). The original file is
then copied in and resized using the
imagecopyresampled() function. Finally, the
thumbnail is saved with imagejpeg().
The rest of the script creates an HTML index for the thumbnails
by using the output buffering functions
ob_start() and
ob_get_clean(); both are used to store the
HTML into a string. That string is then written into a file using
fopen(), fwrite(), and fclose().
Running the Hack
Place the mkthumbs.php script into a directory, and then create two subdirectories: pics and thumbs. In the pics directory, place a bunch of JPEG images. Run the script with the PHP command-line interpreter:
% php mkthumbs.php
This creates all of the thumbnail images and the index.html file in Figure 4-1.
This type of script can be really handy for creating family photo albums. I wish more people would use some sort of thumbnail script. Far too often, I get a message from my friends or relatives pointing me to an Apache directory listing of images from their recent trip—all full size and with none of the blurry or bad shots removed! Lucky for all of us, PHP can turn those reels into a manageable set of thumbnails, and still preserve the originals.
See Also
“Split One Image into Multiple Images” [Hack #30]
“Properly Size Image Tags” [Hack #9]
Create Beautiful Graphics with SVG
Use the SVG XML standard to create scalable graphics that render beautifully.
Adobe’s Scalable Vector Graphics (SVG) XML standard provides a whole new level of graphics functionality to PHP web applications. In this hack, I’ll use a web page and a simple PHP script to create a scalable vector graphic.
Tip
It’s important to note that before you can view an SVG image you must have an SVG viewer plug-in installed in your browser. Adobe hosts plug-in viewers on its web site, http://www.adobe.com/svg/main.html. SVG is an open standard, which Adobe strongly supports. The SVG.org site (http://svg.org/) is an open community supporting the standard across multiple browsers and now even cell phones.
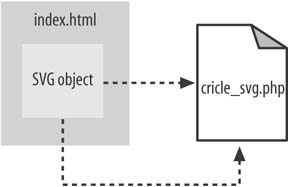
Figure 4-2 demonstrates how the SVG plug-in interacts with the circle_svg. php script, which generates the SVG. The SVG object embedded on the page requests the XML from the script, and the script then returns the XML with the SVG plug-in plots.
The Code
Save the code in Example 4-2 as index.html.
The work is done in circle_svg.php, shown in Example 4-3.
	<?php
	header( "content-type: text/xml" );

	$points_count = 20;

	$points = array();
	for( $p=0; $p<$points_count; $p++ )
	{
		$d = ( 360 / $points_count ) * $p;
		$x = 50 + ( cos( deg2rad( $d ) ) * 50 );
		$y = 50 + ( sin( deg2rad( $d ) ) * 50 );
		$points []= array( 'x' => $x, 'y' => $y );
	}

	echo ("<?xml version=\"1.0\" standalone=\"no\"?>\n" );
	?>
	<!DOCTYPE svg PUBLIC "-//W3C//DTD SVG 1.0//EN"
		"http://www.w3.org/TR/SVG/DTD/svg10.dtd">
	<svg style="shape-rendering:geometricPrecision;" viewBox="0 0 100 100" xml
		space="preserve" xmlns:xlink="http://www.w3.org/1999/xlink" xmlns="http://
		www.w3.org/2000/svg" preserveAspectRatio="xMidYMid meet">
	<?php
	foreach( $points as $start ) {
			$sx = $start['x'];
			$sy = $start['y'];
	foreach( $points as $end ) {
			$ex = $end['x'];
			$ey = $end['y'];
	?>
		<path fill-rule="nonzero" style="fill:#000000;stroke:#FF0000;stroke-width:0.2"
				d="M<?php echo( $sx." ".$sy ); ?> L<?php echo( $ex." ".$ey ); ?> Z"/>
	<?php
	} }
	?>
	</svg>
Running the Hack
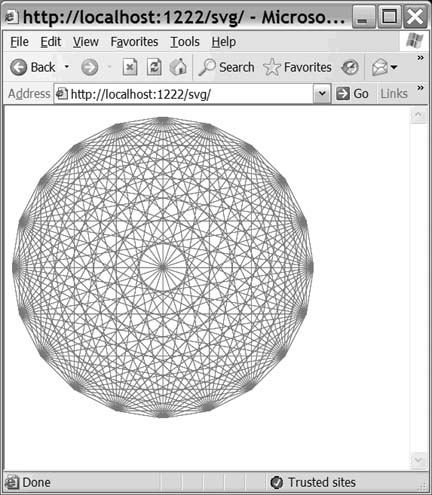
Install both files on your server and browse to them in your SVG-enabled browser. In this case, I used Internet Explorer; the result is shown in Figure 4-3.
The HTML page embedded an SVG object, which triggered a call to the circle_svg.php script to get the XML code for the SVG file. That PHP page creates an SVG image, which is simply a bunch of vectors connecting the various points on a circle, much like a Spirograph. Users can even click and zoom around the image if they want, and the image will scale appropriately since it’s based on vector graphics.
SVG supports a huge range of graphics and effects features. It also supports animation and has JavaScript scriptability (I have used none of that here for the sake of simplicity). In fact, when you think about SVG in terms of functionality, you should probably consider it to be on the same level as Flash 8, with the notable exception that SVG uses XML files rather than compiled SWF files. The big downside with SVG, of course, is the install base, which at the time of this writing was far smaller than that of Flash.
If you are interested in using XML to build Flash movies, check out Laszlo (http://www.laszlosystems.com/), an open source XML compiler that builds SWF movies.
See Also
“Simplify Your Graphics with Objects” [Hack #29]
Simplify Your Graphics with Objects
Use the object-oriented features of PHP to simplify your graphics using layering, object-oriented drawing, and viewport scaling.
PHP’s support for graphics is great. But when you try to build a complex visualization, PHP becomes difficult to use for several reasons. First, the drawing order is really important. Things that you draw first will be covered by the stuff that you draw later (and there’s no good way to get around that limitation). This means that you have to sequence your code based on the drawing order, even when it’s difficult to do so programmatically.
Another problem is scaling. To draw into an image, you have to know how big the image is and how to scale your drawing. That means passing around a lot of information about the drawing context. Add that to the layering issues, and PHP image code becomes a real mess.
Lucky for all of us hackers who aren’t
graphics pros, all of these problems have been solved via graphics
libraries like PHP’s GD library. In this hack, I build a simple object
API for graphics that manages drawing order through z buffering, and handles scaling by creating a viewport.
The Code
Save the code in Example 4-4 as layers.php.
<?php
class GraphicSpace
{
    var $image;
	var $colors;

	var $xoffset;
	var $yoffset;
	var $xscale;
	var $yscale;

	functionGraphicSpace()
	{
		$this->colors = array();
	}

	function get_image() { return $this->image; }
	function set_image( $im )
	{
		$this->image = $im;
	}

	function get_color( $id ) { return $this->colors[ $id ]; }
	function set_color( $id, $color ) { $this->colors[ $id ] = $color; }

	function set_viewport( $left, $top, $right, $bottom )
	{
		$this->xoffset = $left;
		$this->yoffset = $top;

		$this->xscale = imagesx( $this->image ) / ( $right - $left );
		$this->yscale = imagesy( $this->image ) / ( $bottom - $top );
	}

	function transform_x( $x ) { return ( $x - $this->xoffset ) * $this->xscale; }
	function transform_y( $y ) { return ( $y - $this->yoffset ) * $this->yscale; }
	function scale_x( $x ) { return $x * $this->xscale; }
	function scale_y( $y ) { return $y * $this->yscale; }
  }

  class RenderItem
  {
	var $left;
	var $right;
	var $top;
	var $bottom;
	var $color;
	var $z;

	function RenderItem( $left, $top, $right, $bottom, $color, $z )
	{
		$this->left = $left;
		$this->right = $right;
		$this->top = $top;
		$this->bottom = $bottom;
		$this->color = $color;
		$this->z = $z;
	}

		function get_left() { return $this->left; }
		function get_right() { return $this->right; }
		function get_top() { return $this->top; }
		function get_bottom() { return $this->bottom; }
		function get_z() { return $this->z; }

		function render( $gs ) { }
		function transform( $x, $y ) { }
	}

	class Line extends RenderItem
	{
	var $sx;
	var $sy;
	var $ex;
	var $ey;
	var $thickness;

	function Line( $sx, $sy, $ex, $ey, $color, $z, $thickness )
	{
		$this->RenderItem( min( $sx, $ex ), min( $sy, $ey ),
				max( $sx, $ex ), max( $sy, $ey ),
				$color, $z );

		$this->sx = $sx;
		$this->sy = $sy;
		$this->ex = $ex;
		$this->ey = $ey;
		$this->thickness = $thickness;
		}
		function render( $gs )
		{

			if ( $this->thickness > 1 )
			  imagesetthickness( $gs->get_image(), $this->thickness );
			$this->drawline( $gs->get_image(),
				$gs->transform_x( $this->sx ),
				$gs->transform_y( $this->sy ),
				$gs->transform_x( $this->ex ),
				$gs->transform_y( $this->ey ),
				$gs->get_color( $this->color ) );

			if ( $this->thickness > 1 )
			   imagesetthickness( $gs->get_image(), 1 );
		}
		function drawline( $im, $sx, $sy, $ex, $ey, $color )
		{
			imageline( $im, $sx, $sy, $ex, $ey, $color );
		}
	  }

	  class DashedLine extends Line
	  {
	  function drawline( $im, $sx, $sy, $ex, $ey, $color )
	  {
		imagedashedline( $im, $sx, $sy, $ex, $ey, $color );
	  }
	}

	class Ball extends RenderItem
	{
		var $text;

		function Ball( $x, $y, $size, $color, $text, $z )
		{
			$width = $size / 2;
			if ( $text )
			  $width += 20;
			 $this->RenderItem( $x, $y,
				$x + $width, $y + ( $size / 2 ),
				$color, $z );

			$this->text = $text;
			$this->size = $size;
	    }

		function render( $gs )
		{
			imagefilledellipse( $gs->get_image(),
				$gs->transform_x( $this->left ),
				$gs->transform_y( $this->top ),
				$gs->scale_x( $this->size ),
				$gs->scale_x( $this->size ),
				$gs->get_color( $this->color ) );
		    if ( strlen( $this->text ) )
			  imagestring($gs->get_image(), 0,
				$gs->transform_x( $this->left ) + 7,
				$gs->transform_y( $this->top )-5,	$this->text,
				$gs->get_color( $this->color ) );
			}
		  }

		  function zsort( $a, $b )
		  {
			if ( $a->get_z() == $b->get_z() )
				return 0;
			return ( $a->get_z() > $b->get_z() ) ? 1 : -1;
		  }

		  class RenderQueue
		  {
			var $items;

			function RenderQueue() { $this->items = array(); }
			function add( $item ) { $this->items [] = $item; }
		function render( $gs )
		{
			usort( &$this->items, "zsort" );
			foreach( $this->items as $item )	{$item->render( $gs );}
		}
		function get_size()
		{
			$minx = 1000; $maxx = -1000;
			$miny = 1000; $maxy = -1000;
			foreach( $this->items as $item )
			{
				if ( $item->get_left() < $minx )
				$minx = $item->get_left();
				if ( $item->get_right() > $maxx )
				$maxx = $item->get_right();
				if ( $item->get_top() < $miny )
				$miny = $item->get_top();
				if ( $item->get_bottom() > $maxy )
				$maxy = $item->get_bottom();
			}
			return array( left => $minx, top => $miny, right => $maxx, bottom => $maxy );
			}
		}
		$width = 400;
		$height = 400;

		function calcpoint( $d, $r )
		{
			$x = cos( deg2rad( $d ) ) * $r;
			$y = sin( deg2rad( $d ) ) * $r;
			return array( $x, $y );
		}

		$render_queue = new RenderQueue();

		$ox = null;
		$oy = null;

		for( $d = 0; $d < 380; $d += 10 )
		{
			list( $x, $y ) = calcpoint( $d, 10 );

			$render_queue->add( new Ball( $x, $y, 1, "line", "", 10 ) );
			$render_queue->add( new Line( 0, 0, $x, $y, "red", 1, 1 ) );

			if ( $ox != null && $oy != null )
			{
			$render_queue->add( new Line( $ox, $oy, $x, $y, "red", 1, 1 ) );
			}
			$ox = $x;
			$oy = $y;
		}

		$gsize = $render_queue->get_size();

		$fudgex = ( $gsize['right'] - $gsize['left'] ) * 0.1;
		$gsize['left'] -= $fudgex;
		$gsize['right'] += $fudgex;
		$fudgey = ( $gsize['bottom'] - $gsize['top'] ) * 0.1;
		$gsize['top'] -= $fudgey;
		$gsize['bottom'] += $fudgey;

		print_r( $gsize );

		$im = imagecreatetruecolor( $width, $height );
		imageantialias( $im, true );
		$bg = imagecolorallocate($im, 255, 255, 255);
		imagefilledrectangle( $im, 0, 0, $width, $height, $bg );

		$gs = new graphicspace();
		$gs->set_image( $im );
		$gs->set_color( 'back', $bg );
		$gs->set_color( 'line', imagecolorallocate($im, 96, 96, 96) );
		$gs->set_color( 'red', imagecolorallocate($im, 255, 0, 0) );
		$gs->set_viewport( $gsize['left'], $gsize['top'], $gsize['right'],
		$gsize['bottom'] );

		$render_queue->render( $gs );

		imagepng( $im, "test.png" );
		imagedestroy( $im );
		?>
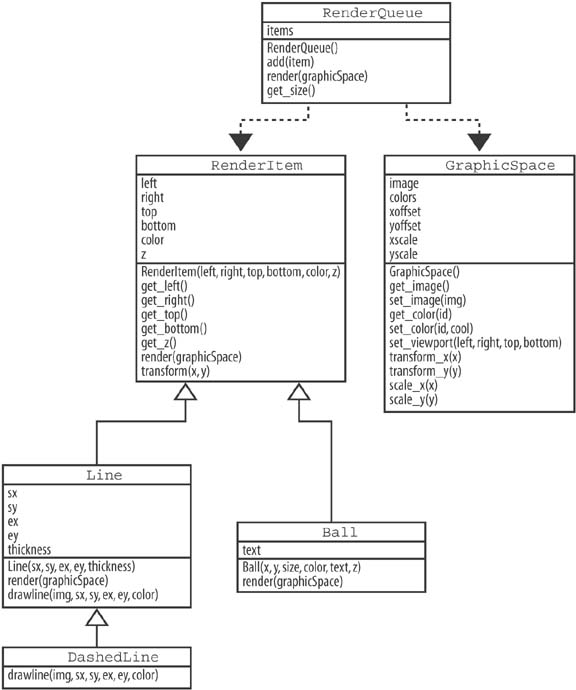
Figure 4-4 shows the
layout of the classes in this script.
RenderQueue refers to two objects: an array of
RenderItems, and a
GraphicSpace that holds the image and the
transformation information. The derived classes of RenderItem create the different types of
shapes: lines, balls, and dashed lines. To add more items, just add
more child classes of RenderItem.
Each RenderItem has a
z level associated with it. Items that have a lower z level (or z value) will be rendered behind items that
have a larger z value. This allows
you to create objects in any order you like, assign them z values, and know that they will be sorted
and rendered in the proper order.
For the coordinate system, I used a mechanism called a viewport. The viewport is a virtual graphics space. The coordinates can be anything you like, ranging from 0 to 1 or from 0 to 1 billion. The system automatically scales the graphics to the size of the image.
Starting with this simple object API, you can create much more complex graphics far more easily than if you used the PHP graphics API directly. The object code is also far easier to understand and maintain.
Running the Hack
Use the PHP command-line interpreter to run the layers.php script:
	% php layers.php
	Array
	(
	[left] => -12.05
	[top] => -12.05
	[right] => 12.55
	[bottom] => 12.55
)
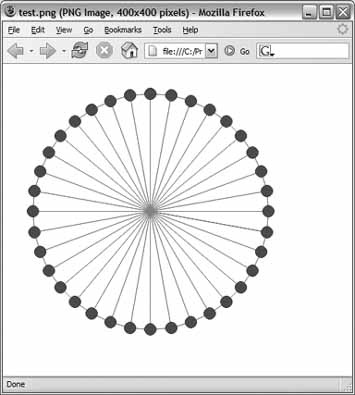
Then use your browser to look at the resulting test.png file, shown in Figure 4-5.
There are three sets of objects in this graph: the lines that go
from the center to the balls, the gray balls, and the lines that go
between the balls along the perimeter. The lines radiating out from
the center are at a z level of 1.
The balls are at a z level of 10.
And the lines that run along the perimeter are at a z level of 20.
To change the z order of the
perimeter lines, you can just change the z value from, for example, 20 to 1:
	if ( $ox != null && $oy != null )
	{
		$render_queue->add( new Line( $ox, $oy, $x, $y, "red", 1, 1 ) );
	}
Now if you rerun the script and look at the results in the browser, you’ll see that the balls are on top of the lines (see Figure 4-6), whereas before they were underneath them.
Now the perimeter lines have dropped behind the gray balls
because of the lower z
order.
See Also
“Create Beautiful Graphics with SVG” [Hack #28]
“Create Modular Interfaces” [Hack #51]
Split One Image into Multiple Images
Use PHP’s graphics engine to break a single large image into multiple small images.
Sometimes it’s handy to have a group of smaller images that make up a single image rather than the one small image. An example is “Create the Google Maps Scrolling Effect” [Hack #26] , which scrolls many smaller images around the screen seamlessly, creating the effect of moving around one large image. To accomplish that trick, though, you might have to break up a large image first; this hack does just that.
The Code
Save the code in Example 4-5 as imgsplit.php.
	<?php
	$width = 100;
	$height = 100;

	$source = @imagecreatefromjpeg( "source.jpg" );
	$source_width = imagesx( $source );
	$source_height = imagesy( $source );

	for( $col = 0; $col < $source_width / $width; $col++)
	{
		for( $row = 0; $row < $source_height / $height; $row++)
		{
			$fn = sprintf( "img%02d_%02d.jpg", $col, $row );

			echo( "$fn\n" );

			$im = @imagecreatetruecolor( $width, $height );
			imagecopyresized( $im, $source, 0, 0,
				$col * $width, $row * $height, $width, $height,
				$width, $height );
			imagejpeg( $im, $fn );
			imagedestroy( $im );
			}
		}
		?>
This is the inverse of the code in Example 4-6 in the upcoming “Hacking the Hack” section of this hack. It creates—from a single big image—lots of smaller images and puts them in a grid. It’s a useful match for the Google Maps scrolling effect hack in “Create the Google Maps Scrolling Effect” [Hack #26] .
The constants at the top of the file define how big the output
images should be. The script reads in the source image and figures out
how big it is; then it uses a set of nested for loops to iterate around all of the grid
items, creating an image, copying the section from the original image,
and then saving the image.
Running the Hack
This code is run on the command line using PHP’s command-line interpreter:
	% php imgsplit.php
	img00_00.jpg
	img01_00.jpg
	…
The script looks for a file called
source.jpg and breaks it up into a set of files
named img<col>_<row>.jpg, where the
col and row items are padded with zeroes. So the
image in column zero, row zero would be named
img00_00.jpg. Each created image is 100x100
pixels. Those values are set with the $width and $height values at the top of the
script.
Hacking the Hack
Instead of splitting images, how about merging images? The next script creates a single large image from a collage of smaller images. You can use this code as the foundation of a scrolling panorama, as shown in “Create the Google Maps Scrolling Effect” [Hack #26] , or simply as a collage of multiple images suitable for a background or desktop image.
Save the code shown in Example 4-6 as imgmerge.php.
	<?php
	$targetsize_x = 4000;
	$targetsize_y = 4000;
	$outfile = "merged.jpg";
	$quality = 100;

	$im = @imagecreatetruecolor( $targetsize_x, $targetsize_y );

	$sources = array();
	$dh = opendir( "." );
	while (($file = readdir($dh)) !== false)
	{
		if ( preg_match( "/[.]jpg$/", $file ) &&
			$file!= $outfile )
		{
			$sources []= imagecreatefromjpeg( $file );
		}
	}

	$x = 0;
	$y = 0;
	$index = 0;
	while( true )
	{
		$width =imagesx( $sources[ $index ] );
		$height = imagesy( $sources[ $index ] );

		imagecopy( $im, $sources[ $index ],
			$x, $y, 0, 0, $width, $height );

		$x += $width;
		if ( $x >= $targetsize_x )
		{
			$x = 0;
			$y += $height;
			if ( $y >= $targetsize_y )
				break;
		}

		$index += 1;
		if ( $index >= count( $sources ) )
			$index = 0;
	}

	imagejpeg( $im, $outfile, $quality );

	imagedestroy( $im );
	?>
This is a fairly simple script that takes image files from a
directory and stores them into an array of sources. Then the script
creates a huge image, into which it copies the original source images.
The while loop wraps around the
large image, creating rows of smaller images, until it gets to the
bottom of the output image. At the end of the script, the large
composite image is saved as a JPEG using imagejpeg().
This code is run from the command line in a directory full of JPEG images.
Tip
The input files must end with the .jpg extension, and all of the input images must be the same size. Otherwise, the composite will have lots of “empty” spaces in it (if it doesn’t crash altogether).
An example image is shown in Figure 4-7.
The command is run in this way:
% php imgmerge.php
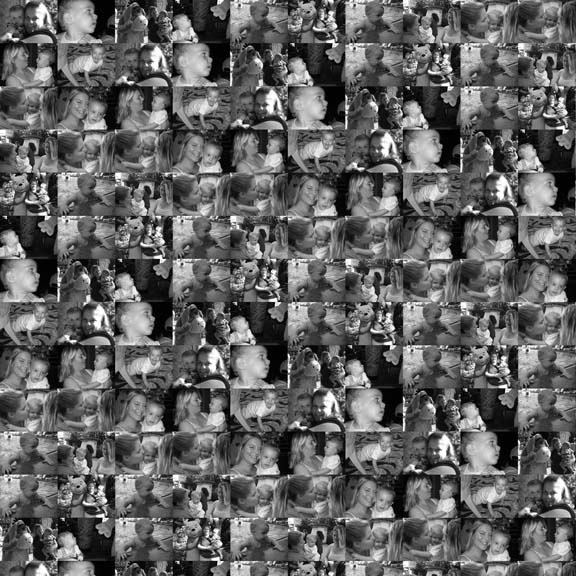
The output file is created in the same directory as the source images, and it is named merged.jpg. With some sample images of my wife (Lori) and my daughter (Megan), I created the composite shown in Figure 4-8.
Even better—and nothing more than a happy accident—Firefox does something pretty cool here. It scales the image down to fit it within the browser. If you hold the mouse over the image, the cursor will turn into a magnifying glass, and you can zoom in on the composite to see it at 100% magnification.
You can adjust the quality of the merged image by tweaking the $quality value. This value goes from 0 to
100, with 100 being the best quality. $targetsize_x and $targetsize_y define the desired width and
height of the merged image, and the $outfile variable specifies the filename of
the merged image.
See Also
“Create the Google Maps Scrolling Effect” [Hack #26]
Create Graphs with PHP
Use PHP’s image toolkit to create dynamic graphs from your data.
PHP has excellent dynamic imaging capabilities. You can use these to overlay images [Hack #32] , or to create whole new images on the fly. This hack uses the image toolkit to do some simple scientific graphing of sine waves (proving that PHP is great for math as well as for imaging).
The Code
Save the code in Example 4-7 as graph.php.
	<?
	$width = 400;
	$height = 300;

	$data = array();
	for( $i = 0; $i < 500; $i++ )
	{
		$data []= sin( deg2rad( ( $i / 500 ) * 360 ) );
	}


	$xstart = $width/10;
	$ystart = $height - ($height/10);

	$image = imagecreate($width, $height);
	$back = imagecolorallocate($image, 255, 255, 255);
	$border = imagecolorallocate($image, 64, 64, 64);

	imageline( $image, $xstart, 0, $xstart, $ystart, $border );imageline( $image, $xstart, $ystart, $width, $ystart, $border );

	imagestring( $image, 2, $xstart-20, $ystart-10, "1", $border );
	imagestring( $image, 2, $xstart-20, 0, "-1", $border );
	imagestring( $image, 2, $xstart, $ystart+5, "0", $border );
	imagestring( $image, 2, $width-20, $ystart+5, "360", $border );

	$datatop = 1;
	$databottom = -1;

	$oldx = 0;
	$oldy = 0;
	$datacount = count( $data );
	$xscale = ( $width - $xstart ) / $datacount;
	$yscale = $ystart / ( $datatop - $databottom );
	$midline = $ystart / 2;
	for( $i = 0; $i < $datacount; $i++ )
	{
		$x = $xstart + ( $i * $xscale );
		$y = $midline - ( $data[$i] * $yscale );
		if ( $i > 0 )
		{
			imageline( $image, $oldx, $oldy, $x, $y, $border );
		}
		$oldx = $x;
		$oldy = $y;
	}

	header("Content-type: image/png");
	imagepng($image);
	imagedestroy($image);
	?>
The script starts with some constants that define the size of the output
image. Then the new image is created, and colors are allocated. Next,
the border of the graph is drawn, along with the axis values using
imagestring(). With the axis values
in place, the script draws the mathematical data using a for loop to iterate over each data point and
uses the imageline() function to
draw a line between the current position and the previous
position.
Because this script is intended for use on the Web, the content
type of the output needs to be set properly to image/png, which tells browsers to expect a
PNG graphic. Many browsers will automatically detect image content,
but it’s best to set the content type properly. With that done, the
image is output using the imagepng() function.
It’s best to leave the content-type header for the end of the
script; that way, if the script fails, you will see the error results
in the browser. If you set the header too early, the browser will get
the content type and attempt to interpret the PHP error message as a
PNG image.
Running the Hack
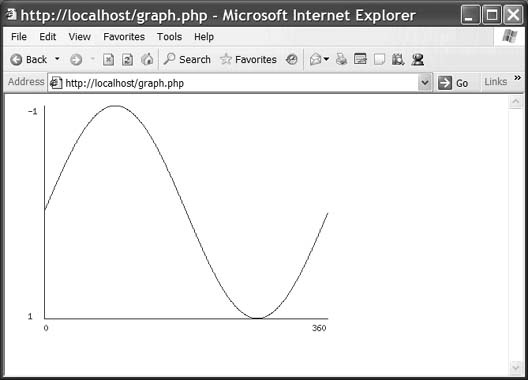
Put the files up on the PHP server and navigate to the graph.php page. You should see something like Figure 4-9.
If you don’t see the graph in Figure 4-9, it’s likely that there is a server configuration problem. PHP is very flexible about how it’s installed, and the image library doesn’t need to be installed for PHP (in general) to run properly; but without the graphing libraries (obviously), you won’t get a graphical PNG (you should see an error message).
See Also
“Create Beautiful Graphics with SVG” [Hack #28]
“Build Dynamic HTML Graphs” [Hack #14]
“Build Lightweight HTML Graphs” [Hack #8]
Create Image Overlays
Using PHP’s graphics capabilities to build a single image from several source images.
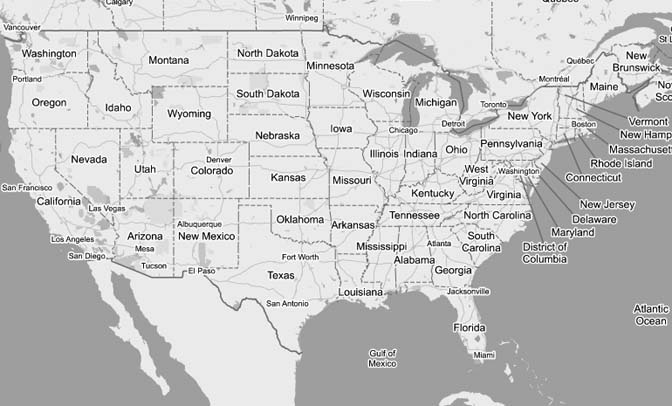
One common graphics scenario is to put some overlay images at specific data-driven locations, stacking those overlays on top of another base graphic. This hack starts with the map in Figure 4-10 as the base image.
Then it places the star graphic in Figure 4-11 onto the map, over the city of San Francisco, as it might appear if you were looking up a location by city or Zip code.
The Code
Save the (rather simple) code in Example 4-8 as graphic.php.
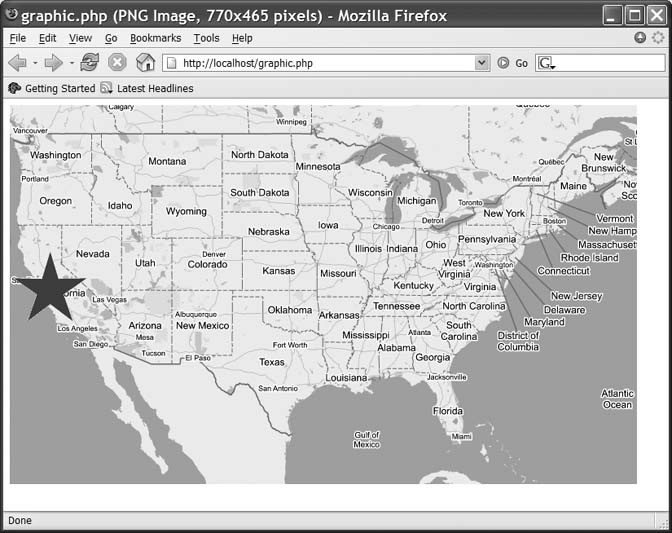
The code starts by reading in the map and star graphics. Then it creates a new image, superimposing the
star onto the map using the imagecopy() function. The new version of the
map—which at this point exists only in memory—is then output to the
browser using the imagepng()
function.
Running the Hack
After uploading the PHP script and the images to your server, navigate your browser to graphic.php. There you will see an image like that shown in Figure 4-12.
Hacking the Hack
The star on the map is cool, but it’s a bit big. Instead of sitting on top of San Francisco, it ends up sitting on top of most of California. Let’s scale it down a little. Save the code in Example 4-9 as graphic2.php.
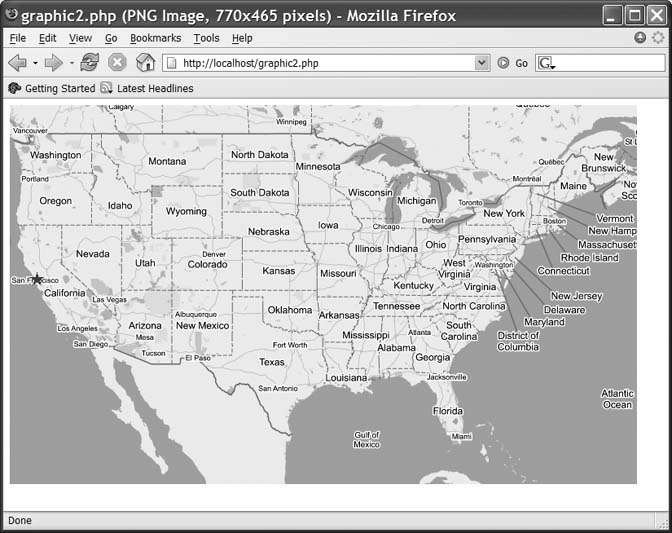
Then navigate to the new script in your web browser; you shouldsee the graphic shown in Figure 4-13.
This new version of the script uses the imagecopyresized() function to change the size
of the star image as it’s copied onto the map. The script divides
the star’s width and height by 5, scaling the image to 20% of its
original size.
See Also
“Create Thumbnail Images” [Hack #27]
“Access Your iPhoto Pictures with PHP” [Hack #33]
“Split One Image into Multiple Images” [Hack #30]
Access Your iPhoto Pictures with PHP
Use PHP’s XML capabilities to parse through iPhoto’s picture database.
Apple is a company known for producing innovative and easy-to-use products. Following on that line, it recently released the iLife suite (http://www.apple.com/ilife/), which makes it easy to produce and organize rich media. I was a bit dismayed by my options for sharing my photos from iPhoto, though. In particular, after having imported my digital photos from my camera and organizing them using iPhoto, I wanted to show off these pictures to family and friends. I didn’t want to sign up for hosting, open an account with a photo printing service, wait for hundreds of files to upload somewhere, export photos to a smaller size, or reorganize all of my images in some other program after having already done the work in iPhoto. I wanted them available to everybody—right now—and I didn’t want to have to lift a finger to make it so. I’d already done plenty of work by taking the actual photos, not to mention organizing and captioning them!
This is what got me working on myPhoto (http://agent0068.dyndns.org/~mike/projects/myPhoto). One Mac OS X feature that most users often do not notice is the built-in web server; Mac OS X includes both Apache and PHP, and both are itching to be enabled. When you combine this and a broadband connection with all of the information readily available in iPhoto, sharing photos becomes (as it should be) a snap.
If your PHP project requires a photo gallery component, it might be tempting to place the burden on users to upload, caption, and organize all of their photos into your system. However, if users have already done the work in iPhoto, do the rest for them! Armed with a simple XML parser, it’s possible to extract all of the meaningful data from iPhoto and reformat it into a simpler format that’s more appropriate and convenient for use with PHP.
A Look Behind the Scenes: iPhoto Data
The first logical step is to get up close and personal with iPhoto so that you know what data is easily available.
Tip
I am basing this discussion on iPhoto Version 5.x, the most current version of iPhoto available as of this writing. With a few small tweaks here or there, though, it’s trivial to apply these same concepts to other versions of iPhoto—something I’ve been doing since iPhoto 2.0.
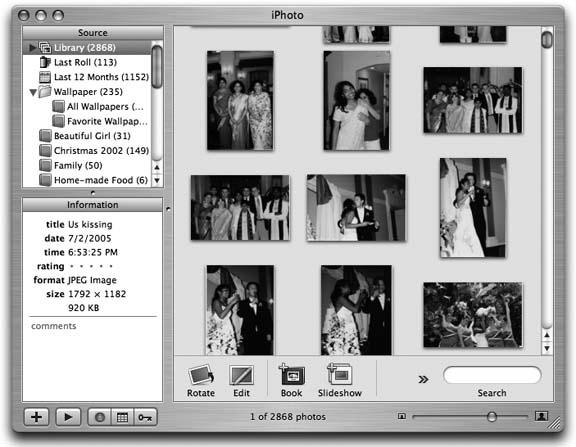
Figure 4-14 shows a small selection from my iPhoto album.
A quick look in ~/Pictures/iPhoto Library/ shows almost everything we could ever need from iPhoto:
- Directories broken down by date
For instance, ~/Pictures/iPhoto Library/2005/07/02/ contains photos from July 2, 2005. The image files in this directory are the actual full-size photos, but they contain all of the edits the user made from within iPhoto (i.e., rotations, color corrections, etc.). It also contains two other subdirectories: Thumbs, which contains 240 x 180 thumbnails corresponding to each image, and Originals, which contains the original, unmodified versions of the images (only if the user has performed any edits in iPhoto). Furthermore, in nearly all cases, these photos are in JPEG format, which is perfect for the Web.
- AlbumData.xml
This XML document contains all of the really interesting (and uninteresting) data surrounding these photos: file paths for a given photo, captions, ratings, modification dates, etc. This file also contains information about groups of photos—also called albums—as well as user-defined keywords. Some version information and meta-information is included as well, but that’s not terribly helpful.
So now we need to make some sense of that AlbumData.xml file. First off, it’s not just any XML file; it’s an Apple Property List. This means that a limited set of XML tags is being used to represent common programmatic data structures like strings, integers, arrays, and dictionaries (also known as associative arrays in some languages). Therefore, for the interesting structures within this file, we should look at some sample content, since the XML tags themselves aren’t terribly descriptive. Rather, the tagged content is where the meaty structure is. I’ve cut some pieces out for the sake of brevity, but the more important parts of the file are here.
The beginning of the file looks something like this—not terribly interesting:
	<?xml version="1.0" encoding="UTF-8"?>
	<plist version="1.0">
	<dict>
		<key>Application Version</key>
		<string>5.0.4 (263)</string>
		<key>Archive Path</key>
			<string>/Users/mike/Sites/myPhoto/iPhoto Library</string>
But further down is a listing of all the photos in the
dictionary keyed by unique identifiers for each photo. In the
following example, you can see that we’re looking at an individual
photo with a unique ID of 5.
Furthermore, it’s an image (rather than, say, a video) which has a
caption of “No more pictures, please” as well as an optional keyword
associated with it (the keyword’s unique keyword ID is 2):
	<key>Master Image List</key>
	<dict>
	<key>5</key>
	<dict>
		<key>MediaType</key>
		<string>Image</string>
		<key>Caption</key>
		<string>No more pictures, please</string>
		<key>Aspect Ratio</key>
		<real>0.750000</real>
		<key>Rating</key>
		<integer>0</integer>
		<key>DateAsTimerInterval</key>
		<real>62050875.000000</real>
		<key>ImagePath</key>
		<string>/Users/mike/Sites/myPhoto/iPhoto Library/2002/12/19/DSC00107.JPG</string>
		<key>OriginalPath</key>
		<string>/Users/mike/Sites/myPhoto/iPhoto Library/2002/12/19/Originals/DSC00107.JPG</string>
		<key>ThumbPath</key>
		<string>/Users/mike/Sites/myPhoto/iPhoto Library/2002/12/19/Thumbs/5.jpg</string>
		<key>Keywords</key>
		<array>
			<string>2</string>
		</array>
	</dict>
	<key>6</key>
	…and so on…
	</dict>
Another section of this file (shown in the next fragment of XML) lists all user-defined groups of photos, known in iPhoto as albums. These are stored in a user-defined order in an array (unlike the Master Image List, which is unordered and stored by keys). This includes all kinds of albums—normal albums, smart albums, folders, slideshow albums, book albums, etc. Various album attributes are described—a unique ID, a name, an ordered list of photo IDs for photos contained in the album, an indicator if the album is the “master” album (each photo library should have only one master album), the parent album ID if this album is in a “folder album,” etc.:
	<key>List of Albums</key>
	<array>
	<dict>
		<key>AlbumId</key>
		<integer>2</integer>
		<key>AlbumName</key>
		<string>Vacation to somewhere</string>
		<key>KeyList</key>
		<array>
			<string>4425</string>
			<string>4423</string>
			<string>4421</string>
			<string>4419</string>
		</array>
		<key>Master</key>
		<true/>
		<key>PhotoCount</key>
		<integer>2868</integer>
		<key>Parent</key>
		<integer>2196</integer>
	</dict>
	<dict>
	…and so on…
	</dict>
	</array>
Also worth noting is that there is a structure whose key is “List of Rolls,” which is structurally identical to “List of Albums.” This automatically-generated list groups photos together each time they are imported into iPhoto, treating the group as if it were one “roll” of film.
Finally, the last major section of the file is the list of
keywords, a dictionary keyed by IDs. These are user-defined keywords
that you can use to tag multiple photos, instead of manually
captioning each photo with the same word. This consists of ID/keyword
pairs; in this example, the ID is 1
and the keyword is _Favorite_:
	<key>List of Keywords</key>
	<dict>
	<key>1</key>
	<string>_Favorite_</string>
	<key>2</key>
	<string>…and so on…
	</dict>
Tip
Keep in mind that in older versions of iPhoto, the file format is slightly different; be sure you know and understand this file for the versions of iPhoto you plan on being compatible with. Minor details do change periodically, and they can cripple your parsing code if you don’t anticipate or account for them.
The Code
Save the code in Example 4-10 as iphoto_parse.php.
<?php
//$curTag denotes the current tag that we're looking at in string-stack form
//$curKey denotes the current tagged attribute so that we have some recollection
//of what the last seen attribute was.
// i.e. $curKey="AlbumName" for <key>AlbumName</key>
//$data denotes the element between tags.
// i.e. $data="Library" for <string>Library</string>
//When reading code, note that $curKey is not necessarily equal to $data.
$curTag="";
$curKey="";
$readingAlbums=false;
$firstTimeAlbum=true;
$firstTimeAlbumEntry=true;
$readingImages=false;
$firstTimeImage=true;
$firstTimeImageEntry=true;
$curID=0;
$masterImageList=array();
class Photo
{
var $Caption;
var $Date;
var $ImagePath;
var $ThumbPath;
}
function newPhoto($capt, $dat, $imgPath, $thumb) {
$aPhoto=new Photo();
$aPhoto->Caption=$capt;
$aPhoto->Date=$dat;
$aPhoto->ImagePath=$imgPath;
$aPhoto->ThumbPath=$thumb;
return $aPhoto;
}
//this function is called on opening tags
function startElement($parser, $name, $attrs)
{
global $curTag;
$curTag .= "^$name";
}
//this function is called on closing tags
function endElement($parser, $name)
{
global $curTag;
$caret_pos = strrpos($curTag,'^');
$curTag = substr($curTag,0,$caret_pos);
}
//this function has all of the real logic to look at what's between the tags
function characterData($parser, $data){
global $curTag, $curKey, $outputAlbums, $outputImages,
$readingAlbums, $firstTimeAlbum, $firstTimeAlbumEntry,
$readingImages, $masterImageList, $firstTimeImage,
$firstTimeImageEntry, $curID;
//do some simple cleaning to prevent garbage
$data = str_replace('!$-a-0*', '&', $data);
if(!ereg("(\t)+(\n)?$", $data) && !ereg("^\n$", $data))
//if $data=non-whitespace
{
//some common place-signatures…really just a list of unclosed tags
$albumName = "^PLIST^DICT^ARRAY^DICT^KEY"; //album attributes, i.e
"AlbumName"
$integerData = "^PLIST^DICT^ARRAY^DICT^INTEGER";//album ID
$stringData = "^PLIST^DICT^ARRAY^DICT^STRING"; //the actual album name
$albumContents = "^PLIST^DICT^ARRAY^DICT^ARRAY^STRING"; //photo ID number
$majorList = "^PLIST^DICT^KEY"; //"List of Albums", "Master Image
List"
$photoID = "^PLIST^DICT^DICT^KEY"; //the unique ID of an individual
photo
$photoAttr="^PLIST^DICT^DICT^DICT^KEY"; //"Caption", "Date", "ImagePath", etc
$photoValStr="^PLIST^DICT^DICT^DICT^STRING"; //caption, file paths, etc
$photoValReal="^PLIST^DICT^DICT^DICT^REAL"; // date, aspect ratio, etc
if($curTag == $majorList)
{
if($data=="List of Albums")
{
//flag so that there's no ambiguity, i.e. for <key>List of Rolls</key>
$readingAlbums=true;
$readingImages=false;
}
else if($data=="Master Image List")
{
$readingAlbums=false;
$readingImages=true;
}
else
$readingAlbums=false;
}
if($readingAlbums)
{
if ($curTag==$integerData)
{
if($data == "AlbumId")
{
$curKey = $data;
}
}
else if ($curTag==$albumName) //we're looking at an attribute, i.e
AlbumName
{ //so the next thing we'll see is the album name
//or the listing of all photos contained in the album
if($data == "AlbumName" || $data="KeyList")
{
$curKey = $data; //$curKey will be that reminder for us next time
}
}
else if($curTag == $stringData || $curTag == $integerData)
//now we are looking at interesting data….
{
if($curKey == "AlbumName") //so the last attribute we saw was AlbumName…
{
$curAlbum = $data; //say the album name was "Library"…
//then now $data="Library"
$curAlbum = str_replace("&", '&', $data);
$serializedObj = "";
if(!$firstTimeAlbum)
$serializedObj.="\n\t\t)\n\t,\n";
$serializedObj .= "\t\"".addslashes($curAlbum)."\" =>\n\t\tarray(\n";
$firstTimeAlbum=false;
fileWrite($outputAlbums,$serializedObj,'a');
$firstTimeAlbumEntry=true;
}
}
else if($curTag == $albumContents) // looking at a listing of photos {
if($curKey == "KeyList")
{
//$data==the photo ID number of a photo in $curAlbum
$serializedObj = "";
if(!$firstTimeAlbumEntry)
$serializedObj.=",\n";
$serializedObj .= "\t\t\t$data";
fileWrite($outputAlbums,$serializedObj,'a');
$firstTimeAlbumEntry=false;
}
}
//fill in all your other album cases of interest…
}
else if($readingImages)
{
if($curTag==$photoID) //we've encountered a new photo, store the ID…
{
$curID="";
if(!$firstTimeImage)
$curID="),\n";
$curID.="\t\"$data\"=>array(";
$firstTimeImageEntry=true;
$firstTimeImage=false;
}
else if($curTag==$photoAttr)
{
if($data=="Caption" || $data=="DateAsTimerInterval" ||
$data=="ImagePath" || $data=="ThumbPath")
$curKey=$data;
else
$curKey="";
}
else if($curTag==$photoValStr || $curTag==$photoValReal)
{
if($curKey == "Caption" || $curKey == "DateAsTimerInterval" ||
$curKey=="ImagePath" || $curKey=="ThumbPath")
{
if(!$firstTimeImageEntry)
$curID.=", ";
if($curKey=="Caption")
$curID .= "\"caption\"=>\"".addslashes($data)."\"";
else if($curKey=="DateAsTimerInterval") //timeinterval based dates
//are measured in seconds from 1/1/2001
$curID .= "\"date\"=>\"".
date("F j, Y, g:i a", mktime(0,0,$data,1,1,2001)).
"\"";
else
$curID .= "\"$curKey\"=>\"$data\"";
$firstTimeImageEntry=false;
}
if($curKey=="ThumbPath") //the last attribute we see for a photo…
fileWrite($outputImages,$curID,'a');
//…and any other image data worth extracting…
}
}
}
}
//this function is what you call to actually parse the XML
function parseAlbumXML($albumFile)
{
global $outputAlbums, $outputImages;
$xml_parser = xml_parser_create();
xml_parser_set_option($xml_parser, XML_OPTION_CASE_FOLDING, true);
//hook the parser up with our helper functions
xml_set_element_handler($xml_parser, "startElement", "endElement");
xml_set_character_data_handler($xml_parser, "characterData");
if (!($fp = fopen($albumFile, "r")))
die("Can't open file: $albumFile");
fileWrite($outputAlbums,"<?php\n\$albumList = array (\n",'w');
fileWrite($outputImages,"<?php\n//key=photo ID, value={",'w');
fileWrite($outputImages," [0]caption, [1]date, [2]image ",'w');
fileWrite($outputImages,"path, [3]thumb path}\n\$masterList = array (\n",'w');
while ($data = fread($fp, 4096))
{
$data = str_replace('&', '!$-a-0*', $data);
if (!xml_parse($xml_parser, $data, feof($fp)))
{
die(sprintf("$albumFile : ".$lang["errXMLParse"].": %s at line %d",
xml_error_string(xml_get_error_code($xml_parser)),
xml_get_current_line_number($xml_parser)));
}
}
fileWrite($outputAlbums,"\n\t\t)\n\t\n\n);\n?>",'a');
fileWrite($outputImages,")\n);\n?>",'a');
//we're done, throw out the parser
xml_parser_free($xml_parser);
echo "Done parsing.";
}
function fileWrite($dest, $dataToWrite, $writeMode)
{
global $err;
if (is_writable($dest))
{
if (!$fp = fopen($dest, $writeMode))
$err .= "Can't open file: ($dest) <br>";
else
{
if (!fwrite($fp, $dataToWrite))
$err .= "Can't write file: ($dest) <br>";
fclose($fp);
}
}
else
$err .= "Bad file permissions: ($dest) <br>";
}
set_time_limit(0); //if you have an enormous AlbumData.xml,
//PHP's default 30-second execution time-out is the enemy
$outputImages="out_images.php";
$outputAlbums="out_albums.php";
parseAlbumXML("myPhoto/iPhoto Library/AlbumData.xml");
?>Also, to use the output from the preceding parser, save the code in Example 4-11 as iphoto_display.php; this file will handle displaying the photos on the Web.
	<?php
	include "out_images.php";
	$photoIDs=array_keys($masterList);
	$thumbsPerPage=6;
	$thumbsPerRow=3;
	if(!isset($_GET["tStart"]))
		$thumbStart=0;
	else
		$thumbStart=$_GET["tStart"];
	if($thumbStart+$thumbsPerPage>count($photoIDs))
		$thumbLimit=count($photoIDs);
	else
		$thumbLimit=$thumbStart+$thumbsPerPage;
	echo "<table border=\"0\" width=\"100%\">\n";
	for($x=$thumbStart; $x<$thumbLimit; $x++)
	{
		$aPhoto=$masterList[$photoIDs[$x]];
		$thumb="<table>";
		$thumb.="<tr><td align=\"center\"><img ";
		$thumb.="src=\"".$aPhoto["ThumbPath"]."\"></td></tr>";
		$thumb.="<tr><td align=\"center\"><small>";
		$thumb.=$aPhoto["date"]."<br>".$aPhoto["caption"]."</small></td></tr>";
		$thumb.="</table>";
		if($x % $thumbsPerRow == 0)
			echo "\n<!--New row-->\n<tr><td>\n".$thumb."\n</td>\n";
		else if($x % $thumbsPerRow == ($thumbsPerRow-1))
			echo "\n<td>\n".$thumb."\n</td></tr>\n<!--End row-->\n";
		else
			echo "\n<td>\n".$thumb."\n</td>\n";
	}
	echo "\n</table>\n";
	?>
Running the Hack
The last few lines of iphoto_parse.php contain hardcoded paths to the AlbumData.xml file, as well as to the output files (as does iphoto_display.php), so be sure that you enter the correct paths. Then, simply load up iphoto_parse.php in your web browser. Also, note that PHP will need to have permission to write to the output files; otherwise, you’ll get no output.
Your web browser will indicate when the script has finished executing with a page that says, “Done parsing.” Open the output files, and you should see an array in each, similar to the following samples.
out_albums.php will look something like this:
	<?php
	$albumList = array (
		"Library" =>
			array(
				4425,
				4423,
	…
				3796,
				3794,
				3792
			)
	);
	?>
And out_images.php will look something like this:
	<?php
	//key=photo ID, value={[0]caption, [1]date, [2]image path, [3]thumb path}
	$masterList = array (
	"13"=>array(
	"caption"=>"The wreath, out of focus again",
	"date"=>"December 23, 2002, 2:59 am",
	"ImagePath"=>"/~mike/myPhoto/iPhoto Library/2002/12/22/DSC00151.JPG",
	"ThumbPath"=>"/~mike/myPhoto/iPhoto Library/2002/12/22/Thumbs/13.jpg"),
	…
	);
	?>
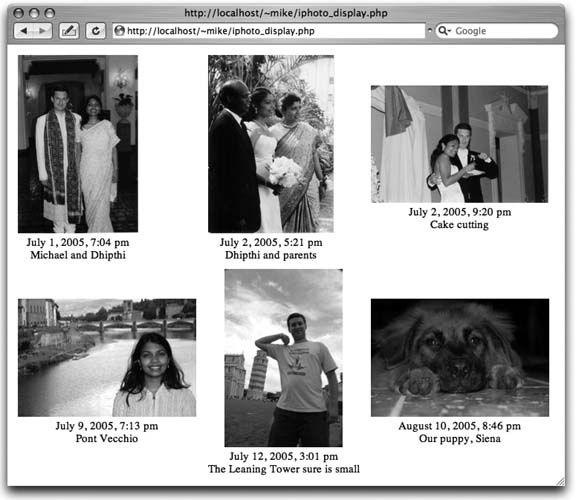
You can also examine some of the resulting output visually by loading up iphoto_display.php in your web browser, as shown in Figure 4-15.
While XML is a versatile format, considering how verbose the AlbumData.xml file is and how large it can get for photo libraries of even moderate size, it needs to be massaged. After all, I have only 2,868 photos in my library, but my AlbumData.xml file is 2.4 MB. I thus chose to employ the XML parser included with PHP 4 (expat) to parse AlbumData.xml into meaningful components, which I then output using a much simpler format. Specifically, the output is piped into two separate files containing the data of interest represented as PHP arrays.
The core idea for the parser is to use a string representing the hierarchy of tags so that we have some context as we walk through the file’s content. It’s sort of like a stack that is represented as a string rather than as the more common array or linked list. Note that this parser parses only some of the elements of the albums section, as well as the images section of AlbumData.xml. I’ve also included a demonstration as to how you can work with the resulting output of this parser.
Before writing any code, it’s probably a good idea to decide how to serve your photos. For instance, by default, Mac OS X will not allow Apache (and therefore, PHP) access to ~/Pictures/ where iPhoto data is stored, so you need to get your permissions straight. You can approach this in a number of ways:
Modify your /etc/httpd/httpd.conf file.
Use a symbolic link.
Quit iPhoto, move your iPhoto Library folder into your ~/Sites/ folder, relaunch iPhoto, and when it panics that all the photos are gone, point it to the new location of the Library folder.
Upload your iPhoto Library folder to some other machine using FTP,
rsync, or any other file-transfer program that floats your boat.
Hacking the Hack
You have a lot of room to work with this hack:
Add further cases to the XML parser so that it extracts all of the data that you’re interested in, rather than just the albums and the images that they contain.
Instead of outputting the processed AlbumData.xml file into a flat text file, store the information in an SQL database or some other, more versatile format.
If you’re going to be this user friendly by getting all of the information out of iPhoto, why not go the extra mile and make this entire process automatic? Automating this process is actually very simple. At this point, we have a means for parsing the XML file as well as a means for caching what we discover from parsing the XML file. The final step calls for knowing when we should be using the cache and when we should be rebuilding the cache. The answer to this question depends on your application, but here are some possibilities worth considering:
Run a
cronjob that invokes your cache rebuild function hourly/daily/whenever.Keep track of the modification date of AlbumData.xml. If that date is newer than the last time you parsed it, reparse.
So, for example, using the latter approach, add a function that looks something like this:
	//returns a boolean value indicating whether or not
	//a cache rebuild (reparse) is necessary
	function needToUpdateCache()
	{
		global $cacheTime, $albumFile, $err;

		$cacheTimeFile="lastCacheTime.txt"; //text file where
				//a string indicates
				//last cache rebuild time.
				//i.e. "January 28 2005 16:31:26."
		$compareFile="iPhoto Library/AlbumData.xml";
		if (file_exists($cacheTimeFile))
		{
			//first, check the file where the last known cached time was stored
			if($fp = fopen($cacheTimeFile, "r"))
			{
				$lastTime = fread($fp, filesize($cacheTimeFile));
				fclose($fp);
			}
			else
			{
				$err.= "Can't read last cache time";
				return true;
			}

			//now, determine the last time the iPhoto data has changed
			//if we need to reparse, it will write the
			//current time into $cacheTimeFile
			//(since we will therefore reparse now)
			if($lastTime!=date ("F d Y H:i:s.", filemtime($compareFile)))
			{
				if (!$fp = fopen($cacheTimeFile, 'w'))
				{
				$err.= "Can't open file: $cacheTimeFile";
				}
				else
				{
				if (!fwrite($fp, date ("F d Y H:i:s.", filemtime($compareFile)) ))
				$err.= "Can't open file: $cacheTimeFile";
				fclose($fp);
				}
				return true;
				}
				else
				return false;
				}
				else
				{
				$err.= "Can't find file: $cacheTimeFile";
				return true;
				}
			}

			//and at the beginning of every page load, call this to ensure
			//viewers are getting the latest photos
			if(needToUpdateCache())
			parseAlbumXML($pathToYourAlbumXMLFile);
This will ensure that you parse the file only when changes have been made in iPhoto that will require a reparse.
—Michael Mulligan
See Also
“Create Thumbnail Images” [Hack #27]
“Create Image Overlays” [Hack #32]
Get PHP Hacks now with the O’Reilly learning platform.
O’Reilly members experience books, live events, courses curated by job role, and more from O’Reilly and nearly 200 top publishers.
