Chapter 4. Formatting and Laying Out Your Slides
In the previous chapter, you learned how to massage text into perfectly indented paragraphs, columns, and lists. Now it’s time for the big picture. This chapter shows you how to format slide using layouts, and how to reapply a theme (see Section 1.2) or color scheme (a list of coordinating font colors). Finally—and most important when you’re in a time crunch—you’ll learn how to turn on PowerPoint’s automatic formatting options.
Changing Slide Layout
Each time you create a slide—by creating a new presentation (Section 1.1), or by adding a slide to an existing presentation (Section 1.4)—PowerPoint gives that slide a layout such as the Title Slide layout, with one title text placeholder near the top and one subtitle text placeholder near the middle of the slide. But you can change the layout of your slide at any time, either before you’ve added content to it or after. PowerPoint gives you several options for changing slide layout:
Apply canned layouts to your slides. You can tell PowerPoint to put a title at the top of a slide and two content placeholders (for text, pictures, and so on) side-by-side in the body of the slide.
Change orientation. You can change a landscape orientation (where the slide’s wider than it is tall) to a portrait orientation (where the slide’s taller than it is wide).
Reposition elements. You can drag text boxes and other objects (such as pictures) around on your slide to reposition them.
Applying a Canned Layout
PowerPoint offers nine canned layouts you can use. Most of the time, you’re going to want to apply these layouts before you add text to your slides, but you can apply them after, as well.
Note
If you have a very specific, custom layout in mind, you’ll probably find it easier and more efficient to create a layout master, as described on Section 5.5.
To apply a canned layout to your slide:
Create a new slide (Section 1.4). Click any blank spot on your new slide.
Make sure you don’t click a text placeholder, picture, diagram, or other object.
Choose Home → Slides → Layout.
A layout gallery based on the template or theme you’ve applied to your slideshow appears. (You can also display the layout gallery by right-clicking the slide or the slide thumbnail you see in the Slides pane and then, from the context menu that appears, mousing over the Layout option.)
From the layout gallery, click to choose the layout thumbnail you want to apply to your slide (Figure 4-1).
Mousing over any thumbnail in the gallery pops up the name of that thumbnail option. Typically, your options include:
Title Slide. One title placeholder near the top of the slide, and one subtitle placeholder.
Title and Content. One title placeholder and one large content placeholder.
Section Header. Similar to the Title Slide layout, but with a contrasting background. (Useful for alerting your audience that you’re starting a new section of your slideshow.)
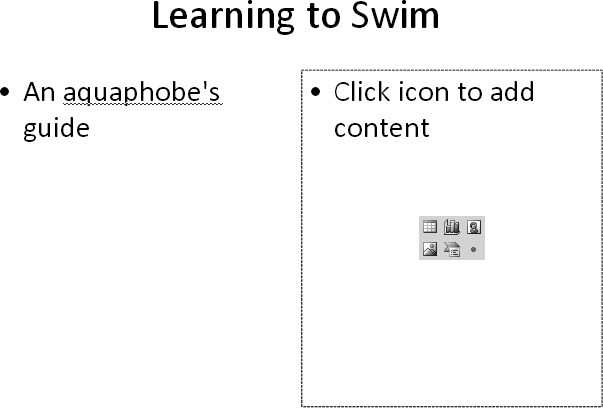
Two Content. One title placeholder and two content placeholders, each containing an icon you can click to add a diagram, chart, picture, or other content (see Figure 4-2).
Comparison. Similar to the Two Content layout, but with extra placeholders for headings.
Title Only. One title placeholder.
Blank. No text placeholders at all.
Content with Caption. One title placeholder and one placeholder containing an icon you can click to add a diagram, chart, picture, or other content (see Figure 4-1).
Picture with Caption. One title placeholder and one placeholder you can click to add a picture.
PowerPoint automatically applies the layout to your slide.

Switching Orientation from Landscape to Portrait (and Back)
Unless you tell it otherwise, PowerPoint assumes you want your presentation to appear in landscape form; that is, with slides that appear wider than they are tall. But you can change this orientation to portrait if you like. For example, if you intend to print your presentation, staple the pages, and hand it out to your audience, then you may want to switch to portrait so your audience can flip through the pages more easily.
To choose an orientation, go to Design → Page Setup → Slide Orientation and choose either Portrait or Landscape. Figure 4-3 shows you an example of each.

Repositioning Text Boxes
PowerPoint gives you different ways to reposition the text boxes (and other objects) on your slides. You can either drag objects where you want them, or use the Size and Position dialog box.
Dragging typically works best when you have only a few objects on your slide. If you’ve got a bunch of objects (especially if they’re overlapping), or if the text box you want to move is so completely filled with text you think you’ll have trouble selecting its border to drag it, you’ll want to use the Size and Position dialog box and save yourself some aggravation.
To reposition a text box by dragging:
Click inside the text box you want to reposition and mouse over the outline of the text box.
PowerPoint changes your cursor from an arrow to the double-arrow cross you see in Figure 4-4.
Click the text box outline.
The dashed outline turns solid.
Drag the text box where you want it and release the mouse.
PowerPoint redraws the text box where you put it.
Tip
For finer control over the position of your text box: As soon as you see both the double-headed arrow cursor shown in Figure 4-4 and a solid text box outline, click the arrow keys on your keyboard to move the text box up, down, left, or right. To move the text box in even tinier increments, hold down Ctrl while you click the arrow keys.

Tip
If you drag a bunch of stuff around on a slide and then change your mind and want to put it back the way it was, there’s an easy way to revert to your original. Choosing Home → Slides → Reset tells PowerPoint to change your slide back to its original layout.
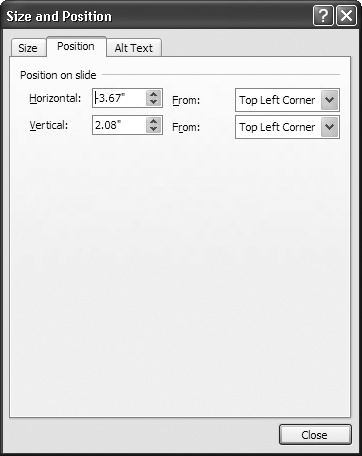
To reposition a text box using the Size and Position dialog box:
Click anywhere inside the text box you want to reposition. Go to Drawing Tools | Format, and click the Size dialog launcher.
The Size and Position dialog box pictured in Figure 4-5 appears.
On the Position tab, use the Horizontal box to tell PowerPoint how many inches to position the top-left corner of the text box from the left edge of the slide.
PowerPoint moves your text box left and right so you can gauge the effects on your slide in real-time.
Use the Vertical box to tell PowerPoint how many inches to position the top-left corner text box from the top of the slide.
PowerPoint moves your text box up and down so you can gauge the effects on the slide in real-time.
When you’re satisfied with the position of your text box, click Close.
The Size and Position dialog box disappears.
Help for Positioning Text Boxes: Zoom, Guides, and Grid
Whether you prefer dragging or using the Size and Position dialog box, there are times you’ll need a little help positioning your text boxes and other objects—especially if your eyesight’s not the best. PowerPoint offers that help in the form of the zoom, guides, and grid.
Zoom. The zoom tool magnifies your slide, making it easier for you to distinguish between the boundaries of different objects on a cluttered slide. To use this tool, drag the zoom slider in the status bar at the bottom of the PowerPoint window. You can also click the + or − signs to zoom in or out, respectively.
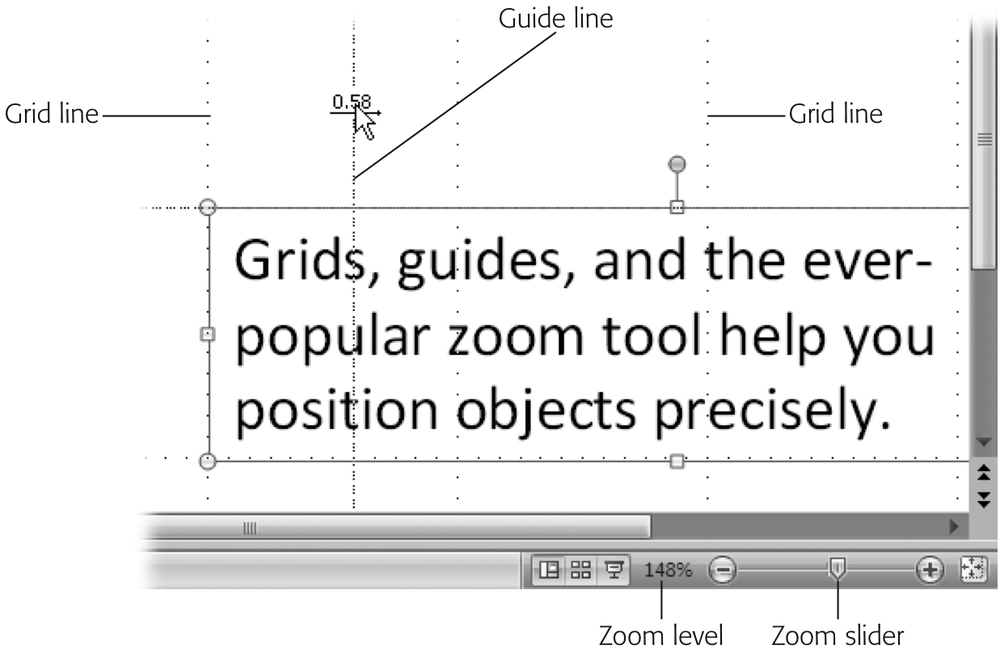
Guides. Guides in PowerPoint consist of two movable (draggable) crosshairs, one horizontal and the other vertical (Figure 4-6). Guides don’t show up when you run your presentation; they appear only when you’re working with your slides, to help you align text boxes and other objects. To display the guides, click Alt + F9. To make them disappear, click Alt + F9 again.
As you drag a guide, PowerPoint pops up a little direction arrow and the number of inches the guide currently is away from the center of your slide, helping you align stuff exactly 2.5 inches left of center, for example.
Grid. PowerPoint’s grid (Figure 4-6) gives you a bunch of visual reference points you can use to line up text boxes and other objects. To display the grid, select View → Show/Hide → Gridlines.
Changing Background Color
In most cases, you won’t want to change the background color of your slides. Instead, you’ll rely on the professionally designed themes that ship with PowerPoint (and that you can find for free or purchase on the Web), which coordinate text and background color and effects into an aesthetically pleasing package.
Of course, there’s an exception or two to every rule. In the case of background color, one exception to the don’t-change-it rule is when you need to match your presentation to a specific (non-PowerPoint) corporate or organizational palette, such as the one your Marketing department uses for brochures and four-color ads.
Another exception is if you’ve monkeyed with your font color as described on Section 3.2.4. Because the human eye sees color in a relative context, black text (for example) appears different depending on whether you set it against a white background, a pink background, or a dark blue background. So when you change the color of your text, you may want to adjust the background color of your slide, too, until you find a combination that looks good to you.
To change the background color of one, some, or all of the slides in a presentation:
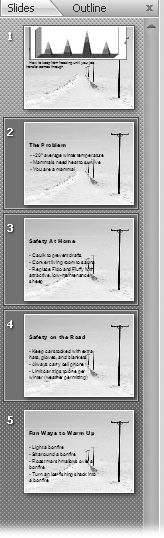
In the Slides pane (see Figure 4-7), Ctrl-click to select the slides you want to change.
You can skip this step if you want to change the background of the currently selected slide only. To select all of the slides in a presentation press Ctrl+A.
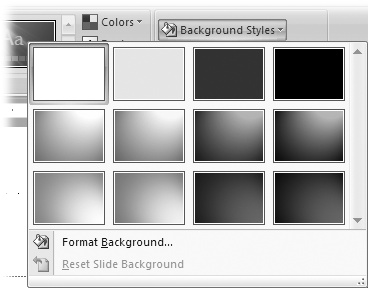
Figure 4-7. If you don’t see the Slides pane on the left side of your PowerPoint window, you—or someone else who has access to your computer—may have turned it off. In that case, head down to the Status bar and click Normal (or select View → Presentation Views → Normal.) If your Slides pane doesn’t look similar to this one, make sure the Slides tab is selected.Choose Design → Background Styles.
A gallery of background color options, complete with cool gradient effects, appears (Figure 4-8).
From the gallery, click to choose an option.
The gallery disappears, and PowerPoint applies the new color-and-gradient background to all the currently selected slides.
Note
PowerPoint doesn’t police you. If you apply a black background to a slide containing black text, your text becomes unreadable—and PowerPoint doesn’t warn you in advance.
If you don’t see a color option you like in the gallery, you can choose from a broader selection:
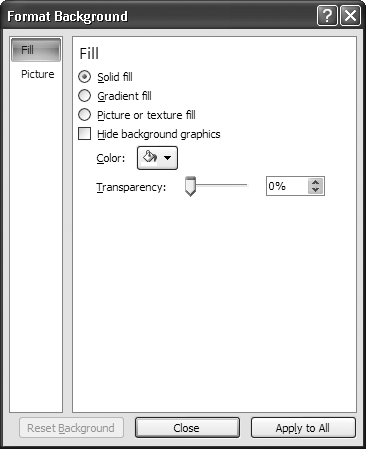
In the Background Styles gallery, choose Format Background.
The Format Background dialog box opens.
On the Fill tab, turn on the radio button next to “Solid fill.”
The options you see in Figure 4-9 appear.
Figure 4-9. Click Color to display a color picker that lets you choose a new background color. Most of the time, you’ll want to stick with one of the Theme colors PowerPoint offers. After all, the whole point of themes is to help you create tasteful presentations. But if you prefer, you can always head to the bottom of the color picker and click “More colors” to apply your own custom-blended background color.Click the Color drop-down box to display a color picker, from which you can choose the color you want.
In most cases, you should stick with a color in the Themes Colors section, so that your background color coordinates with the theme you’ve applied to your presentation. (You can see how to reapply a theme on Section 4.3.1.)
If you want to vary the tint of your color, drag the transparency slider. You can also change the percentage in the Transparency box.
Whether you drag the transparency slider or use the transparency box, PowerPoint automatically previews the transparency effect on the slide.
When you’re satisfied with the color and transparency you’ve chosen, click Close (to dismiss the Format Background dialog box and apply your new background to the currently selected slides) or Apply to All (to dismiss the Format Background dialog box and apply your new background to every slide in your presentation).
Adding a Gradient Effect
A solid colored background, like the ones you learned to apply in the previous section, sometimes do the trick. But some folks think a gradient effect (Figure 4-10) looks a bit more sophisticated. Instead of a single color, gradients blend multiple bands of color for mild to wild effects. All of the basic background options that PowerPoint suggests (Figure 4-8) include gradients, but you can apply your own custom gradient effect quickly and easily.
To apply a gradient effect to your background:
Choose Design → Background → Background Styles.
A gallery of background color options appears, complete with cool gradient effects.
In the gallery, choose Format Background.
The Format Background dialog box appears.
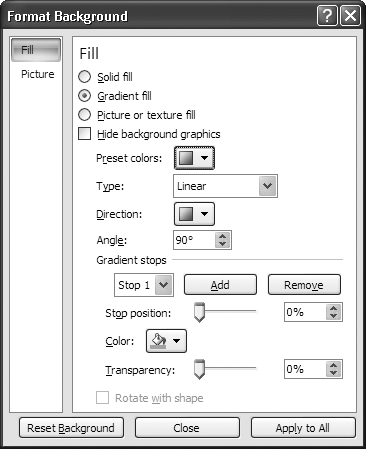
On the Fill tab, turn on the radio box next to “Gradient fill.”
PowerPoint applies a basic fill to your slide, and the gradient-related options you see in Figure 4-11 appear.
Click the down arrow next to “Preset colors.”
A gallery of preset gradient options appears (Figure 4-12).
Click to choose one of the gradient presets.
If you like, you can customize the preset you selected by adding one of the following options:
Hide background objects. Tells PowerPoint not to display background graphics on top of your gradient (assuming you’ve added background graphics to your slides).
Type. Lets you choose from among Linear (straight bands), Radial (bull’s-eye bands), Rectangular (rectangular bands), Path (rectangular bull’s-eye bands), or “Shade from title.” Shade from title tells PowerPoint to display the gradient radiating from the title area outward; otherwise, the gradient radiates from the bottom right corner of the slide.
Direction. Available only if you choose a type of Linear, Radial, or Rectangle, this option lets you choose from thumbnails showing gradient bands running in different directions (straight across, up at an angle, and so on).
Angle. Available only if you choose the Linear gradient, this option lets you choose the angle at which the bands appear (45 percent is diagonal; 90 percent is straight across).
Gradient stops. Click Add to tell PowerPoint to display an additional gradient band (10’s the max). To delete one of the gradient bands you begin with, choose one from the drop-down box and then click Remove.
Color. Click the down arrow next to this option to display a color picker and choose a color to apply to your gradient.
Stop position. Drag the slider (or click the arrows) next to this option to tell PowerPoint where to begin your gradient’s color bands.
Transparency. Drag the slider (or click the arrows) next to this option to fade your gradient, from 100 percent (see-through) to 0 percent (completely opaque).
Rotate with shape. Normally, choosing this option tells PowerPoint to rotate the gradient bands along with the shape—but when you apply a gradient background effect to a slide, PowerPoint deactivates (grays out) this radio box.
When you’re satisfied with your gradient effect, choose Close to apply it to the currently selected slide or Apply to All to apply it to all of the slides in your presentation.

Reapplying Themes, Colors, and Fonts
It’s great having the freedom to apply your own custom colors, fonts, and effects—until you make so many changes that your presentation looks like something your three-year-old might have created. Luckily, if that happens, you can reapply PowerPoint’s professionally designed themes (Section 1.2), color schemes or fonts to your presentation, which clears most of your changes and lets you start over from scratch. Reapplying themes is also a great way to try out new looks.
Warning
Because many themes feature different fonts, your text may appear misaligned after you reapply a theme or font. To avoid having to flip through slides and fix misaligned text, apply the theme you want before you’ve filled all 600 of your intricately laid-out slides with text.
Reapplying a Theme
Themes contain information that tells PowerPoint what fonts, colors, images, and layouts to apply to your presentation. You can reapply a theme after you’ve added content to your slides, but be aware that depending on the theme you choose to reapply, you may have to go back through your slides and eyeball them to make sure they look okay. (Different fonts and sizes can make a presentation that looked great in one theme look terrible in another.)
To reapply a theme:
If you want to reapply a theme to one or more slides—but not all the slides in your presentation—select the slides you want to change.
Section 2.1.1 shows you how to select multiple slides.
In the Design → Themes group, right-click the theme you want to reapply.
A shortcut menu appears.
From the shortcut menu, choose one of the following:
Apply to All Slides. Applies the theme to every slide in your presentation.
Apply to Selected Slides. Applies the theme only to those slides you’ve selected.
PowerPoint reapplies the selected theme.
Warning
A reapplied theme does not always overwrite the custom background you’ve added to your presentation. To delete a background effect you’ve applied to a slide, click Reset Background in the Format Background dialog box (Figure 4-11).
Reapplying a Color Scheme
Professionally designed themes—including the ones that come with PowerPoint—typically come with multiple color combinations, or schemes. These color schemes tell PowerPoint which colors to use for heading text, regular text, hyperlinks, slide backgrounds, and more. All of these colors were chosen by the theme designers to look good together, so choosing one of the theme-sanctioned color schemes ensures you of a reasonably attractive result.
If you decide halfway through creating a presentation that you’d like it to appear in different colors, or if you’ve experimented with changing font colors (Section 3.2.4) and want to put your presentation back to the way it was, then you can do so by reapplying a color scheme.
To reapply a color scheme:
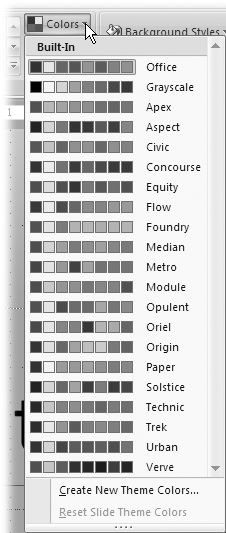
Choose Design → Themes → Colors.
A gallery of color schemes similar to the one you see in Figure 4-13 appears.
Figure 4-13. The color schemes you see listed in the gallery depend both on the theme you apply to your presentation, and whether or not you create new custom color schemes. Here, the color schemes run from Office to Origin and beyond. (The scroll bar indicates there are a few more color schemes to choose from.)Click to choose one of the color schemes. (See the box for tips on choosing a scheme.)
The gallery disappears. On your slide, PowerPoint changes the color of your background and text based on the color scheme you chose.
Reapplying a Font
There are two reasons you may want to reapply a font to your presentation:
You’ve done a bit of experimenting with fonts, changing the text on the first couple of slides to one font, the text on the next couple of slides to a different font, and so on. Now you’re unhappy with the helter-skelter results and want to reapply a single, consistent font.
You’ve assembled your presentation from several other presentations—either ones you’ve done yourself, or ones you’ve cadged from the office stockpile—and now you want to unify all these disparate-looking slides by applying a consistent font.
To reapply a font to all of the text in your slideshow, go to Design → Themes → Fonts. Then, in the Fonts gallery, simply click to choose the font you want to reapply.
Get PowerPoint 2007: The Missing Manual now with the O’Reilly learning platform.
O’Reilly members experience books, live events, courses curated by job role, and more from O’Reilly and nearly 200 top publishers.

