Chapter 1. Set Up a New Project
Premiere Elements calls the videos you create projects because, more likely than not, you’ll include several types of media in your movies. Sure, your project will include video clips, but you might also add narration, background music, still images, text, and title screens. And when you export your video, you might want to add a DVD menu to make navigating the final product easy. So, unlike a word processing document or spreadsheet, your finished video comprises more than just a single PC file—it’s a collection of different files sewn together into a whole.
In this chapter, you’ll learn how to start a new project (as well as how to open an existing one). Along the way, you’ll tour the Premiere Elements workspace—the multifaceted screen where you organize clips, assemble videos, and add sound, transitions, and special effects. At the end of the chapter, you’ll look at Premiere Elements’ Instant-Movie feature—a tool that let’s you quickly turn video clips into finished movies, perfect for YouTube aficionados. In addition, you’ll see how InstantMovie gives you a great introduction to the basic steps of editing any video project.
Note
As you’re probably aware, this book is about Premiere Elements. In an effort to save a tree or two (not to mention your patience as a reader), these pages will refer to the program simply as Premiere.
Start Premiere Elements
You start Premiere just as you would any other Windows program—which also means you can do so in a couple of ways. Installing the program (a process described on Get Ready for Installation) puts an Adobe Premiere Elements 8.0 shortcut on your desktop, so the easiest way to start Premiere is to double-click that shortcut. That’s fine the first few times you run the program, but you may not want the shortcut on your desktop forever. An alternative way to launch the program is to add its shortcut to Windows’ Quick Launch bar. Drag the shortcut from your desktop onto the bar, and a purple “pre” icon appears there. Click it once to start Premiere.
Here are some other ways to start the program:
From the Vista or Windows 7 Start menu, choose Windows → All Programs → Adobe Premiere Elements 8.0.
For Windows XP, go to Start → All Programs → Adobe → Adobe Premiere Elements 8.0
If you’re a keyboard enthusiast, press the Windows key and begin to type premiere. Before you finish typing, Windows searches for a match and displays a list with programs at the top. Most likely, Premiere is at the top of the list and already selected, so just press the enter key. Otherwise, use your mouse or arrow keys to select and start the program.
Note
Adobe stores Premiere and all its supporting files with your other Windows programs. On most computers, that location is C:\Program Files\Adobe\Adobe Premiere Elements 8.0.
Every time you start Premiere, the program displays an introductory screen called a "splash screen” (see Figure 1-1). It includes a “Create Adobe ID” web link to Photoshop.com (see Figure 1-2). Click the link and enter your name and email address to register your copy of Premiere, access Adobe’s online support, and get some free storage space for your videos and photos (see the box on A Brief Tour of Premiere Elements for the details).
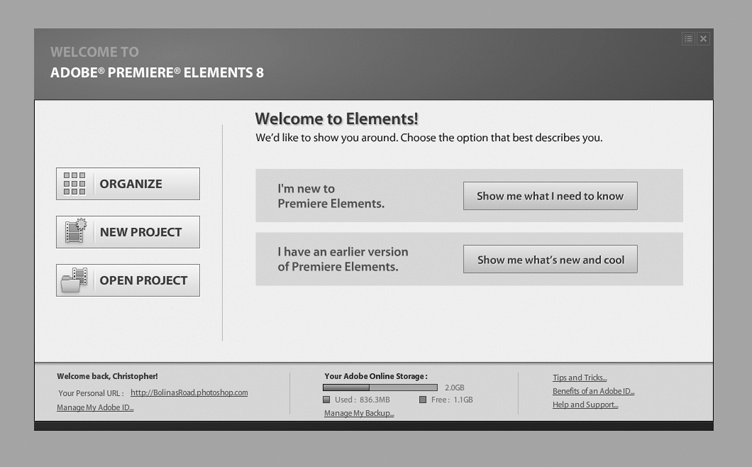
If you’re connected to the Internet, don’t be surprised if the content in the main part of the splash screen changes. From time to time, Adobe may put different messages here, usually feeding you mini-tours of Premiere features or directing you to Photoshop.com.
Note
Photoshop Elements is a program used to edit and retouch still photos. If you bought the DVD version of Premiere Elements, Adobe included a trial version of Photoshop Elements on the disc. Both programs use a third program, called Elements Organizer, to share photos and videos. Like any product that tries to do two things, the Organizer has its quirks. For a full discussion of it, see The Organizer Application.
Once you get used to the splash screen’s layout, you soon realize that all the action for video projects is in the three buttons on the left—they open Premiere and let you start editing. Here’s the rundown:
Organize. Opens Elements Organizer, which is a separate program you use to keep track of all your videos and other media clips.
New Project. Just back from vacation with a camera full of beach scenes? Click this button to start a new project.
Open Project. Want to edit or add new clips to a project you already started? Click here for a list of your saved projects.
The first time you start Premiere, New Project is probably your best choice, because it lets you explore the program and import video clips (see Video Camera Storage Methods).
A Brief Tour of Premiere Elements
Start Premiere and click the New Project button. Premiere asks you to name your project and address a few other details, but for now, as you learn the layout of the program, simply accept the project name that Adobe assigns (My Project.prel) and click the OK button. That takes you to Premiere’s workspace, the place where you edit your videos. It’s divided into three main areas, as shown in Figure 1-3.
The Monitor panel plays back your video clips. Use the DVD-style buttons below it to control playback.
Think of the Tasks panel, to the right of the monitor, as your video-editing toolbox. Select the task you want to tackle by clicking one of the tabs at the top of the panel (Organize, Edit, Disc Menus, and Share). You’ll learn about each of these a little later in this chapter.
The My Project panel displays your movie-in-progress—the video and audio assets you’ve assembled to create your movie. My Project offers two viewing modes: the Sceneline view lets you assemble your movie by dragging clips into a series of boxes, each of which displays a still image of the clip; and the Timeline view looks more like a traditional video-editing tool, with a time scale along the top and separate video and audio tracks below.
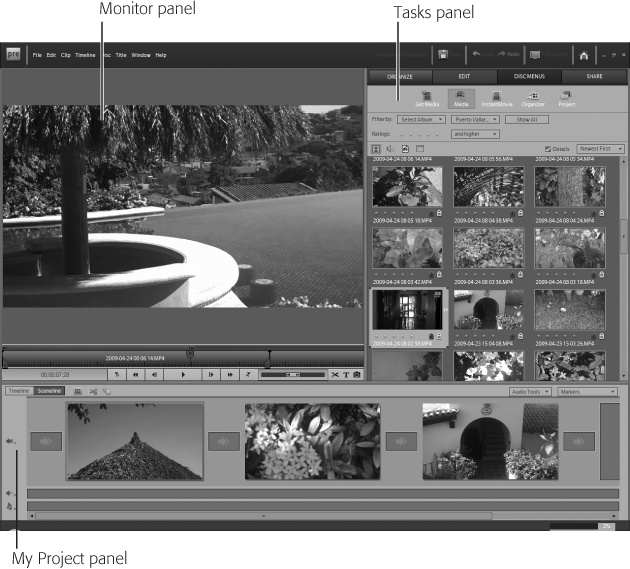
As you work in Premiere, you’ll find yourself jumping back and forth among these panels. For example, to put together a video of a day in the Caribbean, go to the Tasks panel and click on the Organize tab to review your clips. Select the clips you want in your video, drag them to the My Project panel, and arrange them in the order in which you want them to play back. Preview your draft movie in the Monitor panel. Then move on to the other tabs in the Task panel to fine-tune your video, add special effects, and create a disc or export it to a website.
The Monitor Panel
Think of the monitor as a TV screen where you play your clips as you assemble your movie. No matter how great a cameraperson you are, you won’t use every frame of every clip you shoot. Instead, you select the best shots using the monitor’s controls (for details on editing clips, see Choose Your Editing Style). Move back and forth within a clip using the buttons and controls at the bottom of the panel (Figure 1-4).
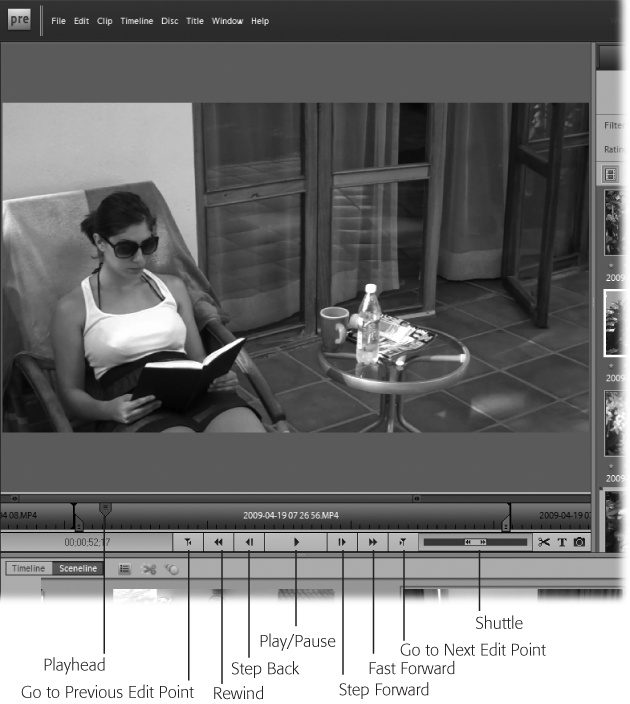
The Play button actually handles two tasks: Click it once to play back a clip, and click it again to pause playback. As you play your video, the playhead tells you exactly where you are. If, as you edit, you know where you want to be in a clip, you can drag the playhead right to that spot.
The Step Back and Step Forward buttons move you forward and backward through your video a frame at a time—a great way to find the exact frame at which you want to cut to another scene, add a transition, or select a single frame of your video to export as a still image (to use as a DVD cover, for example).
The Rewind and Fast Forward buttons work just as they do on your DVD player.
Video projects are made up of more than just a single clip, of course. The point where one clip meets another is called an “edit point.” Premiere uses these edit points as navigational aids to help you move through your movie quickly. The "Go to Previous Edit Point” and "Go to Next Edit Point” buttons move you along each of the edit points in your movie.
The first 20 times you see a clip, you may be patient enough to watch it at normal speed while you admire its cinematic beauty. Later, with a deadline looming, you’re eager to zip to a particular point for editing. That’s when Premiere’s "shuttle” control comes in handy. Shuttle lets you navigate through your video at variable speeds—a favorite trick of experienced video editors. Drag the shuttle to the right to move forward and to the left to move back. The further you drag the control off-center, the faster you move through your video.
Tasks Panel
The Tasks panel is a bit of a chameleon—it looks different depending on which of the four tabs—Organize, Edit, Disc Menus, or Share—you click (see Figure 1-5). When you click a tab, a related set of tools appears in the panel below it. For most video projects, you move from left to right across the tabs as you work toward a finished product. Here’s a look at each of the tabs and their tools:
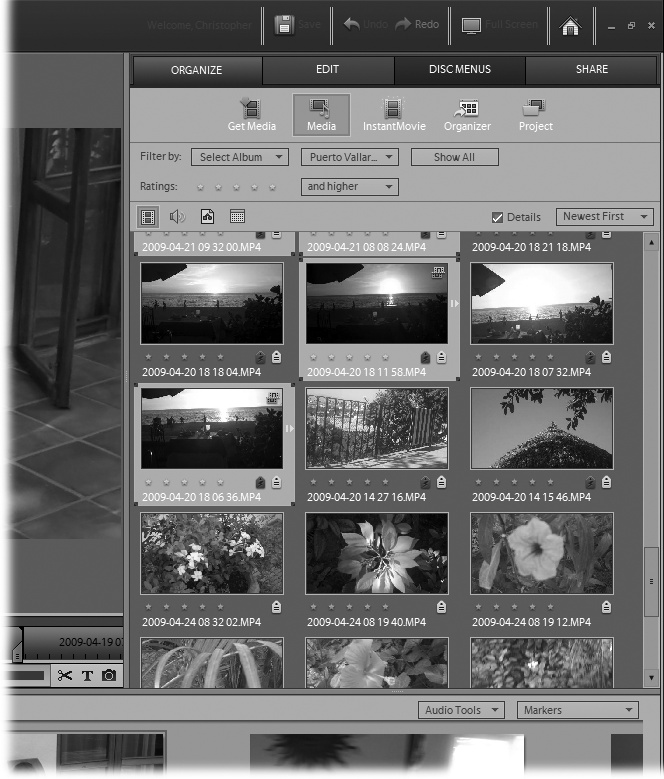
Organize (click the tab itself or, from Premiere’s menu bar, choose Window → Organize) is the natural first step for any project. Here, you transfer video clips from your camera to your computer. It’s also where you first view your clips and organize them by quality and content. You can drag video clips from here to the sceneline, putting them into sequence, a process described in detail on Assemble Your Movie in the Sceneline.
The Edit tab (Window → Effects) is usually the next step for your project. Once you decide on your basic sequence of clips, it’s time to add special effects, transitions, and titles. Premiere also provides themes—predesigned visuals and background music (“Road Trip,” “Outdoor Wedding”). Themes give you an easy way to apply professionally designed wrappings to your project.
Use the Disc Menus tab (Window → Disc Menus) to create an opening screen and chapter divisions for movies destined for DVD or Blu-Ray discs. Again, Adobe provides visuals, all you need to do is mark the scenes and chapters in your movie. The end result is a slick, fool-proof menu and navigation system.
Use the Share tab (Window → Share) to export your finished project. Premiere makes it easy to burn videos and their menus onto a disc. If your video is headed for the web, the Share tab streamlines the process of meeting the video requirements for sites like YouTube and Photoshop.com.
My Project Panel
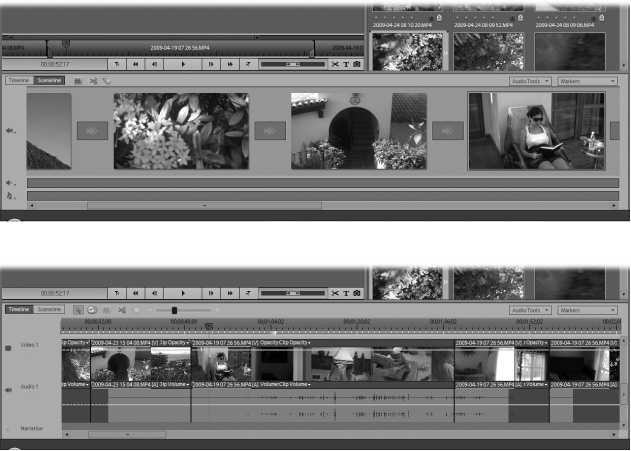
The My Project panel stretches across the bottom of Premiere’s workspace. It gives you two distinct views of your project: Sceneline and Timeline. The Sceneline view lets you quickly piece together a video and work on it in broad strokes. The Timeline view gives you granular control over your movie, letting you fine-tune every frame.
Sceneline mode (Figure 1-6 top) looks like a series of boxes. You drop video clips into the boxes in the correct order to turn individual clips into a movie. You apply transitions, like dissolves and wipes, in the small boxes between each clip (for more on transitions, see Choose a Stock Transition). The sceneline is similar to a storyboard, a tool filmmakers use to visualize their movies before they shoot any film. Typically, a storyboard is a series of drawings, where each drawing represents a scene or some important shot in the movie.
Timeline mode (Figure 1-6 bottom) looks familiar if you’ve used other video-editing programs. At the top of the panel, the timeline measures the length of your movie and the position of the playhead, using a video “frame” as the basic unit of measurement. Below that, horizontal bands hold video and audio tracks. You can have multiples of each, giving you the ability to superimpose both images and sounds. For example, the soundtrack for your movie might combine the audio you recorded as you shot your video, along with narration, music, and sound effects. You can put each of these components on separate tracks, giving you control over their timing, volume, and other properties.
Create a New Project
Now that you’ve had a chance to noodle around Premiere’s workspace, it’s time to officially start a new project. Here are the steps you take:
Click the Premiere icon in Windows’ Quick Launch bar or use the Windows Start menu to launch the program.
Tip
Start Premiere Elements explains some of the different ways to start Premiere.
On the splash screen, click New Project.
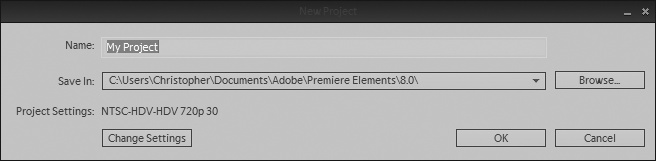
Premiere displays a New Project window with boxes for the project’s name and file location (Figure 1-7). Below that, Project Settings describes the project’s video format, with the option to change it via the Change Settings button.
Figure 1-7. The most important details when you create a new project are the name of your project and where Premiere will store the project. Once you get rolling with video projects, you may not have to change the settings that determine the video size and quality. You’re likely to use the same settings most of the time.In the Name box, type a name for your project, such as My First Classic Movie.
You have to give each project a unique name. For most projects, this is the only change you’ll ever make in the New Project window. You may never specify the location of your saved projects or the technical details related to the Project Settings. Still, it’s good to know what they’re for.
(Optional) To save your project to a new location, click the Browse button beside the “Save In” box.
Initially, Premiere saves your projects in the folder the program itself resides in, C:\Users\yourname\My Documents\Adobe\Premiere Elements\8.0. That’s fine if you have enough room on your hard drive. But if you want to store your videos elsewhere, such as a dedicated hard drive, click the Browse button and navigate to the new location. Then click OK and you’re all set.
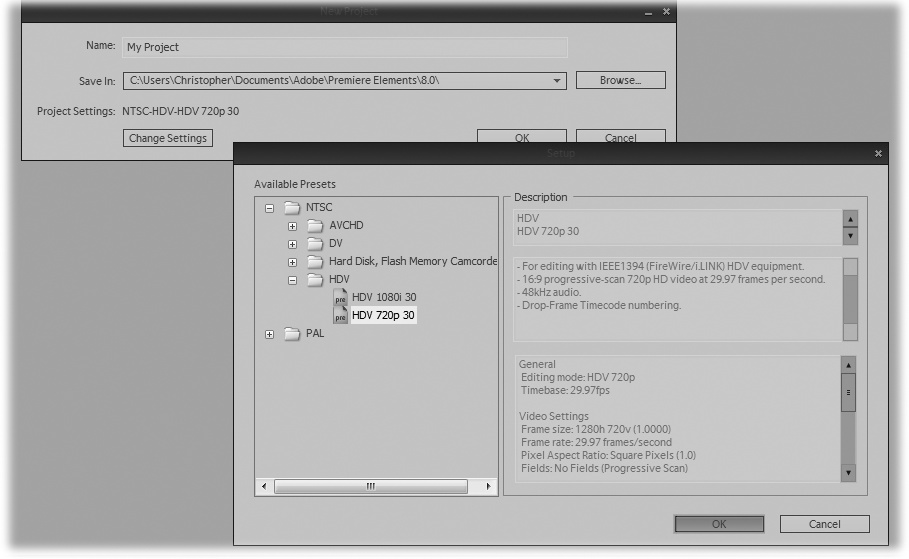
(Optional) To change the format of the movie you create—say from a standard-resolution video using the 4:3 aspect ratio of TV sets to a high-definition widescreen format—click the Change Settings button.
A new window opens (see Figure 1-8) where you make a couple of technical decisions based primarily on the type of video camera you use. If you don’t know the answers to these questions off the top of your head, it’s a good time to pull out the camera’s manual. It’s not missing, is it?
The first thing you need to figure out is whether your camera and TV set use the NTSC or PAL video system. (In the U.S., nearly all video systems use the NTSC format.)
Once you do that, you need to find out the video format your camera uses. Your choices include an arcane alphabet soup of options like AVCHD, DV, and HDV. Who needs that? The good news is that you should be able to find these details on the cover or within the first few pages of your camera’s manual. (If you need more help or want to dig a little deeper, see the box “Choosing Project Settings” on Save and Back Up a Project) After you change the settings to match your camera, click OK to close the Project Settings window.
In the New Project panel, click OK.
The New Project window closes and you see the Premiere workspace, with the three panels described on A Brief Tour of Premiere Elements.
Once you create a new project, you want to add clips to it. You do that from the Organize tab in the Tasks panel. Under that tab, click the Get Media button. The details of importing files for your video project appear in Chapter 2, but because you probably can’t wait to get started, click on one of the sources listed and import a file or two so you see the process in action (if you don’t have a camera hooked up to your PC just yet, browse to the folder that holds Premiere and click Clip Arts → Common → Nature and double-click the file named Palm Tree.png).
Save and Back Up a Project
Once you create a project, you need to know how to save it. As with most PC projects, it’s wise to save early and often. That way, you won’t lose any of your hard work if your PC freezes up mid-project. If your work is especially important (or if you’re a chronic worrier), you may want to save duplicate or back-up copies of your project.
Saving a video project is about the same as saving a word processing document. Go to File → Save or press Ctrl+S. After a little hard disk action, Premiere saves your file. To save a back-up copy, choose File → Save a Copy. The Save Project window opens, where you can give your project a different name and navigate to a new save location.
Note
Premiere projects are saved with the .prel file extension. So, for example, if you double click a file in Windows Explorer that ends in .prel, Windows automatically starts Premiere and opens the project file you clicked.
While the mechanics of saving a Premiere file are the same as those for a Word document, the practical aspects are notably different. Here’s why: When you save a Word document, you save everything associated with that document—words, embedded pictures, graphs, and so on. When you save a Premiere file, you don’t save all the video clips and sound files that make up your movie. If you did, your hard drive, no matter how capacious, would fill up after a couple of movies—video and audio files are notoriously huge. So Premiere, like most video-editing programs, creates a project file that simply points to the appropriate sections of your original clips. A Premiere project file, in other words, is essentially a collection of pointers.
By the same token, when you edit one of your video clips, you aren’t actually chopping up the clip. You’re telling Premiere something like, “I want to use frame 122 to frame 875 of the clip named mydayatthebeach.mp4. Premiere takes note of that and displays only that portion of the clip in the Monitor panel. And, when you export your finished movie, it copies just that portion of the clip to your movie file.
Because all the projects you create point to your raw video clips, you don’t want to move, rename, or delete those original files. If you do, Premiere won’t be able to find them the next time you open a project. For more details on the location of your video files and projects, see the box on Open an Existing Project.
Tip
If you want to make back-ups of your raw video clips, you need to make copies using Elements Organizer (Back Up Your Entire Catalog) or use traditional Windows back-up or file-copying techniques. Just make sure you don’t move, delete, or rename the files your projects point to.
Avoid Disaster with Auto Save
Like a lot of programs, Premiere can automatically save your project on a regular basis. That way, if the power goes out due to natural-, child-, or dog-borne disasters, you’ve got a back-up. Premiere turns Auto Save on when you first install the program. To review or adjust the settings, choose Edit → Preferences. In the list of topics on the left side of the window that pops up, click Auto Save to tweak the settings. Make sure the “Automatically Save Projects” box is checked and then, in the “Automatically Save Every _ minutes” box, type in a number that matches your comfort level. Premiere uses 20 minutes as the default. You may want to change that to, say, 10 or 15 minutes if you’re feeling disaster-prone. Just underneath that setting, the Maximum Project box refers to how many versions you want to back up. Five is a good number for most situations.
This way, if your computer crashes, the next time you start Premiere, it asks if you want to open the last auto-saved version of your project.
Tip
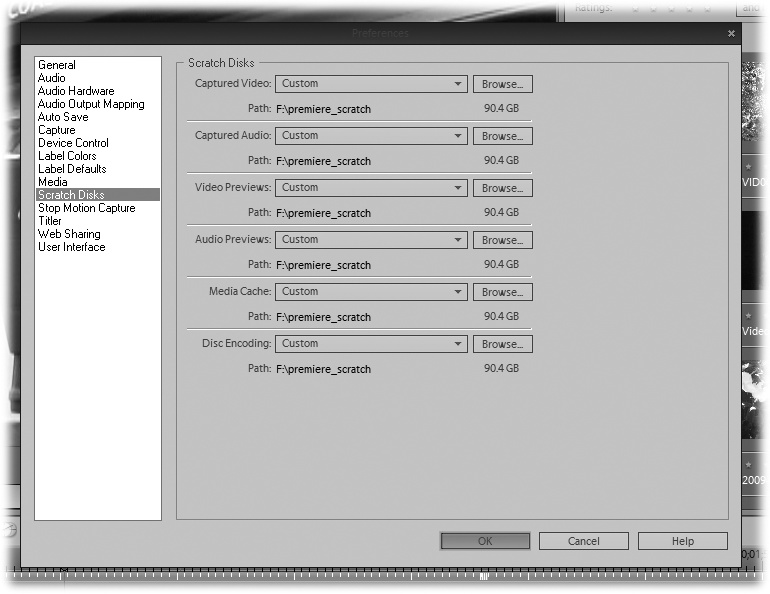
While you have your Preferences window open, you may want to take a look at the Scratch Disk preferences. Premiere stores temporary files, called scratch files, on your computer’s hard drive. You can manage disk space and maybe get a little better video performance by tweaking these settings. For details, see the box on Create an InstantMovie.
Open an Existing Project
After you create a project, you can open it from Premiere’s splash screen or from the File command in Premiere’s menu bar at the top of the screen.
To open a project from the splash screen (shown earlier in Figure 1-1), click on the Open Project button. A list of recent projects appears under your cursor. Click the name of the project you want to open.
To open a project from Premiere’s File menu, choose File → Open Project. A window named Open Project appears displaying the files in your Premiere Elements 8.0 folder. If you want, you can navigate to a different location to open a project file.
To open a project you recently worked on, choose File → Open Recent Projects. Premiere displays a submenu with your last five projects listed. Click the name of the project you want to open.
No matter which method you use, Premiere opens your project and displays its media files in the Organize tab of the Tasks panel. You can only have one project open at a time. The My Project panel displays your video clips arranged the way you last saved them. Now you’re ready to continue editing your project.
Create an InstantMovie
Impatient to put a video together so you can show off your family reunion or vacation highlights? That’s why Adobe created InstantMovie. InstantMovie analyzes your video clips and makes basic editing decisions for you, so it’s a fast path to a video that’s ready for prime time.
InstantMovie assembles the pieces for a 4- to 6-minute movie by asking you a few easy questions along the way, and you have the opportunity to tweak your video at the end of the process. The basic steps are:
Select the video clips you want in your movie.
Choose a theme.
Decide how Premiere applies the theme elements.
Premiere analyzes and “smart tags” the clips.
Premiere assembles the clips.
Premiere applies the theme elements.
You preview the movie.
You tweak the movie.
Premiere saves the movie as a finished product.
Just for fun, and because you’re probably dying to dive into the program, collect some of your favorite movie clips and follow these steps to make an InstantMovie:
Note
For the complete details on importing video clips into Premiere, see Video Camera Storage Methods.
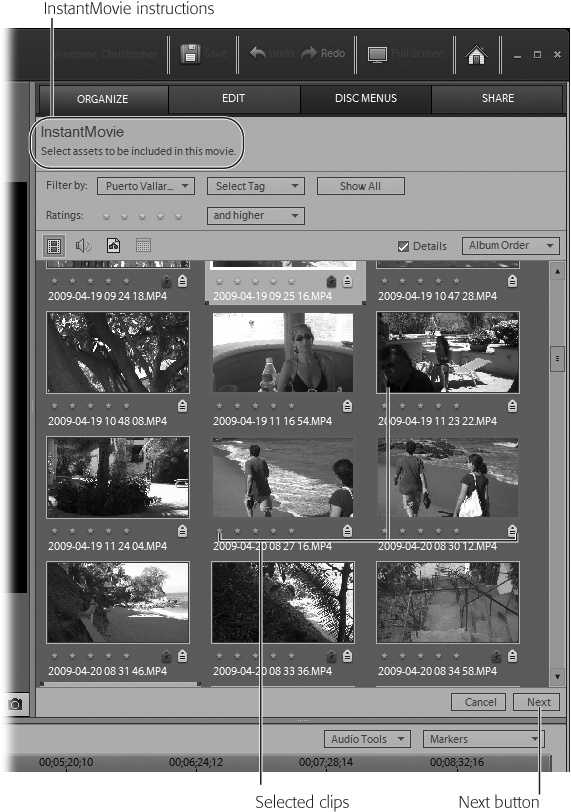
Click InstantMovie in the Organize tab of the Tasks panel.
The Organize tab displays the InstantMovie tools with text prompts in the upper-left corner that lead you, step by step, through the InstantMovie process (Figure 1-10).
Ctrl-click the video clips or assets you want in your InstantMovie.
Ctrl-click works like a toggle; it selects and deselects a clip with each click. Try it; put your cursor on a clip and Ctrl-click. The perimeter of the clip turns blue to indicate that it’s selected. Now Ctrl-click the clip again, and you deselect it—the blue border disappears.
Shift-click selects all the clips between two clip selections. Shift-click on the first clip in a sequence, then move your cursor to the last clip in the sequence, and then shift-click again—you select all the clips between the first and last clip.
Ctrl+A selects all the assets in the Organize window.
In the lower-right corner of the Tasks panel, click the Next button.
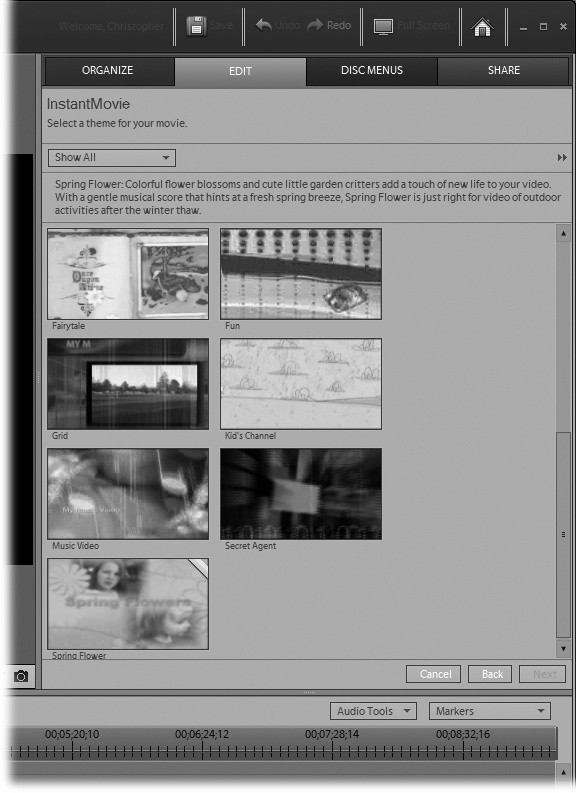
The Tasks panel changes to the Edit tab, displaying Themes.
Select a theme.
You may need to use the scroll bar on the right to see all the themes. You can also use the drop-down menu to display themes by category, such as Style, Events, or Slideshow (see Figure 1-11). One of the Style themes, for example, makes your movie look like a music video.
Click Next.
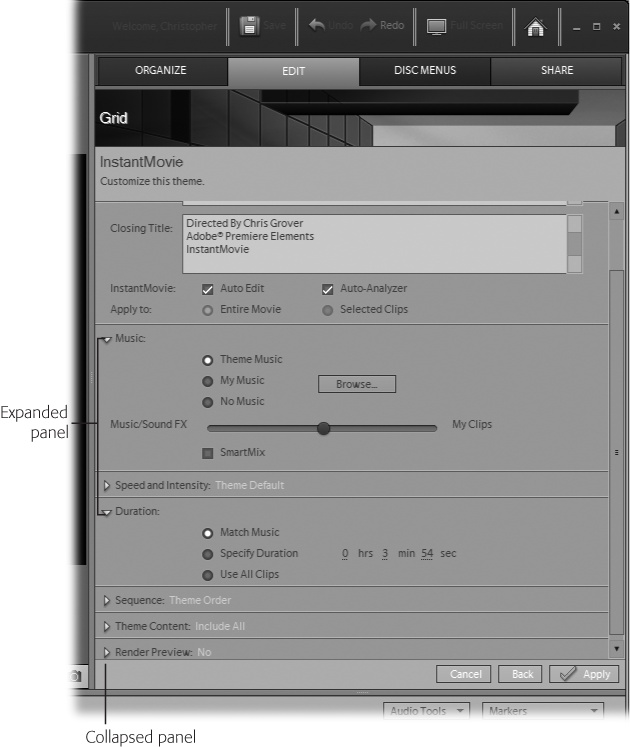
As shown in Figure 1-12, the Edit tab lists the components that make up Premiere’s themes: Opening Titles, Closing Titles, Music, Speed and Intensity, Duration, Sequence, Theme Content, and Render Preview. You can edit each of them to fine-tune the way Premiere applies your chosen theme.
Premiere suggests an opening and closing title in the relevant boxes, but you can edit it to say anything you want. You might, for example, change the Opening Title box to read My First Classic, Directed by Sheer Genius.
Under Music, choose Theme Music.
If you like the music Premiere pairs with the theme, you don’t need to change anything. If not, you have only two options: You can go without music, or you can select a song from your own music files (Premiere doesn’t offer an alternative from its own music archive). To use a track stored on your computer, click the Browse button to locate it.
Below the music choices, the Music/Sound FX slider balances the volume between the music and the sounds recorded in your video clip. Drag the slider to the left to make the music louder and the video clip softer.
Under Duration, choose Match Music.
When you choose Match Music, Premiere automatically makes the length of the InstantMovie match the length of the music you selected. (If you chose No Music, the Match Music option is isn’t available.) If you choose Specify Duration, you dictate the length of the movie. If you choose Use All Clips, the aggregate length of the clips determines the length of your movie.
Under Sequence, choose Theme Order.
Adobe gives themes their own built-in rules for selecting and ordering video clips. For example, when a theme wants to increase the level of excitement, it may use lots of close-ups, with rapid cutting between clips. When you choose Theme Order, you let Premiere use those pre-set rules. You can override them by choosing Time/Date, which orders the clips temporally. For example, you might want to choose the Time/Date option for a wedding video. That way, the sequence of clips follows the sequence of events: groom arrives, bride walks down aisle, vows taken.…
Under Theme Content, you can include or exclude certain theme elements, such as the Intro/Closing Movie, Transitions, Titles, and menus. Just check the boxes you want to include.
Under Render Preview, click Yes.
After Premiere creates a video based on its and your choices, you get to preview the results in the monitor. If a movie and its theme include lots of transitions and special effects, the playback may be choppy. That’s because your computer is trying to perform all the calculations necessary to coordinate the movie and its soundtrack, transitions, and effects at the same time as it plays back your video. When you “render” the preview, Premiere takes the time to perform all those calculations up front. The result is smoother playback, with the rendered preview looking like the final version of your movie. If you render the preview, a progress bar appears to show the status of the rendering process.
Click the Apply button.
Premiere goes to work assembling your video and applying the theme elements you specified. This can take a few minutes, depending on the length of the movie and how powerful your computer is. First, Premiere analyzes the selected clips using its Smart Tags feature (see Smart-Tag with Auto-Analyzer). This process helps Premiere identify the best parts of a clip. When all the work is done, you see a movie in the Monitor panel and a clip in the sceneline or timeline.
In the Monitor panel, click the Play button.
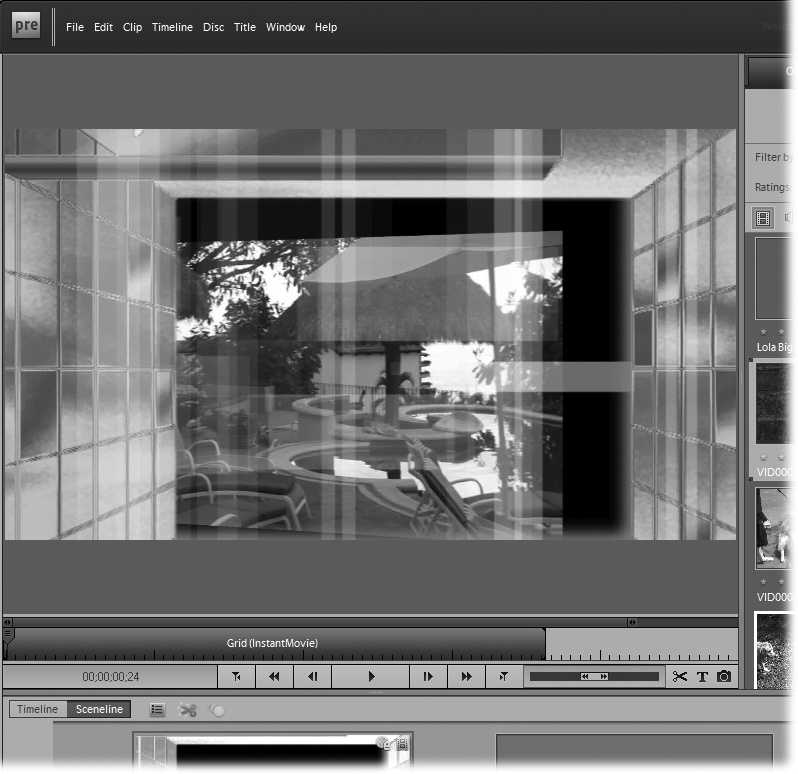
Your movie plays as shown in Figure 1-13. If you’re happy with it, go ahead with the rest of the steps in this exercise. If you want to make changes, see “Edit Your InstantMovie” on Edit Your InstantMovie.
It displays several ways to share your video, including posting it online and saving it to disc, to your PC, to your mobile device, or to tape.
Click Personal Computer.
You can choose any of the options, but Personal Computer lets you create video files that play back on PCs using Windows Media Player, Adobe’s Media Player, or Apple’s QuickTime media player.
Choose MPEG and then click NTSC DVD Widescreen.
If your video clips aren’t in the widescreen format, you can choose the NTSC DVD Standard or another format that suits your movie. You can find more details about video formats on Video Camera Storage Methods.
In the File Name box, type in a name such as My First Classic and click the Browse button to choose a save location.
Premiere automatically saves your videos in your Documents folder unless you tell it otherwise.
Click Save.
Premiere renders your movie, creating a video file in the format you chose. A progress bar shows you how far along the process is. Rendering a movie can take some time, so you may want to grab a beverage of choice or check your email while Premiere does its work.
Edit Your InstantMovie
The mark of a powerful Hollywood director is having “final cut” approval, the last word on every aspect of a film. Premiere gives you that privilege right away, even in InstantMovie. After all, directors and studio heads don’t always agree when it comes to editing, and neither will you and Premiere. It’s good to be the studio big shot.
When Premiere creates an InstantMovie, it produces a single clip. If you want to make changes, such as swapping a clip here or there, you need to break that clip into pieces. Fortunately, Premiere automates the process.
Right-click the InstantMovie clip in the timeline or the sceneline and then choose Break Apart InstantMovie in the shortcut menu. Premiere breaks the movie into its basic parts, showing clips and special effects in the My Project panel.
Replace any of the clips by right-clicking on them in the timeline and choosing Replace Clip From Media or Project. If the replacement clip is longer than the original, Premiere trims it to fit. If the clip is shorter, a message warns you that the clip’s too short.
It’s a Wrap
The steps Premiere goes through to create an InstantMovie are similar to those you take when you create your own movie. In fact, InstantMovie teaches you a lot about assembling a movie and applying transitions and effects. For example, consider the timing and video clip choices Premiere makes in assembling an InstantMovie. Study the way it creates the opening and closing titles. Examine how Premiere applies transitions and special effects to your clips.
In the following chapters, this book expands on each of these movie-making steps and shows how you can add your own personal touches to your movies.
Hooray for Hollywood!
Note
Famous Movie Moment: In 1878, photographer Eadweard Muybridge helped former California Governor Leland Stanford win a bet that when a horse gallops, all four hooves leave the ground at the same time. He used 12 stereoscopic cameras placed 21 inches apart to completely capture a horse’s stride. Even though it’s more like time-lapse photography, this project is considered one of the stepping stones to the invention of motion pictures. Think of what Muybridge could have done with your camcorder.
Get Premiere Elements 8: The Missing Manual now with the O’Reilly learning platform.
O’Reilly members experience books, live events, courses curated by job role, and more from O’Reilly and nearly 200 top publishers.

