Build a Top-Level Menu
Top-level menus appear on either the worksheet menu bar or the chart menu bar (Figure 19-1 or Figure 19-2). To add a top-level menu to the worksheet menu bar, select a worksheet before creating the menu. To add a top-level menu to the chart menu bar, select a chart before creating the menu. To add the menu to both menu bars, create the menu twice—once for each menu bar.
To create a new top-level menu on a menu bar in Excel:
Choose Tools → Customize → Commands. Excel displays the Commands tab of the Customize dialog box.
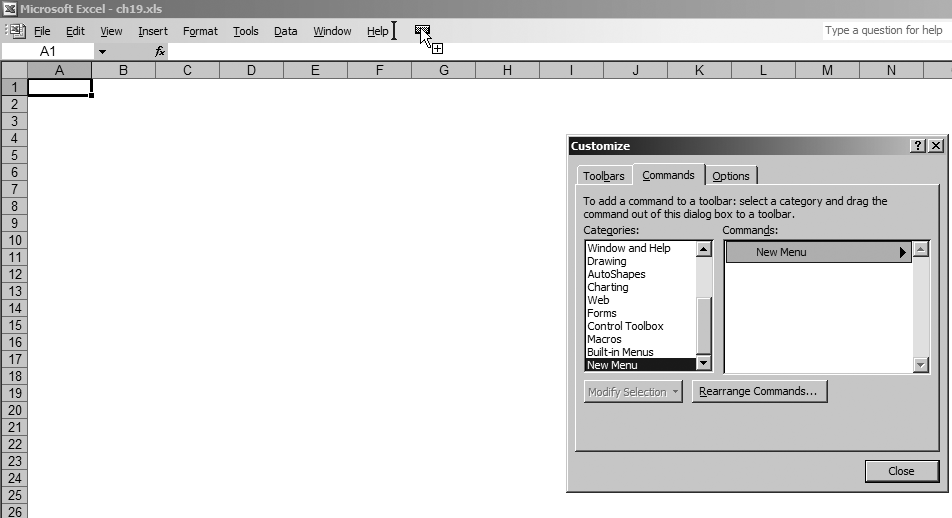
In the Categories list, choose New Menu. Click New Menu in the Commands list and drag it onto the Excel menu bar as shown in Figure 19-4. Excel adds a new top-level menu to the menu bar.

Figure 19-4. Steps 1 and 2: add the top-level menu
Right-click on the new menu item and rename it as shown in Figure 19-5.
In the Categories list, choose Macros, then click Custom Menu Item from the Commands list and drag it onto the new menu item as shown in Figure 19-6.
Right-click the new menu item, rename it, and assign it to run a macro as shown in Figure 19-7.
Click Close on the Customize dialog box when you are done adding items and setting menu properties.
Tip
Right-clicking displays the menu properties shown in Figure 19-5 and Figure 19-7 only while the Customize dialog is open.
Figure 19-5. Step 3: rename the menu
Figure 19-6. Step 4: add items to the menu ...
Get Programming Excel with VBA and .NET now with the O’Reilly learning platform.
O’Reilly members experience books, live events, courses curated by job role, and more from O’Reilly and nearly 200 top publishers.

