Chapter 1. Views
A view (an object whose class is UIView or a subclass of UIView) knows how to draw itself into a rectangular area of the interface. Your app has a visible interface thanks to views. Creating and configuring a view can be extremely simple: “Set it and forget it.” For example, you can drag an interface widget, such as a UIButton, into a view in the nib editor; when the app runs, the button appears, and works properly. But you can also manipulate views in powerful ways, in real time. Your code can do some or all of the view’s drawing of itself (Chapter 2); it can make the view appear and disappear, move, resize itself, and display many other physical changes, possibly with animation (Chapter 4).
A view is also a responder (UIView is a subclass of UIResponder). This means that a view is subject to user interactions, such as taps and swipes. Thus, views are the basis not only of the interface that the user sees, but also of the interface that the user touches (Chapter 5). Organizing your views so that the correct view reacts to a given touch allows you to allocate your code neatly and efficiently.
The view hierarchy is the chief mode of view organization. A view can have subviews; a subview has exactly one immediate superview. Thus there is a tree of views. This hierarchy allows views to come and go together. If a view is removed from the interface, its subviews are removed; if a view is hidden (made invisible), its subviews are hidden; if a view is moved, its subviews move with it; and other changes in a view are likewise shared with its subviews. The view hierarchy is also the basis of, though it is not identical to, the responder chain.
A view may come from a nib, or you can create it in code. On balance, neither approach is to be preferred over the other; it depends on your needs and inclinations and on the overall architecture of your app.
The Window
The top of the view hierarchy is the app’s window. It is an instance of UIWindow (or your own subclass thereof), which is a UIView subclass. Your app should have exactly one main window. It is created at launch time and is never destroyed or replaced. It occupies the entire screen and forms the background to, and is the ultimate superview of, all your other visible views. Other views are visible by virtue of being subviews, at some depth, of your app’s window.
Note
If your app can display views on an external screen, you’ll create an additional UIWindow to contain those views; but in this chapter I’ll behave as if there were just one screen, the device’s own screen, and just one window. I repeat: if there is just one screen, your app should create just one UIWindow. You may encounter online tutorials that advise explicit creation of a second UIWindow as a way of making content appear in front of the app’s main interface; such statements are wrong and should be disregarded. To make content appear in front of the interface, add a view, not another entire window.
The window must fill the device’s screen. Therefore, its size and position must be identical to the size and position of the screen. This is done by setting the window’s frame to the screen’s bounds as the window is instantiated (and I’ll explain later in this chapter what “frame” and “bounds” are):
UIWindow* w = [[UIWindow alloc] initWithFrame:[[UIScreen mainScreen] bounds]];
The window must persist for the lifetime of the app. To make this happen, the app delegate class has been given a window property with a strong retain policy. As the app launches, UIApplicationMain (called in the main function in main.m) instantiates the app delegate class and retains the resulting instance. This is the app delegate instance; it is never released, so it persists for the lifetime of the app. The window instance is assigned to the app delegate instance’s window property; therefore it, too, persists for the lifetime of the app.
You will typically not put any view content manually and directly inside your main window. Instead, you’ll obtain a view controller and assign it to the main window’s rootViewController property. This causes the view controller’s main view (its view) to be made the one and only immediate subview of your main window — the main window’s root view. All other views in your main window will be subviews of the root view. Thus, the root view is the highest object in the view hierarchy that the user will usually see. There might be just a chance, under certain circumstances, that the user will catch a glimpse of the window, behind the root view; for this reason, you may want to assign the main window a reasonable backgroundColor. But this seems unlikely, and in general you’ll have no reason to change anything about the window itself.
Your app’s interface is not visible until the window, which contains it, is made the app’s key window. This is done by calling the UIWindow instance method makeKeyAndVisible.
All of the configuration that I’ve just described is trivial to perform, because the Xcode app templates implement all of it for you:
- App with a main storyboard
If your app has a main storyboard, as specified by its Info.plist key “Main storyboard file base name” (
UIMainStoryboardFile) — the default for most Xcode 5 app templates, except the Empty Application template — thenUIApplicationMaininstantiates UIWindow with the correct frame and assigns that instance to the app delegate’swindowproperty. It also instantiates the storyboard’s initial view controller and assigns that instance to the window’srootViewControllerproperty. All of that happens before the app delegate’sapplication:didFinishLaunchingWithOptions:is called (Appendix A).Finally,
UIApplicationMaincallsmakeKeyAndVisibleto display your app’s interface. This in turn automatically causes the root view controller to obtain its main view (typically by loading it from a nib), which the window adds as its own root view. That happens afterapplication:didFinishLaunchingWithOptions:is called.- App without a main storyboard
If your app has no main storyboard, then creation and configuration of the window must be done in some other way. Typically, it is done in code. You can see this in a project generated from the Empty Application template, where all the configuration I’ve just described is performed explicitly, in code, in
application:didFinishLaunchingWithOptions:, like this:self.window = [[UIWindow alloc] initWithFrame:[[UIScreen mainScreen] bounds]]; // Override point for customization after application launch. self.window.backgroundColor = [UIColor whiteColor]; [self.window makeKeyAndVisible];
It is extremely improbable that you would ever need to subclass UIWindow. If, however, you wanted to create a UIWindow subclass and make an instance of that subclass your app’s main window, then how you proceed depends on how the window is instantiated in the first place:
- App with a main storyboard
As the app launches, after
UIApplicationMainhas instantiated the app delegate, it asks the app delegate instance for the value of itswindowproperty. If that value is nil,UIApplicationMaininstantiates UIWindow and assigns that instance to the app delegate’swindowproperty. If that value is not nil,UIApplicationMainleaves it alone and uses it as the app’s main window. Therefore, the way to instantiate a UIWindow subclass and use that instance as your app’s main window is to implement the getter for the app delegate’swindowproperty in such a way as to generate the UIWindow subclass instance exactly once (that is, instantiate the UIWindow subclass only if you haven’t already done so), like this:- (UIWindow*) window { UIWindow* w = self->_window; if (!w) { w = [[MyWindow alloc] initWithFrame: [[UIScreen mainScreen] bounds]]; self->_window = w; } return w; }- App without a main storyboard
-
You’re already instantiating UIWindow and assigning that instance to the app delegate’s
self.window, in code. So instantiate your UIWindow subclass instead.
Once the app is running, there are various ways to refer to the window:
If a UIView is in the interface, it automatically has a reference to the window through its own
windowproperty.You can also use a UIView’s
windowproperty as a way of asking whether it is ultimately embedded in the window; if it isn’t, itswindowproperty is nil. A UIView whosewindowproperty is nil cannot be visible to the user.The app delegate instance maintains a reference to the window through its
windowproperty. You can get a reference to the app delegate from elsewhere through the shared application’sdelegateproperty, and through it you can refer to the window:UIWindow* w = [[[UIApplication sharedApplication] delegate] window];
The shared application maintains a reference to the window through its
keyWindowproperty:UIWindow* w = [[UIApplication sharedApplication] keyWindow];
That reference, however, is slightly volatile, because the system can create temporary windows and interpose them as the application’s key window. For example, while a UIAlertView is showing (Chapter 13), it is the application’s
keyWindow.
Experimenting With Views
In the course of this and subsequent chapters, you may want to experiment with views in a project of your own. Since view controllers aren’t formally explained until Chapter 6, I’ll just outline two simple approaches.
One way is to start your project with the Single View Application template. It gives you a main storyboard containing one scene with one view controller instance which itself contains its own main view; when the app runs, that view controller will become the app’s main window’s rootViewController, and its main view will become the window’s root view. You can drag a view from the Object library into the main view as a subview, and it will be instantiated in the interface when the app runs. Alternatively, you can create views and add them to the interface in code; the simplest place to do this, for now, is the view controller’s viewDidLoad method, which has a reference to the view controller’s main view as self.view. For example:
- (void)viewDidLoad {
    [super viewDidLoad];
    UIView* mainview = self.view;
    UIView* v = [[UIView alloc] initWithFrame:CGRectMake(100,100,50,50)];
    v.backgroundColor = [UIColor redColor]; // small red square
    [mainview addSubview: v]; // add it to main view
}
Alternatively, you can start your project with the Empty Application template. It has no .xib or .storyboard file, so your views will have to be created entirely in code. The Empty Application template does not supply any view controllers, and does not assign any view controller to the window’s rootViewController property. This situation causes the runtime to complain when the application is launched: “Application windows are expected to have a root view controller at the end of application launch.” A simple solution is to put your code in the app delegate’s application:didFinishLaunchingWithOptions:, creating a minimal root view controller and accessing its main view through its view property. For example:
- (BOOL)application:(UIApplication *)application
        didFinishLaunchingWithOptions:(NSDictionary *)launchOptions {
    // (template code:)
    self.window =
        [[UIWindow alloc] initWithFrame:[[UIScreen mainScreen] bounds]];
    // Override point for customization after application launch.
    // (your code:)
    self.window.rootViewController = [UIViewController new];
    UIView* mainview = self.window.rootViewController.view;
    UIView* v = [[UIView alloc] initWithFrame:CGRectMake(100,100,50,50)];
    v.backgroundColor = [UIColor redColor]; // small red square
    [mainview addSubview: v]; // add it to the main view
    // (template code:)
    self.window.backgroundColor = [UIColor whiteColor];
    [self.window makeKeyAndVisible];
    return YES;
}
Subview and Superview
Once upon a time, and not so very long ago, a view owned precisely its rectangular area. No part of any view that was not a subview of this view could appear inside it, because when this view redrew its rectangle, it would erase the overlapping portion of the other view. No part of any subview of this view could appear outside it, because the view took responsibility for its own rectangle and no more.
Those rules, however, were gradually relaxed, and starting in OS X 10.5, Apple introduced an entirely new architecture for view drawing that lifted those restrictions completely. iOS view drawing is based on this revised architecture. In iOS, some or all of a subview can appear outside its superview, and a view can overlap another view and can be drawn partially or totally in front of it without being its subview.
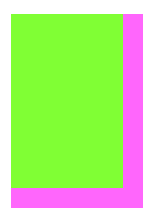
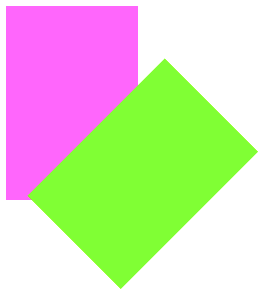
For example, Figure 1-1 shows three overlapping views. All three views have a background color, so each is completely represented by a colored rectangle. You have no way of knowing, from this visual representation, exactly how the views are related within the view hierarchy. In actual fact, the view in the middle (horizontally) is a sibling view of the view on the left (they are both direct subviews of the root view), and the view on the right is a subview of the middle view.
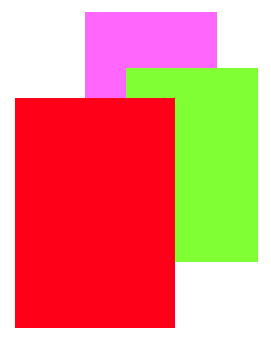
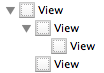
When views are created in the nib, you can examine the view hierarchy in the nib editor’s document outline to learn their actual relationship (Figure 1-2). When views are created in code, you know their hierarchical relationship because you created that hierarchy. But the visible interface doesn’t tell you, because view overlapping is so flexible.
Note
To see an outline of a view’s subview hierarchy at runtime while paused in the debugger, use the debugger console to send the recursiveDescription command to that view; for example, po [someView recursiveDescription].
Nevertheless, a view’s position within the view hierarchy is extremely significant. For one thing, the view hierarchy dictates the order in which views are drawn. Sibling subviews of the same superview have a definite order: one is drawn before the other, so if they overlap, it will appear to be behind its sibling. Similarly, a superview is drawn before its subviews, so if they overlap it, it will appear to be behind them.
You can see this illustrated in Figure 1-1. The view on the right is a subview of the view in the middle and is drawn on top of it. The view on the left is a sibling of the view in the middle, but it is a later sibling, so it is drawn on top of the view in the middle and on top of the view on the right. The view on the left cannot appear behind the view on the right but in front of the view in the middle, because those two views are subview and superview and are drawn together — both are drawn either before or after the view on the left, depending on the ordering of the siblings.
This layering order can be governed in the nib editor by arranging the views in the document outline. (If you click in the canvas, you may be able to use the menu items of the Editor → Arrange menu instead — Send to Front, Send to Back, Send Forward, Send Backward.) In code, there are methods for arranging the sibling order of views, which we’ll come to in a moment.
Here are some other effects of the view hierarchy:
- If a view is removed from or moved within its superview, its subviews go with it.
- A view’s degree of transparency is inherited by its subviews.
-
A view can optionally limit the drawing of its subviews so that any parts of them outside the view are not shown. This is called clipping and is set with the view’s
clipsToBoundsproperty. - A superview owns its subviews, in the memory-management sense, much as an NSArray owns its elements; it retains them and is responsible for releasing a subview when that subview ceases to be its subview (it is removed from the collection of this view’s subviews) or when it itself goes out of existence.
- If a view’s size is changed, its subviews can be resized automatically (and I’ll have much more to say about that later in this chapter).
A UIView has a superview property (a UIView) and a subviews property (an NSArray of UIViews, in back-to-front order), allowing you to trace the view hierarchy in code. There is also a method isDescendantOfView: letting you check whether one view is a subview of another at any depth. If you need a reference to a particular view, you will probably arrange this beforehand as an instance variable, perhaps through an outlet. Alternatively, a view can have a numeric tag (its tag property), and can then be referred to by sending any view higher up the view hierarchy the viewWithTag: message. Seeing that all tags of interest are unique within their region of the hierarchy is up to you.
Manipulating the view hierarchy in code is easy. This is part of what gives iOS apps their dynamic quality, and it compensates for the fact that there is basically just a single window. It is perfectly reasonable for your code to rip an entire hierarchy of views out of the superview and substitute another! You can do this directly; you can combine it with animation (Chapter 4); you can govern it through view controllers (Chapter 6).
The method addSubview: makes one view a subview of another; removeFromSuperview takes a subview out of its superview’s view hierarchy. In both cases, if the superview is part of the visible interface, the subview will appear or disappear; and of course this view may itself have subviews that accompany it. Just remember that removing a subview from its superview releases it; if you intend to reuse that subview later on, you will wish to retain it first. This is often taken care of through a property with a retain policy.
Events inform a view of these dynamic changes. To respond to these events requires subclassing. Then you’ll be able to override any of these methods:
-
didAddSubview:andwillRemoveSubview: -
didMoveToSuperviewandwillMoveToSuperview: -
didMoveToWindowandwillMoveToWindow:
When addSubview: is called, the view is placed last among its superview’s subviews; thus it is drawn last, meaning that it appears frontmost. A view’s subviews are indexed, starting at 0, which is rearmost. There are additional methods for inserting a subview at a given index, or below (behind) or above (in front of) a specific view; for swapping two sibling views by index; and for moving a subview all the way to the front or back among its siblings:
-
insertSubview:atIndex: -
insertSubview:belowSubview:,insertSubview:aboveSubview: -
exchangeSubviewAtIndex:withSubviewAtIndex: -
bringSubviewToFront:,sendSubviewToBack:
Oddly, there is no command for removing all of a view’s subviews at once. However, a view’s subviews array is an immutable copy of the internal list of subviews, so it is legal to cycle through it and remove each subview one at a time:
for (UIView* v in view.subviews)
    [v removeFromSuperview];
Here’s an alternative way to do that:
[view.subviews makeObjectsPerformSelector:@selector(removeFromSuperview)];
Visibility and Opacity
A view can be made invisible by setting its hidden property to YES, and visible again by setting it to NO. This takes it (and its subviews, of course) out of the visible interface without the overhead of actually removing it from the view hierarchy. A hidden view does not (normally) receive touch events, so to the user it really is as if the view weren’t there. But it is there, so it can still be manipulated in code.
A view can be assigned a background color through its backgroundColor property. A color is a UIColor; this is not a difficult class to use, and I’m not going to go into details. A view whose background color is nil (the default) has a transparent background. It is perfectly reasonable for a view to have a transparent background and to do no additional drawing of its own, just so that it can act as a convenient superview to other views, making them behave together.
A view can be made partially or completely transparent through its alpha property: 1.0 means opaque, 0.0 means transparent, and a value may be anywhere between them, inclusive. This affects subviews: if a superview has an alpha of 0.5, none of its subviews can have an apparent opacity of more than 0.5, because whatever alpha value they have will be drawn relative to 0.5. (Just to make matters more complicated, colors have an alpha value as well. So, for example, a view can have an alpha of 1.0 but still have a transparent background because its backgroundColor has an alpha less than 1.0.) A view that is completely transparent (or very close to it) is like a view whose hidden is YES: it is invisible, along with its subviews, and cannot (normally) be touched.
A view’s alpha property value affects both the apparent transparency of its background color and the apparent transparency of its contents. For example, if a view displays an image and has a background color and its alpha is less than 1, the background color will seep through the image (and whatever is behind the view will seep through both).
A view’s opaque property, on the other hand, is a horse of a different color; changing it has no effect on the view’s appearance. Rather, this property is a hint to the drawing system. If a view completely fills its bounds with ultimately opaque material and its alpha is 1.0, so that the view has no effective transparency, then it can be drawn more efficiently (with less drag on performance) if you inform the drawing system of this fact by setting its opaque to YES. Otherwise, you should set its opaque to NO. The opaque value is not changed for you when you set a view’s backgroundColor or alpha! Setting it correctly is entirely up to you; the default, perhaps surprisingly, is YES.
Frame
A view’s frame property, a CGRect, is the position of its rectangle within its superview, in the superview’s coordinate system. By default, the superview’s coordinate system will have the origin at its top left, with the x-coordinate growing positively rightward and the y-coordinate growing positively downward.
Setting a view’s frame to a different CGRect value repositions the view, or resizes it, or both. If the view is visible, this change will be visibly reflected in the interface. On the other hand, you can also set a view’s frame when the view is not visible — for example, when you create the view in code. In that case, the frame describes where the view will be positioned within its superview when it is given a superview. UIView’s designated initializer is initWithFrame:, and you’ll often assign a frame this way, especially because the default frame might otherwise be {{0,0},{0,0}}, which is rarely what you want.
Note
Forgetting to assign a view a frame when creating it in code, and then wondering why it isn’t appearing when added to a superview, is a common beginner mistake. A view with a zero-size frame is effectively invisible. If a view has a standard size that you want it to adopt, especially in relation to its contents (like a UIButton in relation to its title), an alternative is to send it the sizeToFit message.
We are now in a position to generate programmatically the interface displayed in Figure 1-1:
UIView* v1 = [[UIView alloc] initWithFrame:CGRectMake(113, 111, 132, 194)];
v1.backgroundColor = [UIColor colorWithRed:1 green:.4 blue:1 alpha:1];
UIView* v2 = [[UIView alloc] initWithFrame:CGRectMake(41, 56, 132, 194)];
v2.backgroundColor = [UIColor colorWithRed:.5 green:1 blue:0 alpha:1];
UIView* v3 = [[UIView alloc] initWithFrame:CGRectMake(43, 197, 160, 230)];
v3.backgroundColor = [UIColor colorWithRed:1 green:0 blue:0 alpha:1];
[mainview addSubview: v1];
[v1 addSubview: v2];
[mainview addSubview: v3];
In that code, we determined the layering order of v1 and v3 (the middle and left views, which are siblings) by the order in which we inserted them into the view hierarchy with addSubview:.
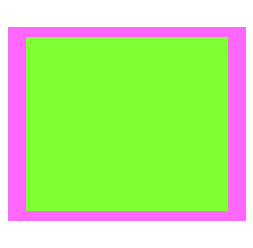
Bounds and Center
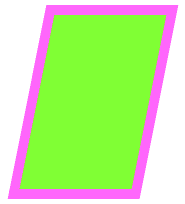
Suppose we have a superview and a subview, and the subview is to appear inset by 10 points, as in Figure 1-3. The utility function CGRectInset makes it easy to derive one rectangle as an inset from another, so we’ll use it to determine the subview’s frame. But what rectangle should this be inset from? Not the superview’s frame; the frame represents a view’s position within its superview, and in that superview’s coordinates. What we’re after is a CGRect describing our superview’s rectangle in its own coordinates, because those are the coordinates in which the subview’s frame is to be expressed. The CGRect that describes a view’s rectangle in its own coordinates is the view’s bounds property.
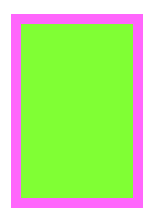
So, the code to generate Figure 1-3 looks like this:
UIView* v1 = [[UIView alloc] initWithFrame:CGRectMake(113, 111, 132, 194)];
v1.backgroundColor = [UIColor colorWithRed:1 green:.4 blue:1 alpha:1];
UIView* v2 = [[UIView alloc] initWithFrame:CGRectInset(v1.bounds, 10, 10)];
v2.backgroundColor = [UIColor colorWithRed:.5 green:1 blue:0 alpha:1];
[mainview addSubview: v1];
[v1 addSubview: v2];
You’ll very often use a view’s bounds in this way. When you need coordinates for drawing inside a view, whether drawing manually or placing a subview, you’ll often refer to the view’s bounds.
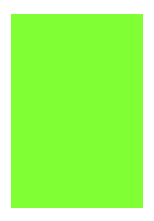
Interesting things happen when you set a view’s bounds. If you change a view’s bounds size, you change its frame. The change in the view’s frame takes place around its center, which remains unchanged. So, for example:
UIView* v1 = [[UIView alloc] initWithFrame:CGRectMake(113, 111, 132, 194)];
v1.backgroundColor = [UIColor colorWithRed:1 green:.4 blue:1 alpha:1];
UIView* v2 = [[UIView alloc] initWithFrame:CGRectInset(v1.bounds, 10, 10)];
v2.backgroundColor = [UIColor colorWithRed:.5 green:1 blue:0 alpha:1];
[mainview addSubview: v1];
[v1 addSubview: v2];
CGRect r = v2.bounds;
r.size.height += 20;
r.size.width += 20;
v2.bounds = r;
What appears is a single rectangle; the subview completely and exactly covers its superview, its frame being the same as the superview’s bounds. The call to CGRectInset started with the superview’s bounds and shaved 10 points off the left, right, top, and bottom to set the subview’s frame (Figure 1-3). But then we added 20 points to the subview’s bounds height and width, and thus added 20 points to the subview’s frame height and width as well (Figure 1-4). The center didn’t move, so we effectively put the 10 points back onto the left, right, top, and bottom of the subview’s frame.
When you create a UIView, its bounds coordinate system’s {0,0} point is at its top left. If you change a view’s bounds origin, you move the origin of its internal coordinate system. Because a subview is positioned in its superview with respect to its superview’s coordinate system, a change in the bounds origin of the superview will change the apparent position of a subview. To illustrate, we start once again with our subview inset evenly within its superview, and then change the bounds origin of the superview:
UIView* v1 = [[UIView alloc] initWithFrame:CGRectMake(113, 111, 132, 194)];
v1.backgroundColor = [UIColor colorWithRed:1 green:.4 blue:1 alpha:1];
UIView* v2 = [[UIView alloc] initWithFrame:CGRectInset(v1.bounds, 10, 10)];
v2.backgroundColor = [UIColor colorWithRed:.5 green:1 blue:0 alpha:1];
[mainview addSubview: v1];
[v1 addSubview: v2];
CGRect r = v1.bounds;
r.origin.x += 10;
r.origin.y += 10;
v1.bounds = r;
Nothing happens to the superview’s size or position. But the subview has moved up and to the left so that it is flush with its superview’s top-left corner (Figure 1-5). Basically, what we’ve done is to say to the superview, “Instead of calling the point at your upper left {0,0}, call that point {10,10}.” Because the subview’s frame origin is itself at {10,10}, the subview now touches the superview’s top-left corner. The effect of changing a view’s bounds origin may seem directionally backward — we increased the superview’s origin in the positive direction, but the subview moved in the negative direction — but think of it this way: a view’s bounds origin point coincides with its frame’s top left.
We have seen that changing a view’s bounds size affects its frame size. The converse is also true: changing a view’s frame size affects its bounds size. What is not affected by changing a view’s bounds size is the view’s center. This property, like the frame property, represents the view’s position within its superview, in the superview’s coordinates, but it is the position of the bounds center, the point derived from the bounds like this:
CGPoint c = CGPointMake(CGRectGetMidX(theView.bounds),
                        CGRectGetMidY(theView.bounds));
A view’s center is thus a single point establishing the positional relationship between a view’s bounds and its superview’s bounds. Changing a view’s bounds does not change its center; changing a view’s center does not change its bounds.
Thus, a view’s bounds and center are orthogonal (independent), and describe (among other things) both the view’s size and its position within its superview. The view’s frame is therefore superfluous! In fact, the frame property is merely a convenient expression of the center and bounds values. In most cases, this won’t matter to you; you’ll use the frame property anyway. When you first create a view from scratch, the designated initializer is initWithFrame:. You can change the frame, and the bounds size and center will change to match. You can change the bounds size or the center, and the frame will change to match. Nevertheless, the proper and most reliable way to position and size a view within its superview is to use its bounds and center, not its frame; there are some situations in which the frame is meaningless (or will at least behave very oddly), but the bounds and center will always work.
We have seen that every view has its own coordinate system, expressed by its bounds, and that a view’s coordinate system has a clear relationship to its superview’s coordinate system, expressed by its center. This is true of every view in a window, so it is possible to convert between the coordinates of any two views in the same window. Convenience methods are supplied to perform this conversion both for a CGPoint and for a CGRect:
-
convertPoint:fromView:,convertPoint:toView: -
convertRect:fromView:,convertRect:toView:
If the second parameter is nil, it is taken to be the window.
For example, if v2 is a subview of v1, then to center v2 within v1 you could say:
v2.center = [v1 convertPoint:v1.center fromView:v1.superview];
Warning
When setting a view’s position by setting its center, if the height or width of the view is not an integer (or, on a single-resolution screen, not an even integer), the view can end up misaligned: its point values in one or both dimensions are located between the screen pixels. This can cause the view to be displayed incorrectly; for example, if the view contains text, the text may be blurry. You can detect this situation in the Simulator by checking Debug → Color Misaligned Images. A simple solution is to set the view’s frame, after positioning it, to the CGRectIntegral of its frame.
Transform
A view’s transform property alters how the view is drawn — it may, for example, change the view’s perceived size and orientation — without affecting its bounds and center. A transformed view continues to behave correctly: a rotated button, for example, is still a button, and can be tapped in its apparent location and orientation.
A transform value is a CGAffineTransform, which is a struct representing six of the nine values of a 3×3 transformation matrix (the other three values are constants, so there’s no point representing them in the struct). You may have forgotten your high-school linear algebra, so you may not recall what a transformation matrix is. For the details, which are quite simple really, see the “Transforms” chapter of Apple’s Quartz 2D Programming Guide, especially the section called “The Math Behind the Matrices.” But you don’t really need to know those details, because convenience functions, whose names start with CGAffineTransformMake..., are provided for creating three of the basic types of transform: rotation, scaling, and translation (i.e., changing the view’s apparent position). A fourth basic transform type, skewing or shearing, has no convenience function.
By default, a view’s transformation matrix is CGAffineTransformIdentity, the identity transform. It has no visible effect, so you’re unaware of it. Any transform that you do apply takes place around the view’s center, which is held constant.
Here’s some code to illustrate use of a transform:
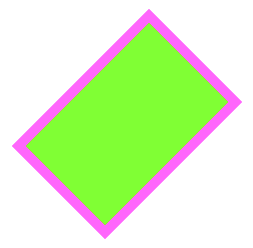
UIView* v1 = [[UIView alloc] initWithFrame:CGRectMake(113, 111, 132, 194)];
v1.backgroundColor = [UIColor colorWithRed:1 green:.4 blue:1 alpha:1];
UIView* v2 = [[UIView alloc] initWithFrame:CGRectInset(v1.bounds, 10, 10)];
v2.backgroundColor = [UIColor colorWithRed:.5 green:1 blue:0 alpha:1];
[mainview addSubview: v1];
[v1 addSubview: v2];
v1.transform = CGAffineTransformMakeRotation(45 * M_PI/180.0);
The transform property of the view v1 is set to a rotation transform. The result (Figure 1-6) is that the view appears to be rocked 45 degrees clockwise. (I think in degrees, but Core Graphics thinks in radians, so my code has to convert.) Observe that the view’s center property is unaffected, so that the rotation seems to have occurred around the view’s center. Moreover, the view’s bounds property is unaffected; the internal coordinate system is unchanged, so the subview is drawn in the same place relative to its superview. The view’s frame, however, is now useless, as no mere rectangle can describe the region of the superview apparently occupied by the view; the frame’s actual value, roughly {{63.7416, 92.7416}, {230.517, 230.517}}, describes the minimal bounding rectangle surrounding the view’s apparent position. The rule is that if a view’s transform is not the identity transform, you should not set its frame; also, automatic resizing of a subview, discussed later in this chapter, requires that the superview’s transform be the identity transform.
Suppose, instead of CGAffineTransformMakeRotation, we call CGAffineTransformMakeScale, like this:
v1.transform = CGAffineTransformMakeScale(1.8, 1);
The bounds property of the view v1 is still unaffected, so the subview is still drawn in the same place relative to its superview; this means that the two views seem to have stretched horizontally together (Figure 1-7). No bounds or centers were harmed by the application of this transform!
Transformation matrices can be chained. There are convenience functions for applying one transform to another. Their names do not contain “Make.” These functions are not commutative; that is, order matters. If you start with a transform that translates a view to the right and then apply a rotation of 45 degrees, the rotated view appears to the right of its original position; on the other hand, if you start with a transform that rotates a view 45 degrees and then apply a translation to the right, the meaning of “right” has changed, so the rotated view appears 45 degrees down from its original position. To demonstrate the difference, I’ll start with a subview that exactly overlaps its superview:
UIView* v1 = [[UIView alloc] initWithFrame:CGRectMake(20, 111, 132, 194)];
v1.backgroundColor = [UIColor colorWithRed:1 green:.4 blue:1 alpha:1];
UIView* v2 = [[UIView alloc] initWithFrame:v1.bounds];
v2.backgroundColor = [UIColor colorWithRed:.5 green:1 blue:0 alpha:1];
[mainview addSubview: v1];
[v1 addSubview: v2];
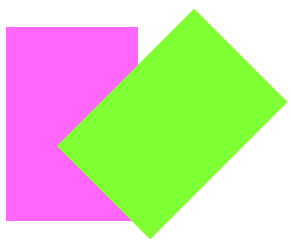
Then I’ll apply two successive transforms to the subview, leaving the superview to show where the subview was originally. In this example, I translate and then rotate (Figure 1-8):
v2.transform = CGAffineTransformMakeTranslation(100, 0);
v2.transform = CGAffineTransformRotate(v2.transform, 45 * M_PI/180.0);
In this example, I rotate and then translate (Figure 1-9):
v2.transform = CGAffineTransformMakeRotation(45 * M_PI/180.0);
v2.transform = CGAffineTransformTranslate(v2.transform, 100, 0);
The function CGAffineTransformConcat concatenates two transform matrices using matrix multiplication. Again, this operation is not commutative. The order is the opposite of the order when using convenience functions for applying one transform to another. For example, this gives the same result as Figure 1-9:
CGAffineTransform r = CGAffineTransformMakeRotation(45 * M_PI/180.0);
CGAffineTransform t = CGAffineTransformMakeTranslation(100, 0);
v2.transform = CGAffineTransformConcat(t,r); // not r,t
To remove a transform from a combination of transforms, apply its inverse. A convenience function lets you obtain the inverse of a given affine transform. Again, order matters. In this example, I rotate the subview and shift it to its “right,” and then remove the rotation (Figure 1-10):
CGAffineTransform r = CGAffineTransformMakeRotation(45 * M_PI/180.0);
CGAffineTransform t = CGAffineTransformMakeTranslation(100, 0);
v2.transform = CGAffineTransformConcat(t,r);
v2.transform =
    CGAffineTransformConcat(CGAffineTransformInvert(r), v2.transform);
Finally, as there are no convenience methods for creating a skew (shear) transform, I’ll illustrate by creating one manually, without further explanation (Figure 1-11):
v1.transform = CGAffineTransformMake(1, 0, -0.2, 1, 0, 0);
Transforms are useful particularly as temporary visual indicators. For example, you might call attention to a view by applying a transform that scales it up slightly, and then applying the identity transform to restore it to its original size, and animating those changes (Chapter 4).
The transform property lies at the heart of an iOS app’s ability to rotate its interface. The window’s frame and bounds, as I’ve already said, are invariant, locked to the screen; but the root view’s frame and bounds are not. Suppose the user rotates the device 90 degrees and the app interface is to rotate to compensate. How is this done? A 90-degree rotation transform is applied to the root view, so that its {0,0} point moves to what the user now sees as the top left of the view. The root view’s subviews have their frame in the root view’s bounds coordinate system, so they are effectively rotated.
In addition, the root view’s bounds height and width are effectively swapped, so that its dimensions still fit the window in spite of the rotation transform: the long dimension becomes the short dimension, and vice versa. This raises concerns about the position of the root view’s subviews. Consider, for example, a subview of the root view, located at the bottom right of the screen when the device is in portrait orientation. If the root view’s bounds width and bounds height are effectively swapped, then that poor old subview will now be outside the bounds height, and therefore off the screen — unless something further is done. That’s the subject of the next section.
Layout
We have seen that a subview moves when its superview’s bounds origin is changed. But what happens to a subview when its superview’s bounds size is changed? (And remember, this includes changing the superview’s frame size.)
Of its own accord, nothing happens. The subview’s bounds and center haven’t changed, and the superview’s bounds origin hasn’t moved, so the subview stays in the same position relative to the top left of its superview. In real life, however, that often won’t be what you want. You’ll want subviews to be resized and repositioned when their superview’s bounds size is changed. This is called layout.
The need for layout is obvious in a context such as OS X, where the user can freely resize a window, potentially disturbing your interface. For example, you’d want an OK button near the lower-right corner to stay in the lower-right corner as the window grows, while a text field at the top of the window should stay at the top of the window, but perhaps should widen as the window widens.
There are no user-resizable windows on an iOS device, but still, a superview might be resized dynamically. For example, your app might respond to the user rotating the device 90 degrees by applying a rotation transform to a view and swapping its bounds width and height values, to match the new orientation of the screen. An iPhone app might launch on two different sizes of screen: the screen of the iPhone 5 and later is taller than that of the iPhone 4S and before. A view instantiated from a nib, such as a view controller’s main view or a table view cell, might be resized to fit into the interface into which it is placed.
Note
New in Xcode 5, you can test your nib-based interface’s basic layout behavior under different conditions without running the app. While in the nib editor, open an assistant pane and switch its Tracking menu (the first component in its jump bar, Control-4) to Preview. Buttons at the lower right let you toggle between “iOS 7.0 and Later” vs. “iOS 6.1 and Earlier”, between portrait and landscape orientation, and between the taller and shorter iPhone screen. See also Chapter 6.
Layout is performed in three primary ways:
- Manual layout
-
The superview is sent the
layoutSubviewsmessage whenever it is resized; so, to lay out subviews manually, provide your own subclass and overridelayoutSubviews. Clearly this could turn out to be a lot of work, but it means you can do anything you like. - Autoresizing
-
Autoresizing is the pre-iOS 6 way of performing layout automatically. A subview will respond to its superview’s being resized, in accordance with the rules prescribed by the subview’s
autoresizingMaskproperty value. - Autolayout
-
Autolayout, introduced in iOS 6 (and incompatible with earlier systems), depends on the constraints of views. A constraint (an instance of NSLayoutConstraint) is a full-fledged object with numeric values; it is much more sophisticated, descriptive, and powerful than the
autoresizingMask. Many constraints can apply to a view, and they can describe a relationship between any two views (not just a subview and its superview). Autolayout is implemented behind the scenes inlayoutSubviews; in effect, constraints allow you to write sophisticatedlayoutSubviewsfunctionality without code.
Your layout strategy can involve any combination of these. The need for manual layout is rare, but it’s there if you need it. Autoresizing is used automatically unless you deliberately turn it off by setting a superview’s autoresizesSubviews property to NO, or unless a view uses autolayout instead. Autolayout is an opt-in technology, and can be used for whatever areas of your interface you find appropriate; a view that uses autolayout can live side by side with a view that uses autoresizing.
One of the chief places where you opt in to autolayout is the nib file, and in Xcode 5 all new .storyboard and .xib files do opt in — they have autolayout turned on, by default. To see this, select the file in the Project navigator, show the File inspector, and examine the “Use Auto Layout” checkbox. On the other hand, a view that your code creates and adds to the interface, by default, uses autoresizing, not autolayout.
Warning
If a nib’s “Use Auto Layout” is checked, do not load it on any system earlier than iOS 6. If you do, your app will crash, because you’re using a class, NSLayoutConstraint, that doesn’t exist before iOS 6.
Autoresizing
Autoresizing is a matter of conceptually assigning a subview “springs and struts.” A spring can stretch; a strut can’t. Springs and struts can be assigned internally or externally, horizontally or vertically. Thus you can specify (using internal springs and struts) whether and how the view can be resized, and (using external springs and struts) whether and how the view can be repositioned. For example:
- Imagine a subview that is centered in its superview and is to stay centered, but is to resize itself as the superview is resized. It would have struts externally and springs internally.
- Imagine a subview that is centered in its superview and is to stay centered, and is not to resize itself as the superview is resized. It would have springs externally and struts internally.
- Imagine an OK button that is to stay in the lower right of its superview. It would have struts internally, struts externally to its right and bottom, and springs externally to its top and left.
- Imagine a text field that is to stay at the top of its superview. It is to widen as the superview widens. It would have struts externally; internally it would have a vertical strut and a horizontal spring.
To experiment with autoresizing in the nib editor, you’ll need to ensure that autolayout is turned off for the .storyboard or .xib file you’re editing. To do so, select that file in the Project navigator and show the File inspector: uncheck “Use Auto Layout.”
When editing a nib file with autolayout turned off, you can assign a view springs and struts in the Size inspector (Autosizing). A solid line externally represents a strut; a solid line internally represents a spring. A helpful animation shows you the effect on your view’s position as its superview is resized.
In code, a combination of springs and struts is set through a view’s autoresizingMask property. It’s a bitmask, so you use bitwise-or to combine options. The options, with names that start with UIViewAutoresizingFlexible..., represent springs; whatever isn’t specified is a strut. The default is UIViewAutoresizingNone, apparently meaning all struts — but of course it can’t really be all struts, because if the superview is resized, something needs to change; in reality, UIViewAutoresizingNone is the same as UIViewAutoresizingFlexibleRightMargin together with UIViewAutoresizingFlexibleBottomMargin.
Note
In debugging, when you log a UIView to the console, its autoresizingMask is reported using the word “autoresize” and a list of the springs. The margins are LM, RM, TM, and BM; the internal dimensions are W and H. For example, autoresize = W+BM means that what’s flexible is the width and the bottom margin.
To demonstrate autoresizing, I’ll start with a view and two subviews, one stretched across the top, the other confined to the lower right (Figure 1-12):
UIView* v1 = [[UIView alloc] initWithFrame:CGRectMake(100, 111, 132, 194)];
v1.backgroundColor = [UIColor colorWithRed:1 green:.4 blue:1 alpha:1];
UIView* v2 = [[UIView alloc] initWithFrame:CGRectMake(0, 0, 132, 10)];
v2.backgroundColor = [UIColor colorWithRed:.5 green:1 blue:0 alpha:1];
UIView* v3 = [[UIView alloc] initWithFrame:CGRectMake(v1.bounds.size.width-20,
                                                      v1.bounds.size.height-20,
                                                      20, 20)];
v3.backgroundColor = [UIColor colorWithRed:1 green:0 blue:0 alpha:1];
[mainview addSubview: v1];
[v1 addSubview: v2];
[v1 addSubview: v3];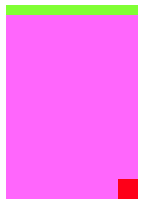
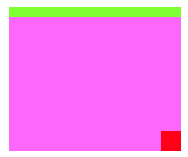
To that example, I’ll add code applying springs and struts to the two subviews to make them behave like the text field and the OK button I was hypothesizing earlier:
v2.autoresizingMask = UIViewAutoresizingFlexibleWidth;
v3.autoresizingMask = UIViewAutoresizingFlexibleTopMargin |
                      UIViewAutoresizingFlexibleLeftMargin;
Now I’ll resize the superview, thus bringing autoresizing into play; as you can see (Figure 1-13), the subviews remain pinned in their correct relative positions:
CGRect r = v1.bounds;
r.size.width += 40;
r.size.height -= 50;
v1.bounds = r;
That example shows exactly what autoresizing is about, but it’s a little artificial; in real life, the superview is more likely to be resized, not because you resize it in code, but because of automatic behavior, such as compensatory rotation of the interface when the device is rotated. To see this, you might modify the previous example to pin the size of v1 to the size of the root view, and then run the app and rotate the device. Thus you might initially configure v1 like this:
v1.frame = mainview.bounds;
v1.autoresizingMask = UIViewAutoresizingFlexibleHeight |
                      UIViewAutoresizingFlexibleWidth;
Now run the app and rotate the device (in the Simulator, repeatedly choose Hardware → Rotate Left). The view v1 now fills the screen as the interface rotates, and its subviews stay pinned in their correct relative position.
Autoresizing is effective but simple — sometimes too simple. The only relationship it describes is between a subview and its superview; it can’t help you do such things as space a row of views evenly across the screen relative to one another. Before autolayout, the way to achieve more sophisticated goals of that sort was to combine autoresizing with manual layout in layoutSubviews. Autoresizing happens before layoutSubviews is called, so your layoutSubviews code is free to come marching in and tidy up whatever autoresizing didn’t get quite right.
Autoresizing for subviews can be turned off at the superview level: to do so, set the superview’s autoresizesSubviews property to NO.
Autolayout
Autolayout is an opt-in technology, at the level of each individual view. If no views in the interface opt in to autolayout, layout for the entire interface behaves as in iOS 5 and before. A view may opt in to autolayout in any of three ways:
- Your code adds an autolayout constraint to a view. The views involved in this constraint use autolayout.
- Your app loads a nib for which “Use Auto Layout” is checked. Every view instantiated from that nib uses autolayout.
A view in the interface, which would be an instance of a custom UIView subclass of yours, returns YES from the class method
requiresConstraintBasedLayout. That view uses autolayout.The reason for this third approach to opting in to autolayout is that you might need autolayout to be switched on in order to add autolayout constraints in code. A common place to create constraints in code is in a view’s
updateConstraintsimplementation (discussed later in this chapter). However, if autolayout isn’t switched on,updateConstraintswon’t be called. SorequiresConstraintBasedLayoutprovides a way of switching it on.
One sibling view can use autolayout while another sibling view does not, and a superview can use autolayout while one or indeed all of its subviews do not. However, autolayout is implemented through the superview chain, so if a view uses autolayout, then automatically so do all its superviews; and if (as will almost certainly be the case) one of those views is the main view of a view controller, that view controller also uses autolayout, and receives autolayout-related events that it would not have received otherwise.
Note
You can’t turn off autolayout for just part of a nib. Either all views instantiated from a nib use autolayout or they all use autoresizing. To generate different parts of your interface from nibs, one part with autoresizing, another part with autolayout, separate those parts into different nibs (different .storyboard or .xib files) and then load and combine them at runtime.
Constraints
An autolayout constraint, or simply constraint, is an NSLayoutConstraint instance, and describes either the absolute width or height of a view or a relationship between an attribute of one view and an attribute of another view. In the latter case, the attributes don’t have to be the same attribute, and the two views don’t have to be siblings (subviews of the same superview) or parent and child (superview and subview) — the only requirement is that they share a common ancestor (a superview at some height up the view hierarchy).
Here are the chief properties of an NSLayoutConstraint:
-
firstItem,firstAttribute,secondItem,secondAttribute The two views and their respective attributes involved in this constraint. If the constraint is describing a view’s absolute height or width, the second view will be nil and the second attribute will be
NSLayoutAttributeNotAnAttribute(which you’ll probably write as 0). Additional attribute types are:-
NSLayoutAttributeLeft,NSLayoutAttributeRight -
NSLayoutAttributeTop,NSLayoutAttributeBottom -
NSLayoutAttributeLeading,NSLayoutAttributeTrailing -
NSLayoutAttributeWidth,NSLayoutAttributeHeight -
NSLayoutAttributeCenterX,NSLayoutAttributeCenterY -
NSLayoutAttributeBaseline
The meanings of the attributes are intuitively obvious, except that you might wonder what “leading” and “trailing” mean: they are the international equivalent of “left” and “right”, automatically reversing their meaning on systems whose language is written right-to-left (making it easy, say, to align the beginnings of several labels of different lengths, irrespective of localization).
-
-
multiplier,constant -
These numbers will be applied to the second attribute’s value to determine the first attribute’s value. The
multiplieris multiplied by the second attribute’s value; theconstantis added to that product. The first attribute is set to the result. (The name constant is a very poor choice, as this value isn’t constant; have the Apple folks never heard the term addend?) Basically, you’re writing an equation of the form a1 = ma2 + c, where a1 and a2 are the two attributes, and m and c are the multiplier and the constant. Thus, in the degenerate case where the first attribute’s value is to equal the second attribute’s value, the multiplier will be 1 and the constant will be 0. If the second attribute is 0 because you’re describing a view’s width or height absolutely, the multiplier will be 1 and the constant will be the width or height value. -
relation -
How the two attribute values are to be related to one another, as modified by the
multiplierand theconstant. This is the operator that goes in the spot where I put the equal sign in the equation in the preceding paragraph. It might be an equal sign (NSLayoutRelationEqual, which you’ll probably write as 0), but inequalities are also permitted (NSLayoutRelationLessThanOrEqual,NSLayoutRelationGreaterThanOrEqual). -
priority - Priority values range from 1000 (required) down to 1, and certain standard behaviors have standard priorities. Constraints can have different priorities, determining the order in which they are applied. Constraints are permitted to conflict with one another provided they have different priorities.
A constraint belongs to a view. A view can have many constraints: a UIView has a constraints property, along with these instance methods:
-
addConstraint:,addConstraints: -
removeConstraint:,removeConstraints:
The question then is which view a given constraint should belong to. The answer is: the closest superview of both views involved in a constraint. Thus, for example, if the constraint dictates a view’s absolute width, it belongs to that view; if it aligns the tops of two sibling views, it belongs to their superview; if it sets the top of a view in relation to the top of its superview, it belongs to the superview. (The runtime may permit you to cheat and add a constraint at too high a level.) Adding a constraint that refers to a view outside the subview hierarchy of the view to which you add it will cause a crash (with a helpful error message).
Both views involved in a constraint must be present in the view hierarchy before the constraint can be added.
NSLayoutConstraint properties are read-only, except for priority and constant. In Chapter 4, it will turn out that changing a constraint’s constant in real time is a good way to animate a view. If you want to change anything else about an existing constraint, you must remove the constraint and add a new one.
Autoresizing constraints
The mechanism whereby individual views can opt in to autolayout can suddenly involve other views in autolayout, even though those other views were not using autolayout previously. Therefore, there needs to be a way, when such a view becomes involved in autolayout, to determine that view’s position and layout through constraints in the same way they were previously being determined through its frame and its autoresizingMask. The runtime takes care of this for you: it translates the view’s frame and autoresizingMask settings into constraints. The result is a set of implicit constraints, of class NSAutoresizingMaskLayoutConstraint, affecting this view (though they may be attached to its superview). Thanks to these implicit constraints, the layout dictated by the view’s autoresizingMask continues to work, even though the view is no longer obeying its autoresizingMask but rather is using autolayout and constraints.
For example, suppose I have a UILabel whose frame is {{20,20},{42,22}}, and whose autoresizingMask is UIViewAutoresizingNone. If this label were suddenly to come under autolayout, then its superview would acquire four implicit constraints setting its width and height at 42 and 22 and its center X and center Y at 41 and 31.
This conversion is performed only if the view in question has its translatesAutoresizingMaskIntoConstraints property set to YES. That is, in fact, the default if the view came into existence either in code or by instantiation from a nib where “Use Auto Layout” is not checked. The assumption is that if a view came into existence in either of those ways, you want its frame and autoresizingMask to act as its constraints if it becomes involved in autolayout.
That’s a sensible rule, but it means that if you intend to apply any explicit constraints of your own to such a view, you’ll probably want to remember to turn off this automatic behavior by setting the view’s translatesAutoresizingMaskIntoConstraints property to NO. If you don’t, you’re going to end up with both implicit constraints and explicit constraints affecting this view, and it’s unlikely that you would want that. Typically, that sort of situation will result in a conflict between constraints, as I’ll explain a little later; indeed, what usually happens to me is that I don’t remember to set the view’s translatesAutoresizingMaskIntoConstraints property to NO, and am reminded to do so only when I do get a conflict between constraints.
Creating constraints in code
We are now ready to write some code involving constraints! I’ll generate the same views and subviews and layout behavior as in Figure 1-12 and Figure 1-13, but using constraints. Observe that I don’t bother to assign the subviews explicit frames, because constraints will take care of positioning them, and that I remember (for once) to set their translatesAutoresizingMaskIntoConstraints properties to NO:
UIView* v1 = [[UIView alloc] initWithFrame:CGRectMake(100, 111, 132, 194)];
v1.backgroundColor = [UIColor colorWithRed:1 green:.4 blue:1 alpha:1];
UIView* v2 = [UIView new];
v2.backgroundColor = [UIColor colorWithRed:.5 green:1 blue:0 alpha:1];
UIView* v3 = [UIView new];
v3.backgroundColor = [UIColor colorWithRed:1 green:0 blue:0 alpha:1];
[mainview addSubview: v1];
[v1 addSubview: v2];
[v1 addSubview: v3];
v2.translatesAutoresizingMaskIntoConstraints = NO;
v3.translatesAutoresizingMaskIntoConstraints = NO;
[v1 addConstraint:
 [NSLayoutConstraint
  constraintWithItem:v2 attribute:NSLayoutAttributeLeft
  relatedBy:0
  toItem:v1 attribute:NSLayoutAttributeLeft
  multiplier:1 constant:0]];
[v1 addConstraint:
 [NSLayoutConstraint
  constraintWithItem:v2 attribute:NSLayoutAttributeRight
  relatedBy:0
  toItem:v1 attribute:NSLayoutAttributeRight
  multiplier:1 constant:0]];
[v1 addConstraint:
 [NSLayoutConstraint
  constraintWithItem:v2 attribute:NSLayoutAttributeTop
  relatedBy:0
  toItem:v1 attribute:NSLayoutAttributeTop
  multiplier:1 constant:0]];
[v2 addConstraint:
 [NSLayoutConstraint
  constraintWithItem:v2 attribute:NSLayoutAttributeHeight
  relatedBy:0
  toItem:nil attribute:0
  multiplier:1 constant:10]];
[v3 addConstraint:
 [NSLayoutConstraint
  constraintWithItem:v3 attribute:NSLayoutAttributeWidth
  relatedBy:0
  toItem:nil attribute:0
  multiplier:1 constant:20]];
[v3 addConstraint:
 [NSLayoutConstraint
  constraintWithItem:v3 attribute:NSLayoutAttributeHeight
  relatedBy:0
  toItem:nil attribute:0
  multiplier:1 constant:20]];
[v1 addConstraint:
 [NSLayoutConstraint
  constraintWithItem:v3 attribute:NSLayoutAttributeRight
  relatedBy:0
  toItem:v1 attribute:NSLayoutAttributeRight
  multiplier:1 constant:0]];
[v1 addConstraint:
 [NSLayoutConstraint
  constraintWithItem:v3 attribute:NSLayoutAttributeBottom
  relatedBy:0
  toItem:v1 attribute:NSLayoutAttributeBottom
  multiplier:1 constant:0]];
Now, I know what you’re thinking. You’re thinking: “What are you, nuts? That is a boatload of code!” (Except that you probably used another four-letter word instead of “boat”.) But that’s something of an illusion. I’d argue that what we’re doing here is actually simpler than the code with which we created Figure 1-12 using explicit frames and autoresizing.
After all, we merely create eight constraints in eight simple commands. (I’ve broken each command into multiple lines, but that’s just a matter of formatting.) They’re verbose, but they are the same command repeated with different parameters, so creating them is just a matter of copy-and-paste. Moreover, our eight constraints determine the position, size, and layout behavior of our two subviews, so we’re getting a lot of bang for our buck.
Even more telling, constraints are a far clearer expression of what’s supposed to happen than setting a frame and autoresizingMask. The position of our subviews is described once and for all, both as they will initially appear and as they will appear if their superview is resized. And it is described meaningfully; we don’t have to use arbitrary math. Recall what we had to say before:
v3 = [[UIView alloc] initWithFrame:CGRectMake(v1.bounds.size.width-20,
                                              v1.bounds.size.height-20,
                                              20, 20)];
That business of subtracting the view’s height and width from its superview’s bounds height and width in order to position the view is confusing and error-prone. With constraints, we can speak the truth directly; our constraints say, plainly and simply, “v3 is 20 points wide and 20 points high and flush with the bottom-right corner of v1”.
In addition, of course, constraints can express things that autoresizing can’t. For example, instead of applying an absolute height to v2, we could require that its height be exactly one-tenth of v1’s height, regardless of how v1 is resized. To do that without constraints, you’d have to implement layoutSubviews and enforce it manually, in code.
Warning
Once you are using explicit constraints to position and size a view, do not set its frame (or bounds and center) subsequently; use constraints alone. Otherwise, when layoutSubviews is called, the view will jump back to where its constraints position it. (The exception is that you may set a view’s frame if you are in layoutSubviews, as I’ll explain later.)
Visual format
If you find constraint-creation code too verbose, it may be possible to condense it somewhat. Instead of creating each constraint individually, it is sometimes possible to describe multiple constraints simultaneously through a sort of text-based shorthand, called a visual format. The shorthand is best understood by example:
@"V:|[v2(10)]"
In that expression, V: means that the vertical dimension is under discussion; the alternative is H:, which is also the default (so it is permitted to specify no dimension). A view’s name appears in square brackets, and a pipe (|) signifies the superview, so here we’re portraying v2’s
top edge as butting up against its superview’s top edge. Numeric dimensions appear in parentheses, and a numeric dimension accompanying a view’s name sets that dimension of that view, so here we’re also setting v2’s height to 10.
To use a visual format, you have to provide a dictionary mapping the string name of each view mentioned to the actual view. For example, the dictionary accompanying the preceding expression might be @{@"v2":v2}. We can form this dictionary automatically with a macro, NSDictionaryOfVariableBindings, which takes a list of variable names. So here’s another way of expressing of the preceding code example, using the visual format shorthand throughout:
UIView* v1 = [[UIView alloc] initWithFrame:CGRectMake(100, 111, 132, 194)];
v1.backgroundColor = [UIColor colorWithRed:1 green:.4 blue:1 alpha:1];
UIView* v2 = [UIView new];
v2.backgroundColor = [UIColor colorWithRed:.5 green:1 blue:0 alpha:1];
UIView* v3 = [UIView new];
v3.backgroundColor = [UIColor colorWithRed:1 green:0 blue:0 alpha:1];
[mainview addSubview: v1];
[v1 addSubview: v2];
[v1 addSubview: v3];
v2.translatesAutoresizingMaskIntoConstraints = NO;
v3.translatesAutoresizingMaskIntoConstraints = NO;
NSDictionary *vs = NSDictionaryOfVariableBindings(v2,v3);
[v1 addConstraints:
 [NSLayoutConstraint
  constraintsWithVisualFormat:@"H:|[v2]|"
  options:0 metrics:nil views:vs]];
[v1 addConstraints:
 [NSLayoutConstraint
  constraintsWithVisualFormat:@"V:|[v2(10)]"
  options:0 metrics:nil views:vs]];
[v1 addConstraints:
 [NSLayoutConstraint
  constraintsWithVisualFormat:@"H:[v3(20)]|"
  options:0 metrics:nil views:vs]];
[v1 addConstraints:
 [NSLayoutConstraint
  constraintsWithVisualFormat:@"V:[v3(20)]|"
  options:0 metrics:nil views:vs]];
That example creates the same constraints as the previous example, but in four commands instead of eight.
The visual format syntax shows itself to best advantage when multiple views are laid out in relation to one another along the same dimension; in that situation, you get a lot of bang for your buck (many constraints generated by one visual format string). The syntax, however, is somewhat limited in what constraints it can express (you can’t even use it to center things); it conceals the number and exact nature of the constraints that it produces; and personally I find it easier to make a mistake with the visual format syntax than with the complete expression of each constraint. Still, you’ll want to become familiar with the visual format syntax, not least because console messages describing a constraint sometimes use it.
Here are some further things to know when generating constraints with the visual format syntax:
-
The
metrics:parameter is a dictionary of NSNumber values. This lets you use a name in the visual format string where a numeric value needs to go. -
The
options:parameter is a bitmask letting you do things like add alignments. The alignments you specify are applied to all the views mentioned in the visual format string. -
To specify the distance between two successive views, use hyphens surrounding the numeric value, like this:
@"[v1]-20-[v2]". The numeric value may optionally be surrounded by parentheses. A single hyphen means that a default distance should be used. -
A numeric value in parentheses may be preceded by an equality or inequality operator, and may be followed by an at sign with a priority. Multiple numeric values, separated by comma, may appear in parentheses together. For example:
@"[v1(>=20@400,<=30)]".
For formal details of the visual format syntax, see the “Visual Format Syntax” chapter of Apple’s Auto Layout Guide.
Mistakes with constraints
You can (and will) make two major kinds of mistake with constraints:
- Conflict
You can apply constraints that can’t be satisfied simultaneously. This will be reported in the console (at great length). Only required constraints (priority 1000) can contribute to a conflict, as the runtime is free to ignore lower-priority constraints that it can’t satisfy. For example, to the previous code, append this line:
[v1 addConstraints:
 [NSLayoutConstraint
  constraintsWithVisualFormat:@"V:[v3(10)]|"
  options:0 metrics:nil views:vs]];
The height of
v3can’t be both 10 (as here) and 20 (as in the preceding line). The runtime reports the conflict, and tells you which constraints are causing it.- Underdetermination (ambiguity)
A view uses autolayout, but you haven’t supplied sufficient information to determine its size and position. This is a far more insidious problem, because nothing bad may seem to happen, so you might not discover it until much later. If you’re lucky, the view will at least fail to appear, or will appear in an undesirable place, alerting you to the problem. For example, in the last line of the previous code, we set the height of
v3to 20; suppose we remove that specification:[v1 addConstraints: [NSLayoutConstraint constraintsWithVisualFormat:@"V:[v3]|" options:0 metrics:nil views:vs]];
Fortunately,
v3fails to appear in the interface, so we know we’ve made a mistake.
To help you analyze ambiguity, log a view’s hasAmbiguousLayout property (a BOOL); be sure to remove that call before submitting your app to the App Store. I find it useful to set up a category on NSLayoutConstraint with a method that lets me check a view and all its subviews at any depth for ambiguity:
@implementation NSLayoutConstraint (Ambiguity)
+ (void) reportAmbiguity:(UIView*) v {
    if (nil == v)
        v = [[UIApplication sharedApplication] keyWindow];
    for (UIView* vv in v.subviews) {
        NSLog(@"%@ %d", vv, vv.hasAmbiguousLayout);
        if (vv.subviews.count)
            [self reportAmbiguity:vv];
    }
}
@end
Alternatively, pause the running app and ask the debugger for the key window’s _autolayoutTrace; ambiguously laid out views are clearly marked:
(lldb) po [[UIWindow keyWindow] _autolayoutTrace]
(id) $1 = 0x074a41a0
*<UIWindow:0x749b890>
|   *<UIView:0x749ccb0>
|   |   *<UIView:0x749c280>
|   |   |   *<UIView:0x749c790>
|   |   |   *<UIView:0x749c930> - AMBIGUOUS LAYOUT
To get a full list of the constraints responsible for positioning a particular view within its superview, log the results of calling the UIView instance methods constraintsAffectingLayoutForAxis:; again, be sure to remove that call before finalizing your app. These constraints do not necessarily belong to this view (and the output doesn’t tell you what view they do belong to). Your choices of axis are UILayoutConstraintAxisHorizontal and UILayoutConstraintAxisVertical, but you are more likely to write these as 0 and 1, and if you are paused in the debugger and talking to it through the console, you’ll have to. If a view doesn’t participate in autolayout, the result will be an empty array. Again, a category method can come in handy:
@implementation NSLayoutConstraint (Listing)
+ (void) listConstraints:(UIView*) v {
    if (nil == v)
        v = [[UIApplication sharedApplication] keyWindow];
    for (UIView* vv in v.subviews) {
        NSArray* arr1 = [vv constraintsAffectingLayoutForAxis:0];
        NSArray* arr2 = [vv constraintsAffectingLayoutForAxis:1];
        NSLog(@"%@\nH: %@\nV:%@", vv, arr1, arr2);
        if (vv.subviews.count)
            [self listConstraints:vv];
    }
}
@end
Given the notions of conflict and ambiguity, we can understand what priorities are for. Imagine that all constraints have been placed in boxes, where each box is a priority value, in descending order. The first box (1000) contains all the required constraints, so all required constraints are obeyed first. (If they conflict, that’s bad, and a report appears in the log; meanwhile, the system implicitly lowers the priority of one of the conflicting constraints, so that it doesn’t have to obey it and can continue with layout by satisfying the remaining required constraints.) If there still isn’t enough information to perform unambiguous layout given the required priorities alone, we pull the constraints out of the next box and try to obey them. If we can, consistently with what we’ve already done, fine; if we can’t, or if ambiguity remains, we look in the next box — and so on. For a box after the first, we don’t care about obeying exactly the constraints it contains; if an ambiguity remains, we can use a lower-priority constraint value to give us something to aim at, resolving the ambiguity, without fully obeying the lower-priority constraint’s desires. For example, an inequality is an ambiguity, because an infinite number of values will satisfy it; a lower-priority equality can tell us what value to prefer, resolving the ambiguity, but there’s no conflict even if we can’t fully achieve that preferred value.
Intrinsic content size
Some built-in interface objects, when using autolayout, have an inherent size in one or both dimensions, so they are not ambiguously laid out even if no explicit NSLayoutConstraint dictates their size. Rather, the inherent size is used to generate constraints implicitly, of class NSContentSizeLayoutConstraint. For example, a button has a standard height, and its width is determined by its title. This inherent size is the object’s intrinsic content size.
Note
In iOS 7, a user can be permitted to change the size of text throughout the interface (see Chapter 10). If your views, such as buttons and labels, can respond to such a change, their intrinsic size can change as well. You will want to configure your autolayout constraints so that your interface responds to such changes gracefully.
The tendency of an interface object to size itself to its intrinsic content size must not be allowed to conflict with its tendency to obey explicit constraints. Assigning a UILabel an explicit, absolute width constraint should not cause a conflict with its intrinsic content size; and we wouldn’t want a UILabel with a lot of text to be compelled by its intrinsic content size to extend outside of its superview. Therefore these tendencies have a lowered priority, and come into force only if no constraint of a higher priority prevents them. Methods allow you to access these priorities:
-
contentHuggingPriorityForAxis: -
A view’s resistance to growing larger than its intrinsic size in this dimension. In effect, there is an inequality constraint saying that the view’s size in this dimension should be less than or equal to its intrinsic size. The default priority is 250 (also known as
UILayoutPriorityDefaultLow). -
contentCompressionResistancePriorityForAxis: -
A view’s resistance to shrinking smaller than its intrinsic size in this dimension. In effect, there is an inequality constraint saying that the view’s size in this dimension should be greater than or equal to its intrinsic size. The default priority is 750 (also known as
UILayoutPriorityDefaultHigh).
(The dimensions are UILayoutConstraintAxisHorizontal and UILayoutConstraintAxisVertical.)
Those methods are getters; there are corresponding setters. Situations where you would need to change the priorities of these tendencies are few, but they do exist. For example, here are the visual formats configuring two adjacent labels pinned to the superview and to one another:
@"V:|-[_lab1]"
@"V:|-[_lab2]"
@"H:|-20-[_lab1]"
@"H:[_lab2]-20-|"
@"H:[_lab1]-(>=20)-[_lab2]"
There may be no ambiguity initially, but as the superview becomes narrower or the text of the labels becomes longer, an ambiguity arises: which label should be truncated? To dictate the answer, it suffices to raise the compression resistance priority of one of the labels by a single point:
[self.lab1 setContentCompressionResistancePriority:751
    forAxis:UILayoutConstraintAxisHorizontal];
Alternatively, you may want to lower the priority of some other constraint, to allow intrinsic content size to predominate. An example that Apple gives is a label to the left of a centered button and not permitted to overlap with it. As the text of the label becomes longer, at first, the label grows leftward. But the label should not stretch leftward past the left side of its superview, so it has an inequality constraint pinning its left at a guaranteed minimum distance from the superview’s left. When it hits that limit, the label’s text should not then be truncated if it doesn’t have to be, so the priority with which the button is horizontally centered is set lower than the label’s compression resistance priority; in effect, the label is able to force the button to move to the right:
self.button.translatesAutoresizingMaskIntoConstraints = NO;
self.label.translatesAutoresizingMaskIntoConstraints = NO;
NSDictionary* d = NSDictionaryOfVariableBindings(_button,_label);
[self.view addConstraints:
 [NSLayoutConstraint
  constraintsWithVisualFormat:@"V:[_button]-(112)-|"
  options:0 metrics:nil views:d]];
[self.view addConstraints:
 [NSLayoutConstraint
  constraintsWithVisualFormat:@"H:|-(>=10)-[_label]-[_button]-(>=10)-|"
  options:NSLayoutFormatAlignAllBaseline metrics:nil views:d]];
NSLayoutConstraint* con =
[NSLayoutConstraint
 constraintWithItem:_button attribute:NSLayoutAttributeCenterX
 relatedBy:0
 toItem:self.view attribute:NSLayoutAttributeCenterX
 multiplier:1 constant:0];
con.priority = 700; // try commenting this out to see the difference
[self.view addConstraint:con];
You can supply an intrinsic size in your own custom UIView subclass by implementing intrinsicContentSize. Obviously you should do this only if your view’s size depends on its contents. If you need the runtime to call intrinsicContentSize again, because that size has changed and the view needs to be laid out afresh, send your view the invalidateIntrinsicContentSize message.
By the same token, you may want to be able to align your custom UIView with another view by their baselines. If your view’s baseline is its own bottom, there’s nothing to do; but it may be that your view has content that gives a different meaning to the notion of a baseline. To dictate where your custom view’s baseline should be, you do not provide a numeric value. Rather, your custom view must contain a subview whose bottom will function as the baseline, and you return that subview in your UIView subclass’s viewForBaselineLayout.
Note
The intrinsic size of a UILabel has some additional complications connected with its text wrapping behavior. I’ll discuss the matter in detail in Chapter 10.
Constraints in the Nib
In a .xib or .storyboard file where “Use Auto Layout” is checked, a vast array of tools springs to life in the nib editor to help you create constraints that will be instantiated from the nib along with the views.
The nib editor would like to help prevent you from ending up with conflicting or ambiguous constraints. In Xcode 4.5, the nib editor did this by making it impossible for conflicting or ambiguous constraints to exist in the nib, even for a moment. This, however, turned out to be too much help. Developers were surprised and confused when their app turned out to be full of constraints they hadn’t asked for, and editing the nib so as to dictate the constraints you wanted, instead of the constraints the nib editor wanted, was often difficult or impossible. In Xcode 5, therefore, the nib editor is much more relaxed about conflicting and ambiguous constraints, and gives you full power to edit constraints as you please, but of course the cost of such increased power is increased complexity.
The Xcode 5 nib editor doesn’t generate any constraints unless you ask it to. However, it doesn’t want the app to run with ambiguous layout, because then you might not see any views at all; you wouldn’t be able to test your app until you’d fully worked out all the constraints throughout the interface. Therefore, if your views lack needed constraints, the nib supplies them implicitly behind the scenes so that they are present at runtime:
- No constraints
- If a view is affected by no constraints at all, it is given constraints tagged in the debugger as “IB auto generated at build time for view with fixed frame.”
- Ambiguous constraints
- If a view is affected by some constraints but not enough to disambiguate fully, it is given additional constraints tagged in the debugger as “IB auto generated at build time for view with ambiguity.”
The Xcode 5 nib editor also doesn’t change any constraints unless you ask it to. If you create constraints and then move or resize a view affected by those constraints, the constraints are not automatically changed. This means that the constraints no longer match the way the view is portrayed; if the constraints were to position the view, they wouldn’t put it where you’ve put it. The nib editor will alert you to this situation (a Misplaced Views issue), and can readily resolve it for you, but it won’t do so unless you explicitly ask it to.
Creating a constraint
The Xcode 5 nib editor provides two primary ways to create a constraint:
- Control-drag from one view to another. A HUD appears, listing constraints that you can create (Figure 1-14). Either view can be in the canvas or in the document outline. To create an internal width or height constraint, control-drag from a view to itself! When you control-drag within the canvas, the direction of the drag is used to winnow the options presented in the HUD; for example, if you control-drag horizontally within a view in the canvas, the HUD lists Width but not Height.
- Choose from the Editor → Align or Editor → Pin hierarchical menus, or click the first or second buttons in the four-button cartouche (the layout bar) at the lower right of the canvas.
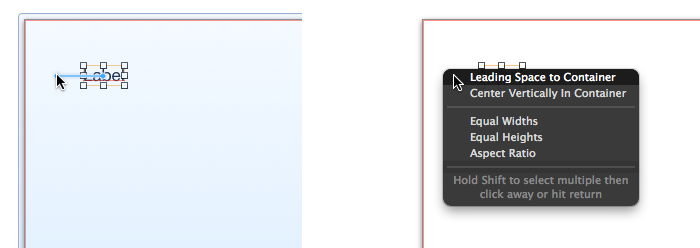
The buttons in the layout bar are very powerful! They present little popover dialogs where you can choose multiple constraints to create (possibly for multiple views, if that’s what you’ve selected beforehand) and provide them with numeric values (Figure 1-15). Constraints are not actually added until you click Add Constraints at the bottom. Before clicking Add Constraints, think about the Update Frames pop-up menu; if you don’t update frames, the views may end up being drawn in the canvas differently from how the constraints describe them (a Misplaced Views issue).

Viewing and editing constraints
Constraints in the nib are full-fledged objects. They can be selected, edited, and deleted. Moreover, you can create an outlet to a constraint (and there are reasons why you might want to do so).
Constraints in the nib are visible in three places (Figure 1-16):

- In the document outline
- Constraints are listed in a special category, “Constraints”, under the view to which they belong. (You’ll have a much easier time distinguishing these constraints if you give your views meaningful labels!)
- In the canvas
- Constraints appear graphically as dimension lines when you select a view that they affect.
- In the Size inspector
- When a view affected by constraints is selected, the Size inspector displays those constraints.
When you select a constraint in the document outline or the canvas, you can view and edit its values in the Attributes inspector. Alternatively, for simple editing of a constraint’s constant, relation, and priority, double-click the constraint in the canvas to summon a little popover dialog.
When you’re viewing a view’s constraints in the Size inspector, you can’t edit those constraints in the Attributes inspector — you’re in the Size inspector instead! However, the gear menu at the right of a constraint lets you choose Select and Edit, which switches to the Attributes inspector for that constraint.
The Size inspector also provides access to a view’s content hugging and content compression resistance priority settings. Beneath these, there’s an Intrinsic Size pop-up menu. The idea here is that your custom view might have an intrinsic size, but the nib editor doesn’t know this, so it will report an ambiguity when you fail to provide (say) a width constraint that you know isn’t actually needed; choose Placeholder to supply an intrinsic size and relieve the nib editor’s worries (and to prevent the missing constraints from being generated automatically at runtime).
There is also a Placeholder checkbox in the Attributes inspector when you’ve selected a constraint. If you check this checkbox, the constraint you’re editing won’t be instantiated when the nib is loaded: in effect, it will be removed at runtime. It will not be replaced by an automatically generated constraint; you are deliberately generating ambiguous layout when the views and constraints are instantiated from the nib.
A typical reason for doing this is that your code will be adding another constraint that will make up for the loss of this one. You don’t want to omit the constraint from the nib, because then the nib editor will complain of ambiguity and will automatically generate a constraint to make up for it. The reason for the Placeholder checkbox is that, without it, not only would you have to add the new constraint in code, but also you’d have to remove the existing constraint in code after it is instantiated from the nib. That is rather elaborate to configure; you have to make an outlet in order to access the existing constraint after the nib loads, which seems wasteful considering that you’re immediately going to delete that outlet’s destination object. (In Xcode 4.5 and 4.6, where there was no Placeholder checkbox, that was exactly what you had to do.)
Problems with constraints
If a view is affected by any constraints, the Xcode 5 nib editor will happily permit them to be ambiguous or conflicting, but it will also call the situation to your attention:
- Issue navigator
- At build time, the Issue navigator will display Ambiguous Layout and Unsupported Configuration entries, as appropriate.
- Canvas
Constraints drawn in the canvas when you select a view that they affect use color coding to express their status:
- Conflicting constraints
- Drawn in red.
- Insufficient constraints
- Drawn in orange. These are ambiguous constraints: they don’t conflict, but they aren’t sufficient to describe a view completely.
- Satisfactory constraints
- Drawn in blue.
- Document outline
If there are layout issues, the document outline displays a right arrow in a red or orange circle. Click it to see a detailed list of the issues (Figure 1-17). Hover the mouse over a title to see an Info button which you can click to learn more about the nature of this issue. The icons at the right are buttons: click one for a list of things the nib editor is offering to do to fix the issue for you. The chief issues are:
- Conflicting Constraints
- A conflict between constraints.
- Missing Constraints
- Ambiguous layout.
- Misplaced Views
If you manually change the frame of a view that is affected by constraints (including its intrinsic size), then the nib editor canvas may be displaying that view differently from how it would really appear if the current constraints were obeyed. A Misplaced Views situation is also reflected in the canvas:
- The constraints in the canvas display the numeric difference between their values and the view’s frame. They are drawn in orange even if they are not insufficient.
- A dotted outline in the canvas may show where the view would be drawn if the existing constraints were obeyed.
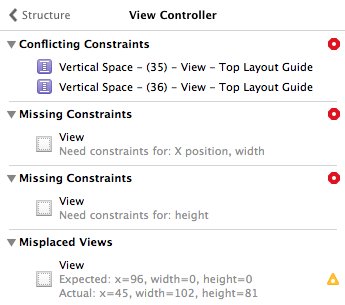
A hierarchical menu, Editor → Resolve Auto Layout Issues (also available from the third button in the layout bar at the bottom right of the canvas), proposes five large-scale moves involving all the constraints affecting selected views or all views:
- Update Frames
Changes the way the view is drawn in the canvas, to show how it would really appear in the running app under the constraints as they stand. Be careful: if constraints are ambiguous, this can cause a view to disappear.
Alternatively, if you have resized a view with intrinsic size constraints, such as a button or a label, and you want it to resume the size it would have according to those intrinsic size constraints, select the view and choose Editor → Size to Fit Content.
- Update Constraints
- Choose this menu item to change numerically all the existing constraints affecting a view to match the way the canvas is currently drawing the view’s frame.
- Add Missing Constraints
Create new constraints so that the view has sufficient constraints to describe its frame unambiguously. The added constraints correspond to the way the canvas is currently drawing the view’s frame.
Not everything that this command does may be what you ultimately want; you should regard it as a starting point. For example, the nib editor doesn’t know whether you think a certain view’s width should be determined by an internal width constraint or by pinning it to the left and right of its superview; and it may generate alignment constraints with other views that you never intended.
- Reset to Suggested Constraints
- This is as if you chose Clear Constraints followed by Add Missing Constraints: it removes all constraints affecting the view, and replaces them with a complete set of automatically generated constraints describing the way the canvas is currently drawing the view’s frame.
- Clear Constraints
- Removes all constraints affecting the view.
Order of Layout Events
When the moment comes to lay out a view, the following events take place:
The view and its subviews are sent
updateConstraints, starting at the bottom of the hierarchy (the deepest subview) and working up to the top (the view itself, possibly the root view). This event may be omitted for a view if its constraints have not changed, but it will certainly be called for the view at the top of the hierarchy.You can override
updateConstraintsin a UIView subclass. You might do this, for example, if your subclass is capable of altering its own constraints and you need a signal that now is the time to do so. You must callsuperor the app will crash (with a helpful error message).You should never call
updateConstraintsdirectly. To trigger an immediate call toupdateConstraints, send a view theupdateConstraintsIfNeededmessage. ButupdateConstraintsmay still not be sent unless constraints have changed or the view is at the top of the hierarchy. To forceupdateConstraintsto be sent to a view, send it thesetNeedsUpdateConstraintsmessage.The view and its subviews are sent
layoutSubviews, starting at the top of the hierarchy (the view itself, possibly the root view) and working down to the bottom (the deepest subview).You can override
layoutSubviewsin a subclass in order to take a hand in the layout process. If you’re not using autolayout,layoutSubviewsdoes nothing by default;layoutSubviewsis your opportunity to perform manual layout after autoresizing has taken place. If you are using autolayout, you must callsuperor the app will crash (with a helpful error message).You should never call
layoutSubviewsdirectly; to trigger an immediate call tolayoutSubviews, send a view thelayoutIfNeededmessage (which may cause layout of the entire view tree, not only below but also above this view), or sendsetNeedsLayoutto trigger a call tolayoutSubviewslater on, after your code finishes running, when layout would normally take place.
When you’re using autolayout, what happens in layoutSubviews? The runtime examines all the constraints affecting this view’s subviews, works out values for their frames, and assigns those views those frames. In other words, layoutSubviews performs manual layout! The constraints are merely instructions attached to the views; layoutSubviews reads them and responds accordingly, setting frames in the good old-fashioned way. (Thus, layoutSubviews is a place where it is legal — and indeed necessary — to set the frame of a view governed by explicit constraints.)
Knowing this, you might override layoutSubviews when you’re using autolayout, in order to tweak the outcome. First you call super, causing all the subviews to adopt their new frames. Then you examine those frames. If you don’t like the outcome, you can change the situation, removing subviews, adding or removing constraints, and so on — and then you call super again, to get a new layout outcome.
Unless you explicitly demand immediate layout, layout isn’t performed until your code finishes running (and then only if needed). Moreover, ambiguous layout isn’t ambiguous until layout actually takes place. Thus, for example, it’s perfectly reasonable to cause an ambiguous layout temporarily, provided you resolve the ambiguity before layoutSubviews is called. On the other hand, a conflicting constraint conflicts the instant it is added.
It is also possible to simulate layout of a view in accordance with its constraints and those of its subviews. This is useful for discovering ahead of time what a view’s size would be if layout were performed at this moment. Send the view the systemLayoutSizeFittingSize: message. The system will attempt to reach or at least approach the size you specify, at a very low priority; mostly likely you’ll specify either UILayoutFittingCompressedSize or UILayoutFittingExpandedSize, depending on whether what you’re after is the smallest or largest size the view can legally attain. I’ll show an example in Chapter 8.
Autolayout and View Transforms
Suppose I apply to a view a transform that grows it slightly:
v.transform = CGAffineTransformMakeScale(1.2,1.2);
I expect the view to expand in both dimensions, with all four sides moving away from the center. Under autolayout, that might not be what I see at all. The view might grow down and right, while its left and top hold steady. The view might not grow at all in one or both dimensions. It all depends on the view’s constraints.
The fact is that autolayout does not play well with view transforms. There are two reasons for this:
- Applying a transform to a view triggers layout immediately.
-
When layout is triggered,
layoutSubviewsapplies constraints to a view by setting its frame.
Thus, when you apply a transform to a view that uses autolayout, autolayout can come along and change the view’s frame in such a way as to thwart the transform. This seems like a bug. There is no reason why a transform should cause layout to be triggered, and setting a view’s frame is exactly what you’re not supposed to do when a view has a nonidentity transform.
This problem is not easy to solve. I have three suggestions, none of them entirely satisfactory:
- Plan your constraints in advance. If you’re going to be applying a transform to a view, set up that view’s constraints so that they affect its center, not its frame.
-
Set up a host view and a subview. The host view is positioned by constraints, in whatever way you like: it is also invisible. Now take the subview out of the influence of autolayout altogether: remove any constraints that affect it, and set its
translatesAutoresizingMaskIntoConstraintsto YES. - Use a layer transform (Chapter 3) instead of a view transform, since applying a layer transform doesn’t trigger layout.
Get Programming iOS 7, 4th Edition now with the O’Reilly learning platform.
O’Reilly members experience books, live events, courses curated by job role, and more from O’Reilly and nearly 200 top publishers.

