Convert practically any video game controller into a USB joystick.
So you’re running some classic games on your PC, but the feel just isn’t right. You’re not getting the same vibe as you do playing the real thing. Maybe what you need is your old controller.
Thanks to those tireless hardware manufacturers in Hong Kong, it should be possible to use a controller from nearly any console system as a PC joystick or gamepad. For most controllers, you will need an additional piece of hardware: an adapter that lets you plug your controller into your PC’s USB port. The Xbox controller, however, is already a USB device, so we can apply the hacker spirit to connecting it to a PC by making our own physical adapter!
For Windows users, this hack should proceed in a fairly plug-and-play fashion (once you have purchased or created the proper adapter so that you can plug, that is). Linux users will want to read “Use USB Gamepads Under Linux” [Hack #52] .
Since the Xbox controller can be made into an interesting project for the handy (or not so handy, in my case!) with a soldering iron, let’s tackle it first!
As stated above, Xbox controllers are USB devices, so you will not need any fancy silicon to convert the electronics to USB. You will, however, need a physical adapter, as Microsoft made sure (for purely technical reasons not related to marketing lock-in, one presumes) that the physical plug for the controllers is not a standard USB one. Such an adapter can be procured from the usual sources like the online retailer Lik-Sang (http://www.lik-sang.com), but the strong of heart may have more fun rolling their own. If you decide to purchase an adapter, just plug the controller into it, plug the adapter into your USB port, and away you go! (Linux users will need to build the driver first—read on to find out how.)
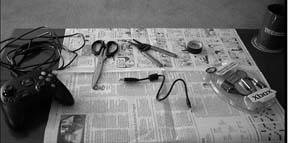
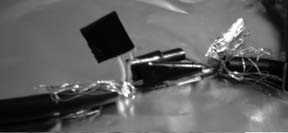
Making a physical adapter is very much in the do-it-yourself hacker tradition, and is pretty easy, too. So grab the following items, shown in Figure 4-48, clear a work-space, and let’s get started!
Xbox breakaway cable. You can either buy one of these (any decent video game store should carry them, or try your local Blockbuster), or maybe you have a broken Xbox controller sitting around that you could cannibalize.
USB “AB” cable. You actually only need the end that plugs into the PC’s USB port, so you can probably use non-working cable. If you cannot find a cable in your pieces and parts bin, or at the local computer store’s bargain bin, http://www.newegg.com has new AB cables for as little as $4.00.
Wire stripper
Electrical tape
Soldering iron (recommended, but not strictly necessary)
Coffee? (actually not recommended, for reasons that will be made clear in due time)
Assemble these materials on a clean, dry surface with plenty of elbow room.
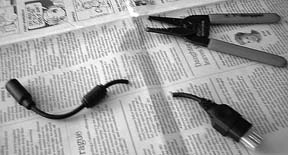
The first step is to cut the end off of your breakaway cable. You can cut it just above or below the hard plastic bit in the middle. I cut mine above, leaving enough cord on the end that plugs into the Xbox so that I can use the end for some other project (see Figure 4-49).
Now, cut the USB cable in a similar fashion as shown in Figure 4-50. Remember, you will be joining the end that plugs into the PC to your Xbox breakaway cable, so be sure to leave yourself plenty of cable so that you will be OK even if you make a mistake or two with the wire strippers.
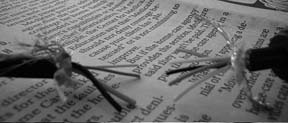
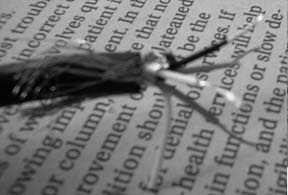
The next step is to strip away about three centimeters (an inch or so) of the outer insulation on both the USB connector wire and the Xbox breakaway wire. The outer insulation is fairly thick, but you still need to be careful when stripping it that you do not cut any of the internal insulation on the individual wires. I found that the best technique was to use the largest gauge on my wire stripper, close it just enough to bite into the insulation, and then rotate the strippers around the wire, slowly increasing the pressure. Then the insulation can be removed with a pair of pliers. This will reveal a braided mesh of wire, which needs to be peeled back. The next layer of the onion, as it were, is some aluminum shielding. This can be peeled away with your fingers or a knife. Just discard the shielding, as it will be almost impossible to keep it, and the electrical tape that we use later will serve quite admirably in its stead. Finally, you will see the actual wires—four of them on the USB connector end, five on the Xbox end, as shown in Figure 4-51.
Note that the colors should match up, leaving an extra wire, hopefully colored yellow, on the Xbox end. Forget that wire (don’t ask me what it is there for—I would assume extra power, but I am not sure), it does not do anything that will prevent the controller from working as a USB gamepad. Strip enough off of the internal wires on both ends to connect them (maybe a centimeter if you are soldering, probably two or a little more if you are twisting them together—see Figure 4-52).
Connect the red wire on the USB end to the red one on the Xbox end, the white to the white, the green to the green, and the black to the black, by soldering them if you have access to a soldering iron (and the know-how needed to operate it), or by simply twisting them together. This step is the main reason that you should not drink a liter of coffee while attempting this hack. My wife actually had to come to my rescue, connecting the wires with hands so steady that a surgeon would have been impressed (as my own hands were oscillating so fast that they were actually causing packet loss on my wireless network). Using either method, be careful not to break off the individual strands of the wires. Once the wires are connected, wrap each one with electrical tape (don’t forget the yellow wire!).
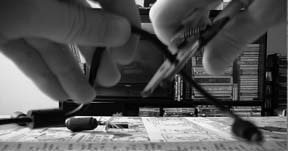
Now, wrap electrical tape liberally around all four (well, four and a half actually, counting the pesky yellow), as shown in Figure 4-53. Reconnect the outer, braided wire around the electrical tape core, then wrap more tape around the whole thing.
Now, detach the standard breakaway cable from your Xbox controller and attach your new USB breakaway as shown in Figure 4-54. If you are a Windows user, plug the controller into your PC. It should be detected right away, ready to serve your emulation needs. (If you are a Linux user, there is one final hurdle to overcome—again, read on and you’ll learn how.)
First, become root and change to the directory where your Linux kernel sources live and run make menuconfig. Select Device Drivers from the main menu, then select USB Support. Scroll down to the USB Input Devices section and highlight X-Box [sic] gamepad support. Press the M key to enable the module, and then hit the Escape key to return to the Device Drivers menu. Hit the Escape key twice more to return to the main menu and exit menuconfig. When prompted, “Do you wish to save your new kernel configuration?”, press Enter to select Yes. Now run: make modules modules_install. If you see no errors, you should now have a /lib/modules/`uname -r`/kernel/drivers/usb/input/xpad.ko file. Make sure that the usbhid and joydev modules are loaded
[Hack #52]
. Go ahead and load the module by running the command modprobe xpad. Tail your message log: tail -f /var/log/messages, and plug your Xbox controller in. You should see something like:
	Feb 27 13:40:48 laurana hub 1-0:1.0: state 5 ports 6 chg ffc0 evt 0008
	Feb 27 13:40:48 laurana ehci_hcd 0000:00:1d.7: GetStatus port 3 status
	001803 POWER sig=j CSC CONNECT
	Feb 27 13:40:48 laurana hub 1-0:1.0: port 3, status 0501, change 0001, 480
	Mb/s
	Feb 27 13:40:48 laurana hub 1-0:1.0: debounce: port 3: total 100ms stable
	100ms status 0x501
	Feb 27 13:40:48 laurana ehci_hcd 0000:00:1d.7: port 3 full speed -->
	companion
	Feb 27 13:40:48 laurana ehci_hcd 0000:00:1d.7: GetStatus port 3 status
	003801 POWER OWNER sig=j CONNECT
	Feb 27 13:40:48 laurana hub 3-0:1.0: state 5 ports 2 chg fffc evt 0002
	Feb 27 13:40:48 laurana uhci_hcd 0000:00:1d.1: port 1 portsc 0083,00
	Feb 27 13:40:48 laurana hub 3-0:1.0: port 1, status 0101, change 0001, 12
Mb/s
	Feb 27 13:40:48 laurana uhci_hcd 0000:00:1d.1: wakeup_hc
	Feb 27 13:40:48 laurana hub 3-0:1.0: debounce: port 1: total 100ms stable
	100ms status 0x101
	Feb 27 13:40:48 laurana usb 3-1: new full speed USB device using uhci_hcd
	and address 7
	Feb 27 13:40:48 laurana usb 3-1: ep0 maxpacket = 8
	Feb 27 13:40:48 laurana usb 3-1: new device strings: Mfr=0, Product=0,
	SerialNumber=0
	Feb 27 13:40:48 laurana usb 3-1: hotplug
	Feb 27 13:40:48 laurana usb 3-1: adding 3-1:1.0 (config #1, interface 0)
	Feb 27 13:40:48 laurana usb 3-1:1.0: hotplug
	Feb 27 13:40:48 laurana hub 3-1:1.0: usb_probe_interface
	Feb 27 13:40:48 laurana hub 3-1:1.0: usb_probe_interface - got id

	Feb 27 13:40:48 laurana hub 3-1:1.0: USB hub found
	Feb 27 13:40:48 laurana hub 3-1:1.0: 3 ports detected
	Feb 27 13:40:48 laurana hub 3-1:1.0: compound device; port removable status:
	FRR
	Feb 27 13:40:48 laurana hub 3-1:1.0: individual port power switching
	Feb 27 13:40:48 laurana hub 3-1:1.0: individual port over-current protection
	Feb 27 13:40:48 laurana hub 3-1:1.0: power on to power good time: 100ms
	Feb 27 13:40:48 laurana hub 3-1:1.0: hub controller current requirement:
	64mA
	Feb 27 13:40:48 laurana hub 3-1:1.0: 436mA bus power budget for children
	Feb 27 13:40:48 laurana hub 3-1:1.0: enabling power on all ports
	Feb 27 13:40:49 laurana hub 3-1:1.0: state 5 ports 3 chg ffff evt ffff
	Feb 27 13:40:49 laurana hub 3-1:1.0: port 1, status 0101, change 0001, 12
	Mb/s
	Feb 27 13:40:49 laurana hub 3-1:1.0: debounce: port 1: total 100ms stable
	100ms status 0x101
	Feb 27 13:40:49 laurana hub 3-1:1.0: port 1 not reset yet, waiting 10ms
	Feb 27 13:40:49 laurana usb 3-1.1: new full speed USB device using uhci_hcd
	and address 8
	Feb 27 13:40:49 laurana hub 3-1:1.0: port 1 not reset yet, waiting 10ms
	Feb 27 13:40:49 laurana usb 3-1.1: new device strings: Mfr=0, Product=0,
	SerialNumber=0
	Feb 27 13:40:49 laurana usb 3-1.1: hotplug
	Feb 27 13:40:49 laurana usb 3-1.1: adding 3-1.1:1.0 (config #1, interface 0)
	Feb 27 13:40:49 laurana usb 3-1.1:1.0: hotplug
	Feb 27 13:40:49 laurana xpad 3-1.1:1.0: usb_probe_interface
	Feb 27 13:40:49 laurana xpad 3-1.1:1.0: usb_probe_interface - got id
	Feb 27 13:40:49 laurana input: Microsoft X-Box pad (Japan) on usb-0000:00:
	1d.1-1.1<7>hub 3-1:1.0: 336mA power budget left
	Feb 27 13:40:49 laurana hub 3-1:1.0: port 2, status 0100, change 0000, 12
	Mb/s
	Feb 27 13:40:49 laurana hub 3-1:1.0: port 3, status 0100, change 0000, 12
	Mb/s
	Feb 27 13:40:49 laurana hub 3-1:1.0: state 5 ports 3 chg fff8 evt 0002
This lets you know that the kernel has detected your controller (weird that it shows up as a hub, huh?). Hit Ctrl-C to stop tailing the log file, then run: ls -l /dev/js0. You should see something like:
lr-xr-xr-x 1 root root 9 Feb 13 16:29 /dev/js0 -> input/js0
Unless ls returns an error, you should be all ready to use your XBox controller in Linux!
In order to use other controllers as a USB gamepad, you will need a hardware converter. These are readily available through online retailers such as Lik-Sang, who sell all manner of SmartJoy converters for GameCube, N64, PlayStation 2, PSone, SNES, Dreamcast, and Saturn controllers. Especially cool is the $20 3-in-1 PC Joy Box, which accepts PSone, PS2, Dreamcast, and Saturn controllers.
Linux users, of course, will need to deal with extra steps to get the adapters to work. Follow all of the steps in “Use USB Gamepads Under Linux”
[Hack #52]
, plug your controller(s) into the adapter, tail the system message log: tail -f /var/log/messages, and plug your adapter into a USB port. You should see some notices like:
	Feb 13 16:29:04 laurana hub 1-0:1.0: state 5 ports 6 chg ffc0 evt 0008
	Feb 13 16:29:04 laurana ehci_hcd 0000:00:1d.7: GetStatus port 3 status
	001403 POWER sig=k CSC CONNECT
	Feb 13 16:29:04 laurana hub 1-0:1.0: port 3, status 0501, change 0001, 480
	Mb/s
	Feb 13 16:29:04 laurana hub 1-0:1.0: debounce: port 3: total 100ms stable
	100ms status 0x501
	Feb 13 16:29:04 laurana ehci_hcd 0000:00:1d.7: port 3 low speed -->
	companion
	Feb 13 16:29:04 laurana uhci_hcd 0000:00:1d.1: wakeup_hc
	Feb 13 16:29:04 laurana ehci_hcd 0000:00:1d.7: GetStatus port 3 status
	003002 POWER OWNER sig=se0 CSC
	Feb 13 16:29:05 laurana hub 3-0:1.0: state 5 ports 2 chg fffc evt 0002
	Feb 13 16:29:05 laurana uhci_hcd 0000:00:1d.1: port 1 portsc 0183,00
	Feb 13 16:29:05 laurana hub 3-0:1.0: port 1, status 0301, change 0001, 1.5
	Mb/s
	Feb 13 16:29:05 laurana hub 3-0:1.0: debounce: port 1: total 100ms stable
	100ms status 0x301
	Feb 13 16:29:05 laurana usb 3-1: new low speed USB device usinguhci_hcd and
	address 2
	Feb 13 16:29:05 laurana usb 3-1: skipped 1 descriptor after interface
	Feb 13 16:29:05 laurana usb 3-1: new device strings: Mfr=1, Product=2,
	SerialNumber=0
	Feb 13 16:29:05 laurana usb 3-1: default language 0x0409
	Feb 13 16:29:05 laurana usb 3-1: Product: PSX/USB Pad
	Feb 13 16:29:05 laurana usb 3-1: Manufacturer: LTS
	Feb 13 16:29:05 laurana usb 3-1: hotplug
	Feb 13 16:29:05 laurana usb 3-1: adding 3-1:1.0 (config #1, interface 0)
	Feb 13 16:29:05 laurana usb 3-1:1.0: hotplug
	Feb 13 16:29:05 laurana usbhid 3-1:1.0: usb_probe_interface
	Feb 13 16:29:05 laurana usbhid 3-1:1.0: usb_probe_interface - got id
	Feb 13 16:29:05 laurana input: USB HID v1.00 Joystick [LTS PSX/USB Pad] on
	usb-0000:00:1d.1-1
	Feb 13 16:29:05 laurana hub 3-0:1.0: state 5 ports 2 chg fffc evt 0002
This lets you know that the kernel has detected your joystick. Hit Ctrl-C to stop tailing the log file, then run: ls -l /dev/js0. You should see something like:
	lr-xr-xr-x	1 root		root		9 Feb 13 16:29 /dev/js0 -> input/
	js0
Unless ls returns an error, you should be ready to use your controller in Linux!
—Josh Glover
Get Retro Gaming Hacks now with the O’Reilly learning platform.
O’Reilly members experience books, live events, courses curated by job role, and more from O’Reilly and nearly 200 top publishers.
