Replace that keyboard with a brand new joystick.
With the advent of Universal Serial Bus (USB) devices, true cross-platform plug-and-play seemed to be within the grasp of every computer user. Well, except Linux users. But don’t worry—using a USB game controller under Linux isn’t that difficult. (Yes, even if it’s a Microsoft Sidewinder pad.)
If you do not already have a USB joystick or gamepad, they can be acquired at practically any computer store, online at Newegg (http://www.newegg.com), Amazon (http://www.amazon.com), approximately one zillion other online retailers, or even your local Radio Shack. The Gravis Gamepad Pro (USB) is a fine entry-level model that should set you back around $20. And of course, if you have a PlayStation 2, Xbox, or other video game console controller lying around, you may want to check out “Use Console Controllers on your PC” [Hack #51] .
In order to use a joystick, you may need to descend into that magical realm known as the Linux kernel, as you are going to need a few kernel modules to make this all work. The first step in this process is to make sure you have the Linux kernel sources. You should refer to your distribution’s documentation on compiling kernels:
- Debian
http://www.debian.org/doc/manuals/users-guide/ch-ctsystem.en.html#s-rak
- Gentoo
http://www.gentoo.org/doc/en/handbook/handbook-x86.xml?part=1&chap=7
- Fedora
http://crab-lab.zool.ohiou.edu/Kevin/kernel-compilation-tutorial-en/index.html (note that this is not an official document)
- Mandrake
http://doc.mandrakelinux.com/MandrakeLinux/100/en/Command-Line.html/compiling-kernel-chapter.html
- Other distributions
Check your distribution’s online documentation carefully, and if you cannot find documentation for building a kernel, you should refer to the Kernel Rebuild Guide (http://www.digitalhermit.com/linux/Kernel-Build-HOWTO.html), which is the successor to the Kernel-HOWTO that was hosted at the Linux Documentation Project (http://www.tldp.org)
Now open a terminal, become root, and change to the directory where your kernel sources are installed (almost always /usr/src/linux). Now, start the menu-based kernel configuration process by running the command: make menuconfig.
Warning
Note that this hack assumes that you are running a Linux 2.6.x kernel; if you are running a 2.4.x kernel, this will still work, but the kernel configuration menus will be a bit different. If you are running a 2.2.x kernel, you should probably upgrade to at least 2.4.x before trying this hack.
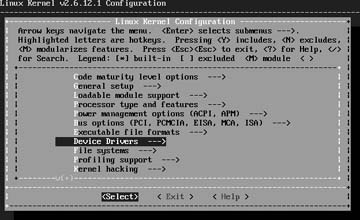
From the main menu, use the down arrow key to scroll down to Device Drivers (see Figure 4-55) and press Enter.
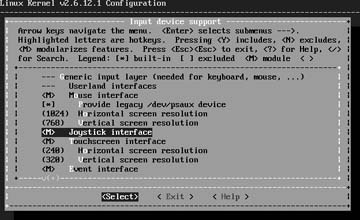
From the Device Drivers menu, select “Input device support”. Scroll down to “Joystick interface”, and if you do not see a <*> or an <M> immediately to the left, press the M key to enable it as a module (the <*> would indicate that it is compiled into the kernel statically, which is usually not what you want). Your screen should now look something like Figure 4-56.
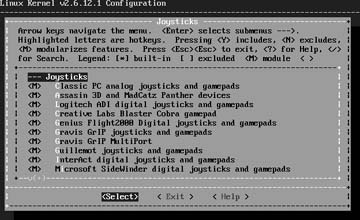
Now scroll down to the “Joysticks” option and press Return to enter the Joysticks menu. This will result in 22 more menu items being displayed (again, as of kernel 2.6.10). Enable building each one as a module (by highlighting the option with the arrow keys and then pressing M) so that the kernel can load the appropriate module for you (don’t worry about bloat—one of the beautiful things about modules is that they can be loaded only as needed, so building a module for hardware that you do not have is OK). When you enable “I-Force devices,” two more options will be displayed beneath it: “I-Force USB joysticks and wheels” and “I-Force Serial joysticks and wheels.” Use the spacebar to toggle them both on (again, this will not add anything to your kernel; it is just configuring the module). Once you have finished, your screen will look something like Figure 4-57.
Finally, if you have an old-school, non-USB gamepad or joystick, hit Escape to exit the Joysticks menu and return to Input Device support, then select Hardware I/O ports and press Return. Scroll down to the “Gameport support” option and hit the M key to enable it as a module. This will expose six new options (at least, six in kernel 2.6.10, the latest version as of this writing) for supporting various types of game ports. You should enable all of them as modules.
Now, hit the Escape key to exit the Hardware I/O ports menu, and once more to return to the Device Drivers menu. Scroll down to USB Support and hit Enter. Use the M key to enable building “Support for Host-side USB” as a module. This will open up a whole new list of options, the first of which should be USB Verbose Debug Messages. I would recommend using the spacebar to turn it on, so that the USB subsystem will spew a bunch of stuff into the system’s message log whenever it finds a new USB device, etc. This can be very useful in getting your devices to work, and you can always turn it off and recompile the module if you ever decide you do not need the log pollution anymore.
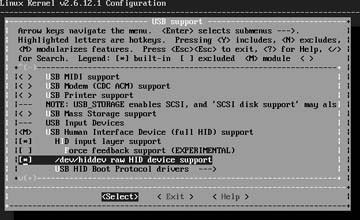
Under Miscellaneous USB options, use the spacebar to activate the USB device filesystem option. Under USB Host Controller Drivers, enable modules for all three HCD types—note that you should probably not enable either of the options marked as (EXPERIMENTAL) for the EHCI HCD (USB 2.0) support module. Under USB Input Devices, enable “USB Human Interface Device (full HID) support” as a module, and enable its “HID input layer support” and “/dev/hiddev raw HID device support” options. At this point, your screen should look something like Figure 4-58.
Now, hit Escape to return to the Device Drivers menu, then hit it again to return to the main menu. Hit the Escape key one final time to exit menuconfig. You will be asked, “Do you wish to save your new kernel configuration?” Hit Enter to select Yes. You will now be returned to the command line. To build your new modules and install them, run the command make modules modules_install. The build process will keep you informed of what it is doing.
Tip
The build process for 2.4.x and older kernels used to display all of this great compiler spew that made you look like a real 1337 h4x0r, especially if you were sporting transparent terminal windows with green text over a black background— but that is more of a topic for Linux Desktop Hacks, by Jono Bacon and Nicholas Petreley (O’Reilly).
When it is finished, you will be returned to the command prompt (do not expect a message telling you that everything went fine—in the Unix world, success is usually silent).
Now, run the lsmod command and examine its output. If you do not see a module named ehci_hcd or uhci_hcd, you will need to load your USB host driver module now. If you have USB 2.0, you will want to run: modprobe ehci_hcd. Your USB 1.x controller is probably a UHCIhost, so run: modprobe uhci_hcd (if this fails, try: modprobe ohci_hcd). Run lsmod again, and you should see whichever host driver module you just loaded and usbcore, somewhere in the output. Now, load the USB HID (Human Interface Device) driver module: modprobe usbhid. The final step is to load the generic joystick driver module: modprobe joydev. If you have a fancy-schmancy joystick that needs its own driver (did you notice the name of your joystick while enabling joystick modules?), use modprobe to load it as well (you can run ls /lib/modules/`uname -r`/kernel/drivers/input/joystick/ to see all of the available drivers).
Now, run: tail -f /var/log/messages to watch your system message log file, and plug your joystick in. If your joystick is a USB device, you should see some notices
[Hack #51]
:
	Feb 13 16:29:05 laurana usb 3-1: new low speed USB device usinguhci_hcd and
	address 2
	Feb 13 16:29:05 laurana usb 3-1: skipped 1 descriptor after interface
	Feb 13 16:29:05 laurana usb 3-1: new device strings: Mfr=1, Product=2,
	SerialNumber=0
	Feb 13 16:29:05 laurana usb 3-1: default language 0x0409
	Feb 13 16:29:05 laurana usb 3-1: Product: PSX/USB Pad
	Feb 13 16:29:05 laurana usb 3-1: Manufacturer: LTS
This lets you know that the kernel has detected your joystick. Hit Ctrl-C to stop tailing the log file, then run: ls -l /dev/js0. You should see something like:
lr-xr-xr-x 1 root root 9 Feb 13 16:29 /dev/js0 -> input/js0
Unless ls returns an error, you should be all ready to use your joystick in Linux!
—Josh Glover
Get Retro Gaming Hacks now with the O’Reilly learning platform.
O’Reilly members experience books, live events, courses curated by job role, and more from O’Reilly and nearly 200 top publishers.


